Add Zoho SalesIQ widget code on your site using Google Tag Manager
Add Zoho SalesIQ widget code to either selective or all the web pages of your site without having to edit the source code.
To add Zoho SalesIQ widget code on your site using Google Tag Manager
- Login to your Google Tag Manager account.
- Click on ADD A NEW TAG which you can find in the New Tag box.
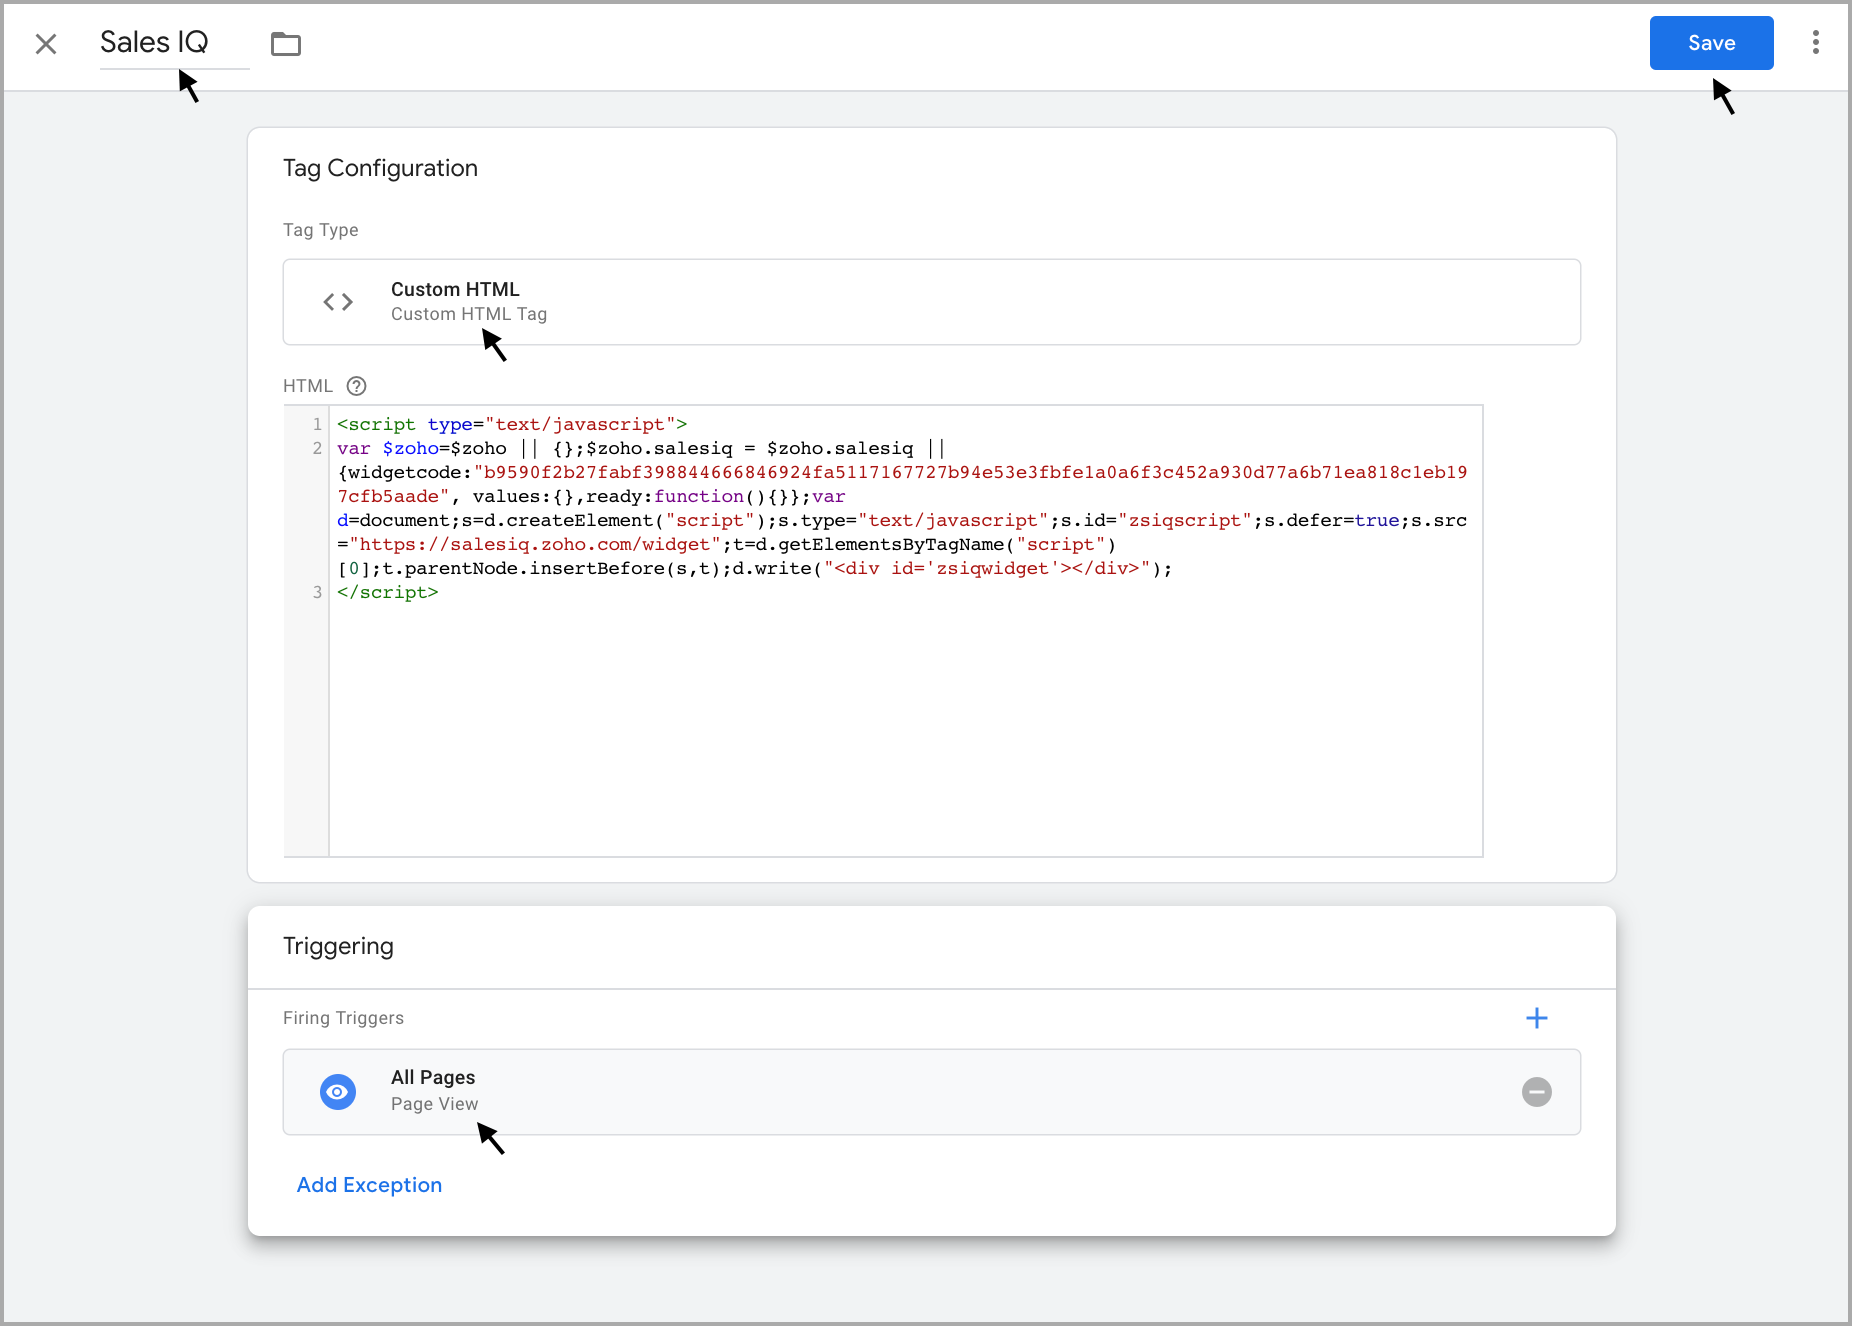
- Name the tag as "Sales IQ".
- Hover over the label that says Tag Configuration and click on the pen icon that appears right beside.
- In the window that slides in choose the option Custom HTML under the section Custom.
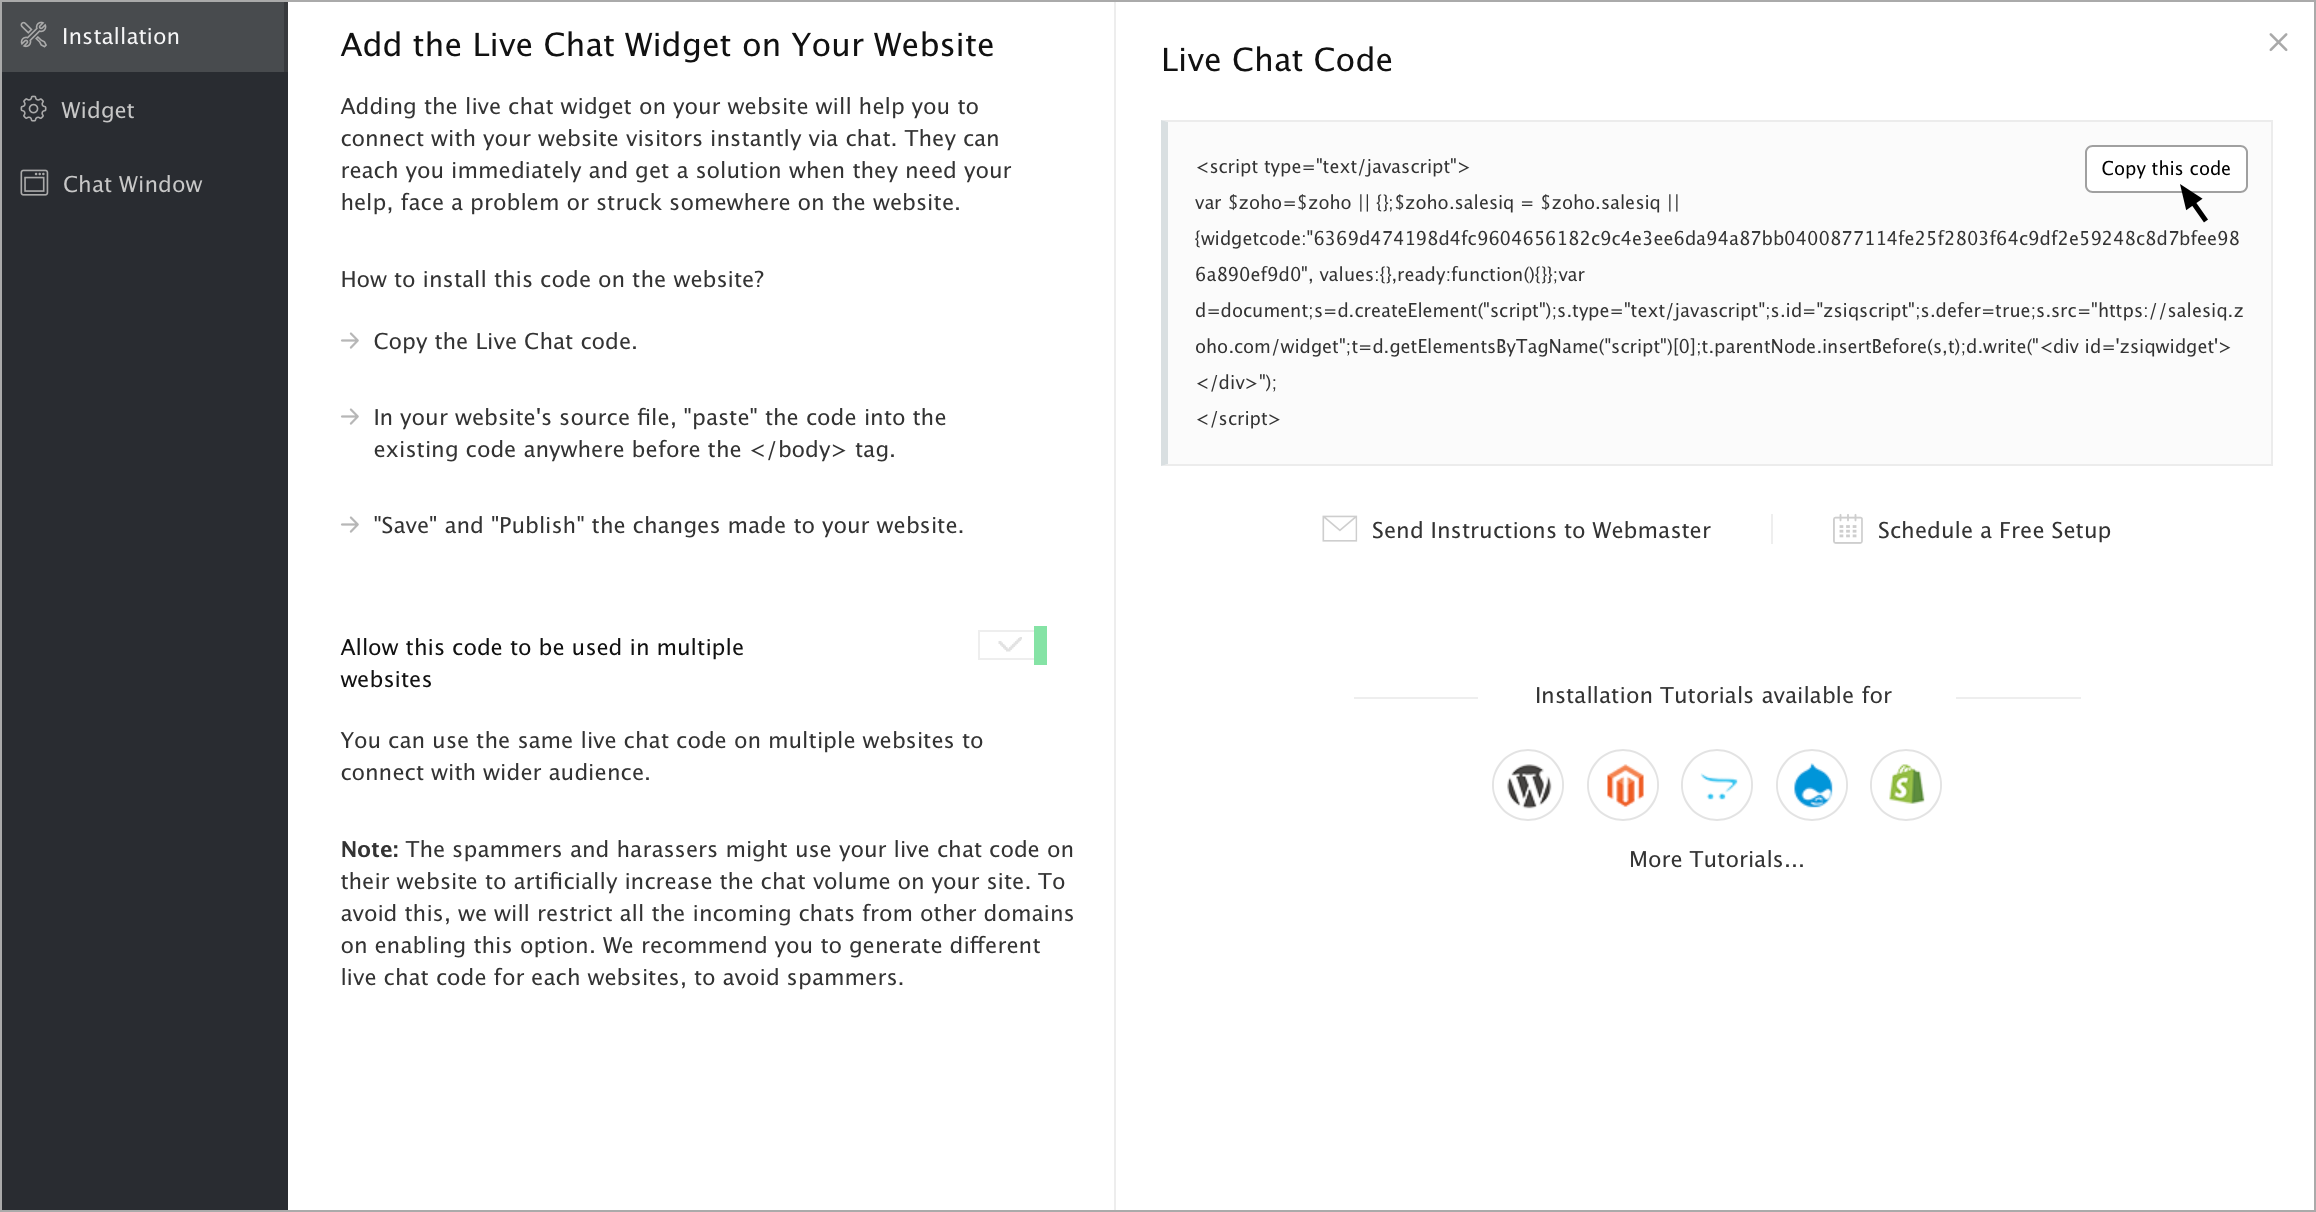
- Paste Zoho SalesIQ live chat code in the space provided. To get the code:
- Login to your Zoho SalesIQ Operator console.
- Navigate to Settings -> Websites, click on the name of the website you are attempting to include in a page.
- Select Live Chat. In the Installation section, click on Copy this code and paste in the Custom HTML window.
- Login to your Zoho SalesIQ Operator console.
- Check in the checkbox that says Support document.write to prevent loading issues.
- Hover over the section that says Triggering and click on the pen icon right beside and either choose the option All pages (Default option available) or opt to frame customized trigger rule based on which the Sales IQ tag that you just created has to be initiated.
- Click on Save.
Publish the tag created
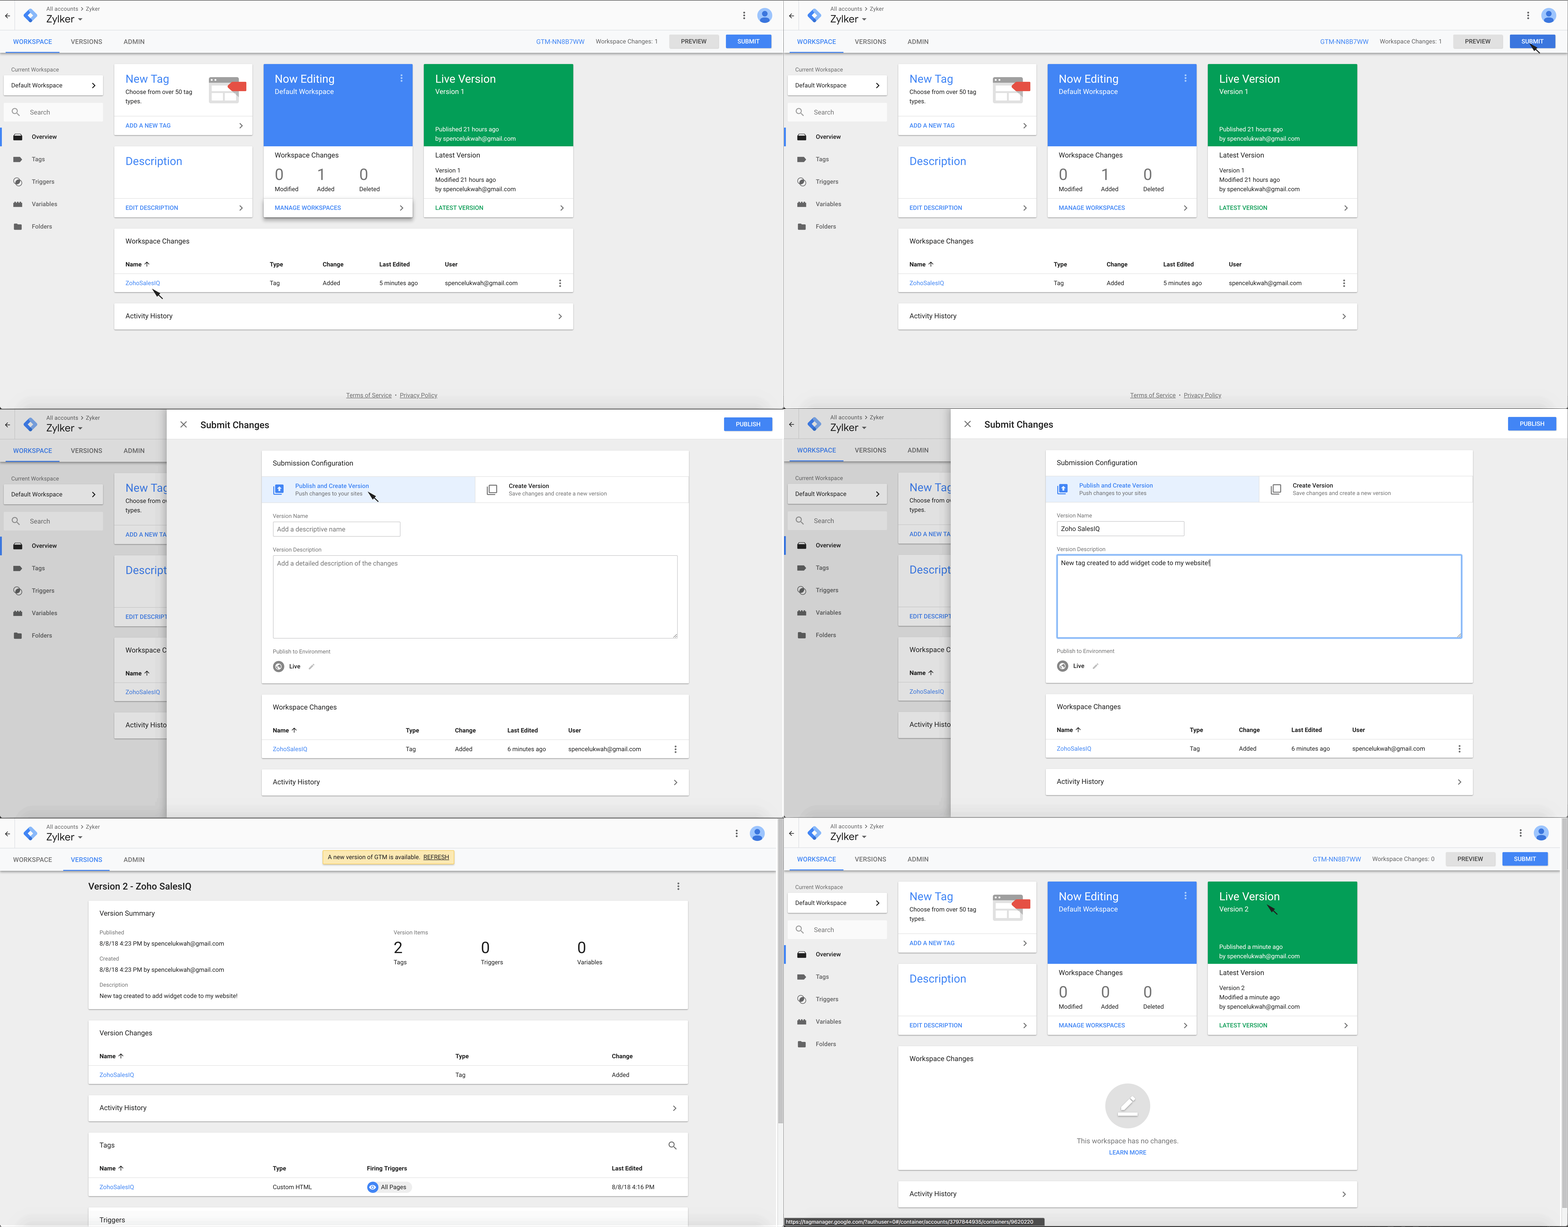
To view the reflected changes you will have to publish the tag that you have just created for this you will have to
- Click on the submit button that you can find in the top right corner.
- Under the Publish and Create Version section, type out version name and a brief description for it.
- Click on Publish to publish the changes made.
- You will be then re-directed to the Version tab in which you can view Version Summary, Version Changes, Activity History and more.
Track all the live chat events by integrating Google Tag Manager with your Zoho SalesIQ
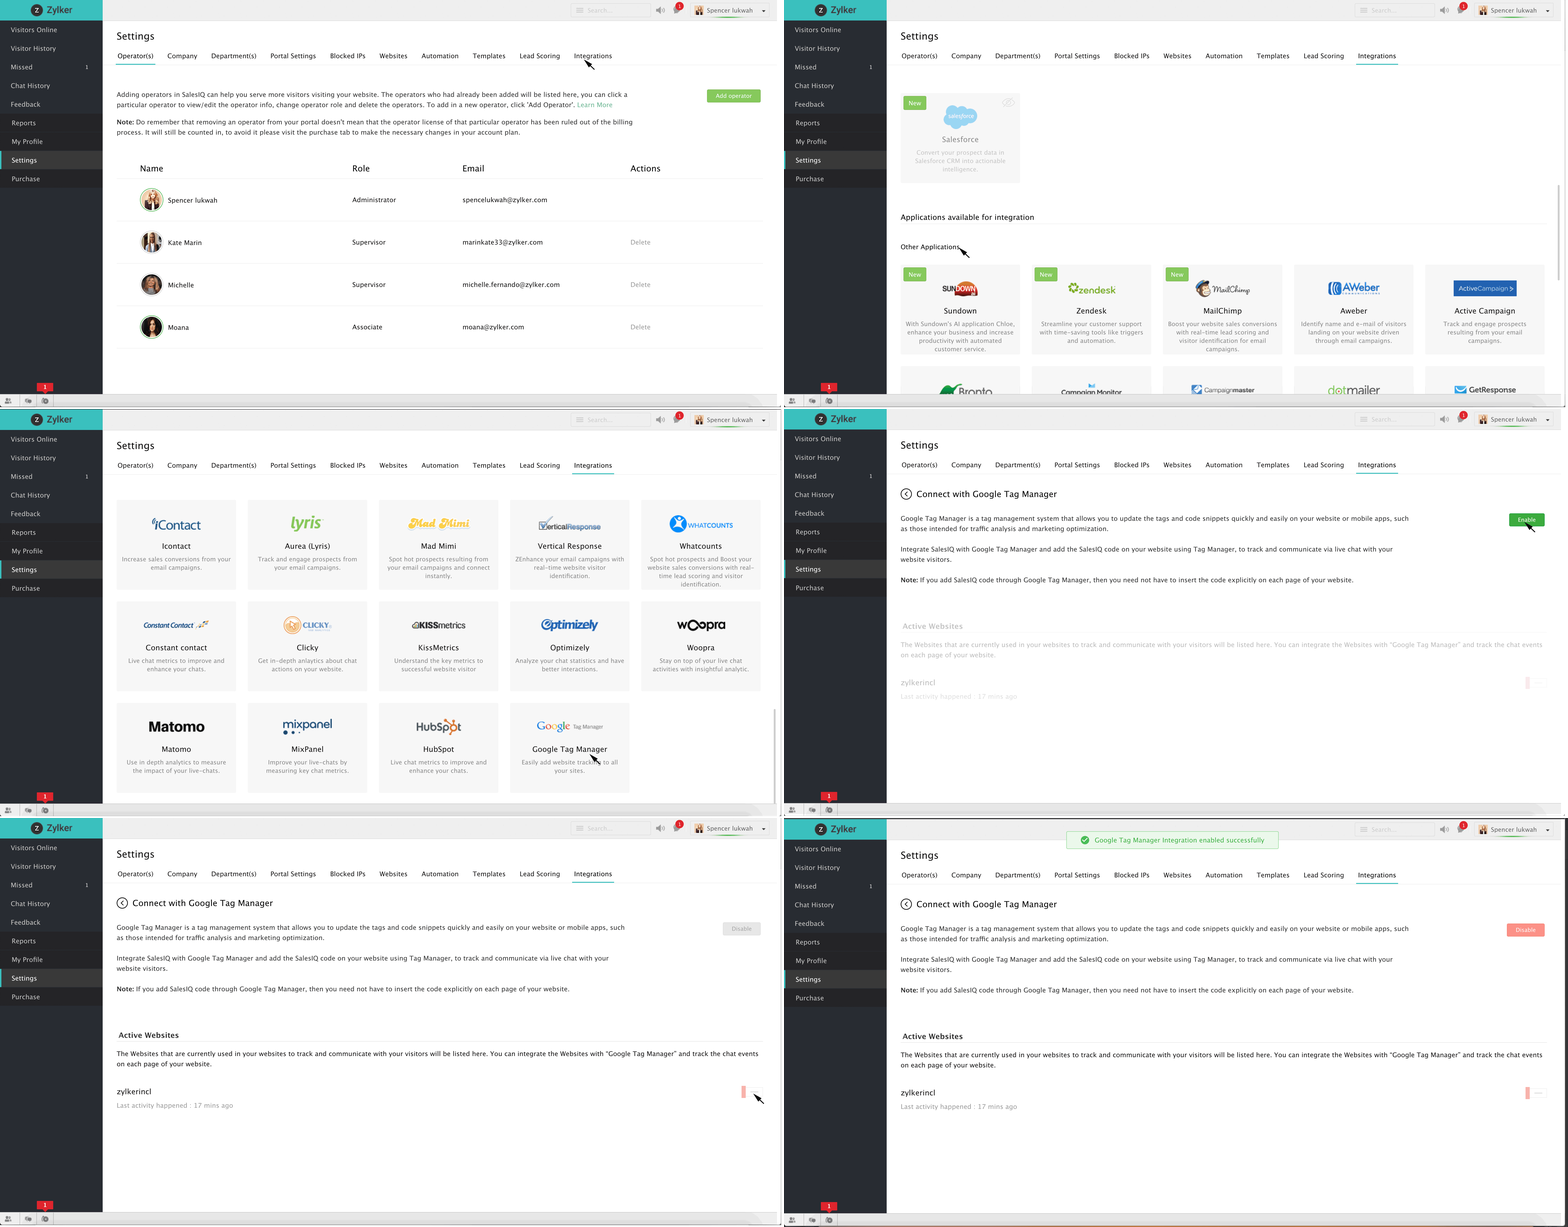
- Log into your Zoho SalesIQ account.
- Navigate to Settings > Integrations > Google Tag Manager.
- Click on Enable.
- You will be listed with all the websites that you have configured till date. You can decide whether to embed Zoho SalesIQ widget code via Google Tag Manager on those websites or not by clicking on the toggle bars provided right beside.
To track Zoho SalesIQ related events inside Google Analytics using Google Tag Manager
You can do this in two different method:
1. By adding the Google Analytics code along with the SalesIQ live chat code in the Google Tag Manager:
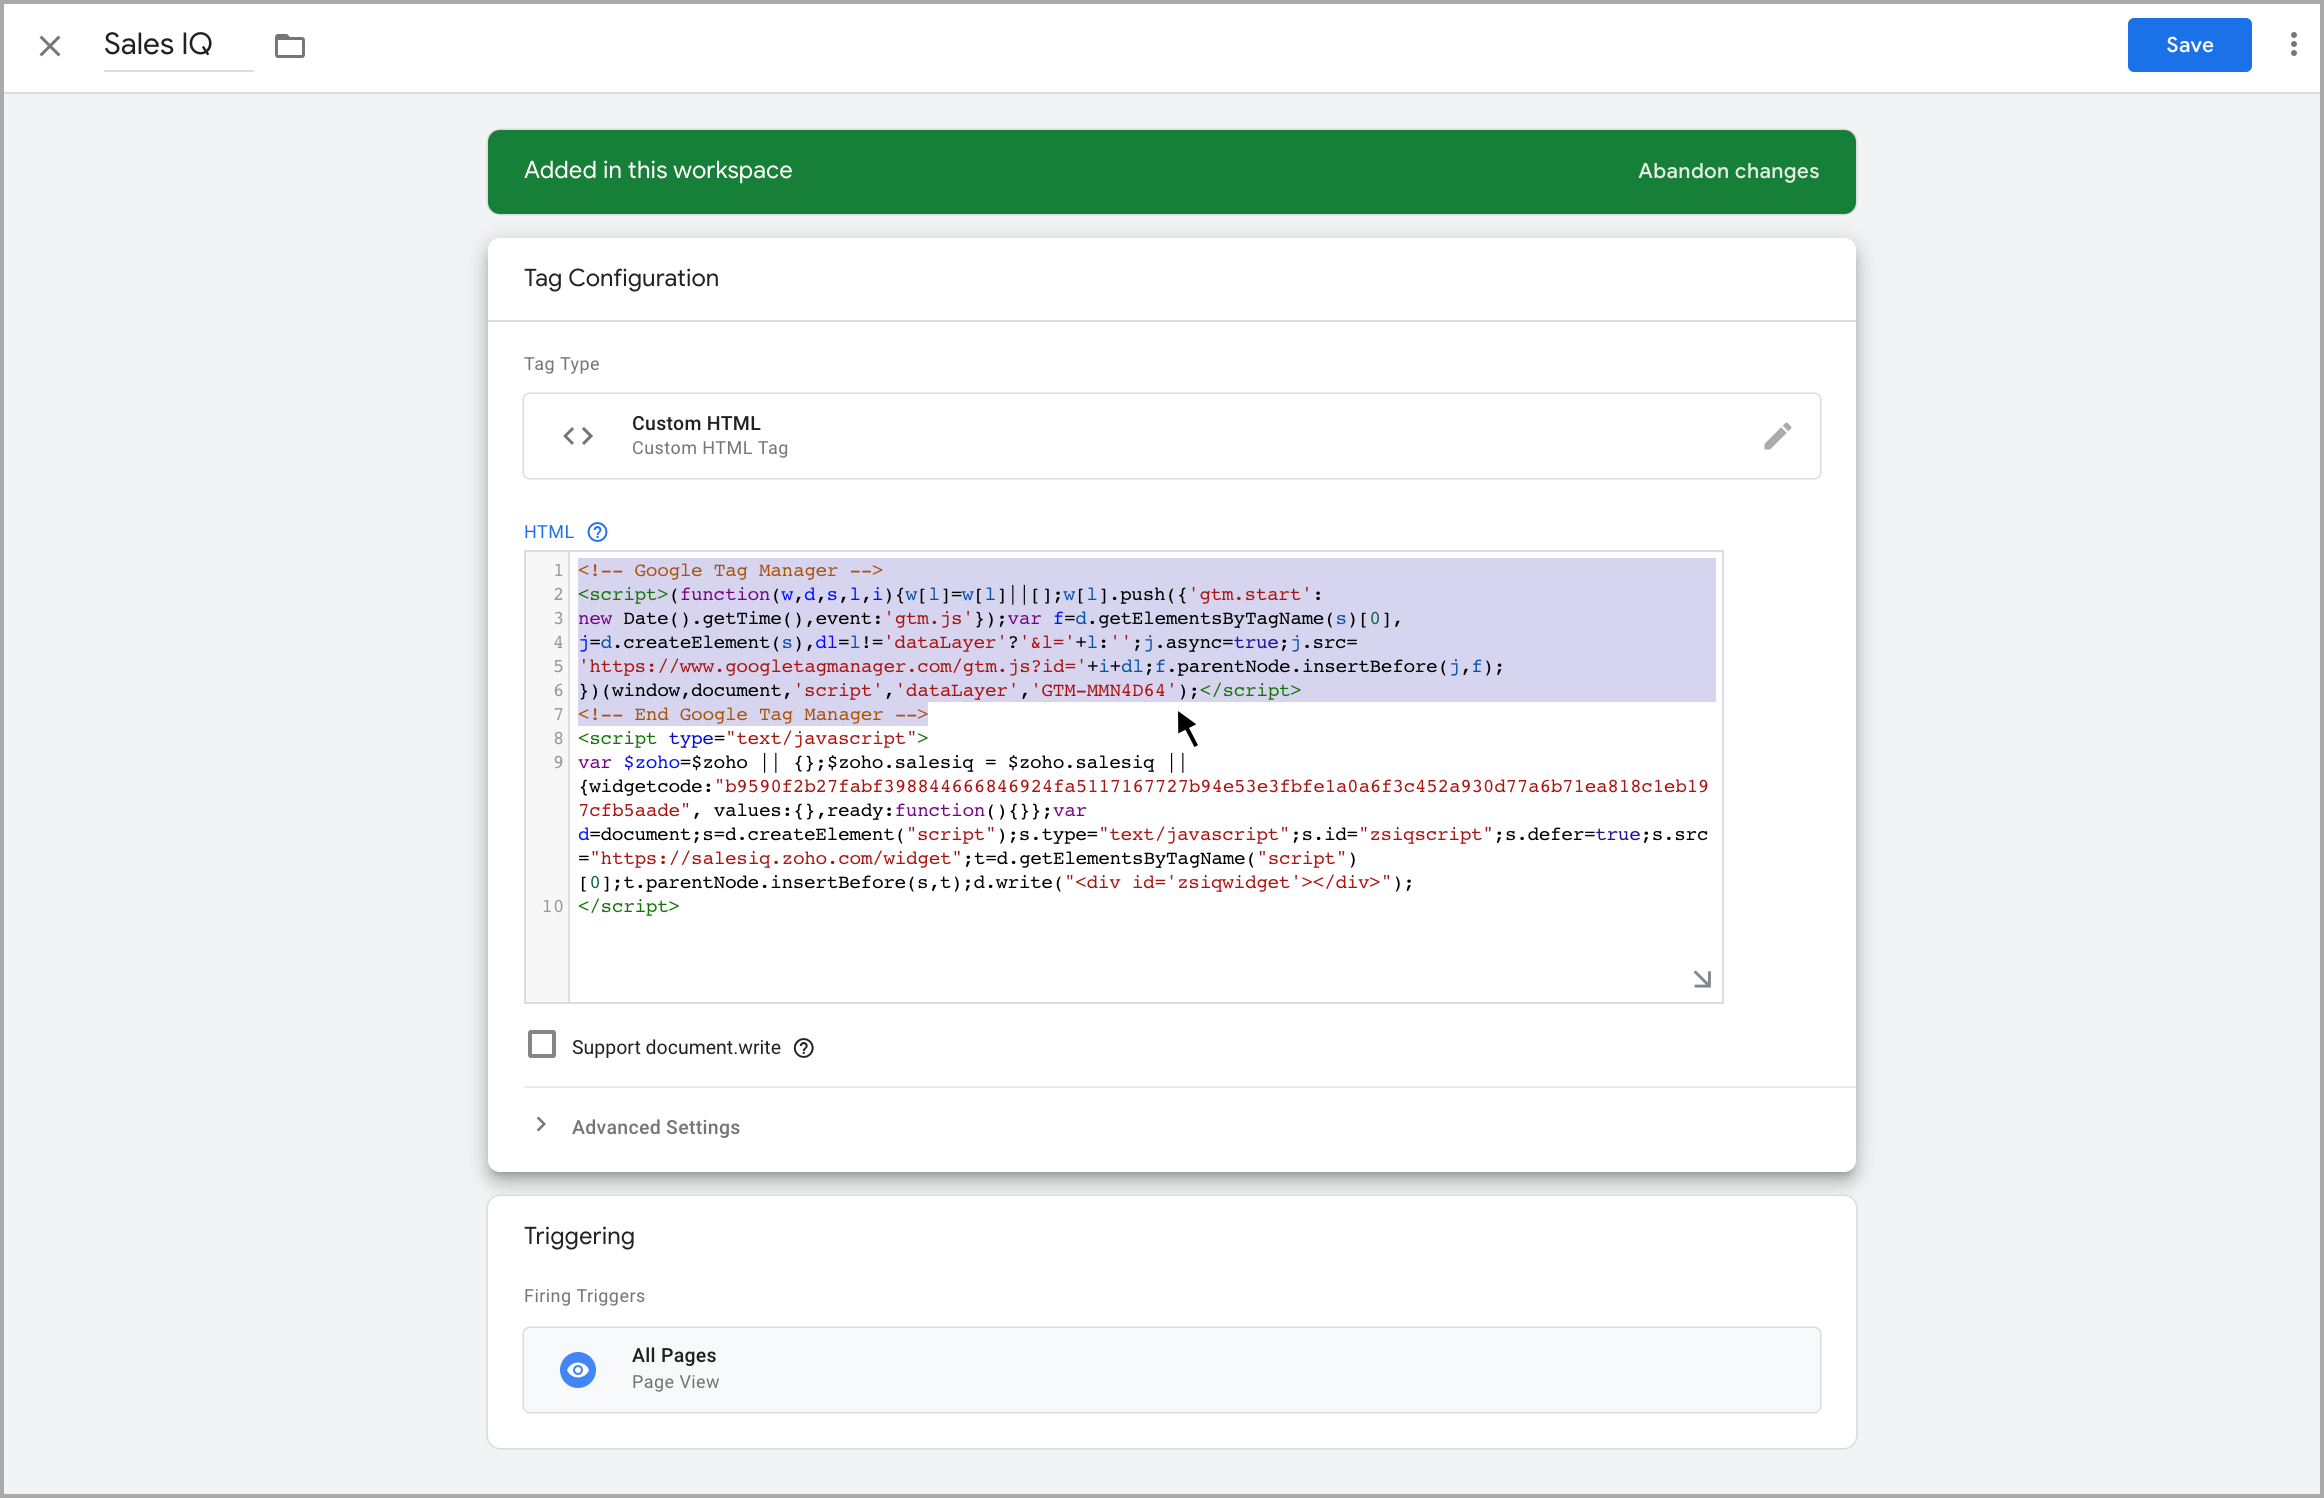
- Open the Sales IQ tag in Google Tag Manager, and paste the Google Analytics tracking code above the SalesIQ live chat script.
2. By adding the Google Analytics - Universal Analytics option:
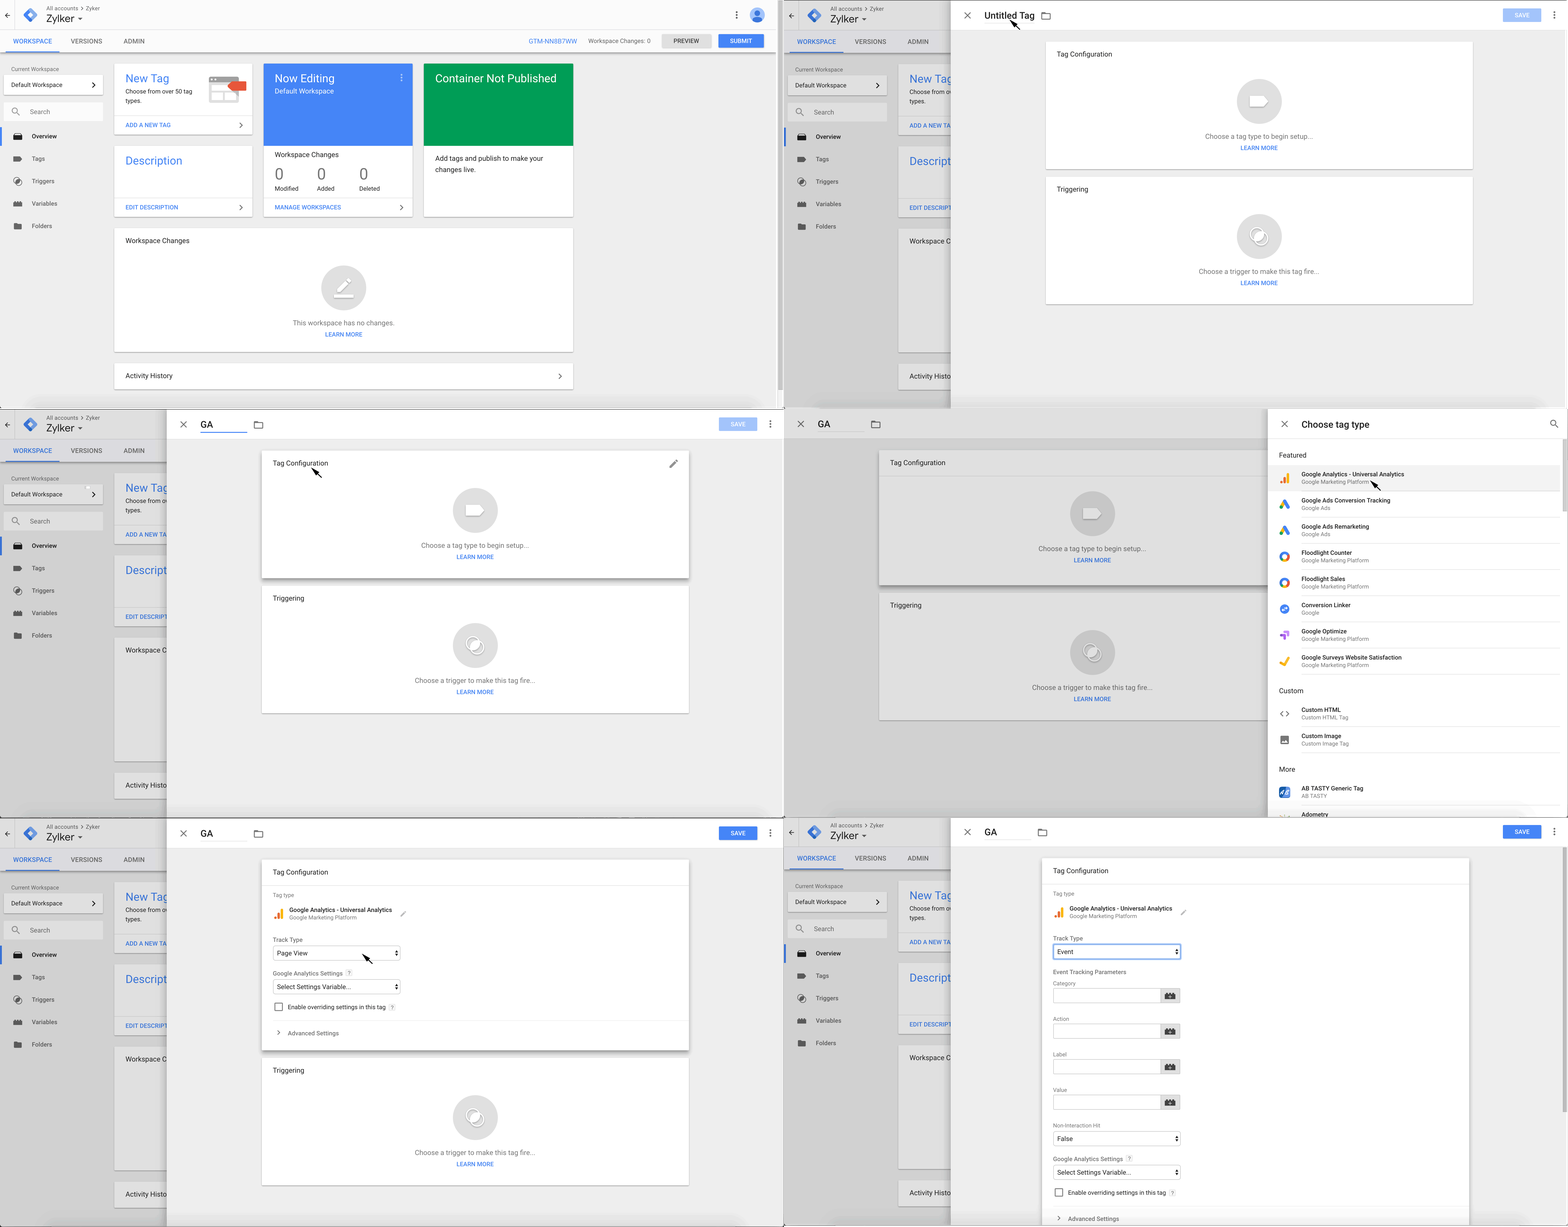
- Click on ADD A NEW TAG which you can find in the New Tag box.
- Name the tag as GA.
- Hover over the label that says Tag Configuration and click on the pen icon that appears right beside.
- In the window that slides in choose the option Google Analytics - Universal Analytics.
- Choose Track Type as Event.
Setting up Category
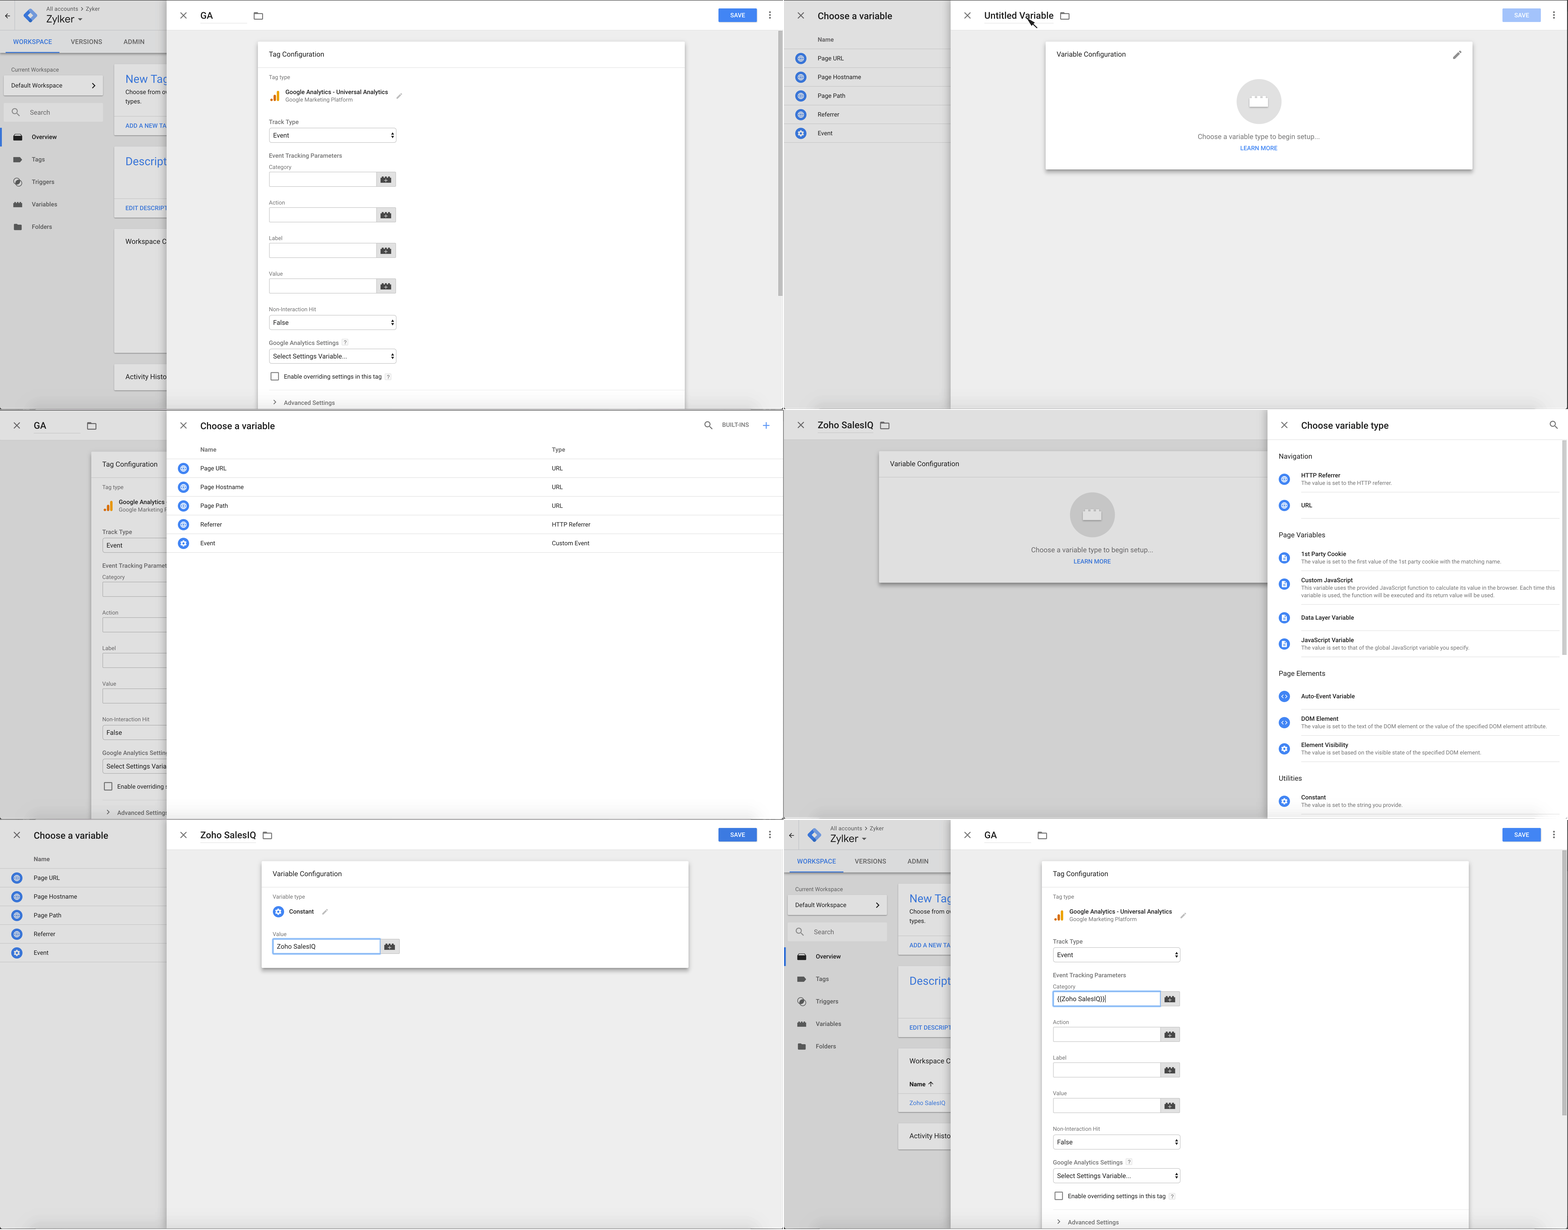
- Click on the more options icon which you can find right beside the Category text box.
- Click on the plus icon which you can find the top right corner in the window that slides in.
- Name the variable as Zoho SalesIQ and hover over the label that says Variable Configuration and click on the pen icon that appears right beside.
- Under the Utilities section choose the option Constant.
- Type out the Value as Zoho SalesIQ.
Setting up Action
- Click on the more options icon which you can find right beside the Action text box.
- Click on the plus icon which you can find the top right corner in the window that slides in.
- Name the variable as Sales IQ Event Action and hover over the label that says Variable Configuration and click on the pen icon that appears right beside.
- Under the section Page Variables choose the option Data Layer Variable.
- Type out the Data Layer Variable Name as Action.
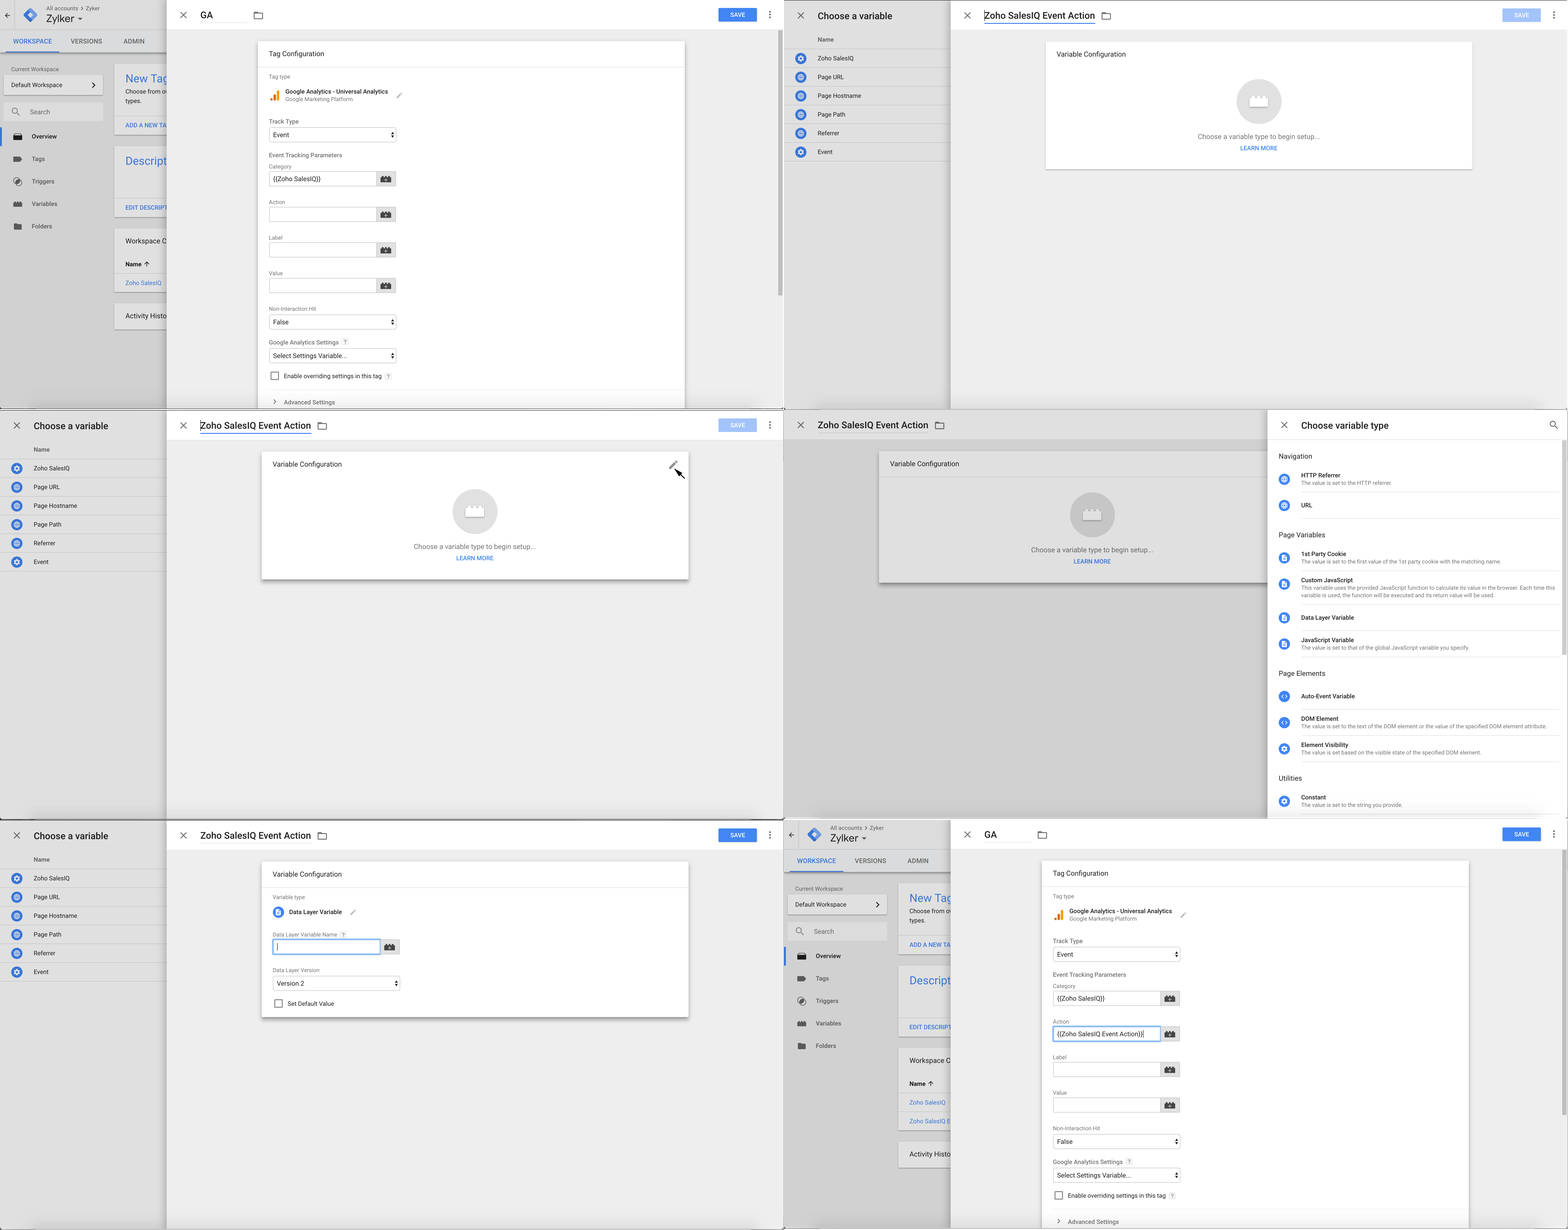
Setting up Label
- Click on the more options icon which you can find right beside the Action text box.
- Click on the plus icon which you can find the top right corner in the window that slides in.
- Name the variable as Sales IQ Event Label and hover over the label that says Variable Configuration and click on the pen icon that appears right beside.
- Under the section Page Variables choose the option Data Layer Variable.
- Type out the Data Layer Variable Name as Label.
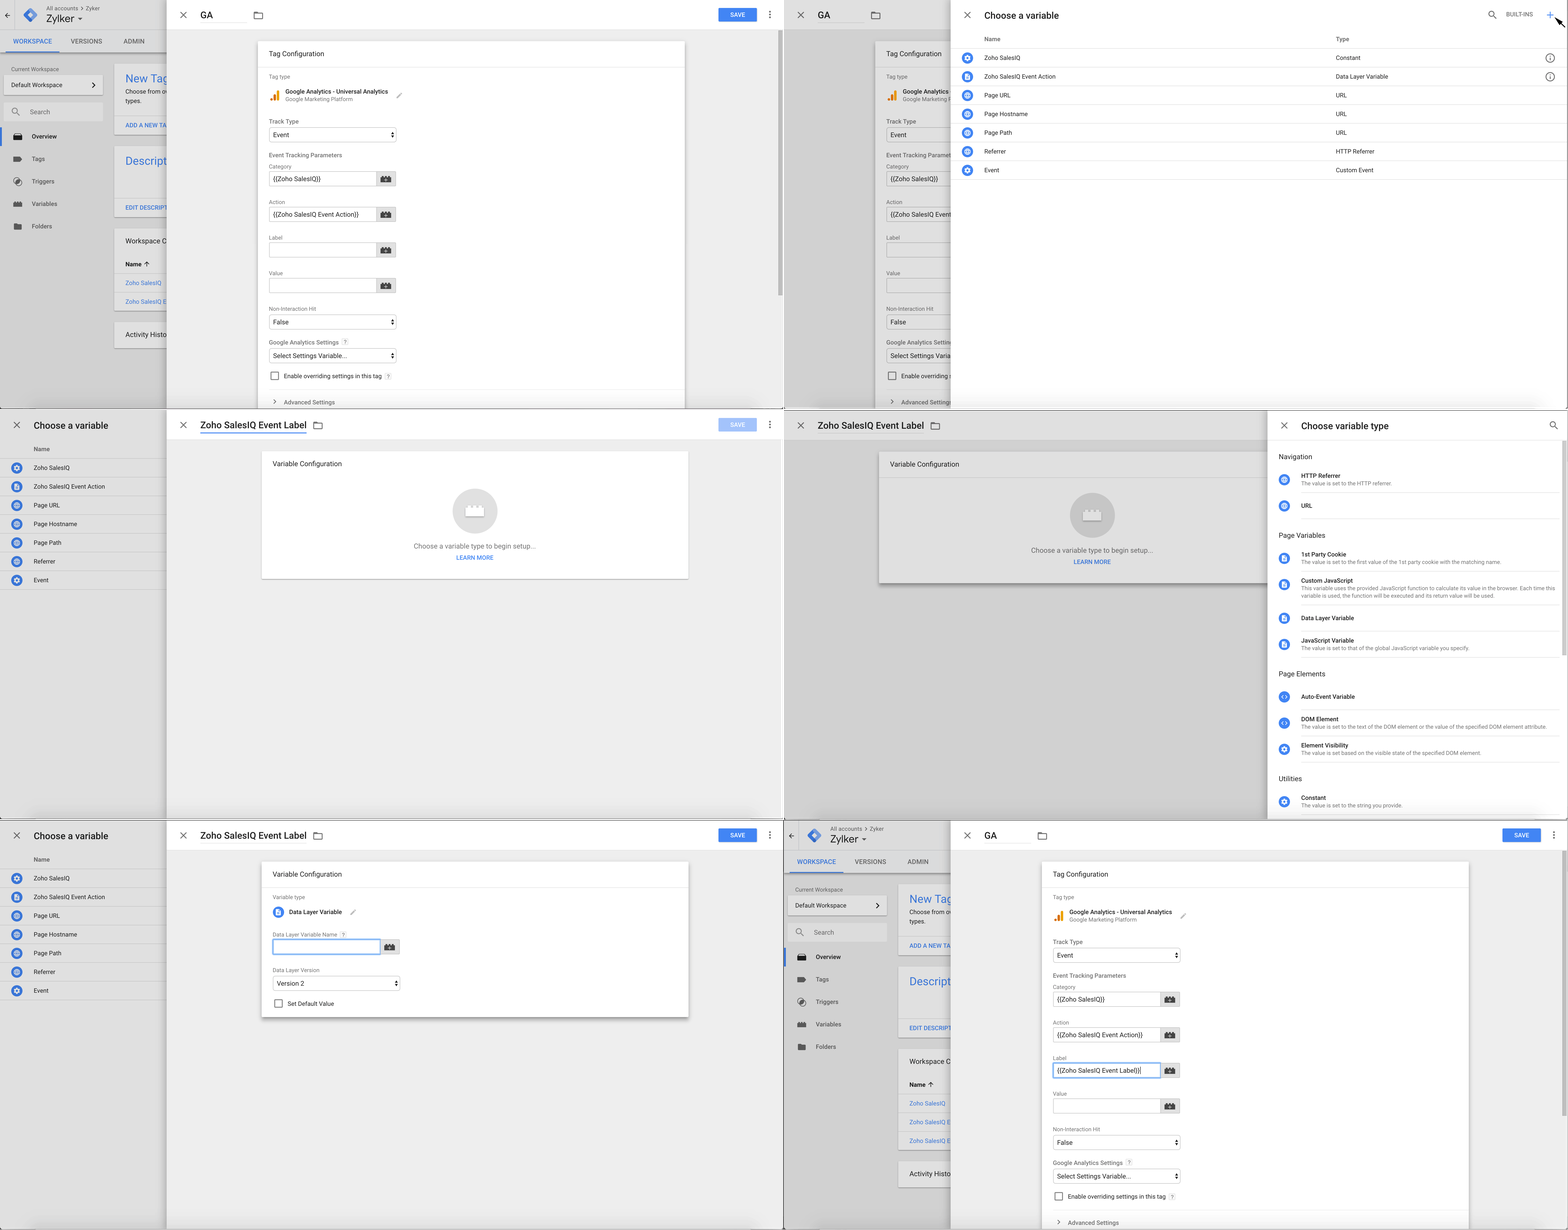
Setting up a Value
- Click on the more options icon which you can find right beside the Action text box.
- Click on the plus icon which you can find the top right corner in the window that slides in.
- Name the variable as Sales IQ Event Value and hover over the label that says Variable Configuration and click on the pen icon that appears right beside.
- Under the section Page Variables choose the option Data Layer Variable.
- Type out the Data Layer Variable Name as Value.
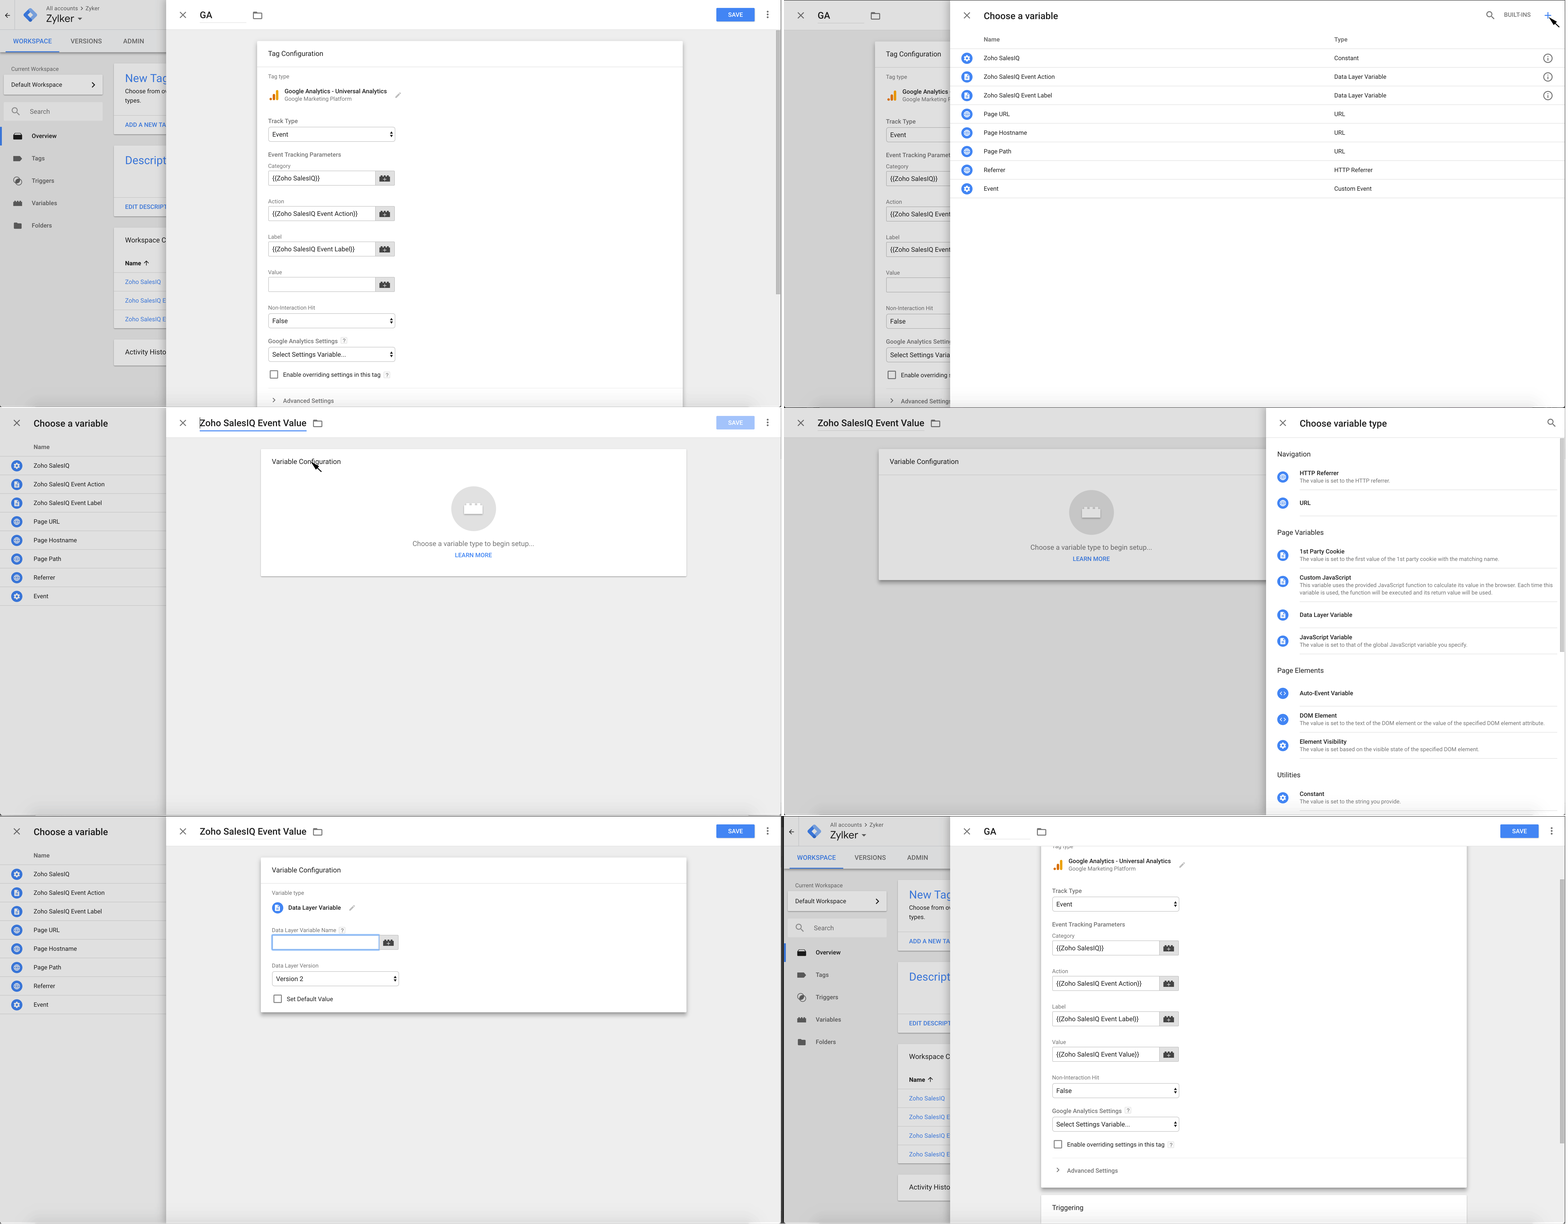
Integrating Google Analytics account with your Google Tag Manager
- Check the checkbox that says Enable overriding settings in this tag.
- Copy and paste the Tracking ID from your Google Analytics account.
- Click on Save.
![]()
Setting up the firing rule
- Navigate to the Triggers section.
- Click on New.
- Type out a name for the trigger say Trigger1.
- Hover over the label that says Trigger Configuration and click on the pen icon that appears right beside.
- Under the section Other choose Custom Event.
- Type out the Event name say Zoho SalesIQ Event.
- Choose the instance at which the rule has to be fired - Some Custom Events.
- Then choose "Sales IQ Event Value" "contains" "Sales IQ" from the drop boxes provided.
- Click on Save.
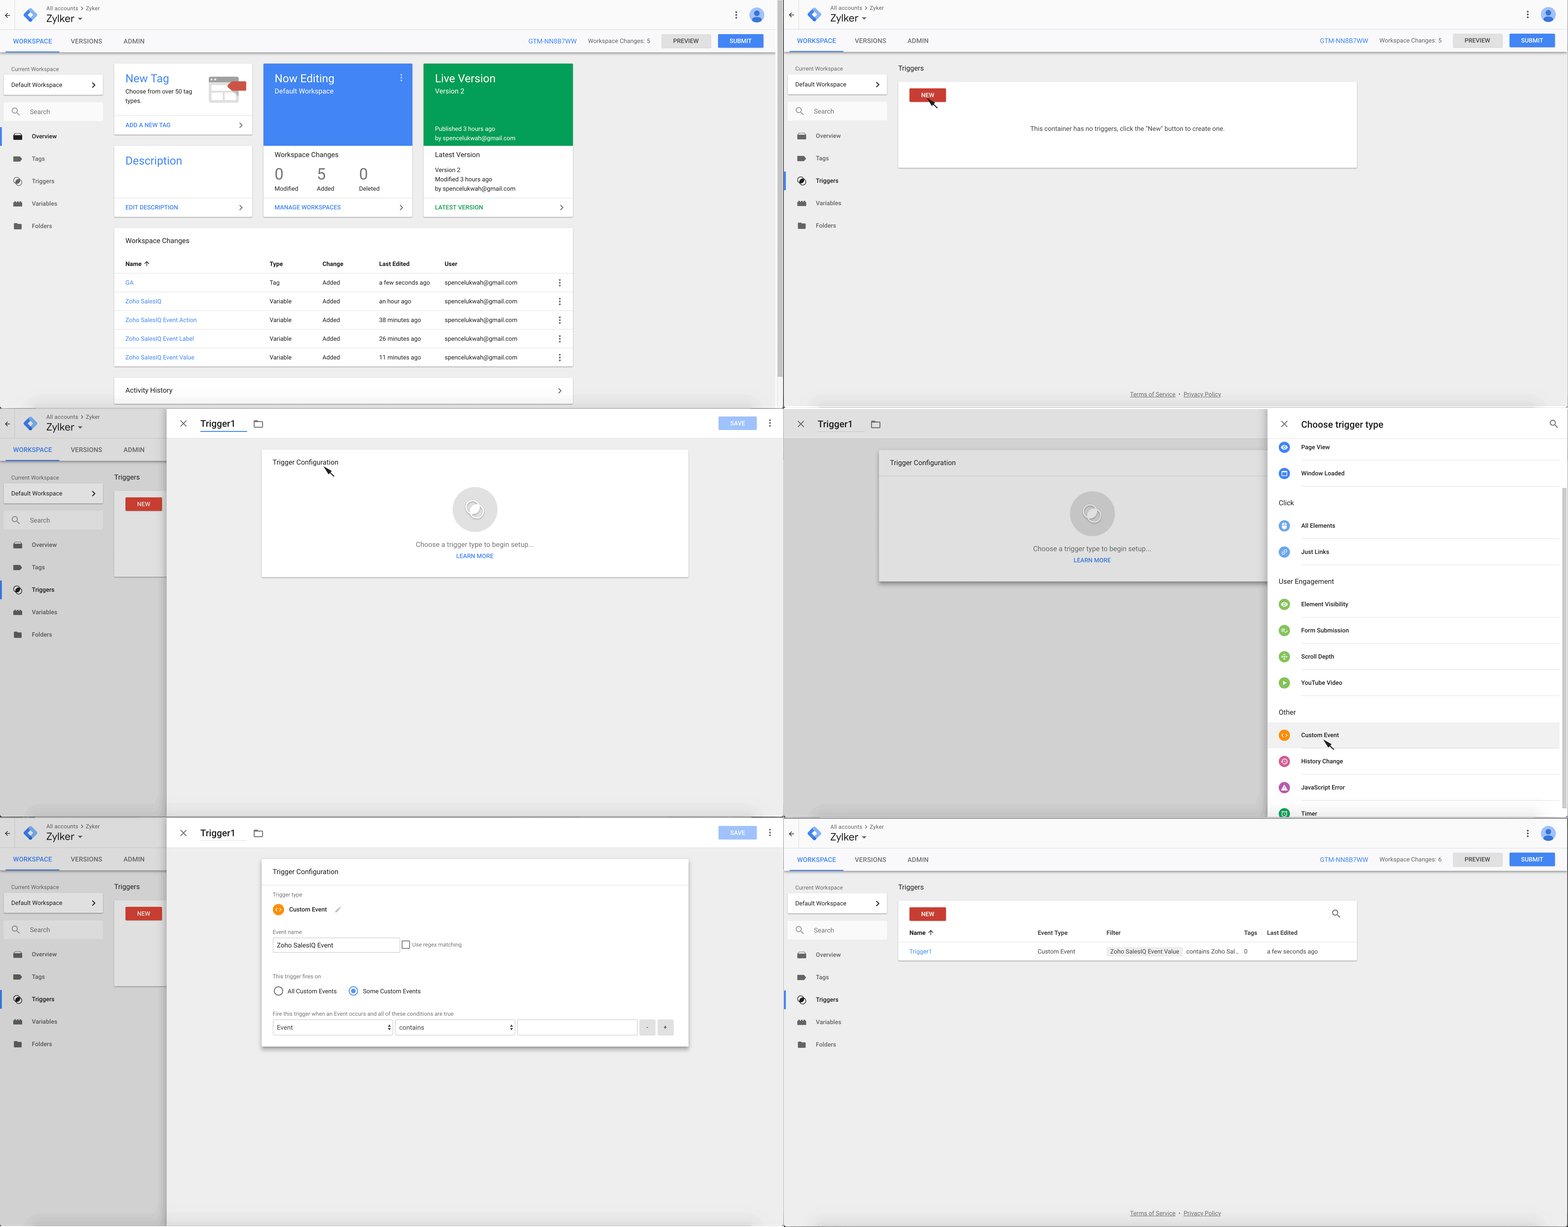
Zoho SalesIQ related events that can be tracked inside Google Analytics via Google Tag Manager
| Events | Description |
| Button Clicked | Number of clicks on the Zoho SalesIQ chat button. |
| Chat Closed | Number of clicks on the Close (X) icon in the chat window. |
| Chat Minimized | Number of clicks to minimize the Zoho SalesIQ chat window. |
| Bubble Closed | Number of clicks on the Close(X) icon on the chat bubble. |
| Chat Connected | Number of chat sessions with the visitors. |
| Chat Ended | Number of chats ended by the visitors. |
| File Transferred | Number of file transfers made by the visitors. |
| Chat Printed | Number of chat transcripts printed by the visitors. |
| Chat Mail Sent | Number of chat transcripts emailed by the visitor. |
| Rating submitted | Number of ratings submitted by visitors. |
| Feedback submitted | Number of feedback messages submitted by visitors. |
| Chat Triggered | Number of auto and proactive chat initiated to the visitors. |
| Chat Initiated | Number of visitor initiated chats. |
| Offline Message Submitted | Number of offline messages submitted by the visitors. |
| Chat Missed | Number of chats missed by the SalesIQ users. |
| Chat Ended by visitor | Number of chats ended by the visitors. |
Related Articles
Add Code to Website
How do I Log into Zoho SalesIQ? Go to Zoho.com/SalesIQ Enter the login credentials in the sign in page, and click on the Sign In button. How do I add Tracking and Live Chat Code to my websites? The SalesIQ code will appear in the SalesIQ welcome ...How do I link Google Tag Manager to my survey?
Add various Google Tag Manager (GTM) codes to your live survey, to track the traffic that accesses your surveys. To link your GTM code to your survey: Click the Hub tab. Click the Track section. Click Create in the Google Tag Manager section. ...How to add live chat widget to WHMCS?
Connect to your webserver via the FTP program of your choice, and navigate to whmcs/template/X, where X is the name of the theme that you are using in WHMCS. Find the file footer.tpl and click on it. From the left side of your cPanel click ...Customize your Live Chat Widget
You can now customize the live chat widget and the chat window to match the look-and-feel of your website and choose where and how you want them to be displayed to your customers and can connect with the seamlessly. Float Widget The float live chat ...Setting up Live Chat using Zoho SalesIQ
Open an immediate line of communication between your support team and your customers by adding the power of live chat to Zoho Desk. It enables your agents to have real-time conversations with your customers to serve them more quickly, and to build a ...