Adding, Modifying, and Re-inviting Users
Users with Manage User permission in their profile can access this feature.
Types of user profiles
Once the account is created, the super admin should confirm the account. If an user is invited before confirming, the invitation email will not be sent. The super admin should confirm the account and re-invite the user.
- The Administrator adds a user by providing some basic details like name, email address, role, and profile.
- Once the user's details are added, the system automatically sends an email invitation to the user's email address provided by the administrator. Other details such as phone numbers, address, photo, fax, website, date of birth, language, etc. can be entered after adding the user.
- The user accepts the invitation by clicking the Access link in the email within 7 days of receiving it.
- After accepting the invitation, the user completes whichever of the following is applicable:
- User is new to Zoho and does not have a Zoho account:
- After clicking the access link in the email, the user will be redirected to the sign-up page.
- User will sign up and create an account with Zoho.
- On creating the account, the user should click the Continue signing in button.
- The user has to confirm the email address by accessing the link sent in the confirmation email.
- After clicking the access link in the email, the user will be redirected to the sign-up page.
- User already has an account with Zoho, but does not have a Zoho CRM account:
- After clicking the access link in the email, the user should click the Continue signing in button.
- The user will be logged in to the Zoho CRM account that is associated with the company's account.
- After clicking the access link in the email, the user should click the Continue signing in button.
Adding Users
To add users
- Log in to Zoho CRM with Administrator privileges.
Users with Manage Users permission in their profile can also add users. - Go to Setup > Users & Control > Users.
- In the Users page, click +Add New User.
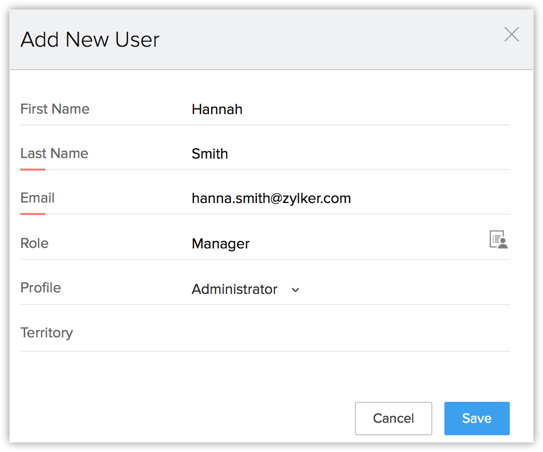
- In the Add New User page, enter the following details:
- First Name & Last Name: It is mandatory to enter Last Name.
- Email : Enter the user's valid email address that has not already been used to create a Zoho CRM account.
An invitation will be sent to this email address. - Role : Choose the role of the user in your organization.
- Profile : Choose a profile that defines the user's access rights in your Zoho CRM account.
You can add other details like phone numbers, address, photo, fax, website, date of birth, language, etc., after adding the user. - Territory: Assign a territory for the user.
This option will be available only if your enable Territories.
- First Name & Last Name: It is mandatory to enter Last Name.
- Click Save.
The system sends an invitation to the user's email address. Only when the user accepts the invitation, will the status of the user change to Confirmed.

Note
While adding a user to your account, if the user's email address is already registered with a data center you will not be able to register it with another data center. For example, if Mr. John Parker is registered with email address john.parker@zylker.com in EU data center, you will not be able to add him in the US data center using the same email address.
However, you can add the same user to your account by using the options below:
- Request the user to delete the registration with the existing data center and then add them to your account.
- Request the user to migrate his/her account to your organization's datacenter.
Modifying Users
When you add a user, you will start by be specifying only their name, email address, role and profile details. You can add the user's other details such as phone numbers, address, photo, fax, website, date of birth, language, etc., later, when you need.
To modify a user's details
- Go to Setup > Users & Control > Users.
- In the Users page, select the user from the list to modify the user details or add more information.
- In the User's Details section, click Edit for the corresponding section in which you want to modify the user's details. You can provide the following details:
- Phone, Mobile, Website, Fax and Date of Birth: Enter contact and biographical information about the user.
- Address Information : Enter the user's full address details.
- Language: Set the language for the user's Zoho CRM account.
- Country Locale: Select the user's country from the list.
- Date Pattern: Select the preferred pattern of the date from the list of available options. (The date pattern will be populated based on the user's country locale which can be change based on individual's preference).
- Time Format: Choose between a 12-hour or 24-hour time format.
- Time Zone: Set the time zone for the user's Zoho CRM account.
- Phone, Mobile, Website, Fax and Date of Birth: Enter contact and biographical information about the user.
- Click Save.
Re-inviting Users
If a user does not accept the invitation sent by the Administrator within seven days, the administrator can resend the invitation to the user. Users who have not accepted the invitation to join the organization's CRM account will be listed under Unconfirmed Users. Here you can resend an invite only to the unconfirmed users. If the user is deactivated, you will need to activate them first. See Also Activate Users
To re-invite a user
- Log in to Zoho CRM with Administrator privileges.
- Go to Setup > Users & Control > Users.
- In the Users page, select the required user. In the User's Details section click Re-invite.
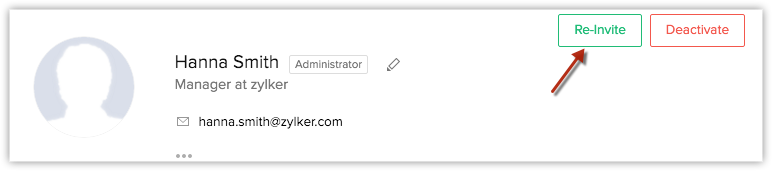
- Alternatively, you can also go to the Unconfirmed Users view and select the user to re-invite. An invitation email will be sent to the user's email address.
Points to remember:
| When you are invited to Company A's CRM account and... | What you need to do |
| You do not have an existing CRM account. | Click on the access link in the invitation email to join Company A's account. |
| You are already part of Company B's organization account. | Ask the Super Administrator of Company B's CRM account to delete you from that account. Then click on the access link in the invitation email to join Company A's account. |
| You are already part of Company B's organization account. Also, you are the Super Administrator in the same account. | In Company B's CRM account, make another user as the Super Administrator and ask the same user to delete you from that account. Then click on the access link in the invitation email to join Company A's account. |
| You are already part of Company B's organization account. Also, you are the only active user in the account. | Delete Company B's CRM account and then click on the access link in the invitation email to join Company A's account. In this case, Company B's Zoho CRM account will be closed and all the data will be securely erased. An email will be sent to you with a link to download the final backup of your data. |
| You are already part of Zoho Docs/Zoho Mail/Zoho Creator in Company B's organization account. | Ask the Administrator of Zoho Docs/Zoho Mail/Zoho Creator (of Company B) to delete you from the corresponding product's account. Then click on the access link in the invitation email to join Company A's account. |
| You are already part of Zoho Docs/Zoho Mail/Zoho Creator in Company B's organization account. Also, you are the Administrator of the account in these products. | In Company B's Zoho Docs/Zoho Mail/Zoho Creator account, make another user the Administrator and ask the same user to delete you from that account. Then click on the access link in the invitation email to join Company A's account. |
| You are already part of Zoho Docs/Zoho Mail/Zoho Creator in Company B's organization account. Also, you are the only active user in the account. | Delete Company B's Zoho Docs/Zoho Mail/Zoho Creator account, and then click on the access link in the invitation email to join Company A's account. In this case, Company B's Zoho CRM account will be closed and all the data will be securely erased. An email will be sent to you with a link to download the final backup of your data. |
Related Articles
Adding and Managing your Zoho Desk Users
Agents are the persons who handle tickets and work with customer problems. They perform a wide array of actions like responding to customers, editing ticket details, closing tickets, moving tickets between departments, etc. You can add as many agents ...User Management
Define and manage who has access to your CRM account Help guide Adding, Modifying, and Re-inviting Users Activating and Deactivating Users Deleting and Transferring UsersAdding Users
Users with the Manage Users permission in their profile can access the users' list and perform tasks such as adding users, modifying the user details, and view the apps and add-ons that are activated for each user. The user's details page will also ...Adding Users
Users with the Manage Users permission in their profile can access the users' list and perform tasks such as adding users, modifying the user details, and view the apps and add-ons that are activated for each user. Important Steps in Adding a User ...Inviting members to a network
Network admins of internal and external networks can invite people by typing their email addresses or by uploading a .csv file containing the addresses. In case the admin hasn't verified their account, they'll need to complete the verification before ...