Common Operations
Navigate Records
Navigate primarily means the process of moving back and forth within the records. Navigation in Zoho Recruit allows easy movement between records; provides options to choose the number of records to be displayed in one page; and saves time in accessing records.
The two navigational options available in Zoho Recruit are:
- Page-level navigation
- Record-level navigation
Page-level navigation
Record-level navigation
Search Records
The search option helps locating specific information or specific records without having to go through the entire list of records, thus saving time in finding records.
The different search options available in Zoho Recruit are:
- Search records by Alphabet
- Search records by Information
- Search records by Criteria using Advanced Filters
Search records by Alphabet
Search records by Information

Search records by Criteria using Advanced Filters
Create Records
In the Zoho Recruit system, you can create records by:
- Entering data manually in the record details form
- Importing records from external sources
- Capturing records from Web site through Web-to-record form

Note:

- Some of the standard fields listed below may not be visible or editable depending on your organization's business process.
- In case you want to add or modify fields, please contact your System Administrator for more details on the usage of other fields.
Create Records Individually
You can create records manually whenever there is a limited number of records that can be created one by one. In such cases, it is easy to manually feed in the available details and create new records instantly.
You can create records individually by:
- Filling details in the record creation form.
- Duplicating the record with few changes in the existing details.
You can create candidates individually by using the following:
- Filling details in the candidate creation form.
- Cloning the candidate with few changes in the existing record.

Note:
- By default, the person who creates the candidate owns it.
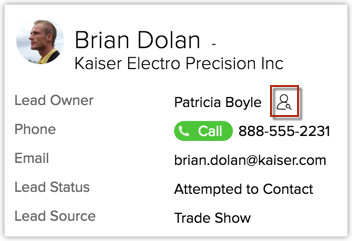
- To change owner, click the Change link in the Candidate Owner field from the Candidate Details page and select another user.
To create candidates individually
- In the [Module] tab, click New [Module] . Alternatively, click
 .
. - In the Create Record page, enter the details. (Refer to the Standard Fields)
- Click Save.
To clone records
- In the [Module] tab, click a particular record that is to be cloned.
Module refers to Candidates, Clients, Contacts, etc. tabs. - In the [Module] Details page, click Clone.
- In the Clone [Record] page, modify the required details.
- Click Save.
Import Records
Importing records from external sources to the ATS system is one of the most important activities in marketing and sales, when you are using different systems to gather data. For example, you may be purchasing records from external sources, capturing product requests through Web sites, getting records from a different business unit within the organization where there is a chance of cross-selling products, or migrating data from your old system to Zoho Recruit. In all these cases, importing records enhances your productivity.
You can import records, if you are authorized to perform this operation. Otherwise, the Import records button in [Module] Home page will be hidden in your user interface. By default, record ownership is held by the user, who imports the records. You can change the record's ownership while importing, by adding a record owner column in the CSV/XLS file that is imported and the map it to the Assigned To field. This will automatically assign records to particular users. Use the exact Zoho Recruit users' names while creating the record import file, otherwise records are not created in Zoho Recruit.

Note:
- The Import link is displayed only if you have the privilege to use the Import feature.
- Please contact your administrator in case these links are disabled.
- Before importing records, you must have the record details in a CSV/XLS file.
- Before importing the records, close the CSV/XLS file and the Spreadsheet program.
- Ensure that the CSV file does not contain any apostrophes (For example, ABC's).
Capture Records from Website (Using Web-to-record Form)
Web forms simplify the process of capturing visitors' or users' information from the website into your ATS system. They are designed to automate the importing of data from website into Zoho Recruit and to enable non-technical users to design and publish their own web forms.

Benefits:
- Web forms can be used for:
- Capture data (visitors' information)
- Communicate with website visitors
- Conduct surveys
- Respond to user questions
- Generate online sales
- Receive online feedback
Export Records
Occasionally it is very useful to export the records from Zoho Recruit to Spreadsheet programs, such as Microsoft Excel, OpenOffice, and others for further data analysis. The different export options available in Zoho Recruit are:
- Export data
- Request ATS data backup
Change Record Owner
When prospecting is in progress, occasionally it may be very useful to change the owner of some of the records in a single step. You can change the owner of an individual record or a group of records.

Note: You need to have the Change Owner profile permission to use this feature.
To change the owner of records individually
- Click the [Module] tab.
Module refers to Candidates, Clients, Contacts, etc. tabs. - In the [Module] Home page, select the record.
- In the [Module] Detailspage, do one of the following:
- In the [Record] page, change the owner, and then click Save.

To change the owner of records in bulk
- Click the [Module] tab.
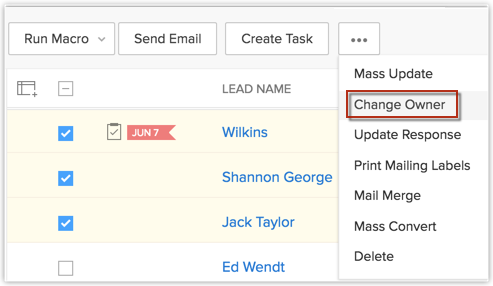
Module refers to Candidates, Clients, Contacts, etc. tabs. - In the [Module] Home page, select the required check boxes.
- Under More Actions, click Change Owner.

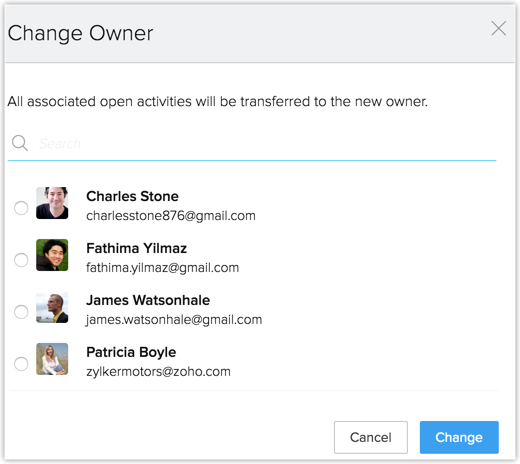
- In the Change Owner page, select the new user from the Change Owner pick list.

- Click OK.

Note:
- Record ownership will be changed to another user, irrespective of its existing owner.
- Use this operation carefully, otherwise records belonging to different users will be changed to new user.
- To overcome this problem, you may first search the records with a required owner name and then change the owner in bulk.
- The Change Owner option will not be available for the records for which you have Read Only permission.
Print Records
You can view the record details in printable form and print them using the browser’s print function.
To print record details
- Click the [Module] tab.
Module refers to Candidates, Clients, Contacts, etc. tabs. - In the [Module] Home page, click the required record that you want to print.
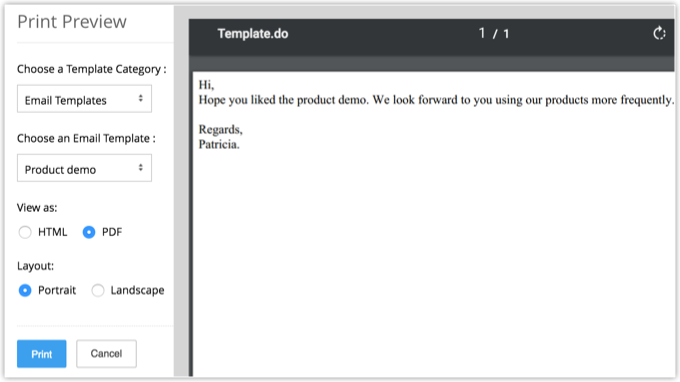
- In the [Module] Details page, click More Actions > Print Preview.
- Choose a Template Category from the list.
The chosen Email Template, Mail Merge Template or Inventory Template, as the case may be, appears for Print Preview.
- Click Print.

Note:
- You can also print the details using the Web browser's print function.
- Email Templates appears only if there are any email templates created for the module in question.
- The Mail Merge Templates option is restricted to Candidates, Contacts, Clients and Job Openings.
- Inventory Templates are restricted to Inventory Modules.
- These additional Print options (Email, Mail Merge and Inventory templates) are available for all paid Zoho Recruit accounts. For Free and Trial accounts, only the default print option is available.
To print records
- Click the [Module] tab.
Module refers to Candidates, Clients, Contacts, etc. tabs. - In the [Module] Home page, click the Print View icon.
- In the Print Preview page, the system displays the list of records.
- Click Print Page.
Delete Records
Occasionally you may need to remove some of the unnecessary records from Zoho Recruit, for a better organization of data. You may consider removing records that are not useful for future reference.

Note:

- The deleted records are temporarily stored in the Recycle Bin for 60 days from the date of deletion after which they are permanently deleted.
- Users with Administrator profile will have access to all the records in the Recycle Bin.
- Only the Administrator can delete the records from the Recycle Bin.
To delete records individually
- Click the [Module] tab.
Module refers to Candidates, Clients, Contacts, etc. tabs. - In the [Module] Home page, select the record.
- In the [Module] Details page, click Delete.
To delete records in bulk
- Click the [Module] tab.
Module refers to Candidates, Clients, Contacts, etc. tabs. - In the [Module] Home page, select the check boxes corresponding to the records.
- Click Delete.
Restore Deleted Records
If you delete records by mistake, you can always restore the deleted records from the Recycle Bin.
To restore deleted records
- Click Settings > Setup > Data Administration > Recycle Bin.
- In the Recycle Bin page, select check box(es) of the records that you want to restore.
- Click Restore.

Note: Users with Administrator profile will be able to view all the records that are deleted.
Merge Duplicate Records
Over a period, there may be a chance of accumulating duplicate records. You can search the duplicates and merge them for a better organization of records. There are two features to merge duplicate records.
Find & Merge Duplicate Records - Specify criteria to find duplicate records. There are 6 fields in which you can specify the criteria in each module.
De-duplicate Records - Search all duplicate records in a module based on a selected field's value. You can choose any one from the 4 fields that are available based on the selected module.
Mass Transfer Records
This feature allows you to transfer records from one user to another user. As a result, all the open activities will also be transferred to the new owner. You need to have the Mass Transfer profile permission for the individual modules to use this feature.
To transfer mass records
- Click the [Module] tab.
Module refers to Candidates, Clients, Contacts, etc. tabs. - In the [Module] Home page, click [Module] Tools > Mass Transfer [Module].
- In the Mass Transfer [Module] page, do the following:
- In the Select New Owner section, click
 to select the owner's name for the Transfer From and Transfer To fields.
 - Specify the criteria.
- Click Search.
- Under Matching [records], select the check box(es).
- Click Transfer.
Mass Delete Records
This feature allows you to delete records in bulk. You need to have the Mass Delete profile permission for the individual modules to use this feature.
To delete mass records
- Click the [Module] tab.
Module refers to Candidates, Clients, Contacts, etc. tabs. - In the [Module] Home page, click [Module] Tools > Mass Delete [Module].
- In the Mass Delete [Module] page, do the following:
- Specify the criteria.
- Click Search.
- Under Matching [records], select the check box(es).
- Click Delete.

Note:
- The records deleted in bulk will be temporarily available in Zoho Recruit's Recycle Bin.
- To restore the data, select the records, and then click Restore.
Mass Update Records
This feature allows you to update record details in bulk. You need to have the Mass Update profile permission for the individual modules to use this feature.

Note:
You cannot update the following fields using the Mass Update feature.


- Text Area fields.
- Lookup fields.
To update mass records
- Click the [Module] tab.
Module refers to Candidates, Clients, Contacts, etc. tabs. - In the [Module] Home page, click [Module] Tools > Mass Update [Module].
- In the Mass Update [Module] page, do the following:
- Specify the criteria.
- Click Search. The page displays the list of matching records.
- Under Matching [records], select the check box(es), and then click Mass Update.
- In the Select Field to Update page, select the field to be updated.
- Enter the corresponding data in the box.
- Click Save.
To update mass records from the list view
- Click the [Module] tab.
Module refers to Candidates, Clients, Contacts, etc. tabs. - In the [Module] Home page, select the check box(es) corresponding to the records that you want to update.
- Under More Actions, click Mass Update.
- In the Select field to update popup, choose the field that you want to update for the records.
- Specify the value for the field.
- Click Save.
Use Last Activity Time in Criteria
Apart from editing a record, there are various other activities associated with records. For example, adding a note, closing a task, sending emails etc. The last updated time of such activities is captured in each record as Last Update: Time (only in the Candidates, Clients, Contacts and Job Openings modules).
The information in this field can be used in the criteria for List View and Reports, to filter out records that did not have any activity for a specific period of time or those records that had recent activities.

Note:
- This option is supported only for the Candidates, Clients, Contacts and Job Openings modules.
- The Last Activity Time under list view criteria and the Last Update time in the Record Details page are the same.
The activities and updates that will be recorded as Last Activity time:
- Editing fields in a record
- Adding & updating activities, i.e. Tasks, Events, Calls
- Sending emails to candidates and contacts
- Adding & editing notes
- Adding potentials & contacts under an account
- Changing the owner of the record
- Adding and deleting a record
(This does not include deleting a record associated to the parent record.) - Closing a task
(This does not apply for events as they are automatically moved under Closed Activities after the End DateTime.) - Deleting and restoring the records (individually or in bulk).
- The activities and updates that will NOT be recorded as Last Activity time:
- Mass operations like Mass Update, Mass Transfer, etc.
(Except for Mass Delete option.) - Editing contacts or potentials under an account will not be listed under the Account
- Deleting related lists under a record.
Related Articles
Common Operations with records
Record Navigation Navigation primarily means the process of moving back and forth within the records. In Zoho CRM, navigation allows easy movement between the records; it provides options to choose the number of records to be displayed in one page ...Common Operations with records
Record Navigation Navigation primarily means the process of moving back and forth within the records. In Zoho CRM, navigation allows easy movement between the records; it provides options to choose the number of records to be displayed in one page ...Common Functions
Navigate Records Navigate primarily means the process of moving back and forth within the records. Navigation in Zoho Workerly allows easy movement between records; provides options to choose the number of records to be displayed in one page; and ...Other file operations
You can perform lot of actions on your files. Simply right click on the file to open up more options. Add tag Navigate to the file that you wish to add a tag. Right click on the file and select Add tag. Add necessary keywords in the text box. ...Common Questions
1. What is ShowTime? Zoho ShowTime is a web-conferencing and an online training delivery tool that lets you interact and engage with your attendees in real time. 2. What are the compatible browsers supported by ShowTime? ShowTime supports the ...