Common Operations with records
Record Navigation
Navigation
primarily means the process of moving back and forth within the
records. In Zoho CRM, navigation allows easy movement between the
records; it provides options to choose the number of records to be
displayed in one page and saves time in accessing them. See Also Navigate Records
The two navigational options that are available in Zoho CRM are:
- Page-level navigation
- Record-level navigation
Page-level navigation
With page-level
navigation you can easily move between the previous or next pages of a
module to view the list of records. Also, based on your Zoho CRM edition
you can select the number of records to be displayed in the module's
home page.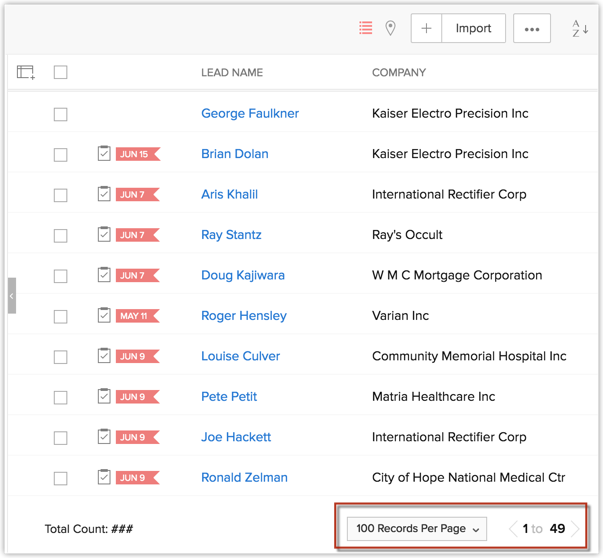
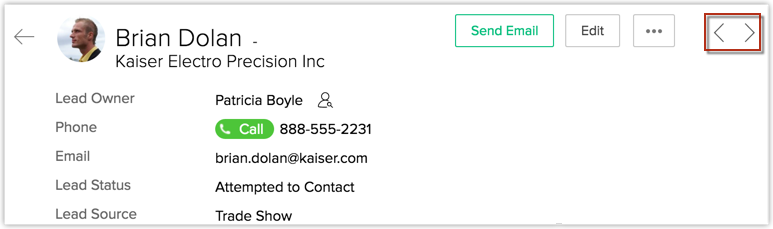
Record-level navigation
With
record-level navigation you can move from one record to the previous or
next consecutive record(s). You can also view the first or last record
entry.
Search Records
When
you have a seemingly-endless list of records in a CRM module, searching
for a specific record can take up all your time. We understand this, so
Zoho CRM gives you three options for searching records: See Also Search Records
The different search options available in Zoho CRM are:
- Search records by alphabet
- Search records by information
- Search records by criteria using advanced filters
Search records by alphabet
Choose an alphabet and CRM will list out all the records that begin with the defined alphabet. 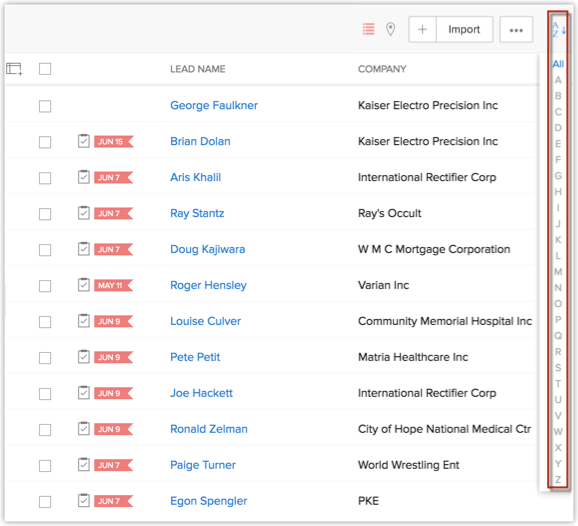
Search records by information
Search a record by selecting any information like calls, tasks, events, modules, etc. 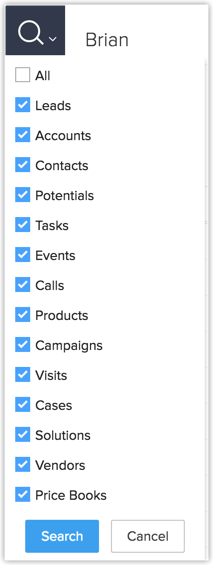
Search records by criteria using advanced filters
Mention specific details like company, email, or country in the advanced filter as criteria to search the records. 
Create Records
You
can capture information about leads, deals, quotes, and more from
various sources and add them as records in the modules. You can add
these records in your CRM account in more than one way; you can either
add them manually, import them to CRM, or capture the data from the web
forms.

- Some of the standard fields listed below may not be visible or editable depending on your organization's business process.
- In
case you want to add or modify fields, please contact your System
Administrator for more details on the usage of other fields.
For a complete list of standard lead fields, click here.
Create records manually
If
you have a limited number of records, you can add them manually in the
CRM module. You can create records individually by the following
methods:
- Filling in details in the record creation form.
- Duplicating the record with few changes in the existing details.
- Filling in details in the lead creation form.
- Cloning the lead with few changes in the existing record.
- By default, the person who creates the lead owns it.
- To change owner, click the Change link in the Lead Owner field from the Lead Details page and select another user.
To create leads individually
- In the [Module] tab, click New [Module] . Alternatively, click
 .
. - In the Create Record page, enter the details. (Refer to the Standard Fields)
- Click Save.
To clone records
- Go to the desired module tab (e.g., Leads, Account, Contracts, etc).
- In the [Module] tab, click the specific record that is to be cloned.
- In the [Module] Details page, click Clone.
- In the Clone [Record] page, modify the required details.
- Click Save.
Import Records
It's
very possible that you are using different systems to gather important
business related data. In this case, it will be important to import the
records directly to your CRM system to avoid any kind of data
mismatch. For example, you may be purchasing records from external
sources, capturing product requests through Web sites, getting records
from a different business unit within the organization where there is a
chance of cross-selling products, or migrating data from your old system
to Zoho CRM. In all these cases, importing records enhances your
productivity. Zoho CRM provides you with two options:
- Importing data to individual modules in Zoho CRM: Individual files can be imported, one at a time, to a specific module.
- Migrating
data from other accounts to Zoho CRM: The migration wizard can be used
while migrating from another CRM and transferring huge amount of data to
Zoho CRM. See Also: Migrate Data
You can import records, if you are authorized to perform this operation. Otherwise, the Import records button in [Module] Home page will be hidden in your user interface.
See Also: Import Data
- The Import link is displayed only if you have the privilege to use the Import feature.
- Please contact your administrator in case these links are disabled.
- Before importing records, you must have the record details in a CSV/XLS file.
- Before importing the records, close the CSV/XLS file and the Spreadsheet program.
- Ensure that the CSV file does not contain any apostrophes (For example, ABC's).
Capture Records Using Web Forms
With web forms you can simplify the process of capturing visitors' or users' information from your company's website into your CRM system. This automates the data import from websites into Zoho CRM. Web forms are supported for the Leads, Contacts, Cases, and other Custom modules in your account. You can use a web form to conduct surveys, receive feedbacks, generate online sales, respond to customers' queries, and so on.
Benefits
Web forms can be used to:
- Capture data (visitors' information)
- Communicate with website visitors
- Conduct surveys
- Respond to user questions
- Generate online sales
- Receive online feedback
- When the email is sent to users within the organization, it is sent as a notification from the email address notifications@zohocrm.com.
Change Record's Owner
With the change record owner option, you can transfer the ownership of a record to another user. In addition, you can also transfer the ownership of the open activities, open contacts, or open deals that are associated with the record and owned by the record's owner.
Following are a few important points to note while changing the ownership of a record:
- Accounts: While changing a record's ownership in the Accounts module, you can choose to either change to the selected owner or retain the old owner for the open activities, open deals, or contacts associated with the record.
- Contacts: While changing a record's ownership in the Contacts module, you can either choose to change the ownership of the open activities or open deals associated with the record or retain the ownership, as it is.
- Other Modules (except the Activities module): If the record's ownership is changed you can also choose to change the owner of the associated open activities.
- Changing record's owner in automation rules: If you have configured an automation rule that will be triggered either by editing a record or by a field update, the trigger will be applied to the parent and the first-level child only. For instance, an account has an open deal and this deal is associated with a contact, so the rule (if any) will be triggered only for the account and the open deal. It will not be applied to the deal's contact. Please note that here automation rules are workflow rules, approval processes, blueprints, and scoring rules, and that automation execution is enabled only for Standard edition users.
- Changing owner when there is an association with the Contact: If an activity is created for a deal or account and is also associated with a contact, then the ownership of the activity can be changed when the ownership of the deal or account, or that of a contact, is changed.
- Changing Owner from Deleted or Deactivated Users: When the ownership of the record owned by a deleted or deactivated user is changed, the associated open activities, open deals, or contacts are automatically transferred to the new owner. There will be no option to retain the ownership of the associated records.
- Changing Owner in Parent-Child Relationship: When
the ownership of the parent record is changed the ownership of the
associated first-level and second-level child record will also change.
However, the Change Owner notification will not be shown for the
second-level child record. For instance, Zylker Corp. (parent account)
has an open deal (first-level child record) which also has a task
(second-level child record). On changing the ownership of the deal, the
task's owner will change as well.
- You need to have the Change Owner profile permission to use this feature.
- The
items related to the records in a module that should be transferred to
the corresponding user, depends on the permission that the user holds
for Events, Tasks, Calls. For example, If the user does not have
permission for Events, then they cannot be transferred whereas Open
Tasks and Open Calls can be transferred.
An alert will be displayed if the owner doesn't have the permission.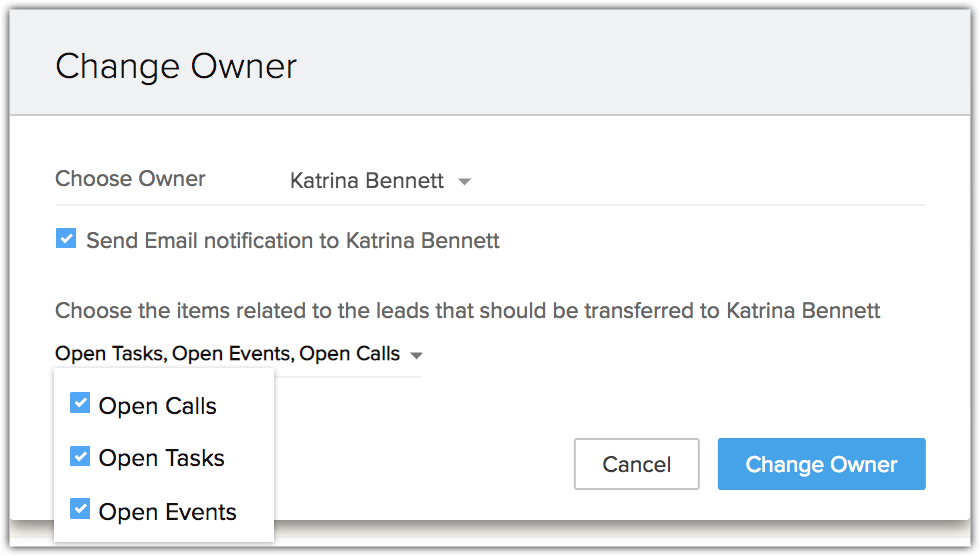
- Open calls is referred to scheduled and overdue calls only.
- You can transfer the ownership of the open activities, open contacts or open deals only if they are associated to the same record owner.
- If a user does not have the permission to view a module, their name will not be listed while changing the owner of a record.
- If a user does not have permission to access related records you will receive an alert while changing the owner of a record.
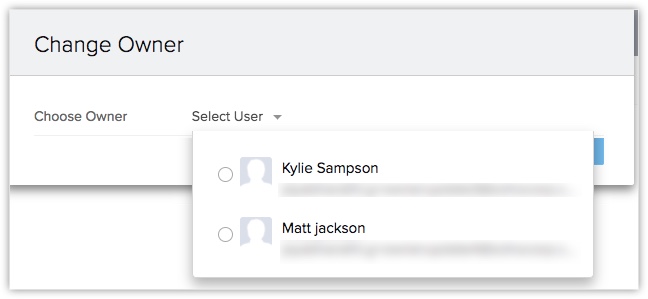
To change the owner of records individually
- Go to the desired module tab (e.g., Leads, Account, Contracts, etc).
- In the [Module] Home page, select the record.
- Click the
 Record Owner icon.
 - In the Change Owner notification, select a User from the drop-down list.
- Click the checkbox Open activities, Open tasks or Open Deals.
- Click Save.
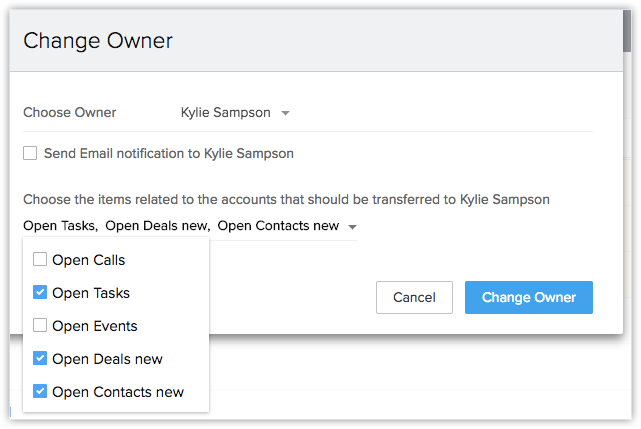
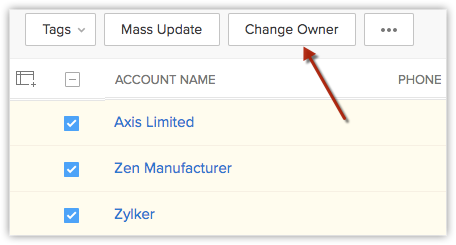
To change the owner of records in bulk
- Click the [Module] tab.
Module refers to Leads, Accounts, Contacts, etc. tabs. - In the [Module] Home page, select the required check boxes.
- Under the tabs in the top panel > select Change Owner.
- In the Change Owner page, select the new user from the Change Owner pick list.
- Click the checkbox of the associated related records.
- Click Change Owner.
- Record ownership will be changed to another user, irrespective of its existing owner.
- Use this operation carefully, otherwise records belonging to different users will be changed to new user.
- To overcome this problem, you may first search the records with a required owner name and then change the owner in bulk.
- The Change Owner option will not be available for the records for which you have Read Only permission.
Print Records
You can view the record details in printable form and print them using the browser’s print function. You can also print the list of records from the module's home page. While printing the record details, you can choose the template category from the email template, mail merge template, or inventory template in which you want to print the records.
To print record details
- Click the [Module] tab.
Module refers to Leads, Accounts, Contacts, etc. tabs. - In the [Module] Home page, click the required record that you want to print.
- In the Record Detail page, click MoreActions > Print Preview.
- Choose a Template Category from the list.
The chosen Email Template, Mail Merge Template or Inventory Template, as the case may be, appears for Print Preview.
- Click Print.
- You can also print the details using the Web browser's print function.
- Email Templates appears only if there are any email templates created for the module in question.
- The Mail MergeTemplates option is restricted to Leads, Contacts, Accounts and Deals.
- Inventory Templates are restricted to Inventory Modules.
- These additional Print options (Email, Mail Merge and Inventory templates) are available for all paid Zoho CRM accounts. For Free and Trial accounts, only the default print option is available.
To print list of records
- Click the [Module] tab.
Module refers to Leads, Accounts, Contacts, etc. tabs. - In the [Module] Home page, click the PrintView icon.
- In the Print Preview page, the system displays the list of records.
- Click Print Page.
Delete Records
Occasionally
you might want to remove some of the unnecessary records from Zoho CRM,
for better management of your data. You may also consider removing
records that are not useful for future reference.
To delete records individually
- Click the [Module] tab.
Module refers to Leads, Accounts, Contacts, etc. tabs. - In the [Module] Home page, select the record.
- In the Record Detail page, click Delete.
To delete records in bulk
- Click the [Module] tab.
Module refers to Leads, Accounts, Contacts, etc. tabs. - In the [Module] Home page, select the check boxes corresponding to the records.
- Click Delete.
- When you delete a record, all the associated child records including the notes and open/close activities will also be deleted. For example, if you delete an account, then all the contacts and deals associated with that account will also be deleted.
- The
deleted records are temporarily stored in the Recycle Bin for 60 days
from the date of deletion after which they are permanently deleted.
- Users with Administrator profile will have access to all the records in the Recycle Bin.
- Only the Administrator can delete the records from the Recycle Bin.
Restore Deleted Records
Records that are deleted individually or mass deleted are stored in the recycle bin for a temporary period of 60 days. You can restore the records within that period.
To restore deleted records
- Go to Setup > Data Administration > Recycle Bin.
- In the Recycle Bin page, select check box(es) of the records that you want to restore.
- Click Restore.
- Users with Administrator profile will be able to view all the records that are deleted.
Merge Duplicate Records
Over time, you may accumulate duplicate records. To better organize your records, you can search for duplicates and merge them. There are two features to merge duplicate records:
- Find and Merge Duplicate Records: Specify criteria to find duplicate records. There are six fields in each module in which you can specify the criteria.
- De-duplicate Records:
Search all duplicate records in a module based on a selected field's
value. You can choose any one of the four fields that are available
based on the selected module. See Also Merge Duplicate Records
Mass Transfer Records
This
feature allows you to transfer records from one user to another and
also select the open activities that should be transferred to the new
owner. You need to have the Mass Transfer profile permission for the individual modules to use this feature.
To transfer mass records
- Click the desired [Module] tab (e.g., Leads, Accounts, Contacts, etc.).
Module refers to Leads, Accounts, Contacts, etc. tabs. - In the [Module] Home page, click [Module] Tools > Mass Transfer [Module].
- In theMass Transfer [Module]page, do the following:
- In the Select New Owner section, click
 to select the owner's name for the Transfer From and Transfer To fields.
 - Specify the criteria.
- Click Search.
- Under Matching [records], select the check box(es).
- Click Transfer.
- In the Select New Owner section, click
Mass Delete Records
Using the mass delete option you can delete records in bulk. You need to have the Mass Delete profile permission for the individual modules to use this feature.
To delete mass records
- Click the desired [Module] tab (e.g., Leads, Accounts, Contacts, etc.).
- In the [Module] Home page, click [Module] Tools > Mass Delete [Module].
- In theMass Delete [Module]page, do the following:
- Specify the criteria.
- Click Search.
- Under Matching [records], select the check box(es).
- Click Delete.
- The records deleted in bulk will be temporarily available in Zoho CRM's Recycle Bin.
- To restore the data, select the records, and then click Restore.
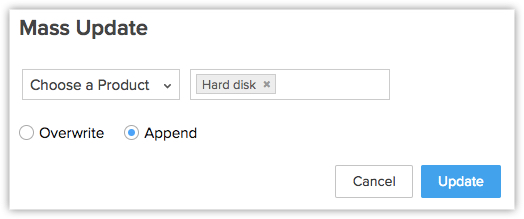
Mass Update Records
This feature allows you to update record details in bulk. You need to have the Mass Update profile permission for the individual modules to use this feature.
- You cannot update the Text Area and Lookup fields using the Mass Update feature.
- During Mass Update of multi-select fields, you can choose eitherOverwriteorAppendoptions.
- Overwrite - This is the default option in CRM. Choosing overwrite will replace the previous value with the new one.
- Append - The Append option will retain the previous value and add the new value.
To update mass records
- Click the [Module] tab (e.g., Leads, Accounts, Contacts, etc.).
- In the [Module] Home page, click [Module] Tools > Mass Update [Module].
- In theMass Update [Module]page, do the following:
- Specify the criteria.
- Click Search. The page displays the list of matching records.
- Under Matching [records], select the check box(es), and then click Mass Update.
- In the Select Field to Update page, select the field to be updated.
- Enter the corresponding data in the box.
- Click Save.
To update mass records from the list view
- Click the [Module] tab (e.g., Leads, Accounts, Contacts, etc.).
- In the [Module] Home page, select the check box(es) corresponding to the records that you want to update.
- Under More Actions, click Mass Update.
- In the Select field to update popup, choose the field that you want to update for the records.
- Specify the value for the field.
- Click Save.
Use Last Activity Time in Criteria
Apart
from editing a record, there are various other activities associated
with records. For example, adding a note, closing a task, sending emails
etc. The last updated time of such activities is captured in each
record as Last Update: Time (only in the Leads, Accounts,
Contacts and Deals modules). The information in this field can be used
in the criteria for List View and Reports, to filter out records that
did not have any activity for a specific period of time or those records
that had recent activities.
- This option is supported only for the Leads, Accounts, Contacts and Deals modules.
- The Last Activity Time under list view criteria and the Last Update time in the Record Details page are the same.
The activities and updates that will be recorded as Last Activity time:
- Editing fields in a record
- Adding and updating activities, i.e. Tasks, Events, Calls
- Sending emails to leads and contacts
- Adding and editing notes
- Adding deals and contacts under an account
- Changing the owner of the record
- Adding or deleting a record
(This does not include deleting a record associated with a parent record.) - Closing a task
(This does not apply to events as they are automatically moved under Closed Activities after the end data/time.) - Deleting and restoring records (individually or in bulk).
Activities and updates that will NOT be recorded as Last Activity time:
- Mass operations like Mass Update, Mass Transfer, etc.
(except for Mass Delete option.) - Editing contacts or deals under an account will not be listed.
- Deleting related lists under a record.
Related Articles
Common Operations with records
Record Navigation Navigation primarily means the process of moving back and forth within the records. In Zoho CRM, navigation allows easy movement between the records; it provides options to choose the number of records to be displayed in one page ...Common Operations
Navigate Records Navigate primarily means the process of moving back and forth within the records. Navigation in Zoho Recruit allows easy movement between records; provides options to choose the number of records to be displayed in one page; and ...Common Functions
Navigate Records Navigate primarily means the process of moving back and forth within the records. Navigation in Zoho Workerly allows easy movement between records; provides options to choose the number of records to be displayed in one page; and ...How do I add common Terms and Conditions for the Inventory records?
Some orgs use common set of guidelines and terms of service for every service or product they sell. It will be logical to set a common value in the Terms and Conditions field that applies across the organization. To set common value for the terms and ...Other file operations
You can perform lot of actions on your files. Simply right click on the file to open up more options. Add tag Navigate to the file that you wish to add a tag. Right click on the file and select Add tag. Add necessary keywords in the text box. ...