Consent Management
Zoho CRM's consent management settings helps you get consent from your prospects and customers. We provide a system where you can customize the consent form, include it in your email templates, set consent related preferences, and most importantly, get assistance in keeping track of consent details.
Consent can be applied to records in the Contacts, Leads, Vendors, and custom modules. Upon enabling GDPR Compliance Settings in Zoho CRM, you can start marking lawful basis for data processing and get the essential consent as the case may be.
You will begin by marking the records whose data needs to be processed after obtaining consent. Next, customize the consent form and include its link in the email template. This email template can be used to send email to the data subjects that you require consent from. Later, the consent status can be tracked for individual records and records in bulk.
Understanding Consent Management in Zoho CRM
Best Practices for Consent Management
- Inform the data subjects on the purpose of consent and data processing.
- If you deviate from the original purpose of data processing for which you received consent, then you will need to get consent from the data subjects again.
- Make sure to keep your consent requests separate from any other terms and conditions.
- Do not use pre-ticked checkboxes or any other options selected by default in your consent forms. Consent should be a deliberate action by the data subjects to opt in.
- The consent request or form should contain details about who is collecting the consent (data controller), where the data is processed (data processor), and where the data is being shared.
- Maintain a proper record of the consent collected. This is important in order to demonstrate that the data subject has given proper consent to process data.
- Avoid usage of technical terms and legal jargons while getting consent. Keep your message clear and simple.
- Make a point of refreshing consent at regular intervals.
Ways to get consent
There are a few ways that you can get consent from the data subjects.
- Consent form - The consent form available in Zoho CRM can be customized with various fields that ask for communication preferences, consent statements by the data subjects, etc. The link to this form can be used in email templates and sent to get consent.
You can send individual emails from a record, or mass email to a list of records. - Update manually - When you get consent during a call or in person, you can update it manually in the Data Privacy section of a record.
- Via portal - Data subjects who have access to the Zoho CRM portal, can update their consent from the portal.
Stages in Consent Management
There are three stages that you can track in Zoho CRM with respect to consent as the lawful basis for processing data. Please note that primary email field is used to update the consent status in all the similar records that have the same email address as the primary one in your Zoho CRM account. For example, you get consent from a lead, and when you convert the lead, the created contact will be updated with the consent status.
- Pending - When the request for consent is not sent to the data subjects.
- Waiting - When the consent form has been sent and you are waiting for a reply.
- Obtained - When you have received consent from the data subject.
- Not Responded - When you have not received consent from the data subject within the waiting period defined in the Consent Settings.
Dashboard to view the status of the consent.
From Setup > Users and Control > Compliance Settings > Overview, you can view the records that fall under each consent status - Pending, Waiting, and Obtained. You can click on a status to view the records and perform the necessary actions such as sending consent email to the selected records, updating the data processing basis, etc.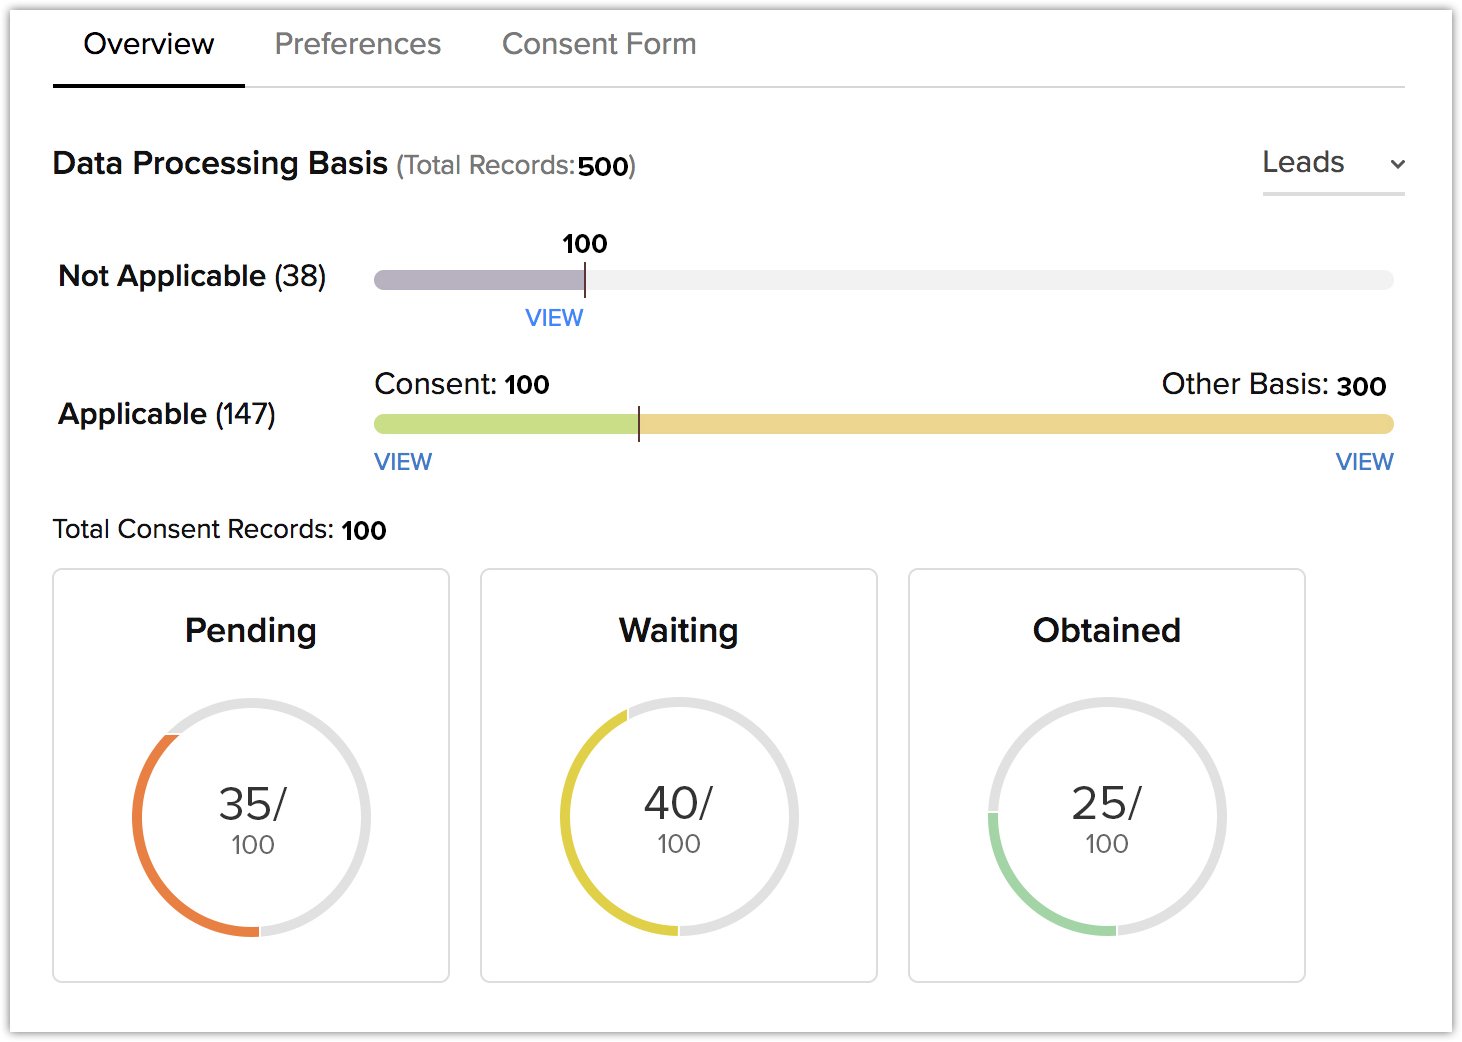
Define Consent Settings
Consent Settings helps you define two things:
- A waiting period to get consent: You a define a time within which you need to get a reply from the data subjects regarding the consent request. This could be in days or months. When you do not get consent within the specified time, the consent status is marked as Not Responded and is automatically locked. Data from these records will not be processed.
- Restrict actions for the records: During this waiting period, when the controller is waiting for a response from the data subjects you can decide what needs to be done with the records. The options include - processing data as usual, stopping data processing, restricting certain actions for the records such as, emailing, calling, editing, etc.
To define consent settings
- Click Setup > Users and Control > Compliance Settings > Preferences.
- Under Consent Settings section, do the following:
- Waiting Period - Select the period in Days or Months.
After this waiting period is over, the consent status is updated as Not Responded.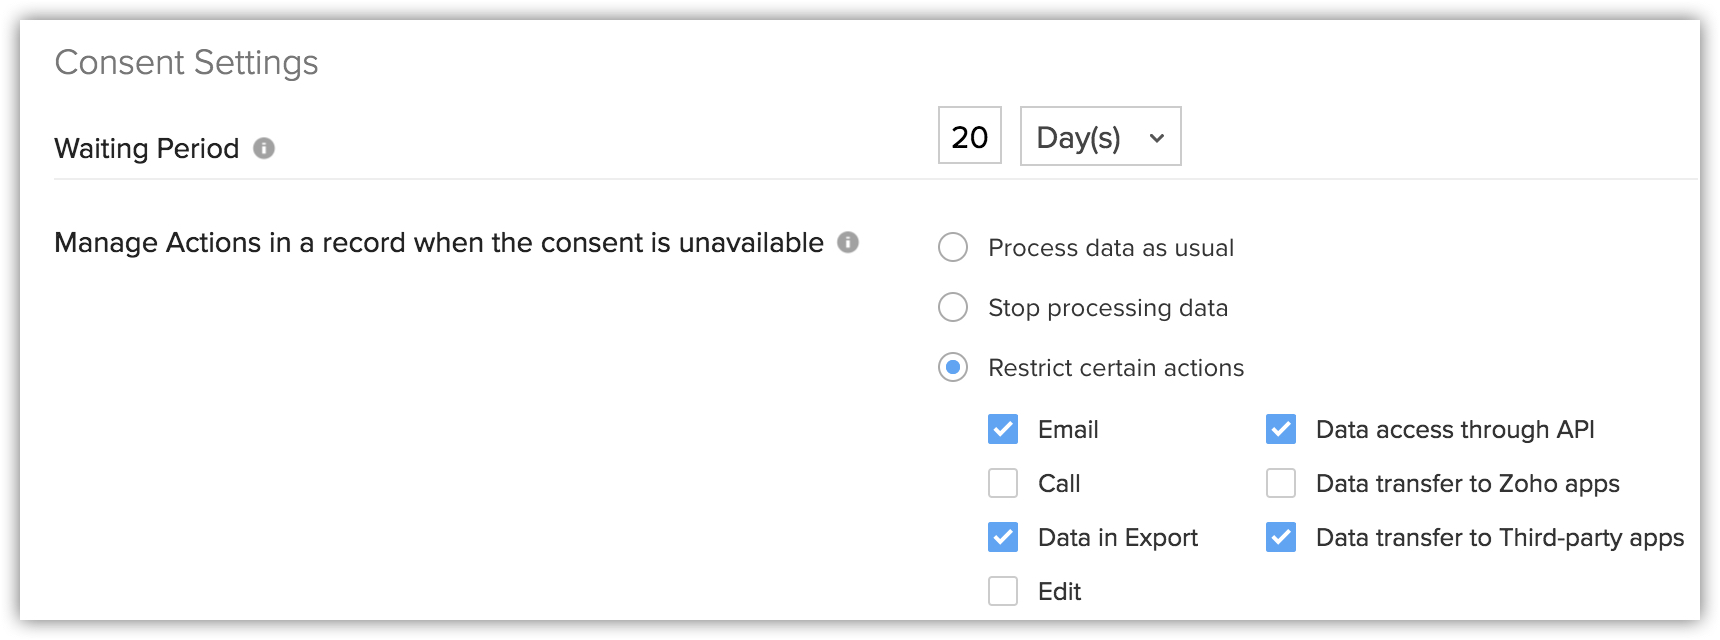
- Manage Actions in a record when the consent is unavailable - Select one of the following:
- Process data as usual - You can continue to work with the records as usual.
- Stop processing data - The records will be locked and data form the record will not be processed.
- Restrain certain actions - Select the actions that needs to be restricted when the consent is yet to be received.
- Process data as usual - You can continue to work with the records as usual.
- Waiting Period - Select the period in Days or Months.
- Click Save.
Set Up Consent Form
The consent form can be customized and it allows controllers to state the explicit details for which they are obtaining consent. The following can be added in the form:
- The purpose of data collection.
- Preferred communication channel.
To set up the consent form
- Click Setup > Users and Control > Compliance Settings.
- In the Compliance Settings page, click the Consent Form sub tab.
- Select the Language that you want your data subjects to view the form in.
- Under the Consent Portal, do the following to customize the form:
- Add relevant text to state the purpose of using their personal data and why you are getting consent.
- For the Communication Preferences, specify a short description. For example: Allow us to contact you through:
- Click the Show/Hide links for the corresponding options (Email, Phone, Survey) to make them visible/hidden in the form.
Based on the selection, the option to send emails, make calls or send surveys will be disabled for the corresponding records.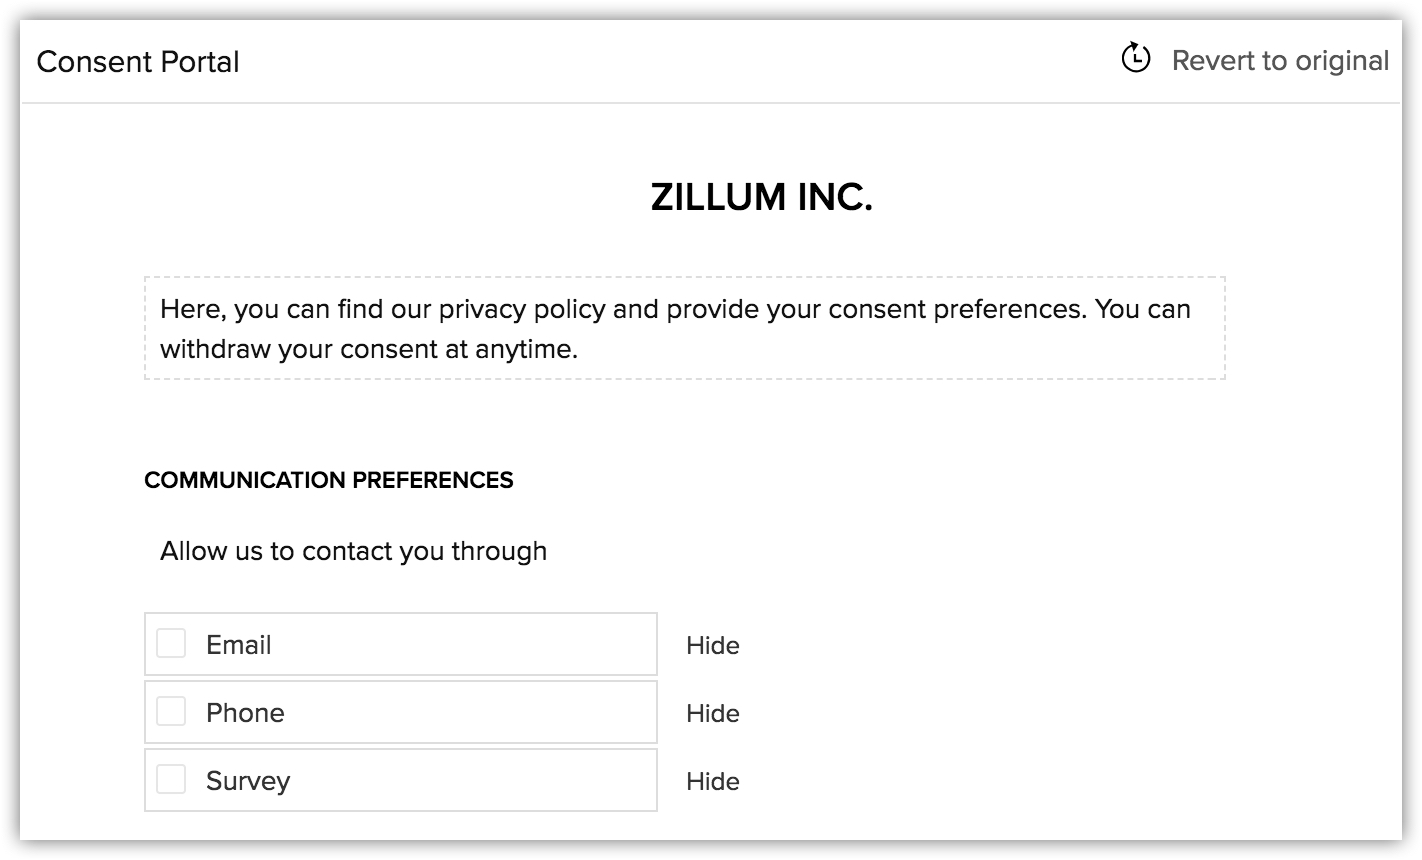
- For Consent Statement, add a message that asks the data subjects to provide remarks, if any.
- Add your Privacy Statement in the text box.
- Specify any additional text before the Submit button in the form.
- Add relevant text to state the purpose of using their personal data and why you are getting consent.
- Click Preview to check the form, then click Save.

- When consent is collected and the data subject agrees to receive communication only via emails and not through calls, it is automatically restricted in Zoho CRM. The call icon next to the phone number will be disabled. Similarly, Say if Dan, your customer, wishes to be contacted only through calls, then the Send Email button will be disabled. Emails will not be send through any channel such as sending email from list views, using mass email option, workflows, etc.
- Likewise, if Dan prefers not to be contacted through surveys, the Insert Survey link in the email composer will be disabled. Also, the Send Survey option under the Related list will not be available. From the list view, when you send an email using a template that has a survey link, the email will not be sent Don. The alert message will list out the reasons for not sending emails.
- Portal users can update the consent details from their Zoho CRM Portal. The portal user can also update the consent details of the Leads/Contacts that they add. See Also Data Privacy for Portal Users
Add Consent Link in an Email Template
To make sure that the data collected is only used for the purpose stated by the controller and to ensure privacy and security of the data collected, Zoho CRM has provided multiple options. There are two ways these consents can be collected:
- You can send an email asking data subjects to fill in the consent form and mention their preferences.
- You can obtain the consent via a call or any other means and update it in your CRM account.
The consent form's link can be added:
- in an email template and used to send emails.
- while composing an email that is being sent to an individual.
To add the consent link in an email template
- Go to Setup > Customization > Templates > Email.
- Click + New Template.
You can also add the link to your existing email templates. - Select the module that the email template has to be created for from the drop-down list and click Next.
- Choose the Blank template or one of the existing templates from the gallery and customize it.
- Drag and drop all the required components from the All Components section onto the template and customize it as needed.
- Select an appropriate line of text and click the Create Link icon from the editor.

- In the Add Link popup, select Consent form link.
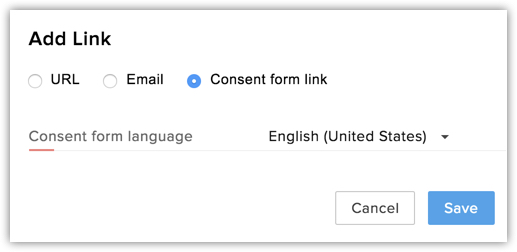
- Select the Consent form language form the drop-down list.
- Click Save.
- In the Add Link popup, select Consent form link.
- Customize the template and Save it to the appropriate folder. See Also Email Templates
To add the consent link in an email
- Select a record to send the consent form's link.
- In the Record's Details page, click Send Email.
- Draft your email in the email composer window.
- Select a word or phrase that should have the link to the form.
- Click the Link icon and then select the Consent Form icon.
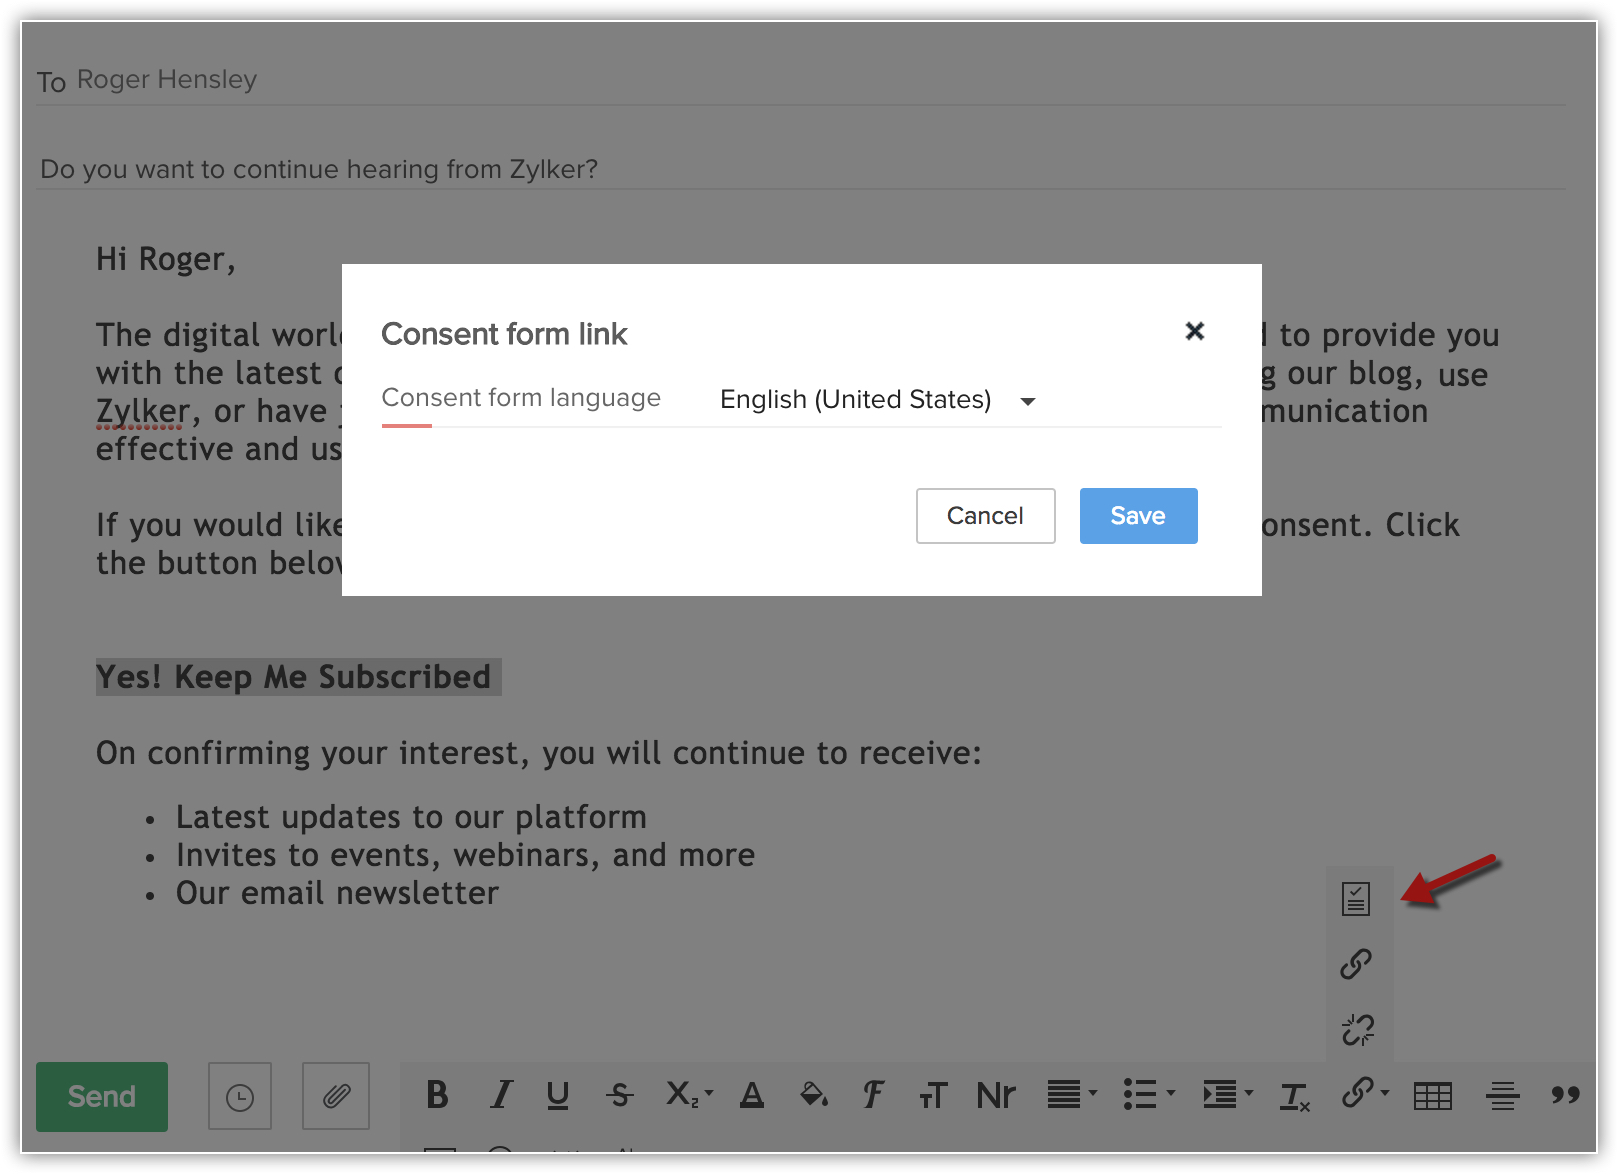
- In the pop-up, select the Consent Form Language from the drop-down list and click Save.
- Click Send.
To update the consent details manually
- Click open the data subjects record in your CRM account.
The record could be in the Leads, Contacts, Vendors or any other custom module for which GDPR Compliance is enabled. - Click Data Privacy.
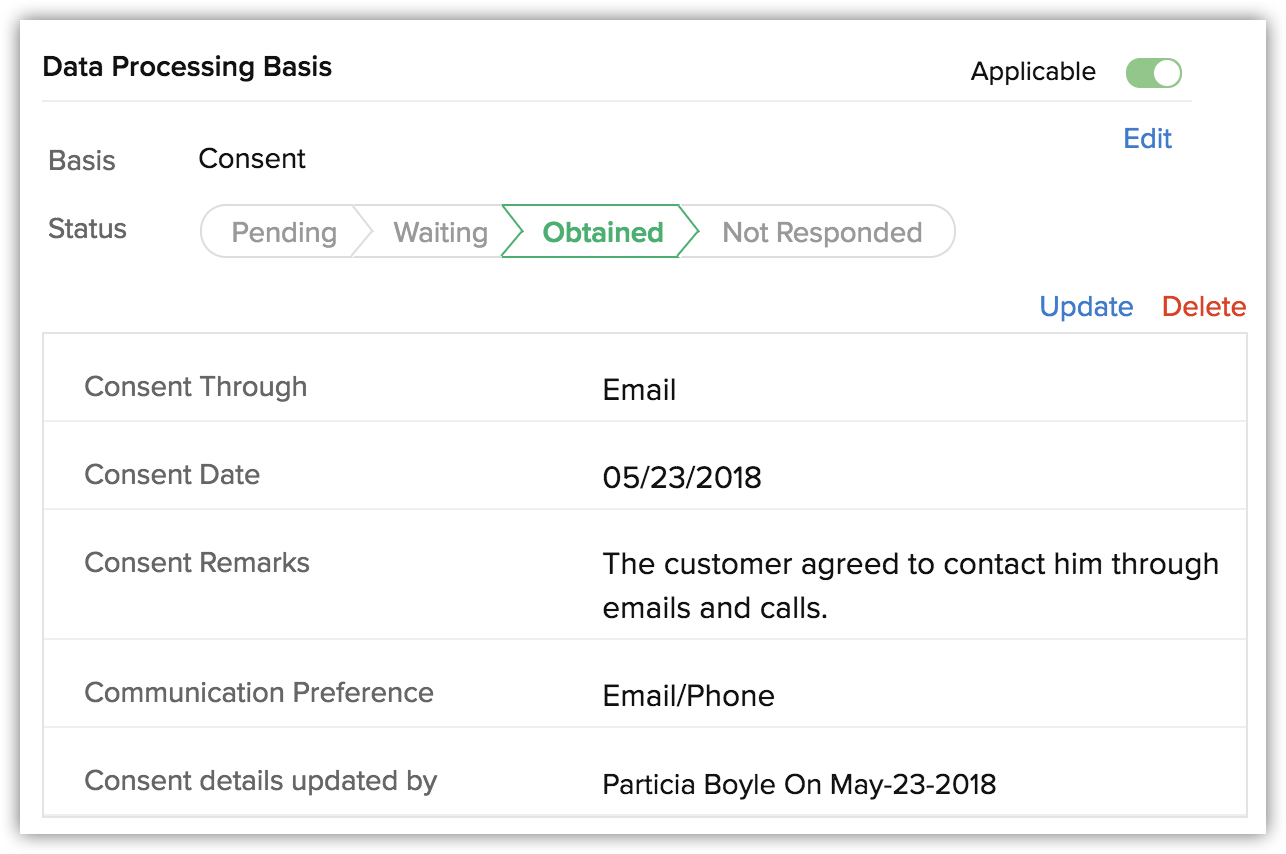
- Under Consent Details, mark the Data Processing Basis as Applicable and select Consent from the drop-down list.
- Under the Pending status, click the Update consent details link.
- In the Update Consent Details popup, do the following:
- Select Email or Call, to maintain a record of how you received the consent.
- In the Consent Date field, specify the date when you got the consent.
- Add Consent Remarks, if any.
- Select from the list of Communication Preferences mentioned by the data subject.
- Click Save.
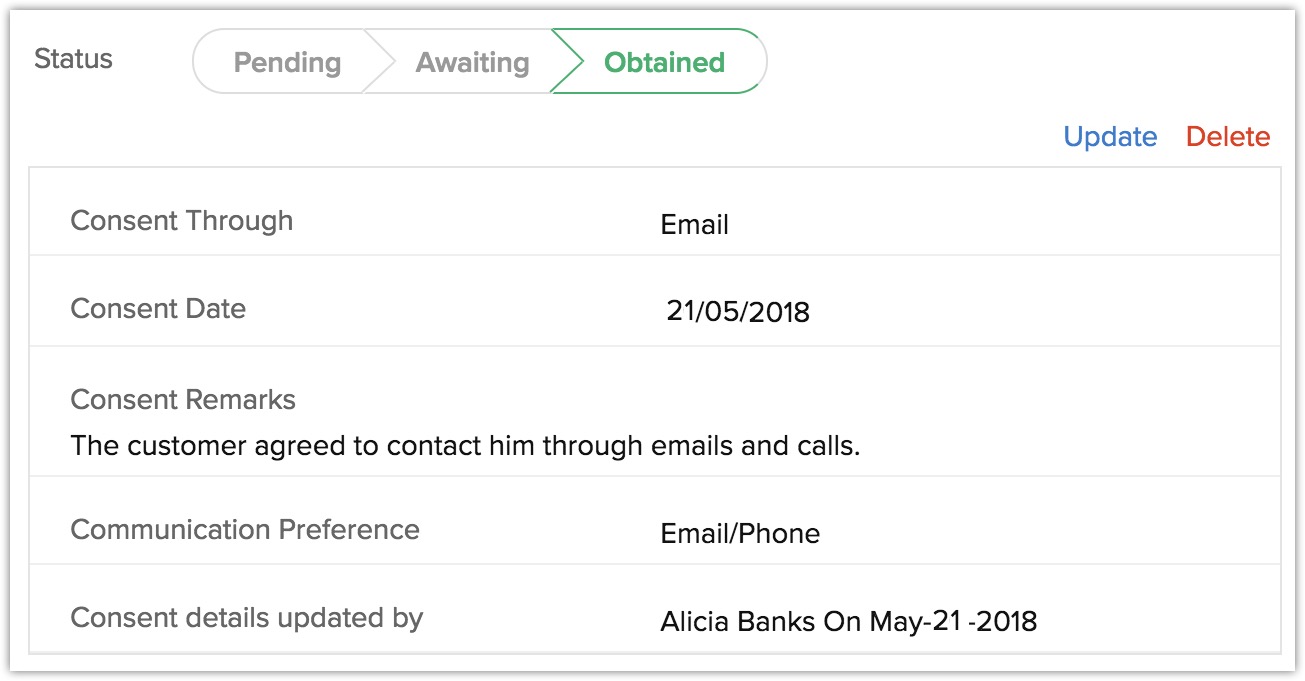
- Select Email or Call, to maintain a record of how you received the consent.
View status of consent request
To view the status of the consent request
- Click Setup > Users and Control > Compliance Settings > Overview.
Under Data Processing Basis, the various consent statuses are listed. - Select a module from the drop-down list for which you want to check the status of the consent.
- Click on a status to view the records that fall under that category.
For records under pending status, you can select the records and send consent form or update the data processing basis.
Implement Consent Management for your Customers
Before implementing consent management for your business, you need to understand the three categories of data subjects here.
- Customer from whom you do not need to get consent.
- Existing customers from whom you need to get consent.
- New customers from whom you need to get consent.
I. Customer from whom you do not need to get consent.
As per your discretion and business cases, data subjects whose personal data will be processed under lawful bases other than consent needs to be filtered out first. Here is how:
- Create a list view that filters out these records. See Also Managing List Views
- Select record in the list view.
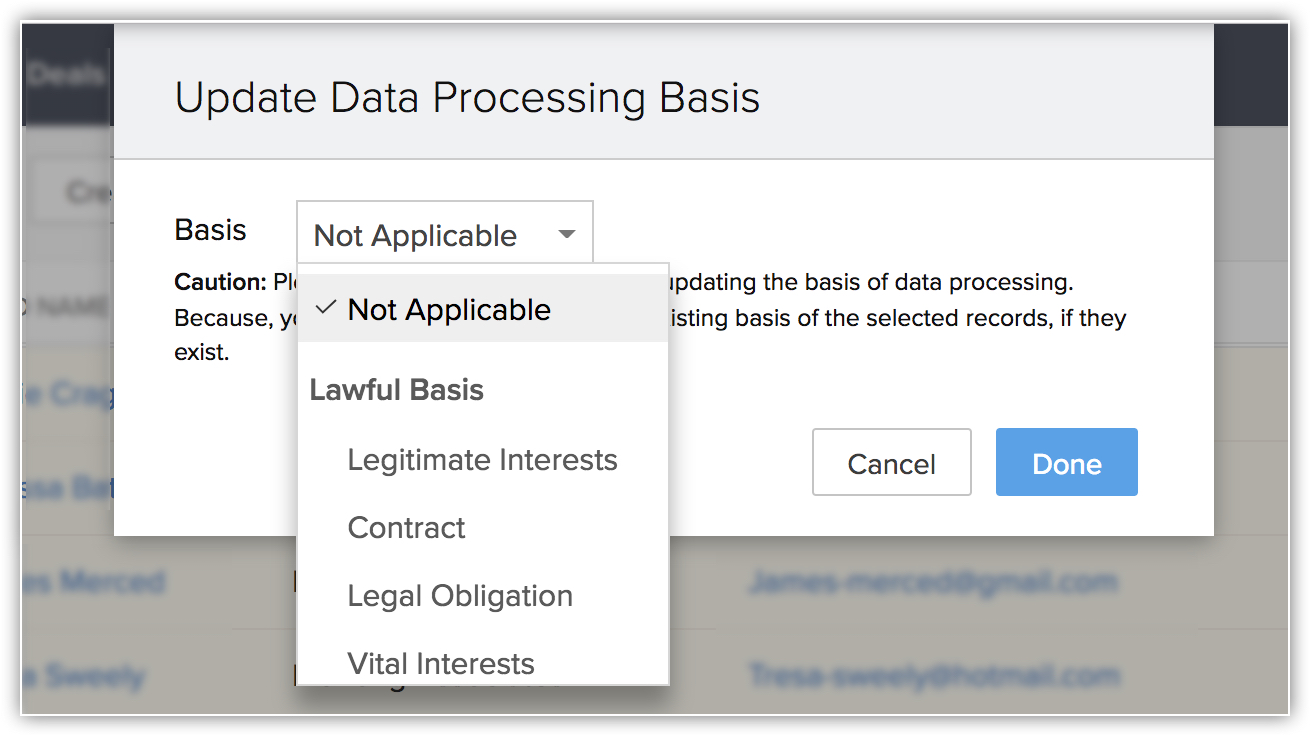
- Click the More icon, and then click Update Data Processing Basis.
- Apply the data processing basis as Not Required, or any one of the bases other than Consent.
II. Existing customers from whom you need to get consent.
For your existing customers or other data subjects in your CRM account, you can get consent by using the consent form in Zoho CRM.
- Customize the consent form.
- Create an email template with the consent form link.
- Create a list view that filters out the new record that you want to send the consent email to. See Also Managing List Views
- Select the records from the list view and use the Send email option.
- Choose the template with the consent form's link and send it to the selected data subjects.
III. New customers that you need to get consent from.
For new customers or other data subjects you can be prepared by creating an email template containing the consent form's link.
- Customize the consent form.
- Create an email template with the consent form link.
- Use the email template to send emails from list view, and workflow rules.
Related Articles
Consent Management
Zoho Recruit's consent management settings helps you get consent from your data subjects by providing a system where you can customize the consent form, include it in your email templates, set consent related preferences, and most importantly, get ...Manage Consent
We aim to protect individuals from spam that has been sent through any mode of communication. As an email marketing service, we ensure that all our users get permission from their leads before sending emails. Zoho MarketingHub's Manage ...Mailing list management
List management is a macro level to deal with contacts and take actions on them at your convenience. This provides a detail view of contacts with respect to mailing lists. Create list Once you create your Zoho Campaigns account, you'll be redirected ...Get Consent
We aim to protect individuals from spam that has been sent through any form of electronic communication. As an email marketing service, we ensure that all our users get permission from their contacts before sending emails. You can select 1 out of the ...Creating a consent email
Creating a consent email for your leads allows you to get their permission before sending out newsletters about your business or product. This is a two step process: There are two types of consent email that you can send: Recurring consent email: ...