Converting Leads
Convert Leads to Other Sales Records
When there is a chance for further negotiations with a lead, it can be converted into an account, contact, and finally a deal. In short, once the lead status has reached a certain stage, it can be qualified as a deal. On conversion, a lead is converted to an account and contact and then, if appropriate, a deal can be created upon conversion. You can map the lead fields with those of the account, contact, and deals so that the details are transferred to the appropriate fields. See Also Map Fields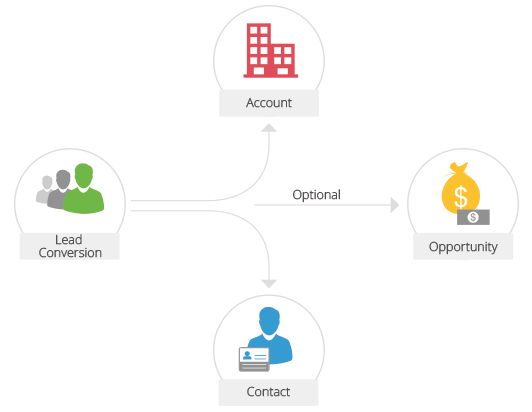

- When a lead is converted, it cannot be reverted.
- An account will be created on lead conversion if the Company Name detail is available for the lead.
Users with the Convert Leads permission in profile can access this feature.
When converting a lead to a deal, first a new account and contact are created with the relevant lead data, and then a new deal is created. The following table provides descriptions of various fields converted to an account, contact, and deal during lead conversion. If you have custom fields, you can map them too. See Also Map Fields
| Lead Field | Converted To |
| Salutation | Contact: Salutation |
| First Name | Contact Name |
| Last Name | Contact Name |
| Company | Account: Name Contact : Name |
| Designation | Contact: Title |
| Lead Source | Deal: Lead Source Contact: Lead Source |
| Industry | Account: Industry |
| Annual Revenue | Account: Annual Revenue |
| Assigned To | Account, Contact, Deal: Assigned To |
| Phone | Account: Phone Contact: Phone |
| Mobile | Contact: Mobile |
| Fax | Account: Fax Contact: Fax |
| Email | Contact: Email |
| Skype ID | Contact: Skype ID |
| Web site | Account: Web site |
| Lead Status | User should specify the Deal Stage while converting the lead. |
| Rating | Deal: Rating |
| No of Employees | Account: No. of Employees |
| Email Opt Out | Contact: Email Opt Out |
| Street | Account: Street Contact: Street |
| City | Account: City Contact: City |
| State | Account: State Contact: State |
| Postal Code | Account: Postal Code Contact: Postal Code |
| Country | Account: Country Contact: Country |
| Custom Fields | Users can map their own custom field. |
To convert leads to other sales records
- Click the Leads tab.
- In the Leads Home page, select the lead to be converted.
- In the Lead Details page, click Convert.

- In the Lead Conversion page, choose the appropriate account/contact option.The options to create an account/contact or add to the existing account/contact will be available based on different use cases. (Refer to the table)
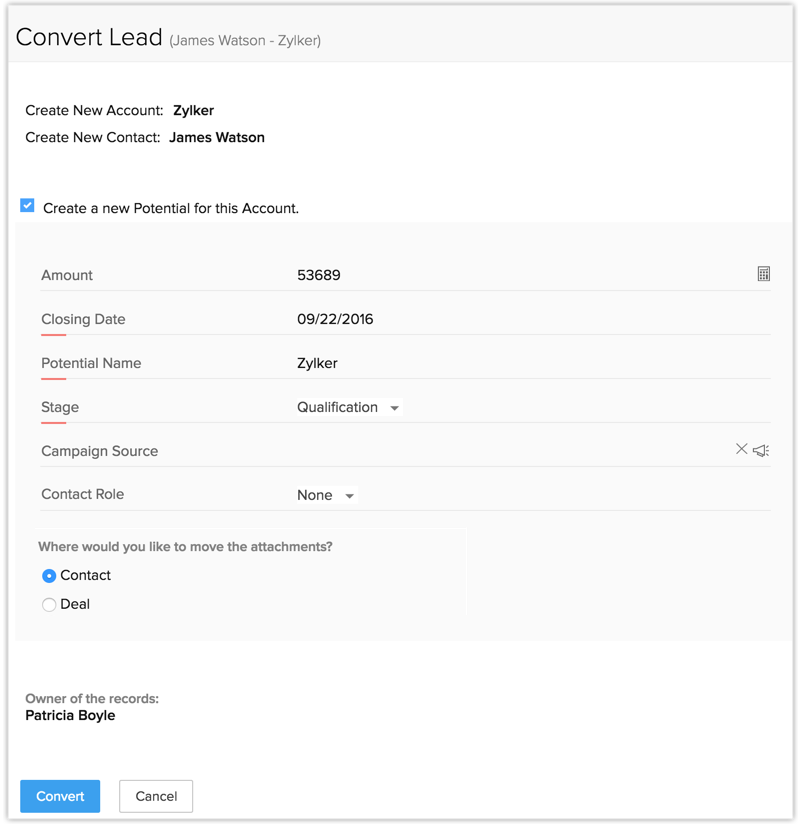
- Select Create a new Deal for this Account/Contact checkbox if you want to create a deal on lead conversion.All the mandatory fields for the Deals module will be listed.
- Specify the Deal Name.By default, the Company Name will be populated as the deal name.
- Specify the Deal Closing Date or select the date from the calendar displayed.
- Select the Deal Stage from the drop-down list.
- Select the Contact Role from the drop-down list.
- Enter the Amount.
- Choose the Campaign Source from the lookup.Note that only the campaigns associated to the lead will be listed. You can associate one campaign which qualified the lead. This details for this campaign source will be available in the deal.
- Select the Owner of the record.This option will be available only if a new record is created.
- Click Convert.
- All the mandatory fields available for the Deals module will be listed during lead conversion. An exception to this is when you have created page layouts. If you have created multiple page layouts, upon conversion of leads via workflow or mass convert, you will see only the mandatory fields of Deals - Deals Name, Closing Date and Stage.
- When the Email Address Duplication Check is enabled, you will not be able to convert a lead, if the following conditions are true.
- Lead is assigned to a User A and User B tries to convert it.
- User B is a subordinate to User A in the organization's hierarchy.
- There are duplicates available for the record.
- During lead conversion, the values from Leads module to Contacts module will be transferred only if the fields in the contact module are empty.
Scenarios - Convert Leads
Here is an example that will help you understand the different scenarios. Let us take for example a lead with the following details:
- Lead Name - Charles Stone
- Company Name - Zylker Inc.
- Email Address - charles.s@zylker.com
| Various scenarios | If Account/Contact already exists in CRM | If Account/Contact does not exist in CRM |
Lead Name: Available Company: Available Email Address: Available | Use Case 1 If the email address matches with an existing contact then
Use Case 2 If there is no contact with the matching email address, the system will search for accounts with a matching company name. If the company name matches an existing account, then:
Use Case 3 If Case 2 is not satisfied and there is no account with the matching company name, the system will search for contacts with a matching lead name. If the lead name matches an existing contact, then:
| A new account and a new contact will be created. |
Lead Name: Available Company: Not Available Email Address: Not Available | Options:
| A new contact will be created |
Lead Name: Available Company: Available Email Address: Not Available | Options:
| A new account and a new contact will be created. The contact will be associated to the account. |
Lead Name: Available Company: Not Available Email Address: Available | Options:
| A new contact will be created |
Map Fields
When a lead is converted into an account, contact, and deal, the lead's field values are transferred to the mapped account, contact, and deal fields. Only when the fields are accurately mapped with those of the corresponding modules, will the data be transferred properly.
By default, the standard fields are mapped with the corresponding fields of the other modules (Accounts, Contacts, and Deals). With the lead conversion mapping tool, you can easily map other fields that you create. Please note that you need to map a field with a similar type of field as well as field length only. For example,
- A text field should be mapped only with a text field
- A picklist field should be mapped only with a similar type of picklist field.
- A single line field of 255 characters can be mapped only with another text field of 255 characters or greater.
To map lead fields with other modules
- Go to Setup > Customization > Modules and Fields.
- From the List of modules, select the Leads module.
- Click the Module Settings icon > Lead Conversion Mapping.
- In the Map Fields for Leads Conversion page, the fields are listed under the Lead Fields column. Fields under corresponding modules (Accounts, Contacts and Deals) are also present.
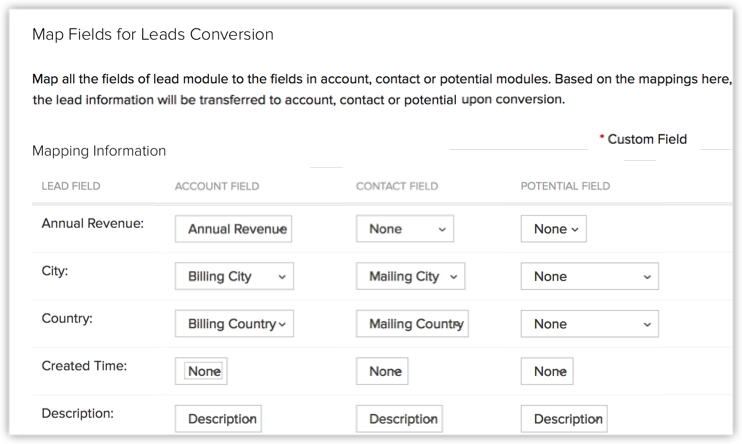
- Map the lead fields to the corresponding fields of Accounts, Contacts and Deals.
- Click Save.
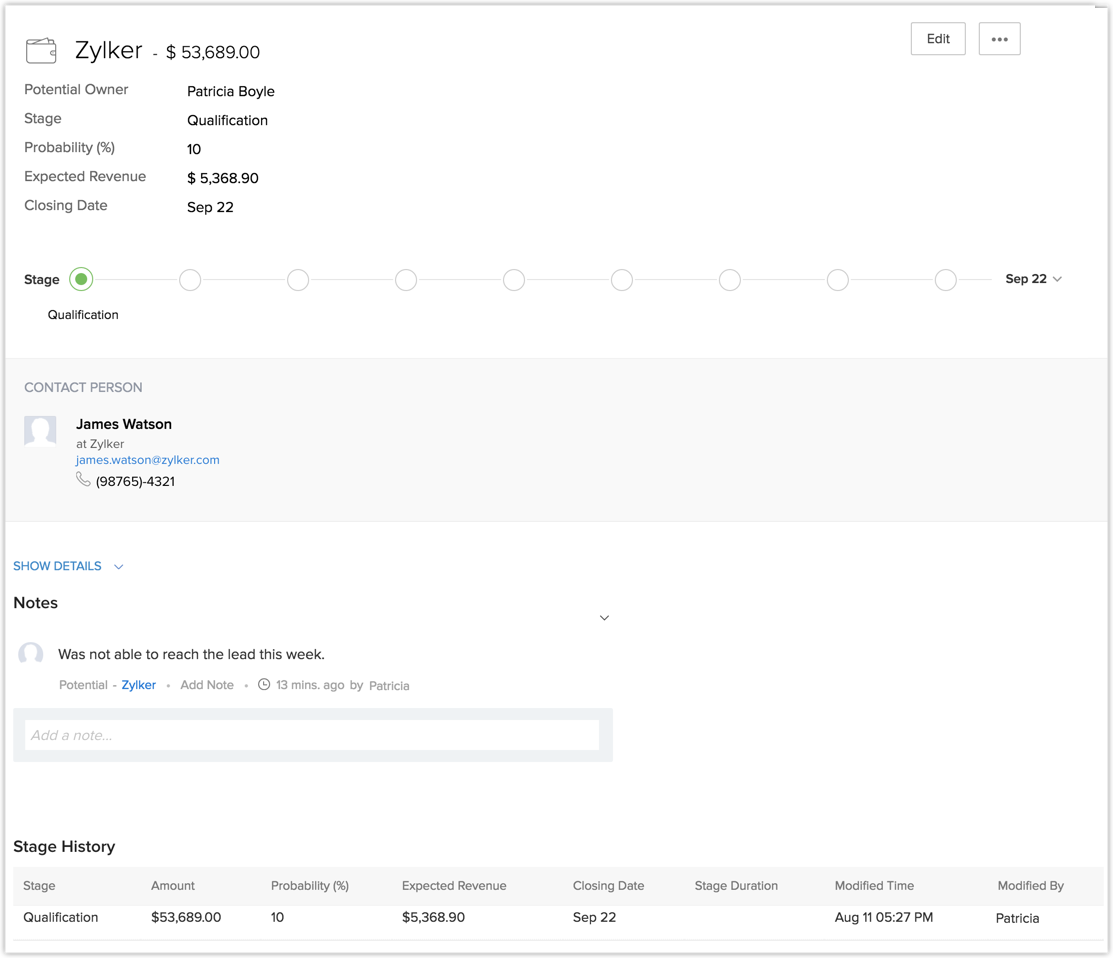
- During lead conversion, if you choose to create a deal, the notes added to the lead will automatically be moved to the corresponding deal. A copy of the notes will also be shown in the relevant account and contact. If you do not create a deal during lead conversion, then the notes will be available only in the corresponding contact.
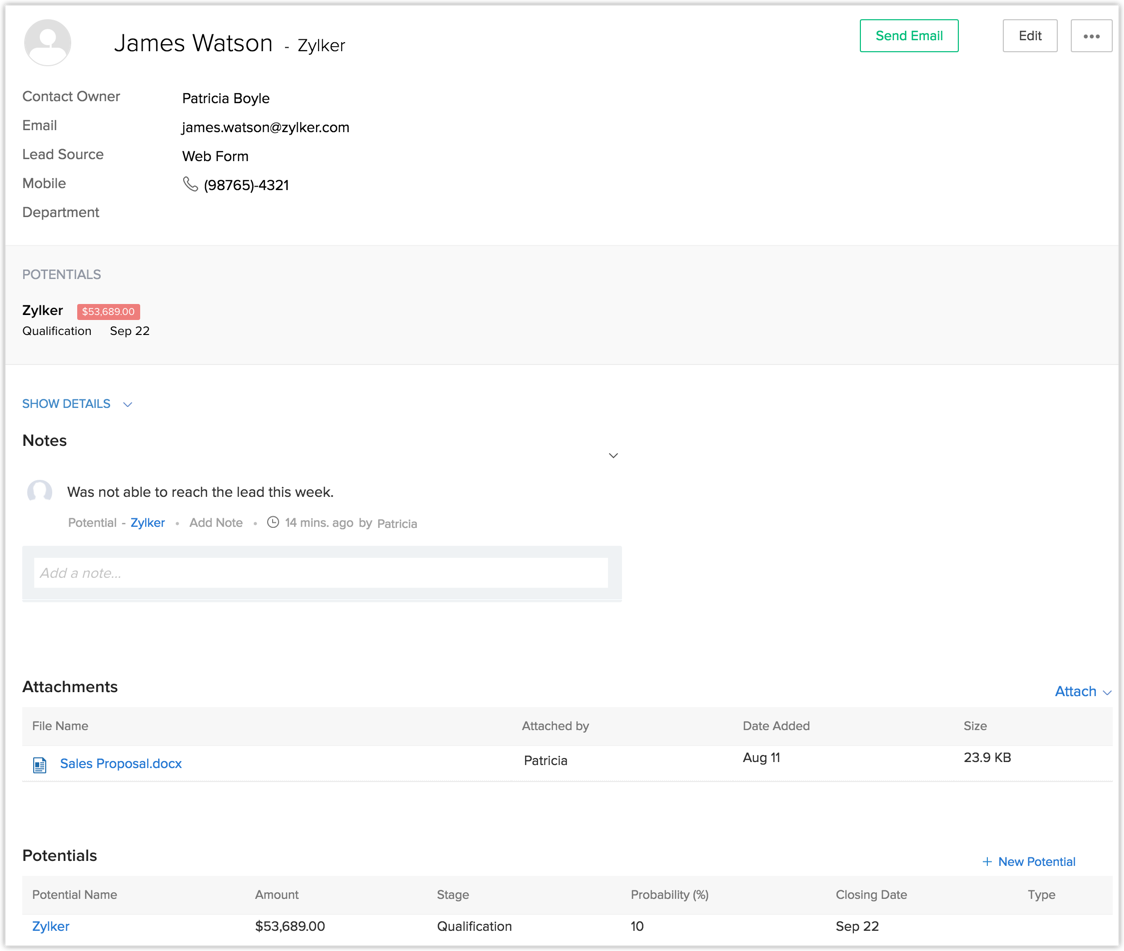
- When converting a lead, you have the choice of selecting where you want its attachments to be moved. They can be moved either to a contact or a deal that is created. If a deal is not being created, then the attachments will be automatically moved to the contact.
Map fields based on page layouts
If you have created multiple layouts for a module, you can enable conversion of leads across layouts.
To map fields based on page layouts
- Go to Setup > Customization > Modules and Fields.
- From the List of modules, select the Leads module.
- Click the Module Settings icon > Lead Conversion Mapping.
- In the Map Fields for Leads Conversion page, choose the desired layout under the Leads module.By default, the fields of the Standard layout of Leads, Contacts, Accounts and Deals are displayed
- Choose the corresponding layout under Contacts/Accounts/Deals as required.
- For each field under Leads, map the corresponding field under Contacts/Accounts/Deals from the dropdown lists.
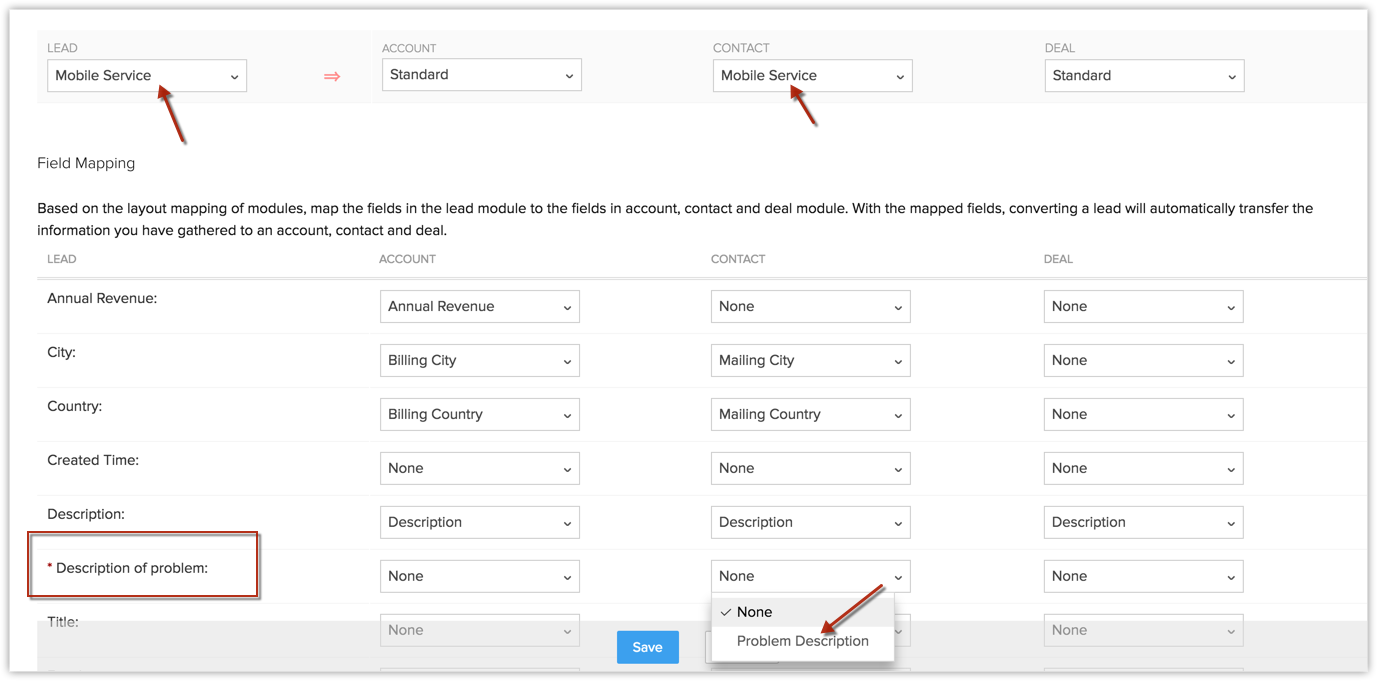
- Click Save.
- By default, the fields from Leads are mapped to the Standard layout of other modules.
- Upon account downgrade, layout based conversion will not happen as the layouts will no longer exist. However, immediately after downgrade the mapping settings will remain intact until you edit the settings.
- When you attempt to deactivate/delete a layout that has been associated in lead conversion mapping, you will be prompted to remove the layout from the mapping settings before you can deactivate/delete it.
- When page layouts have been enabled, if you select the Also Create for Contacts/Accounts/Deals checkbox while creating a custom field for Leads, the auto-mapping of custom fields will not take place.
- For every field under Leads, the corresponding fields under Accounts/Contacts/Deals will not be displayed in the dropdown list for mapping, if their field types and field length do not match.
Mapping fields in Subforms
- A number data type field can be mapped with another number data type field in the subform of other module.
- A lookup field can be mapped with a similar lookup field.
- The fields can be mapped when leads are converted,
- One at a time
- Through API
- By workflow rules
- Field mapping will not be carried out when records are converted in bulk (Mass Convert).
- In the Lead Conversion Mapping page, go to the Subform Field Mapping section. The subform and the list of fields will be displayed.
- In the first row, select a subform from the drop-down list.
All the subforms present in the Accounts, Contacts, and Deals modules will be listed. - Map the fields with the suitable fields from the Accounts, Contacts, and Deals.
- Click Save.
Close Leads Without Converting
Based on your business requirements, you may want to close the leads instead of converting them. In such a case, you can do the following:
- Add a custom value (Closed) for the Lead Status field.
- Change the Lead Status to Closed.
- Create a List View to filter all the leads that are closed.
By default, some industry standard pick list values are available in the Lead Status field. You can modify the pick list values as per your organization's business process and replace the existing value with new value.
To add a pick list value
- Log in to Zoho CRM with Administrator privileges.
- Go to Setup > Customization > Modules.
- From the List of modules, select Leads.
- In the Lead Status pick list field, select the Field Settings icon and select Edit Properties.
- In the Pick List Properties popup, click the Add (+) icon beside a value to add a new value below it.
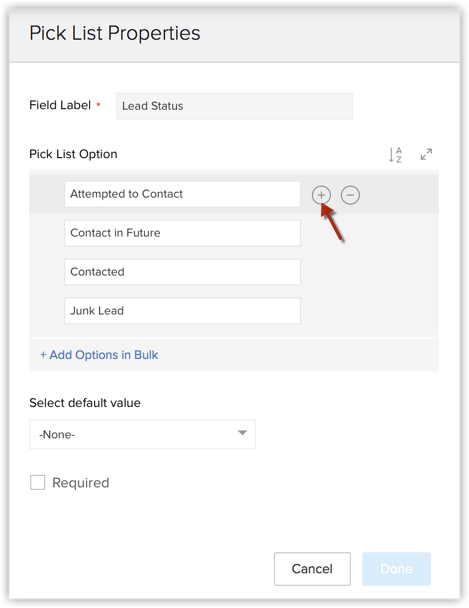
- In the Add New Value box, specify Closed.
- Click Done.
- Click Save Layout.
Convert Leads in Bulk
Mass conversion of leads is also possible in the Leads module by selecting multiple records from the list view to convert. You can also use the Mass Convert [Records] option under LeadTools to filter records based on criteria and then convert them in bulk.
To convert leads in bulk
- Click the Leads tab.
- From the list of leads, select the ones that you want to convert.
- Click the Moreicon > MassConvert.
- In the Mass Convert pop-up, do the following:
- Select the Deal checkbox, if you want to create a deal upon lead conversion.The deal fields will be listed. The mandatory fields will be pre-populated based on Conversion Mapping.
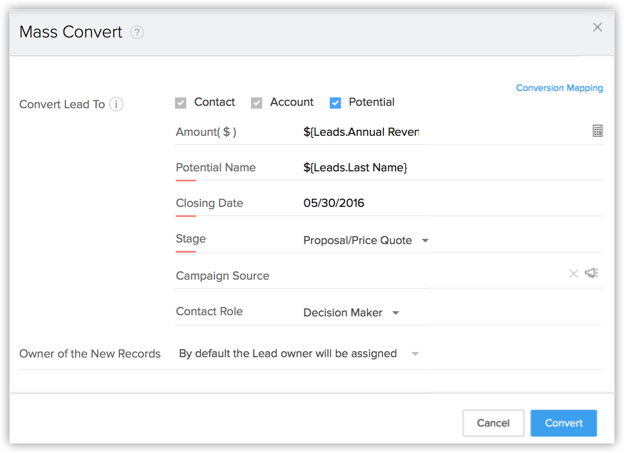
- Fill in the fields for deals. You can either specify a value or use merge fields to add a variable for the deal fields.
- Click the Change link to select one owner for the contacts, accounts or deals that the leads are being converted to. By default, all the converted contacts, accounts and deals will be assigned to the users who own the respective leads.
- Click Convert.
- During conversion, if there are records that match the email address of the lead, then the lead details will be merged with the existing record.
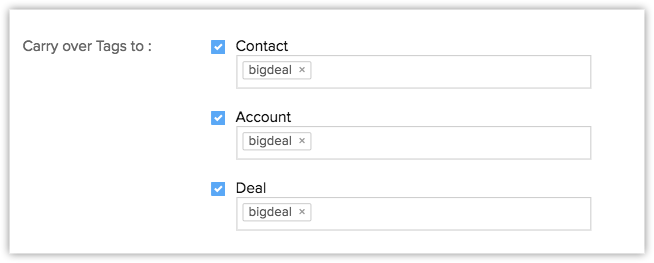
- Any tags associated with the leads can be carried over to accounts, contacts and deals upon individual as well as mass conversion of leads. See also: Tagging records.
Related Articles
What is the difference between Open Leads and Converted Leads?
Open Leads are those leads that have not been converted yet, while Converted Leads are those that have been recently converted from leads to contacts or an account. More information on converting LeadsWorking with Leads
Leads are the details gathered about an individual or representatives of an organization. They play a very important role in an organization's Sales & Marketing department and are useful in identifying potential customers. Collecting leads and ...Import leads from file
Zoho Campaigns allows you to import leads from other sources into a mailing list. Before you begin importing leads, make sure that you've created a mailing list to save the data. In this guide, you’ll learn the different ways to import leads from ...Can I have two leads from the same company? If so, will all leads for a company be added as contacts to an account?
Yes, it is possible. When you're converting leads from the same company, you can associate both of them to an existing Account and manage those contacts easily.The custom fields that I create for leads do not get transferred when I convert the leads to an account. Why?
The custom field values will not be transferred while converting a lead to account, for these reasons: The custom fields have not been created for the Contacts, Accounts and Deals - You need to first create the fields in the Accounts, Contacts and ...