Creating Clients
Methods
In Zoho Recruit, you can create clients by:
- Entering data in the client's details form: You can manually fill in the Client details gathered from various external sources.
- Importing Candidates from external source: You can gather data through various sources and import the CSV and XLS files into Zoho Recruit.
- Converting Candidate to Client: On candidate conversion, contacts, clients and job openings can be created.
- Synchronizing Microsoft Outlook contacts: Synchronize the contacts in Microsoft Outlook with Zoho Recruit. In special cases: A client will be created in Zoho Recruit while the Company Name field is specified in the Microsoft Outlook

Note:
Some of the standard fields may not be visible or editable depending on your organization's business process.
In case you want to add or modify fields or would like to know more details on the usage of fields, please contact your System Administrator
Creating Clients Individually
You can create clients individually by:
- Filling in the details on the client creation form.
- Cloning the client with a few changes in the existing client details.
Availability

Profile Permission Required: Access to the Clients Tab with the Create permission enabled.
To create clients individually
- In the Clients module, click (Add button) to add a new client.
- In the Create Client page, enter the client details.
- Click Save.
To clone clients
- In the Clients tab, click a particular client that is to be cloned.
- In the Client Details page, click
 (More button) and choose Clone from the list.
 - In the Clone Client page, modify the required details.
- Click Save.
Client Details Page
Once you have created a client, you can view the details of the client in the record's details page. The details page of a client presents information related to the clients - for example, job openings and contacts related to the clients, activities, notes, events, emails and so on - in a single location.
To view the client details page
- Click on the Clients module.
- Click on the desired client from the Clients list view.
- You will see the details page of the client.
Here is a quick tour of the Client's details page:
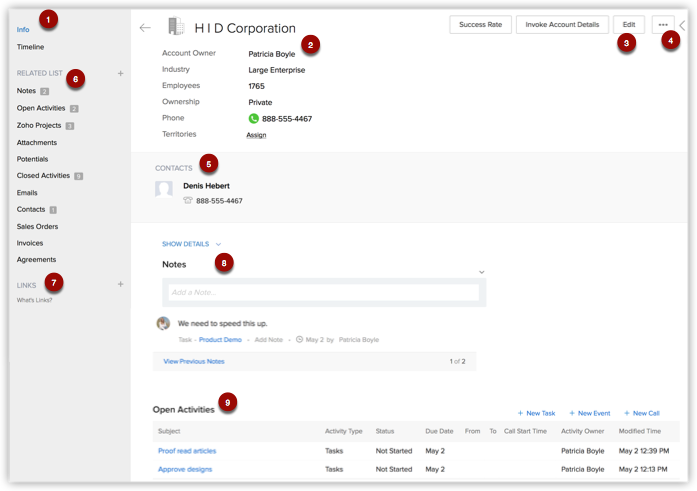
Switch between the Info and Timeline views.
- Info - Displays related lists and links associated the client
- Timeline - Displays a history of actions performed on the client's details page.
- Business card view - View the top 5 fields related to the client. You can customize the business card to view a client.
- Edit - Allows you to edit the record.
- More icon - Displays further options that you can perform for the client.
View related details such as potentials and contacts related to the client.
- Related Lists Section- Navigate to the desired related list from this section. You can add a new related list as well as add new entries to an exisiting related list from this section.
- Custom links - View custom links associated with the client.
- Notes - View notes associated with the client.
- Related Lists- Scroll down to see all the related lists associated with the client.
Associate Client with Other Records
You can create a 360-degree view of the client to display all the associated details, such as contacts, job openings, activities, attachments, and notes in a single view.
In the Client Details page, you can update the following:
- Job Openings: To add job openings.
- Contacts: To add contacts.
- Open Activities: To add tasks and events (meetings and calls).
- Closed Activities: To display the closed activities.
- Attachments & Notes: To attach documents and notes.
- Member Clients: To add other divisions or subsidiaries to the parent client.
Add Member Clients
Member Clients are secondary clients added to an existing parent client. This allows having separate clients with different divisions within a parent company and provides a full view of the individual clients as well as the consolidated clients within the parent client.
To add a member client
- In the Client Details page, the existing member client details, if any, are displayed.
- Click on Client Name, Phone, Website, Client Type, Industry, or Annual Revenue links to sort the display order of the records.
- Click on the relevant Edit or Del link to modify or delete the member client respectively.
- Click on New.
- Enter the member client details.
- Click Save.
Related Articles
Creating Contacts
Methods In Zoho Recruit, you can create contacts by: Entering data in the contact details form: You can manually fill in the Contact details gathered from various external sources. Importing contacts from external source: You can gather data through ...Creating Forecasts
Configure Forecast Settings At first, a user with administrator profile has to configure the organization's forecast settings in the Zoho Recruit account. The settings include: Target Period of Forecast (Monthly or Quarterly). The start month of the ...Creating Dashboards
The dashboard is a summarized view of the custom report data in Zoho Recruit. It provides a platform for real-time analysis of the stages in your firm's recruitment process. You can make your dashboards publicly accessible to all users or to select ...Creating Custom Fields
In Zoho Recruit, you can add new fields as required. These fields will be available to all the users added to your organization's Recruit account. Customize Zoho-Defined Fields: You can edit, delete, and hide some of the Zoho-defined fields, but note ...Creating Custom Fields
In Zoho Workerly, you can add new fields as per your requirements. These fields will be available to all the users added to your organization's Workerly account. Customize Zoho Defined Fields: You can edit, delete and hide some of Zoho defined ...