Creating Job Openings
Methods
In Zoho Recruit, you can create job openings by:
- Entering data in the job opening details form: You can manually fill in the Job Opening details gathered from various external sources.
- Importing job openings from external sources: You can gather data through various sources and import the CSV and XLS files into Zoho Recruit.

Note:
- Some of the standard fields may not be visible or editable depending on your organization business process and field-level security settings.
- In case you want to add or modify fields or would like to know more details on the usage of fields, please contact your System Administrator.
Create Job Openings Individually
You can create job openings individually by:
- Filling in the details in the job openings creation form.
- Cloning the job opening with a few changes from the existing job details
To create job openings individually
- In the Job Openings module, click Create Job Opening.
- In the Create Job Opening page, enter the job opening details.
- Click Save.
Note:
While selecting the Clients or Contacts from the Lookup field's pop-up window, there is also an option to create a Client or Contact.
You can use this option to quickly create a client or contact by providing some mandatory information. You have two options:
- Click Save. The record will be saved and it will be listed with the other clients or contacts. You can select it to associate to the job opening that you were creating.
- Click Save & Associate to save the new record and also associate it to the job opening that you were creating.
To clone job opening
- In the Job Openings tab, click a particular job that is to be cloned.
- In the Job Opening Details page, click More icon > Clone.
- In the Clone Job Opening page, modify the required details.
- Click Save.
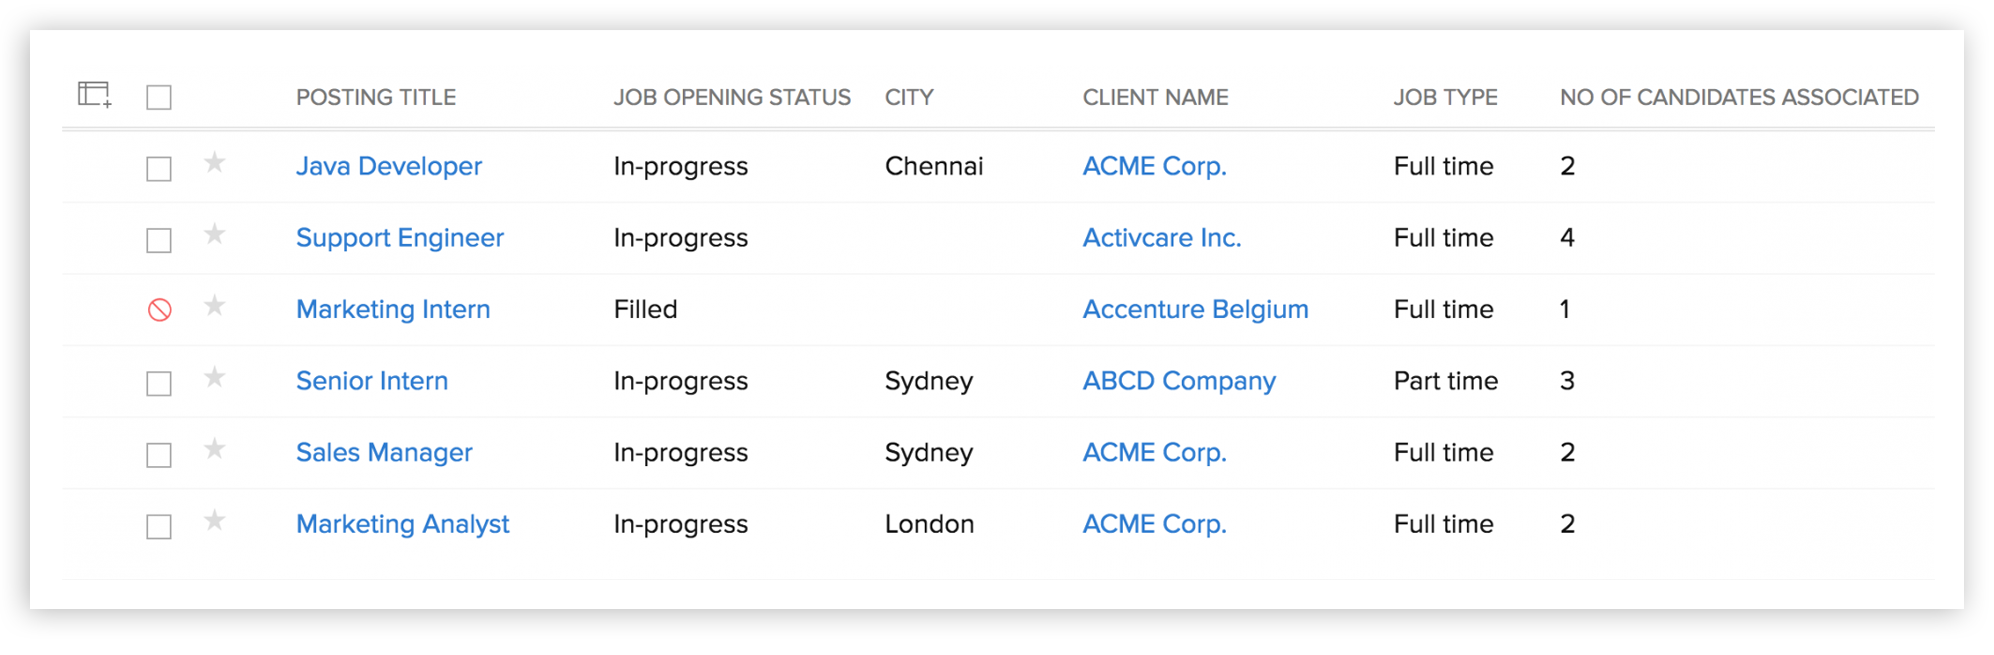
List View
The Job Openings list view displays the jobs one after the other in rows and columns. The list view is helpful when you wish to see the maximum details of your job openings at one glance. For example, you wish to see the job openings, the job opening owner, revenue, closing date, stage, etc you can customize the list view columns and view all the jobs and their details in a single page, one after the other.
Work with the Job Openings Details page
Once you have created a job opening, you can view the details of the job in the record's details page. The details page of a job opening presents information related to the job opening - for example, clients and contacts related to the job opening, activities, notes, events, emails and so on - in a single location.
To view the job openings details page
- Click the Job Openings module.
- Click the desired job opening from the Job Openings list view.
- You will see the details page of the job opening.
Switch between the Info and Timeline views.
- Info - Displays related lists and links associated with the job opening
- Timeline - Displays a history of actions performed on the job opening's details page.
- Edit - Allows you to edit the record.
- More icon - Displays further options that you can perform for the account.
- Business card view - View the top 5 fields related to the account. You can customize the business card view of a job opening.
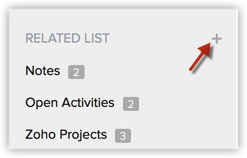
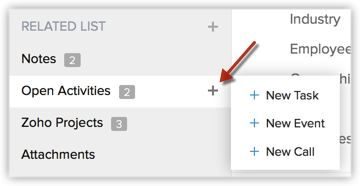
- Related Lists Section - Navigate to the desired related list from this section. You can add a new related list as well as add new entries to an exisiting related list from this section.
- Quick stage-update section - Update the Stage and Closing date of a job opening quickly using the quick stage-update section.
- View related information such as Next Action and Contact details.
Associate Job Openings with Other Records
You can create a 360-degrees view of the job to display all the associated details, such as open activities, history of the completed activities, contacts, attachments, and notes.
In the Job Openings Details page, you can update the following:
- Attachments: To attach documents
- Notes: To add notes
- Open Activities: To create tasks and events
- Closed Activities: To display the completed tasks and events
- Assigned Recruiter: The recruiter for this particular job vacancy
- Job Opening Status: The current status of this job opening
- Emails: To send emails to the primary contact of the job opening
- Revenue: To create and forecast revenue details
Associate Candidates with Job Openings
This feature enables you to associate candidates to job openings.
To associate candidates with job openings
- Click the Job Openings tab.
- In the Job Openings Home page, select the required job.
- In the Job Openings Details page, the associated candidates, if any, are displayed.
- Click Associated Candidates on the left panel and do the following:
- Select the candidates to be associated.
- Click Associate Now.
- Select the candidates to be associated.
- Click Associate.
Or you could also associate job openings to selected candidates by:
- Click the Candidates tab.
- Select the candidates to be associated. Select Actions > Associate Job Openings.
- In the Associate Job Openings page, search the job openings to be associated with the Criteria Component.
- Select one or more Job Openings to be associated and click Associate.
Publish Job Opening
You can use the Publish Job Opening to notify the world of job seekers about a job vacancy. A Job Opening can be published to various free and paid job boards as well as to your own careers page on the website.
To publish a job opening
- Click on Job Openings tab.
- In the Job Openings home page, click on a required job.
- In the Job Openings details page, click on Actions > Publish.
Note: Date of job opening must not exceed 30 days from the current date (published date). - Select the required job boards and careers page (if required). See Also Supported Job Boards.
- Select a Candidate Application Form.
- Click Publish.
Related Articles
Job Templates
Working with Job Templates Job Templates in Zoho Recruit allows you to quickly create and use different templates for a wide range of job openings in your company. We make hiring one step simpler by giving a set of templates for commonly used Job ...Creating Forecasts
Configure Forecast Settings At first, a user with administrator profile has to configure the organization's forecast settings in the Zoho Recruit account. The settings include: Target Period of Forecast (Monthly or Quarterly). The start month of the ...Creating Contacts
Methods In Zoho Recruit, you can create contacts by: Entering data in the contact details form: You can manually fill in the Contact details gathered from various external sources. Importing contacts from external source: You can gather data through ...Creating Clients
Methods In Zoho Recruit, you can create clients by: Entering data in the client's details form: You can manually fill in the Client details gathered from various external sources. Importing Candidates from external source: You can gather data through ...Creating Groups
Create Groups You can create different types of user groups and share common records among groups. To create groups Go to Setup > Users & Control > Groups. In the Groups section, click Create New Group. In the New Group page, do the following: In ...