Customize Chat window
What is a Proactive Chat? Is it possible to trigger a chat if only the visitor tracking is enabled on the website?
With proactive chat, you(operator) can deliberately initiate a chat to the visitors visiting the website from the Visitor Online dashboard. For instance, if you see a visitor on your website looking for something and if you wish to extend your help, then you can click on the customer info in the Visitor Online dashboard and initiate a chat immediately.
The proactive chat will work, even if you have only enabled visitor tracking (Not enabled Live Chat Widget) on your website.

The Live Chat window and the Proactive Chat window customization process remains the same. But, if you wish to customize the look and feel of your proactive chat window, you should navigate to Settings -> Websites -> Visitor Tracking -> Chat window.
Customizing the Chat Window Appearance
Where do I Customize the Appearance of the Live Chat Window?
In Settings > Websites > Website Name, choose Live chat widget .
Then, navigate to Chat Window > Appearance , and customize the default window according to your needs.
Where do I Customize the Appearance of the Proactive Chat Window?
In Settings > Websites > Website Name , choose Visitor Tracking.
Then, navigate to Chat Window > Appearance , and customize the default window according to your needs.
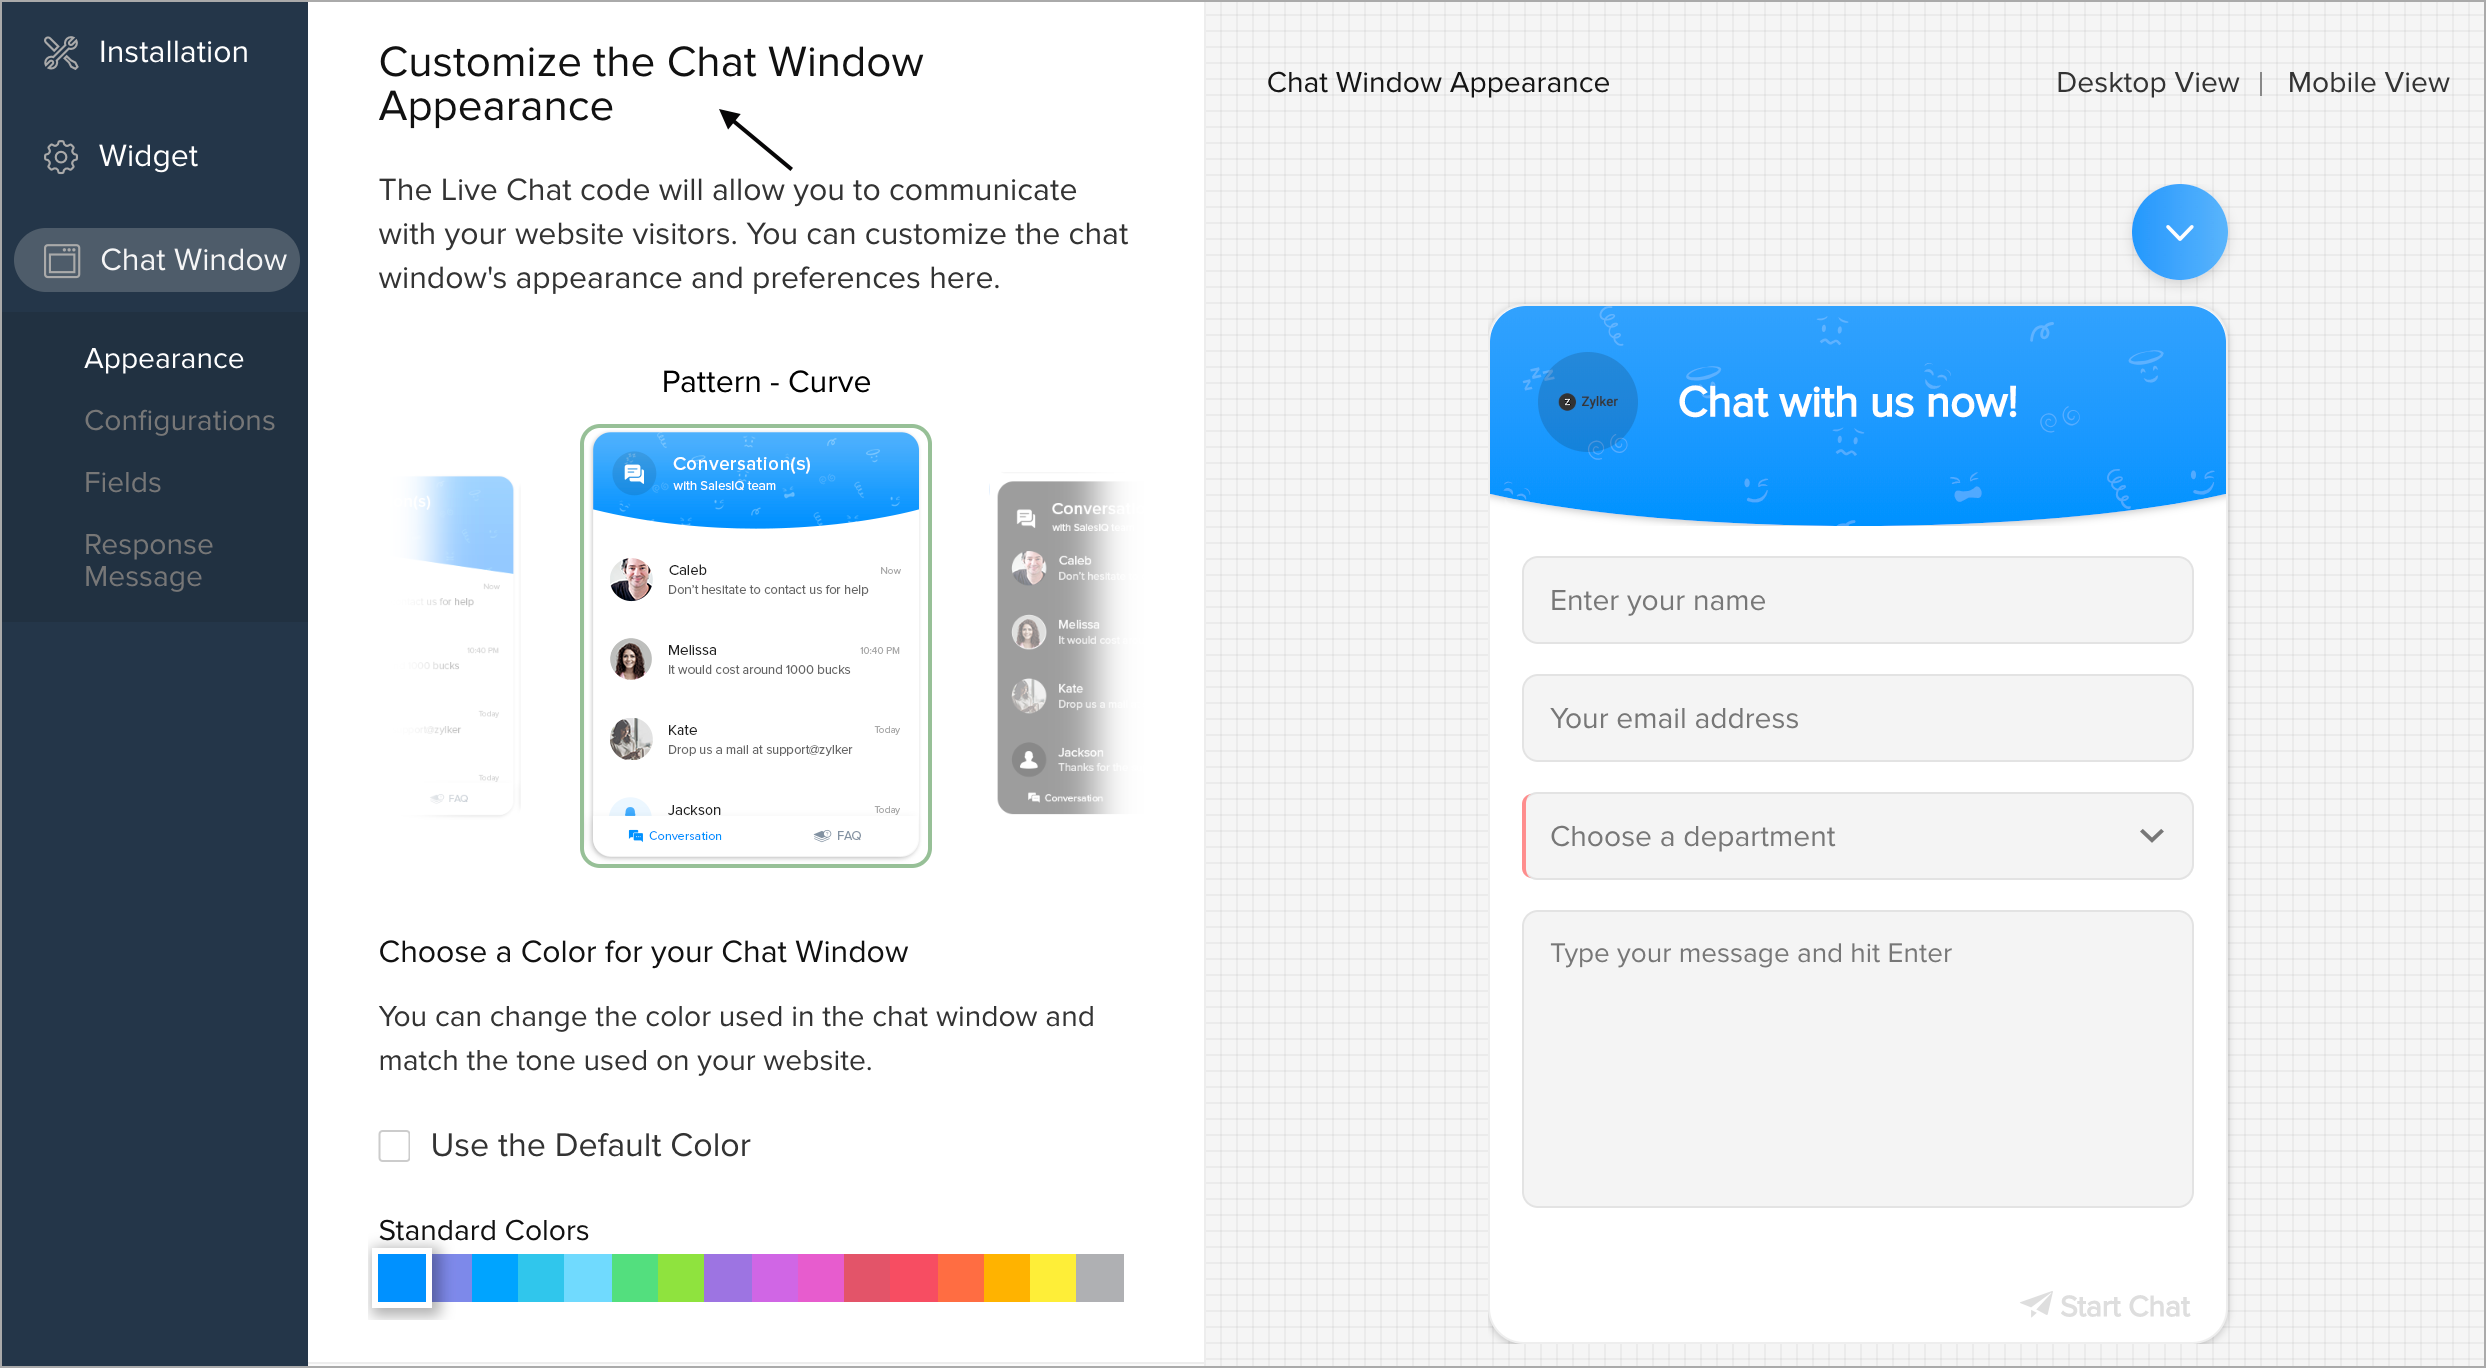
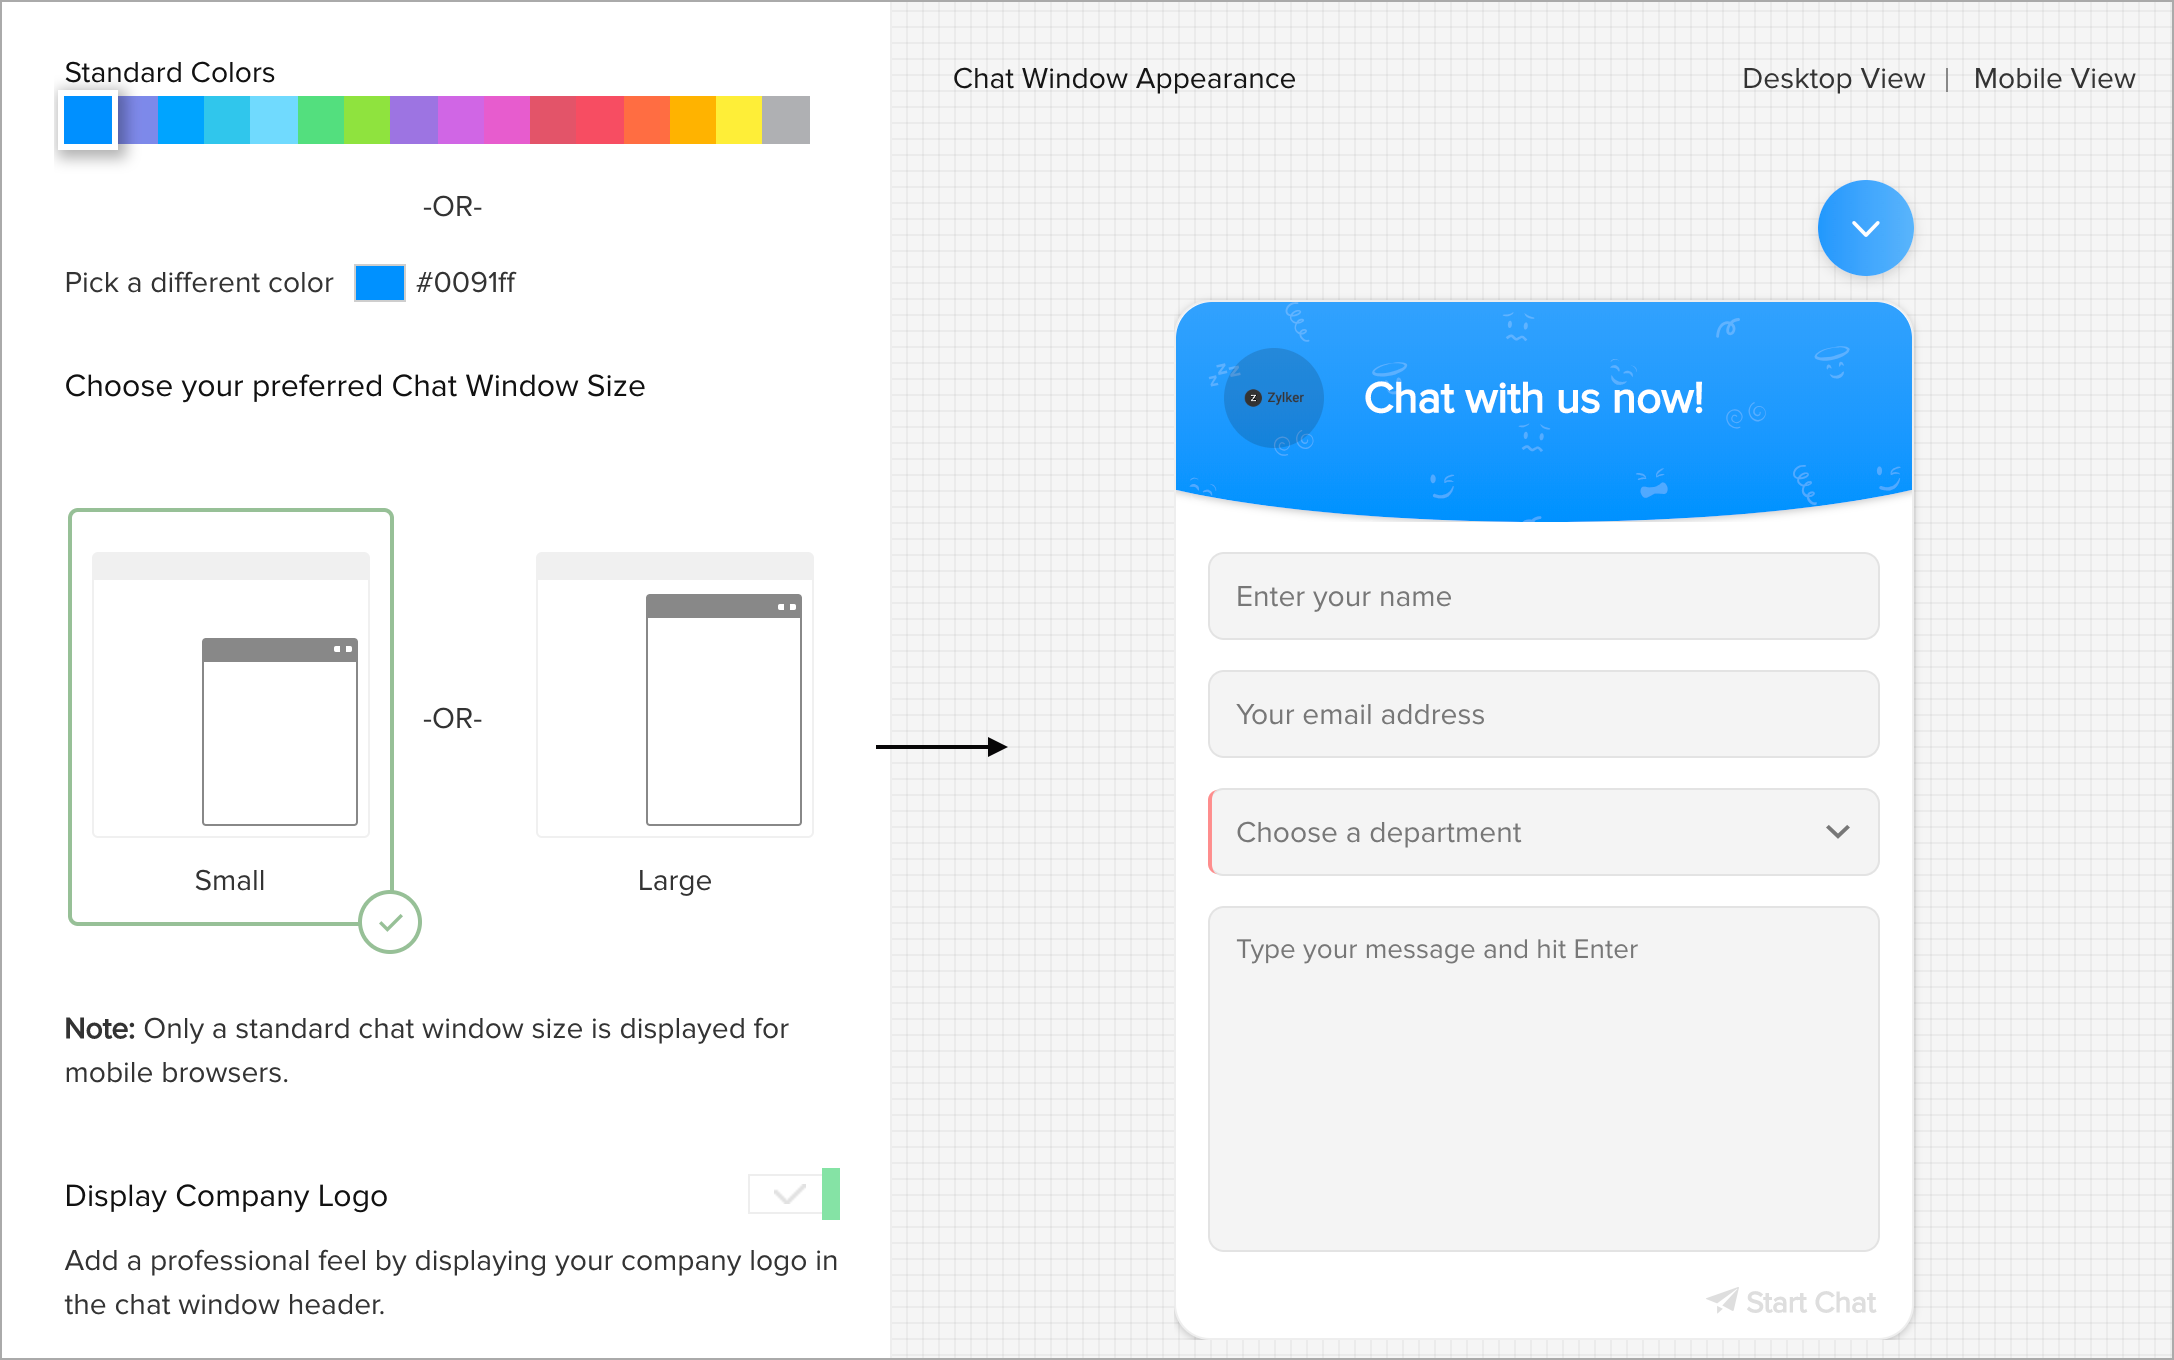
Choose the Appearance of the chat window
- In Settings > Websites > Website Name , choose Live chat widget.
- Then, navigate to Chat Window > Appearance , and customize the default window according to your needs.
- In Customize the chat window appearance , choose a chat window from the options. You can have an instant chat window preview on the right side of the screen.
- Also, click on the View live chat widget on your website option from the bottom of the preview window, and check if the widget suits the website design.
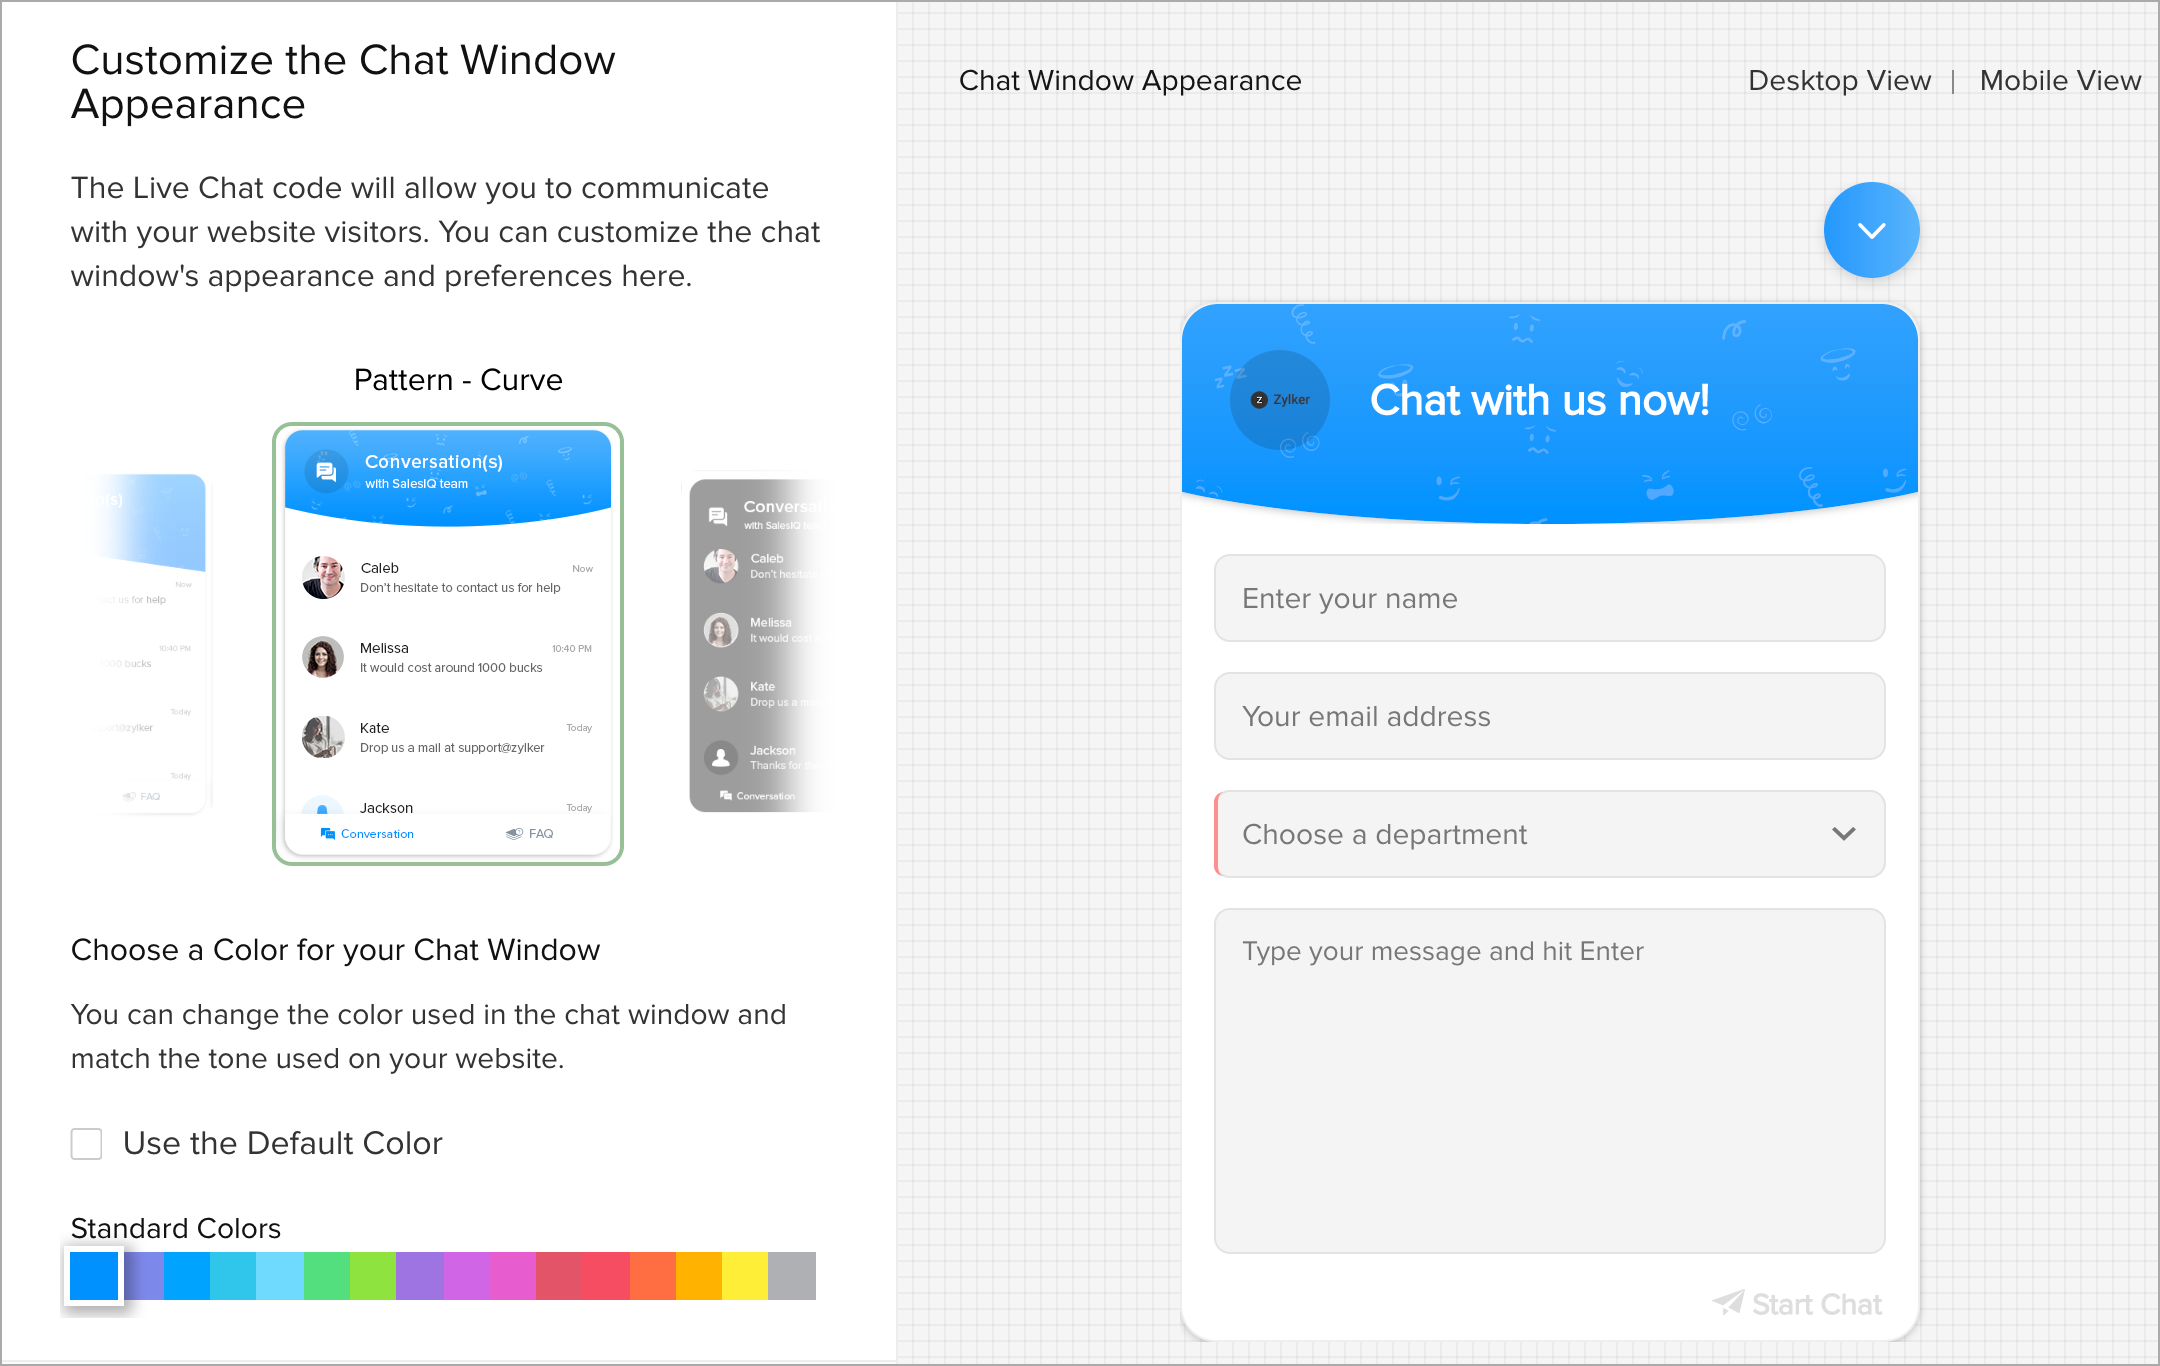
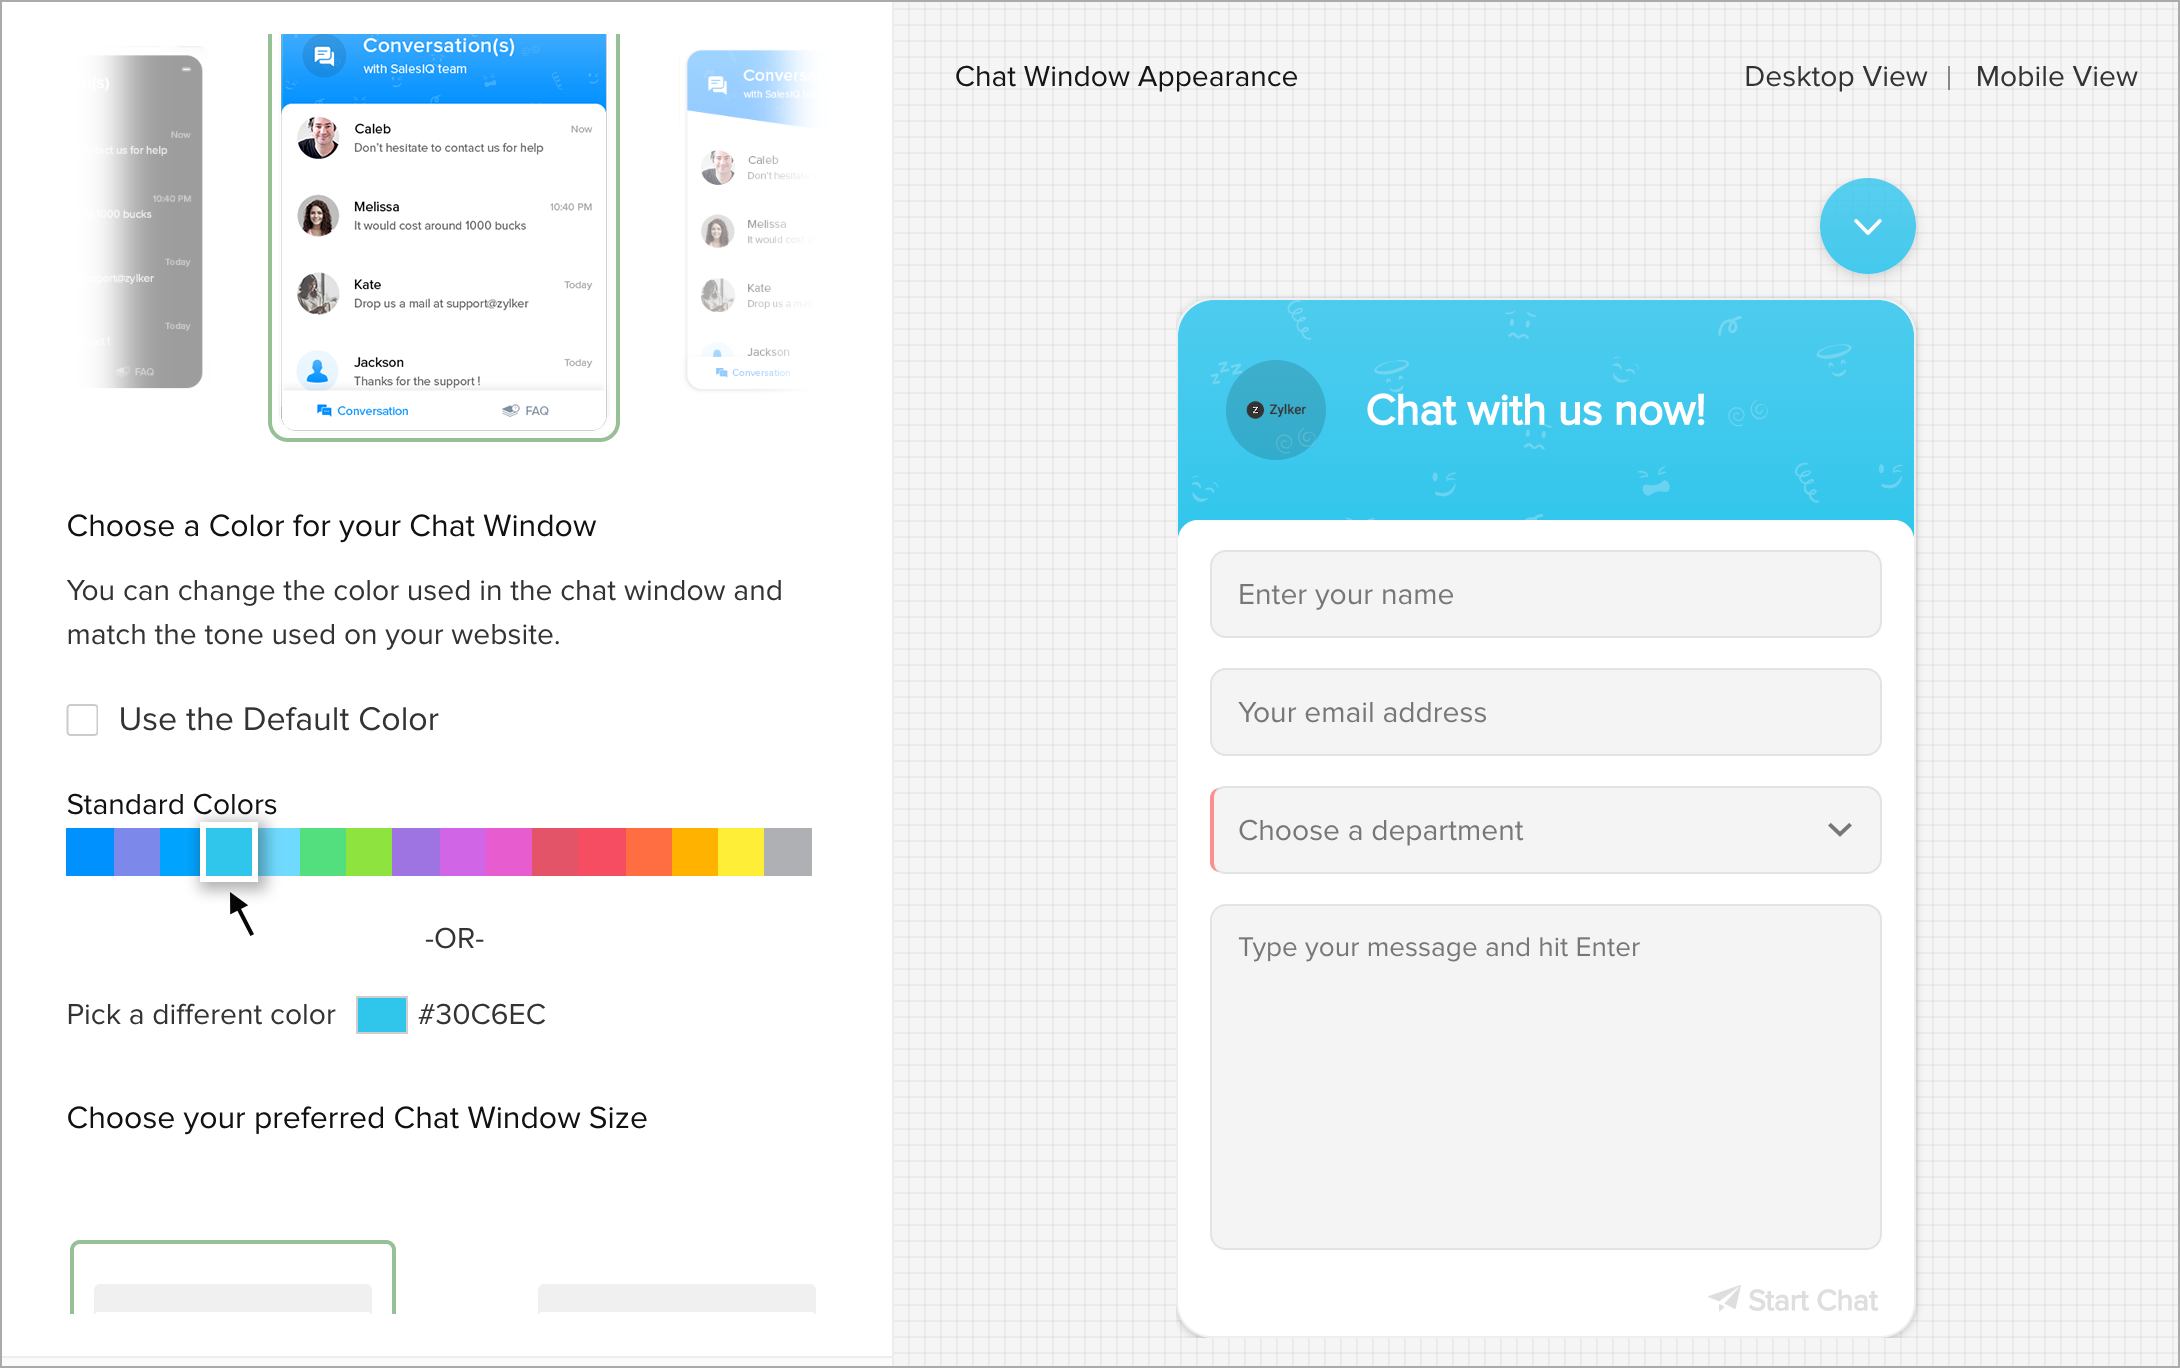
Changing the Color of the chat window
- In Settings > Websites > Website Name , choose Live chat widget .
- Then, navigate to Chat Window > Appearance , and customize the default window according to your needs.
- In Customize the Chat Window Appearance > Choose a color for your chat window option.
- Click on the color you would like to apply on the chat window from the Standard Color.
- Need more options? Then click on the Pick a Different Color option.
- You can either give the color code, or pick a color from the color palette.
- You can have an instant chat window preview on the right side of the screen, the colors you choose will reflect on the window.
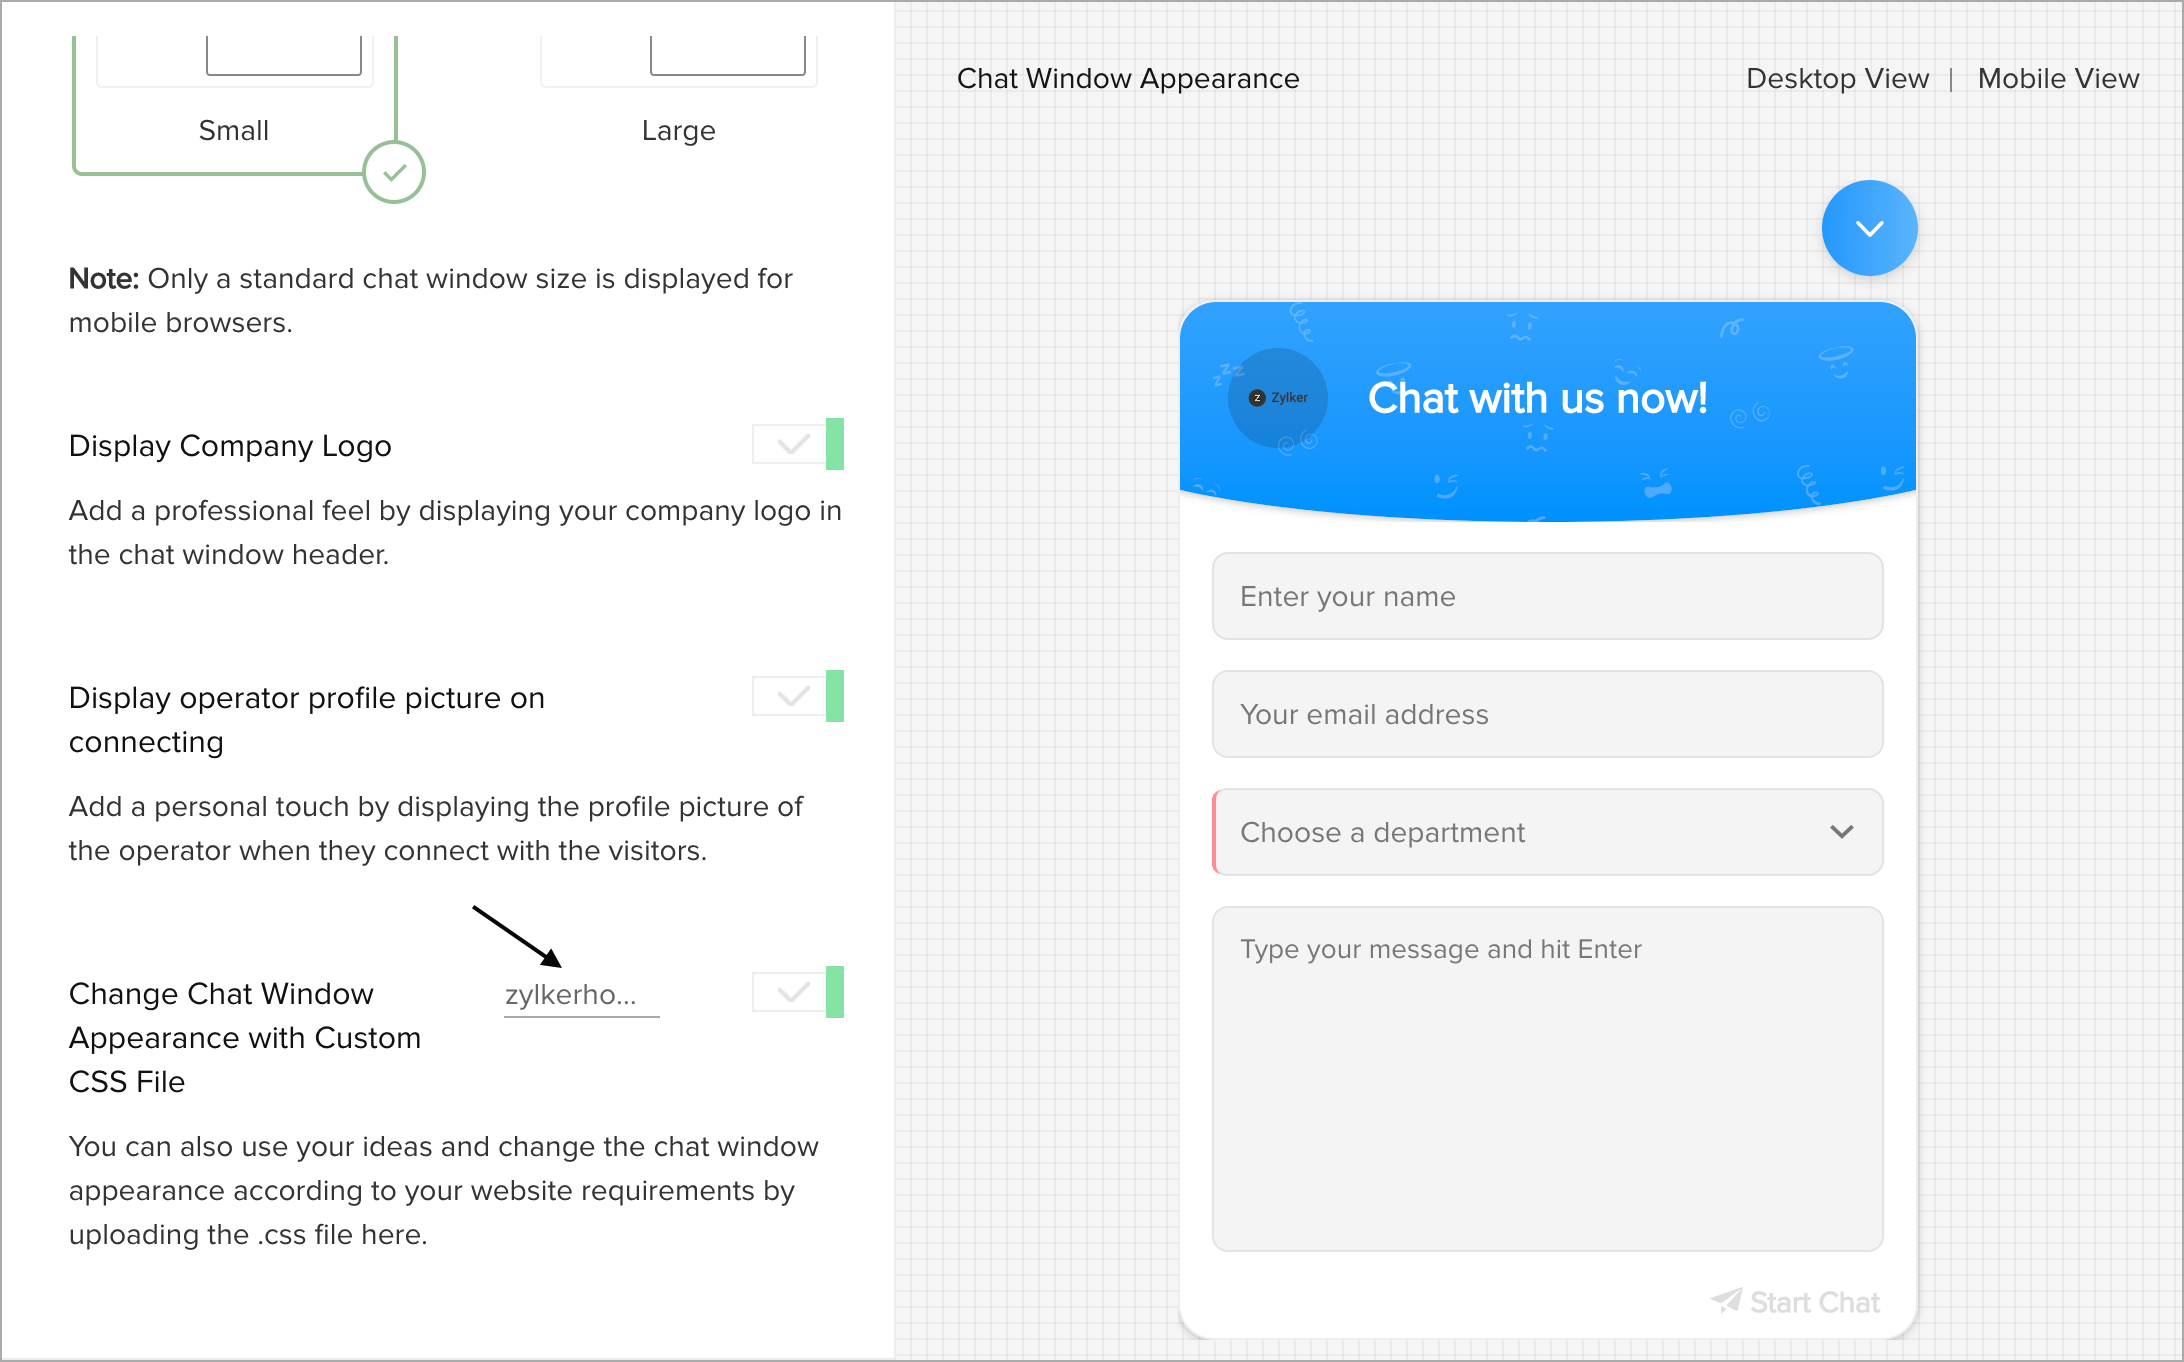
How to display Company Logo in the chat window?
- In Settings > Websites > Website Name , choose Live Chat Widget .
- Then, navigate to Chat Window > Appearance , and customize the default window according to your needs.
- In Customize the Chat WindowAppearance section, enable the Display Company Logo button.
Learn where and how to upload the company logo![]()
How do I display the Operator's Profile Picture while connecting on chat with visitor?
- In Settings > Websites > website name , choose Live Chat Widget .
- Then, navigate to Chat Window > Appearance , and customize the default window according to your needs.
- In Customize the Chat WindowAppearance section, enable the Display operator profile picture on connecting option.
- The profile picture of the operator who attends the chat will be displayed on the window.

Choose the Size of your chat window
- In Settings -> Websites -> Website Name, choose Live chat widget.
- Then, navigate to Chat Window -> Appearance, and customize the default window according to your needs.
- You can choose the size of your chat window between Small / Medium / Large according to your website needs.
Choosing the size of the chat window is not applicable on the mobile browsers, only a standard live chat window size will be displayed.
Is it possible to use a Customized CSS file to change the appearance of the chat window?
- Yes, it is possible to change the appearance of the chat window with your Custom CSS file. Refer our Custom CSS guide and try customizing your chat window.
- In Settings > Websites > Website Name , choose Live Chat widget .
- Then, navigate to Chat Window > Appearance , and customize the default window according to your needs.
- In Customize the Chat WindowAppearance section, enable the Change Chat Window Appearance with Custom CSS File option.
- The Upload link will appear, upload your Custom CSS file.
- Update the changes made.
Edit Configurations
How do I display the Remote Assistance/Screen Sharing options in the visitor's chat window?
You can display the screen sharing option to the visitor, using which they can share you their desktop screen. This option will ease the troubleshooting process and other complicated issues. You can view the desktop screen of the visitor in your screen and instruct them about the troubleshooting process.
- In Settings > Websites > website name, choose Live Chat Widget.
- Then, navigate to Chat Window > Configurations, and customize the default window according to your needs.
- In Configurations tab, enable the Display remote assistance option. Update changes.
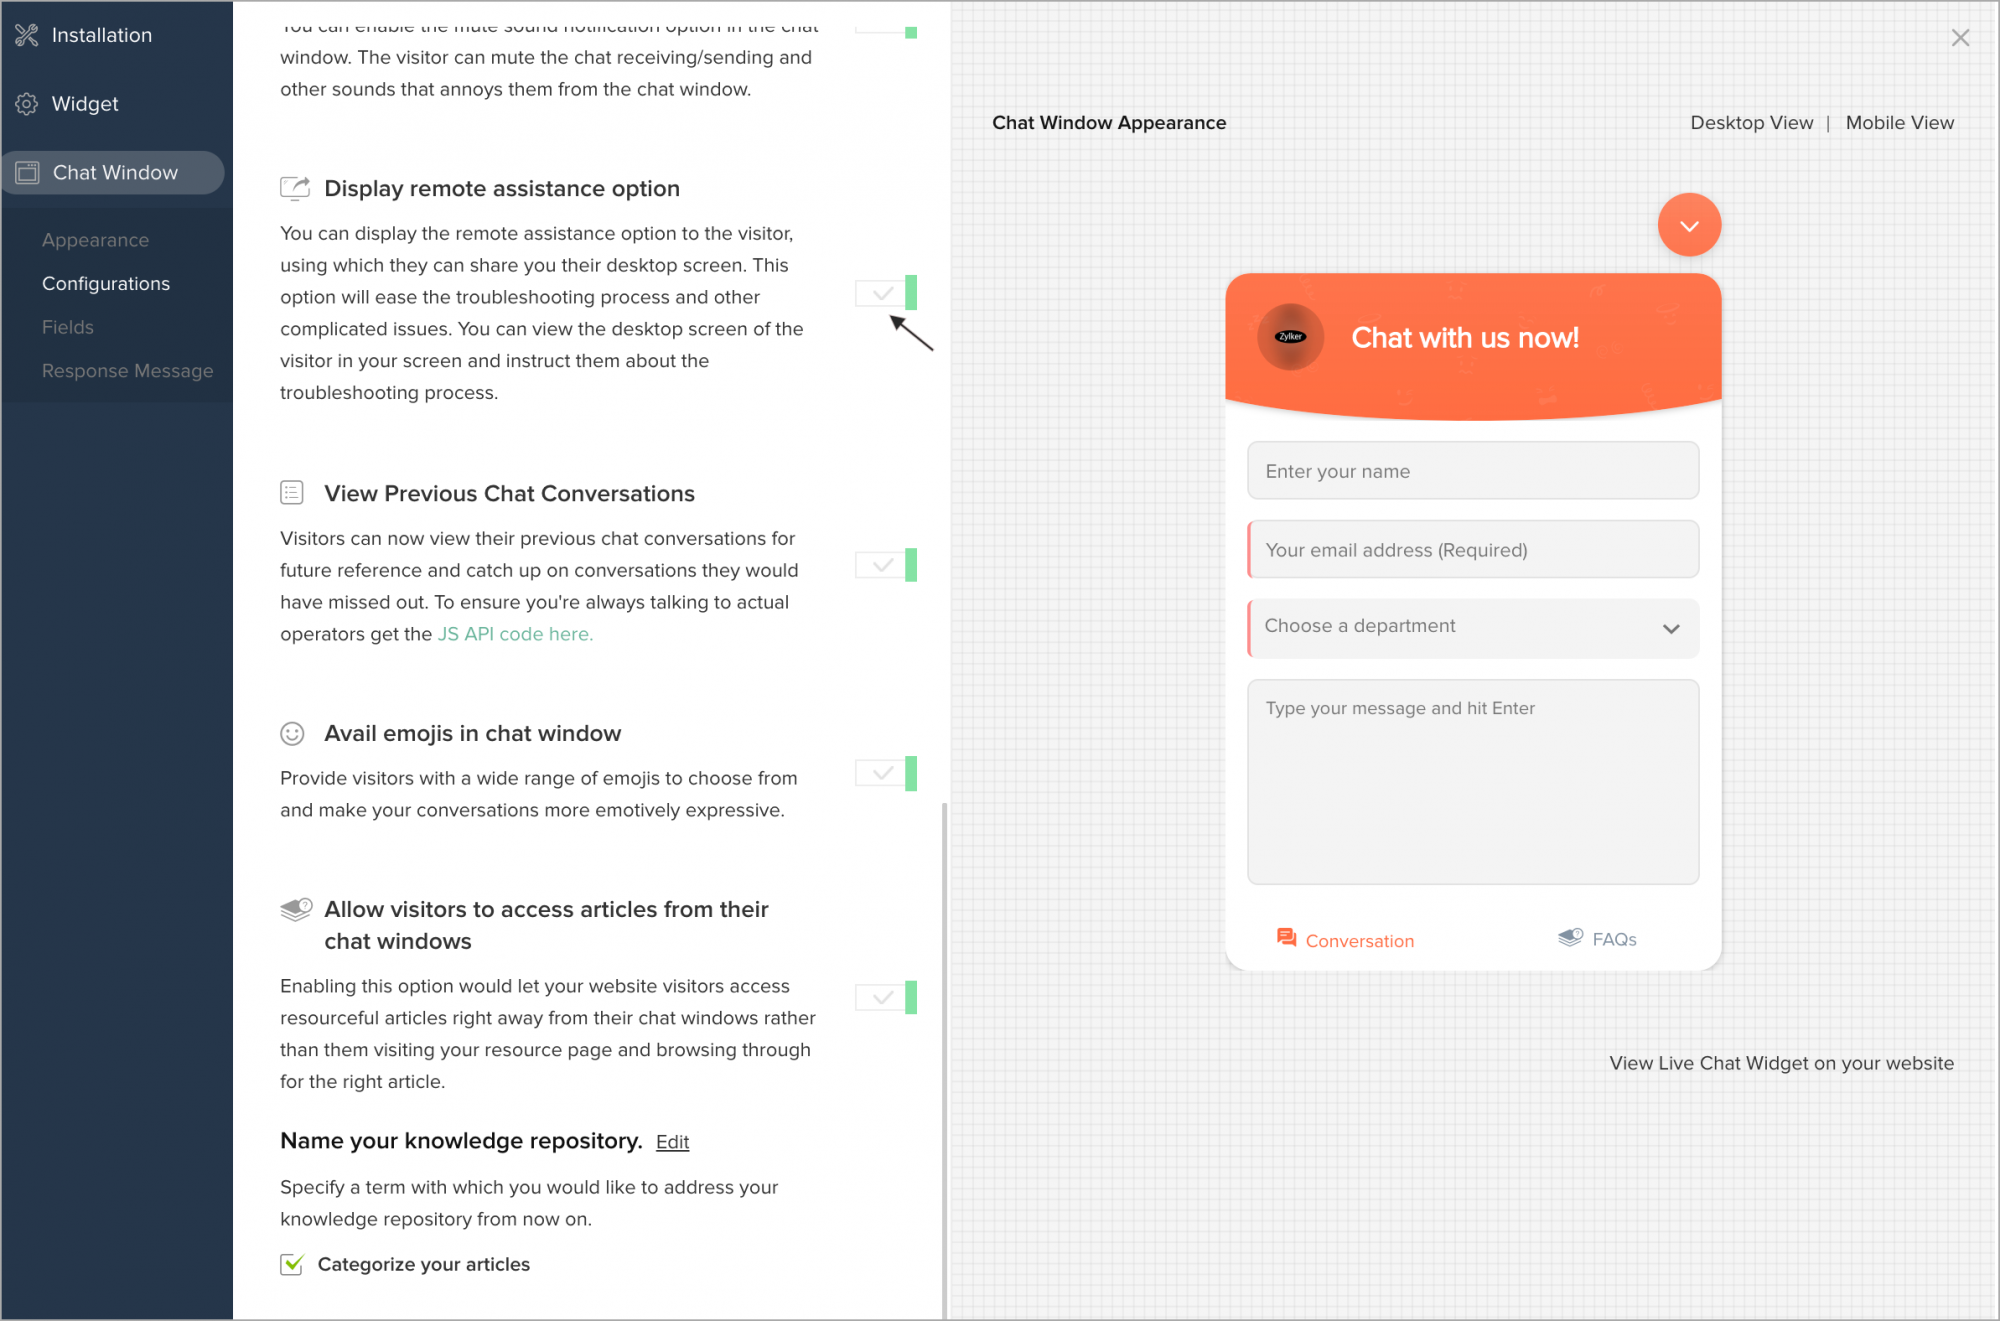
Now, the visitor can view the option in the Chat Window. Learn how Remote Assistance works.

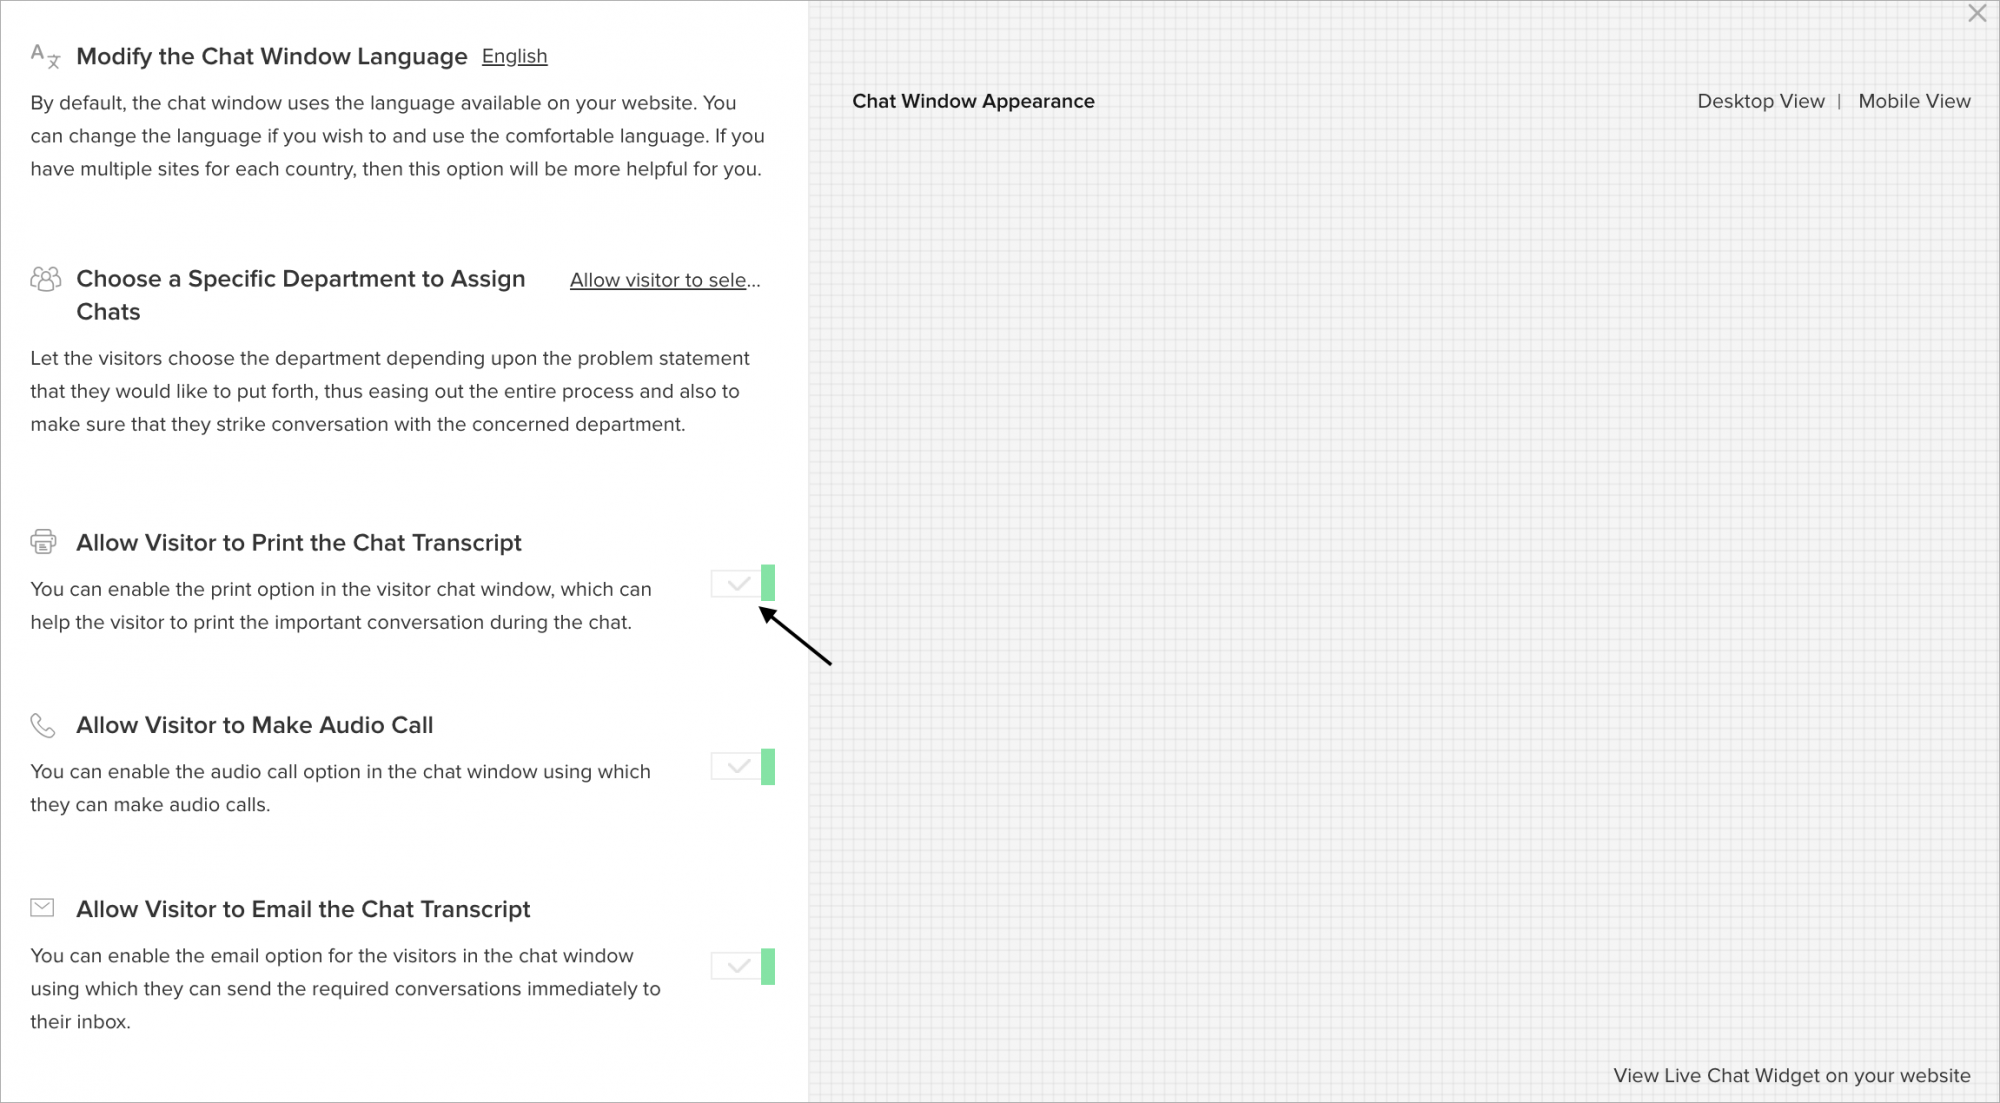
Allow visitors to Email the chat transcript
You can enable the email option for the visitors in the chat window using which they can send the required conversations immediately to their inbox.
- In Settings > Websites > website name, choose Live Chat Widget.
- Then, navigate to Chat Window > Configurations, and customize the default window according to your needs.
- In Configurations tab, enable the Allow Visitor to Email the Chat Transcript option, Update changes.

- Now, the visitor can view the option in the Chat Window.

How do I enable the articles tab in the chat window?
- Navigate to Settings -> Websites -> Your website name -> live Chat widget -> Chat window -> Configurations, and enable the Allow visitors to access articles from their chat windows option.
- You can also edit the name of your knowledge repository, by default, it is named as FAQs.
- If you wish to categorize the articles, you can check the Categorize your articles box.
- Update changes.
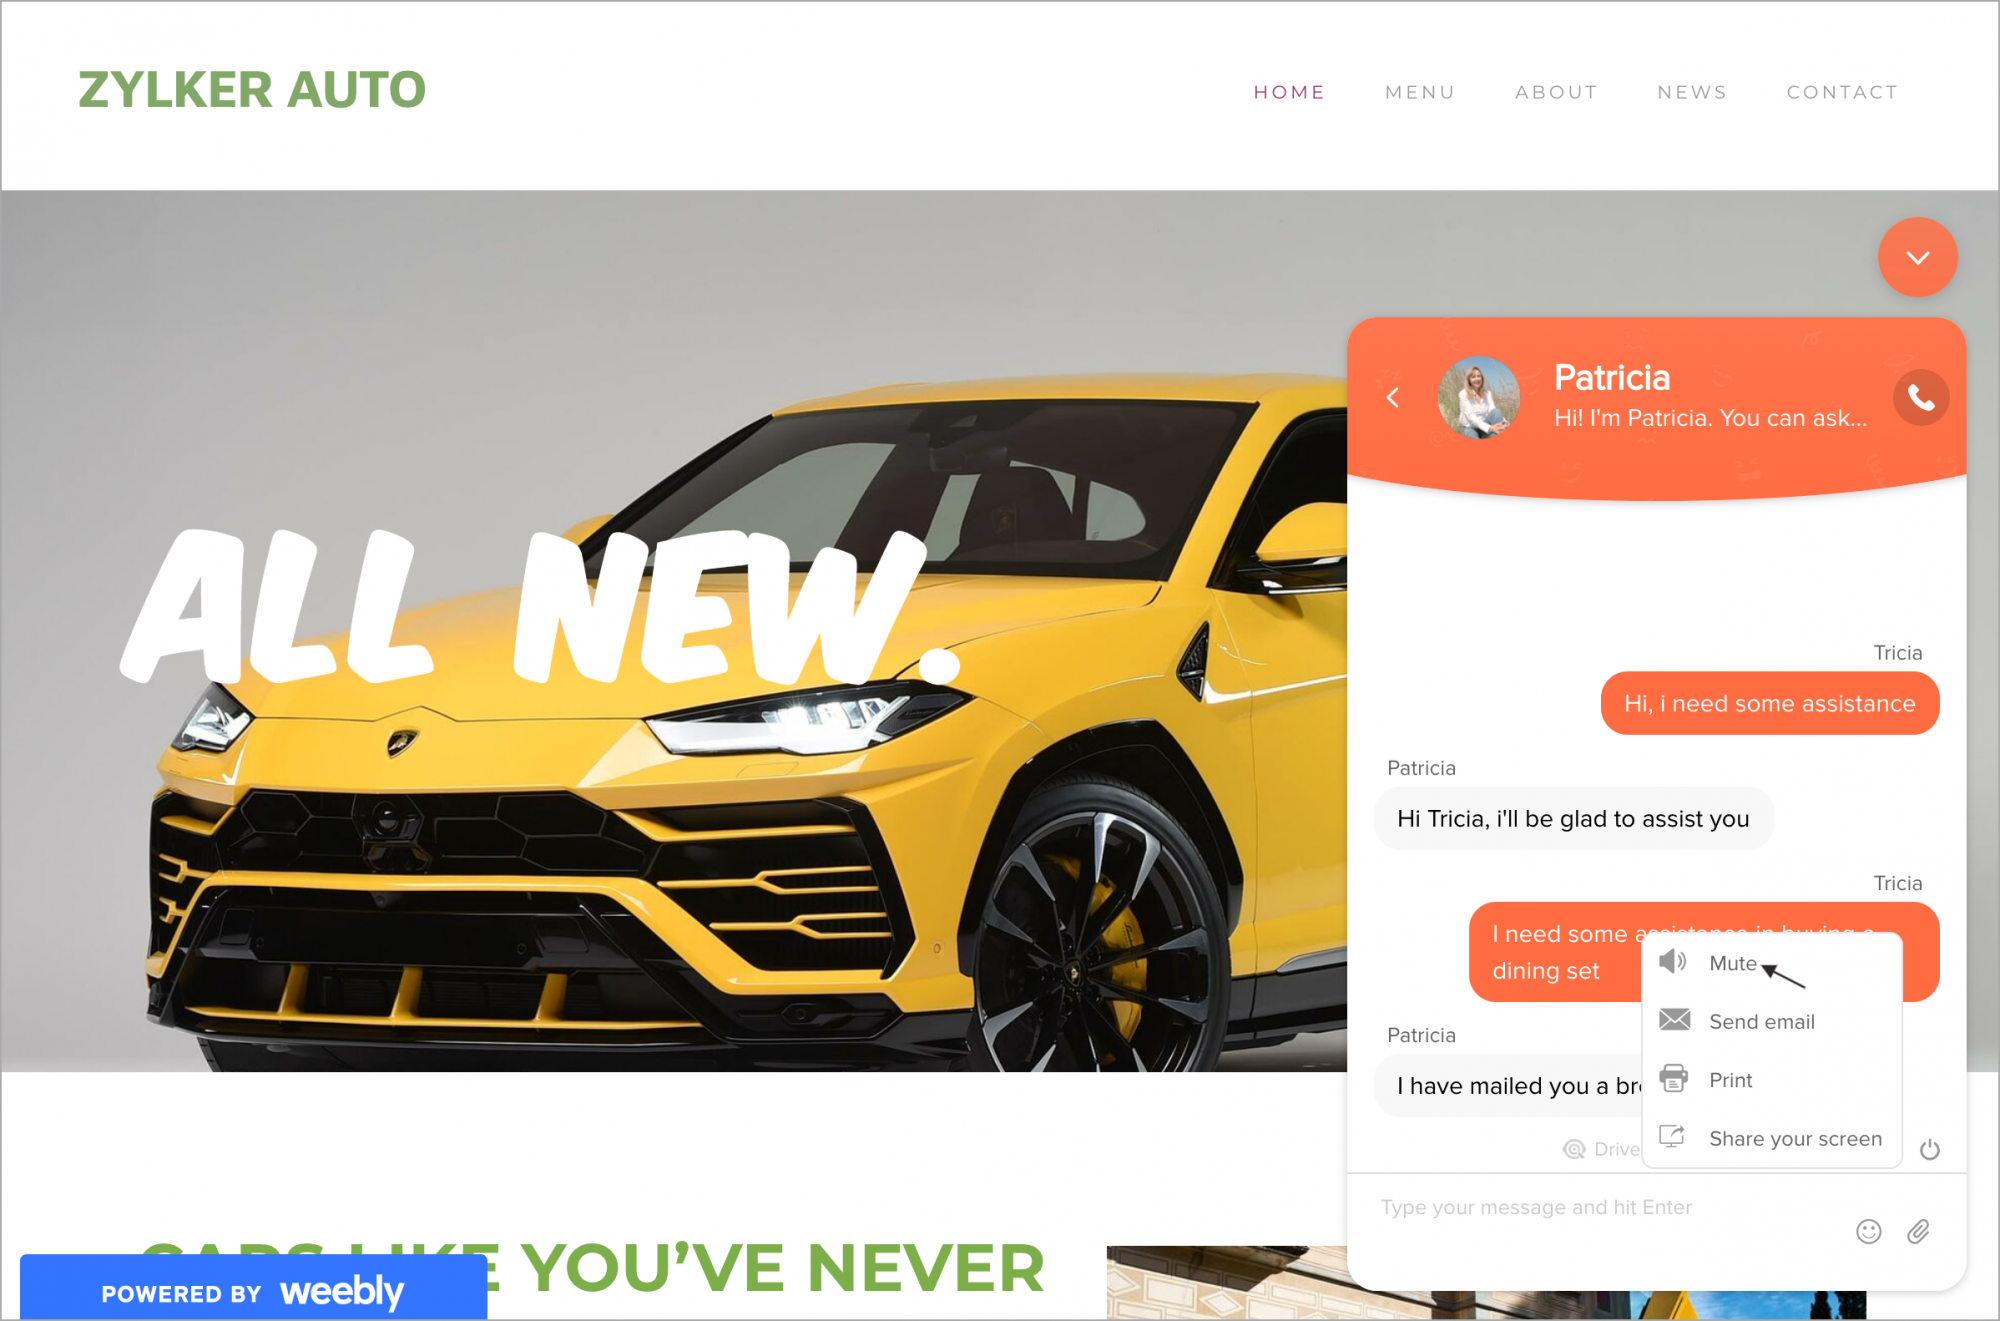
Allow visitor to Mute the Sound Notification during the conversation
You can enable the mute sound notification option in the chat window. The visitor can mute the chat receiving/sending and other sounds that annoys them from the chat window.
- In Settings > Websites > website name, choose Live Chat Widget.
- Then, navigate to Chat Window > Configurations, and customize the default window according to your needs.
- In Configurations tab, enable the Allow Visitor to Mute the Sound Notification During the Conversation option. Update changes
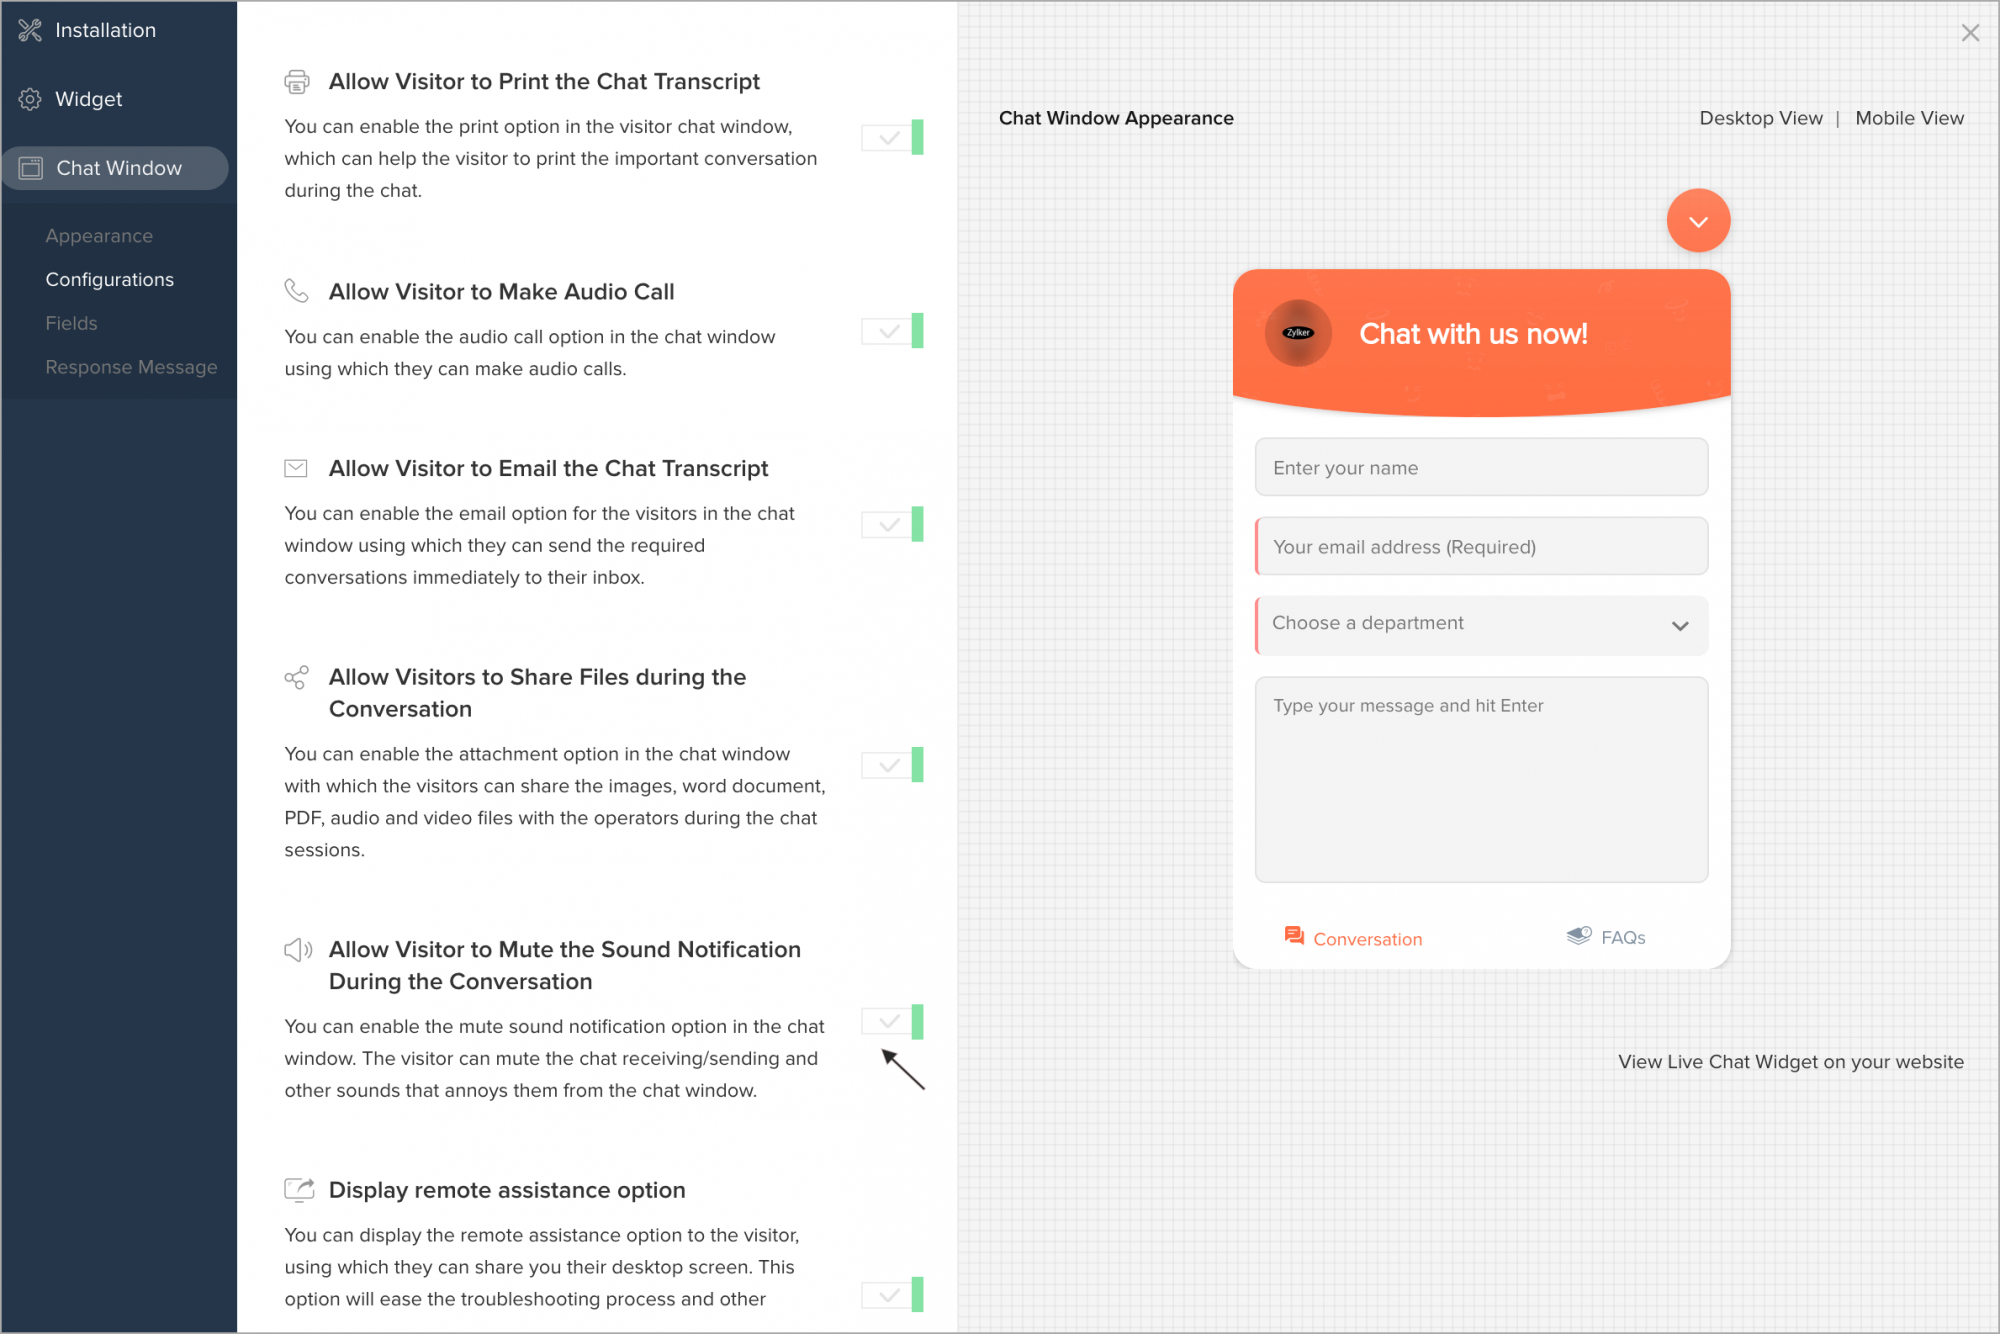
- Now, the visitor can view the option in the Chat Window.
Set Chat Waiting Time
- In Settings > Websites > website name, choose Live Chat Widget.
- Then, navigate to Chat Window > Configurations, and customize the default window according to your needs.
- In Configurations tab, select a waiting time from the Set the Chat Waiting Time.
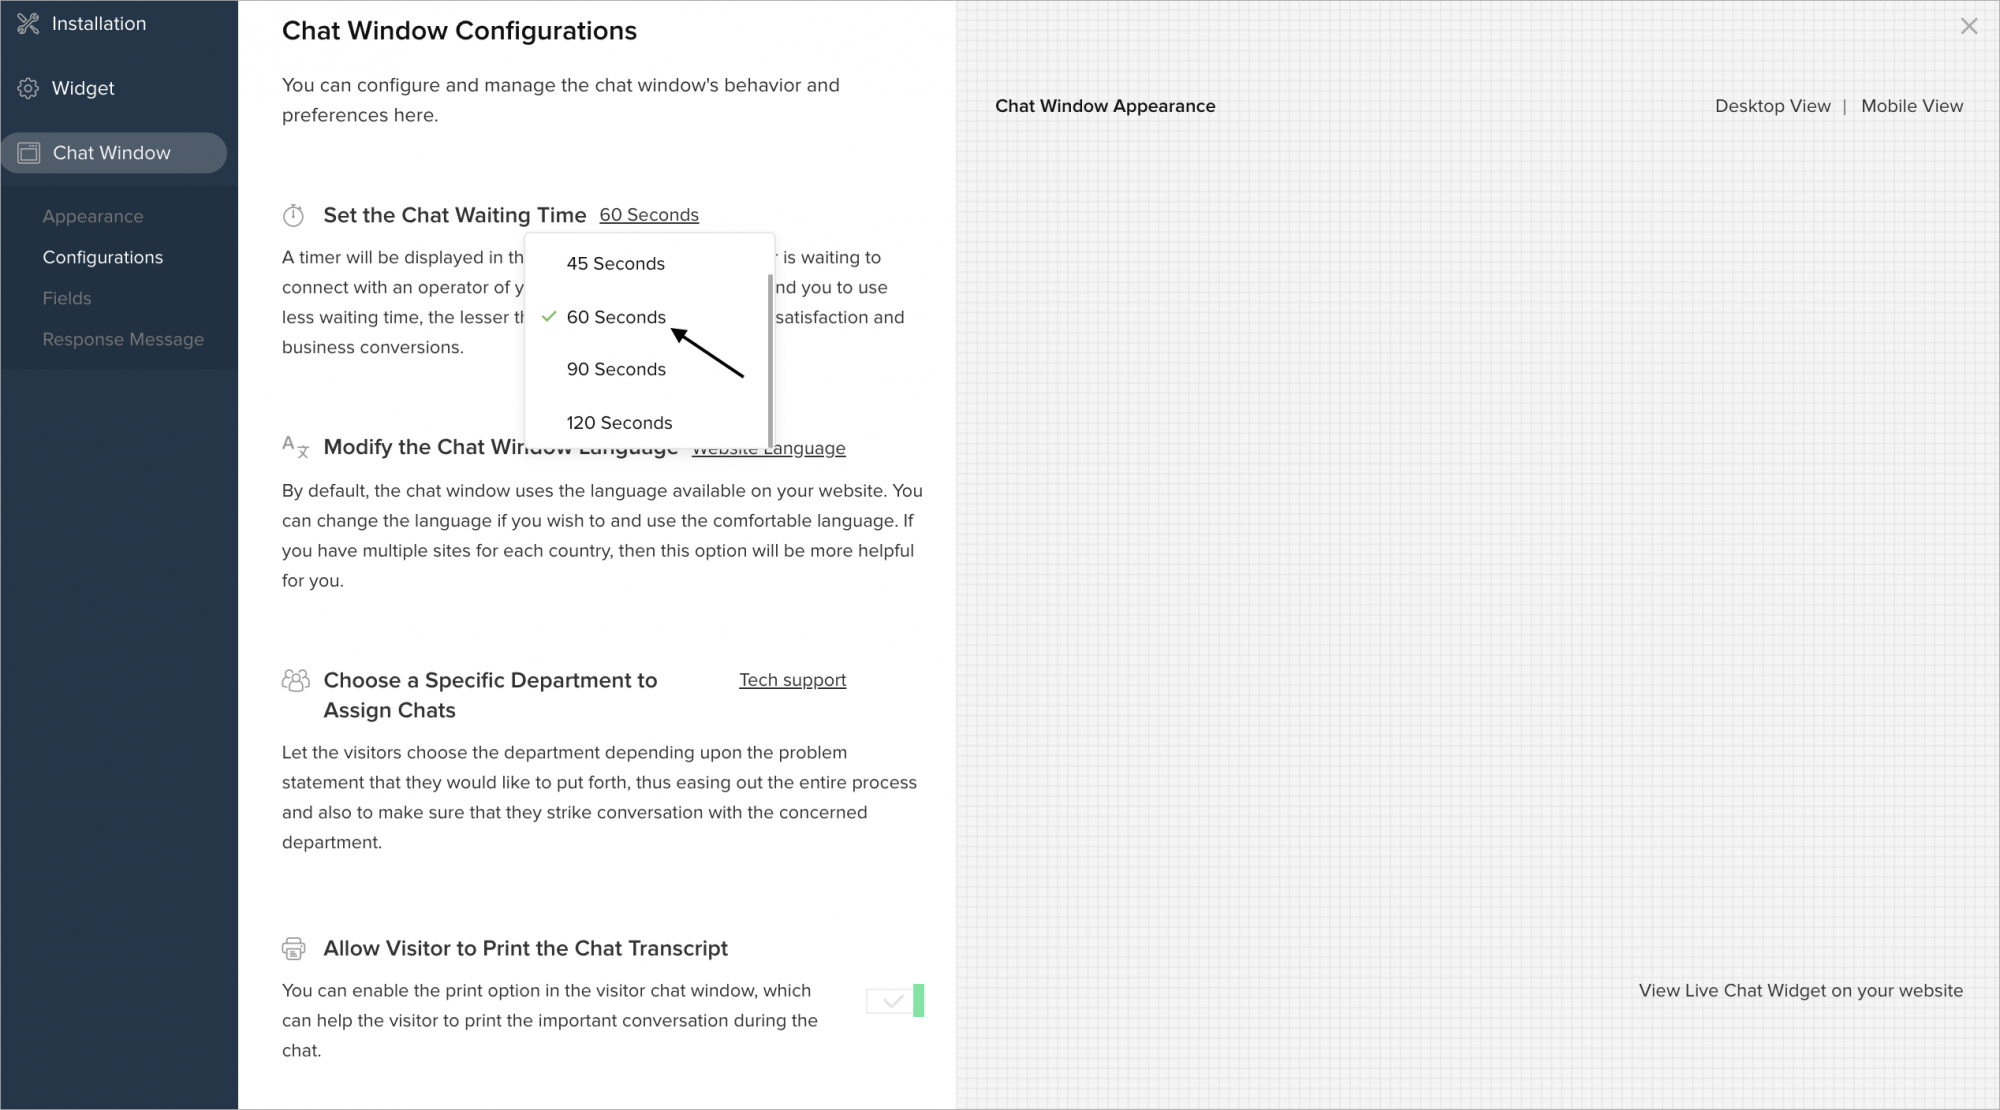
- A timer will be displayed in the chat window while the visitor is waiting to connect with the operator via chat.
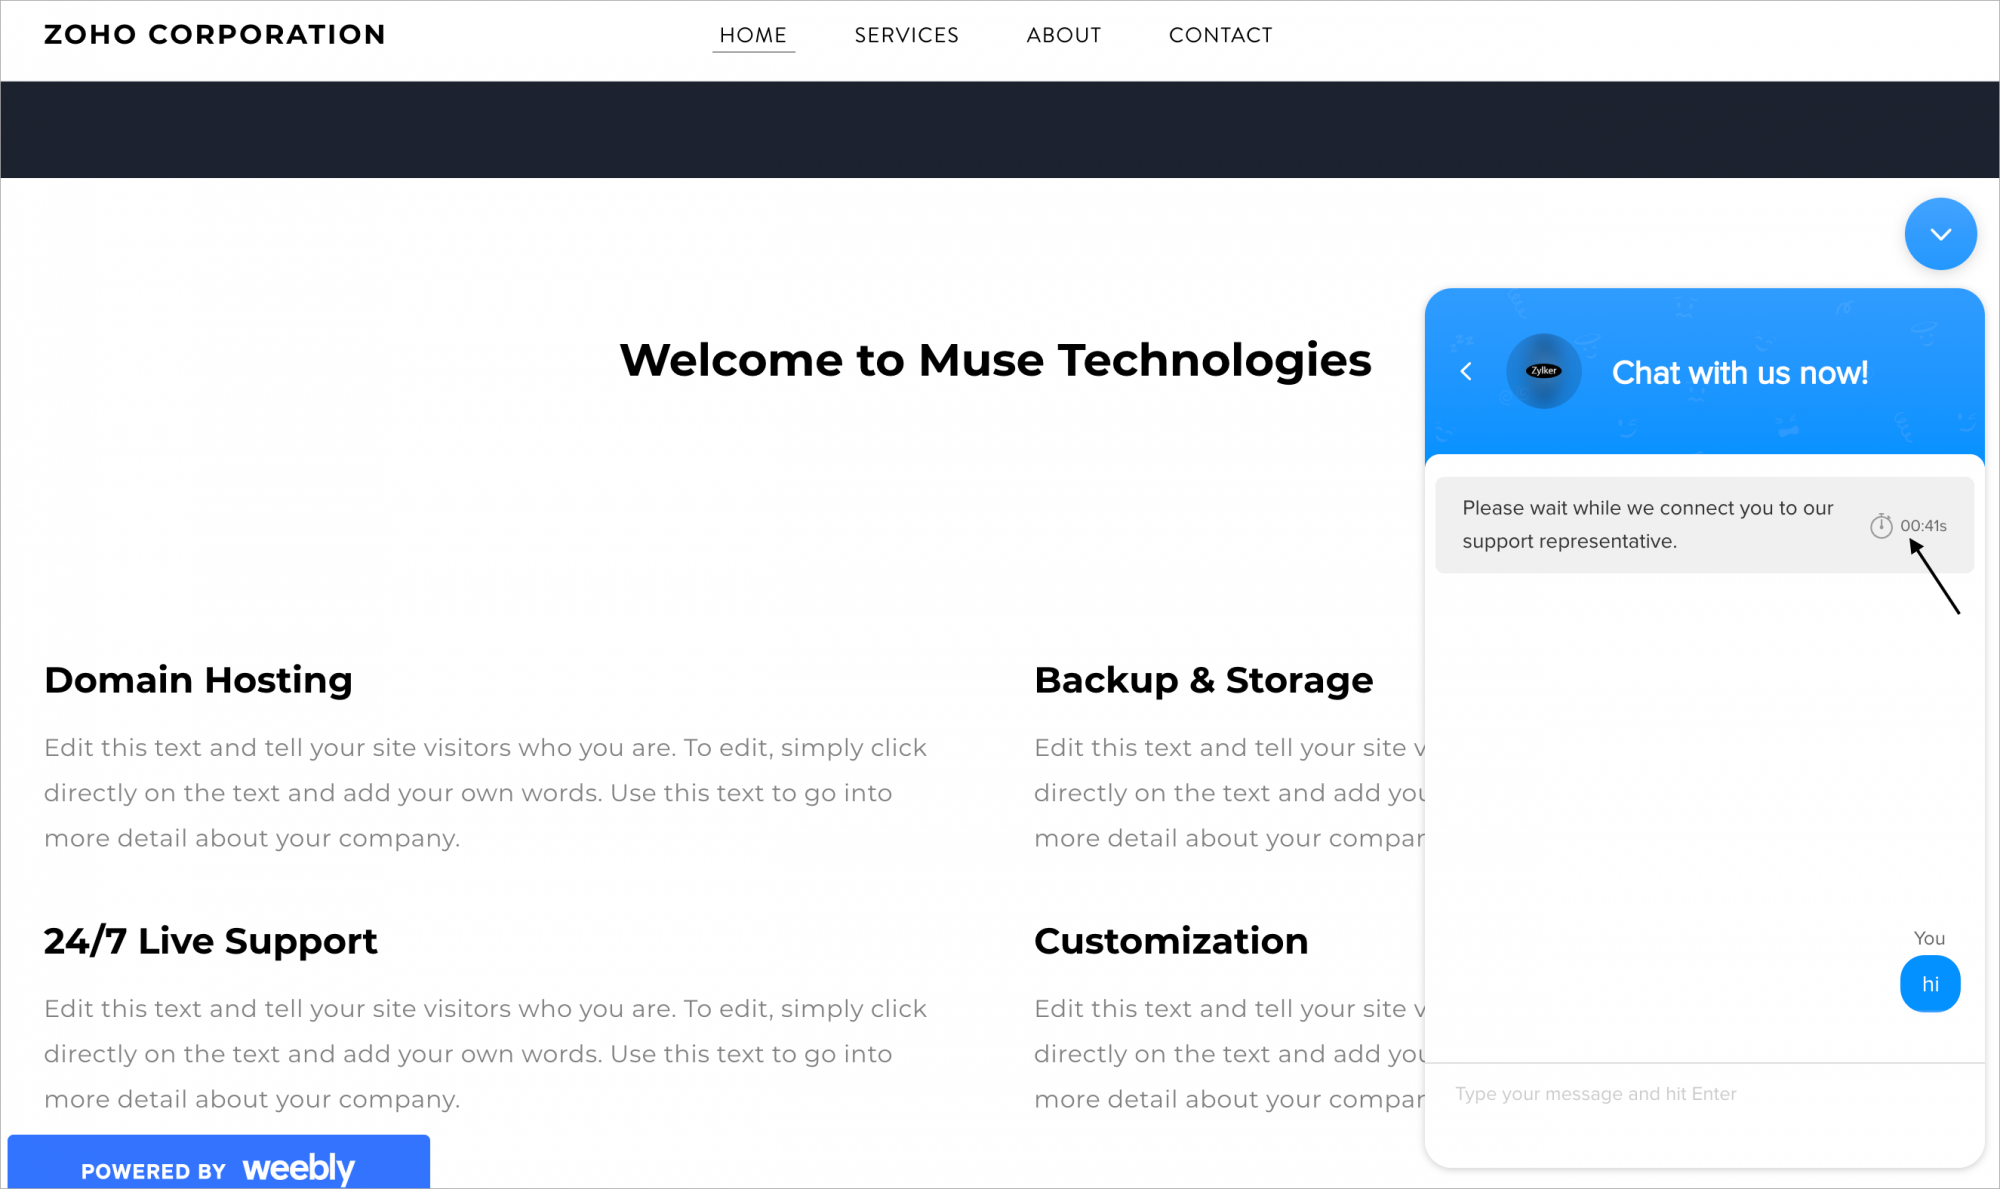
We recommend you to use less waiting time, the lesser the waiting time, the higher the satisfaction and business conversions.
How do I choose a Specific Department to assign visitor chats?
Let the visitor choose the department operator whom they would like to chat with, this ease the process and allow the visitor to connect with the right representative instantly.
- In Settings > Websites > website name, choose Live Chat Widget.
- Then, navigate to Chat Window > Configurations, and customize the default window according to your needs.
- In Configurations tab, Choose a Specific Department to Assign Chats from the drop-down.
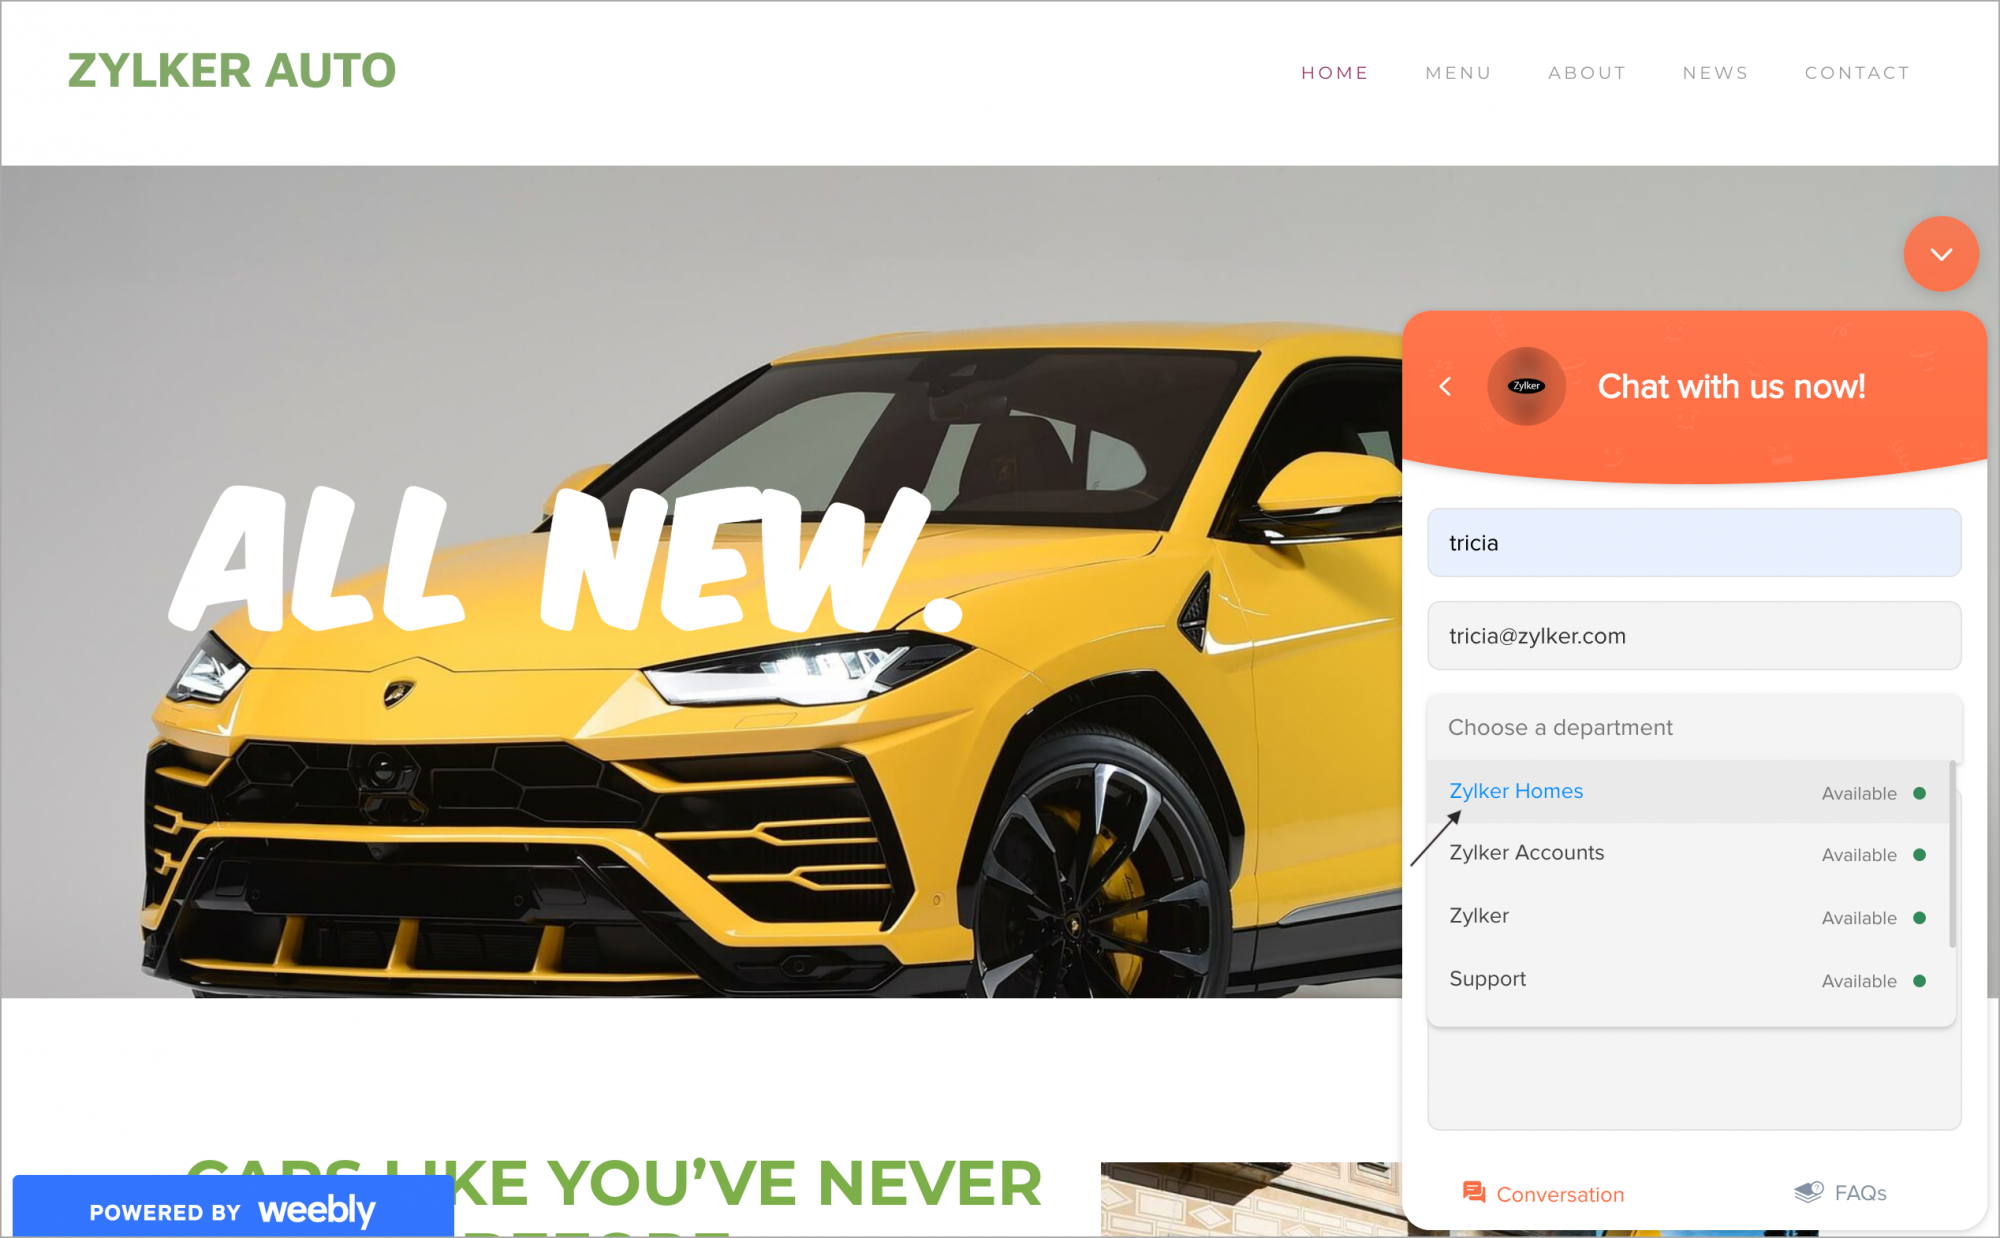
- If you choose, Allow Visitors to Select Department option then the drop-down will be displayed in the Pre-chat window and the visitor can select the department he would like to chat with.
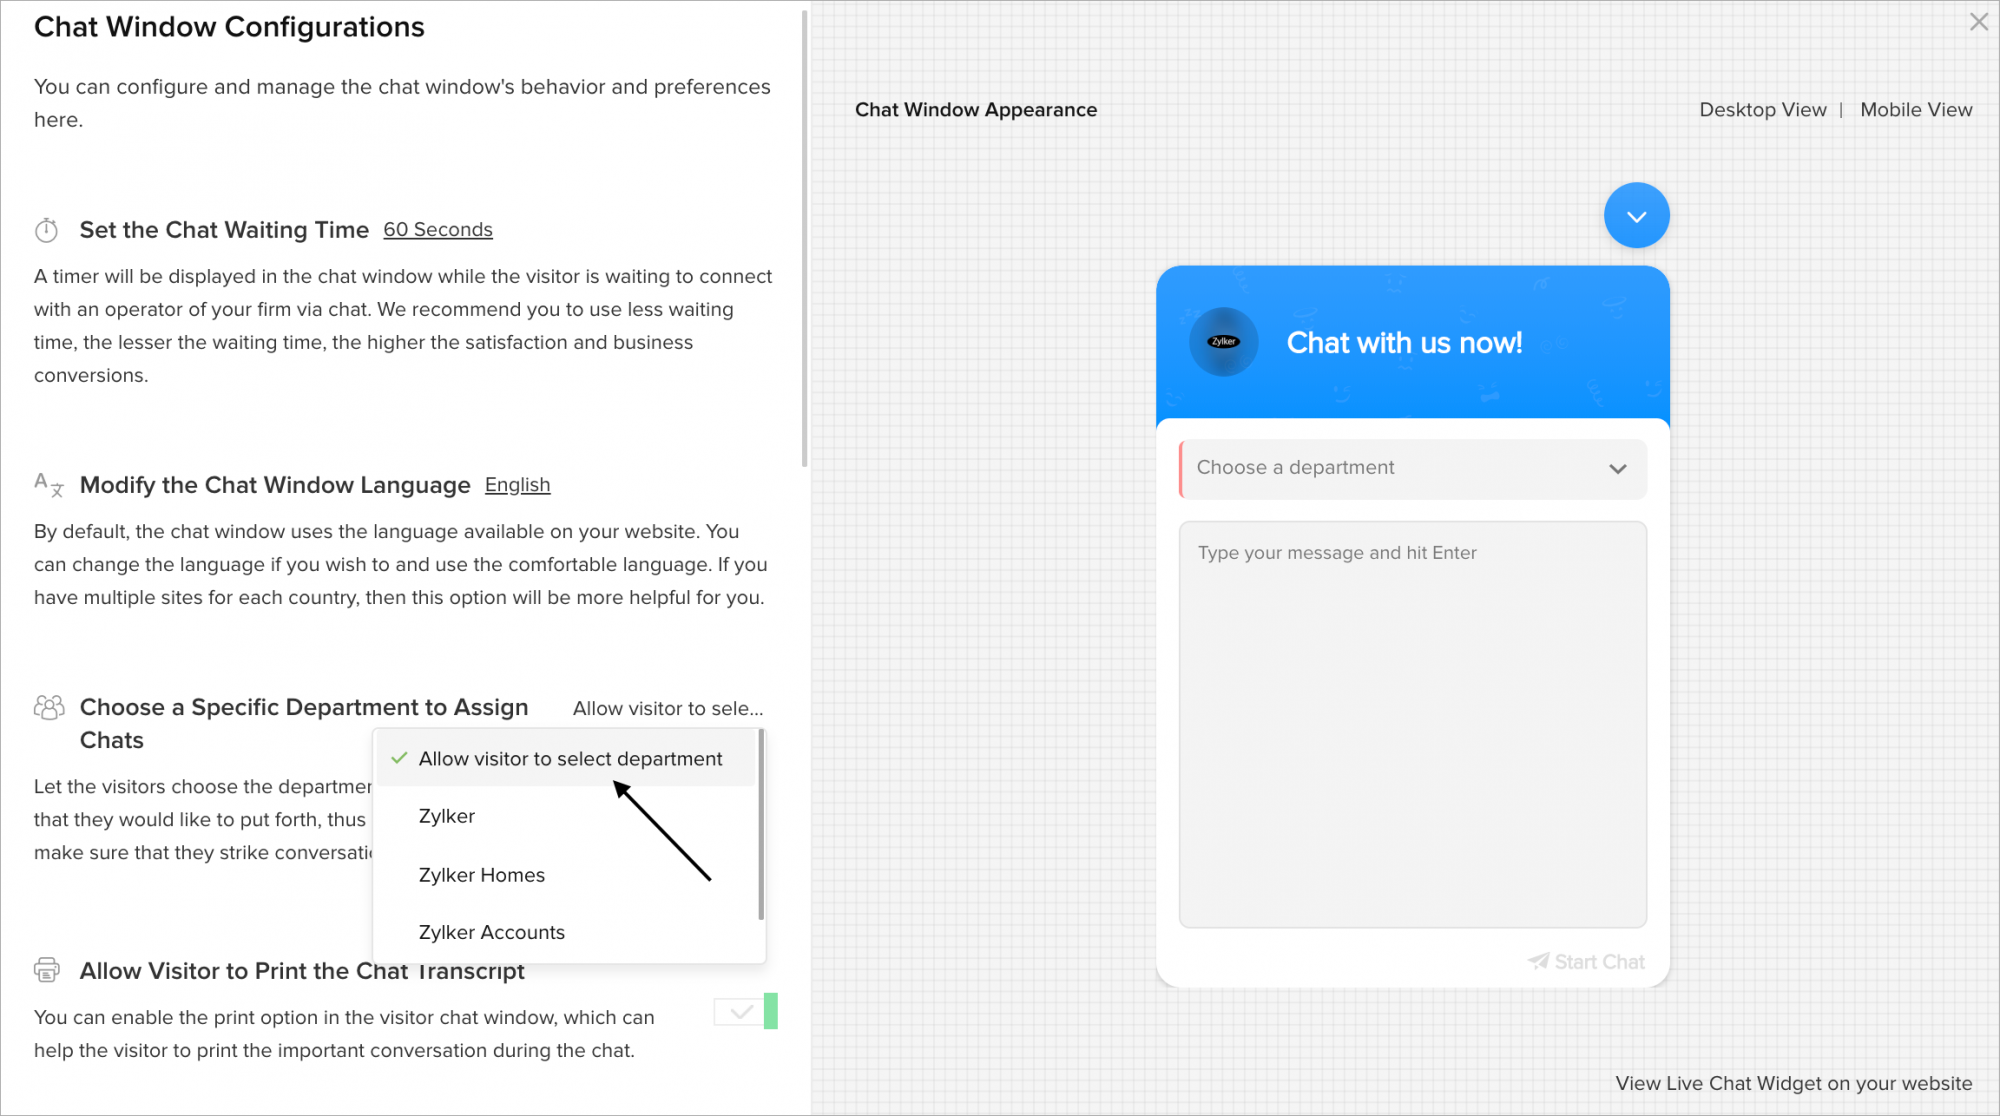
- Now, the visitor can choose the available departments in the chat window to strike a conversation.
How do I modify the chat window Language according to my website locale?
By default, the chat window uses the language available on your website. You can change the language if you wish to and use the comfortable language. If you have multiple sites for each country, then this option will be more helpful for you.
- In Settings > Websites > website name, choose Live Chat Widget.
- Then, navigate to Chat Window > Configurations, and customize the default window according to your needs.
- In Configurations tab, Choose from the Modify the Chat Window Language drop-down.
- If you do not find the language you are looking for, or if you wish to change the language according to your website. Then, choose the Website Language option in the top of the drop-down.
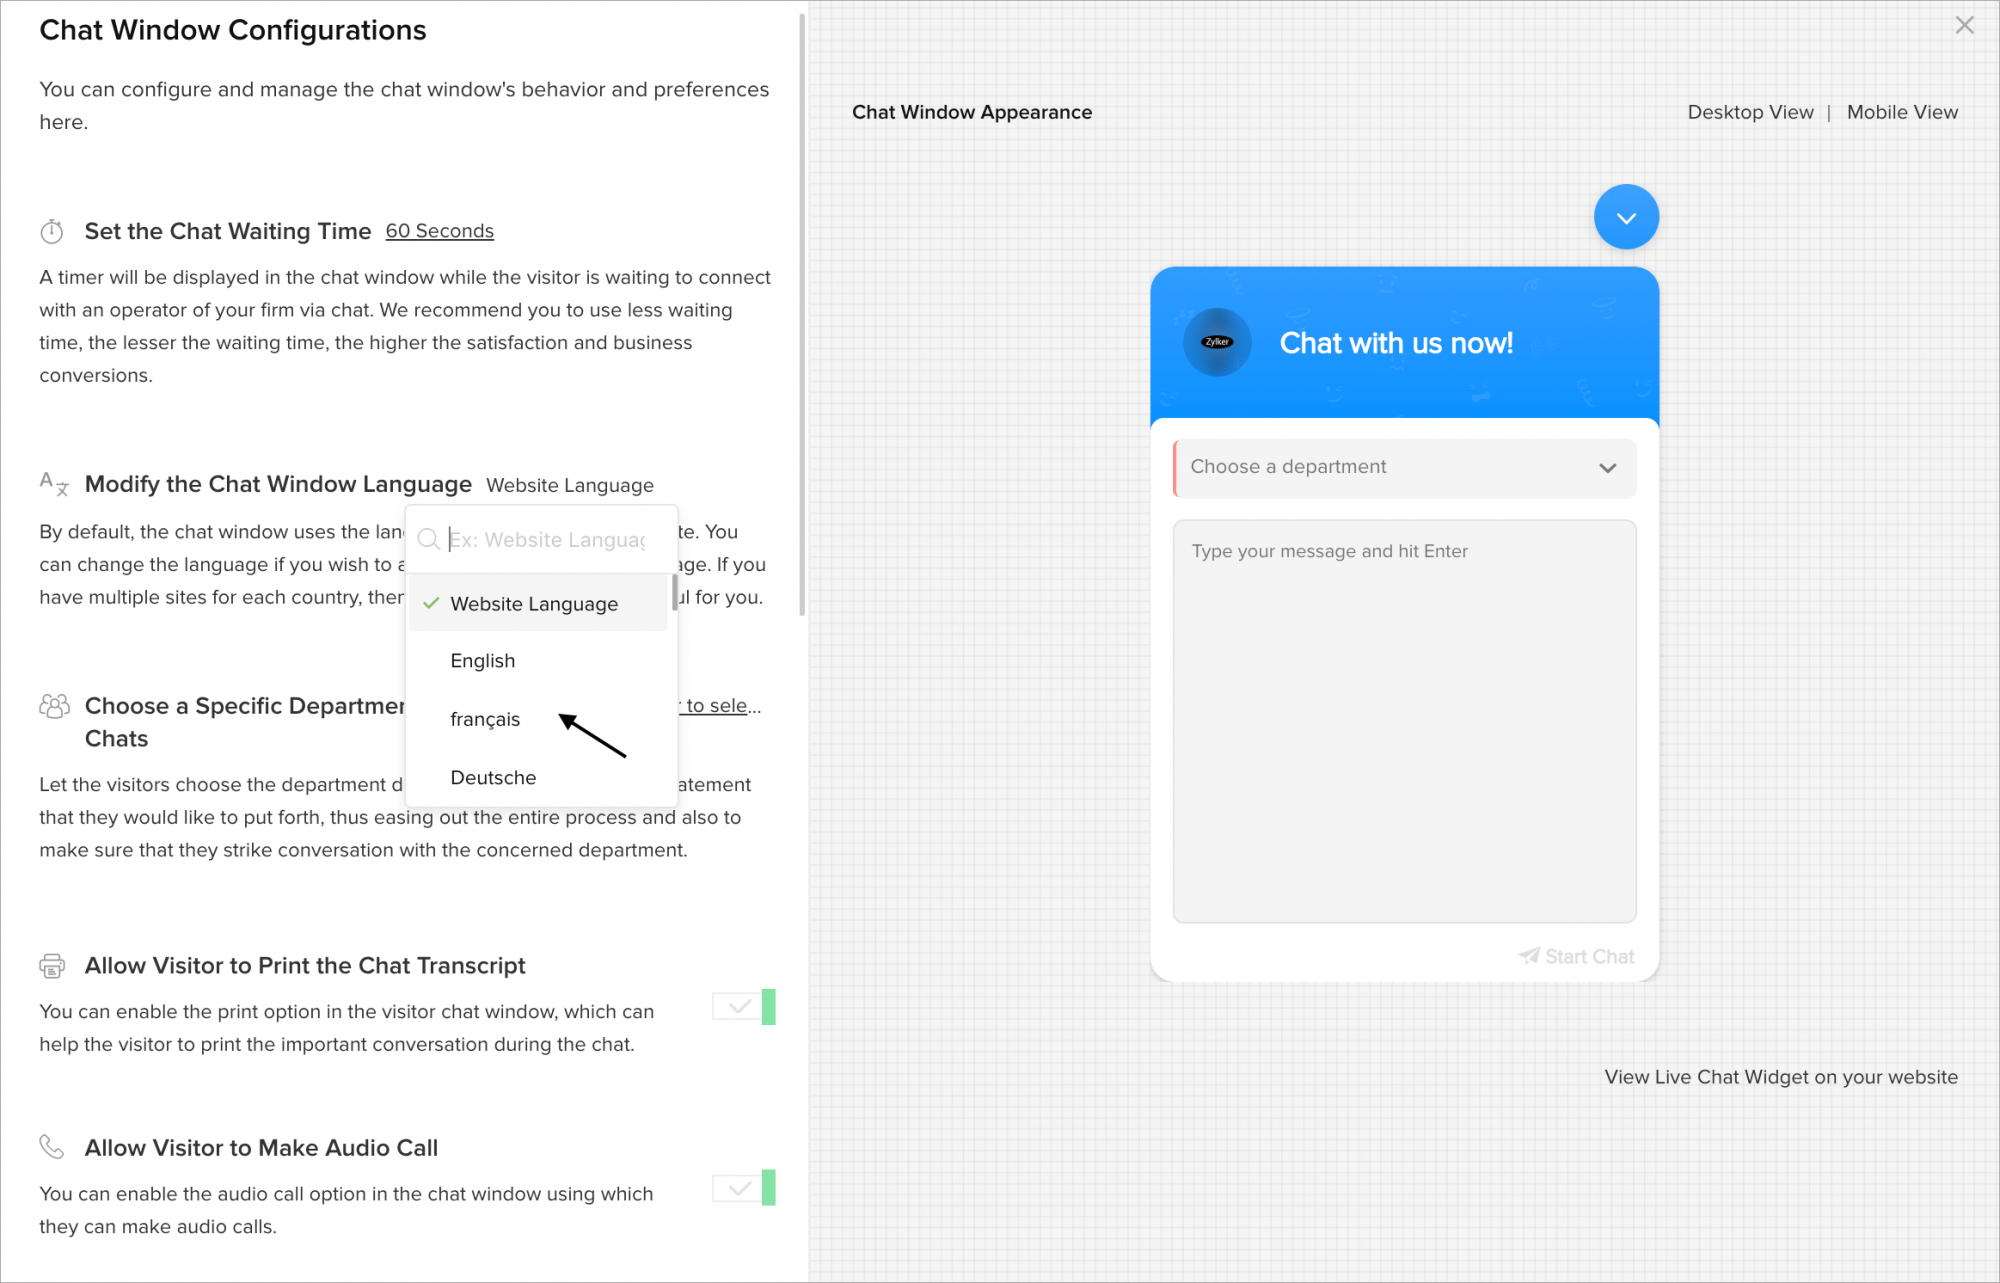
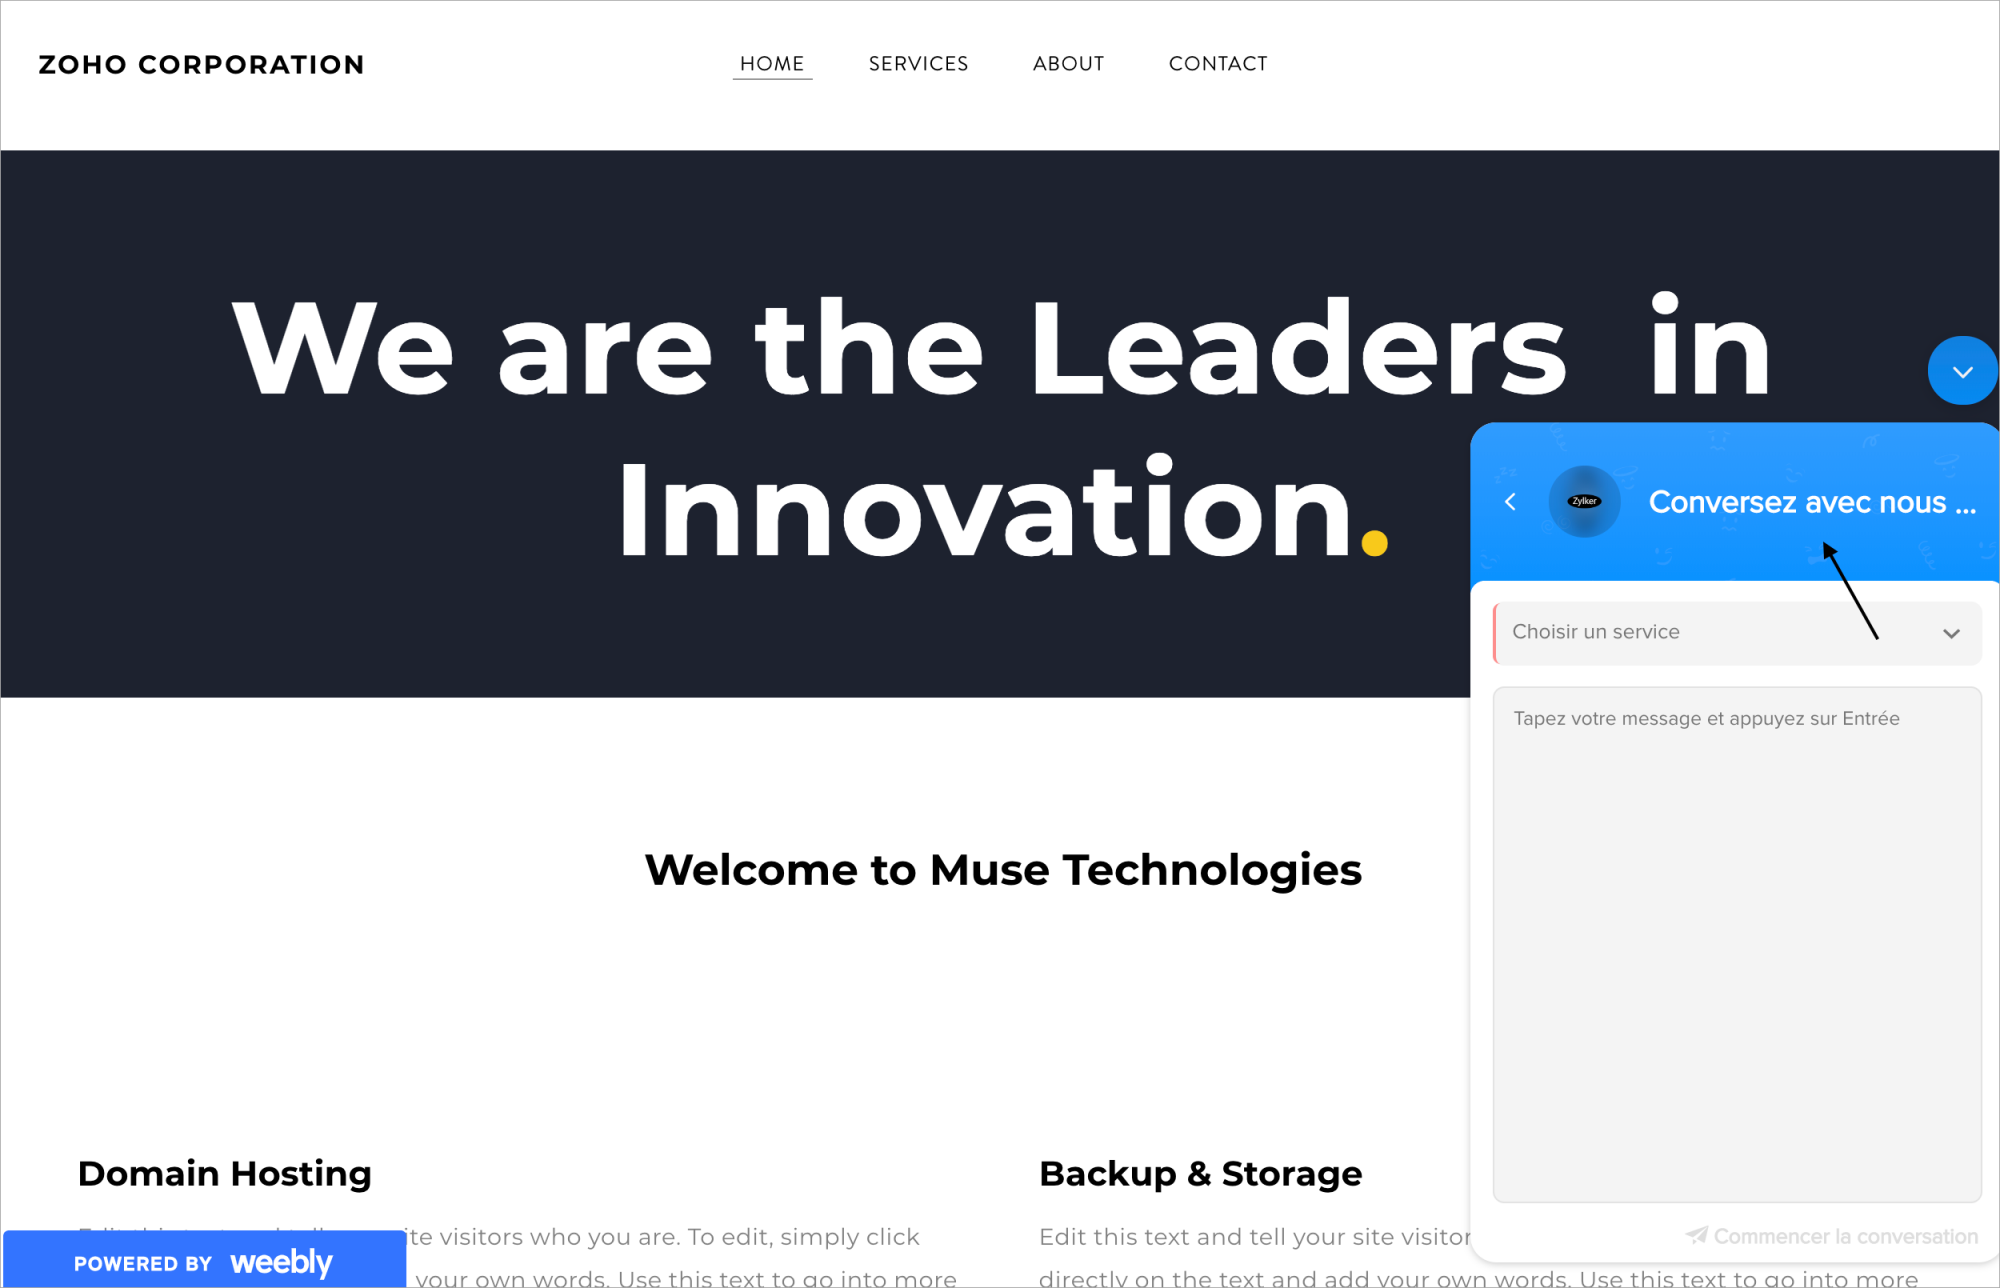
- Now,the visitor can view the chat window in the selected language or website language.
The Languages supported in Zoho SalesIQ:
- French [français]
- German [Deutsche]
- Spanish [Español]
- Dutch [Nederlands]
- Norwegian [norsk]
- Turkish [Türk]
- Russian [русский]
- Portuguese [português]
- Italian [italiano]
- Korean [한국어]
- Japanese [日本語]
- Danish [dansk]
- polish [polski]
- Arabic [العربية']
- Hungarian [Magyar]
- Portuguese [pt_PT]
- Chinese [中文]
- Hebrew [עברית]
- Irish [Gaeilge]
- Romanian [Română]
- Thai [ไทย / Phasa Thai]
- Swedish [Svenska]
- Greek [Ελληνικά]
Allow visitor to Print the chat transcript
You can enable the print option in the visitor chat window, which can help the visitor to print the important conversation during the chat.
- In Settings > Websites > website name, choose Live Chat Widget.
- Then, navigate to Chat Window > Configurations, and customize the default window according to your needs.
- In Configurations tab, enable the Allow Visitor to Print the Chat Transcript option.
- And, Update changes.
- Now, the visitor can view the option in the Chat Window.

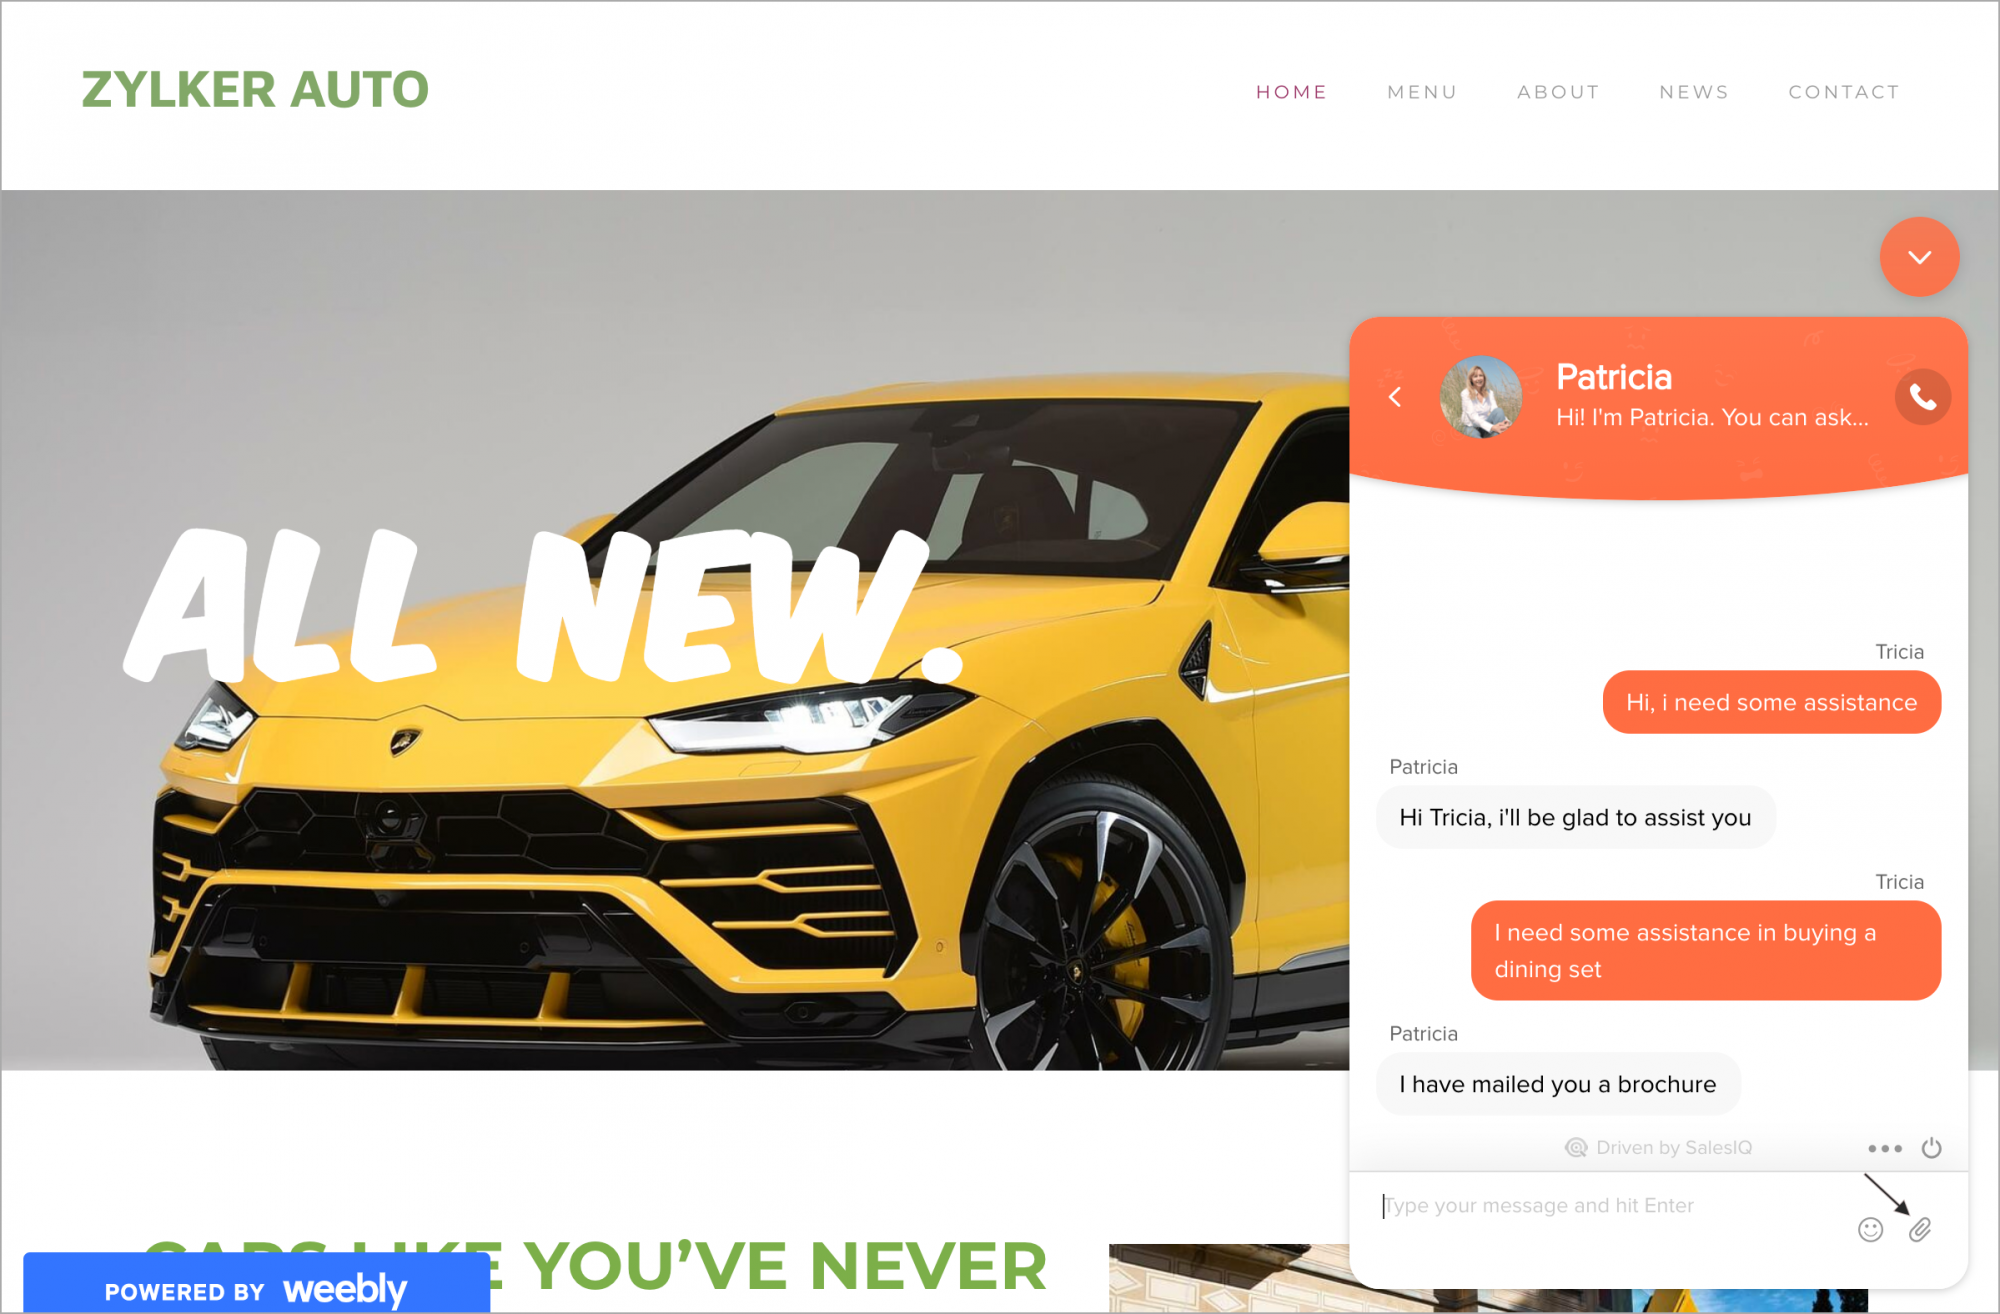
Allow visitors to Share Files during the conversation
You can enable the attachment option in the chat window with which the visitors can share the images, word document, PDF, audio and video files with the operators during the conversation.
- In Settings > Websites > website name, choose Live Chat Widget.
- Then, navigate to Chat Window > Configuration, and customize the default window according to your needs.
- In Configurations tab, enable the Allow Visitors to Share Files during the Conversation option. Update changes.

- Now, the visitor can view the option in the Chat Window.
Display the emojis icon in the chat window
You can provide visitors with a wide range of emojis to choose from and make your conversations more emotively expressive.
- In Settings > Websites > website name, choose Live Chat Widget.
- Then, navigate to Chat Window -> Configurations, and customize the default window according to your needs.
- In Configurations tab, enable the Avail emojis in chat window option. Update changes.

- Now, the visitor can view the option in the Chat Window.

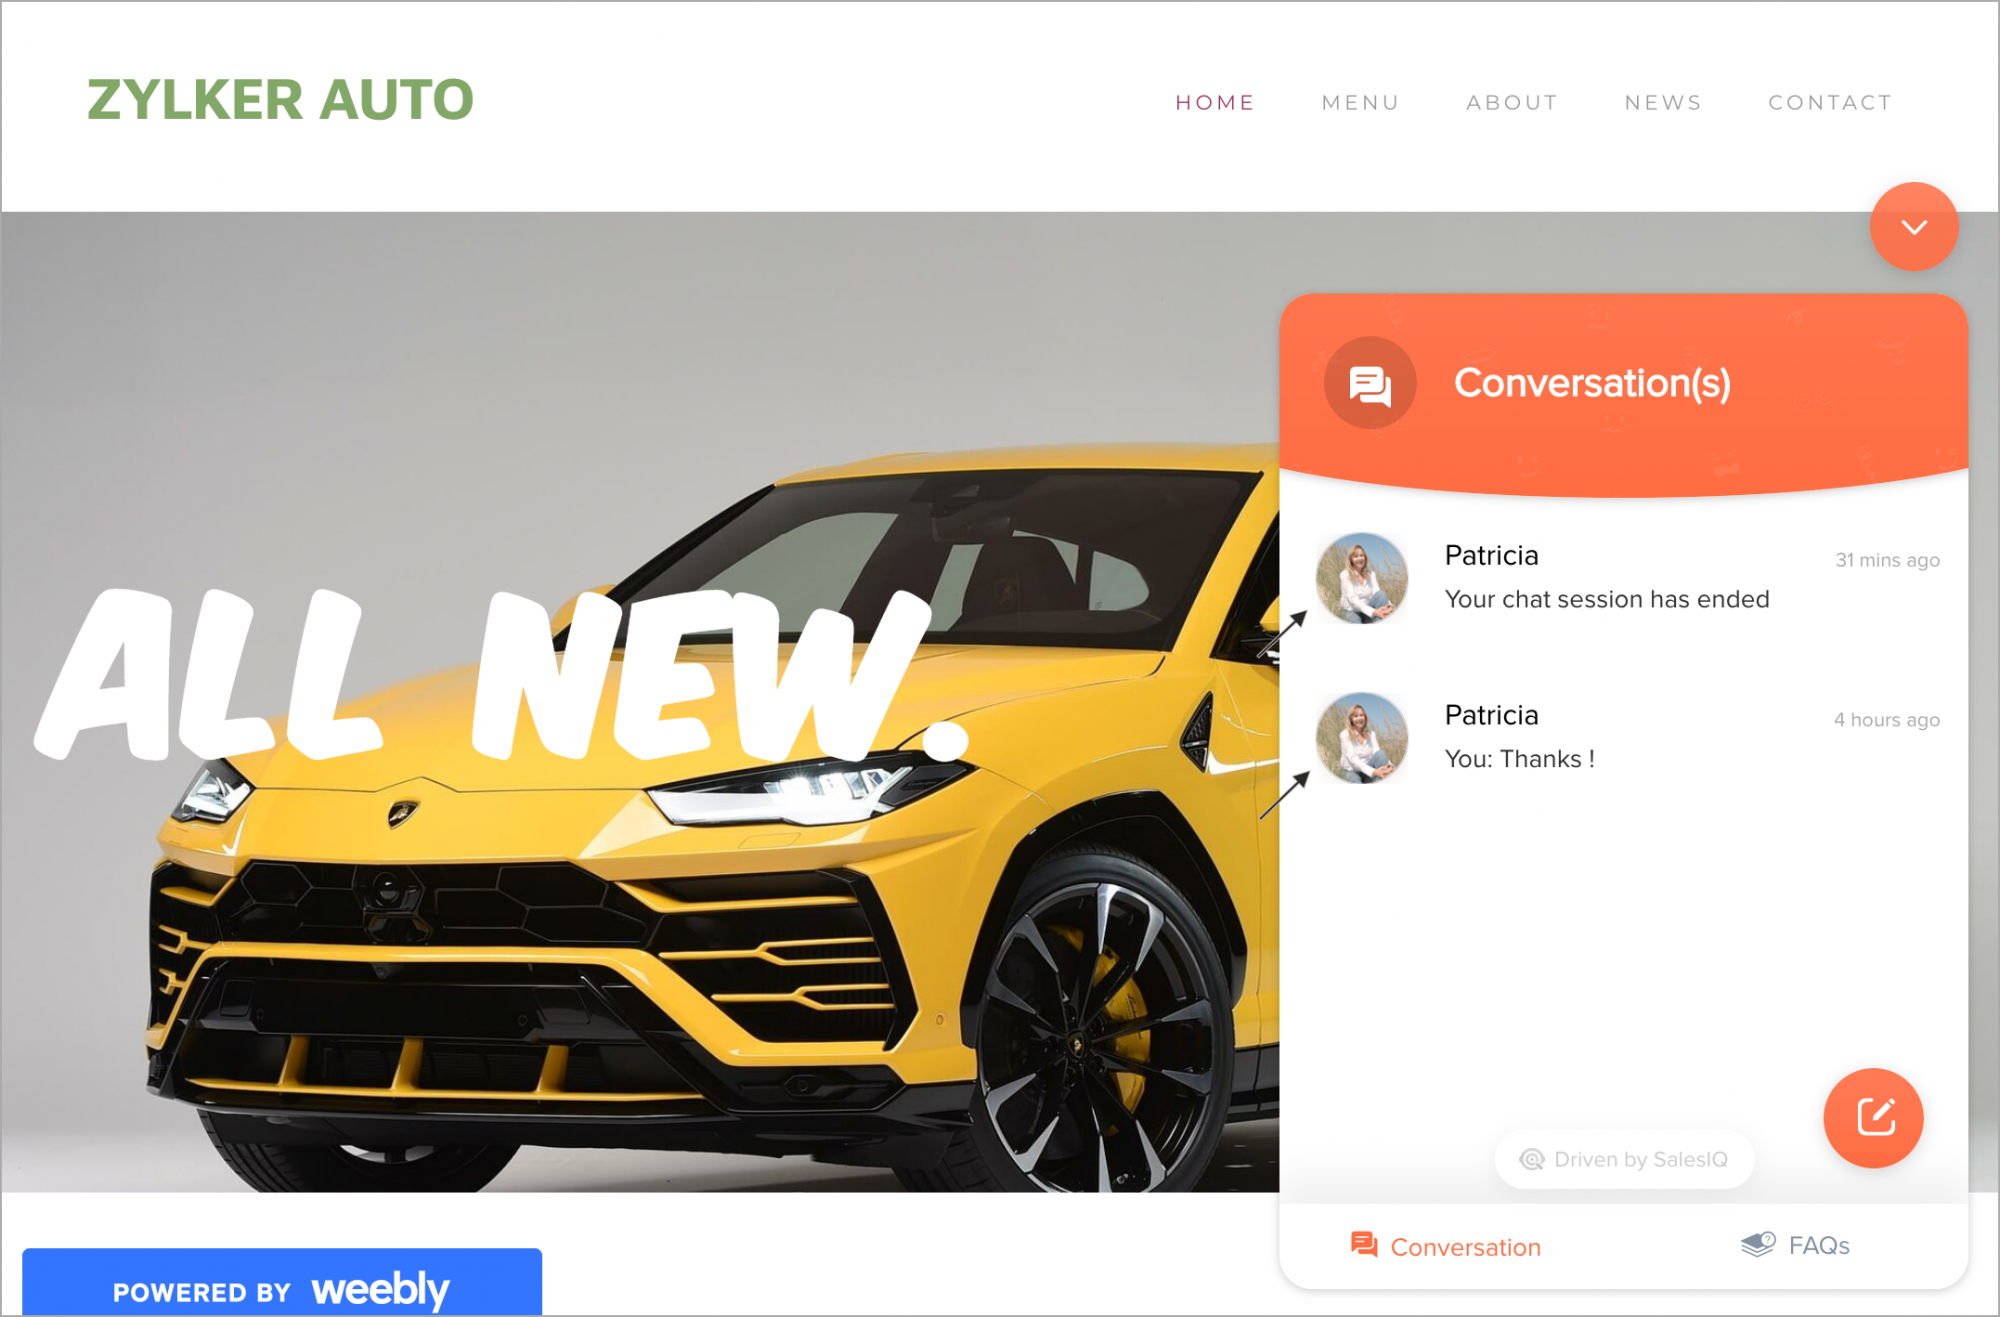
Let your visitors view the Previous Chat Conversations in the chat window
The visitors can view their previous chat conversations for future reference and catch up on conversations they would have missed out.
- In Settings > Websites > website name, choose Live Chat Widget.
- Then, navigate to Chat Window > Configurations, and customize the default window according to your needs.
- In Configurations tab, enable the View Previous Chat Conversations option.
- And, Update changes.
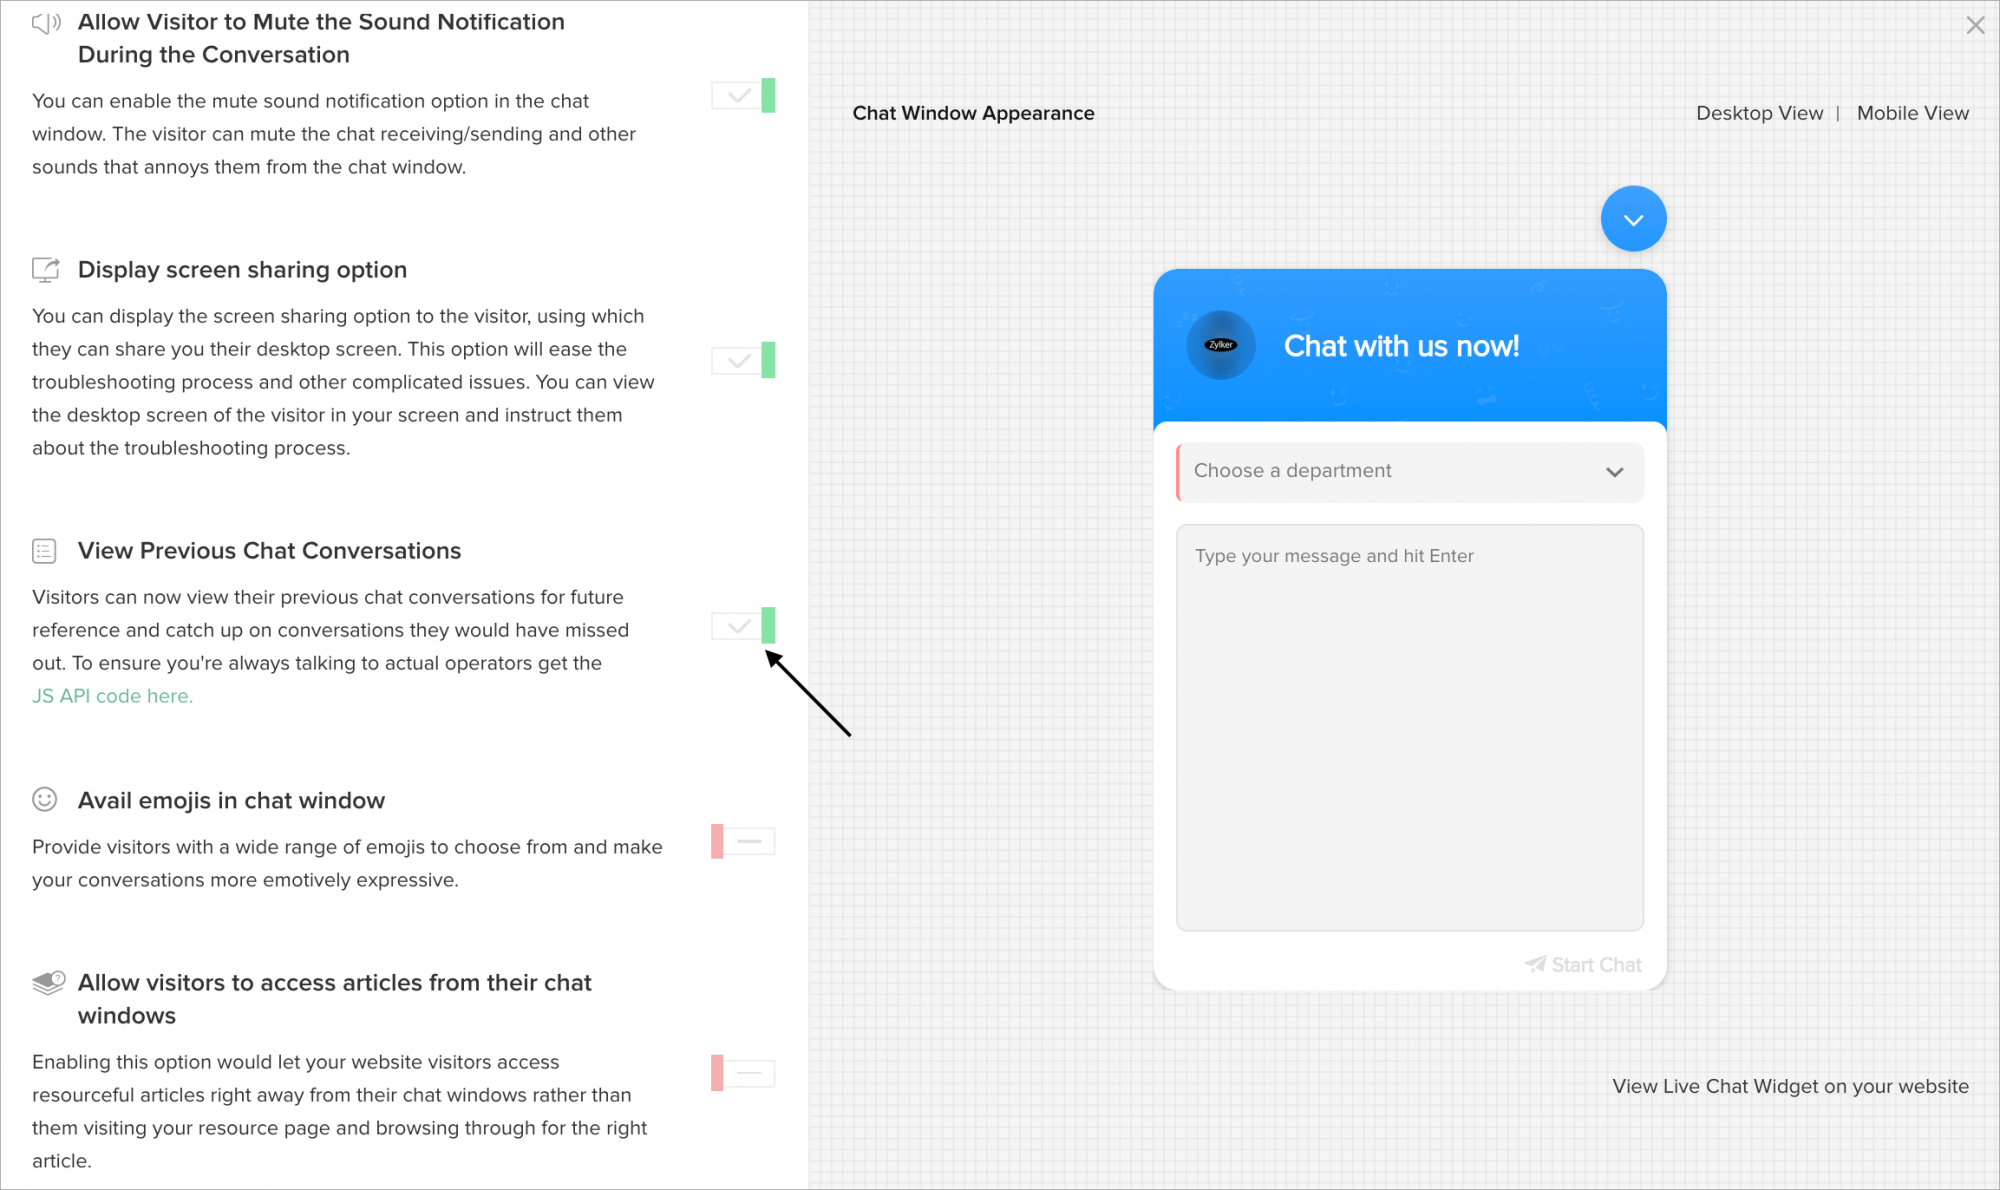
- Now, the visitor can view the option in the Chat Window.
How do I choose visitor Input Fields displayed in the Chat Window?
You can choose the visitor input fields in the chat window in the Fields section. You can add these fields in the chat window to fetch the visitor's information before they connect with you in chat. You can add or remove the fields in the chat window by clicking on the button adjacent to the field name. If you wish to mark the field as mandatory, then add the field to the chat window and click above the field and check the mandatory box
Adding visitor input fields in the Pre-Chat Window
- In Settings -> Websites -> Website Name, choose Live chat widget.
- Then, navigate to Chat Window -> Fields, and customize the default window according to your needs.
- In the Fields section, Choose the Pre-Chat option in Chat Survey.
- In the Choose Input Fields to Display in the Chat Window, click on the Add button adjacent to the fields you would like to add in the chat window.

- If you wish to make the input field as mandatory, then hover over the chat window pre-view displayed in the left side.
- The Mark the field as mandatory option appears, check the field.

- If you wish to delete/remove the input field in the chat window, click on the Disable button adjacent to the fields.
Adding visitor input fields in the Post-Chat Window
- In Settings > Websites > Website Name, choose Live chat widget.
- Then, navigate to Chat Window > Appearance, and customize the default window according to your needs.
- In the Fields section, Choose the Post-Chat option in Chat survey.
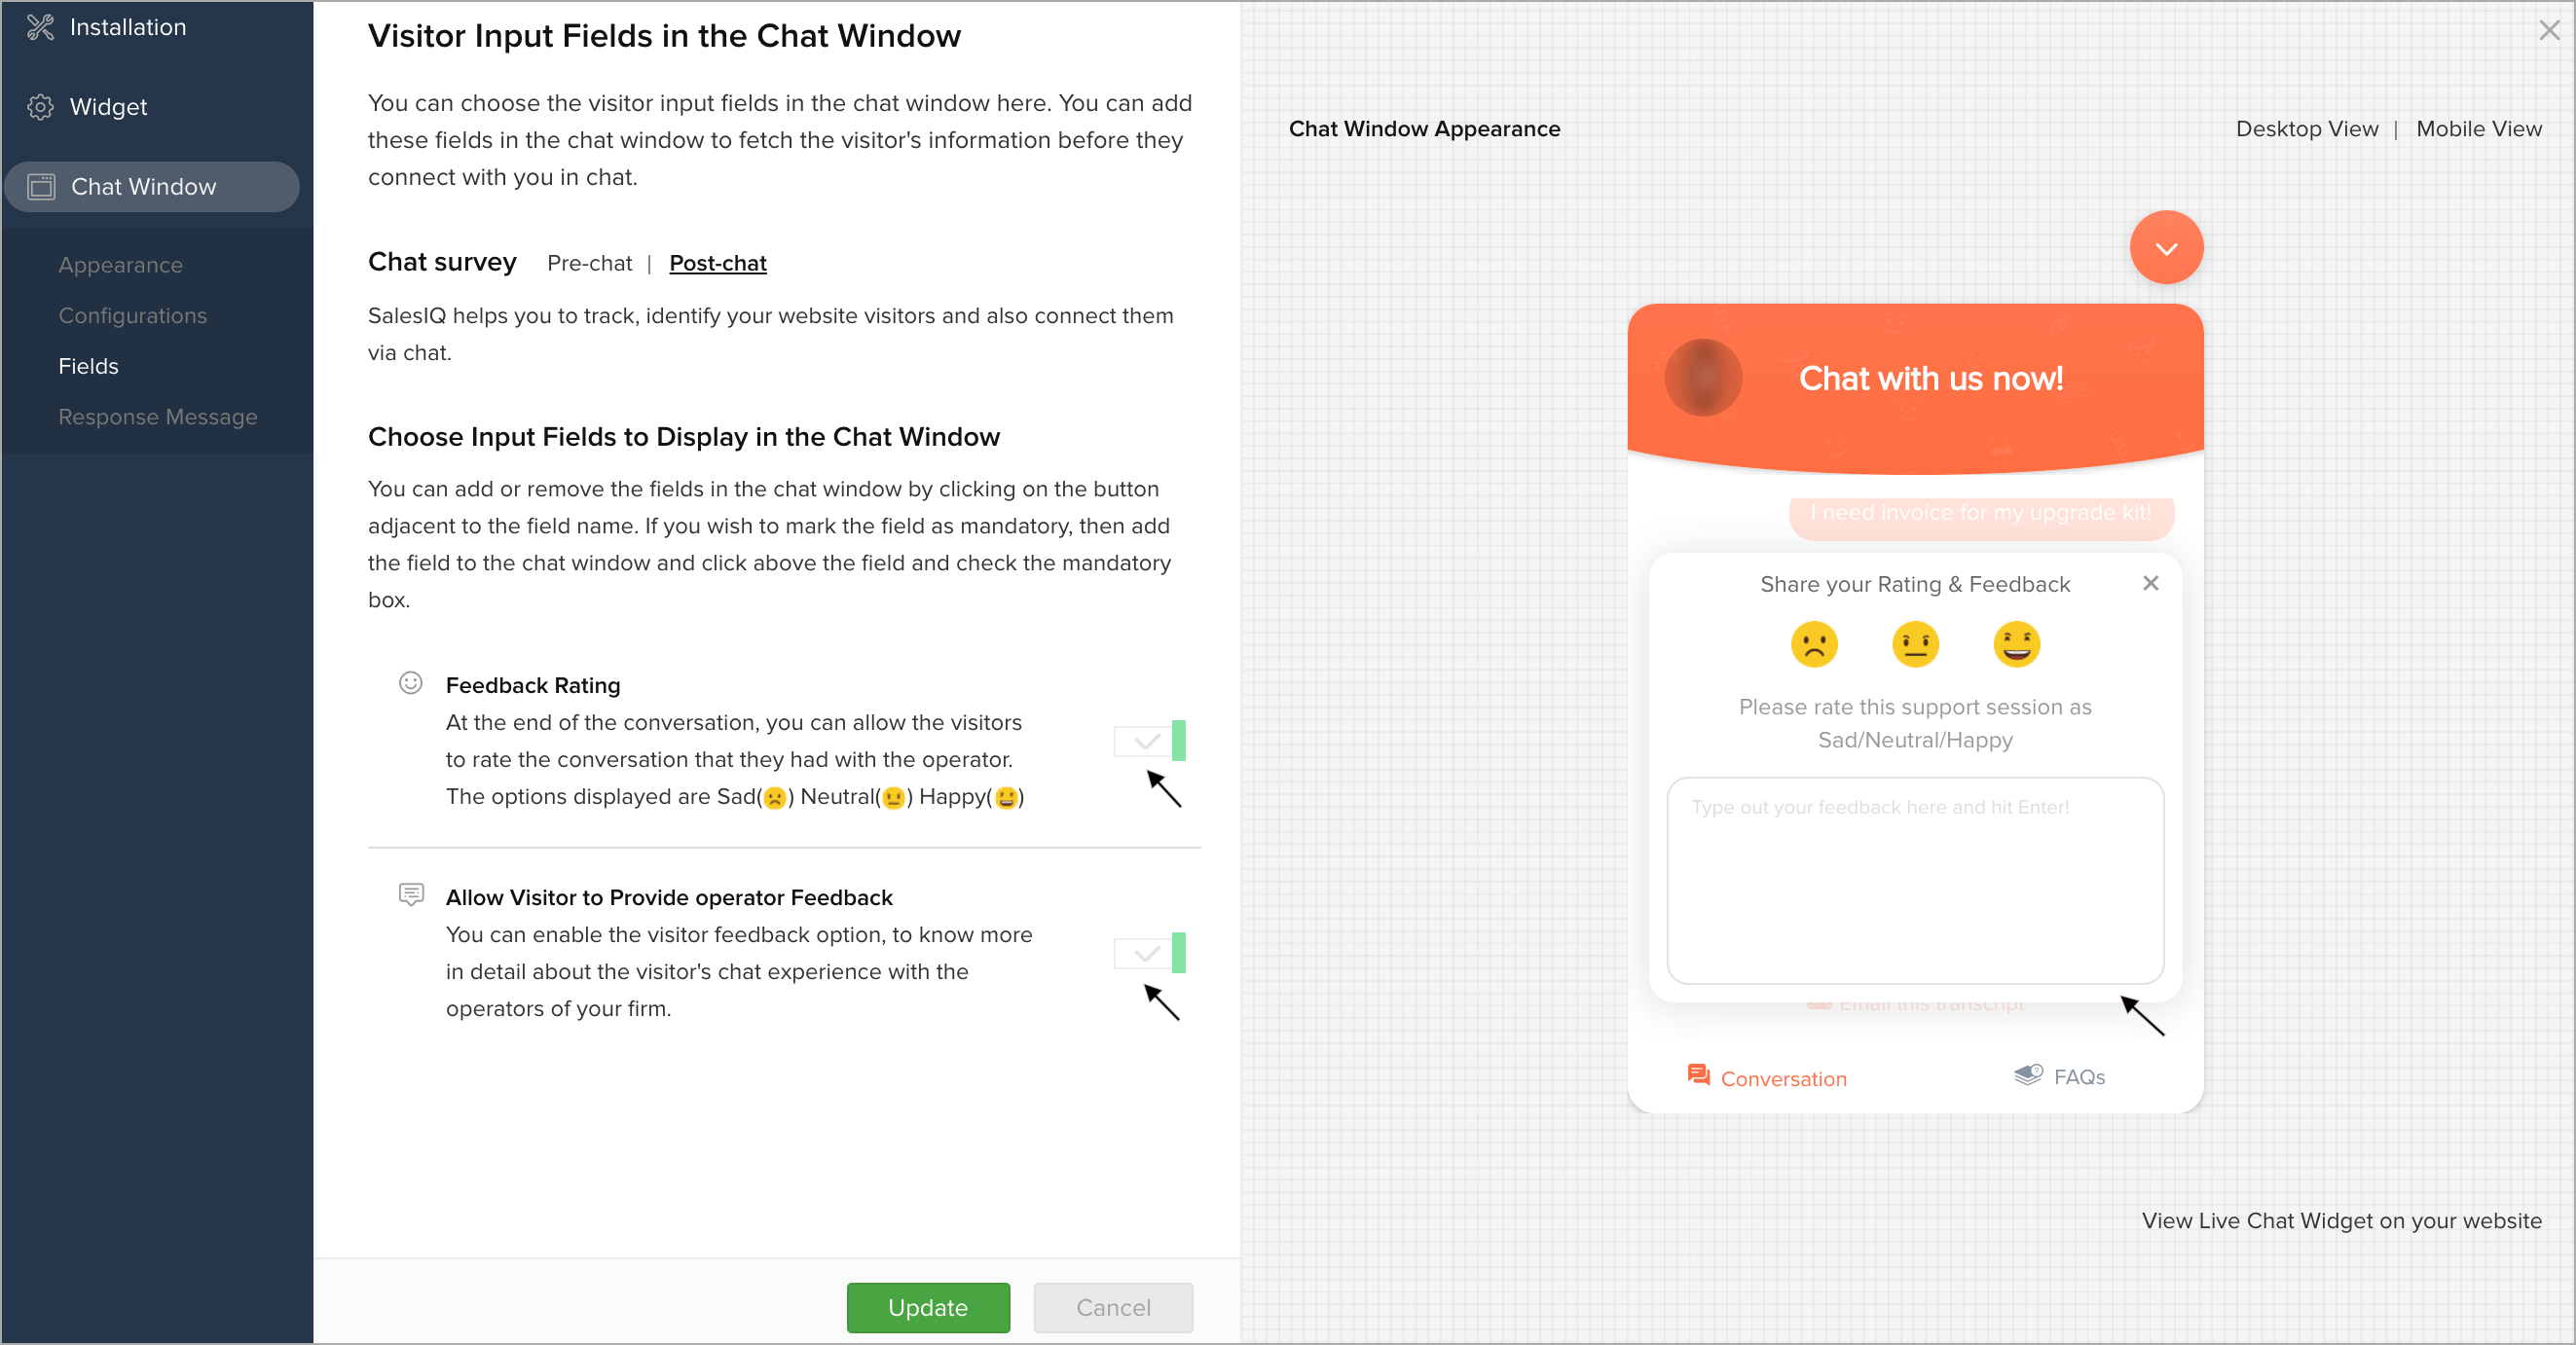
- In the Choose Input Fields to Display in the Chat Window, enable the option you would like to add in the post-chat window.
- You can rate the chat conversation by enabling the Feedback Rating option.
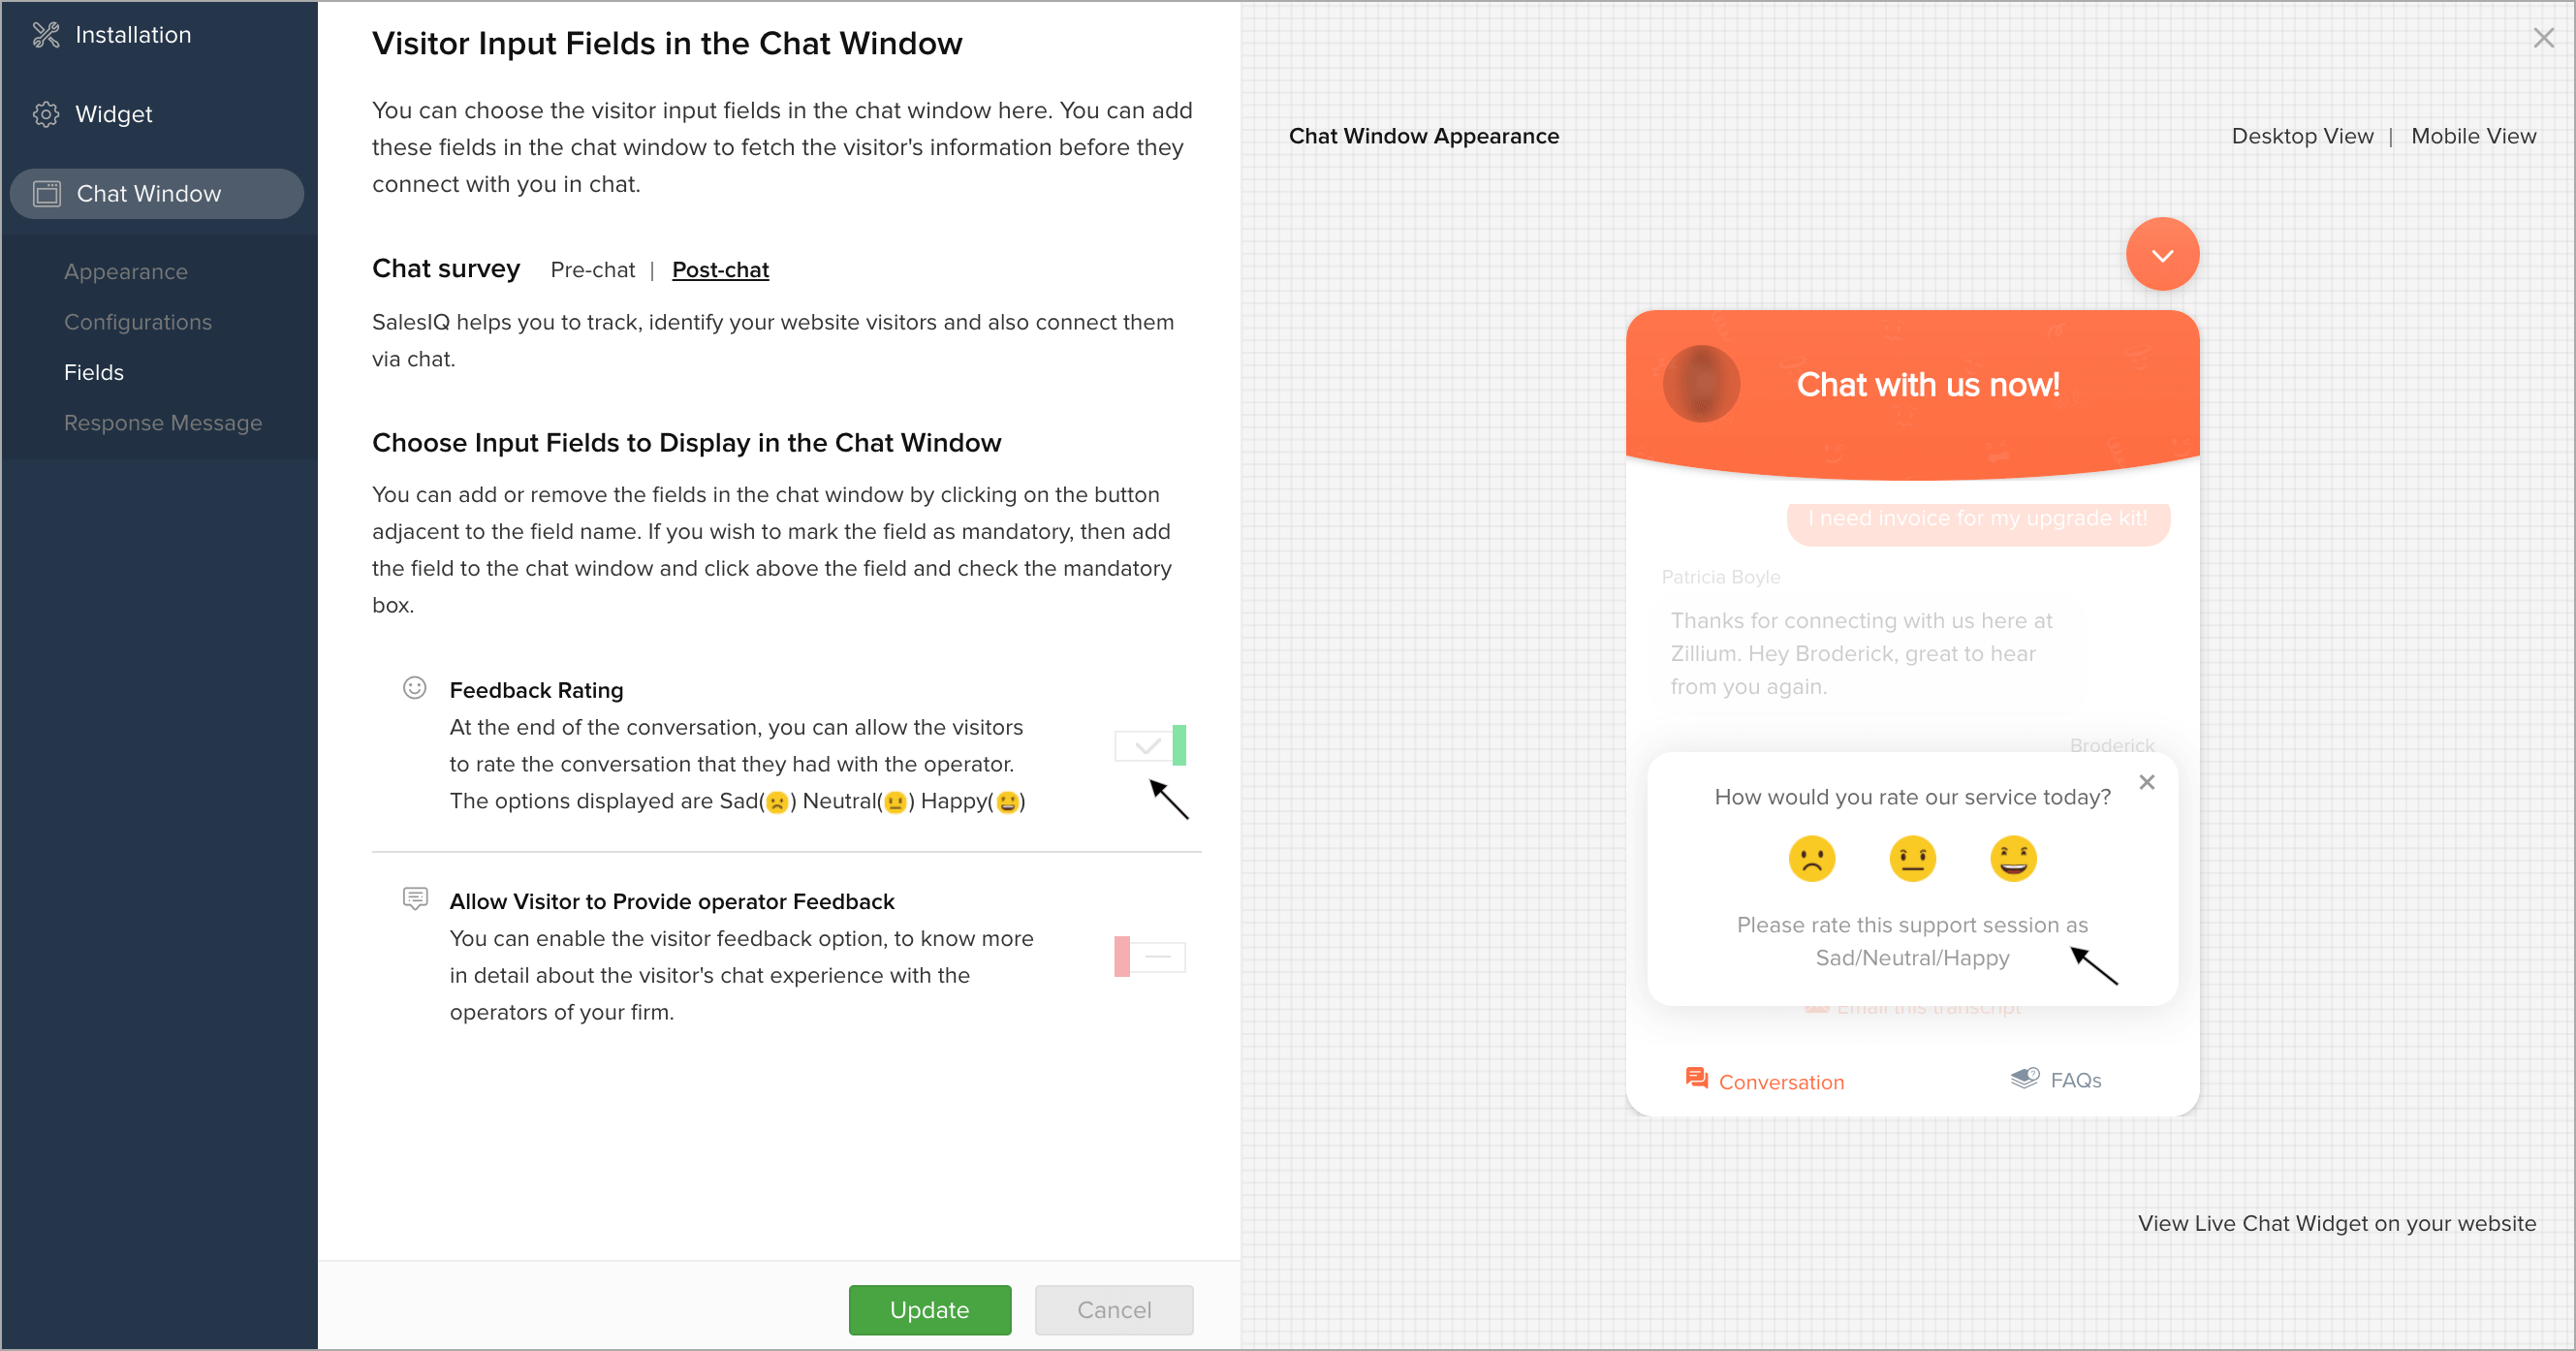
- This will enable the visitor rating option while ending the chat conversation, which can define the visitor's satisfaction about the service provided. The visitor can rate the operator based on the options - Sad/Neutral/Happy.
- If you wish to allow the visitor to provide Feedback, then enable the Allow Visitor to Provide Operator Feedback option.
- You can enable the visitor feedback option, to know more in detailed about the visitor’s experience during the chat conversation with the operator.
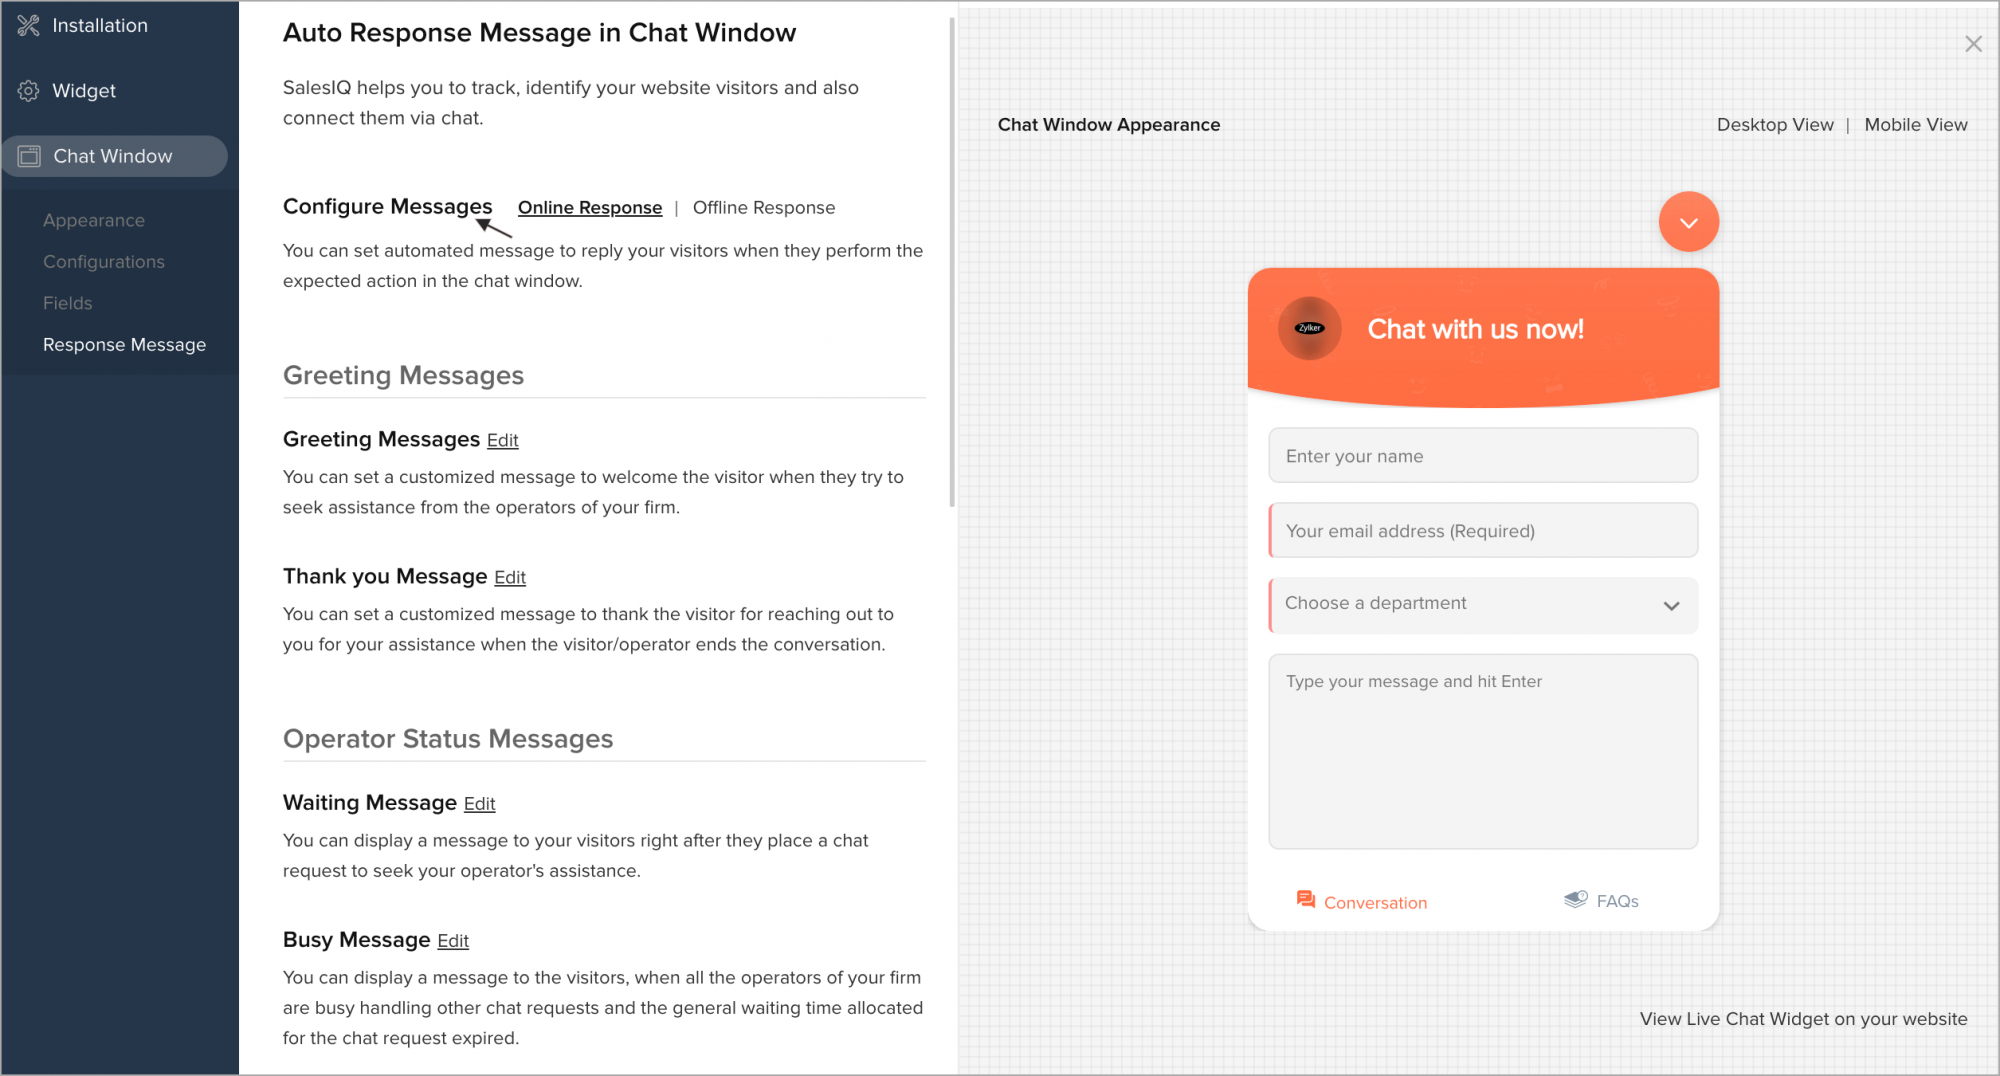
How do I set Auto Response Message in chat window?
You can set automated message to reply your visitors when they perform the expected action in the chat window. You can set Offline and Online messages.
Online Status Messages
- Greeting Messages
- Greeting Messages
- Thank you Message
- Operator Status Messages
- Waiting Message
- Busy Message
- Busy Response Message
- Engaged Message
- Engaged Response Message
- Customer Satisfaction
- Feedback Message
- Rating Message
Offline Status Message
- Offline Message
- Offline Response Message
How do I set the Auto Response - Offline Status Message in chat window?
- In Settings > Websites > website name, choose Live Chat Widget.
- Then, navigate to Chat Window > Response Message, and customize the default window according to your needs.
Setting an Offline Message
If the visitors visit your website after business hours or holidays, then you can display a message to submit their queries as a message.You can display a customized message to thank the visitor for submitting the message.
How do I set the Auto Response - Online Status Messages in chat window?
In Chat Window > Response Message section you can set automated message to reply your visitors when they perform the expected action in the chat window.
Setting Greeting Messages
- Greeting Messages - You can set a customized message to welcome the visitor when they initiate a chat and get connected to the operator.
- Thank you Message - You can set message to thank the visitor in the chat window for reaching you when the visitor/operator ends the conversation.

Setting the Operator Status Messages in Chat Window
- Waiting Message - You can display a message to the visitor when they initiate a chat and waiting to connect to the operator.
- Busy Message - You can display a message to the visitors, when all the operators are busy in other chat and the chat connecting time in the visitor chat window expired.
- Busy Response Message - You can display confirmation message to the visitor, when they leave their queries as a message for the operator to contact them after trying to connect and gets a operator busy message.
- Engaged Message - You can display a message to the visitors when all the operators are busy assisting other visitors, and the chat window goes offline.
- Engaged Response Message - You can display a thank you message to your website visitors when the chat button goes offline while all the operators are busy assisting others and the visitor submits the query for getting assistance later.
Setting Customer Satisfaction Messages
- Feedback Message - You can display a customized message to get your visitors feedback to measure their satisfaction.
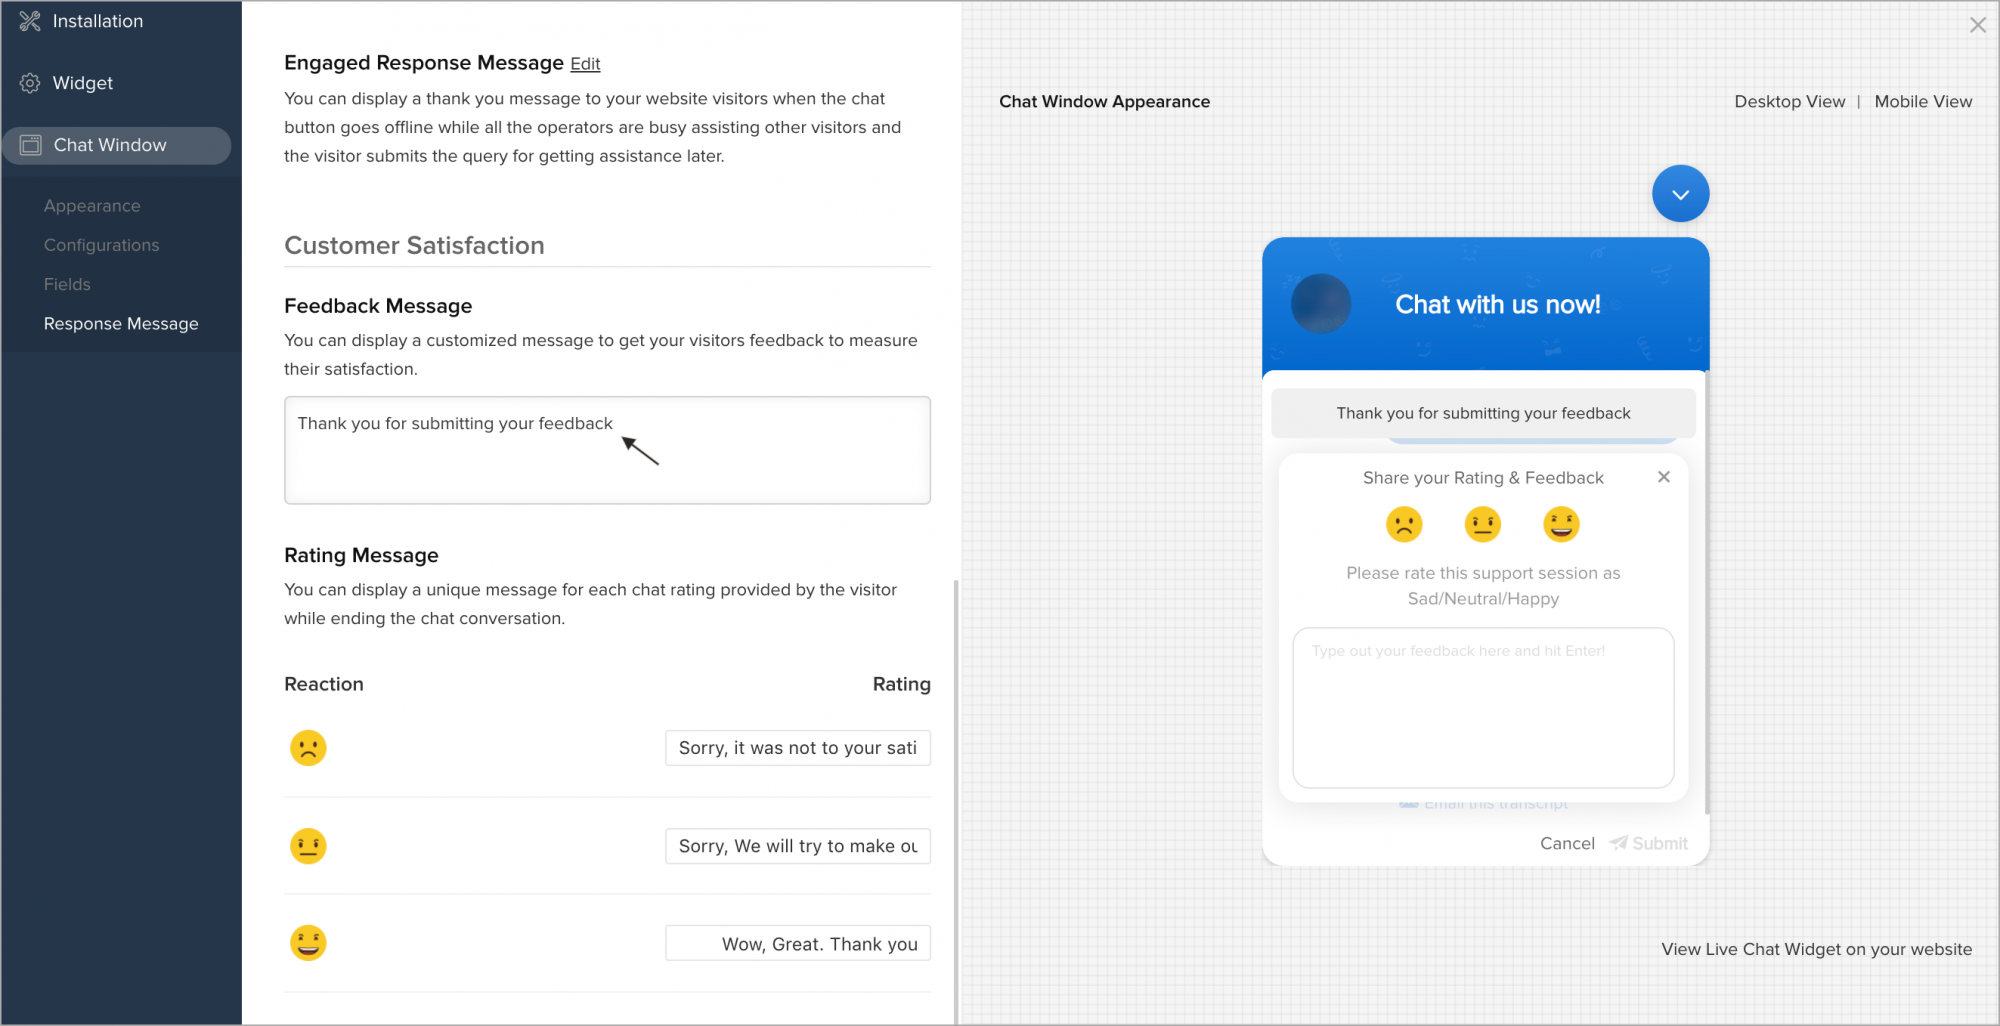
- Rating Message - You can display a unique message based on the emoji (Sad/Neutral/Happy) clicked by the website visitors while ending the chat conversation.
Related Articles
Customize your Live Chat Widget
You can now customize the live chat widget and the chat window to match the look-and-feel of your website and choose where and how you want them to be displayed to your customers and can connect with the seamlessly. Float Widget The float live chat ...Customizable Live Chat for your Websites
You can now build your custom Live Chat widget, Chat Window and Pro-active Chat Window with Zoho SalesIQ's Websites. Make the chat window a part of your website using the customization options. Each part of the your chat window can be customized to ...Setting up Live Chat using Zoho SalesIQ
Open an immediate line of communication between your support team and your customers by adding the power of live chat to Zoho Desk. It enables your agents to have real-time conversations with your customers to serve them more quickly, and to build a ...Articles in Chat Window
The Articles tab helps you draft and attach the content, frequently wanted by the customers right on the chat window. This eases your work as the visitors would look for suitable articles in the Articles tab before approaching you for help. You can ...The Operator Chat Window Settings
Here, you can configure what information you would like to show in the operator chat window. Navigate to Settings > Portal Settings > Operator Chat Window Configuration. You can enable/disable the following settings in the operator chat window. Show ...