Email Genie
What is Email Genie?
Email Genie is a magical technology that works with your favourite email client and provides more insights about the email sender. The details like Lead Score, Opportunity, CRM info, Support, and Campaign info if available in SalesIQ then they will be attached to the emails received via the mobile email client. With the available data, you can draft personalized replies to the emails from your mobile email client without opening your SalesIQ app or browser window.
Benefits you get from Email Genie:
- You will get all necessary data from SalesIQ along with the email, which can help you to respond instantly.
- You can compose an individualized response that helps you to win more deals.
- Relieves the pain of switching between the apps to learn about the email sender.
- Protect you from sending wrong or irrelevant replies.
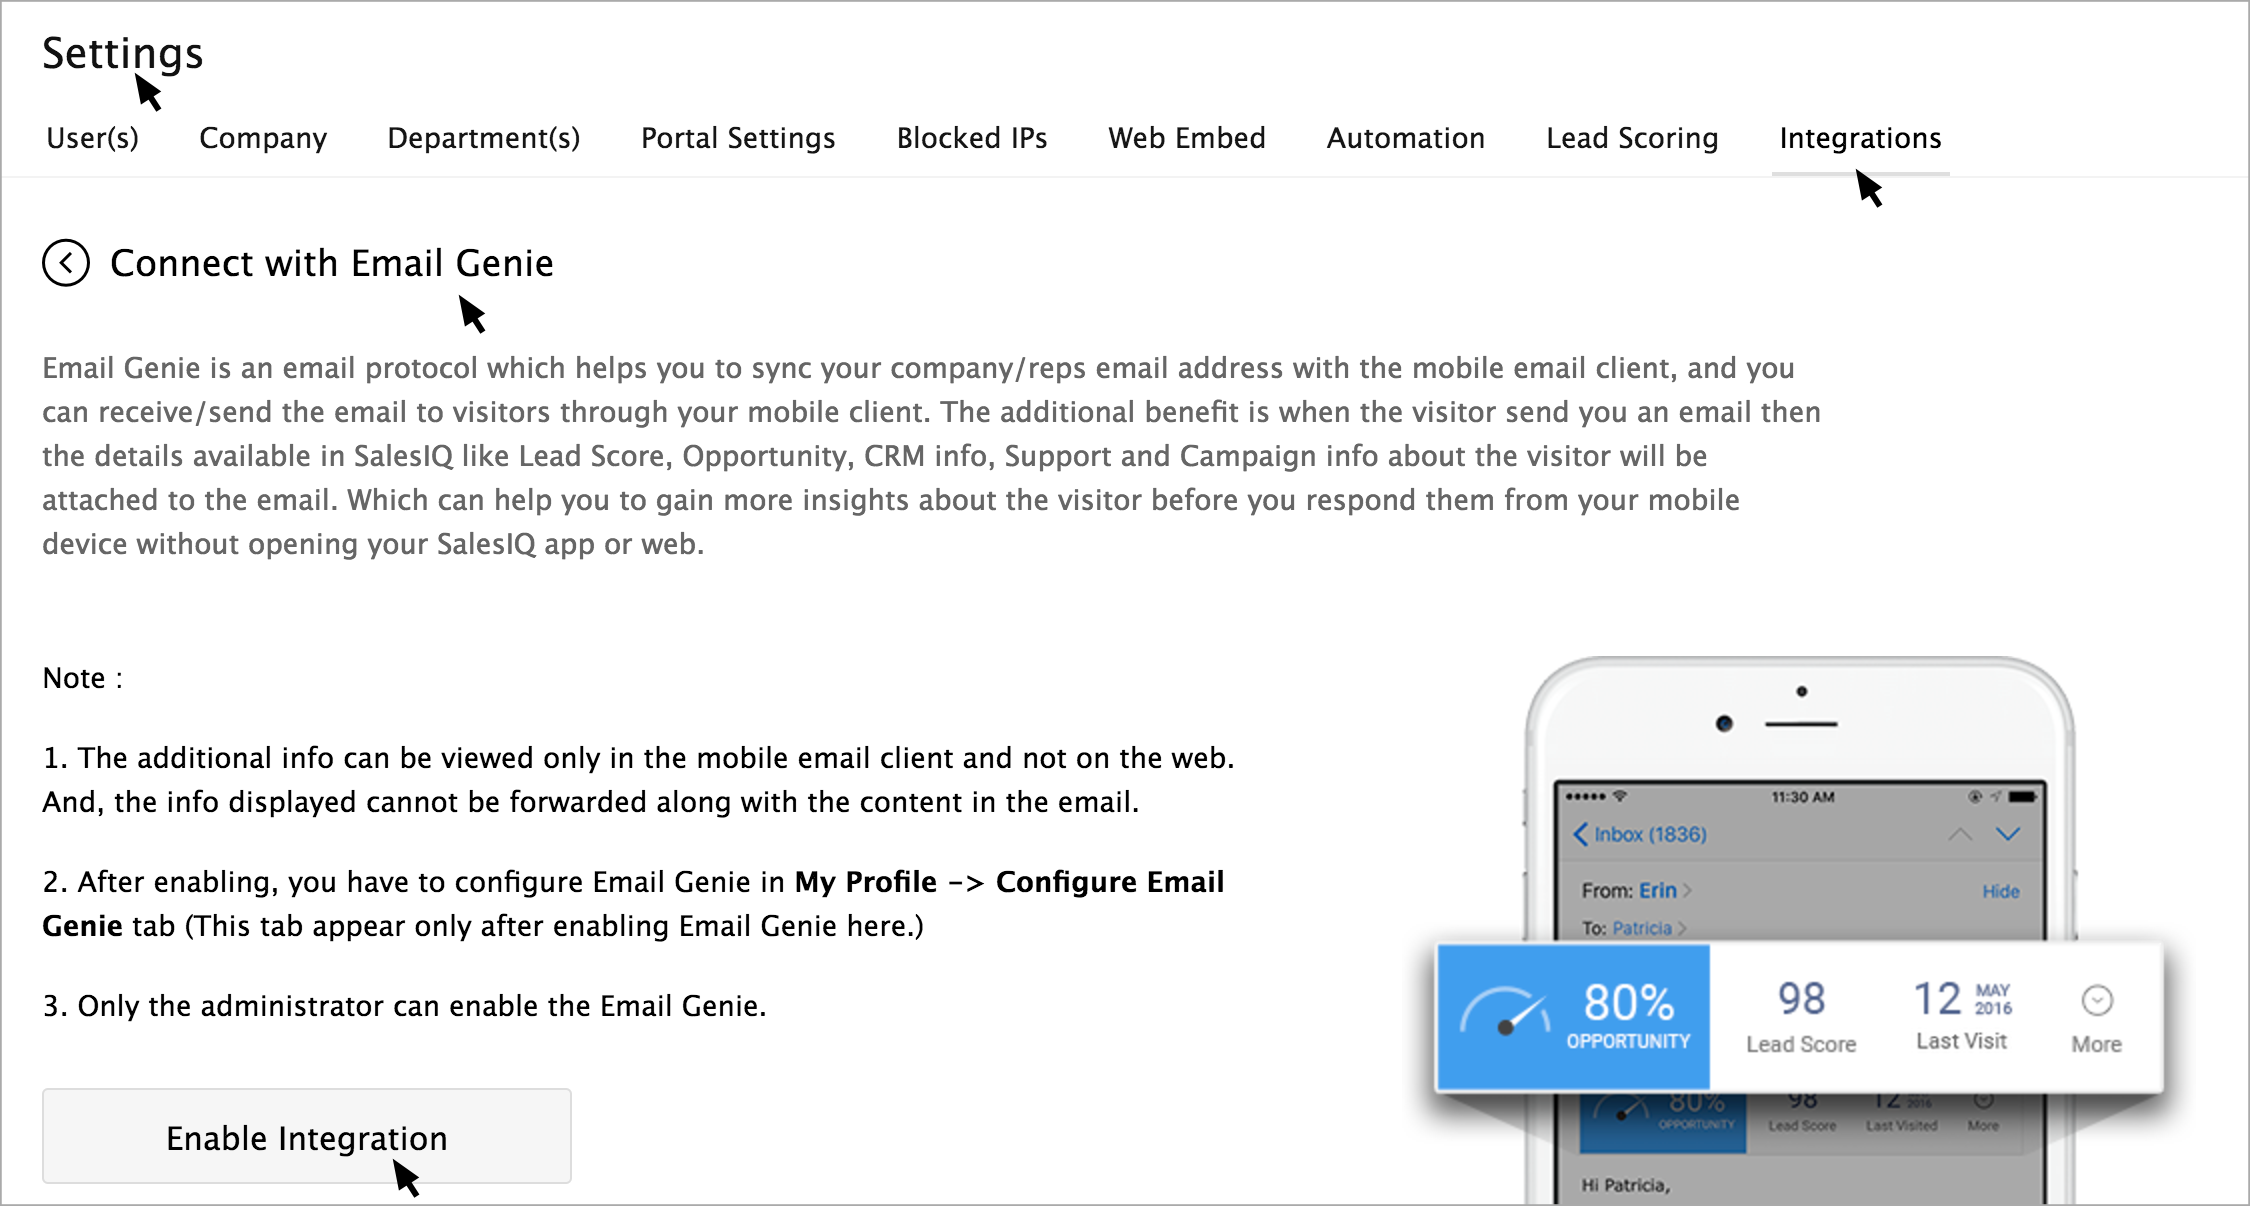
How to enable Email Genie integration?
Go to Settings -> Integration -> Email Genie. Click Enable Integration.

Only the administrator can access the Email Genie Integration tab and provide access to other users
You can also view the users available in your portal listed. By default, the email genie configuration access will be enabled to all the users.
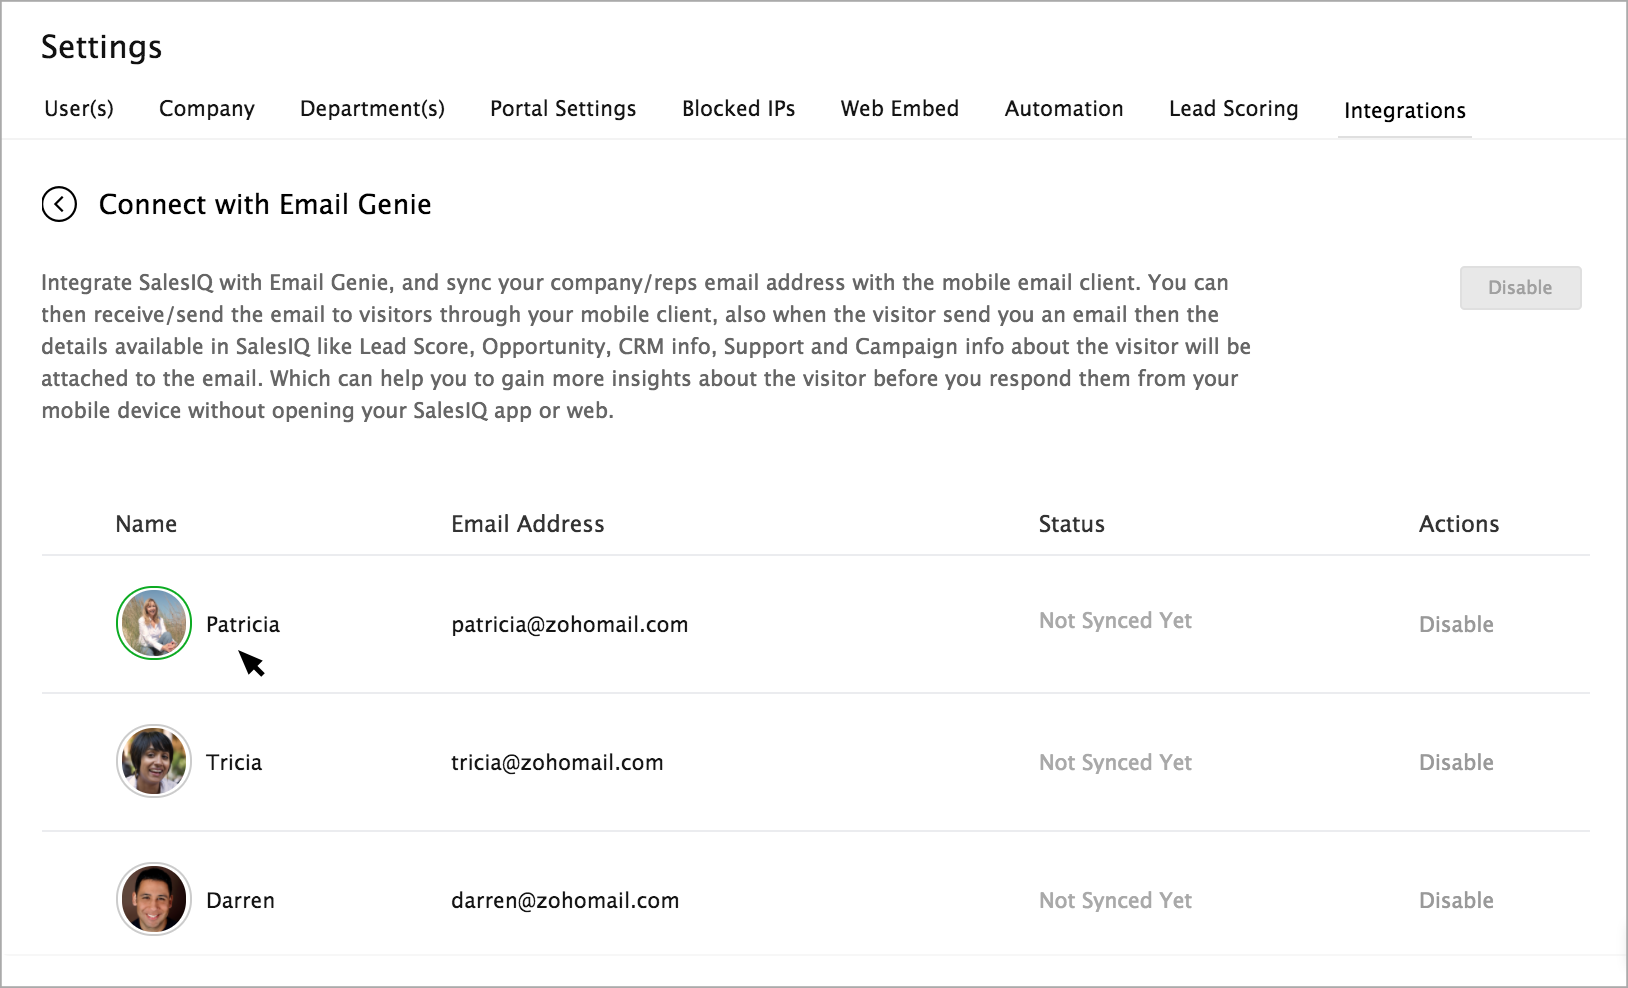
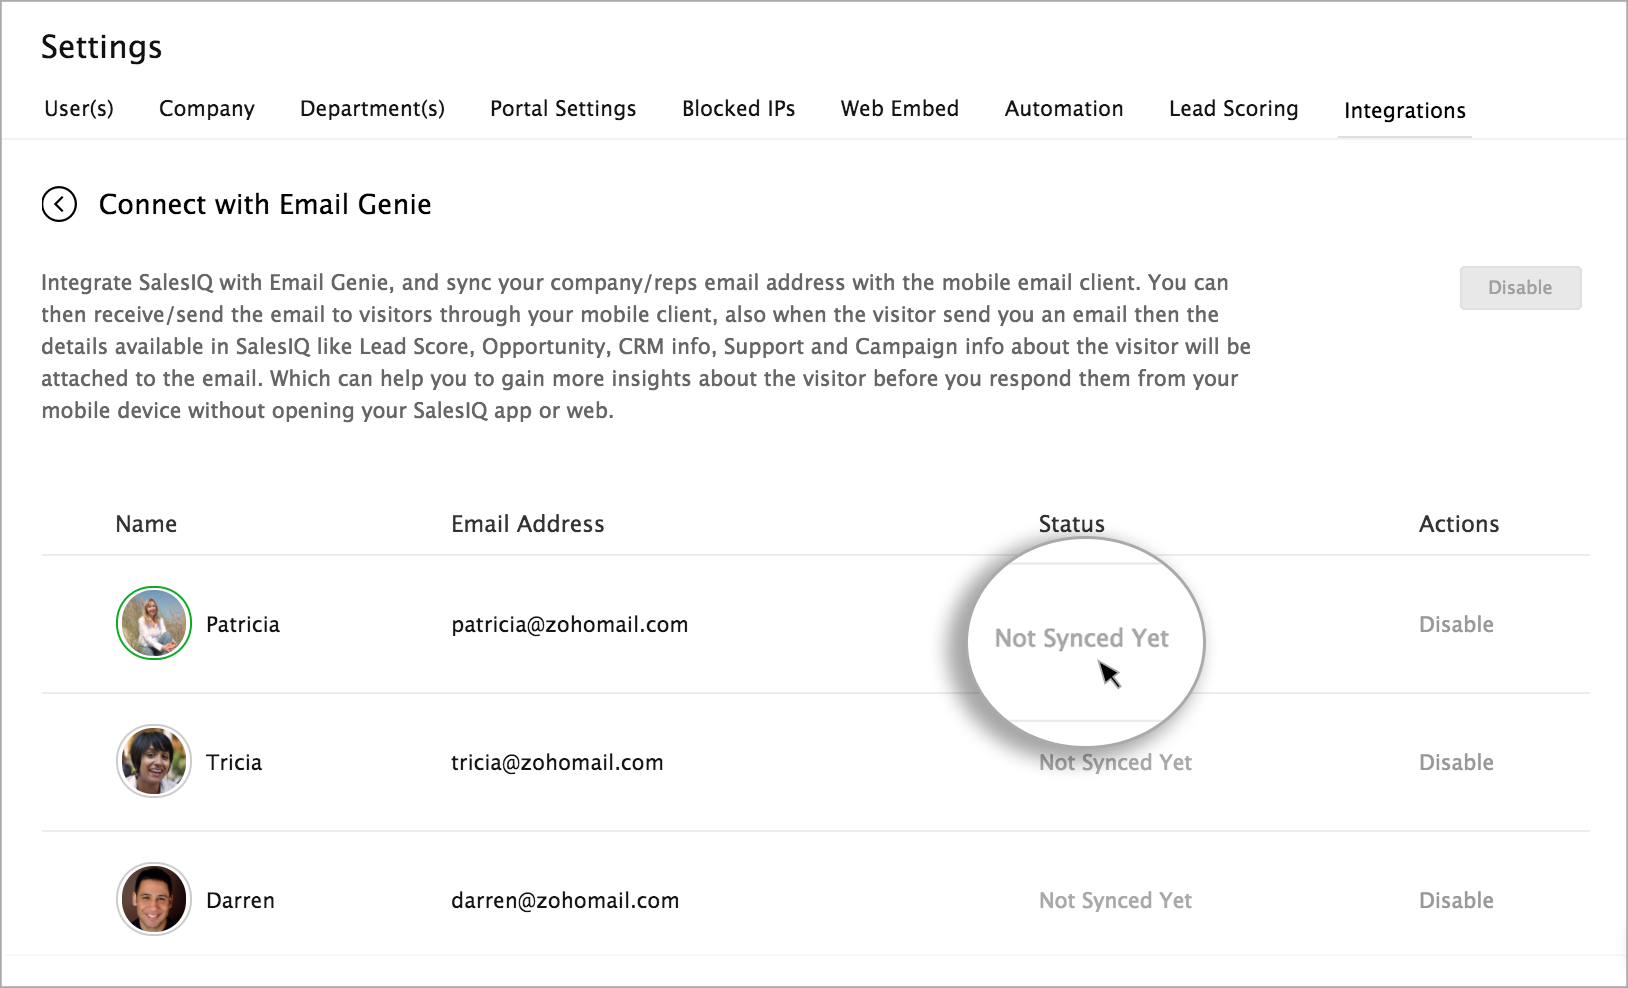
Email Genie is now enabled. But, the status will remain as “Not Synced Yet” until you configure in the mobile email client.
How to Configure Email Genie in SalesIQ?
The “Configure Email Genie” tab will appear in the “My Profile” section after the administrator enables the Email Genie in the Integrations tab.
Once the administrator allows email Genie integration, the Configure Email Genie tab will be visible to all the users irrespective of departments. So, if you wish to restrict the particular user, then please use the "Disable" option.
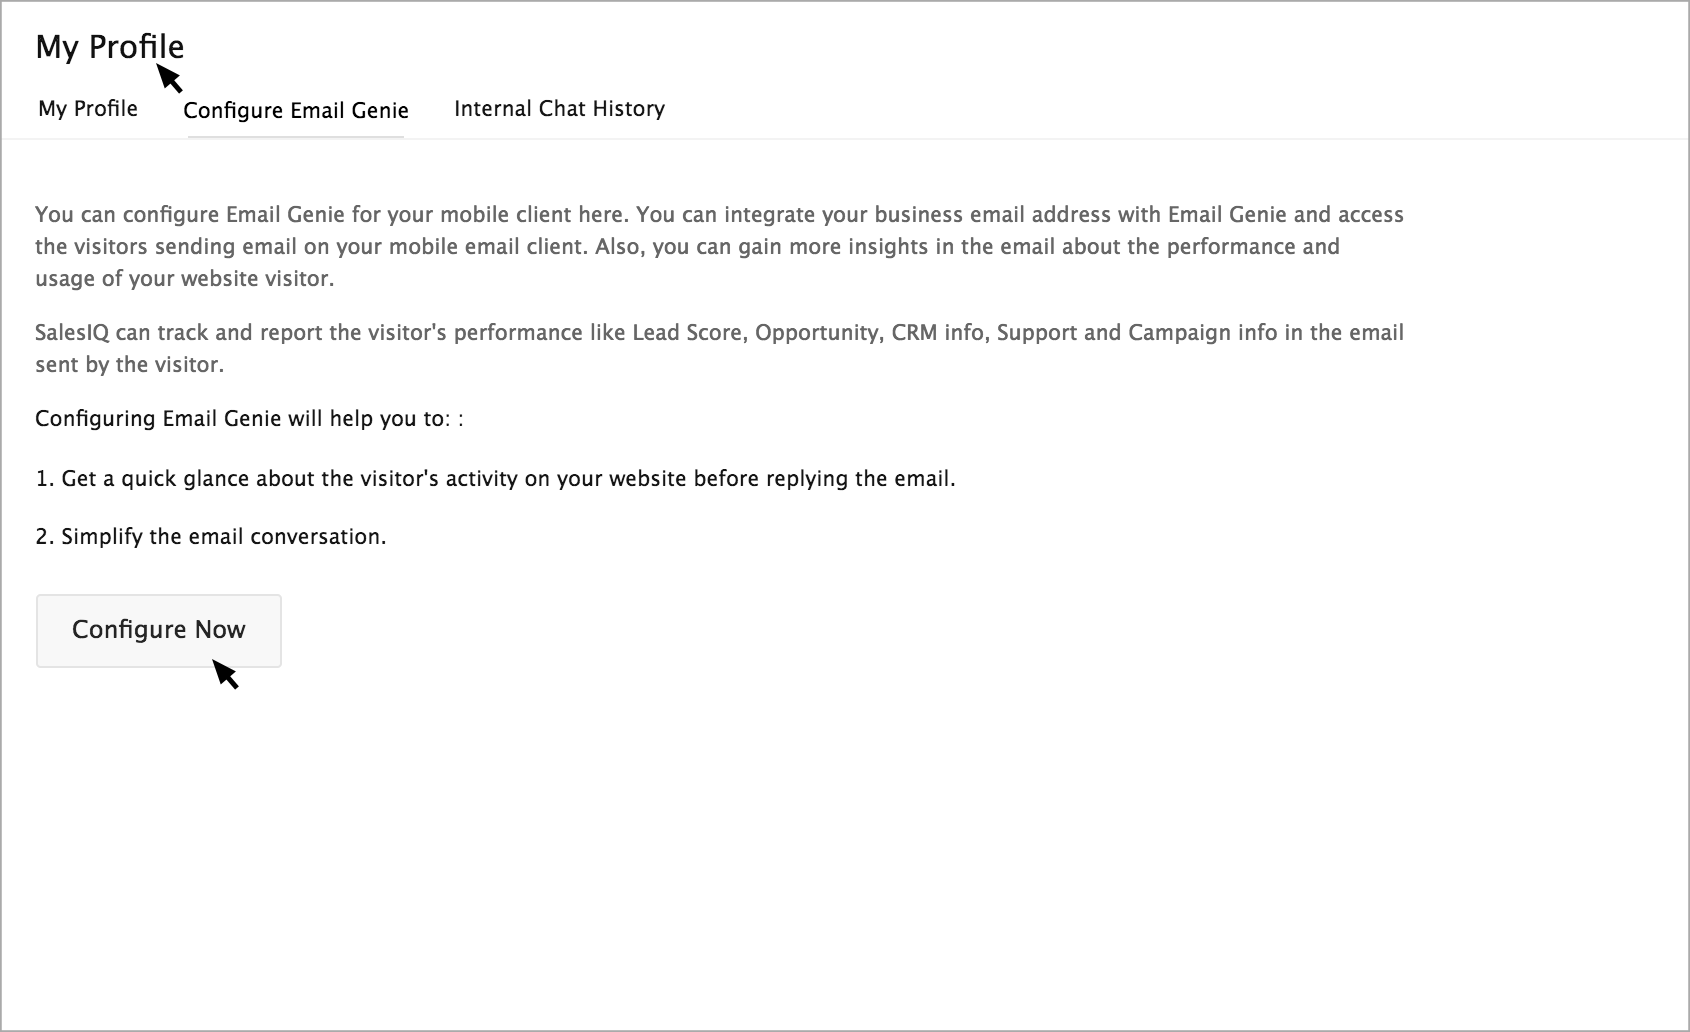
Clicking on the “Configure Now” button will open configuration page. Provide your email client information on the page.
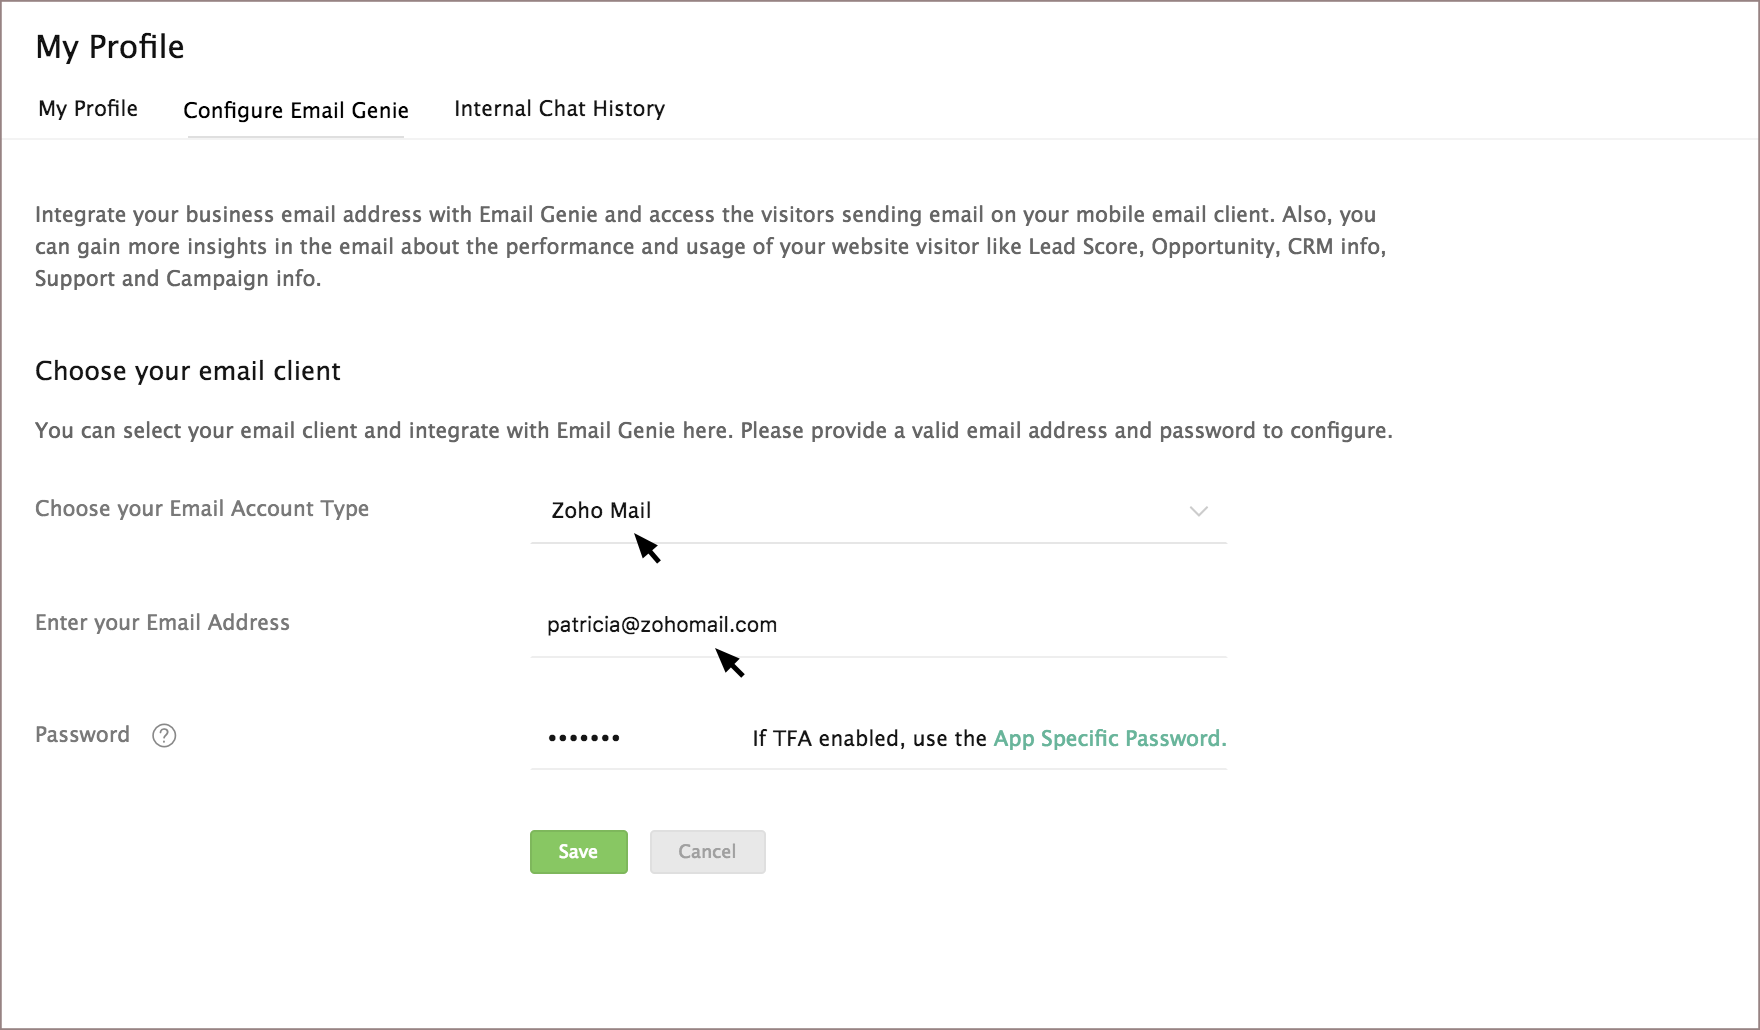
In the password section:
If you have enabled the Two-Factor Authentication for your email account, then provide the App specific password.
If not provide the login password of your email account.
And, save changes.
If you choose Zoho Mail account type, then Enable the IMAP Access in Zoho Mail Settings option before you proceed to configure the email genie in your mobile device.
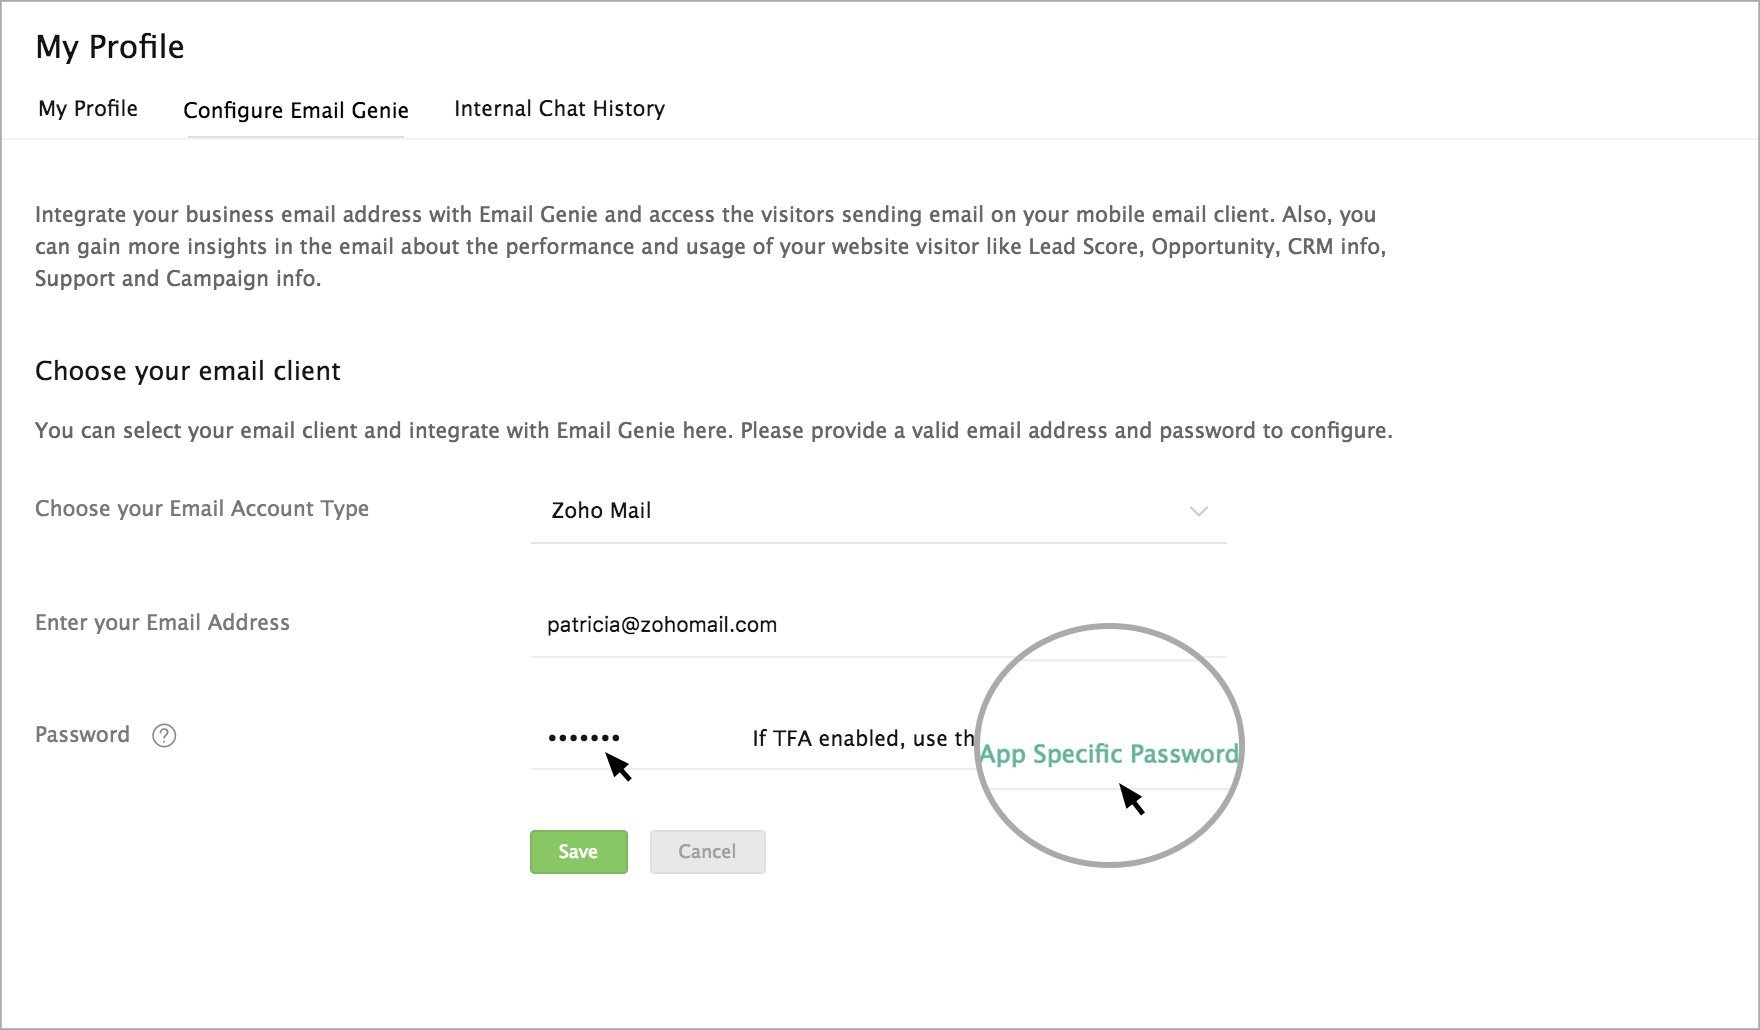
You can find the App specific configuration guide attached for each service near the password. If you have enabled TFA, then the doc can guide you to get the password.
How to configure Email Genie on your mobile device?
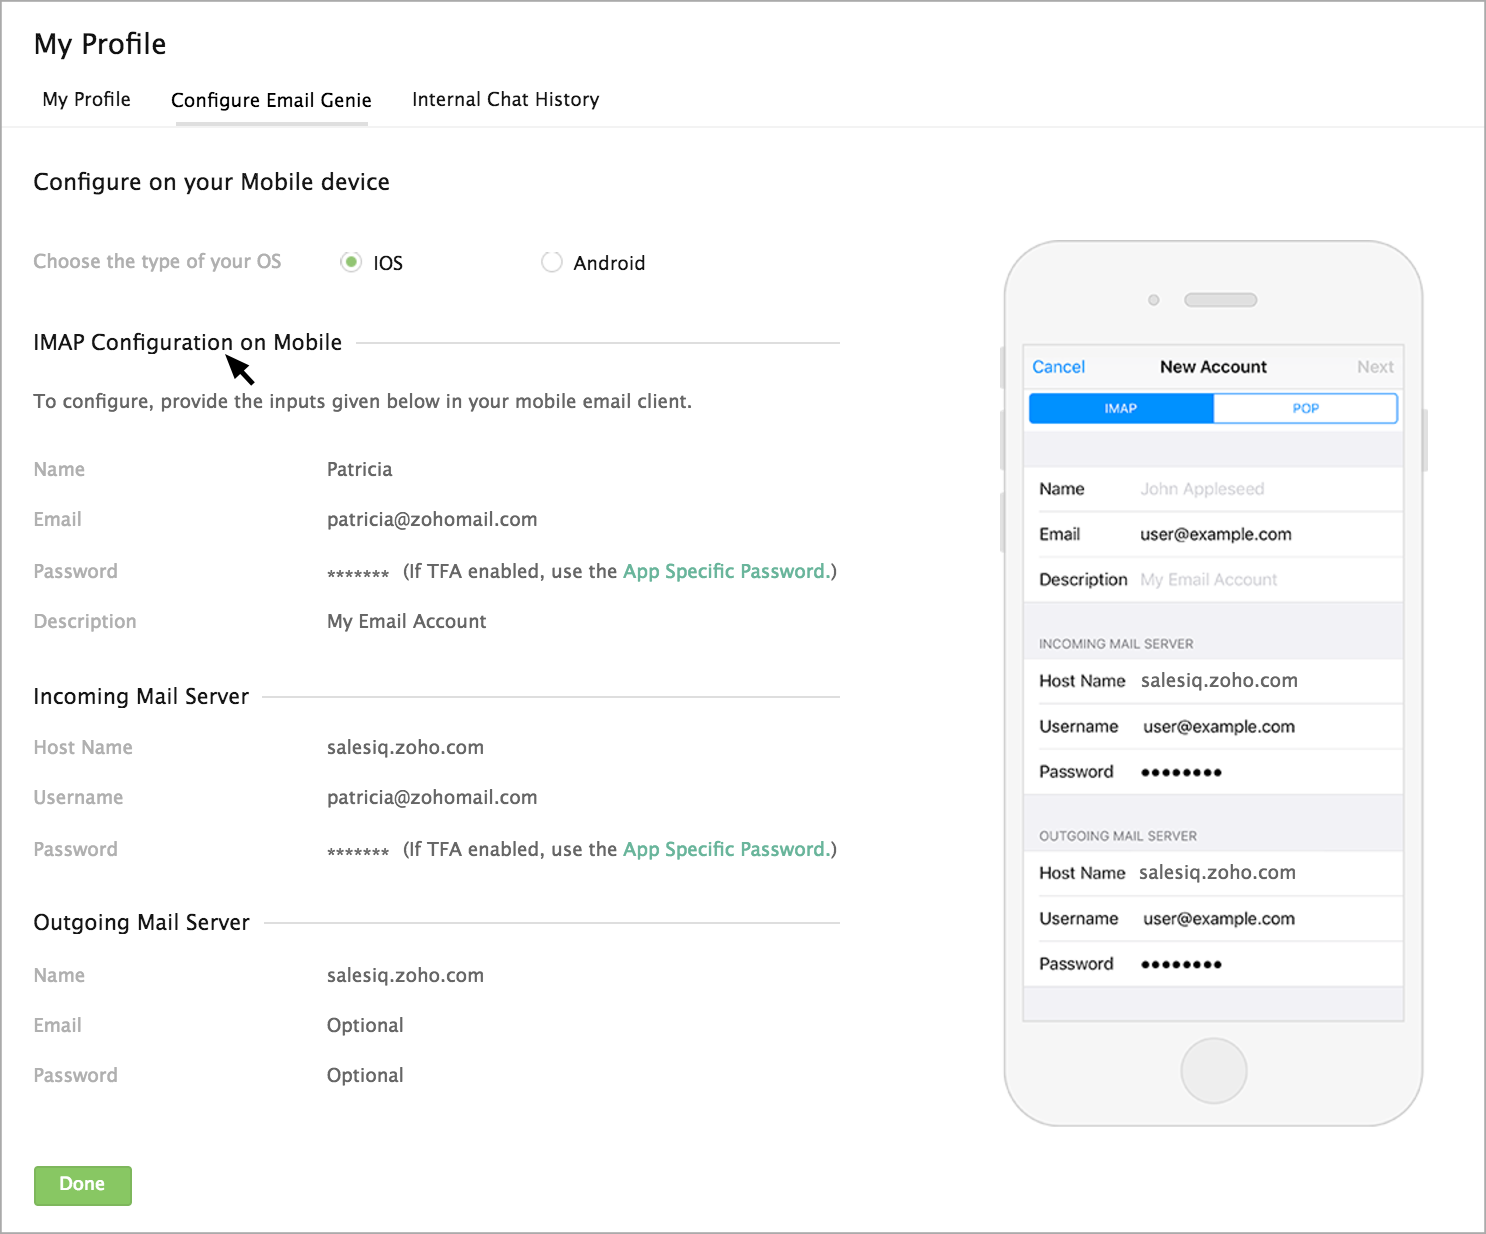
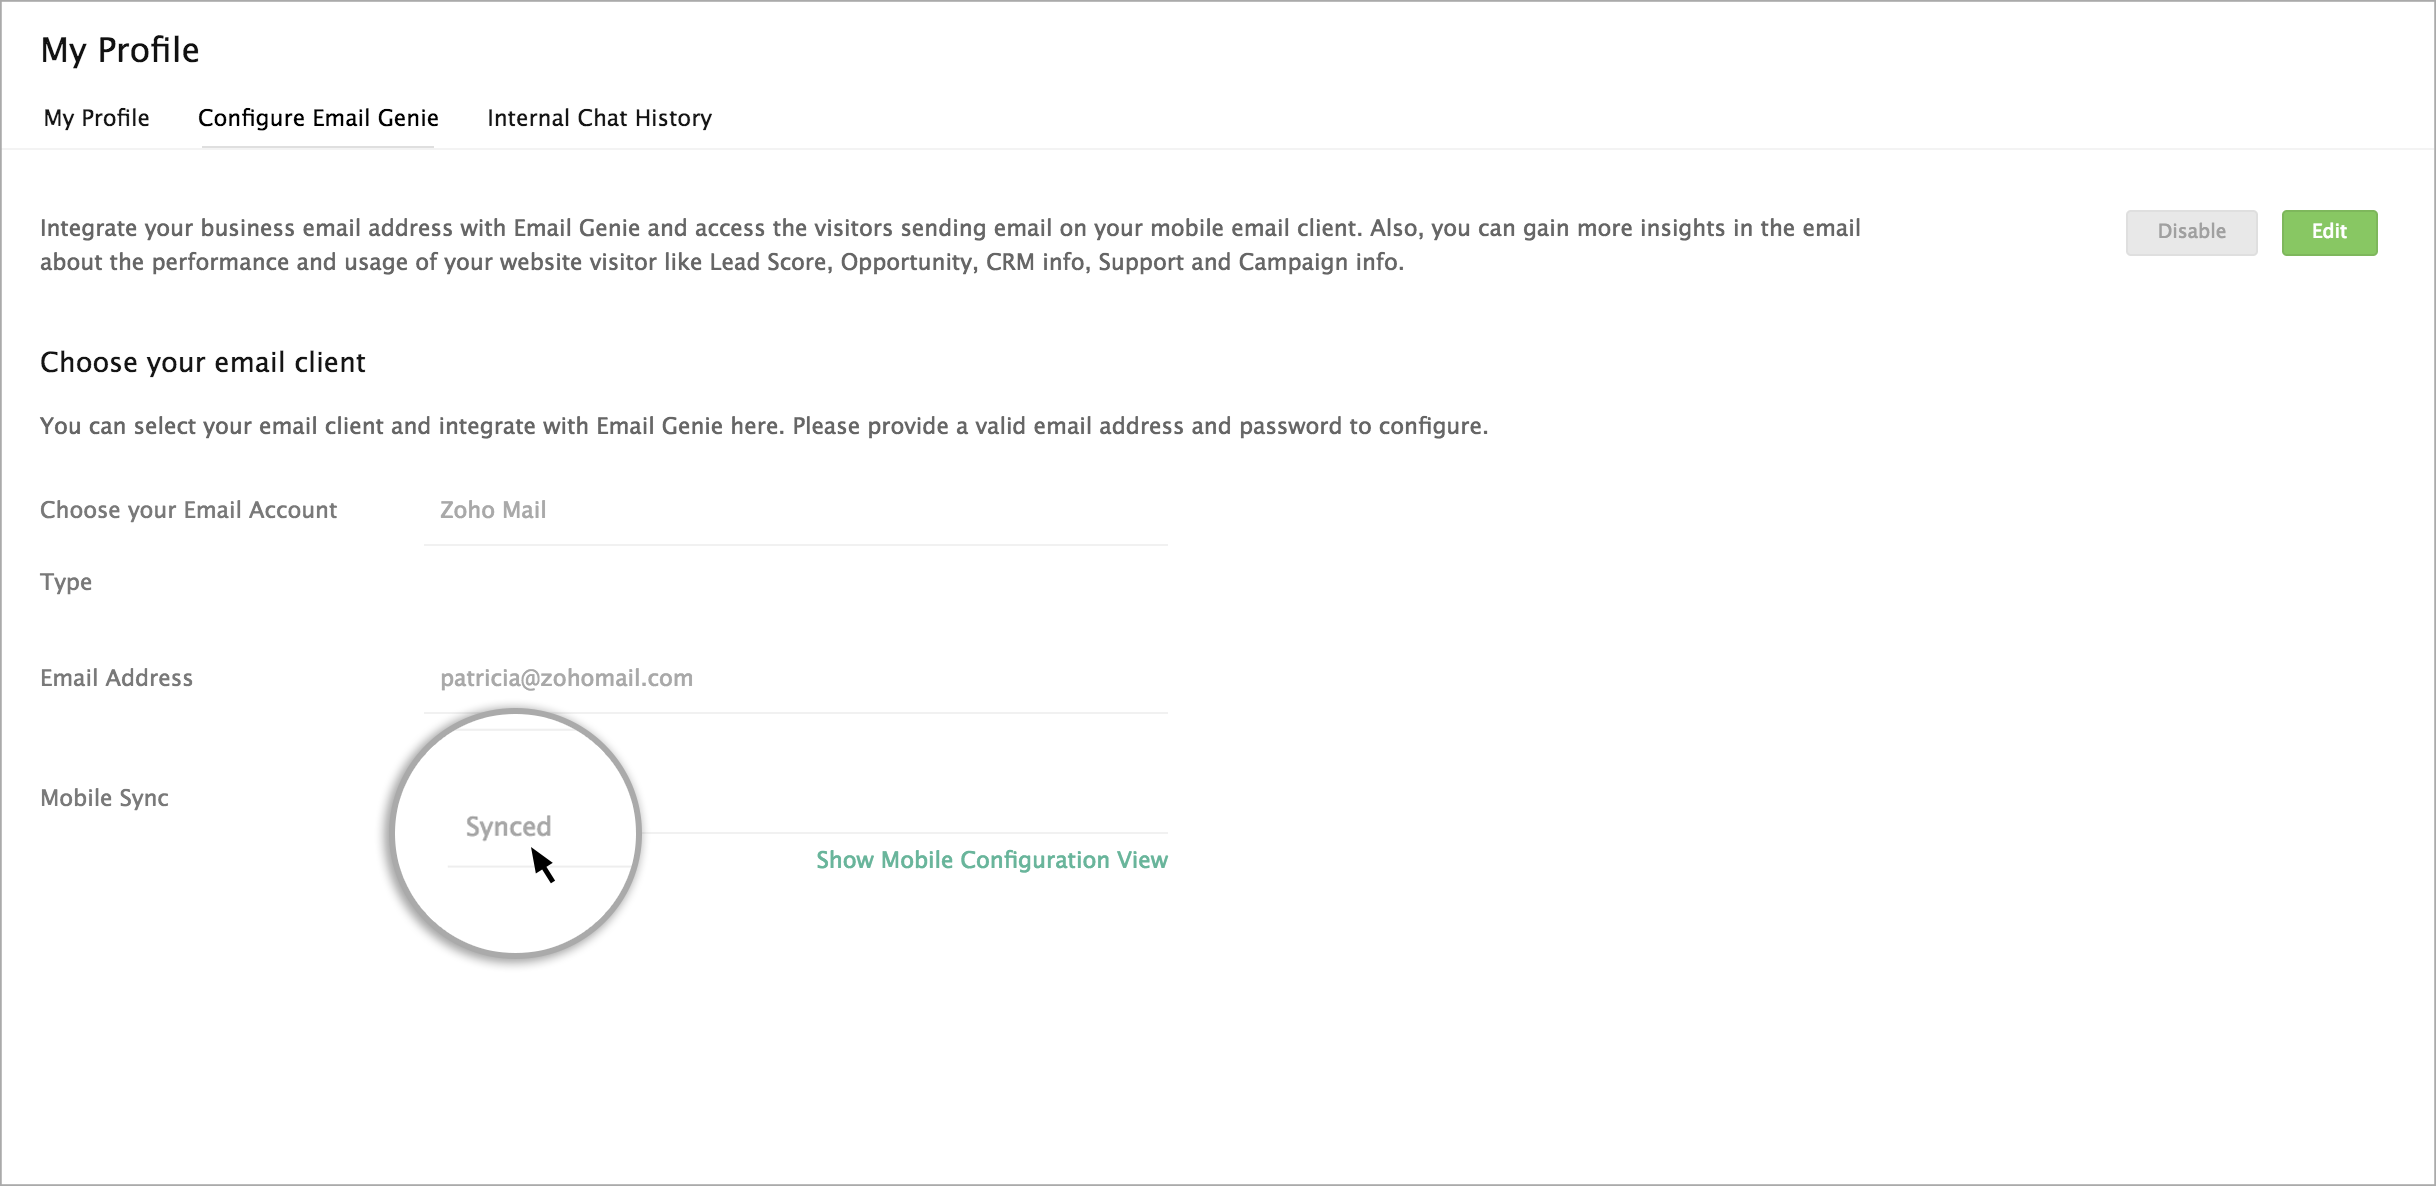
On providing the email client credentials, the “Configure on your Mobile Device” page will appear. You can find the information that you have to provide on your mobile email client displayed on the screen.
Use your SalesIQ account Email Address and Password to configure on your mobile

The configuration info will change based on the Mobile OS, so first, choose your mobile OS.
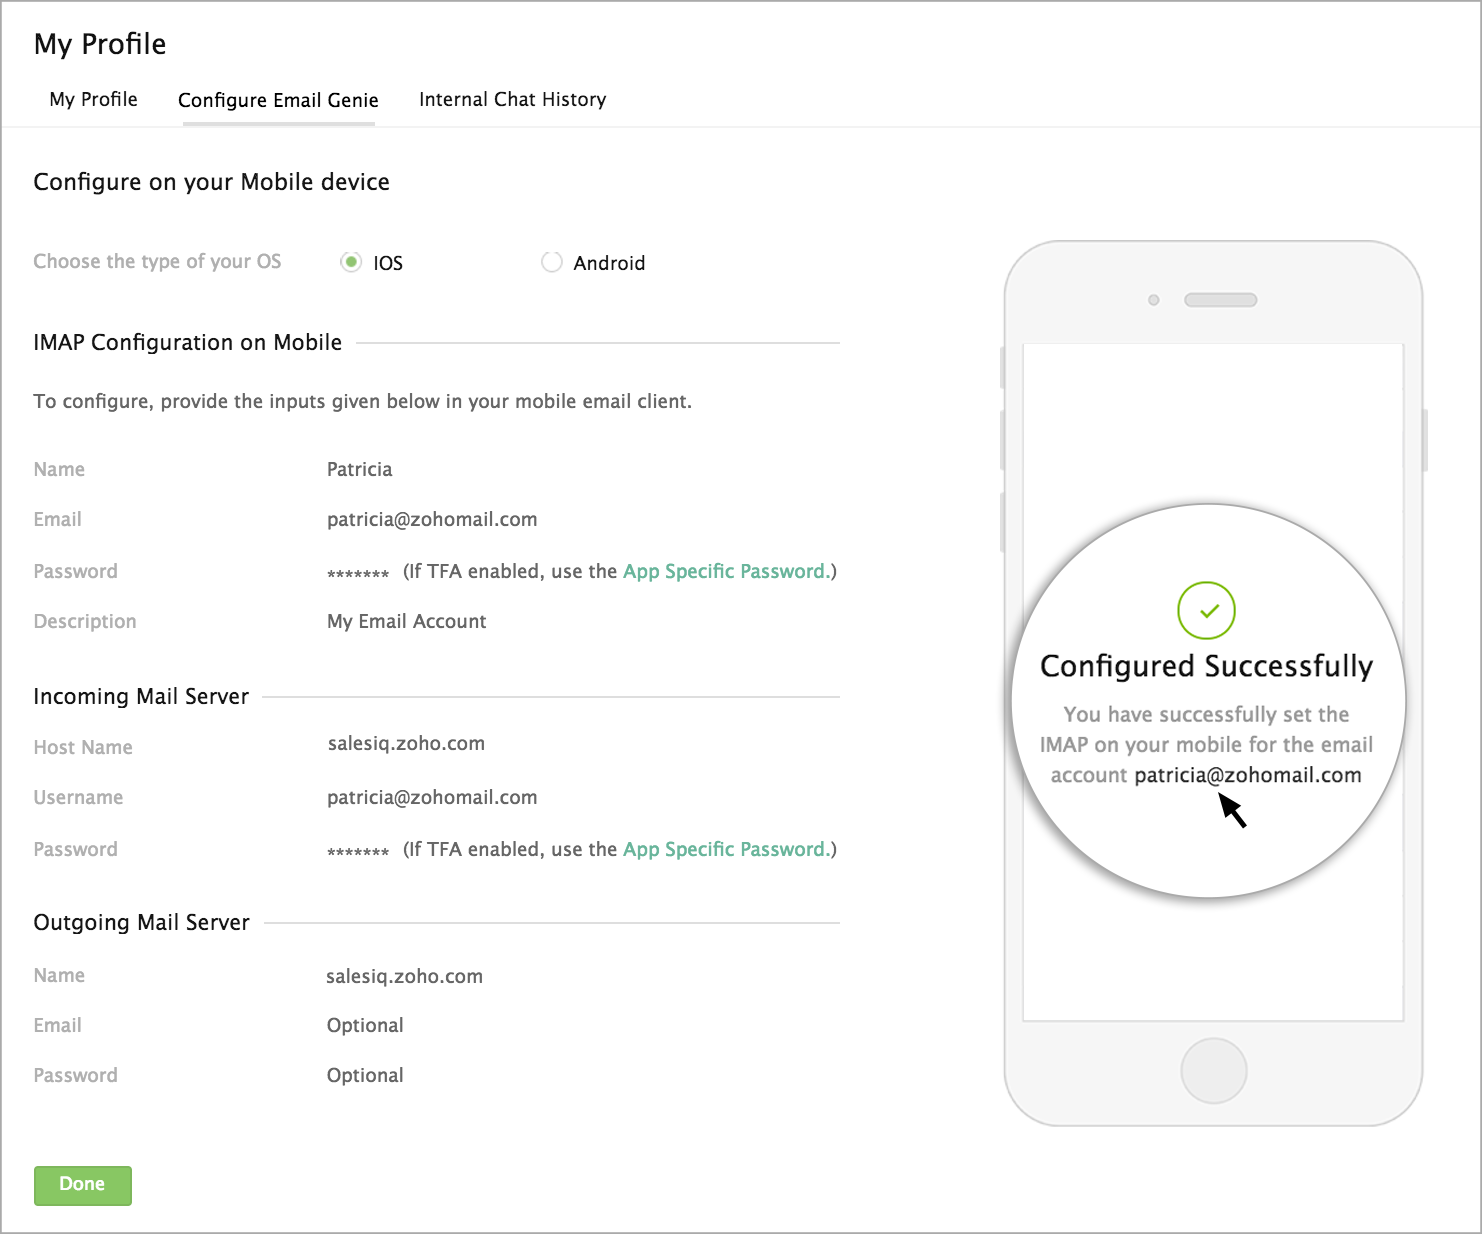
If you use an iPhone then choose the IOS option.
Email Genie will work only on IOS version 9 and above.

Now, enter the configuration info displayed in your mobile email client.
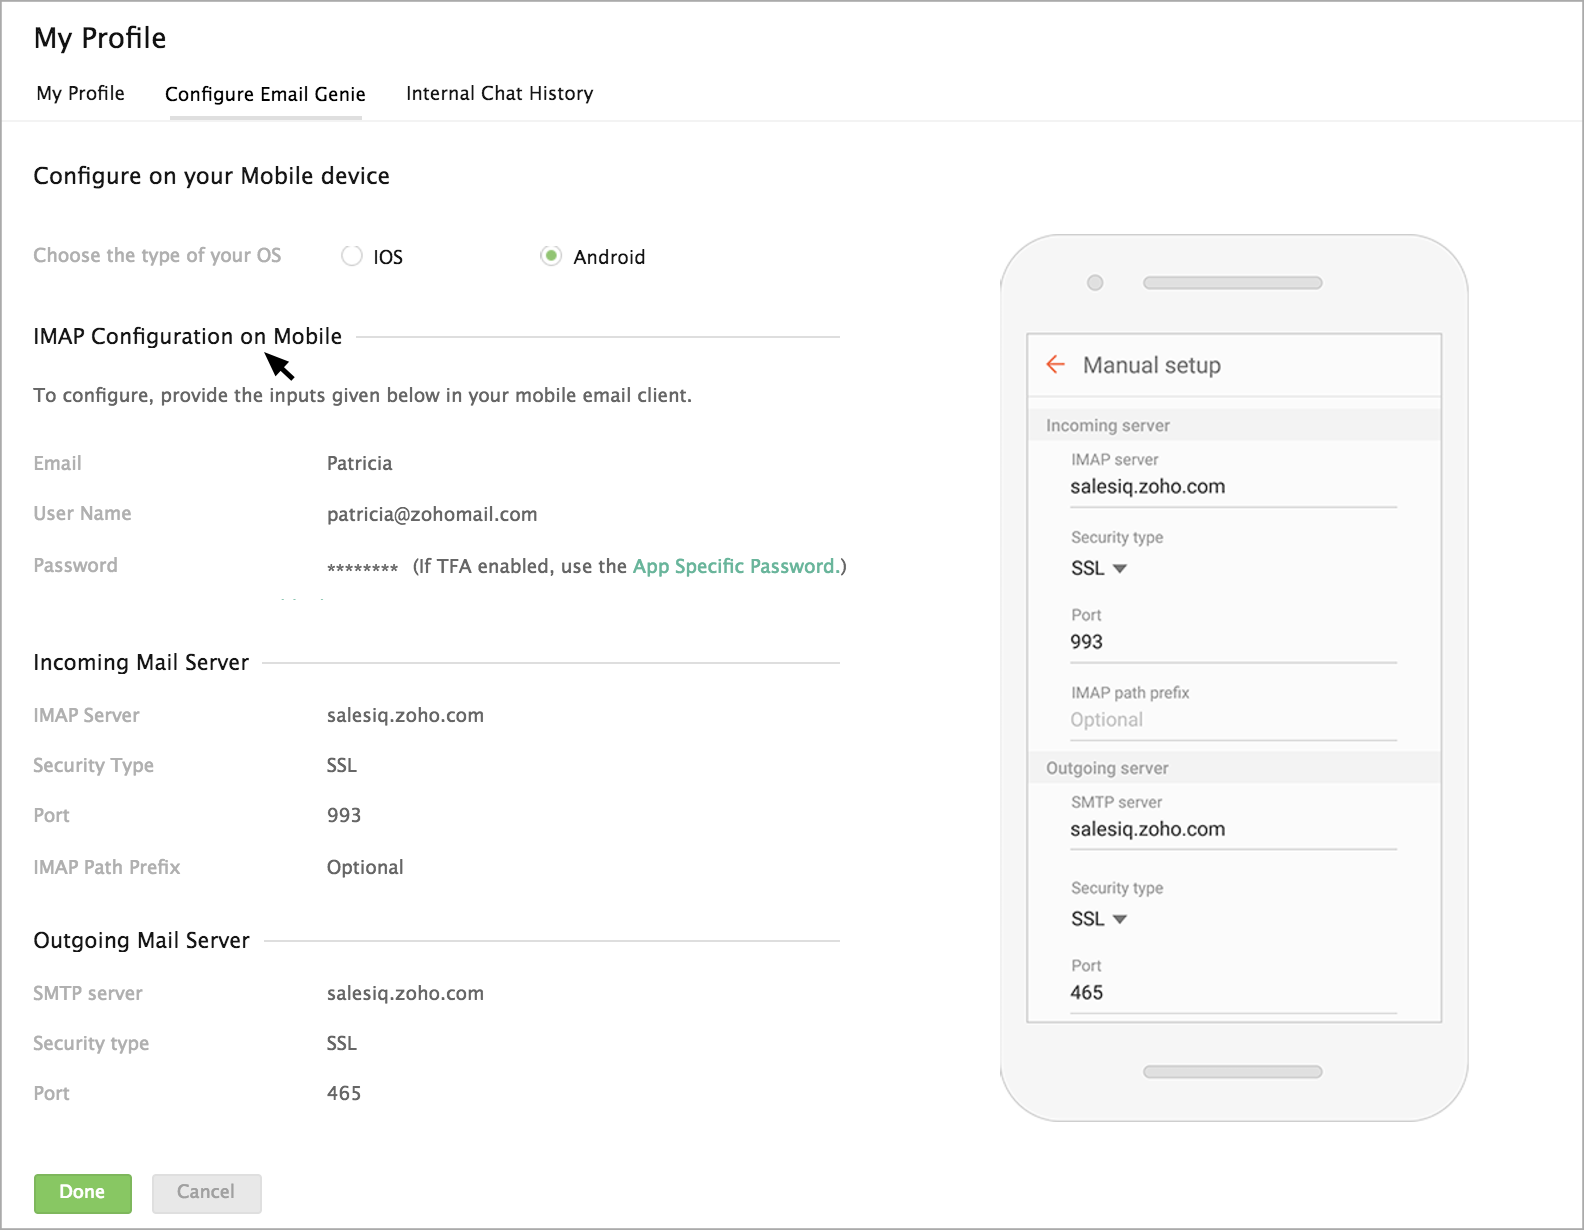
If you use a phone that runs on the android platform like Samsung, Lenovo, HTC, etc., then choose the Android option
Email Genie will work only on Android version 5 and above
Learn how to configure Email Genie in the mobile Gmail client.
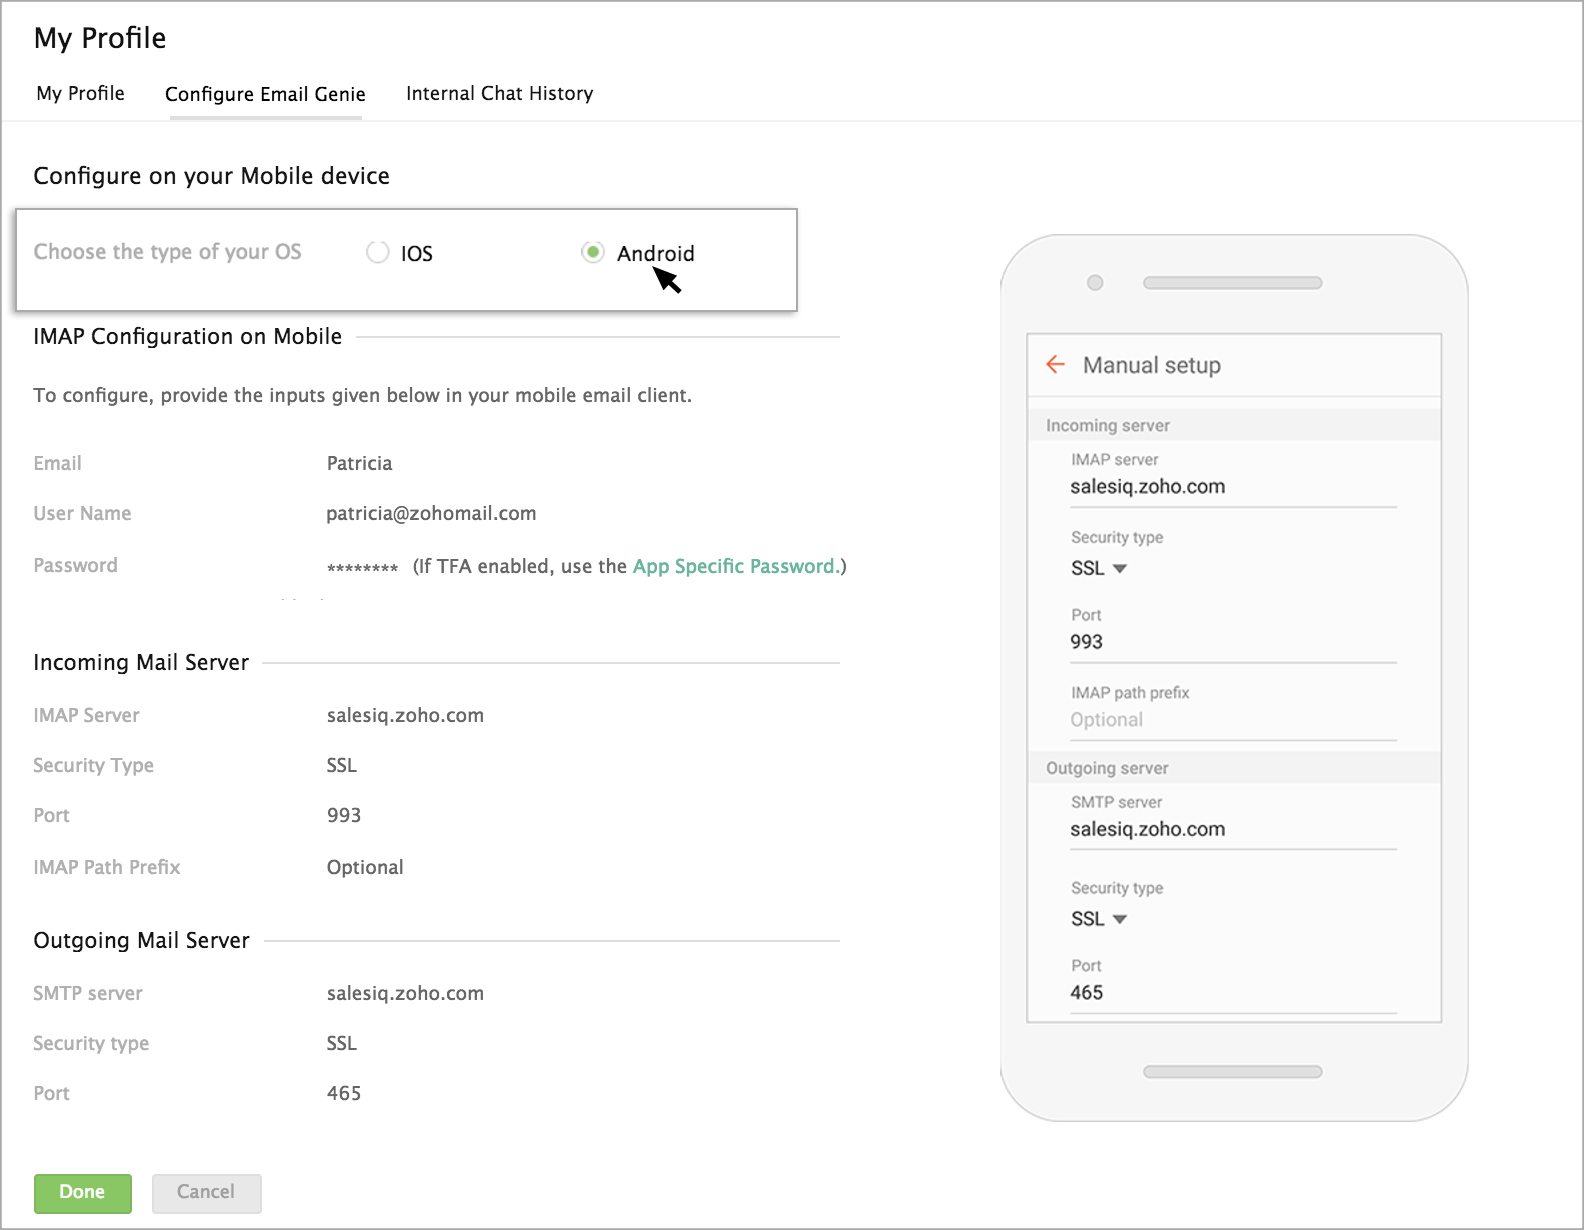
Enter the configuration info available for android in your mobile email client.
The success message will be displayed in the configuration page once IMAP is configured on your mobile client.
If not, the error will be prompted on the configuration page.
Click Done. The status will be changed as “Synced.”
What benefit does Email Genie offer when you receive the email in the Mobile email client?
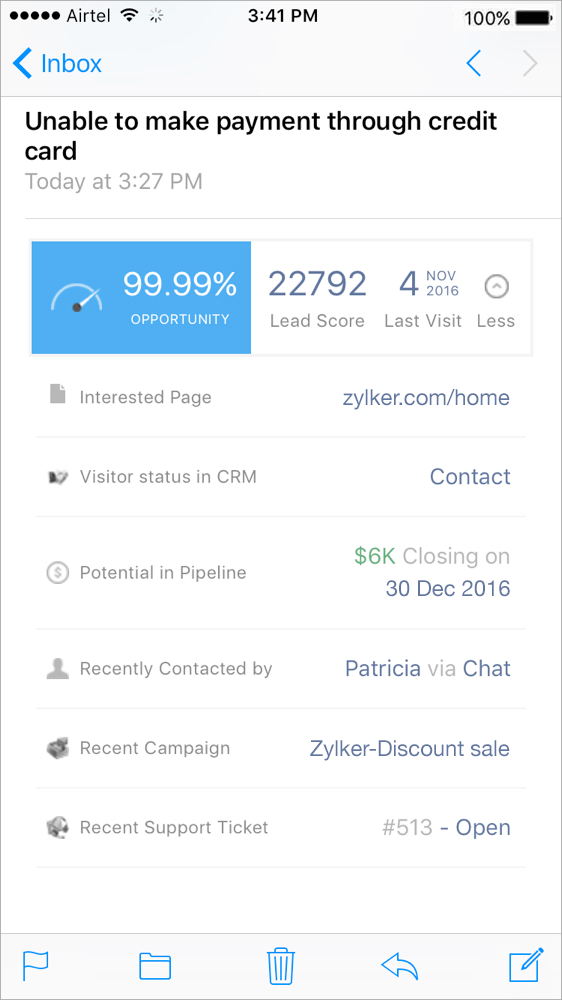
Email Genie push the important details about the visitor that is available in your SalesIQ along with the email sent by the visitor.
When you receive an email from your visitor, then SalesIQ will attach the important details required for you to reply to the visitor’s email. That is, you can reply the email without opening SalesIQ app or the SalesIQ browser window.
The details you receive about the visitor in email:
- Opportunity Percentage
- SalesIQ - Lead Score
- Last Visit
- Last Contacted by
- Visitor Interested Page
- Visitor Status in Zoho CRM
- Potential in Pipeline
- Recent Support Ticket
- Recent Campaign Sent to the Visitor
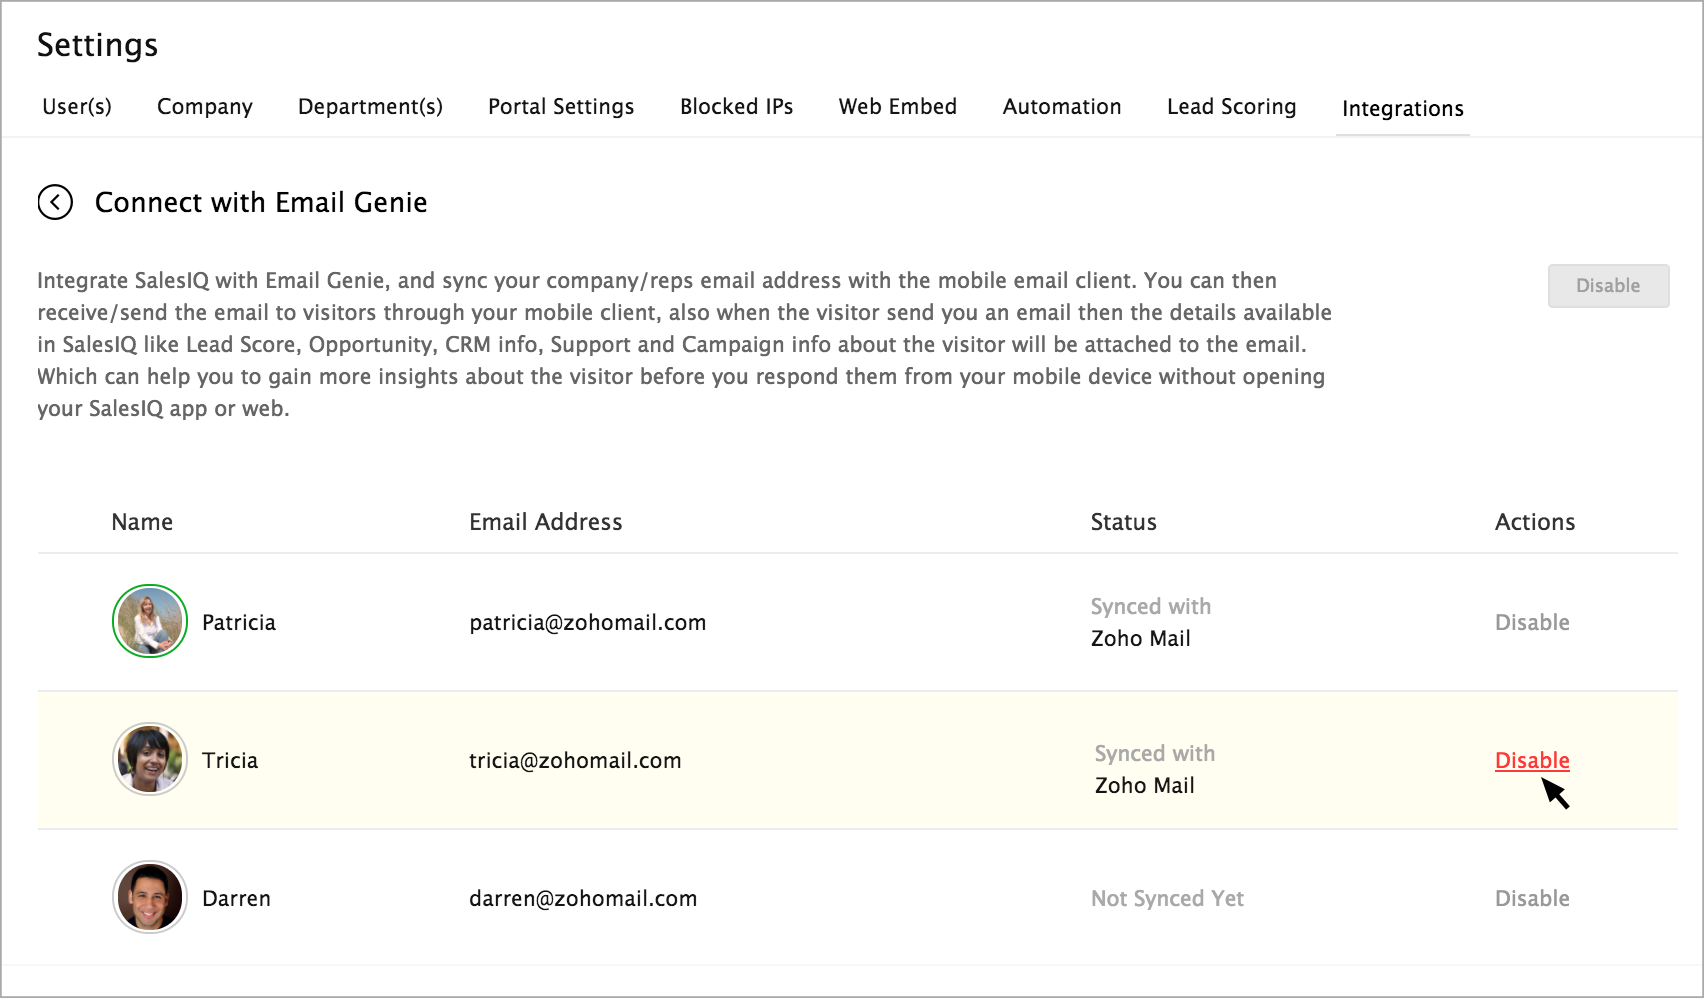
How can an admin disable the Email Genie access to an Operator?
If you wish to remove the Email Genie access of a particular operator, then navigate to the Integrations -> Email Genie -> Connect to Email Genie.
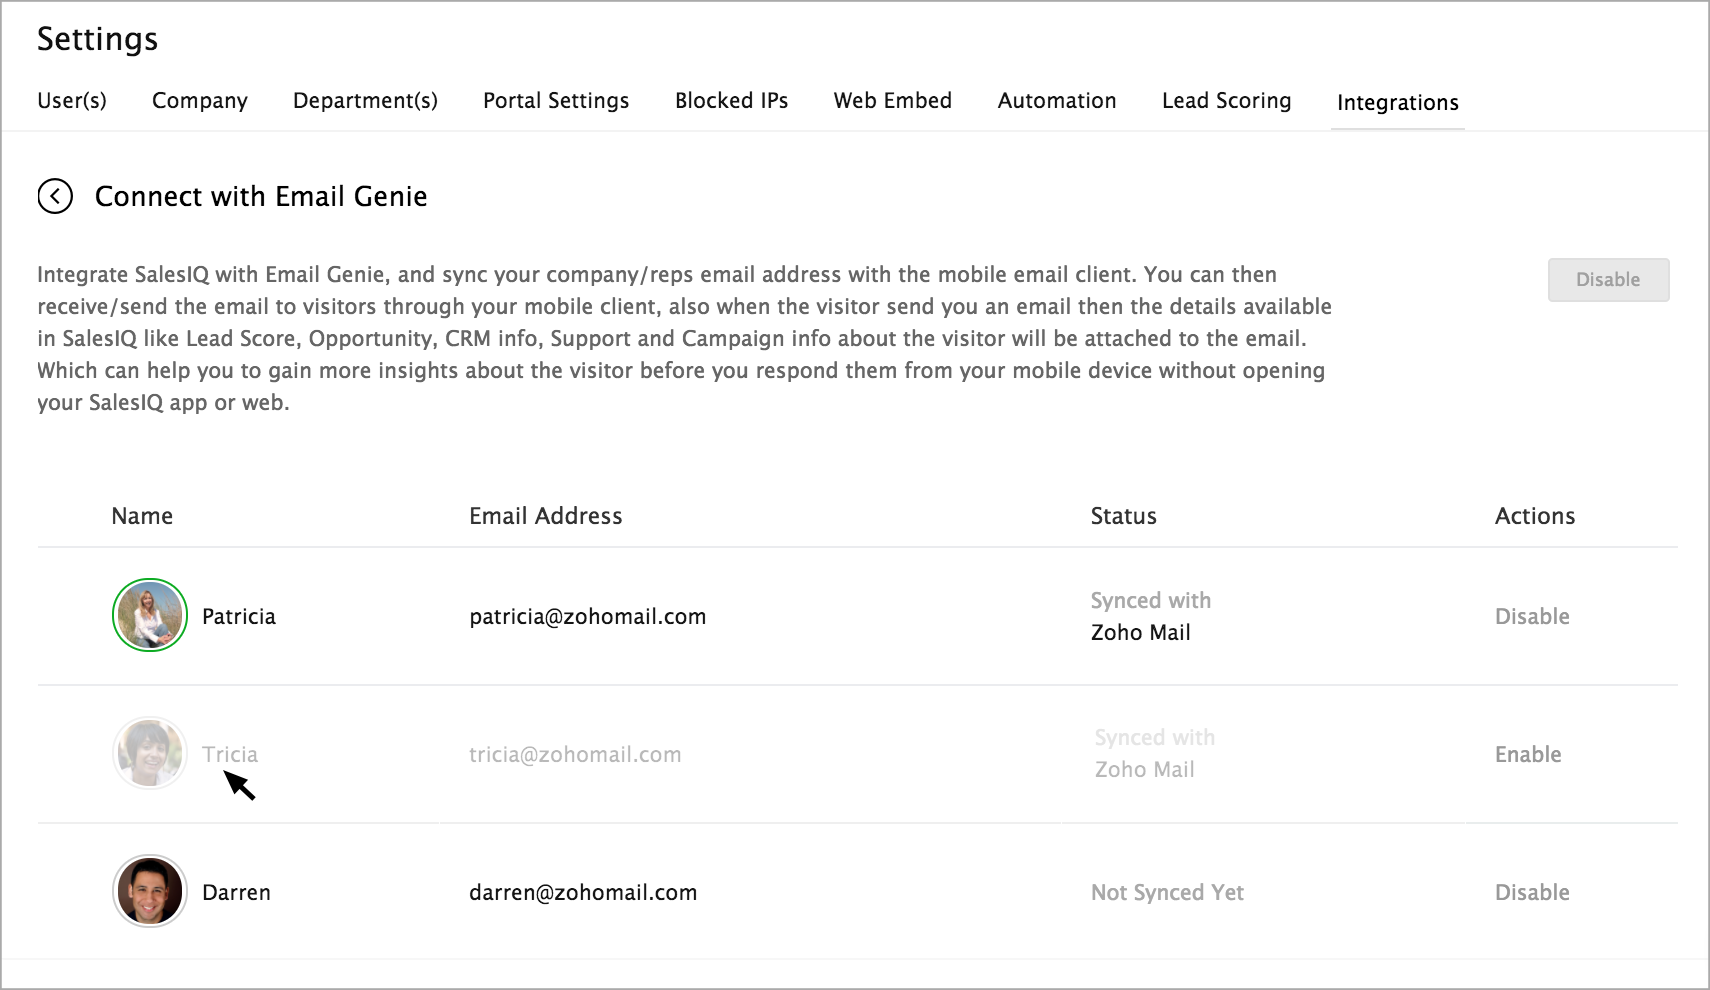
And, click on the “Disable” button near each user details in the “Actions” column.
The user will be disabled and will not be able to access the configuration tab, as well as the user will not receive any email in their mobile client.
Related Articles
How to enable Email Genie integration?
Go to Settings -> Integration -> Email Genie. Click Enable Integration. Only the administrator can access the Email Genie Integration tab and provide access to other users You can also view the users available in your portal listed. By default, the ...How to Configure Email Genie in SalesIQ?
The “Configure Email Genie” tab will appear in the “My Profile” section after the administrator enables the Email Genie in the Integrations tab. Once the administrator allows email Genie integration, the Configure Email Genie tab will be visible to ...How to configure Email Genie on your mobile device?
On providing the email client credentials, the “Configure on your Mobile Device” page will appear. You can find the information that you have to provide on your mobile email client displayed on the screen Use your SalesIQ account Email Address and ...How can an admin disable the Email Genie access to an Operator?
If you wish to remove the Email Genie access of a particular operator, then navigate to the Integrations -> Email Genie -> Connect to Email Genie. And, click on the “Disable” button near each user details in the “Actions” column. The user will be ...What benefit does Email Genie offer when you receive the email in the Mobile email client?
Email Genie push the important details about the visitor that is available in your SalesIQ along with the email sent by the visitor. When you receive an email from your visitor, then SalesIQ will attach the important details required for you to reply ...