Email project management
Zoho Projects now
supports email based project management. Now, you can easily manage your
projects with emails. It saves time and gets your work done in just a
click. You can add notes for your tasks, associate documents
with a task, post comments to forums, attach files in forums, file an
issue, add issue comments, attach files for an issue, and so on, all
through an email. You can use any of your mail accounts and collaborate
with Zoho Projects.

Know your requirements
- You need to register your personal or business email address with accounts.zoho.com.
- You have to be associated with that project to add tasks, issues, comments, and files via email into the projects.
- If
you are not associated with the project, still you can manage your
project. But, this is possible only if you own the Enterprise edition of
Zoho Projects. You must configure the email settings, to forward issues
from Zoho Projects to your configured mail address.
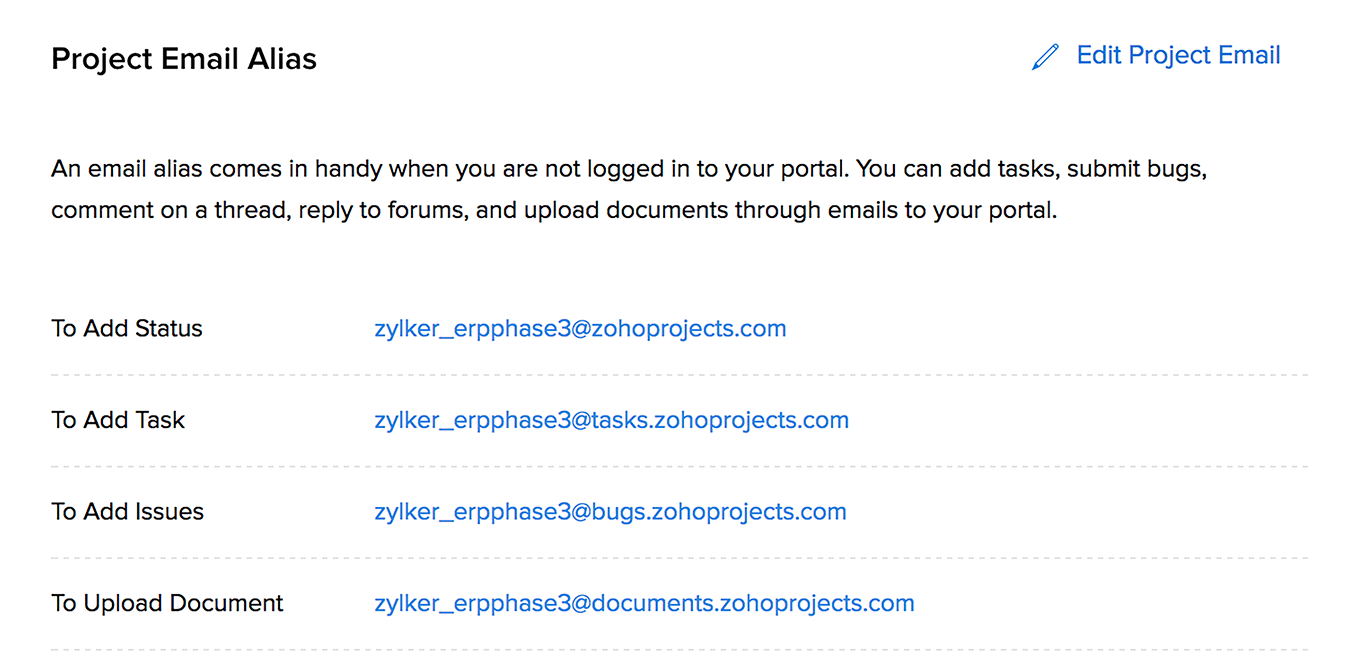
Add your project activities via Email
- Choose
 in the upper-right corner.
 - Select Email Alias in Project Settings section.
- Select Project to ensure which project you are going to edit.
- Copy the email address provided for different project activities - To Add Status, To Add Issue, To Add Task, To Add Forum and To Upload Document.
- Paste the email address in the To address.
- Type the content and click Send.
Now, open your email and start adding your project activities in one click.
- To add a status - Copy the email address given in the To Add Status section to your To address.
- To add a task - Copy the email address given in the To Add Task section to your To address.
- To add an Issue - Copy the email address given in the To Add Issue section to your To address.
- To add a forum post - Copy the email address given in the To Add Forum section to your To address.
- To upload a document - Copy the email address given in the To Upload Document section to your To address.
Add comments for project activities
If you want to add comments to your status, task, issue, and forums, you can do it via your email.
Add comments to task
You can add comments to a task via email.
- Click the required task.
- Copy the email address mentioned in the 'To add comment(s) to this task mail to' section in the bottom of the task.
- Select Reset address right next to the current email address to change the email address.
- Compose a mail and paste this email address in the To address.
- Type your content and click Send.
The contents mentioned in the email gets automatically added as comments for this task.

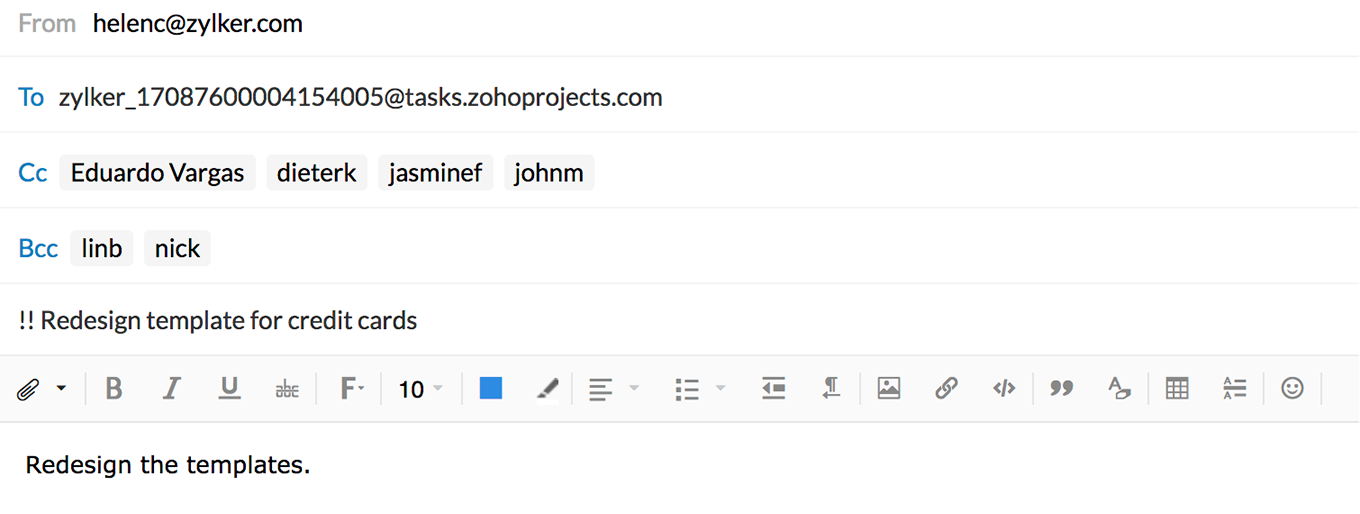
While adding a task via email:
- In
Subject, enter its priority first, followed by the task message.
(Note: !- Low priority, !!- Medium priority, !!!- High priority). Your
subject should look like this: SYNTAX - Subject: !!Redesign Template
for credit cards
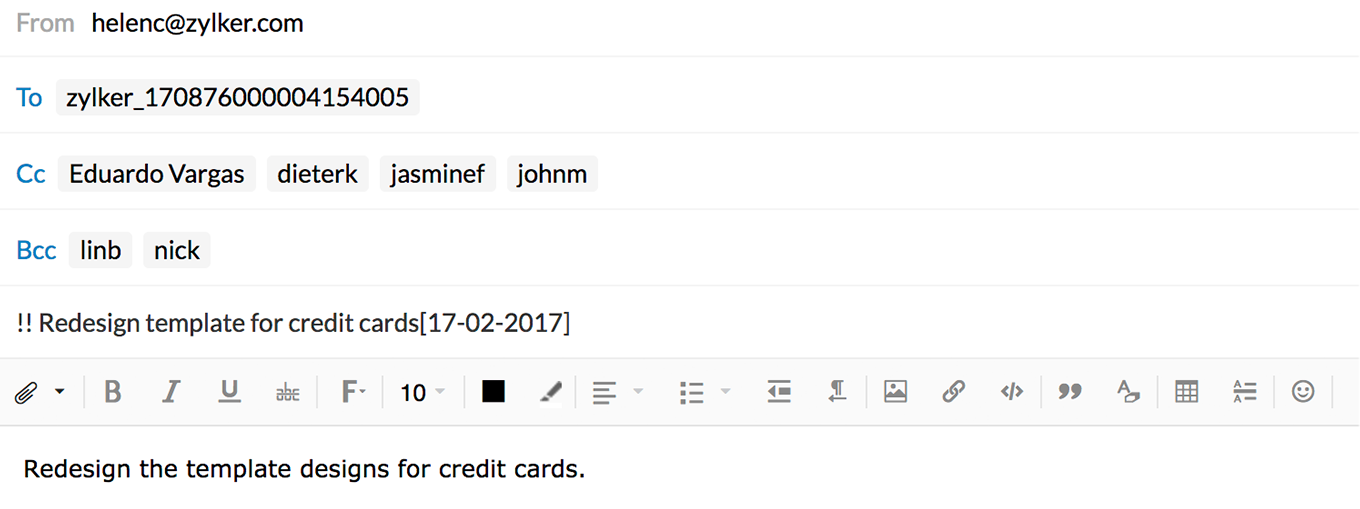
- You
can also add the start date and end date for tasks in the subject. The
first square bracket contains the start date and the second square
bracket contains the end date. [11-29-2019][11-30-2019].
- The task will be assigned to users mentioned in the CC.
- The
files that you attach to the task from your email alias, will be added
to the documents section in your task details page. Also, the file size
that you attach in the email should not exceed 20 MB.
- You can also attach files to the task along with its comments.
Post reply in forums
You can post replies in forums via email.
- Select the required project and then click Forums.
- Click open a forum topic to post a reply.
- Scroll down to the bottom of the page and copy the email address specific to this forum topic.
- Select Reset address right next to the email address of the forum to change the email address.
- Compose a mail and paste this email address in the To address.
- Type your contents, attach files (if needed), and click Send.
The contents mentioned in the email gets automatically posted as comments along with attached files for your forum post.
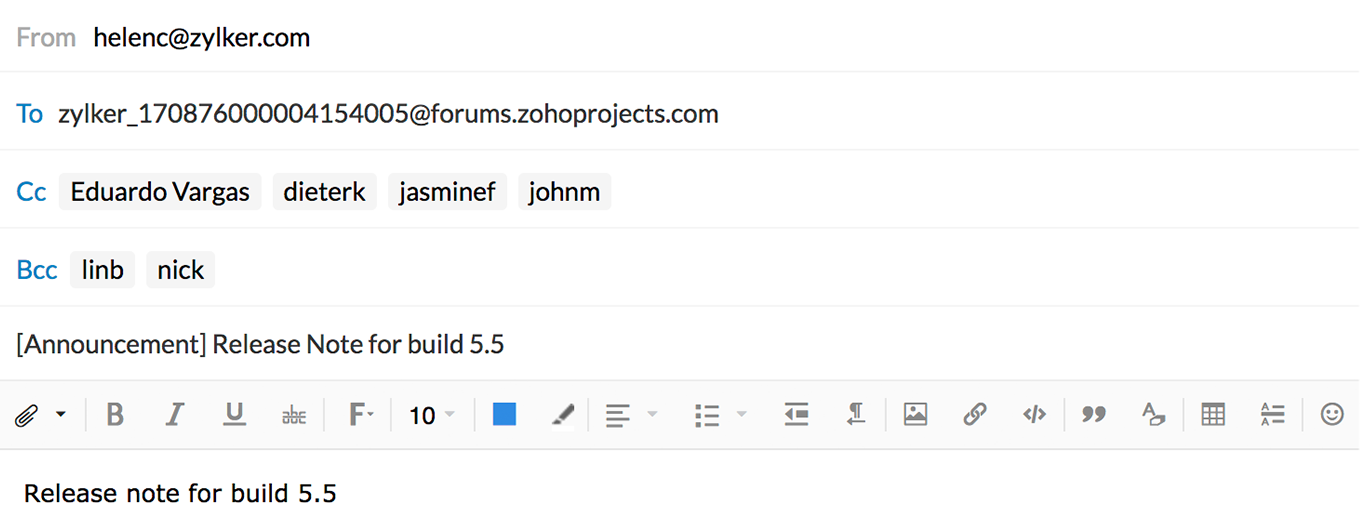
While adding a form via email:
- In Subject, first select if the forum post is an announcement or a sticky post followed by the forum message.
- Syntax
for announcement: [announcement] Example: [announcement] Release Note for build 4.0
- Syntax for sticky post: [sticky].
Add comments for Issues
- Click the required issue in the Issue list view.
- Click the Comments tab and copy the issue mail address specific to this issue in the bottom of the issue details page.
- Compose a mail and paste this email address in the To address.
- Type your contents and click Send.
You can also attach files to the issue along with its comment.
Add comments / Attach files for an event
- Select the required project in the Projects and click Calendar.
- Click Events, and then click an event to add comments or share documents.
- Copy the event email address specific for this event provided in 'To add comment(s) to this Event mail to:'
- From your mail account, compose a mail and paste the copied email address in the To address.
- Add comments, attach files and then click Send.
The contents added in the email is automatically posted as comments along with the files for your event.
Upload files to a folder
- Select the required projects in Projects and click Documents.
- Select a folder to upload the file(s).
- Scroll down to the right bottom of the page and click Show Info. Copy the email address to this folder in Send Document via email, for uploading the document.
- Compose a mail and paste this email address in the To address.
- Attach files and click Send to attach files to the selected folder.
The file size that you upload should not exceed 10MB.
Supported Date Formats
Zoho
Projects supports many date formats such as Today, Tomorrow, Yesterday,
Monday, Tuesday, Next Thursday, Next Friday and so on. The supported
Start Date and End Date formats are listed below:
Start Date formats:
Date
must be in 'mm-dd-yyyy' format or in any one of the following strings:
Today, Tomorrow, Yesterday, Monday, Tuesday, Wednesday, Thursday,
Friday, Saturday, Sunday, Next day, Next week, Next month, Next year,
Next Monday, Next Tuesday, Next Wednesday, Next Thursday, Next Friday,
Next Saturday, Next Sunday.
End Date formats:
Date
must be in 'mm-dd-yyyy' format or in any one of the following strings:
Today, Tomorrow, Yesterday, Monday, Tuesday, Wednesday, Thursday,
Friday, Saturday, Sunday, Next day, Next week, Next month, Next year,
Next Monday, Next Tuesday, Next Wednesday, Next Thursday, Next Friday,
Next Saturday, Next Sunday.
The
suffix for the end date is 'd' for days and 'h' for hours. E.g. Redesign
template for credit cards [17-12-2019][8d] - This will set
the start date as 17-12-2019 with a duration of 8 days. The end date
will be calculated based on the start date and duration. Alternatively,
you can enter the start and end date in the subject. E.g. Redesign
template for credit cards [17-12-2019][27-12-2019].
Related Articles
Project budget
Managing budget is a crucial part of any project. A budget can help managers improve cost management and reduce budget overruns. Project managers can view the planned versus actual cost in real time with the budget status report. Multiple currencies ...Project budget
Managing budget is a crucial part of any project. A budget can help managers improve cost management and reduce budget overruns. Project managers can view the planned versus actual cost in real time with the budget status report. Multiple currencies ...Email templates for issue notifications
Communication plays a significant role in project management. Emails have become handy in the business world to communicate effectively. Zoho Projects very well understands this fact and it provides Email Templates to customize the automated emails ...Project management
Zoho Projects is an online project management software that helps you run your business with ease. It stands as a comprehensive solution to your day-to-day problems in project management and adds value to your business by leaps and bounds. Learn more ...Project terms
What is a project? The goals of a team is divided into smaller tasks and are grouped within a project. A project has a predefined set of tasks that are accomplished by the team members. The Team Owner/Admin adds the team members to particular ...