Fundamentals of Zoho Show UI
The Zoho Show comes with an attractive, redesigned user interface (UI) to help you make your presentations spectacular. We've grouped all of our features into easily-accessible panes and toolbars to make it easy to find what you want, and the contextual UI reacts to every click by showing more in-depth options related to the actions you're working on. There's a ton to explore, so take a look around while you're crafting your next presentation.
Here's a screenshot of the UI to familiarize you with our new look. You can see the features grouped into panes, menus, and toolbars for easy access. We'll refer to these elements often throughout our help guides, so let's take a quick tour and get acquainted with what they contain.
Top Bar
Contains tools for creating, editing, sharing, managing and delivering your presentation.
Divided into two sections:
1. Meta-data section
It includes:
- File menu: save, open, create, print, or download presentations.
- Presentation Title.
- Last Modified Status: displays the date and time your presentation was last edited.
- Account: sign out, view account details, access to resources and Zoho Show product features.
2. Presentation editing section
It includes:
- New Slide button: add a new slide into your presentation with desired layout.
- Toolbar (top left): shortcut buttons for popular actions like cut, copy, paste, format painter, undo, and redo.
- Insert (top center): add objects such as pictures, text, chart, table, media files, or shapes to your slide.
- Slideshow (top right): create and manage custom slideshows, teaser videos, voice explanations and play your slideshow in fullscreen view. Also, use Presenter View to access speaker notes in your own private display while presenting to the audience.
- Share menu: access collaboration tools. Share your presentation with individuals or teams, publish it internally within your organization or on the web, broadcast it to a remote audience, and check it out or in to enable or disable editing by other collaborators.
Right Pane (right side)
Contains tools for formatting, animating, and reviewing your slide and slide objects. Notice that the pane reacts to your clicks by displaying a number of object properties to try out.
Divided into three modes:
1. Format mode: set slide background, layout, footer, orientation, and presentation themes, or edit the Master Slide.
2. Animate mode: apply and customize different animation effects and slide transitions.
3. Review mode: check spelling, view version history, select language, and add or edit comments.
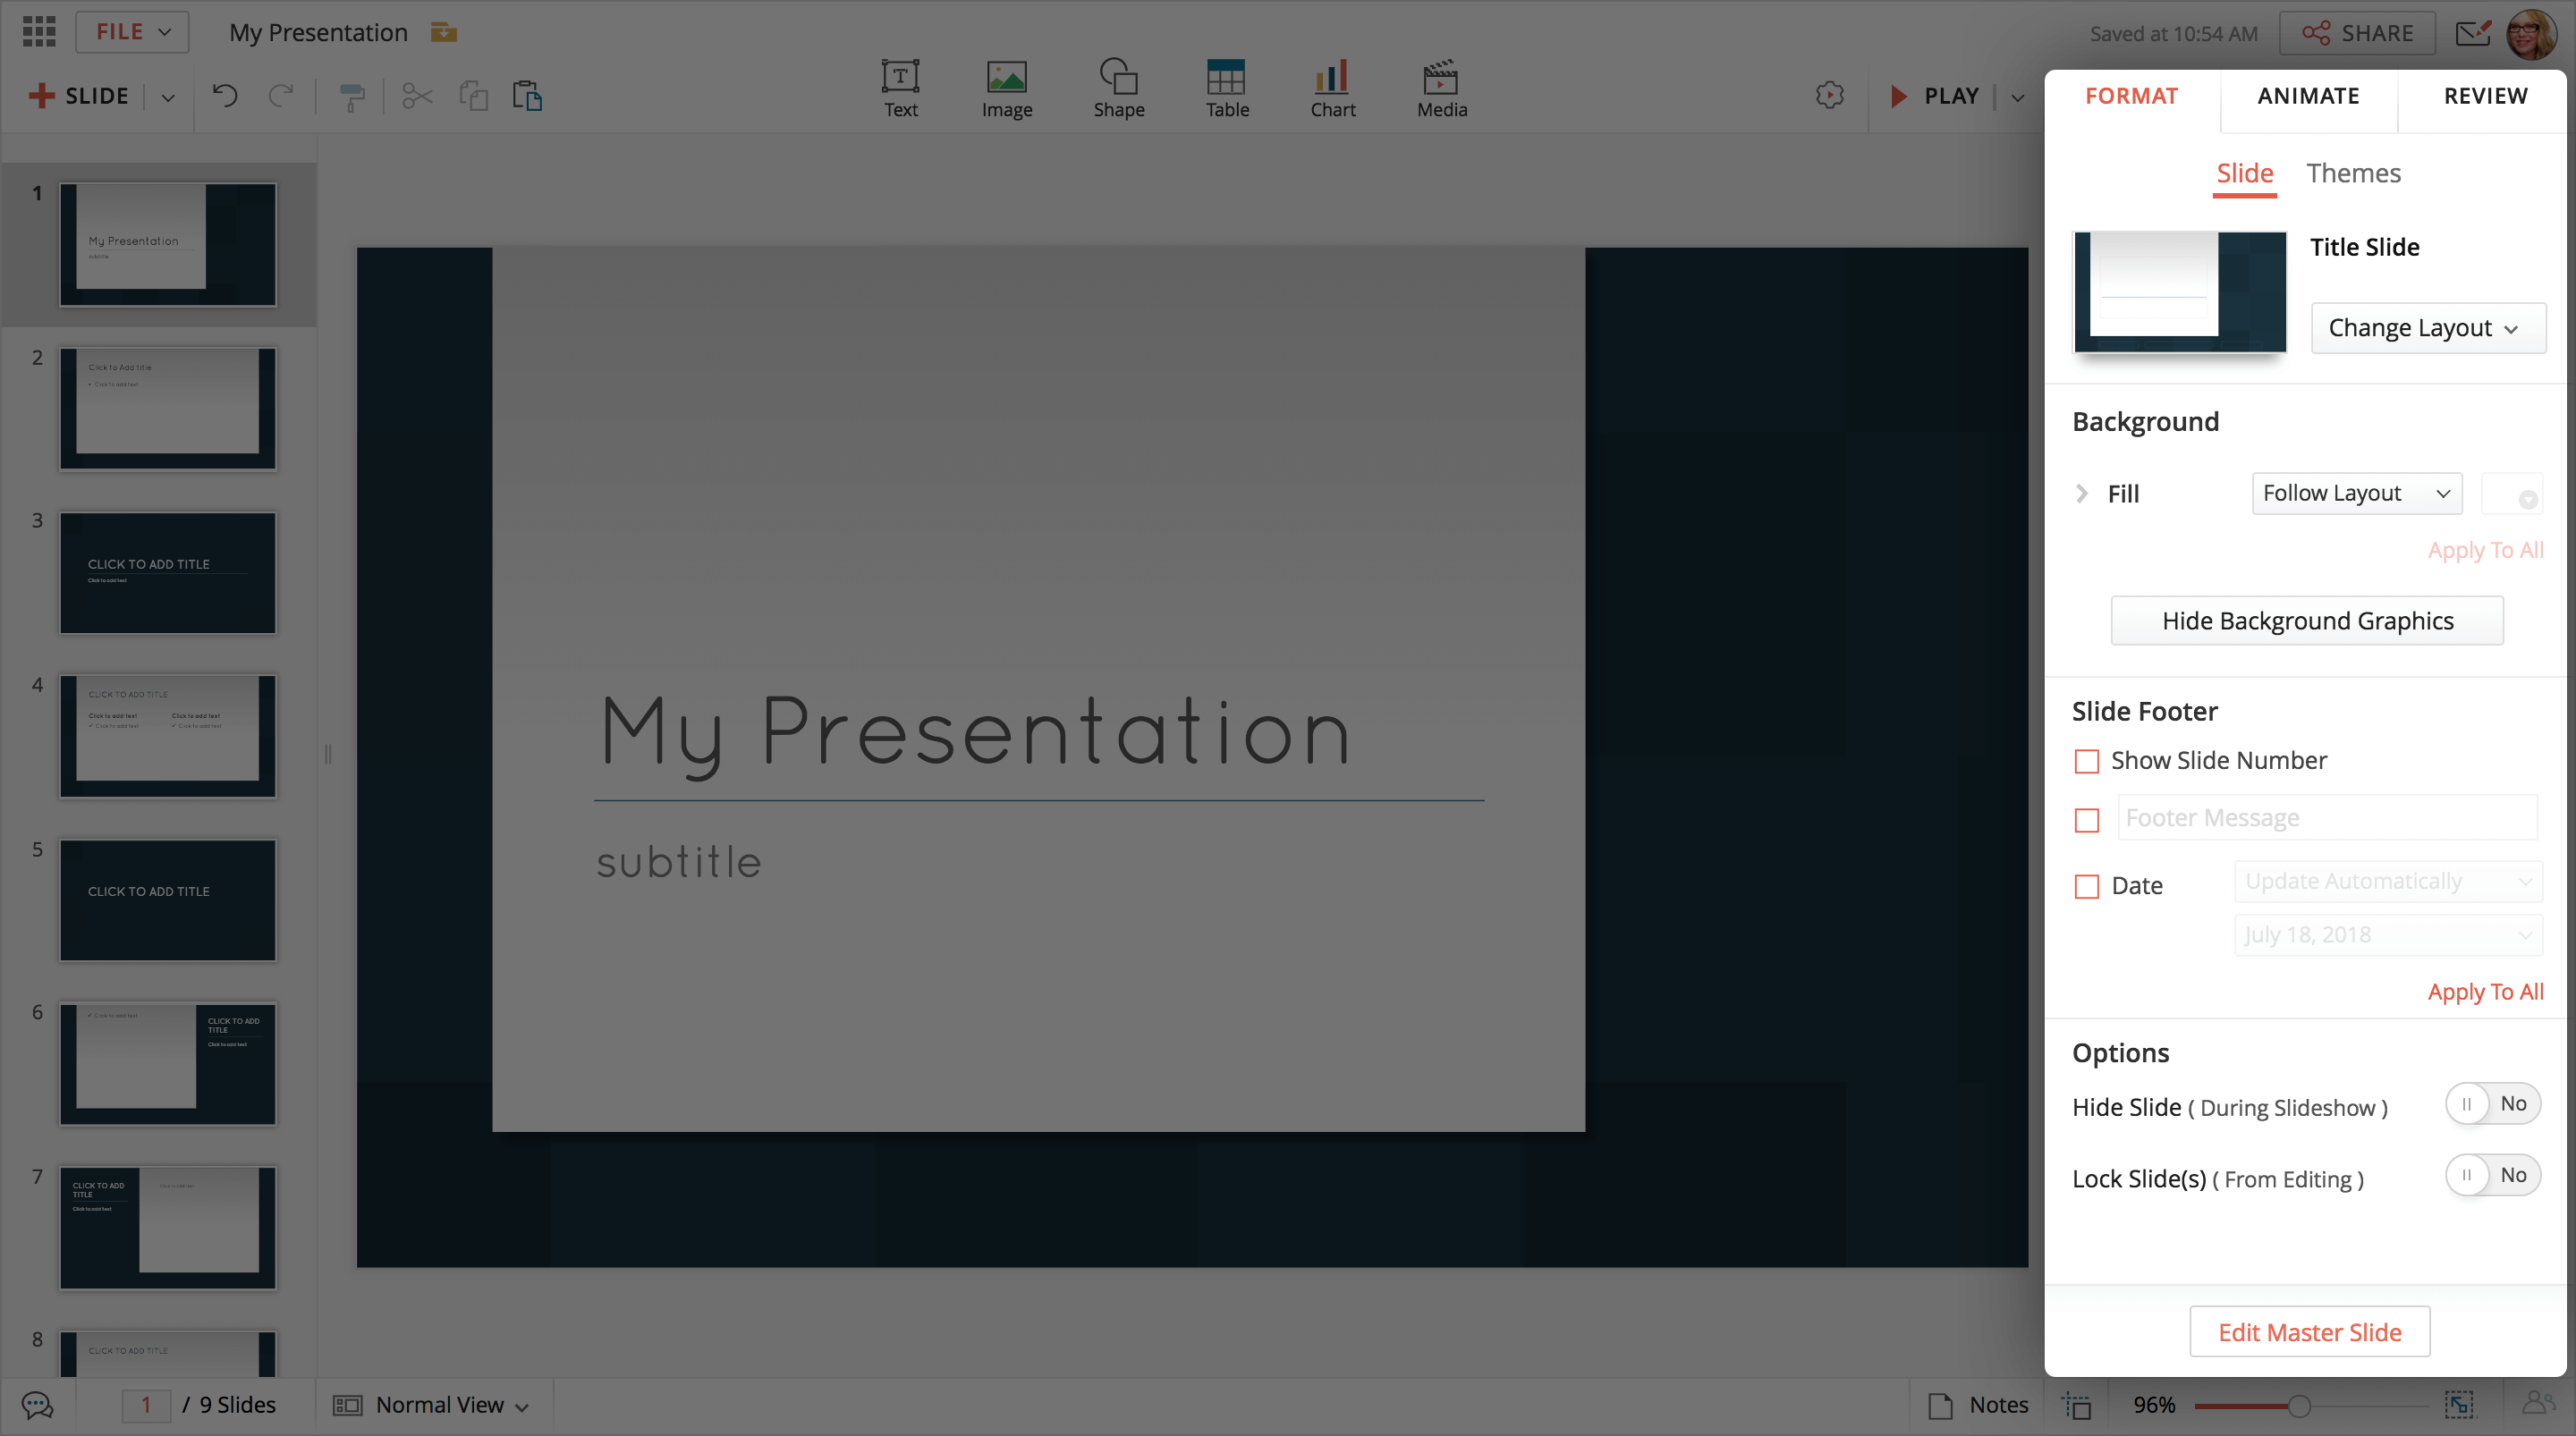
Slide Area (center)
The area where the active slide is created and edited. This large view allows you to add, edit, and delete text, images, shapes, multimedia objects and more.
Thumbnail Pane (left side)
Lists all the slides in your presentation in miniature form. You can navigate through your presentation, see design changes, add, delete, rearrange, hide/show, lock, or copy slides from here.
Bottom Bar
Shows the number of active slides, speaker notes inserted to the slide, different types of slide views, and buttons to toggle common presentation functions on and off.
Includes:
- Slide notes: a quick reference for the presenter that is not displayed on the screen during a slideshow.
- Slide Views (bottom left): switch between Zoho Show Normal, Master, and Slide Sorter slide views.
- Collaborators list: work and chat with your project partners in real time without creating multiple versions of your presentation. Displays each collaborator's name and which slide they are currently viewing or editing.
- Snap to: add dotted guidelines to the slide to help you accurately place and adjust your slide elements in relation to each other.
- Zoom Slider & Fit to Screen function: zoom in or out to get a closer look at your slide elements and again resize them again to fit within the available display area (such as a projector or slide area), regardless of the current zoom level.
The goal of the new user interface is to make working on presentations convenient and intuitive. With the features you use frequently available right in your working view, you won't need to dig to find what you want. Get started with the format pane's convenient spread of options, and our contextual menus will take care of you from there.
Related Articles
Fundamentals of UI in Zoho Show app for android
The Zoho Show for mobile comes with an attractive, redesigned user interface (UI) to help you make your presentations spectacular. We've grouped all our features into easily-accessible panes and toolbars to make it easy for you to find what you want, ...Using the Zoho Show Editor
Zoho Show, is an online presentation tool that lets users create, design, and collaborate on slides together in realtime. It features an attractive user interface to help you make your presentations spectacular. Here is a list of all Shows' ...Introduction: Zoho Show for Confluence
What is Zoho Show for Confluence? Zoho Show is an online presentation software that lets users create, edit, share, collaborate, and deliver presentations from anywhere. Confluence is a powerful collaboration tool that gives teams the power to ...Install Zoho Show for Slack
Setting up Zoho Show for Slack from the Slack app directory is quick and easy. You simply need to adhere to the following steps: Log into your Slack account. Ensure you are the admin for the Slack workspace. There are two ways to add Zoho Show to ...Installing Zoho Show for Jira
Setting up your Zoho Show add-on for Jira from the Atlassian Marketplace is quick and easy. All you have to do is to log in to your Atlassian account, access Jira and install the Show add-on. To install the Zoho Show add-on: Open the Jira page and ...