Issue layouts & fields
Feature availability
- Feature Availability: Enterprise plan
- Navigate to
 > Portal Configuration > Layouts and Fields > Issues to create custom fields and layouts for Issues. If you are an admin but unable to access the above path, write to support@zohoprojects.com
What is a layout?
Issue Layouts are used for creating forms where customers can fill details relevant to the issue. Create unique layouts based on the business requirement.

What is a section?
The various parts of the layout are called a section. The standard layout has a default section called Issue information. You can customize each section by adding fields based on the requirements.
What is a field?
Customize fields to collect issue details based on your requirement. You can add a new field or an existing field to your layout. The default fields can neither be edited nor deleted. They can only be reordered. Module, Severity, Is it Reproducible, and Classification fields can be renamed.
Reporter, Assignee, Created, Last closed time, Modified, Due date, Status & Workflow, Severity, Release Milestone, Affected Milestone, Module, Classification, Is it Reproducible and Flag are the default fields in a layout.
Standard layout
- Every portal will have a Standard Layout to start with.
- The standard layout has one default section - the fields in this section can neither be edited nor deleted. They can only be reordered.
- Users can clone the standard layout and create a new layout. After cloning, they will be able to add new sections and fields to the new layout.
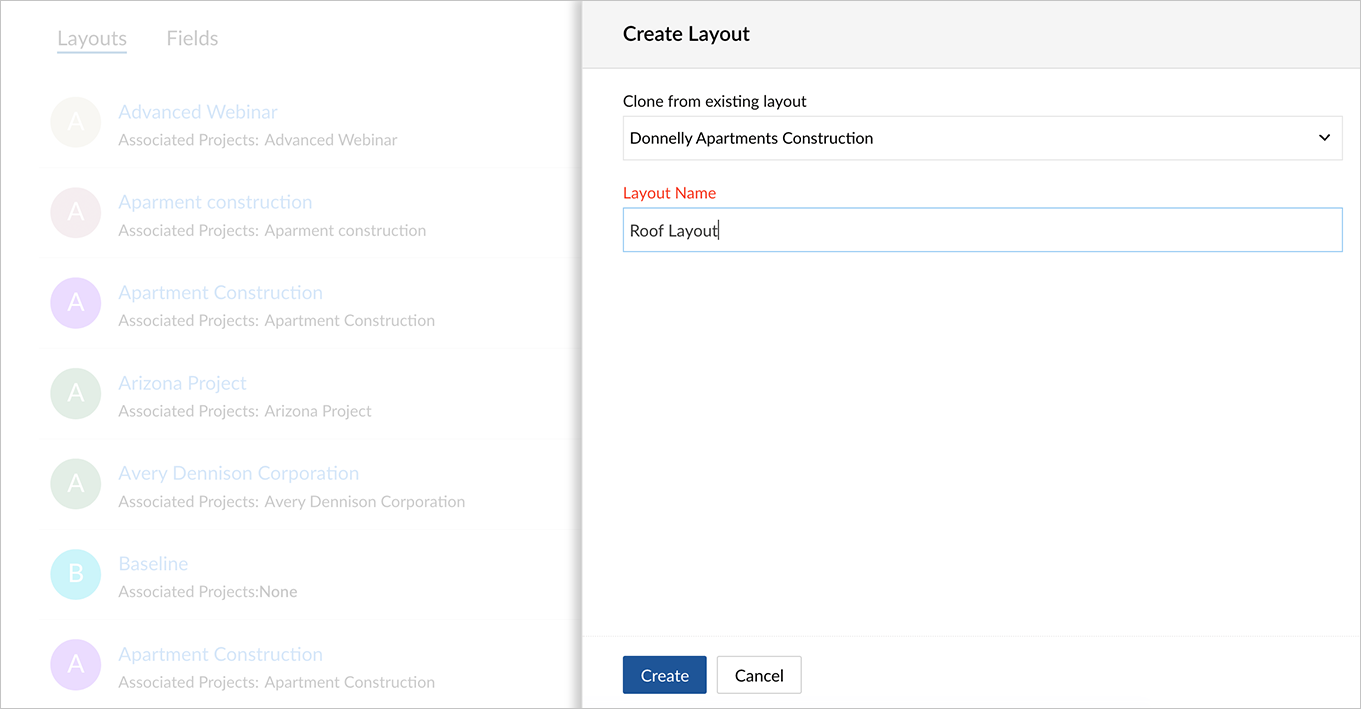
Create layout
- Click in the upper-right corner of the top navigation bar.
- Navigate to Portal Configuration > Layouts and Fields > Issues.
- Click Create Layout in the upper-right corner.
- Select a base layout that you want to build (clone) your new layout on. If you have not created any layouts, the standard layout will be listed in the drop-down.
- Enter a Layout Name.
- Click Create.
- The standard layout and the layouts associated with a project cannot be deleted. You can delete the layout after associating the projects to a different layout.
- To view the list of layouts available in a portal, navigate to Portal Configuration > Layouts and Fields > Issues > Layouts.
- You can also edit a layout's name by directly editing its name in the layout editor screen.
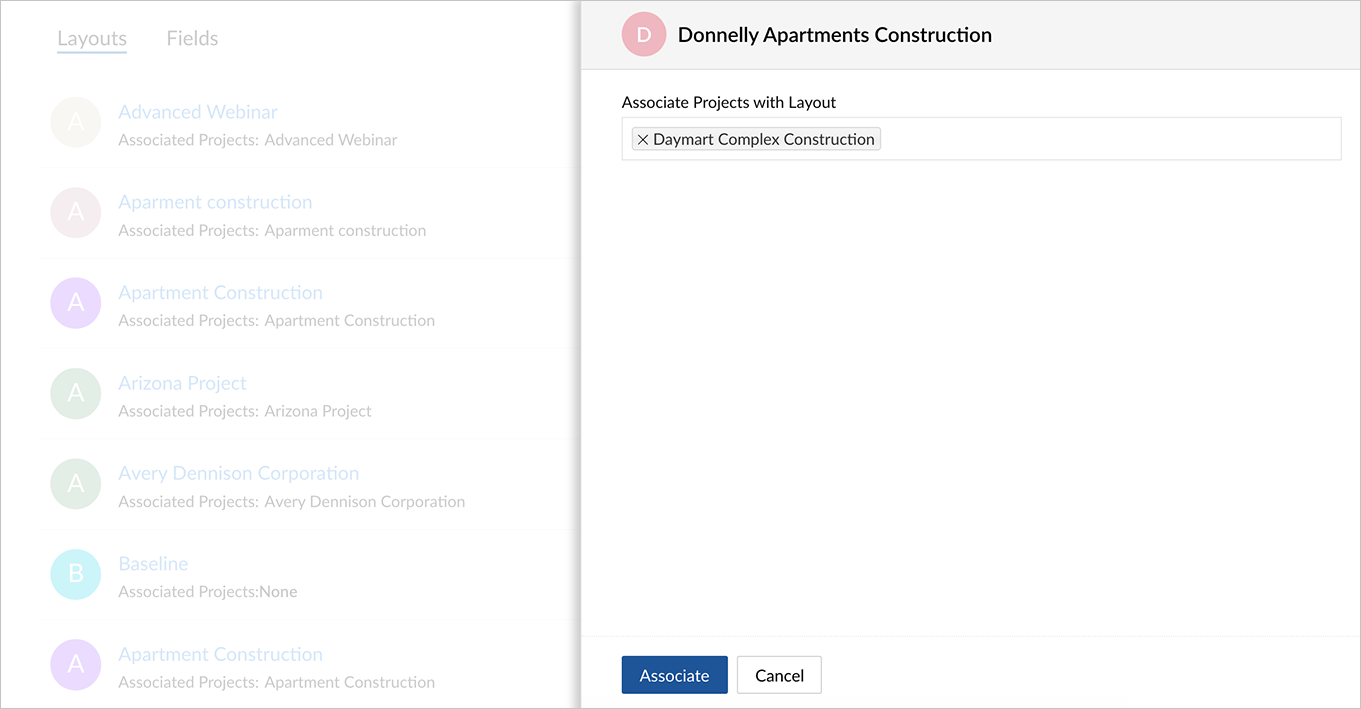
Associate a project with issue layout
- Click in the upper-right corner of the top navigation bar.
- Navigate to Portal Configuration > Layouts and Fields > Issues.
- Click the plus icon
 to the right of the selected layout.
 - Select one or more projects from the drop-down to associate. You can also associate project templates with a layout.
- Confirm your action.
- Click Associate.
View layout
- Click in the upper-right corner of the top navigation bar.
- Navigate to Portal Configuration > Layouts and Fields > Issues.
- In the Layouts section, you can view the list of issue layouts that have been created already.
- The layouts that are listed cannot be reordered.
- Click the layout you want to edit, do the necessary changes, and save.
Delete layout
- Click in the upper-right corner of the top navigation bar.
- Navigate to Portal Configuration > Layouts and Fields > Issues.
- Click the Layouts section.
- Hover over a layout that you would like to delete and click the trash icon
 .
. - Confirm your action.
- Hover over a layout that you would like to delete and click the trash icon
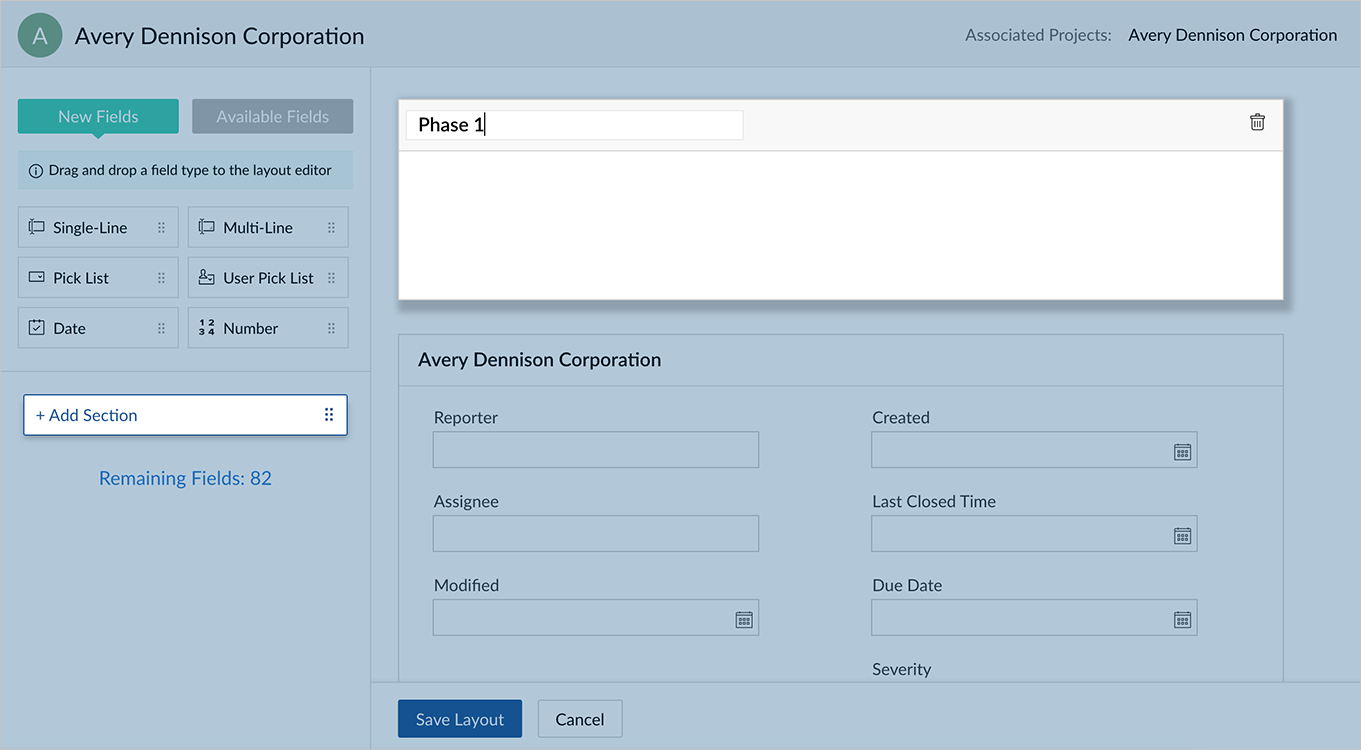
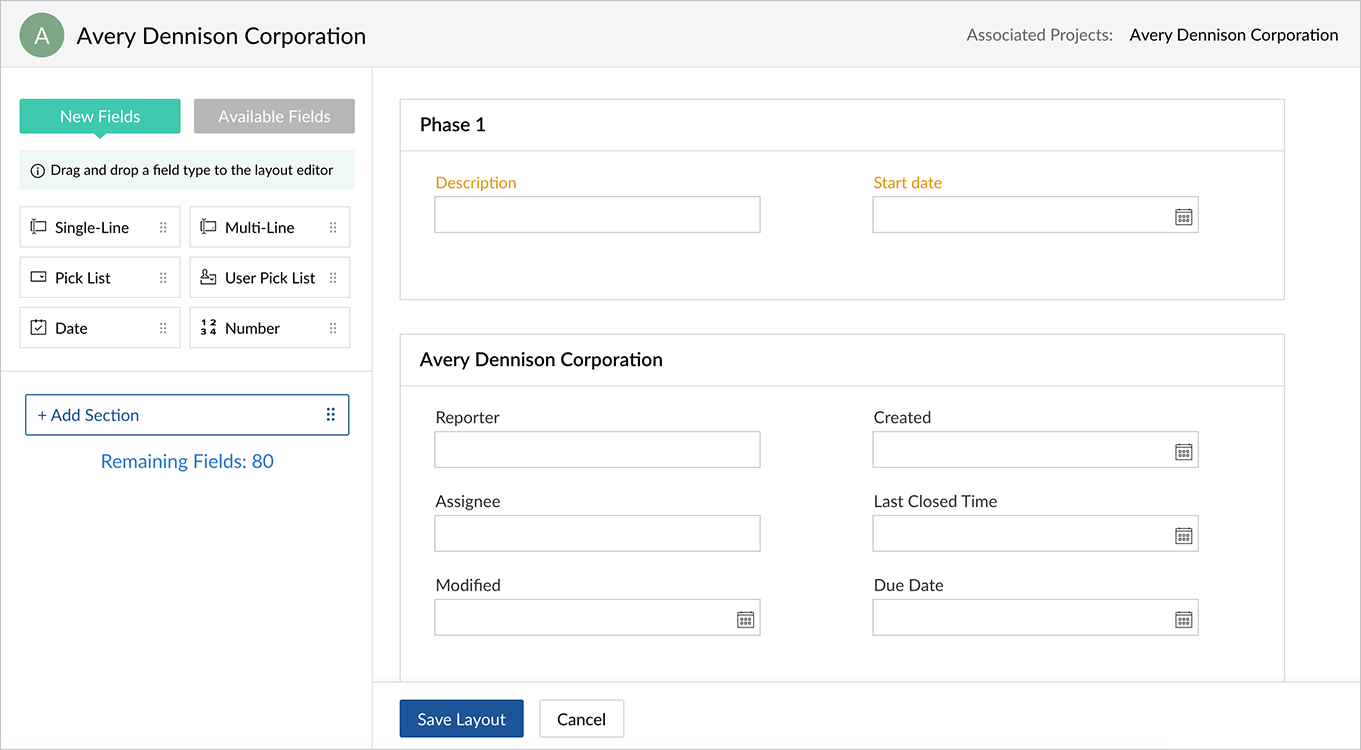
Create or edit section
- Click in the upper-right corner of the top navigation bar.
- Navigate to Portal Configuration >Layouts and Fields > Issues.
- Click a layout to add a section.
- Drag and drop the Add Section component from the left tray to the layout editor (main panel). Initially, the sections will be named "Untitled Section", "Untitled Section 1", "Untitled Section 2" and so on as you keep adding new sections in the layout editor.
- Hover over the section name and edit it.
- You can also add new or existing custom fields to your section.
- Click Save Layout.
Delete section
- Click in the upper-right corner of the top navigation bar.
- Navigate to Portal Configuration > Layouts and Fields > Issues.
- Click a layout to delete a section in the layout.
- Hover over the section and click .
- The icon will be visible only when all the custom fields inside the section are removed. We recommend you to remove the custom fields first and then delete the section.
- Confirm your action.
Create custom field
- Click in the upper-right corner of the top navigation bar.
- Navigate to Portal Configuration > Layouts and Fields > Issues.
- Click a layout to add a custom field.
- Drag and drop a field type from the New Fields tray into the layout editor (main panel).
- Set a Default Value if necessary.
- Select Mandatory checkbox if you want the field to be filled compulsorily.
- Select Insert Tooltip checkbox if you want to set tooltip information for the field.
- Click Add to Layout to include the field in the layout. When you Cancel, the field is never stored anywhere.
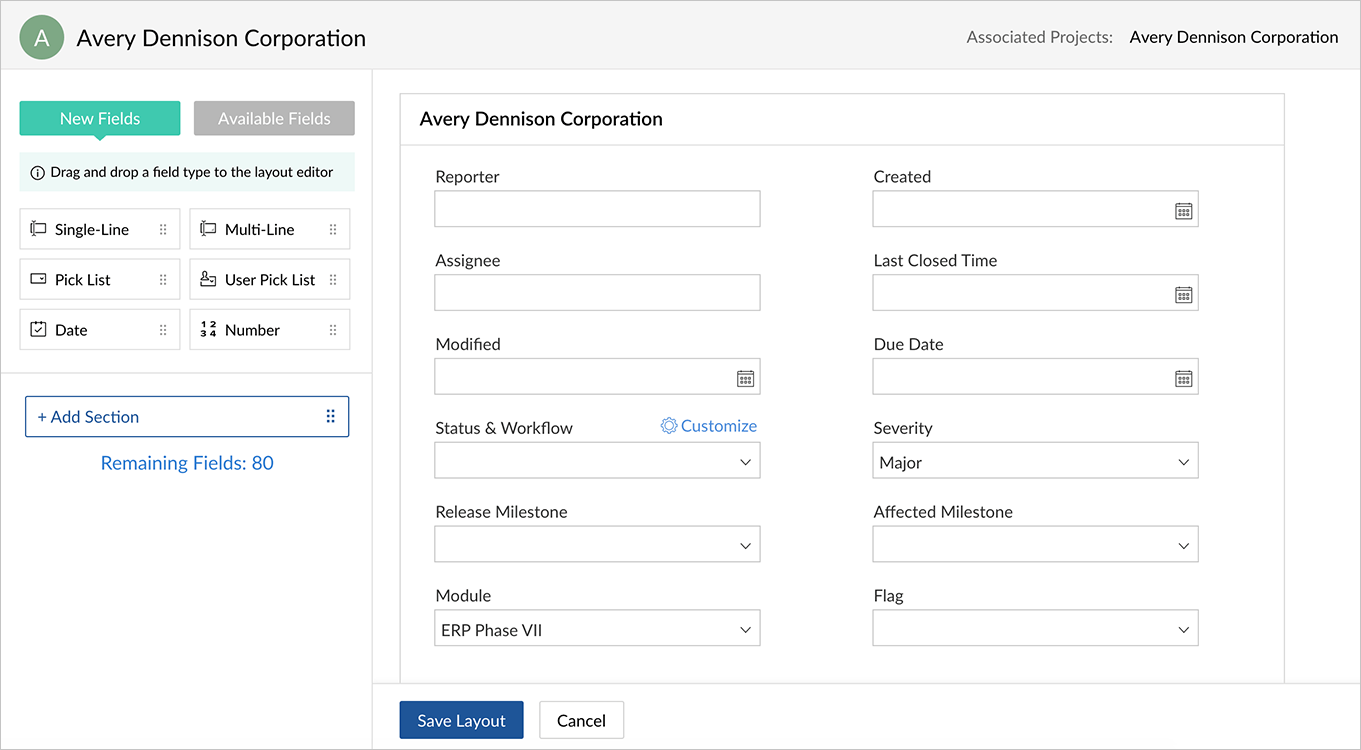
You can create the following custom fields:
- Single-line text field: Add one line of text. Single line text fields can be marked as containing Personally Identifiable Information (PII). If you select Encrypt Field, the data will be encrypted at the backend.
- Multi-line text field: Add multiple lines of text. Hit Enter to key in more information. Multi-line text fields can be marked as containing Personally Identifiable Information (PII). If you select Encrypt Field, the data will be encrypted at the backend.
- Pick List field: Create your own dropdown using a pick list. Set values and wrap them under a pick list as per your business needs.
- User Pick List field: Use this field when you need to store usernames.
- Date: Store dates in this field.
- Number: Store numbers in this field. A number can have a maximum of 19 digits. Number fields can be marked as containing Personally Identifiable Information (PII). If you select Encrypt Field, the data will be encrypted at the backend.
Edit custom field
- Navigate to > Portal Configuration > Layouts and Fields > Issues.
- Open the layout editor and hover over the custom field you would like to edit.
- Click the pencil icon
 .
. - Edit the field properties except the field name. You can change the field name also, but the new name will be reflected in all the projects.
- Click Save Changes.
Reorder custom field
- Navigate to > Portal Configuration > Layouts and Fields > Issues.
- Open the layout editor and hover over the custom field you would like to reorder.
- Drag and swap with another field in the editor. You can reorder the fields as many times as you want until you get the desired order.
- Click Save Field Order.
Remove custom field
- Navigate to > Portal Configuration > Layouts and Fields > Issues.
- Open the layout editor and hover over the custom field you would like to dissociate.
- Click
 .
. - Confirm your action.
- Removing a project custom field will not permanently delete it from the database.
- The custom field will be moved to the Available Fields tray and it can be reused anytime later from this tray.
Delete custom field
- Navigate to > Portal Configuration > Layouts and Fields > Issues > Fields.
- Hover over the field you would like to delete.
- Click.
- The data stored in the field will be lost
- Confirm your action.
Create custom status
- Navigate to > Portal Configuration > Layouts and Fields > Issues > Fields.
- Open an existing layout or create a new layout.
- Click Customize on the right-side of Status & Workflow.
- Change the default status for an issue under Set Default Status section.
- Click the +Add Status link to create a new issue status.
- A new status will fall under either Open or Closed status types.
- Default Status can't be deleted and there should be at-least one open & one closed status.
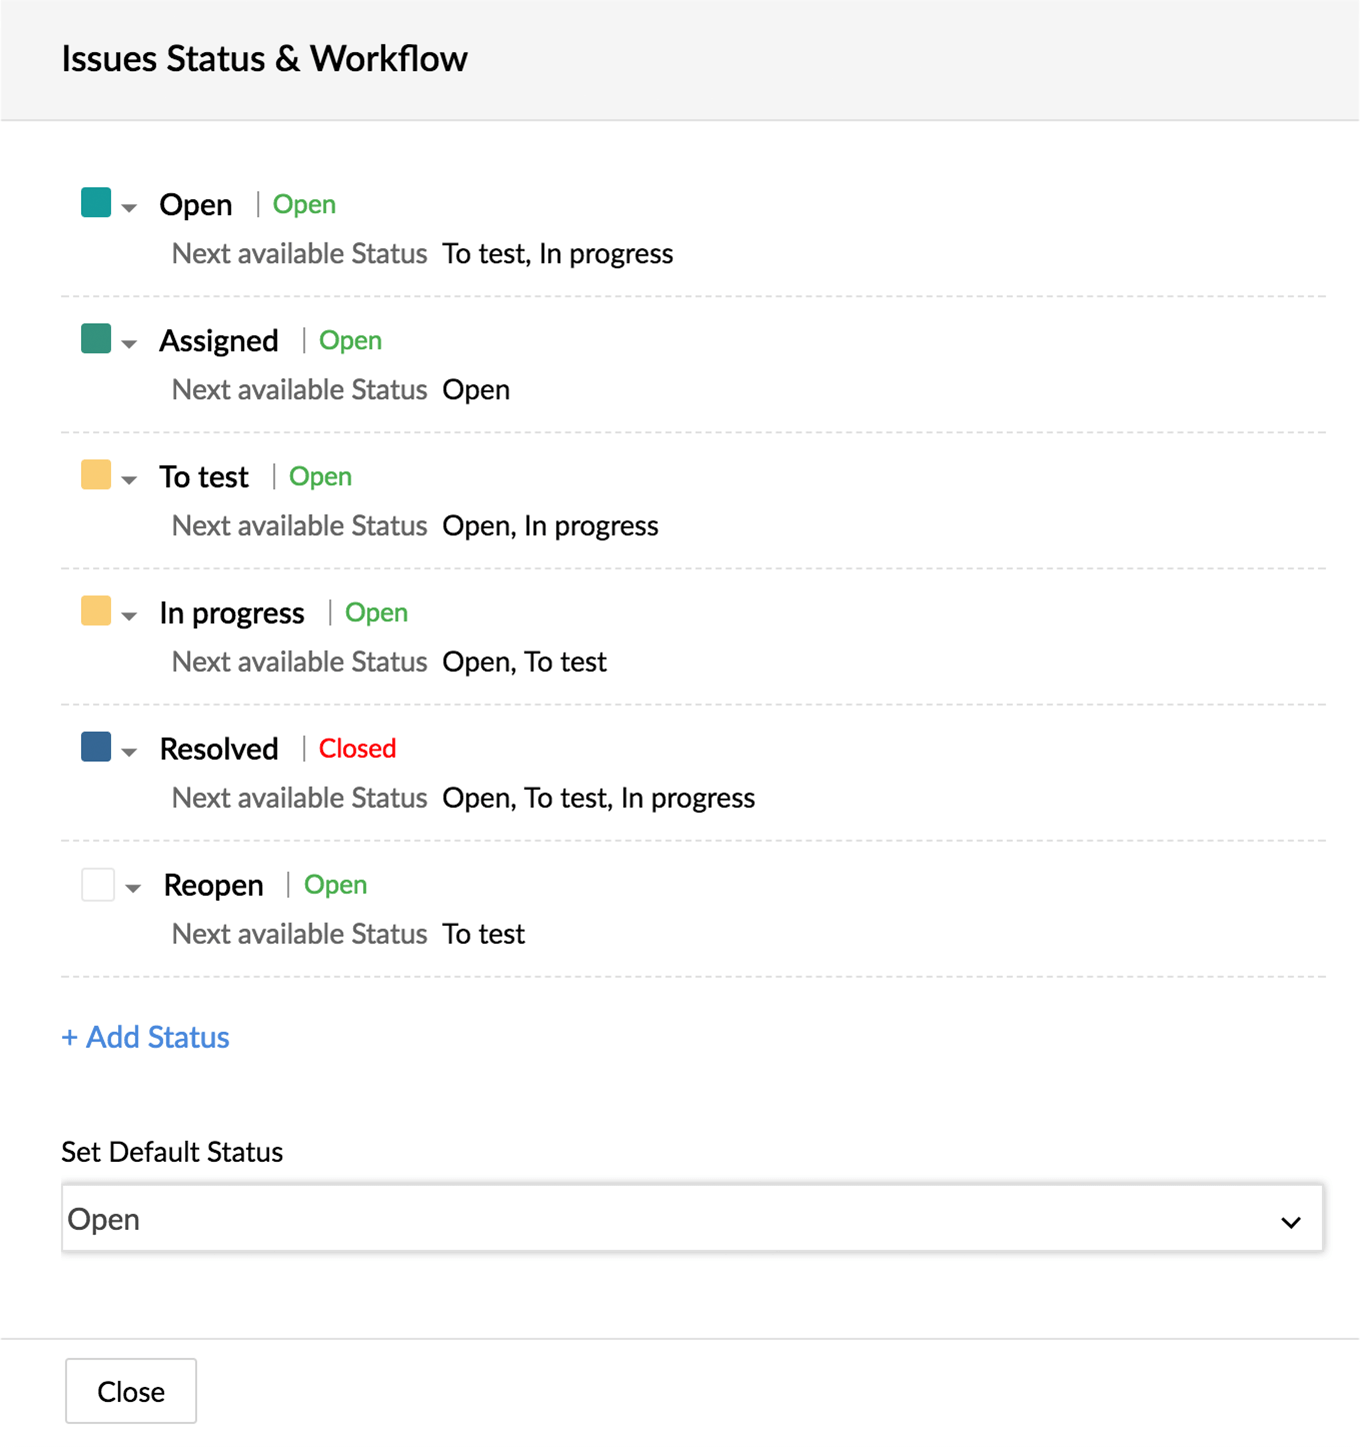
- Give a status name.
- Click
 or
or  to the left of the status name to assign a color. Pick any color from the palette that matches the status name and type.
- Click
- Define a Workflow by selecting the next available status. The workflow is determined by the next available status specified in the box.
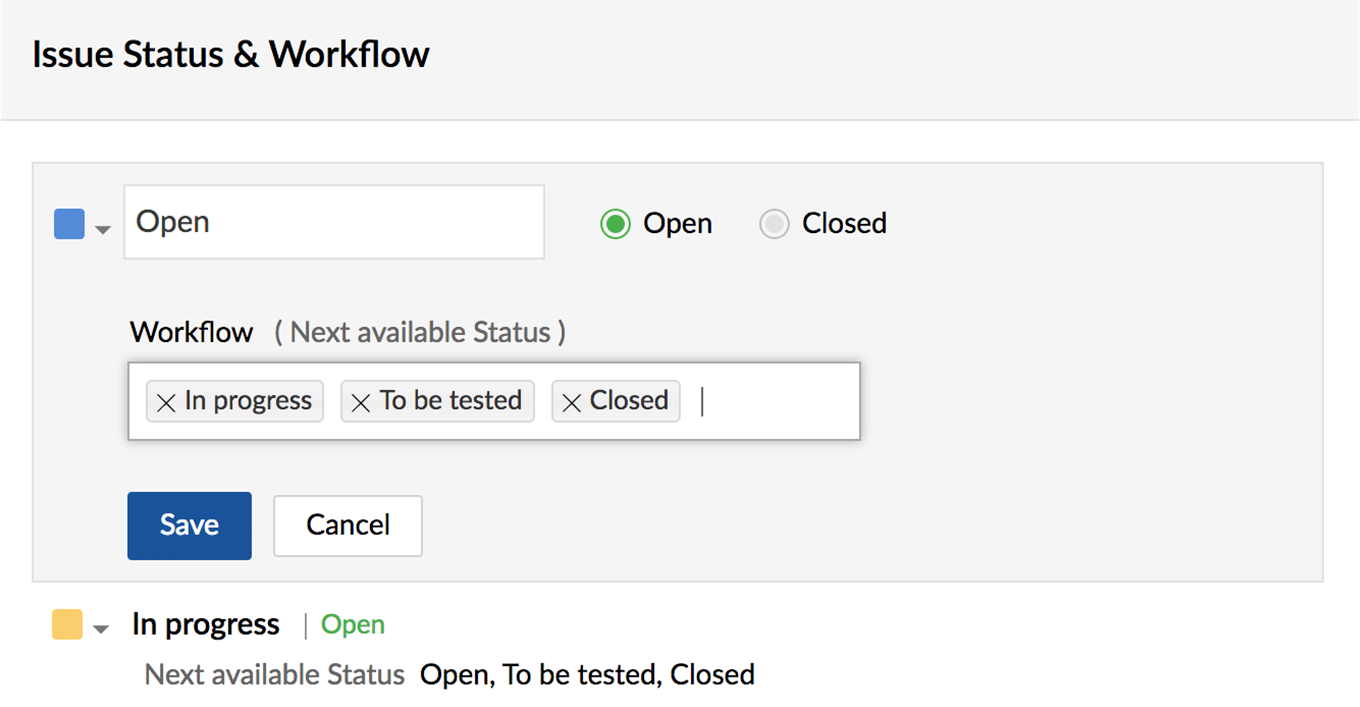
- Click Save to add the Status.
Related Articles
Working with Page Layouts
Understand page layouts with a scenario Here is a simple scenario in which we will demonstrate the use of page layouts in Zoho CRM. With this as an example, you will be able to implement page layouts for your organization depending on your company’s ...Working with Page Layouts
Understand page layouts with a scenario Here is a simple scenario in which we will demonstrate the use of page layouts in Zoho CRM. With this as an example, you will be able to implement page layouts for your organization depending on your company’s ...Project layouts & fields
What is a layout? A project layout is used to create a form where the project details are collected. You can create different project layouts based on your project requirements. Initially, all projects will be associated with the standard layout. If ...Task layouts & fields
Zoho Projects supports custom fields and layouts for tasks. Create your own fields and task layouts and use them for creating tasks as per your business requirements. Click here to learn more about access privileges for Custom Fields and Task ...Default Fields in Layouts
When a new layout is created, it will contain a set of default fields. The properties and privileges of these fields can be edited to suit different layouts. They appear when a new job is created. Field Name Mandatory Visibility Renaming ...