Lead Queue for Zoho CRM
Time management is essential in any organization. Finishing activities faster will pave way for room for more activites and hence more output. Track how much time is consumed by each activity and convert all these leads to successful completion.
Install the extension
You can either go to the Zoho Marketplace and install the Lead Queue extension or log in to your Zoho CRM account and install. On installation, the extension will be available for all the users in the Zoho CRM's organization account.
To install Lead Queue
- Go to Setup > Marketplace.
- Clicking Marketplace will list all your installed extensions.
- Under All Extensions you can view all the extensions supported in CRM.
- Scroll down and click Lead Queue to see the extension details.
- Click Install Now.

- Agree to the terms of service and click Continue to Install.
- Choose one of the following and click Confirm.
- Install for Admin only - The extension will only be installed in CRM for the users with an administrator profile.
- Install for All Users - The extension will be installed for all users.
- Choose profiles - The extension will be installed for all the users with a particular profile. To use this option, click Continue and then select the desired profile.
The extension will be installed to the specified users.
Create a new queue:
To create a new queue
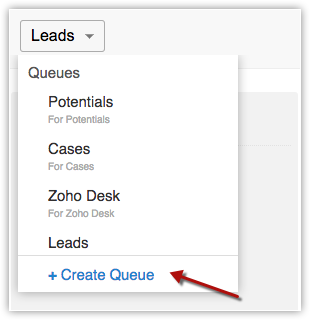
- Click the dropdown button in the top-left. The button will titled Leads by default. Select +Create Queue from the dropdown.

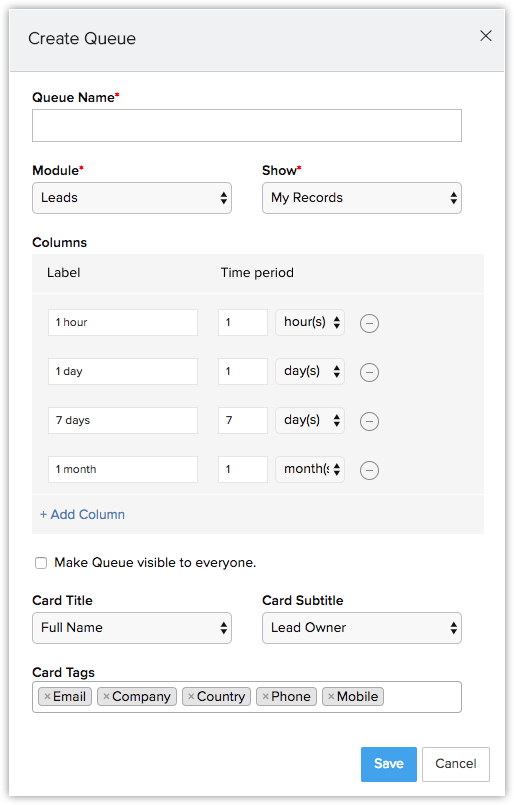
- Enter the name of the new queue to be created in the following pop-up.

- Select the Module that you need to create a board for from the dropdown. Custom modules will also be listed here.
- In the Show field, select if you want to be shown only your records or all the records associated with that module..
- In the Columns field, you can set a label and the time period for each column, hence tailoring your queue to suit your requirements.
You can also add any number of columns to customize it the way you want. - Next, select the CardTitle, CardName, and CardTags. These are the values displayed in the record's summary in each column.
- Click Save.
Edit or Delete an existing queue
To edit or delete a queue
- Hover over the current queue button, then select the Edit option.
- Make the necessary changes in the resulting pop-up.
- Click Save.
- To delete a queue, click the Delete button present next to the queue.

Note
- You
have to manually refresh the feed to update the queue. The refresh
button can be found on hovering over the current queue button.
Uninstall the extension
If you wish to uninstall Lead Queue, please be aware that all the records in the queue will also be deleted.
To uninstall Lead Queue
- Go to Setup > Marketplace > All.
All the installed extensions are listed. Under All Extensions you can view all the extensions supported in CRM. - Browse for Lead Queue and click the corresponding Uninstall link.
- Click Ok to confirm.
Related Articles
Lead Generation
The key to generating leads is sharing interesting content, keeping your audience engaged, and listening carefully to what people are saying about your brand on social media, because that's where you will find a large number of your customers. If ...When will a lead be skipped while pushing lead data to Zoho CRM?
When there is data missing in the mandatory fields When data entry in certain fields is invalid When there is a permission denial for the lead When there is a permission denial for the account in Zoho CRMWhat will cause a lead to be skipped while pushing lead data to Zoho CRM?
Leads will be skipped when: there is data missing in mandatory fields data entry in certain fields is invalid there is a permission denial for the lead there is a permission denial for the account in Zoho CRMFacebook Lead Ads Integration
If you're running a Facebook Lead Ads campaign, you've probably found yourself wishing for a tool to track your leads easily. Facebook Lead Ads are a great way to connect with quality leads—but wouldn't it be so much easier if you could: ...Facebook Lead Gen Reports
Lead Ads Statistics Once you've set up a Lead Ads campaign, you will want to measure its performance. This includes being able to identify the number of leads generated from Facebook Lead Ads, the demographics of the leads being generated, and more. ...