Migrating Data from Salesforce
Follow the steps in this document to migrate your Salesforce data into Zoho CRM.
Data files from Salesforce
The zip file you upload should contain all the files in CSV format and a folder named Attachments. This folder contains the source files used as attachments in Salesforce records. One of the CSV files will list the record of attachment mappings. This will be used to retain the records' association with the attachment files.
Data from any custom modules that you created in Salesforce will be stored in files with a "_c" suffix on the file name. (e.g., registrations_c.csv).
All your data should be in the format described above. When you save the data backup to your local drive, it is a good idea to extract the files to check that the format matches and compress them again for import. This may sometimes create additional folders. If there are any additional folders in the zip file, uploading your file may fail. The data backup from Salesforce will have additional folders named Attachments, Documents and Content Version. These folders will not cause the migration to fail.
Modules Mapping
You can migrate the following supported modules to Zoho CRM from Salesforce account:
|
|
Migrate data
To migrate data
- Log in to Zoho CRM with ]an account which has Administrator privileges.
- Go to Setup > Data Administration > Import.
- In the Data Migration page, choose Salesforce.
- In the pop-up, browse for and upload the files.
You can select multiple files or upload a zip file to migrate data into more than one module. - Click Next.
Zoho CRM automatically reads the files and maps the data to the correct modules and fields. - You can do the following in the Module-File Mapping section:
- View the mapped and unmapped modules separately.
- Click on a file and see which module it is mapped to.
- View the mapped, unmapped and unsupported files separately.
- Click the Discard Migration link to start again.
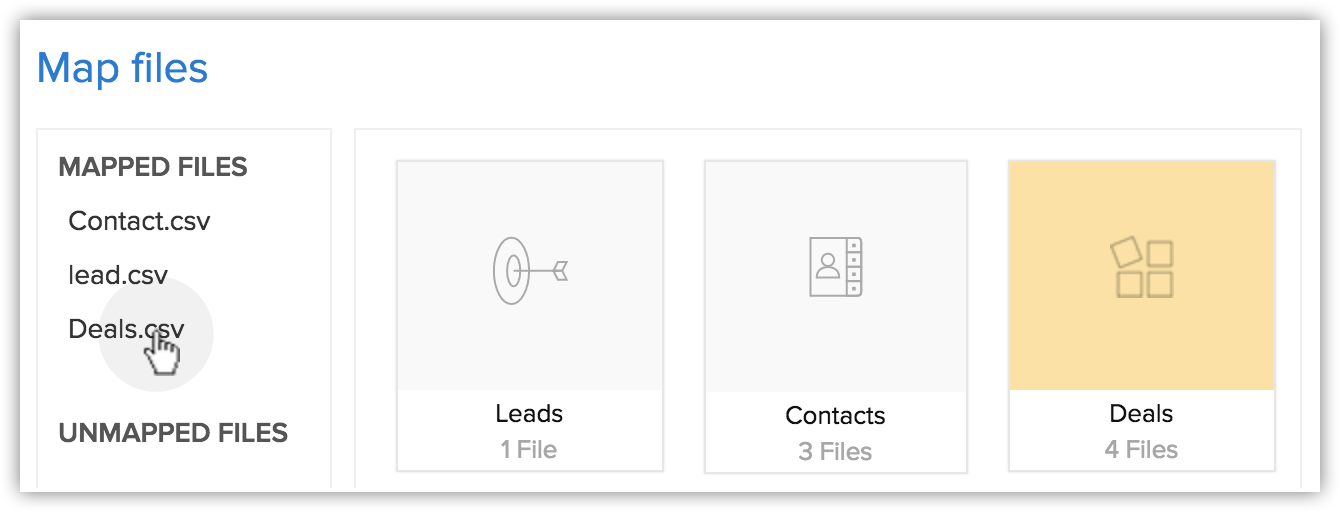
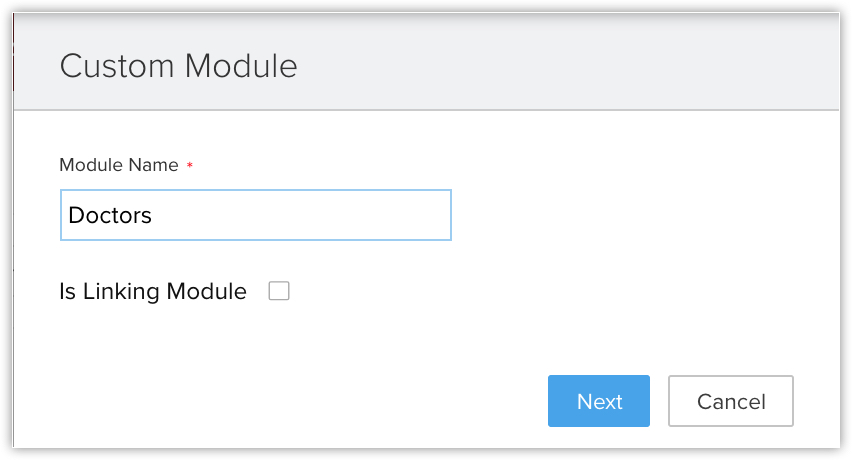
- Click on a module to view the files that have been mapped to it.You can also select from the Unmapped files and map them. Multiple files can be mapped at the same time.You can also create a new module and map the appropriate file.To create a new module, do the following:
- Click Create New Module.
- Enter the module name and click Next.
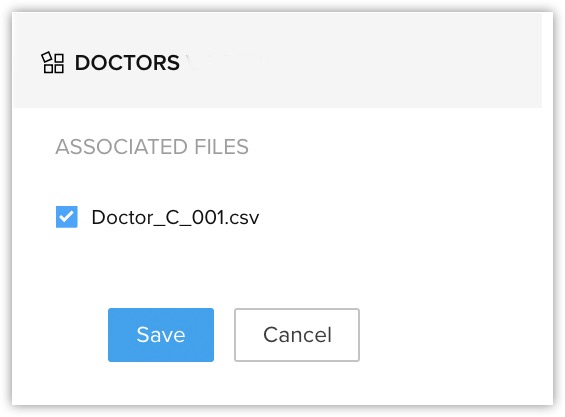
- Select the file to be mapped with this module and click Save.
- Click Create New Module.
- Click Next.
The mapped modules will be listed where you can map the fields for each module. - In the Field Mapping tab, make sure that you map all the mandatory fields.
The field names that you specified in the CSV file will be available in the drop down lists. - Click Create New Fields to add new fields and insert data for them during the migration.
The number of fields that you can create depends on your Zoho CRM edition. (Skip to step 12 if you do not want to create fields.) - In the Create New Fields pop-up, do the following:
- Modify the field labels, if required.
All the fields from the import file that were not mapped for migration because they are not available in Zoho CRM will be listed with their column numbers from the import file.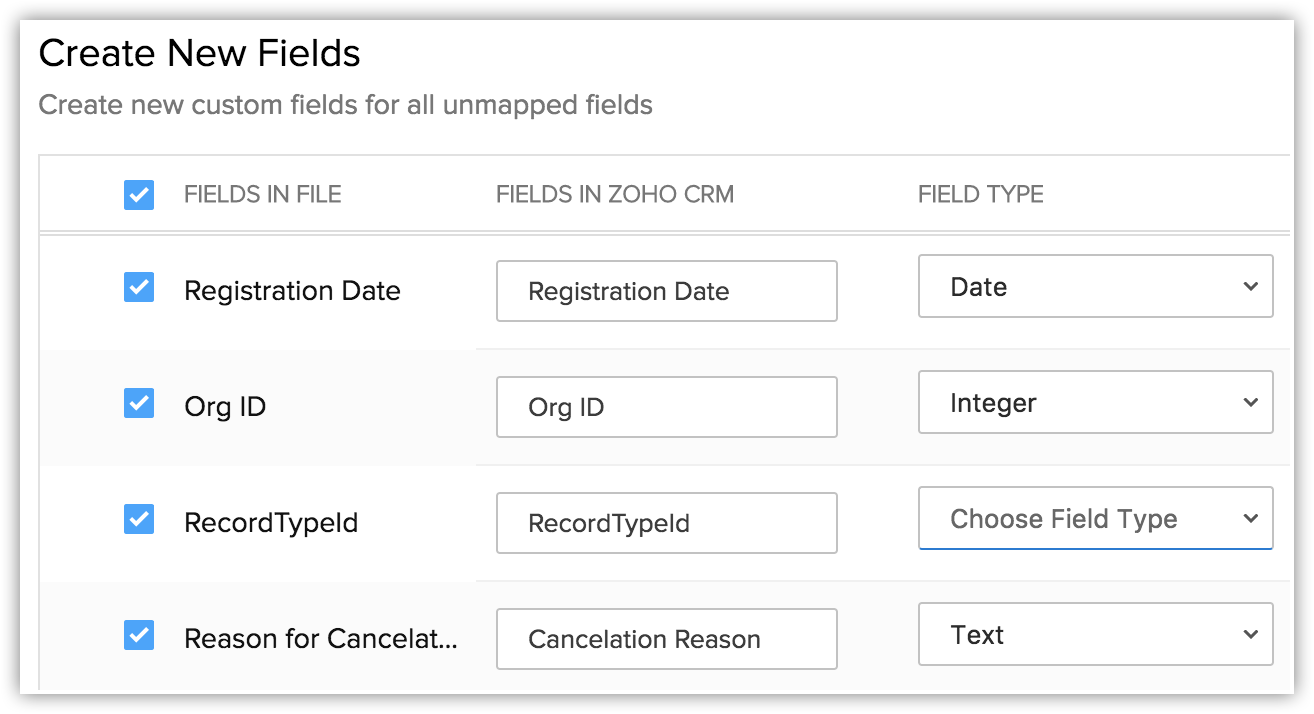
- Select the Field Type from the drop-down list.
Autonumber and Formula are not available. You cannot create these fields during migration. - Click Create.
The field will be created and mapped to the columns in the import file. - Click Close to continue the migration process.
- Modify the field labels, if required.
- Click Mapped Fields and Unmapped Fields to view the columns that are mapped and not mapped respectively with the fields in Zoho CRM.
- Click the Reset Mapping link to start mapping from scratch.Any mapping you have done so far will be removed and you can start over.
- Click the Auto Map link to let CRM map the import columns with matching fields.The system will identify columns that match the CRM fields and map them automatically.
- Hover over the field and enter the field values in the Replace Empty Values text box.
Sometimes the field in an import file doesn't have a value, in case that field is marked mandatory in CRM, the record will not be imported because of absence of value. To avoid such situations, you can mention an alternate value that will replace the empty field.
For example, you have mapped the Last Name field from the file with the Last Name field in the Leads module, which is mandatory. So without the field value, the record will be skipped during the import process. To avoid that, you can specify the value that should replace the empty Last Name field. - Hover over the field and click the Add (+) icon next to the field name and map multiple fields in CRM with a single field from the file.
For example, if the Billing Address and the Shipping Address are same you can map both these CRM fields to the appropriate fields from the file. - Click the Assign Default Values tab and select the CRM Fields with the appropriate Default field values.
Once the values are specified, all the records will have the field value that you have specified by default. For example, you are importing a set of records to the Leads module and the Lead Source is common for all the records. The appropriate value for the lead source can be chosen here so that all the records will have the specified field value by default. - Click Save and Next.
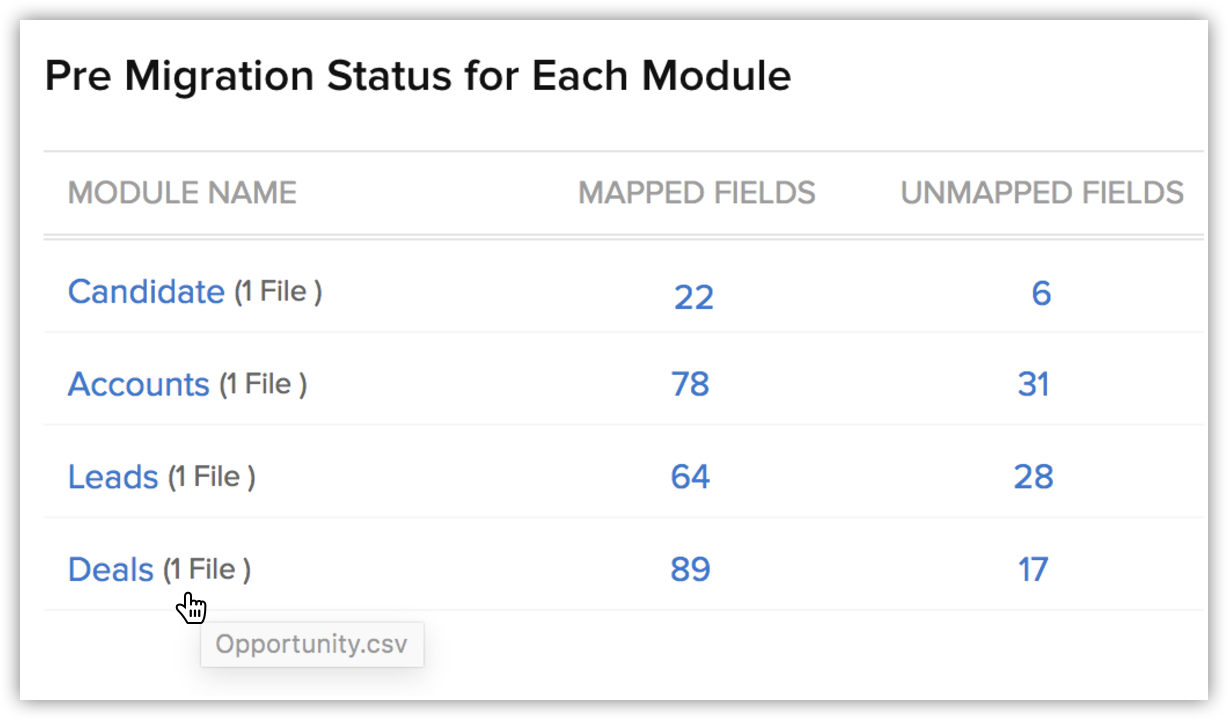
- In the Review page, check the Field Mapping Status and the Pre Migration Statusfor Each Module.
- Click Start Migration to initiate data migration.
You can still click Edit Mapping and re-run Migration while the migration is running.

- Tags can be migrated from your file into CRM.
- If a record has more than 10 tags, only the first ten tags will be migrated.
- Each tag can have a maximum of 25 characters.
- Then data migration will be paused if more than 5000 records in a module are skipped during the migration. You will have the option to discard the migration or continue. Zoho CRM will also inform you for each module if more than 5,000 records are skipped.
- You can undo the data migration from Import History. See Also Viewing Import History
Check for Data Accuracy
After importing each file, check that the data is imported correctly. For example, after importing users to Zoho CRM, go to Setup> Users & Permissions > Users to check that all the users have been imported. Follow the same steps for Leads, Accounts, Contacts, etc. If the data is not imported properly or the fields were incorrectly mapped, you can delete the imported records and reimport. See Also Import History
If you have any issues with the above steps, please contact us at support@zohocrm.com or, if you would like us to migrate your data for you, fill in the form http://www.zoho.com/crm/zwitch.html and one of our representatives will contact you shortly.
Related Articles
Data Migration
Bring-in data to Zoho CRM from other sources using Data Migration Help guide Data Migration - An Introduction Migrating Data from Other CRMs Migrating Data from SalesforceData Migration - An Introduction
The Data Migration wizard in Zoho CRM ensures that your data is migrated accurately and helps you reduce much of the manual work. It automatically maps import files to CRM modules and import file columns to Zoho CRM fields. In the case of modules ...Salesforce
Overview Amplify the value of every other conversation that your users have with your visitors by integrating Salesforce - CRM with your SalesIQ account, as Salesforce improvises every nuance of customer relationship management. Salesforce records, ...Migrating Data from Other CRMs
Follow the steps in this document to successfully migrate your data into Zoho CRM from another Zoho CRM account or a different CRM system. Data files from Zoho CRM or any other CRMs If you are planning to use a backup of data from Zoho CRM to import, ...Set up sync with Salesforce
Using Zoho Campaigns' integration with Salesforce, create well designed branded email campaigns and send targeted emails to your contacts in Salesforce. Improve your engagement with your contacts using emails and measure how these email campaigns ...