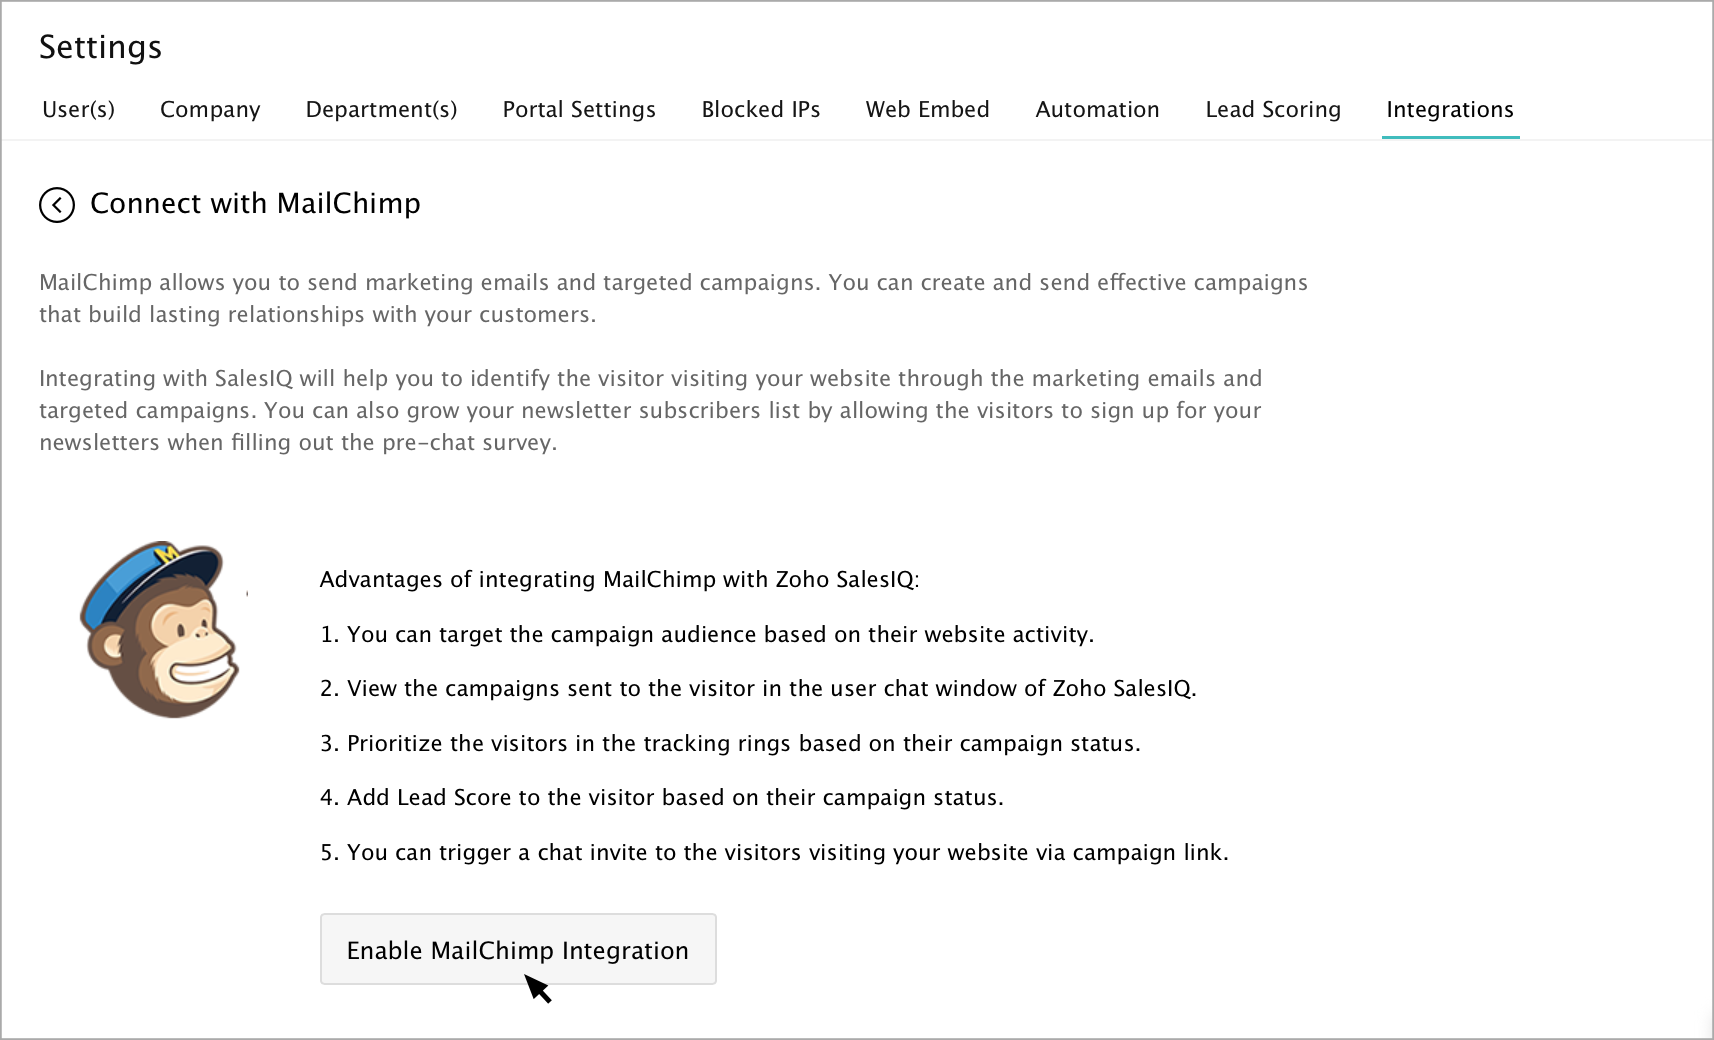
Overview
 To use Zoho SalesIQ integrated with MailChimp, you will need to be a customer of the Enterprise/Professional/Basic plans of Zoho SalesIQ and have a MailChimp account. You can also try this feature during your 14 days free trial.
 Integrate MailChimp Campaigns with SalesIQ
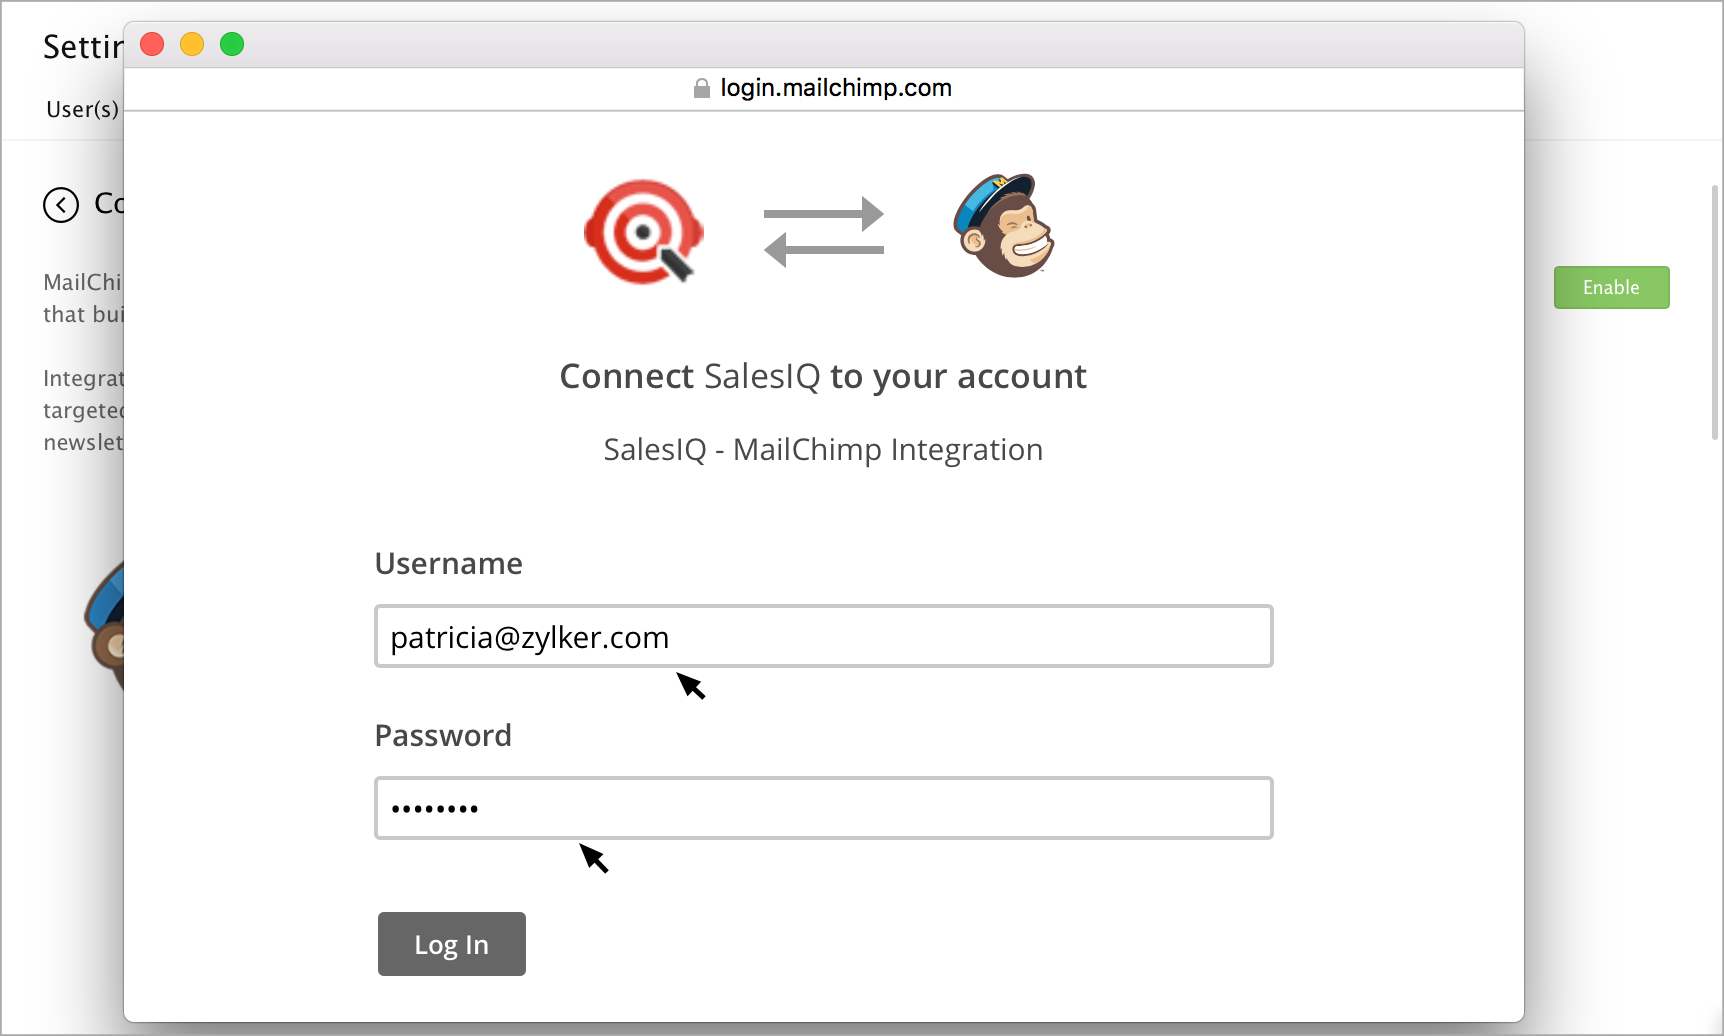
The MailChimp - SalesIQ integration page appears in a new window.

Enter your MailChimp Username and password, and click Log In.
Your MailChimp account is now integrated with SalesIQ.
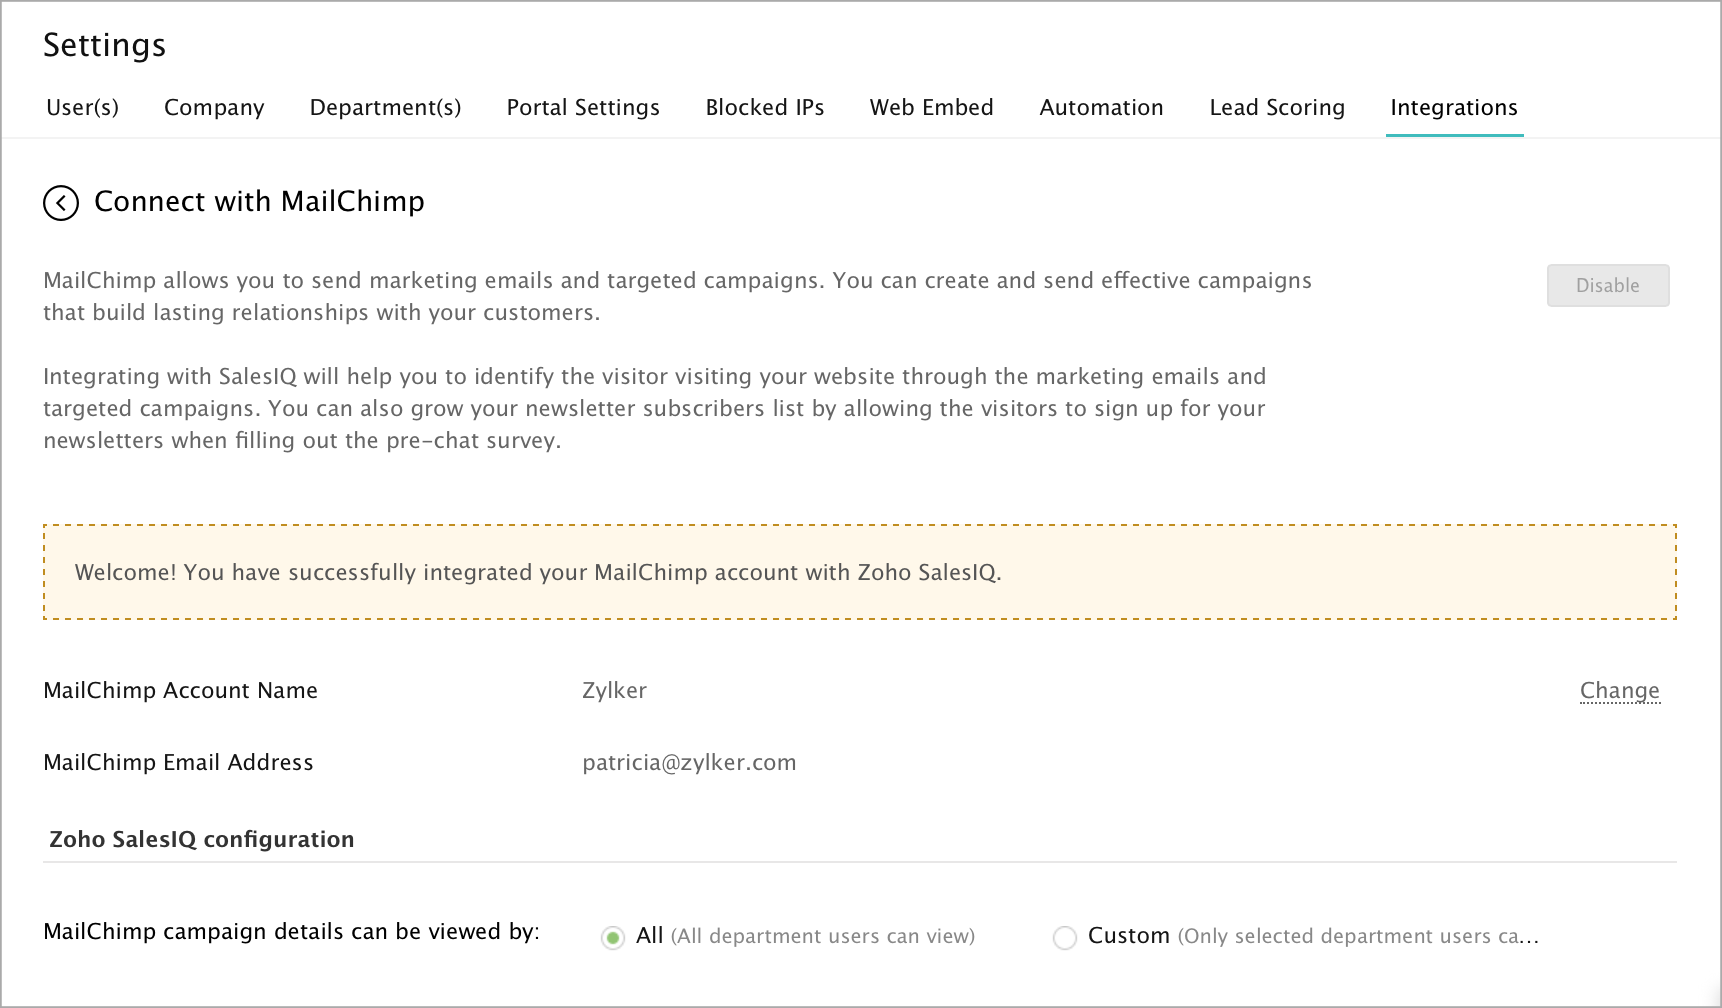
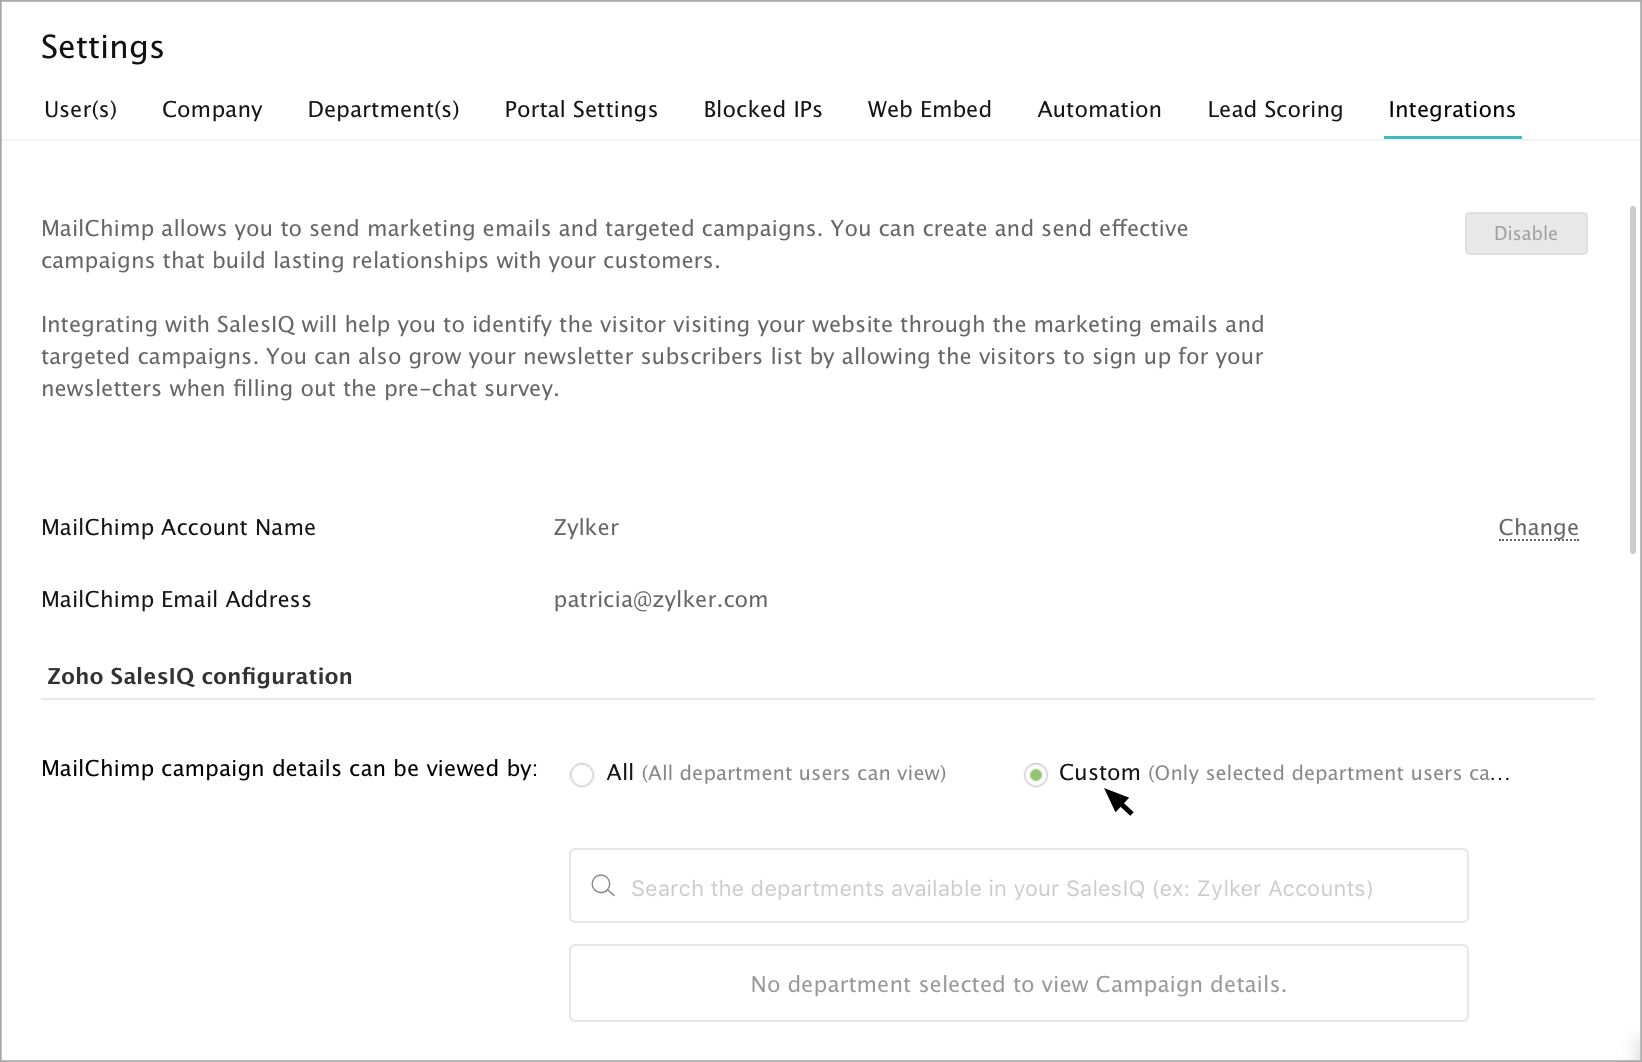
Who can view the MailChimp Campaign details in the SalesIQ dashboard?
If you wish to show the campaign details to all the Users irrespective of departments, then you can choose "All" option in MailChimp Campaign details can be viewed by section.
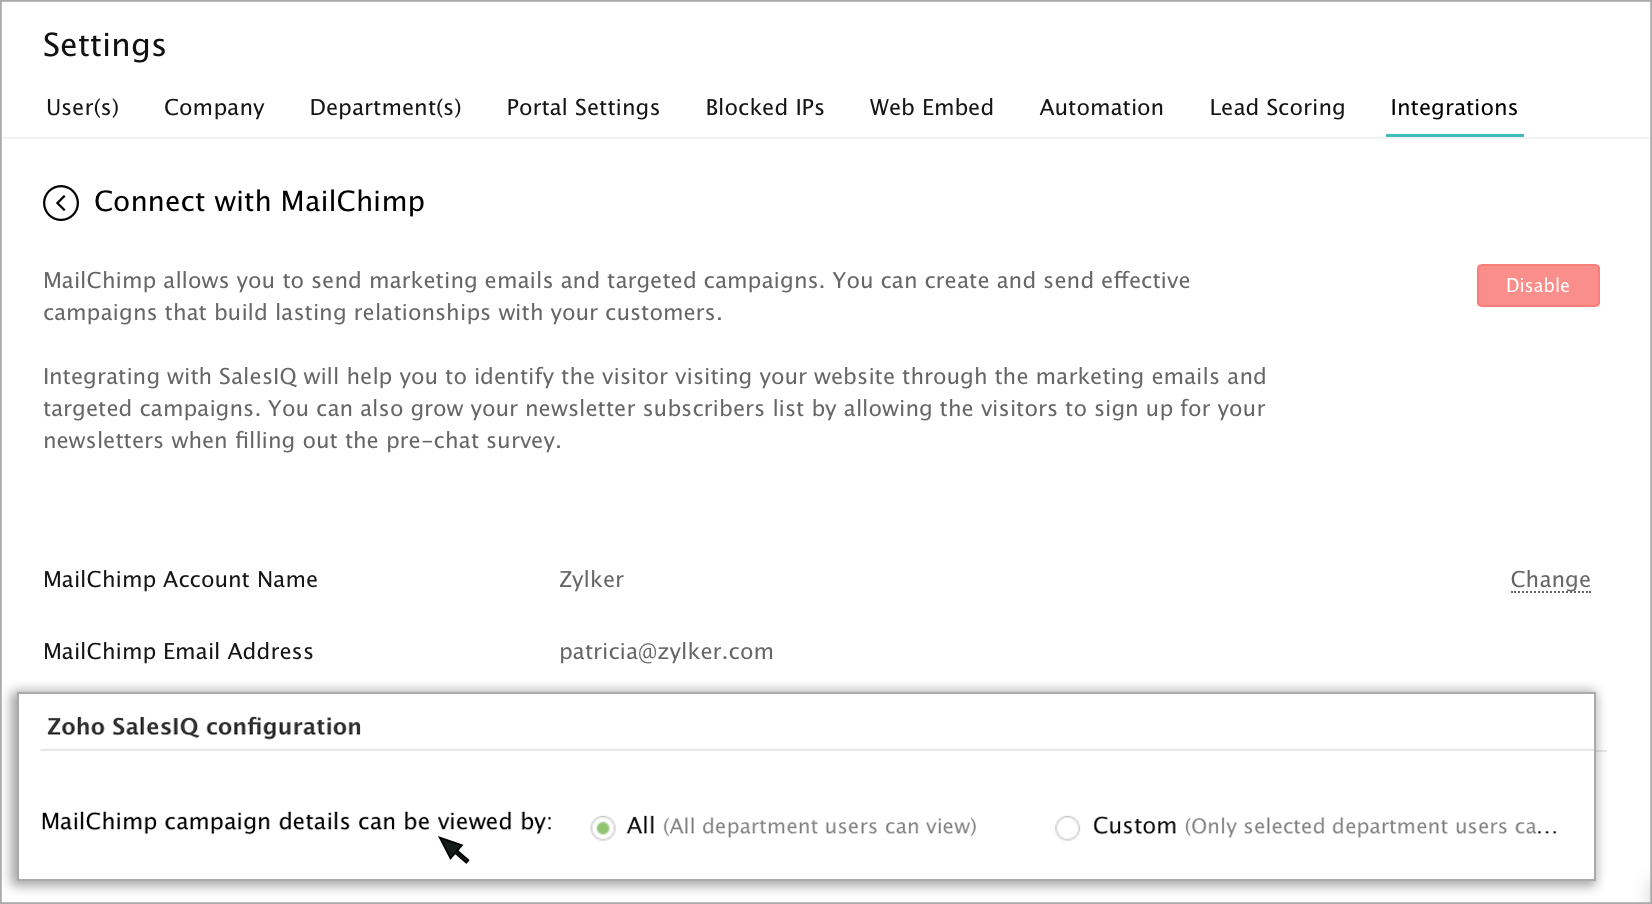
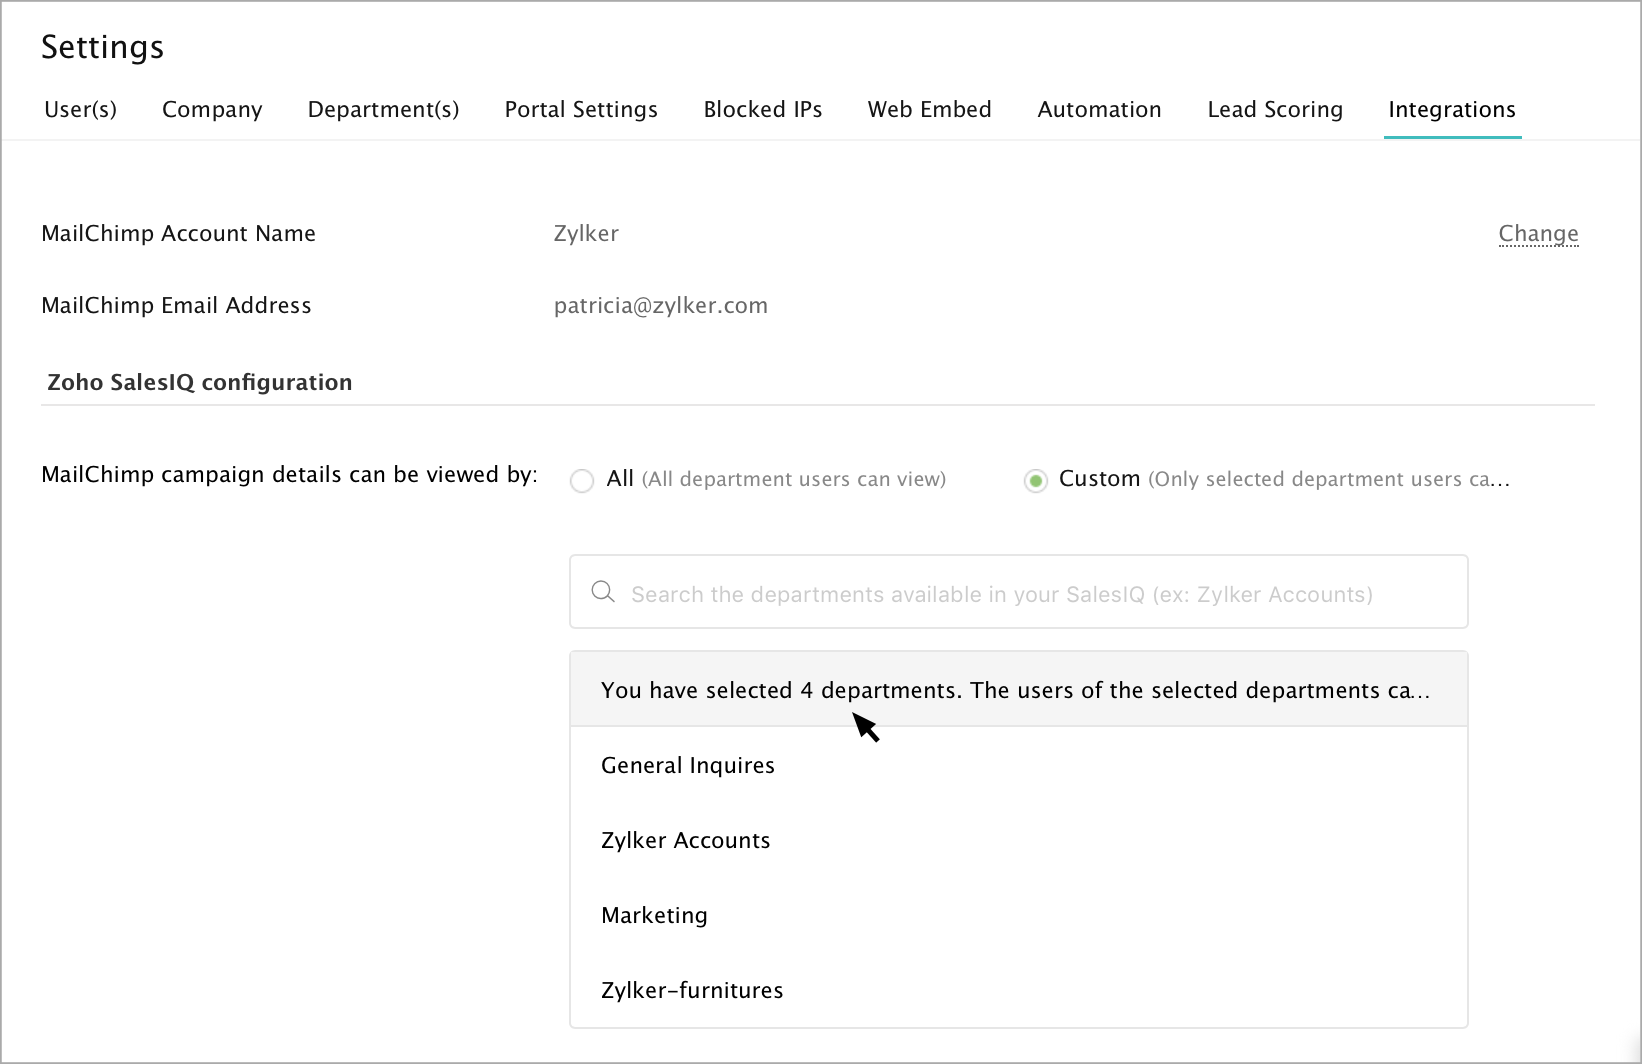
You also have the option to select the departments who can view the Campaign details in the Zoho SalesIQ dashboard. To allow only selected departments to view the campaign details, choose the "Custom" option in the MailChimp Campaign details can be viewed by section.
A search option will appear, click on the search bar. The departments available will auto-populate in the drop-down, Choose the departments. Now, the users of the chosen department can only view the MailChimp Campaign Details in Zoho SalesIQ dashboard.
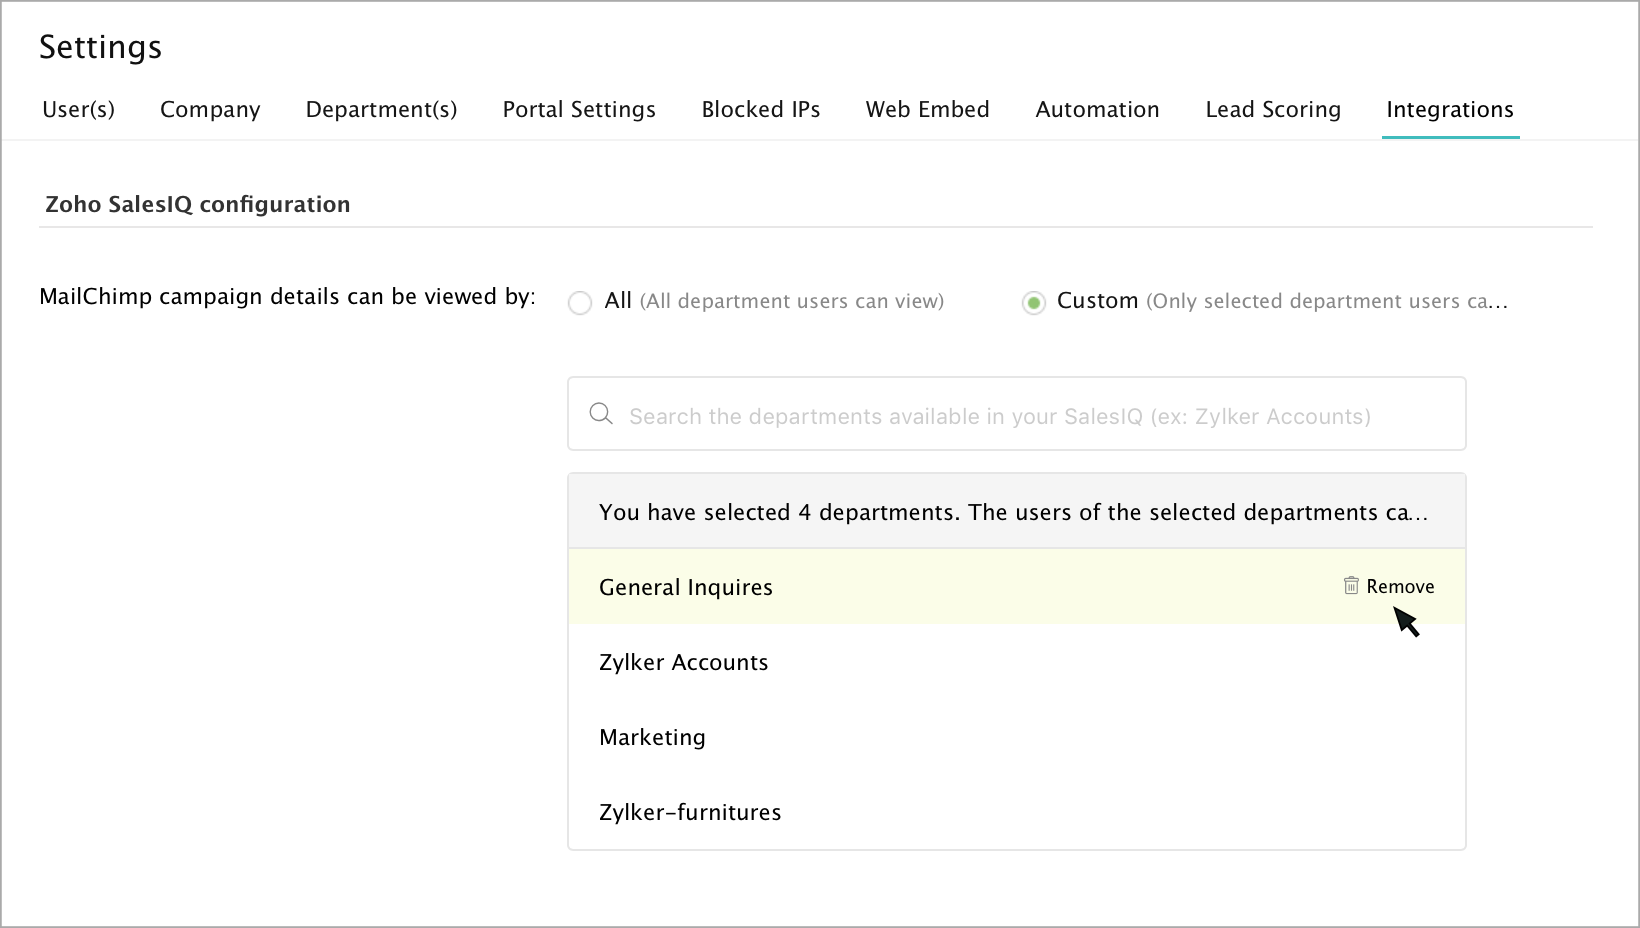
You can delete the chosen departments by clicking on the "Remove" button.
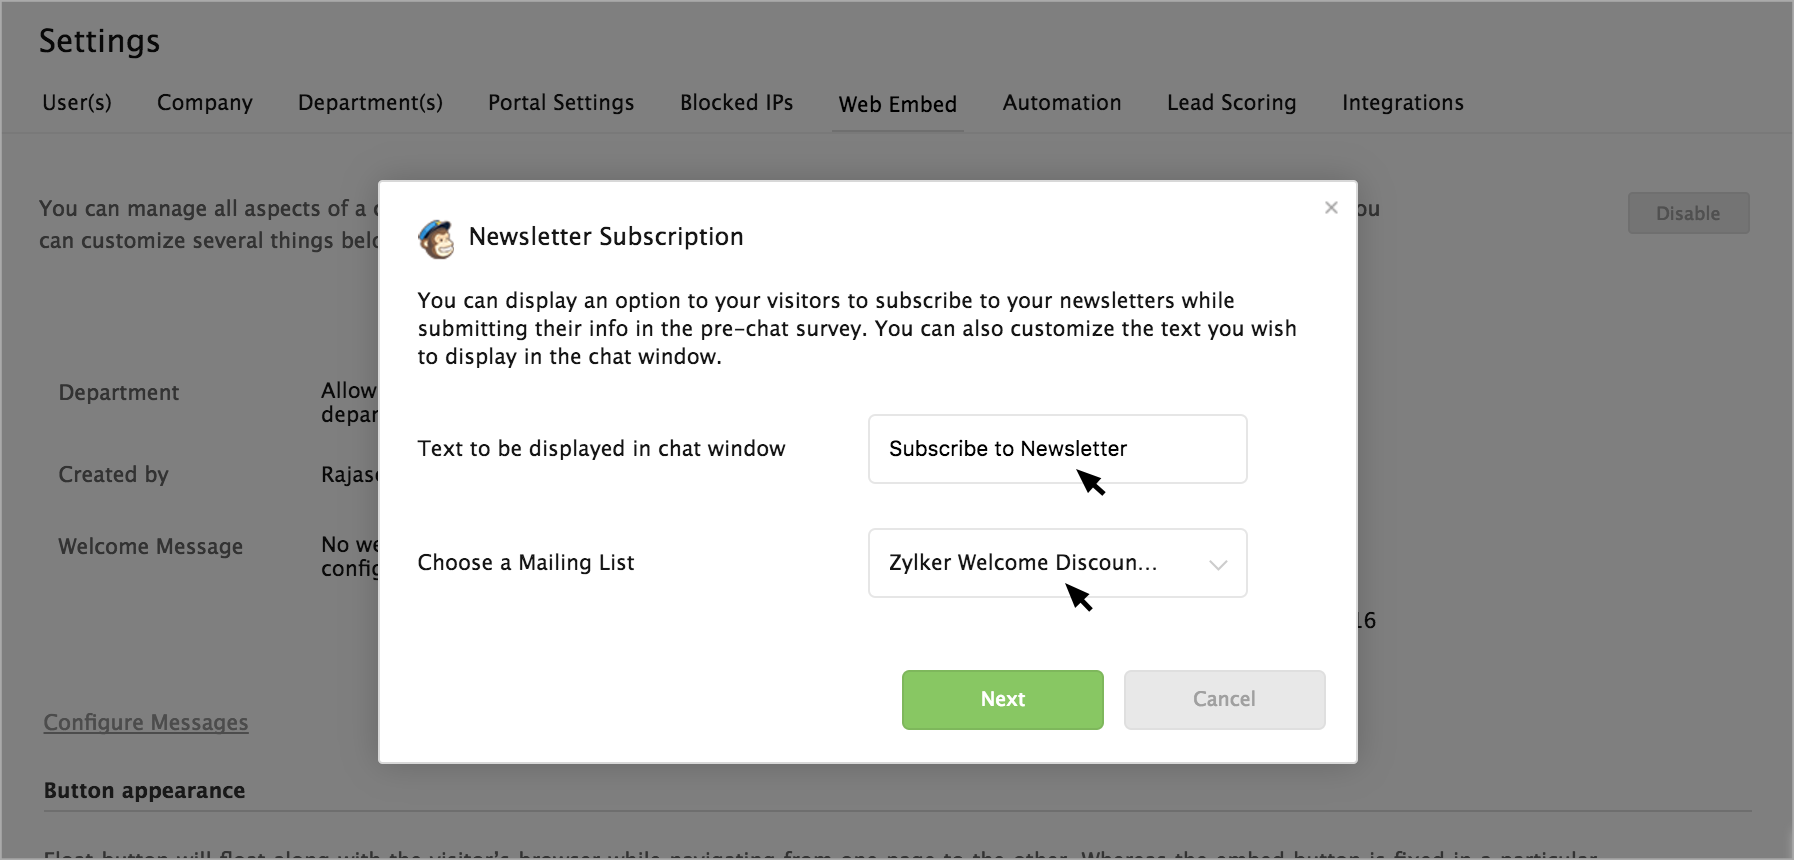
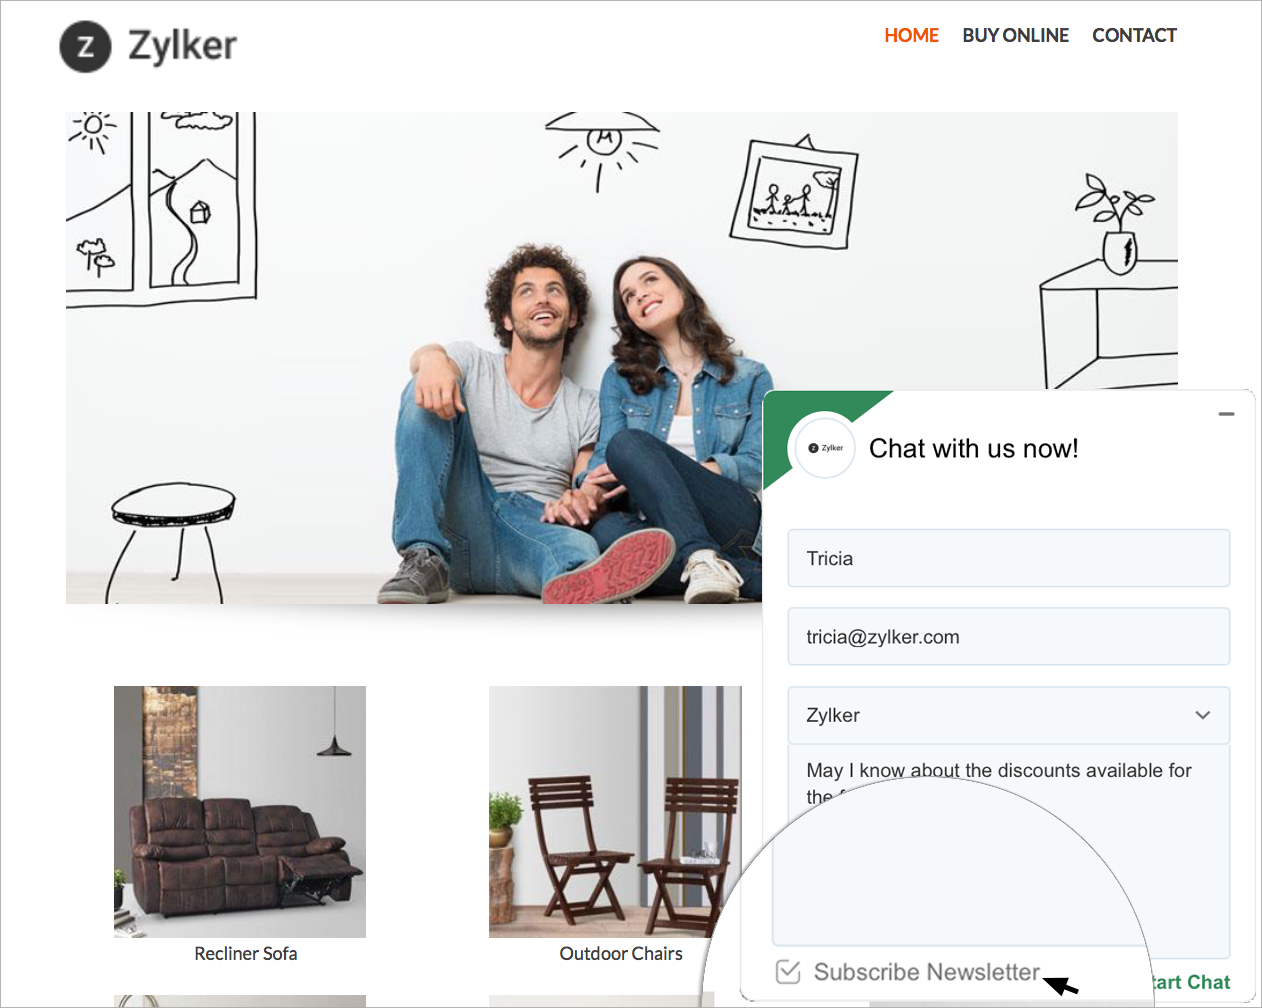
How to enable the newsletter subscription option in the chat window?
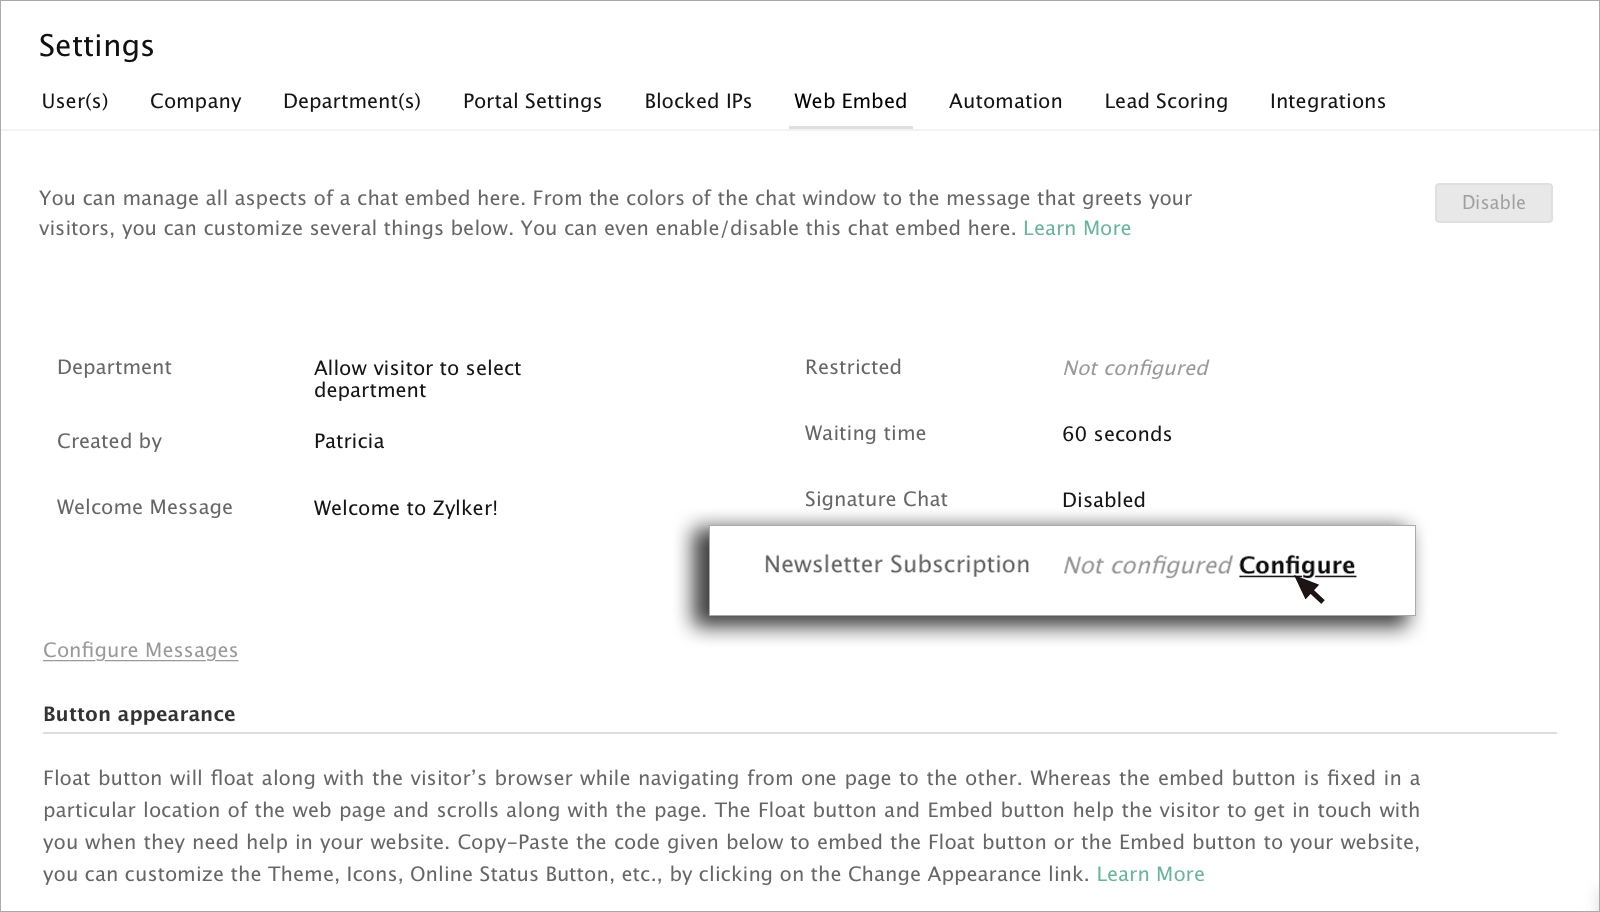
A dialog box will appear, enter the text you would like to display to your website visitors in the chat window. Then, choose a mailing list from the drop down and click Next.
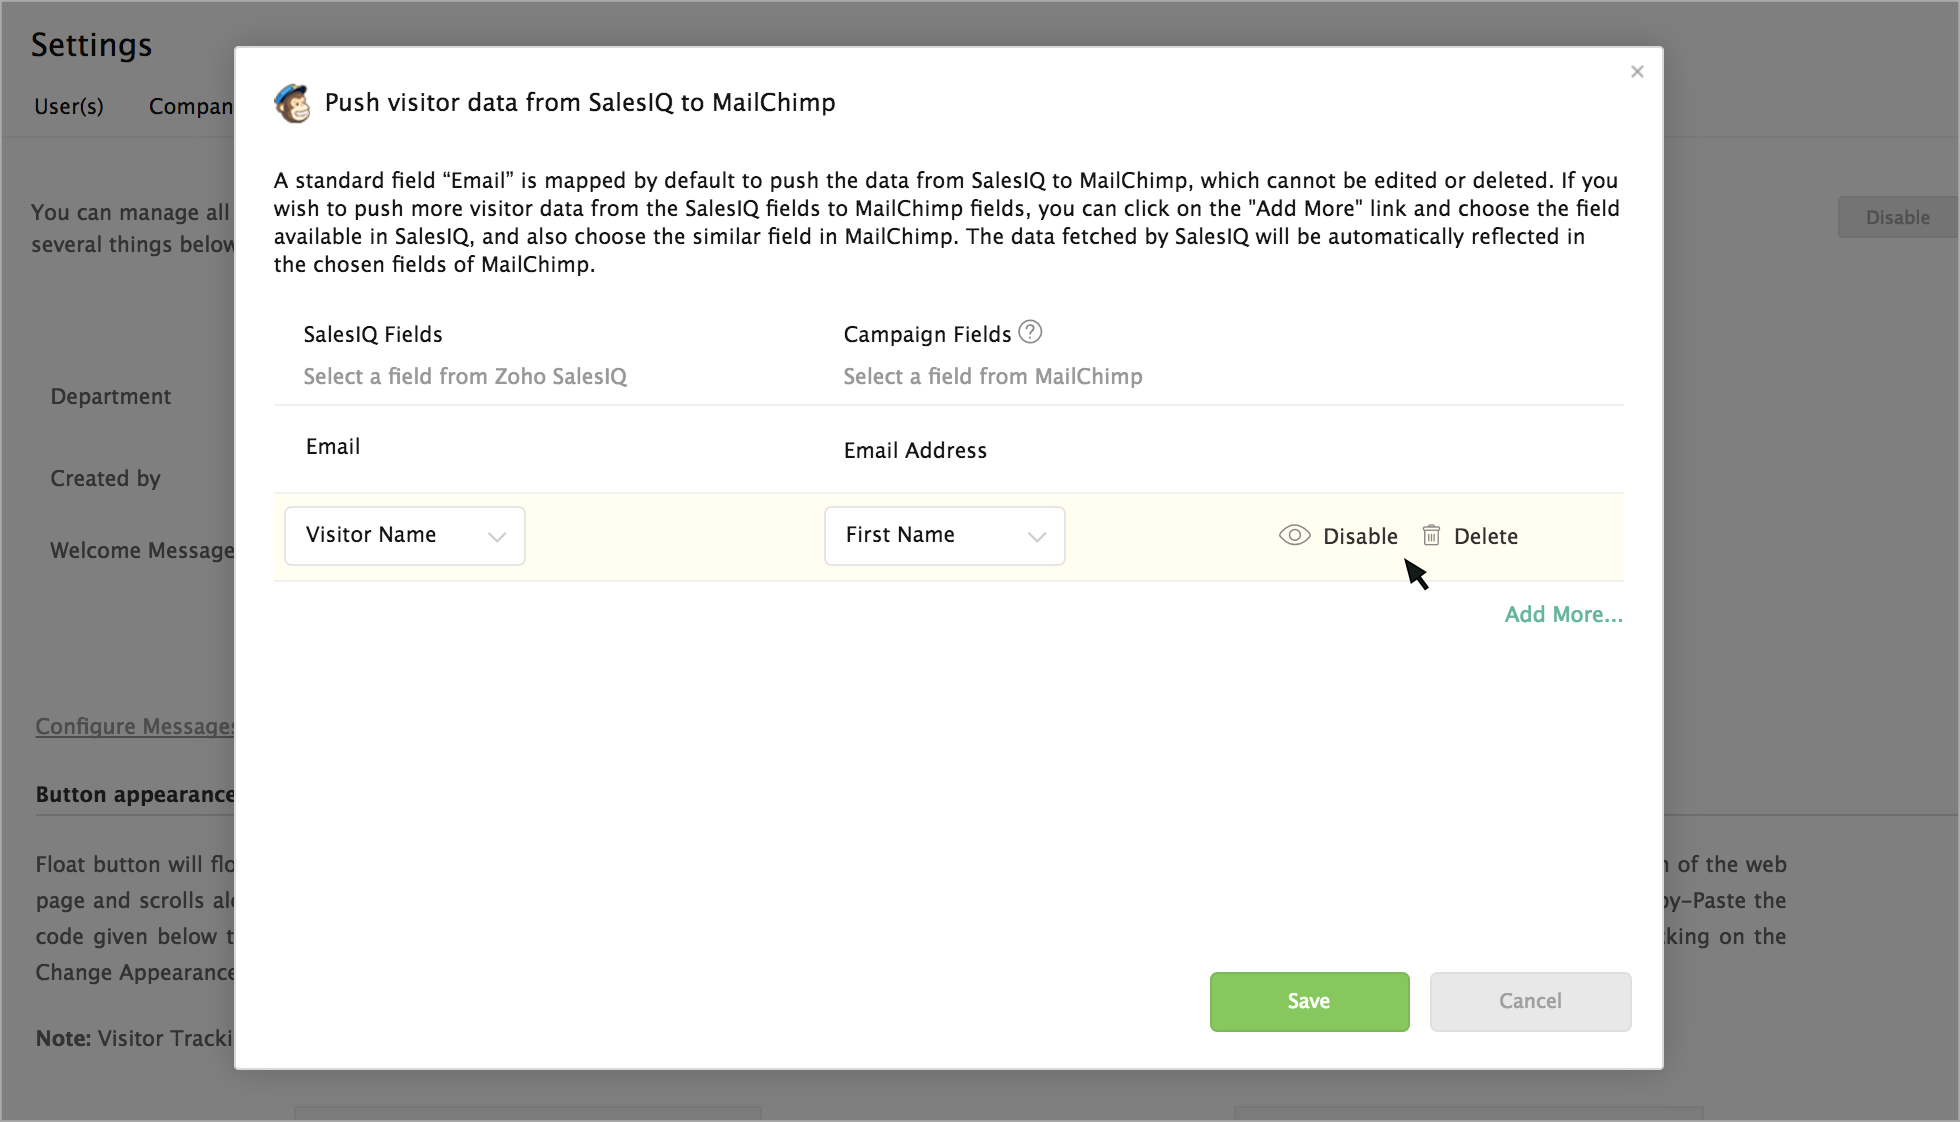
You can choose the fields to push the data automatically from SalesIQ to MailChimp Campaigns. By default, the Email field in SalesIQ and Email Address field in MailChimp Campaigns were mapped.
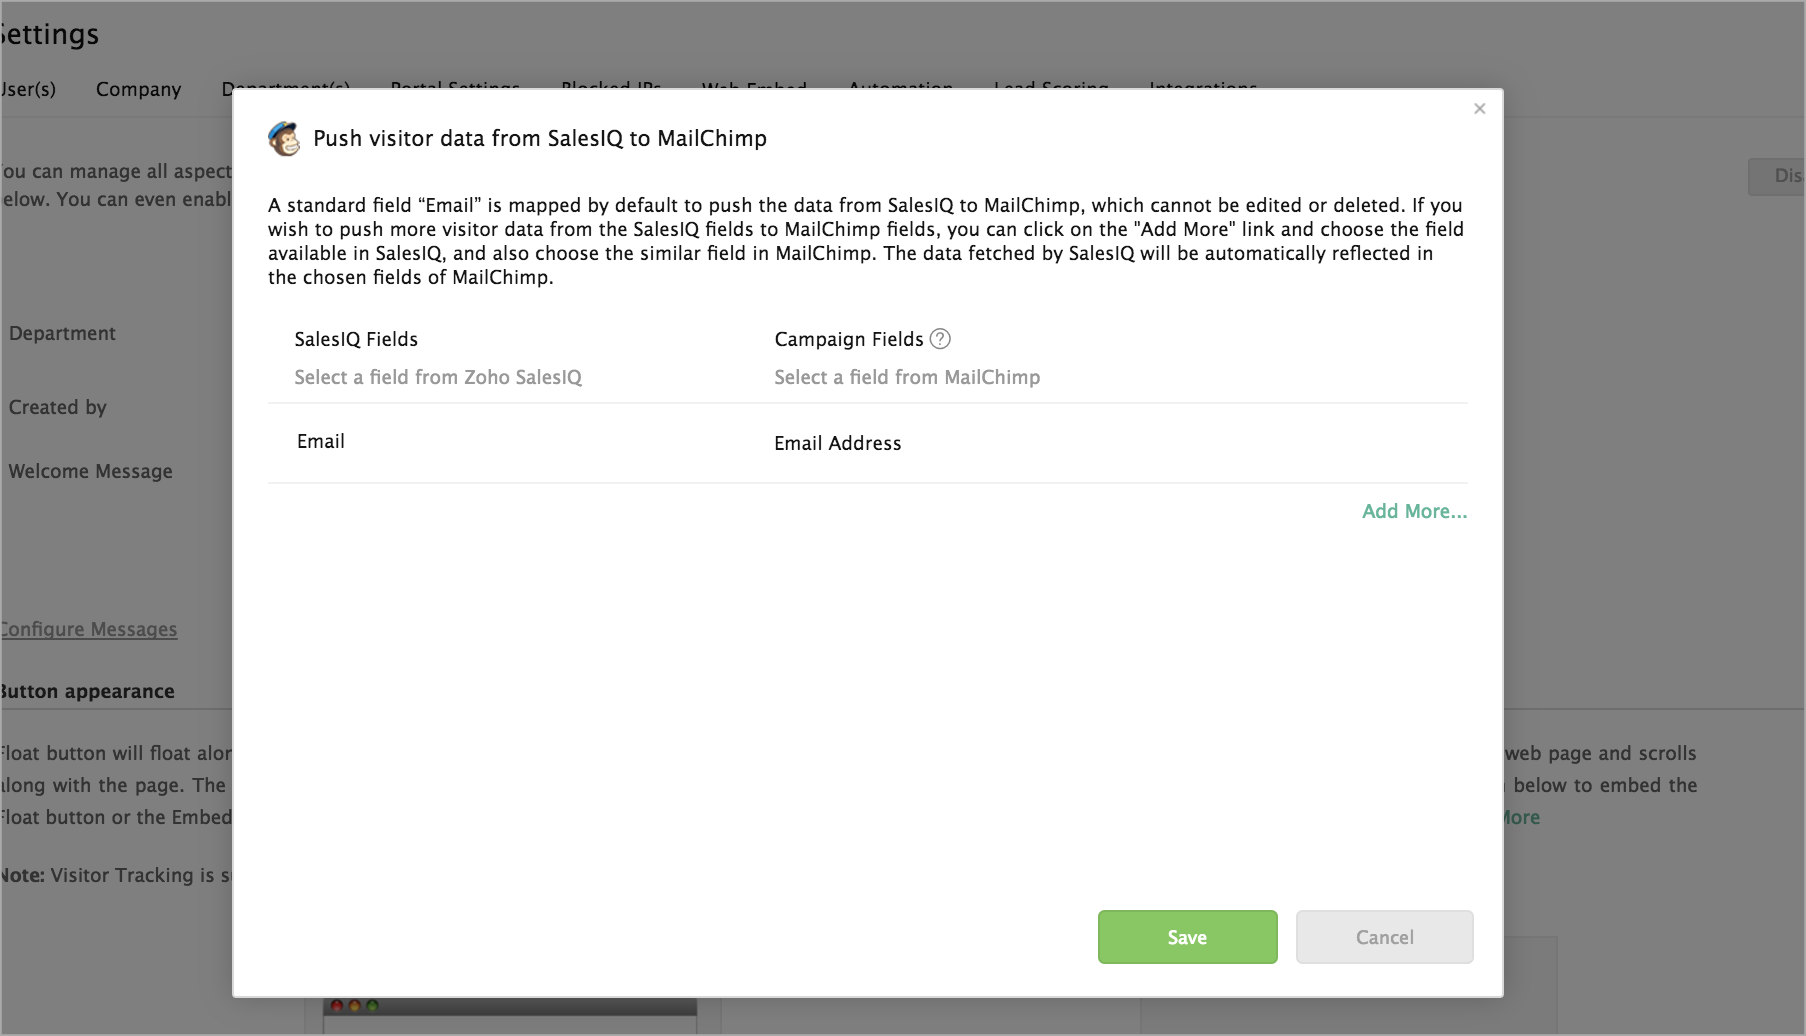
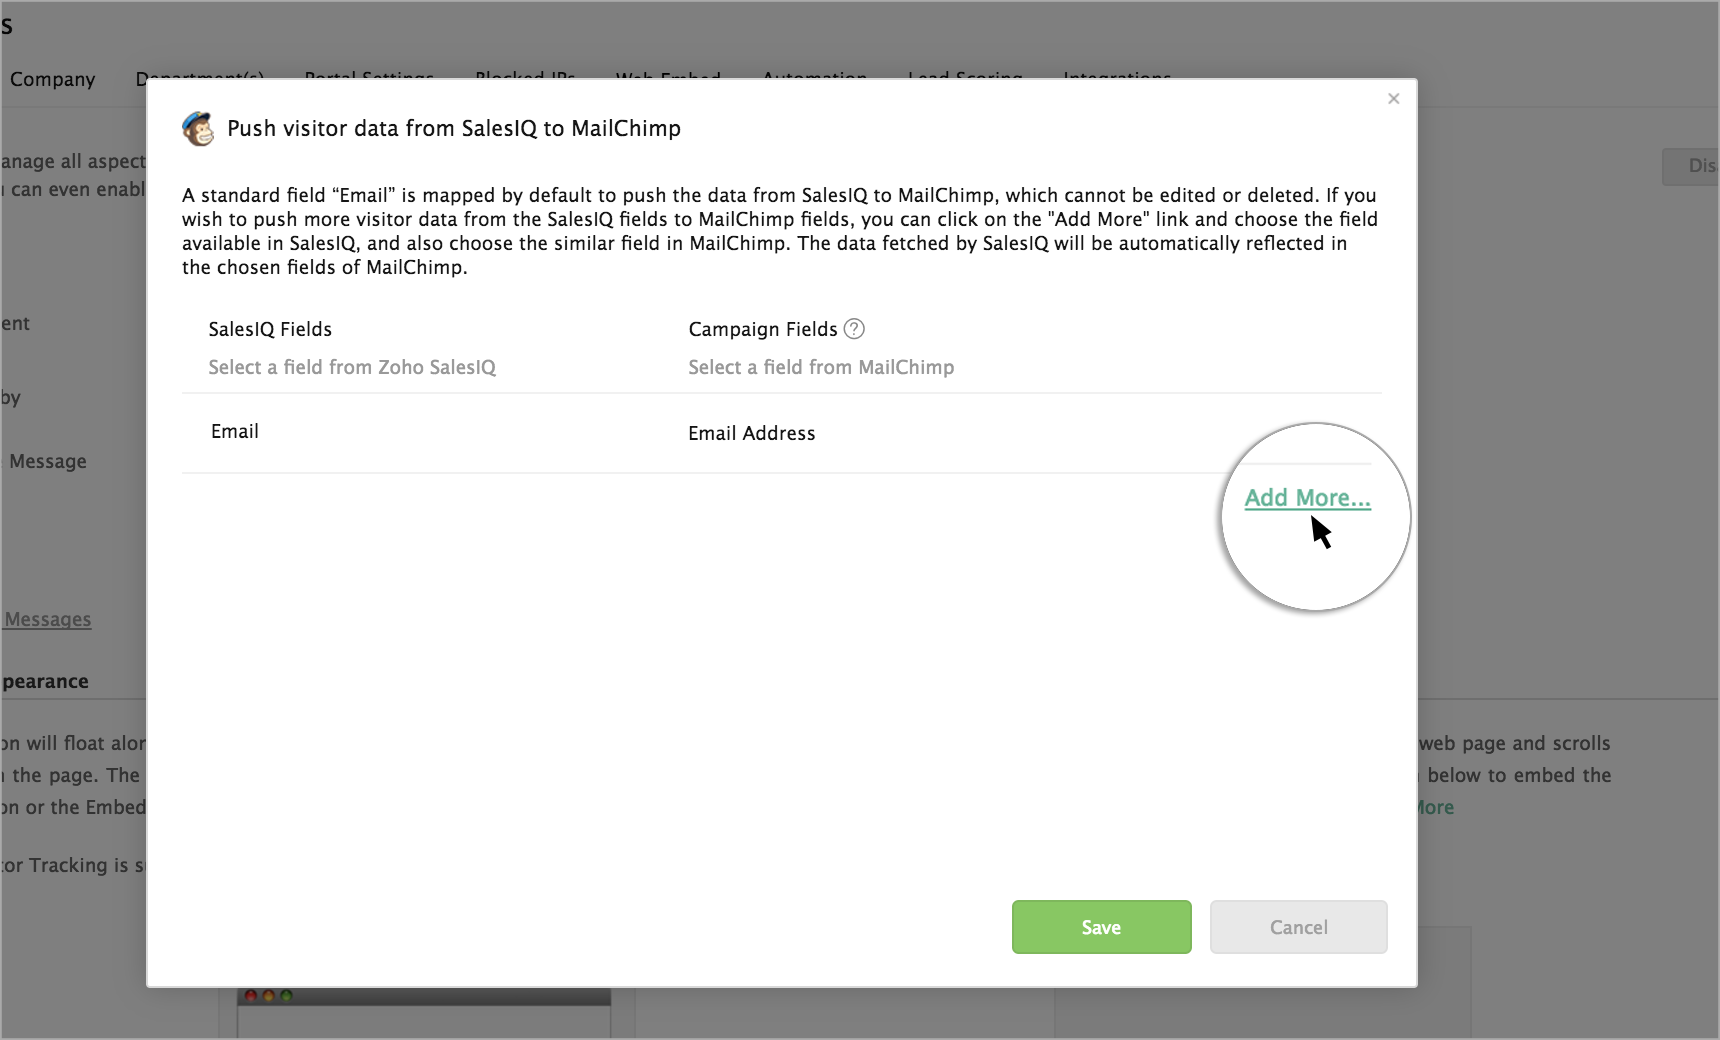
Other than the email field, you can choose four more fields to be mapped. Click on "Add More" to map other fields.
Choose the field you would like to map in SalesIQ from the drop-down under "SalesIQ Fields."
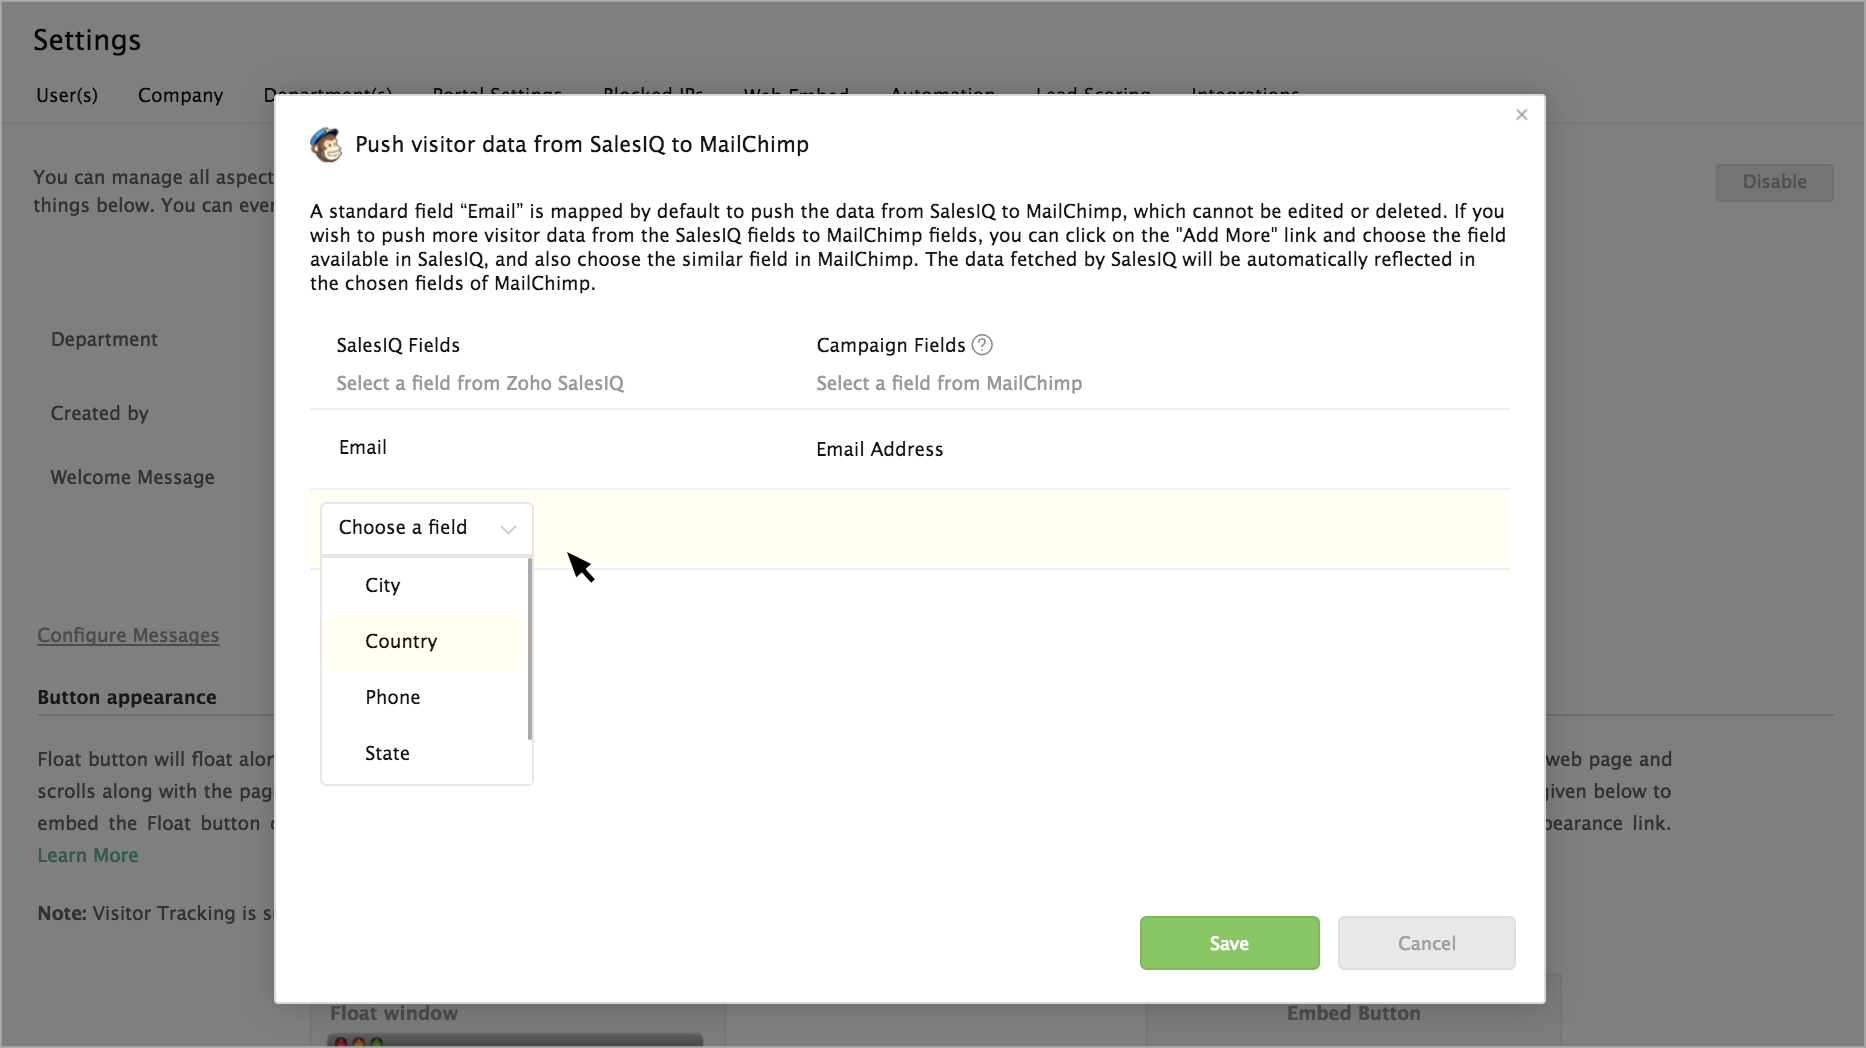
Then, choose the parallel field in MailChimp Campaigns from the drop-down under "Campaign Fields."
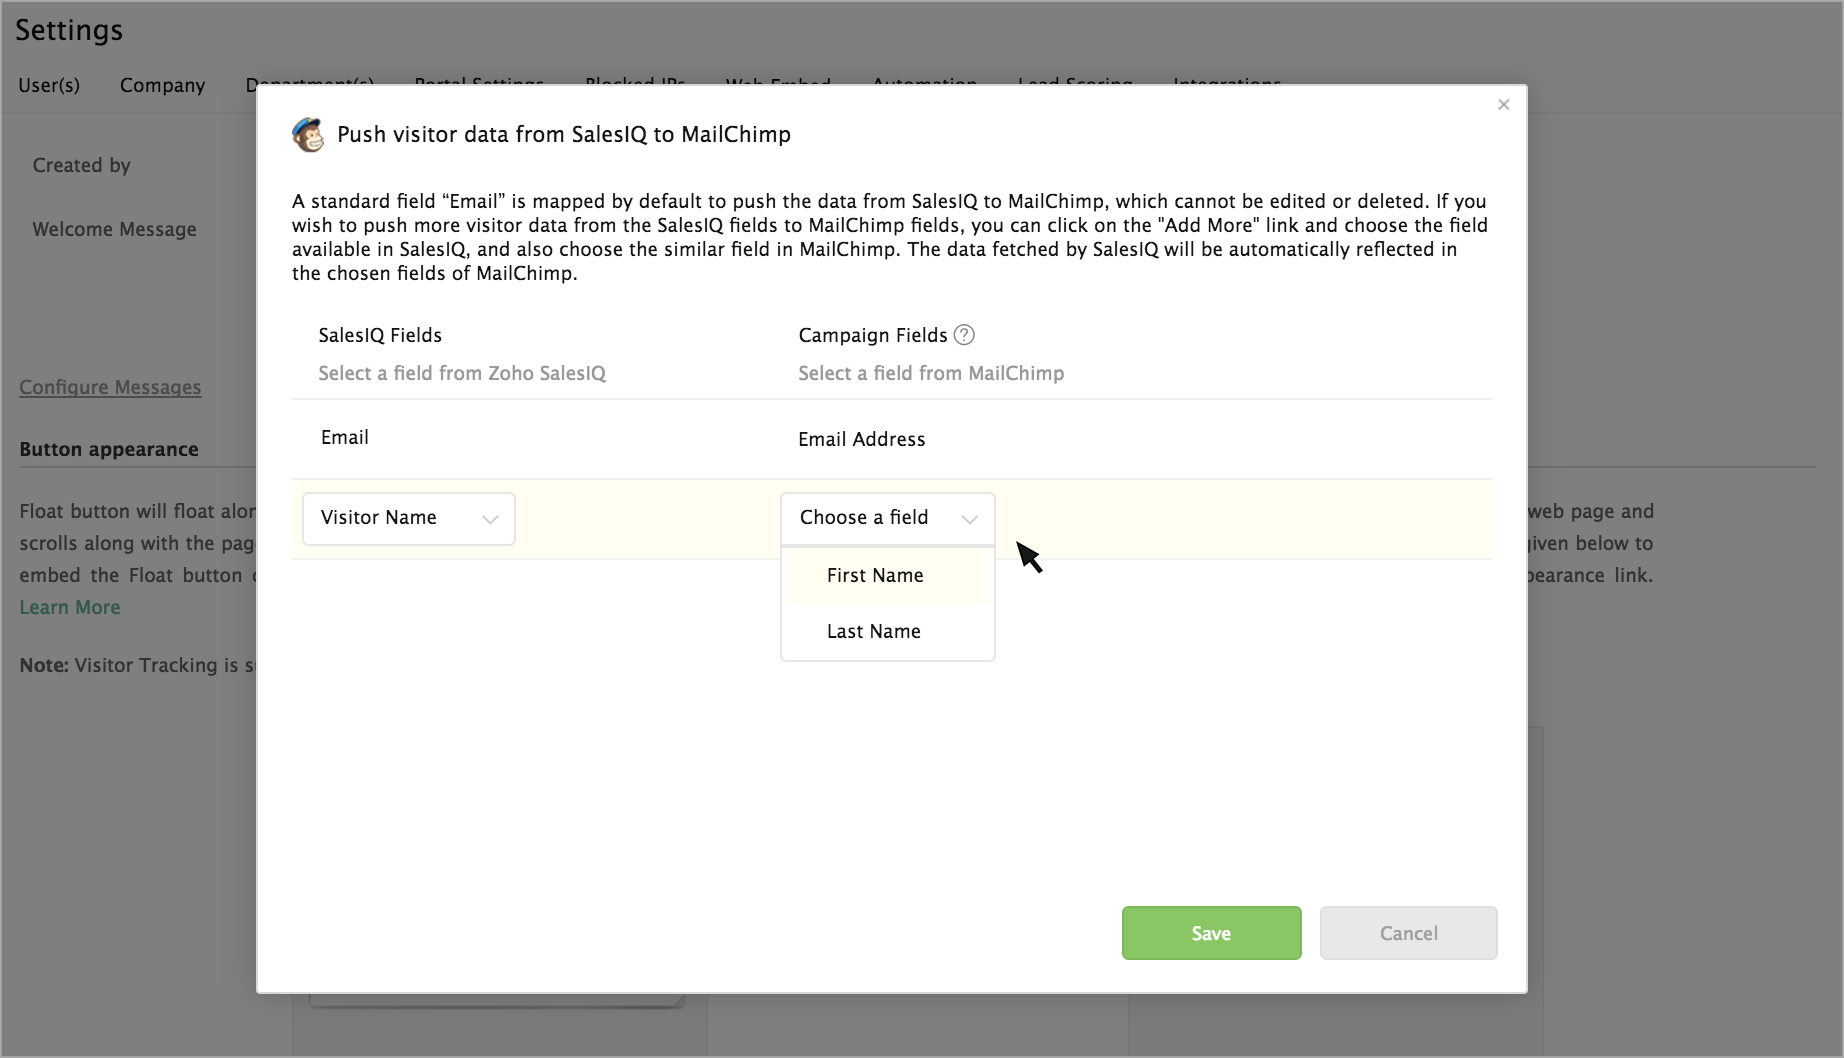
The data fetched by SalesIQ will be pushed to the selected fields in MailChimp Campaigns. You can also disable or remove the added fields using the "Disable" and "Delete" buttons.
Now, the visitors who access the chat widget on your website will be able to view the Newsletter subscription option in the pre-chat survey window.
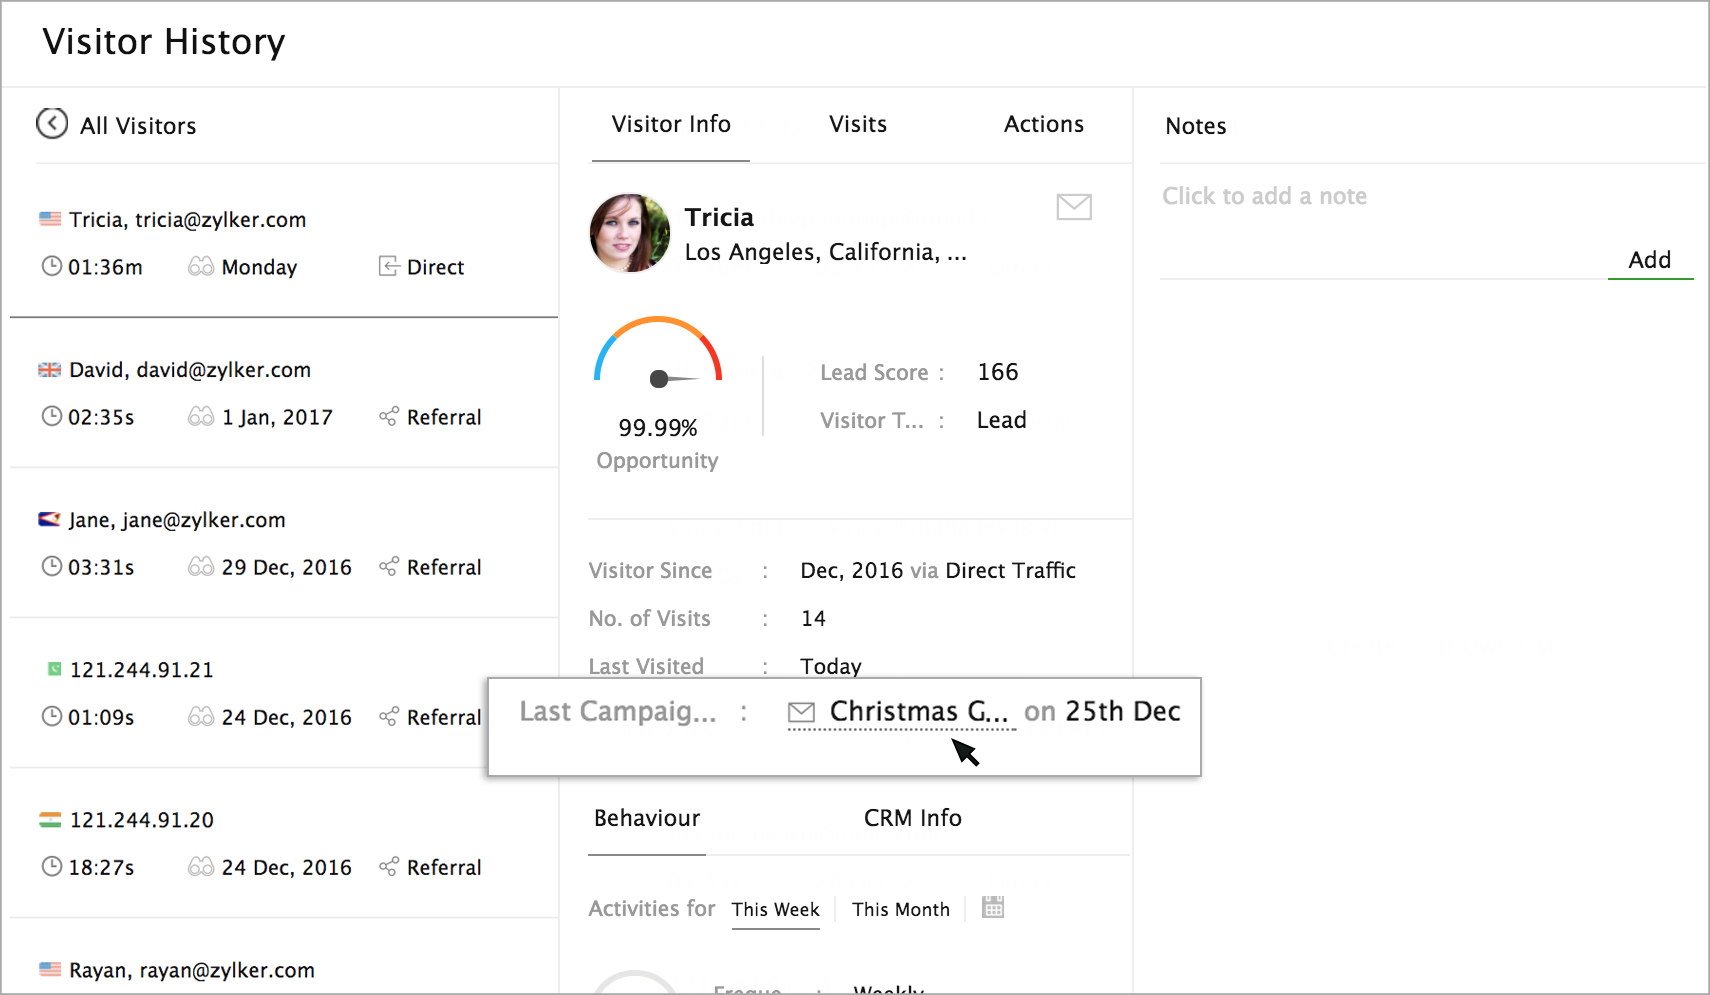
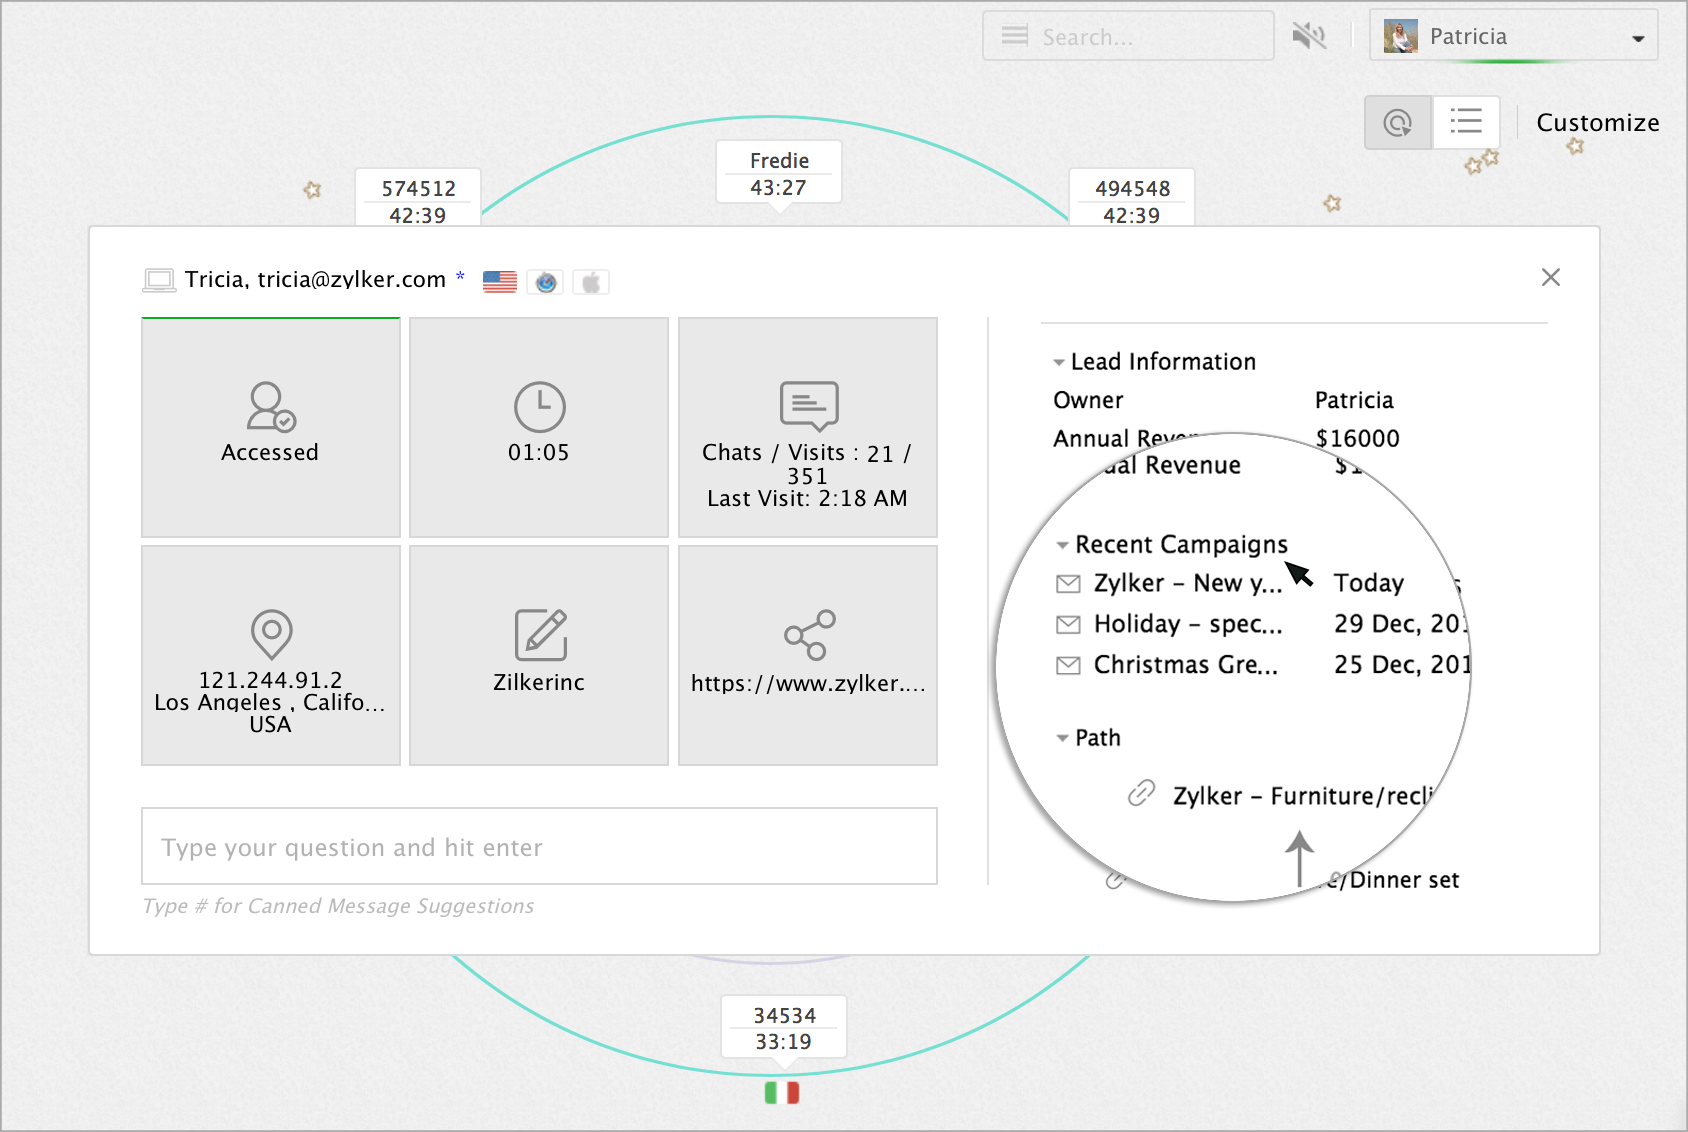
Campaign info displayed in visitor history
You can view the Last campaign sent to the visitor in the visitor history section. You can click on the Campaign name to see the campaign content.
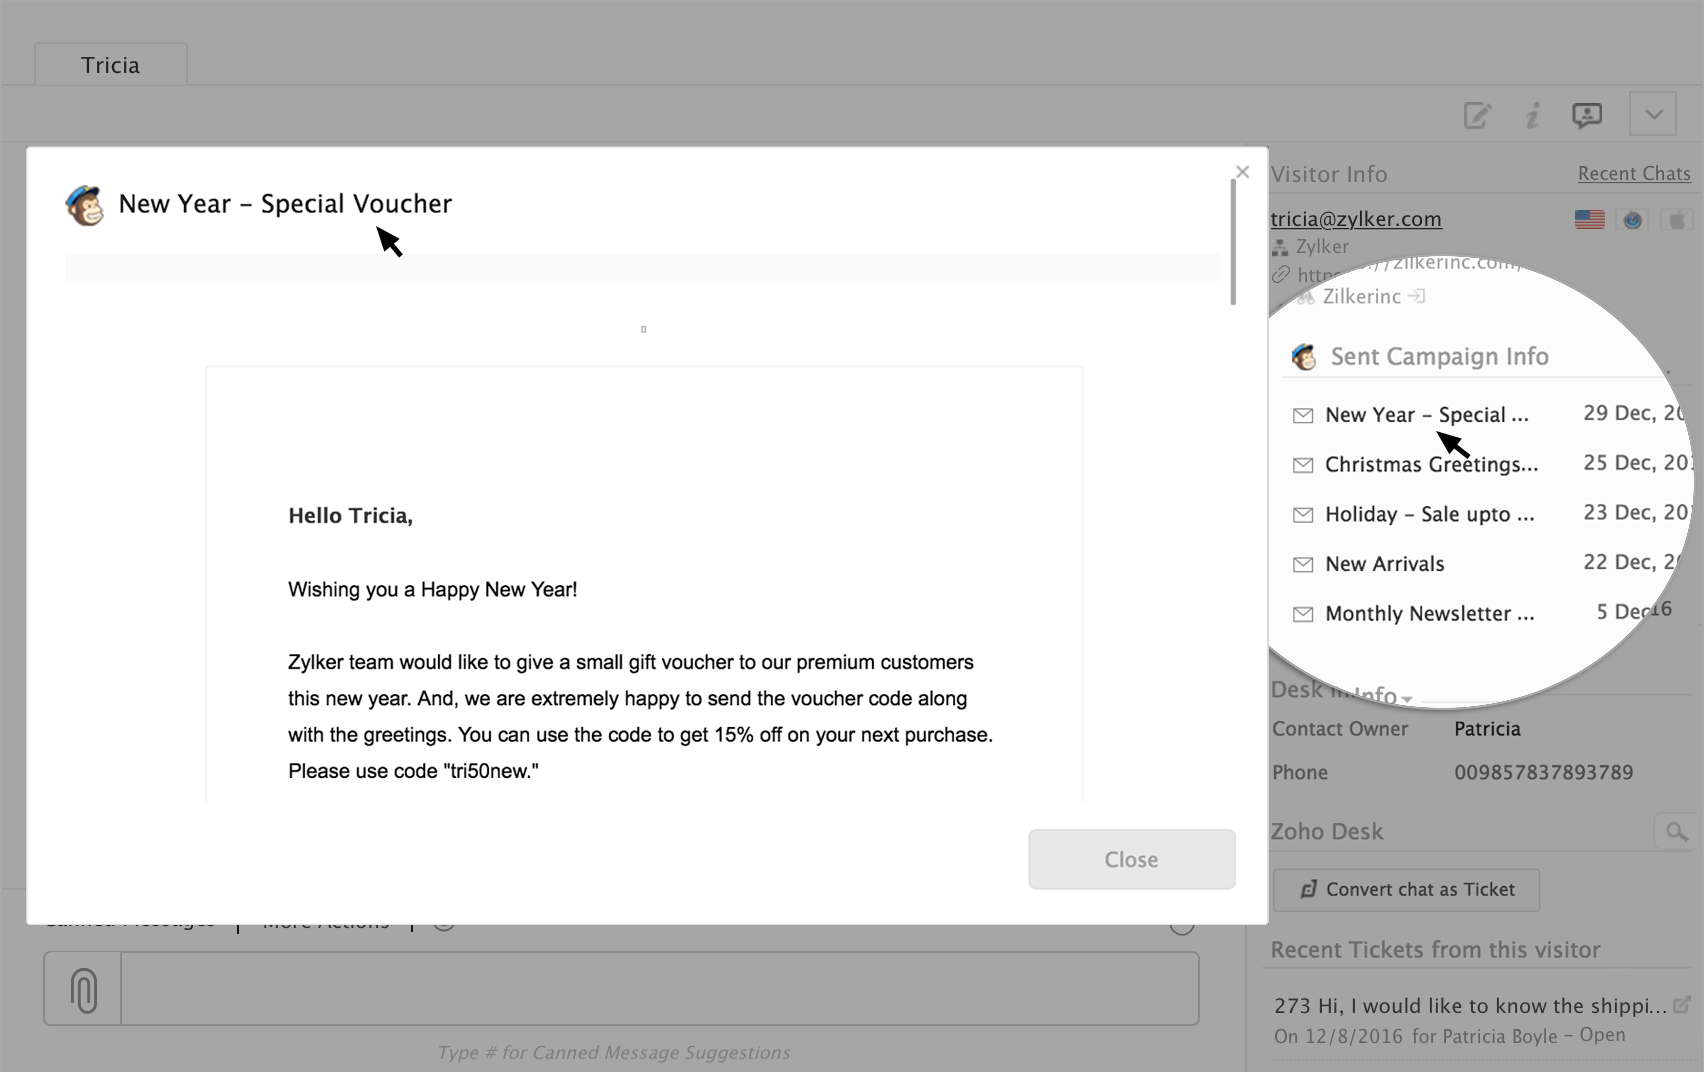
Campaign info displayed in the ongoing chat window
You can view the list of last five campaigns sent to the visitor in the ongoing chat window/chat history under the Sent Campaign info section.
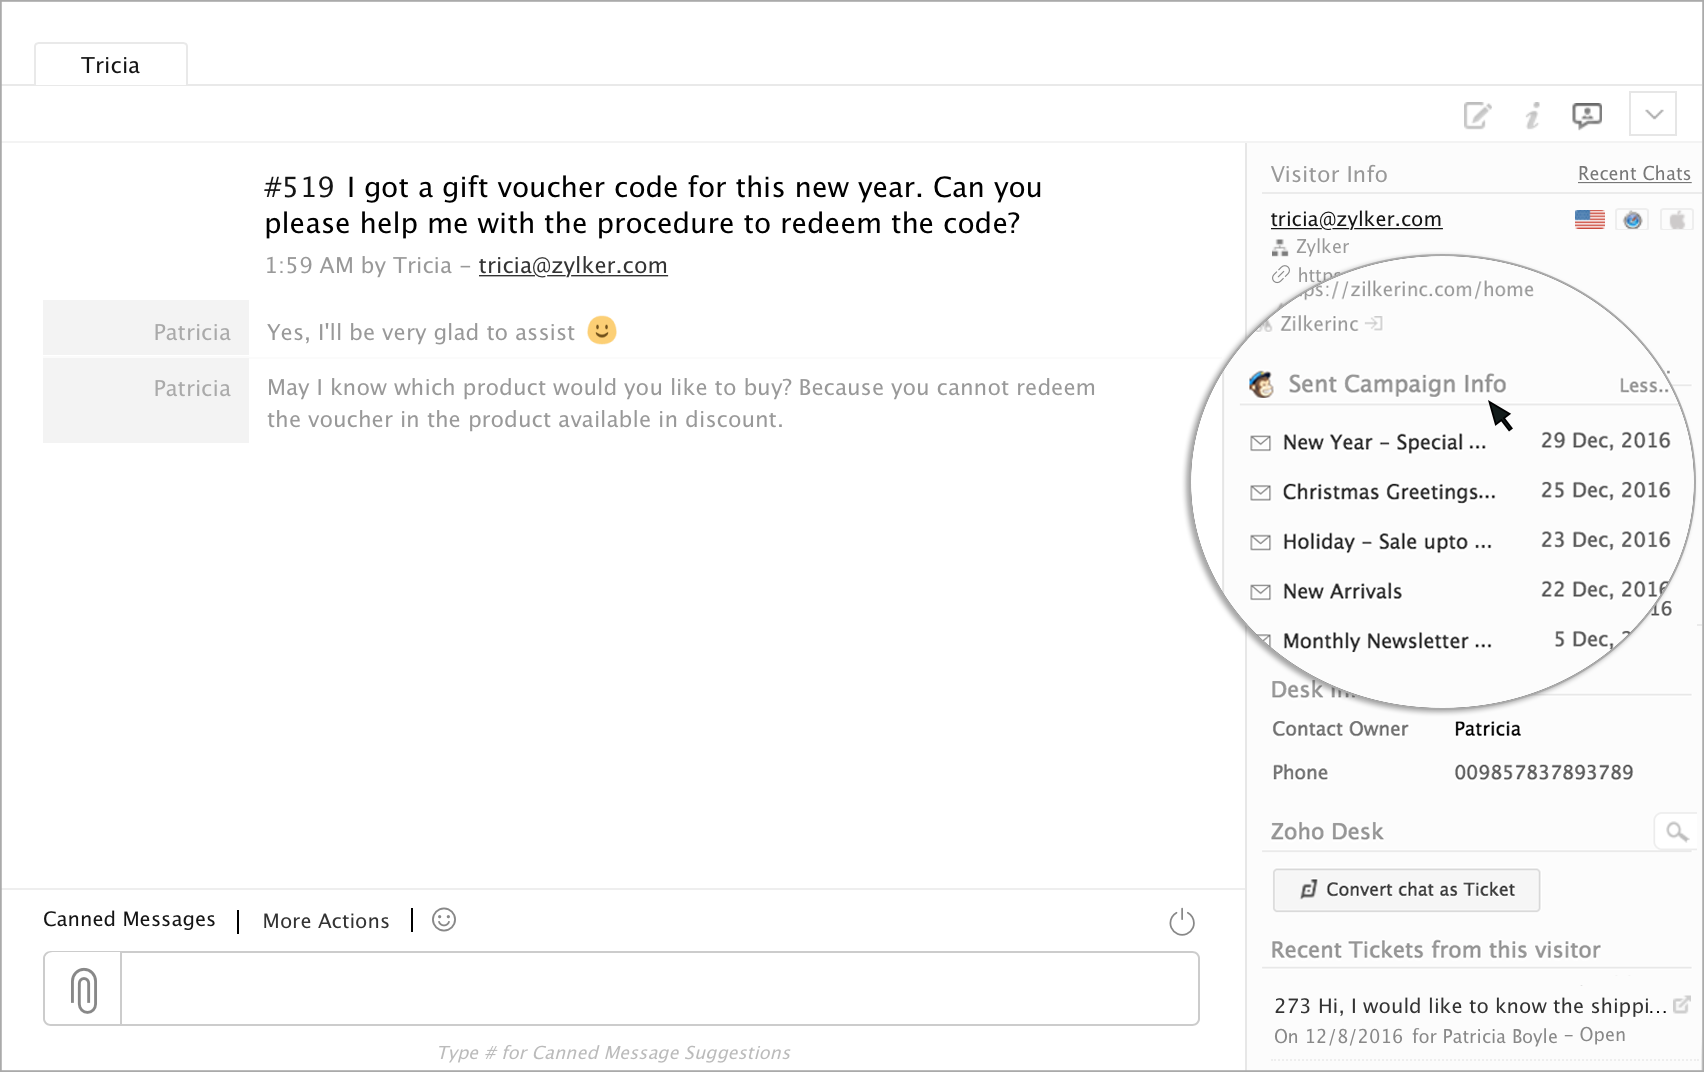
You can click on the Campaign name to view the entire campaign content.
Campaign status displayed in the proactive chat window
You can view the status (Paused, Pending, Save, Schedule, Sending, Sent, Subscribed, Unsubscribed) of the last three campaigns sent to the visitor in the proactive chat window.
How to score the website visitors based on the email campaigns sent via MailChimp Campaigns?
You can now score the visitors visiting your website from the specific email campaigns sent via MailChimp Campaigns.
- Go to Settings -> Lead Scoring -> Add in Zoho SalesIQ.
- Select MailChimp campaigns in the condition drop-down.
- The emails campaigns sent from your MailChimp Campaigns will be listed in the next drop-down. Choose an email campaign.
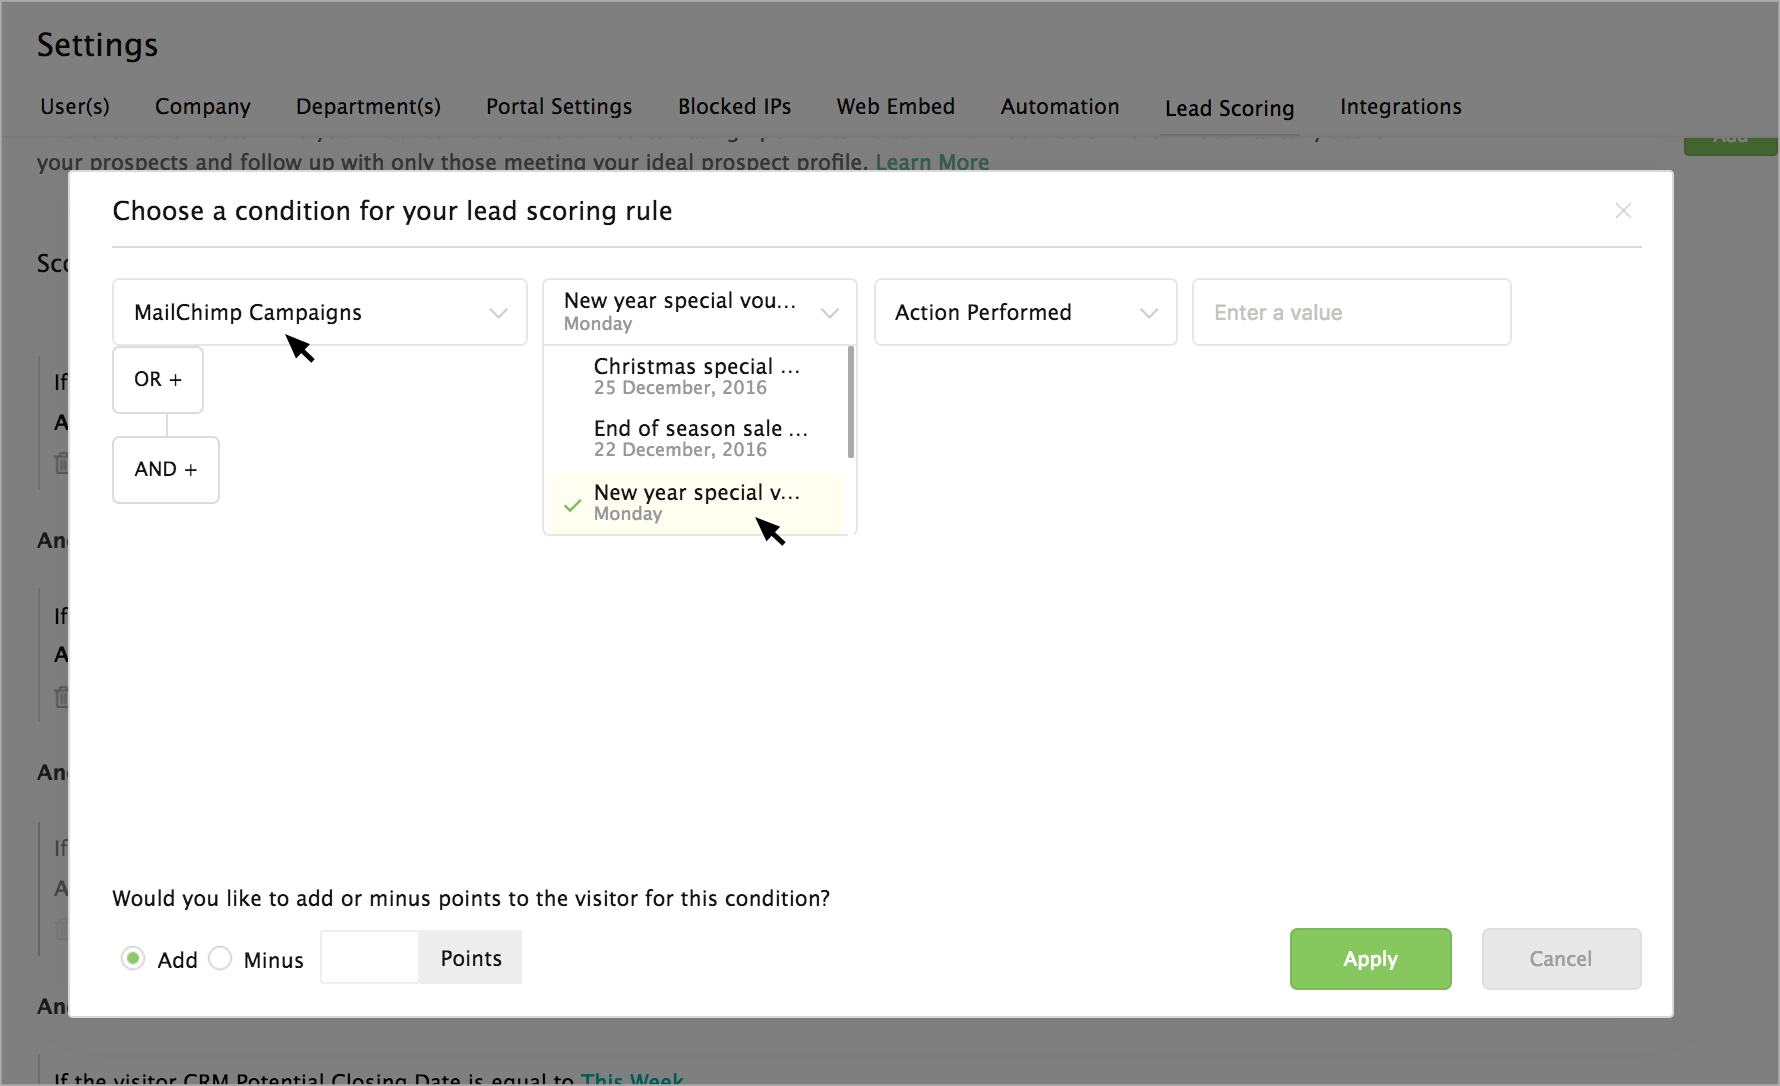
- Then choose an action based on which you would like to score the visitor.
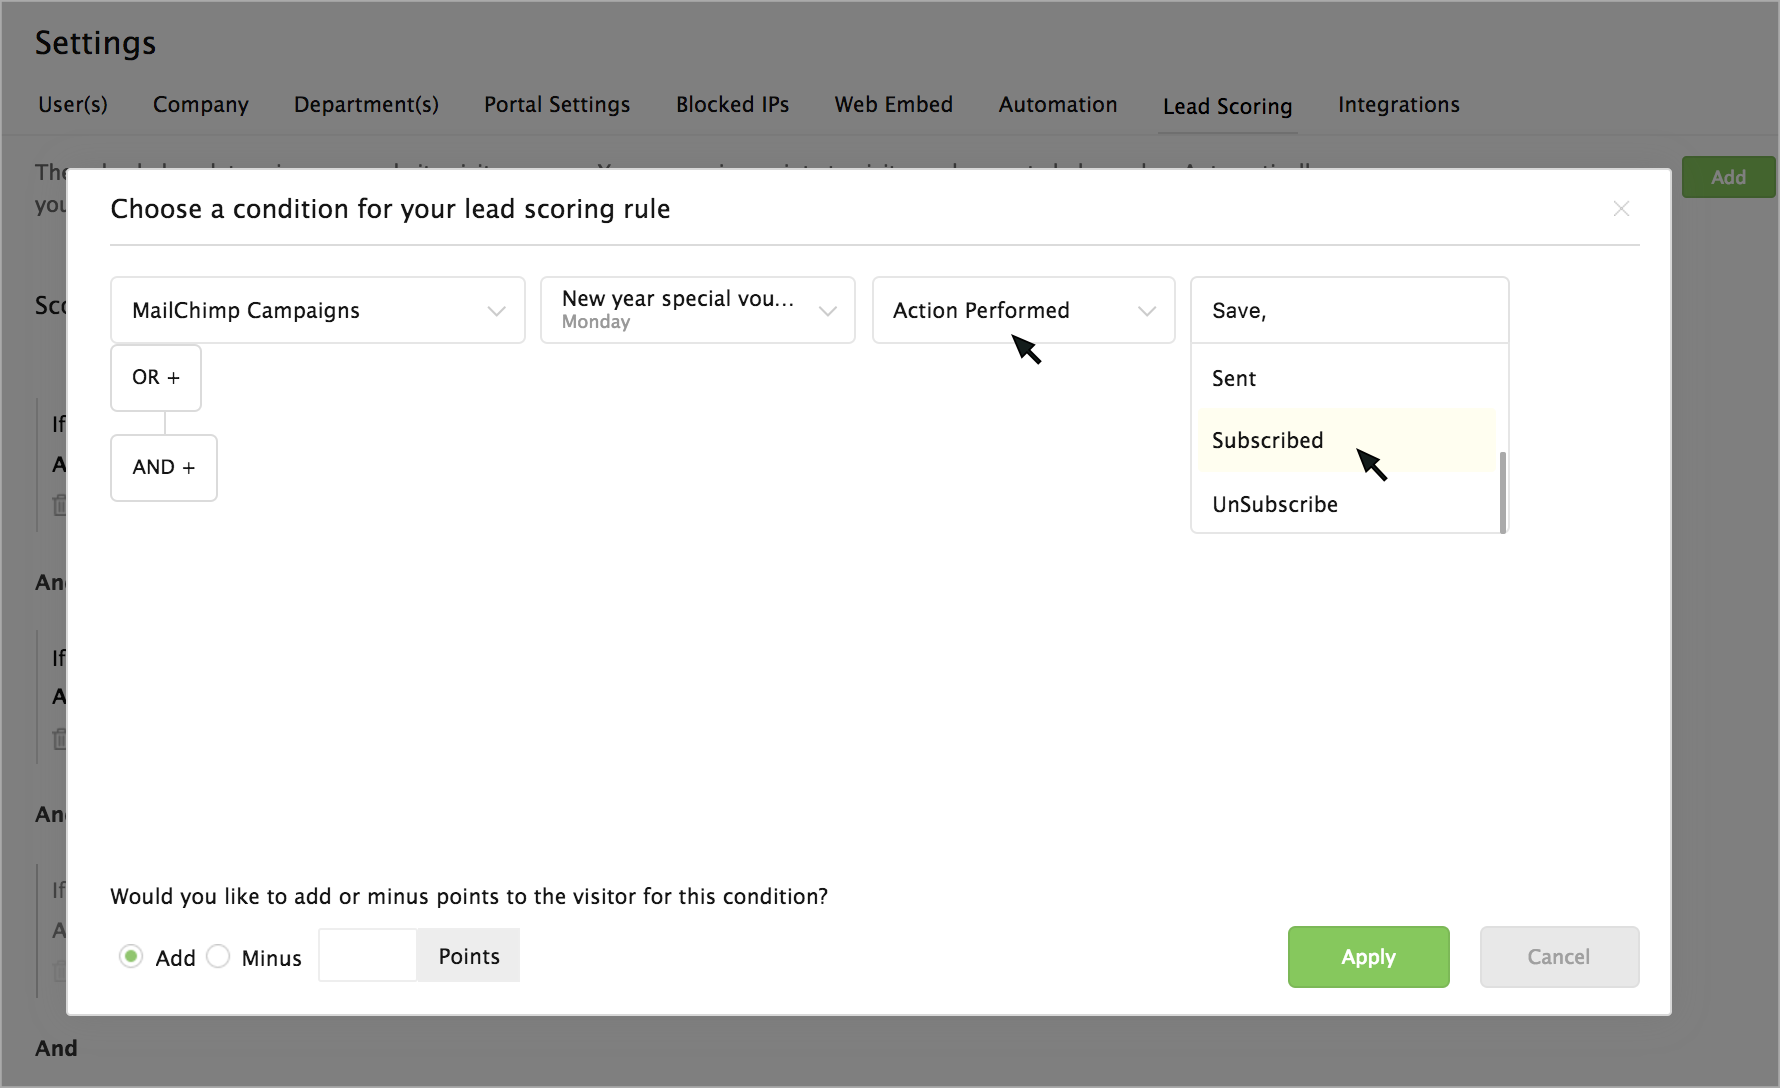
- Now select the points you would like to award for the specific action.
- Then, click on the Apply button.
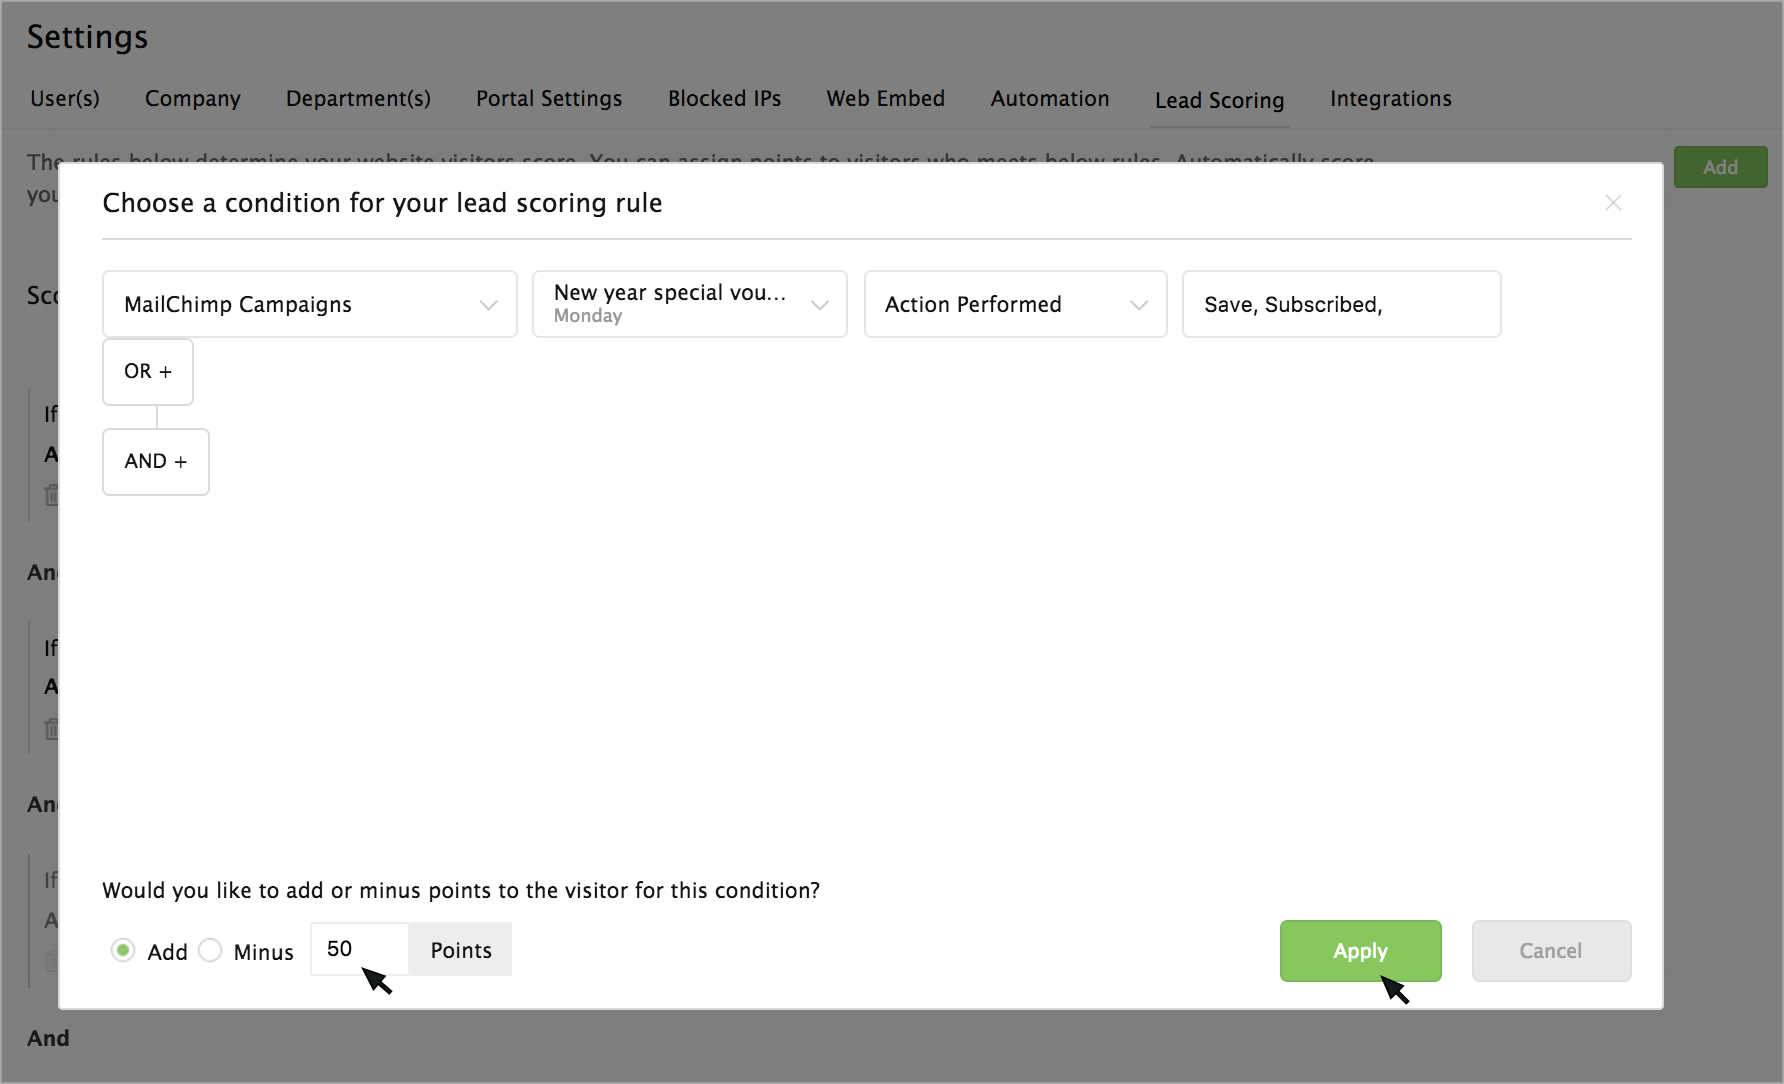
Now when each time, the visitor visit your website from the specified email campaign, then the points you have chosen will be added/reduced to the visitor's score.
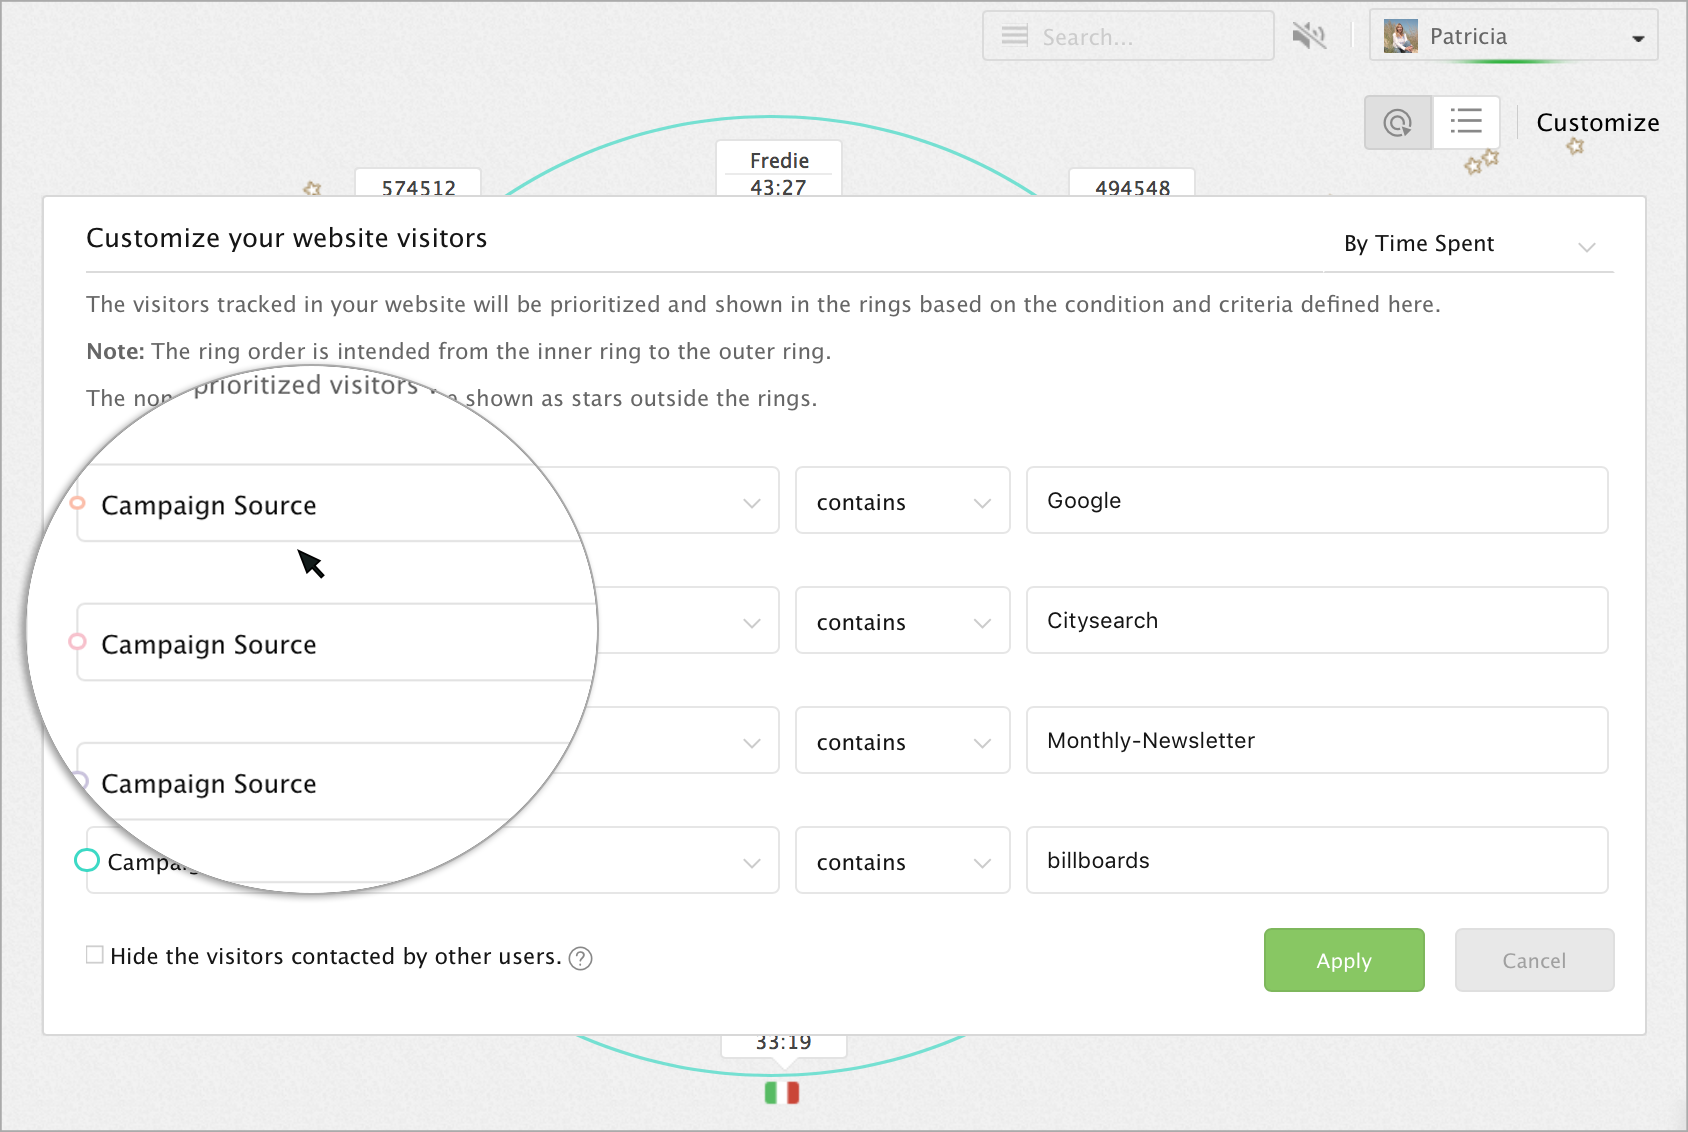
Prioritize website visitors in the tracking rings based on the email sent
You can prioritize the website visitors on your tracking rings based on their email campaign.
- In tracking rings -> customization, select MailChimp Campaigns in the condition drop-down.
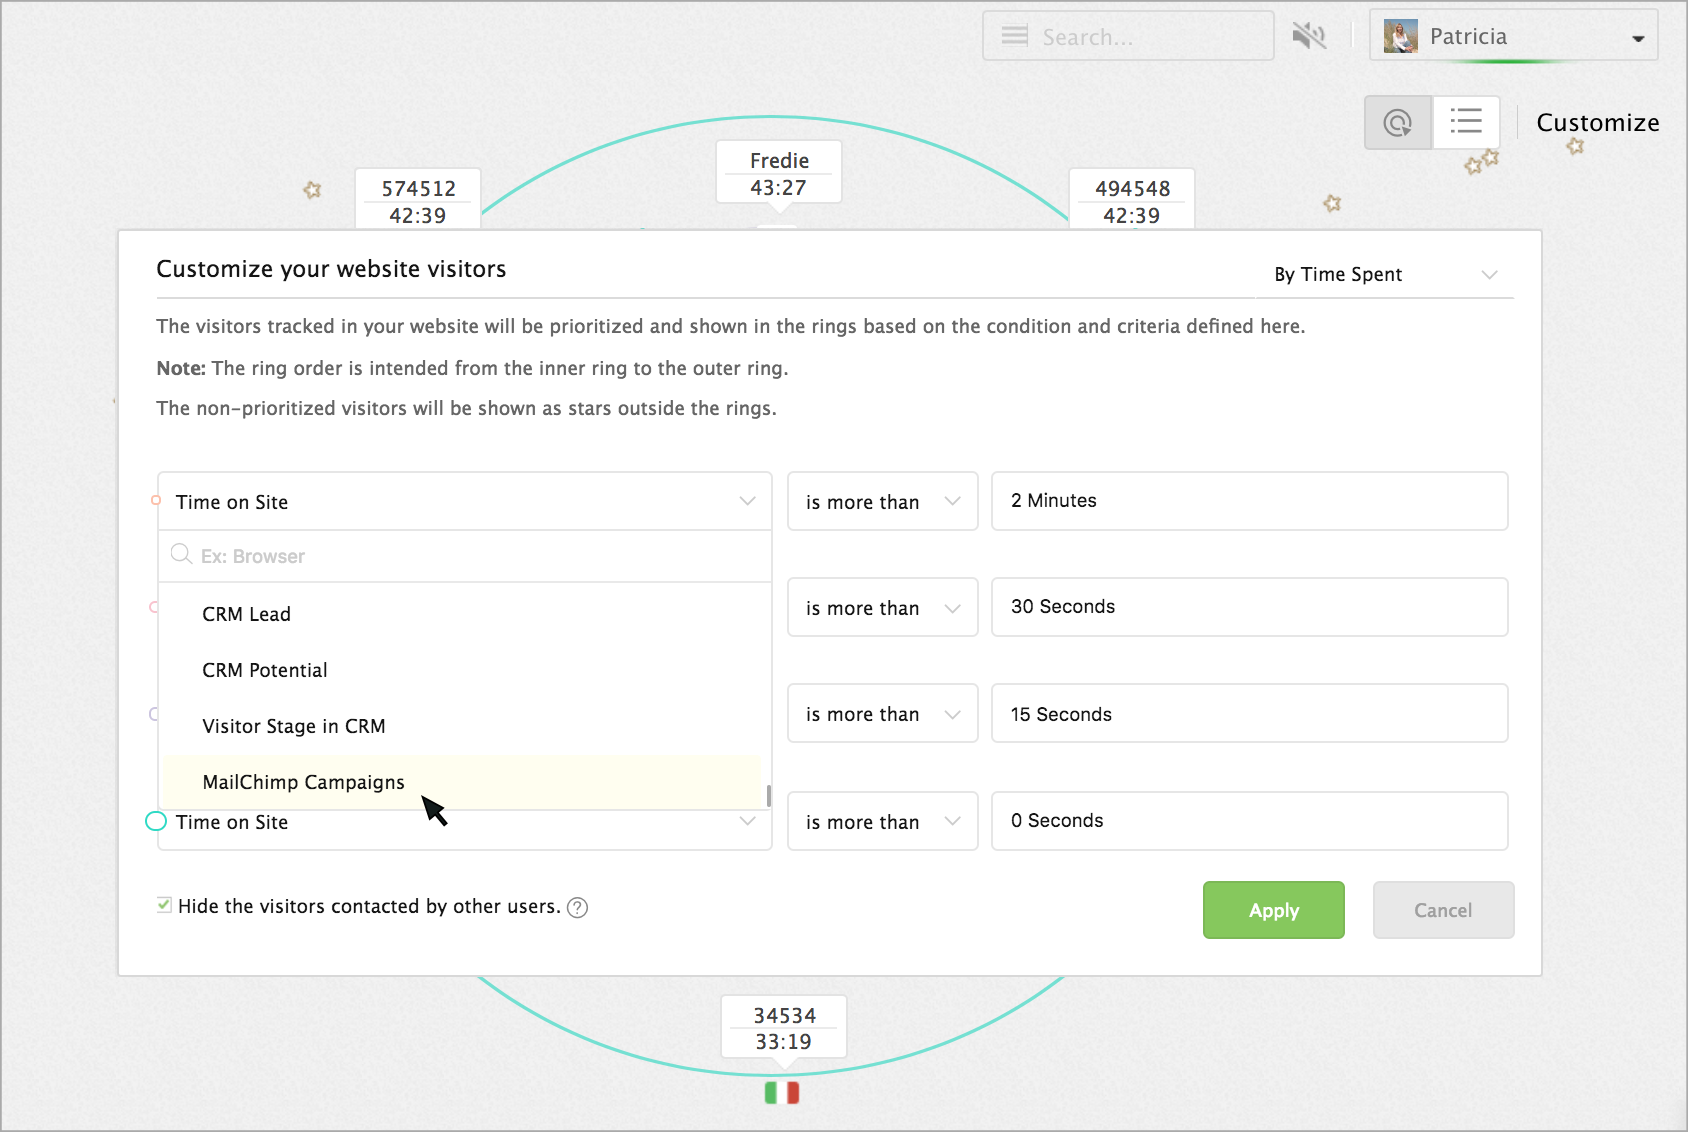
- The emails campaigns sent from your MailChimp Campaigns will be listed in the next drop-down. Choose an email campaign.
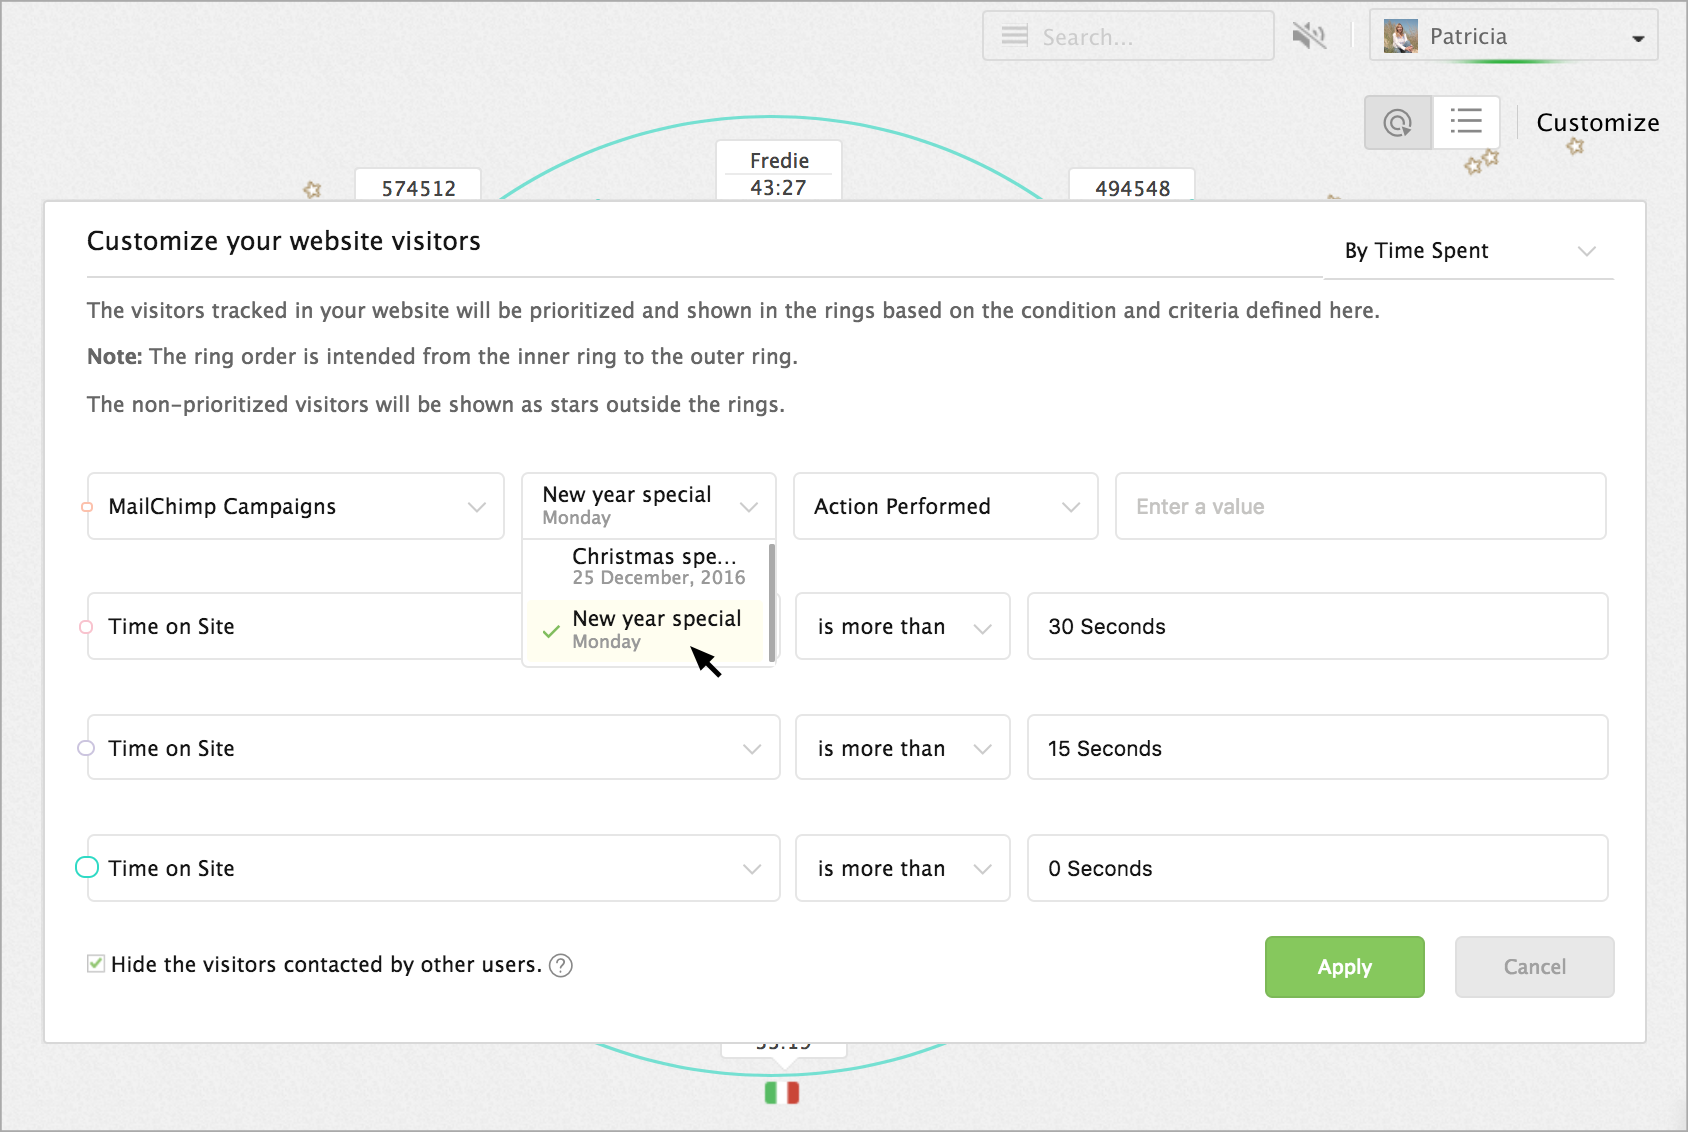
- Then choose an action based on which you would like to prioritize the visitor in the tracking rings.
- Click on the Apply button.
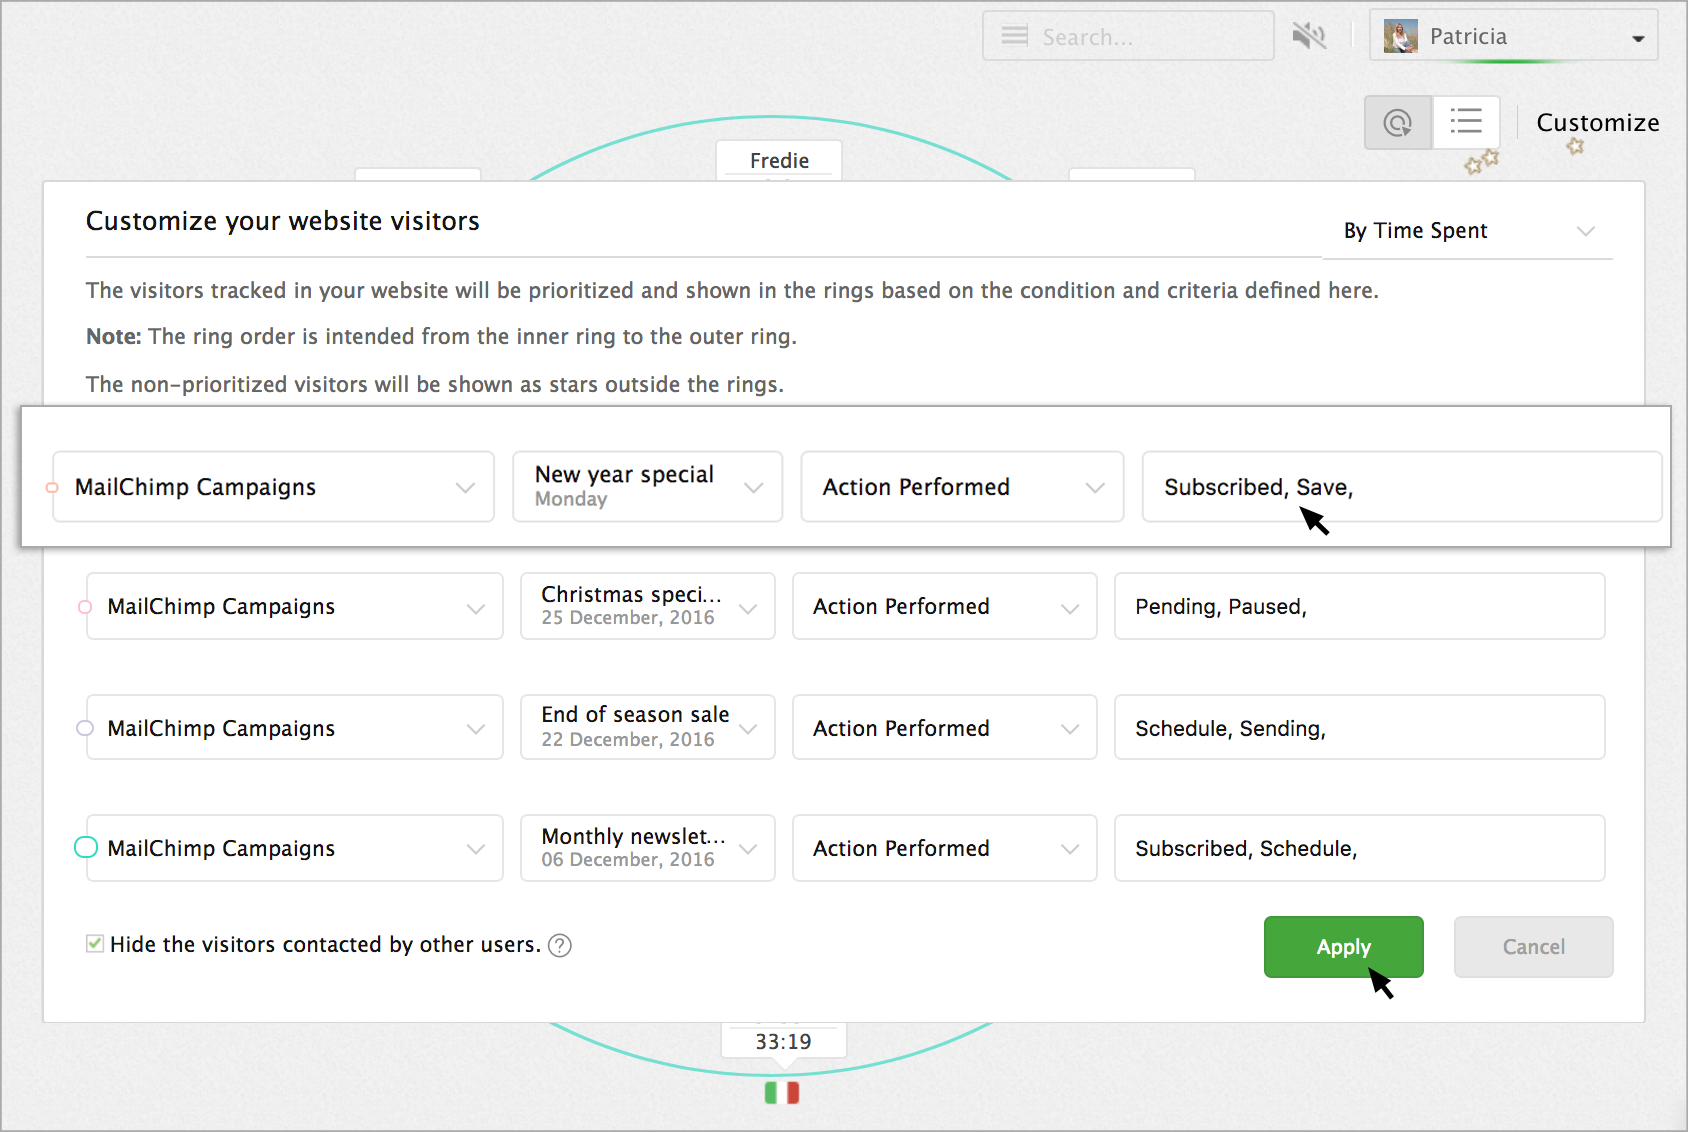
Now, the visitor visiting your website from the email campaign will be prioritized in the specified tracking ring.
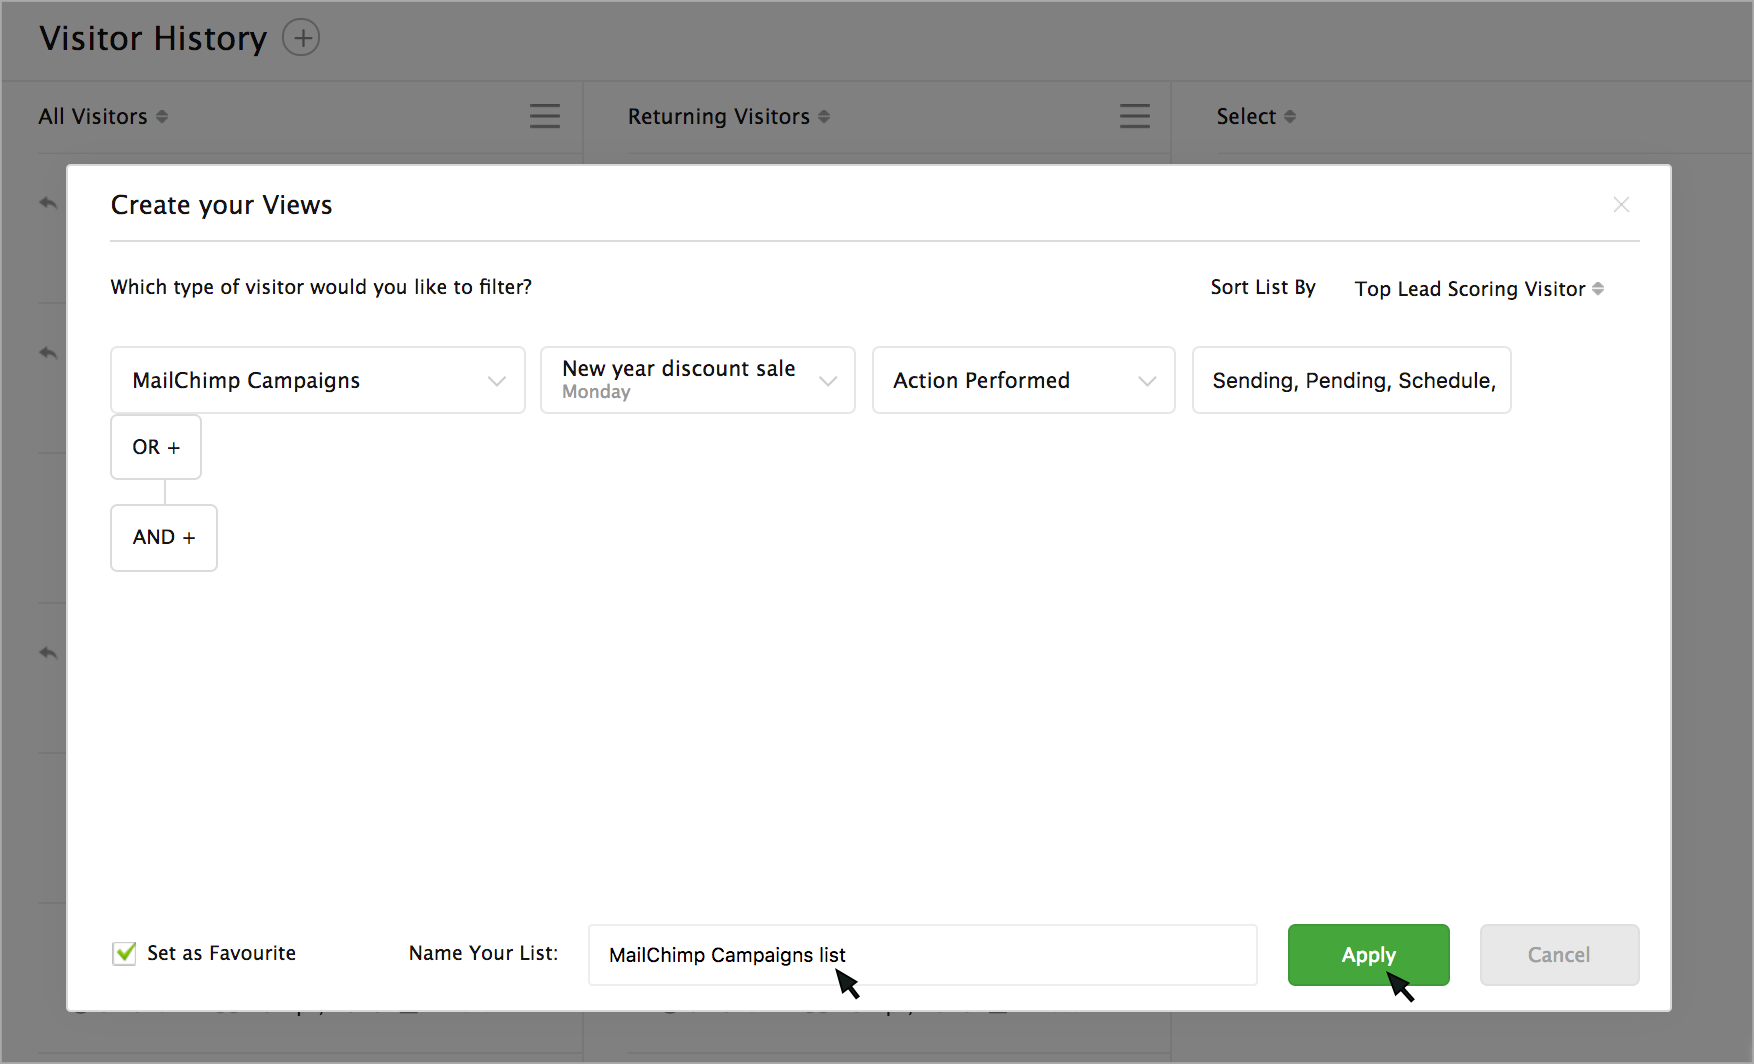
Filter website visitors in visitor history based on the email campaigns sent
You can apply a filter to list the visitor visited your website from a specific email campaign.
- Go to Visitor History -> Add symbol (+) -> Create your views.
- Now select "MailChimp Campaigns" in the conditions drop down.

- The emails campaigns sent from your MailChimp Campaigns will be listed in the next drop-down. Choose an email campaign.
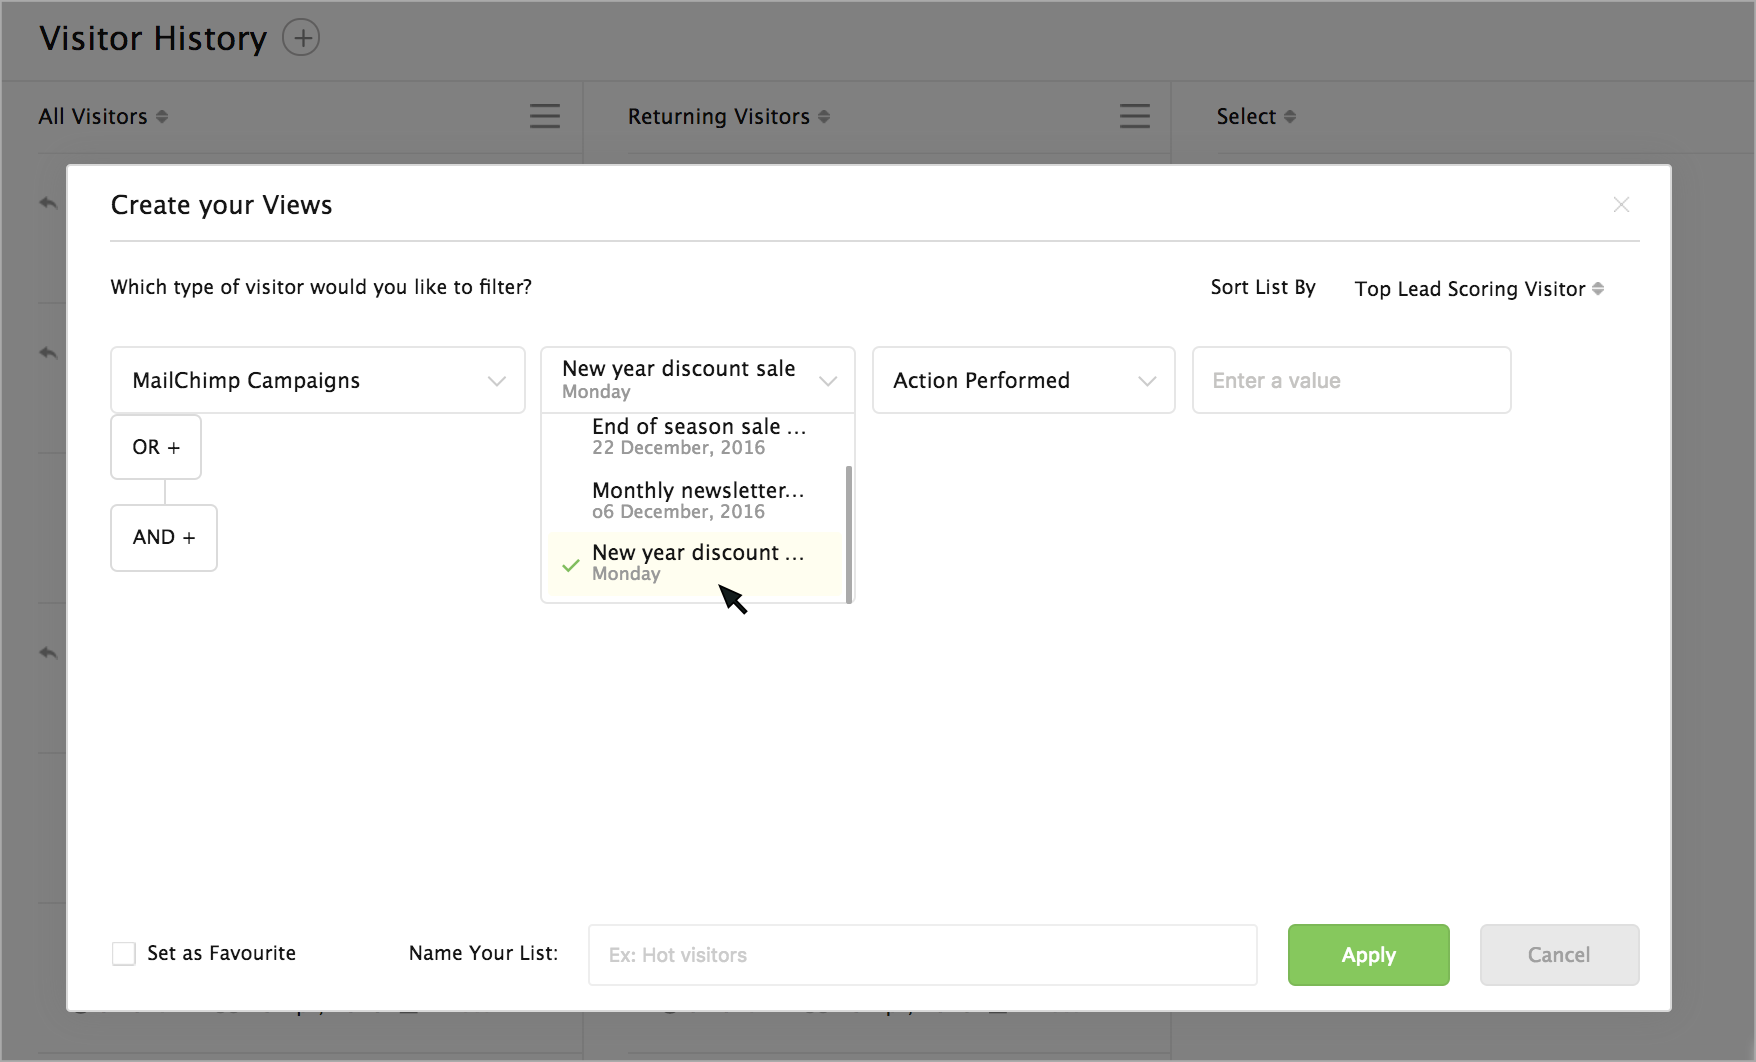
- Then, select an action based on which you would like to get the visitor list.
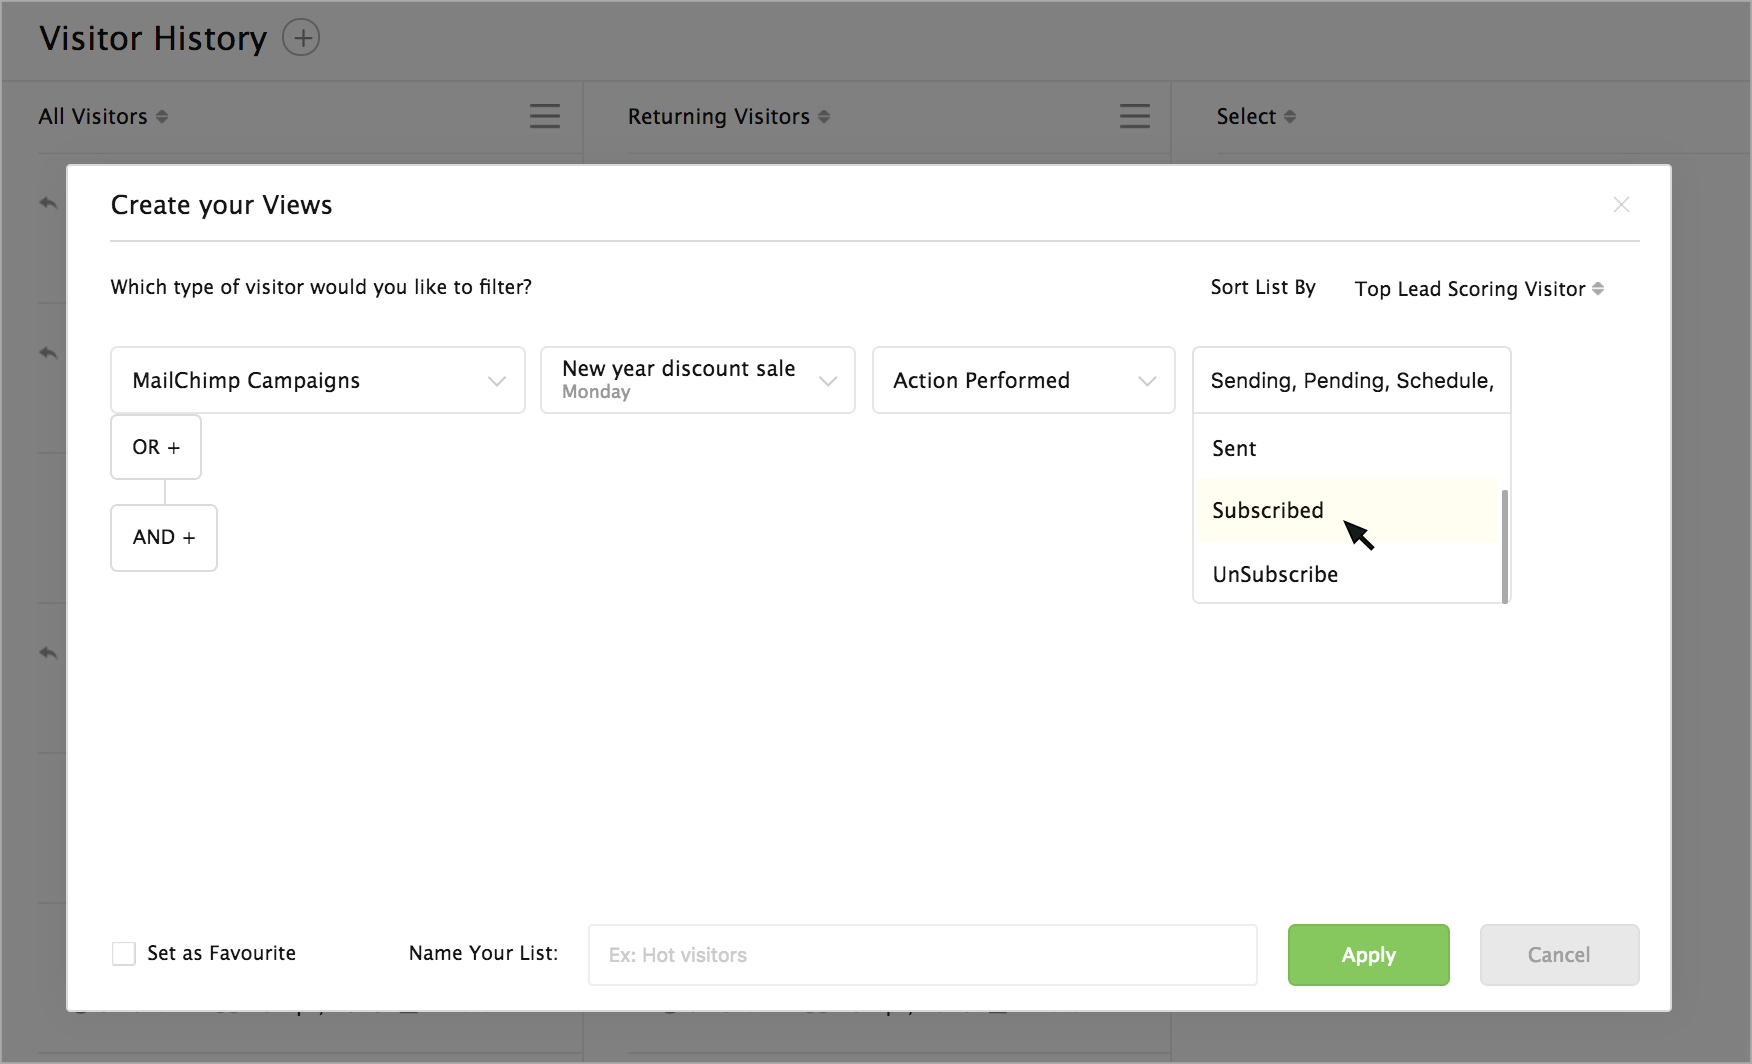
- Then, provide a name for your list and click on the Apply button.
- The visitors visiting the website via the specified email campaign will be listed in a separate column.
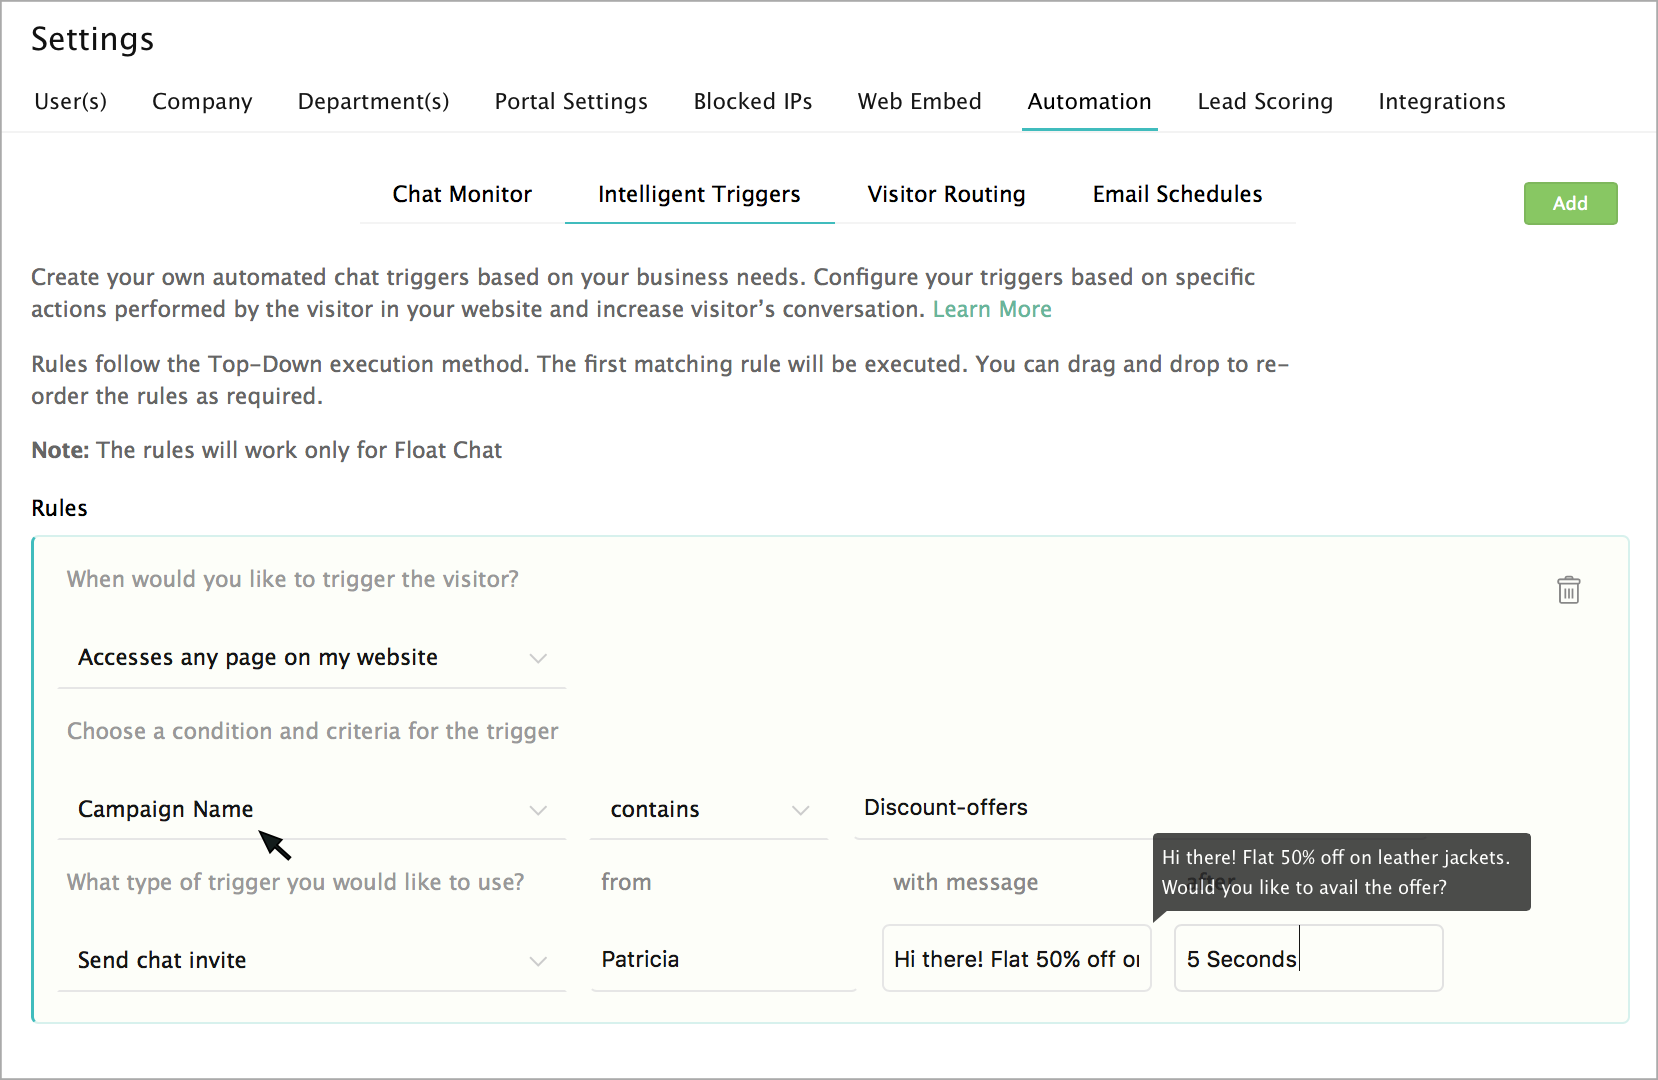
Set chat triggers to website visitors from a specific email campaign
You can set a special trigger to the visitors visiting your website from the email campaigns you have sent.
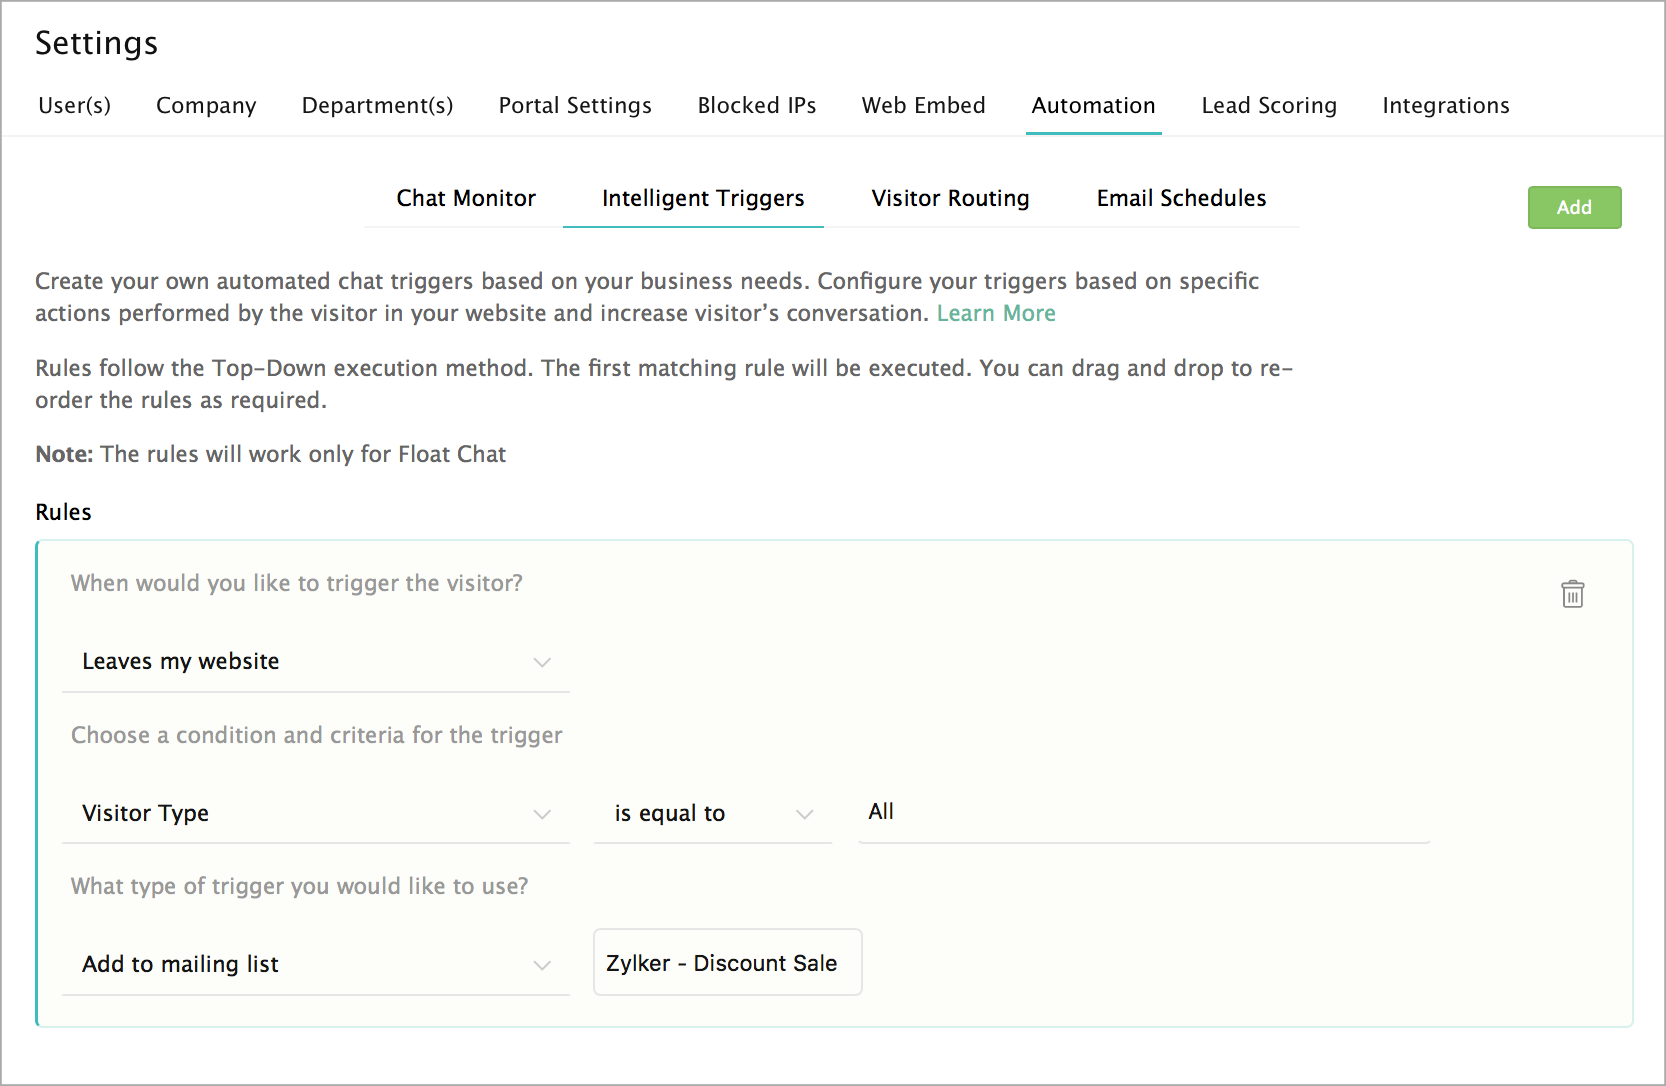
- In settings ->Automation ->Intelligent triggers ->Add.
- Choose when would you like to execute this trigger to the visitor in "When the visitor" section.
- Now select "MailChimp Campaigns" condition in "And if" section.
- The emails campaigns sent from your MailChimp Campaigns will be listed in the next drop-down. Choose an email campaign.
- Then choose an action based on which you would like to trigger the website visitor.
- Select the type of trigger action you would like to perform to the website visitor in the drop-down.
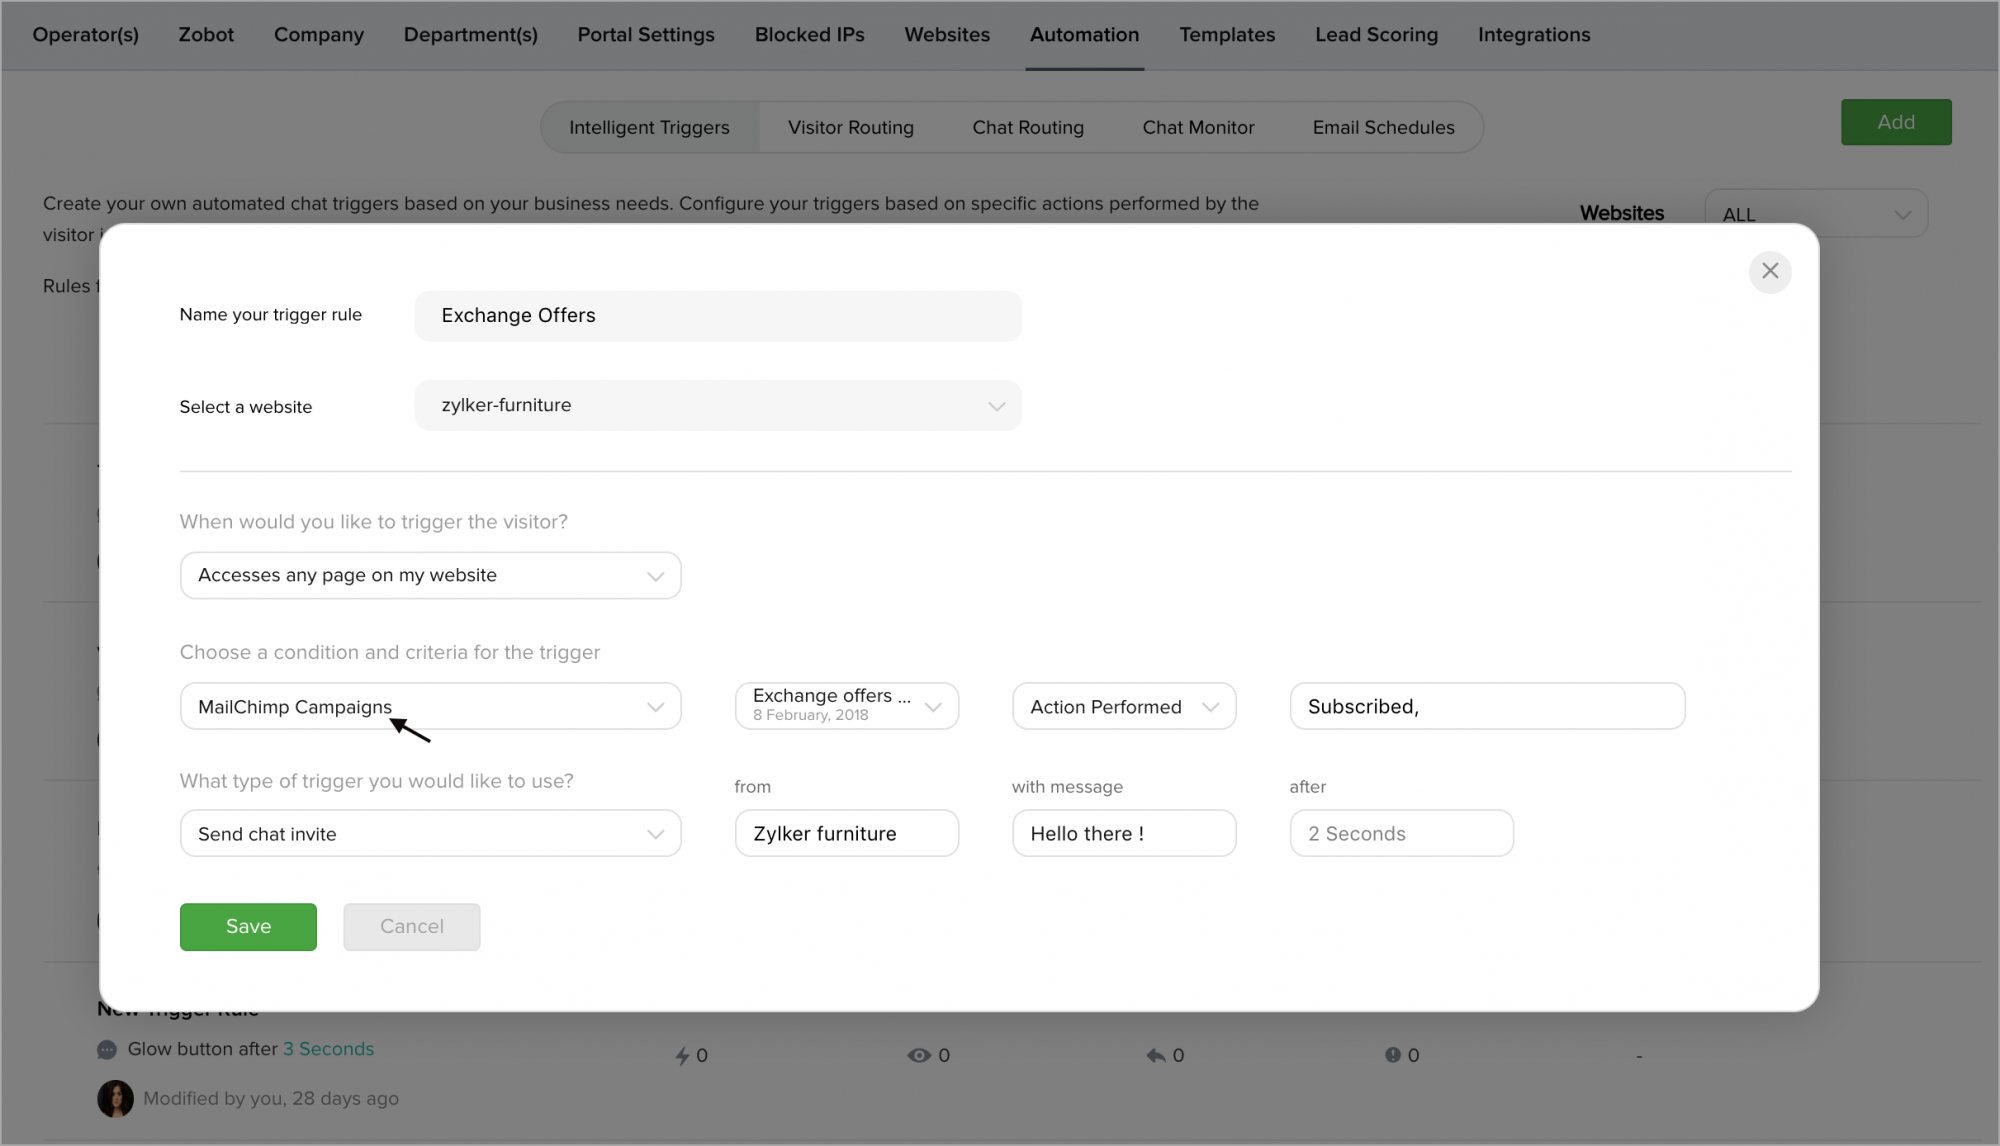
Now when the visitor visits your website from the specified email campaign, then the action you have set (open chat window) will be triggered.
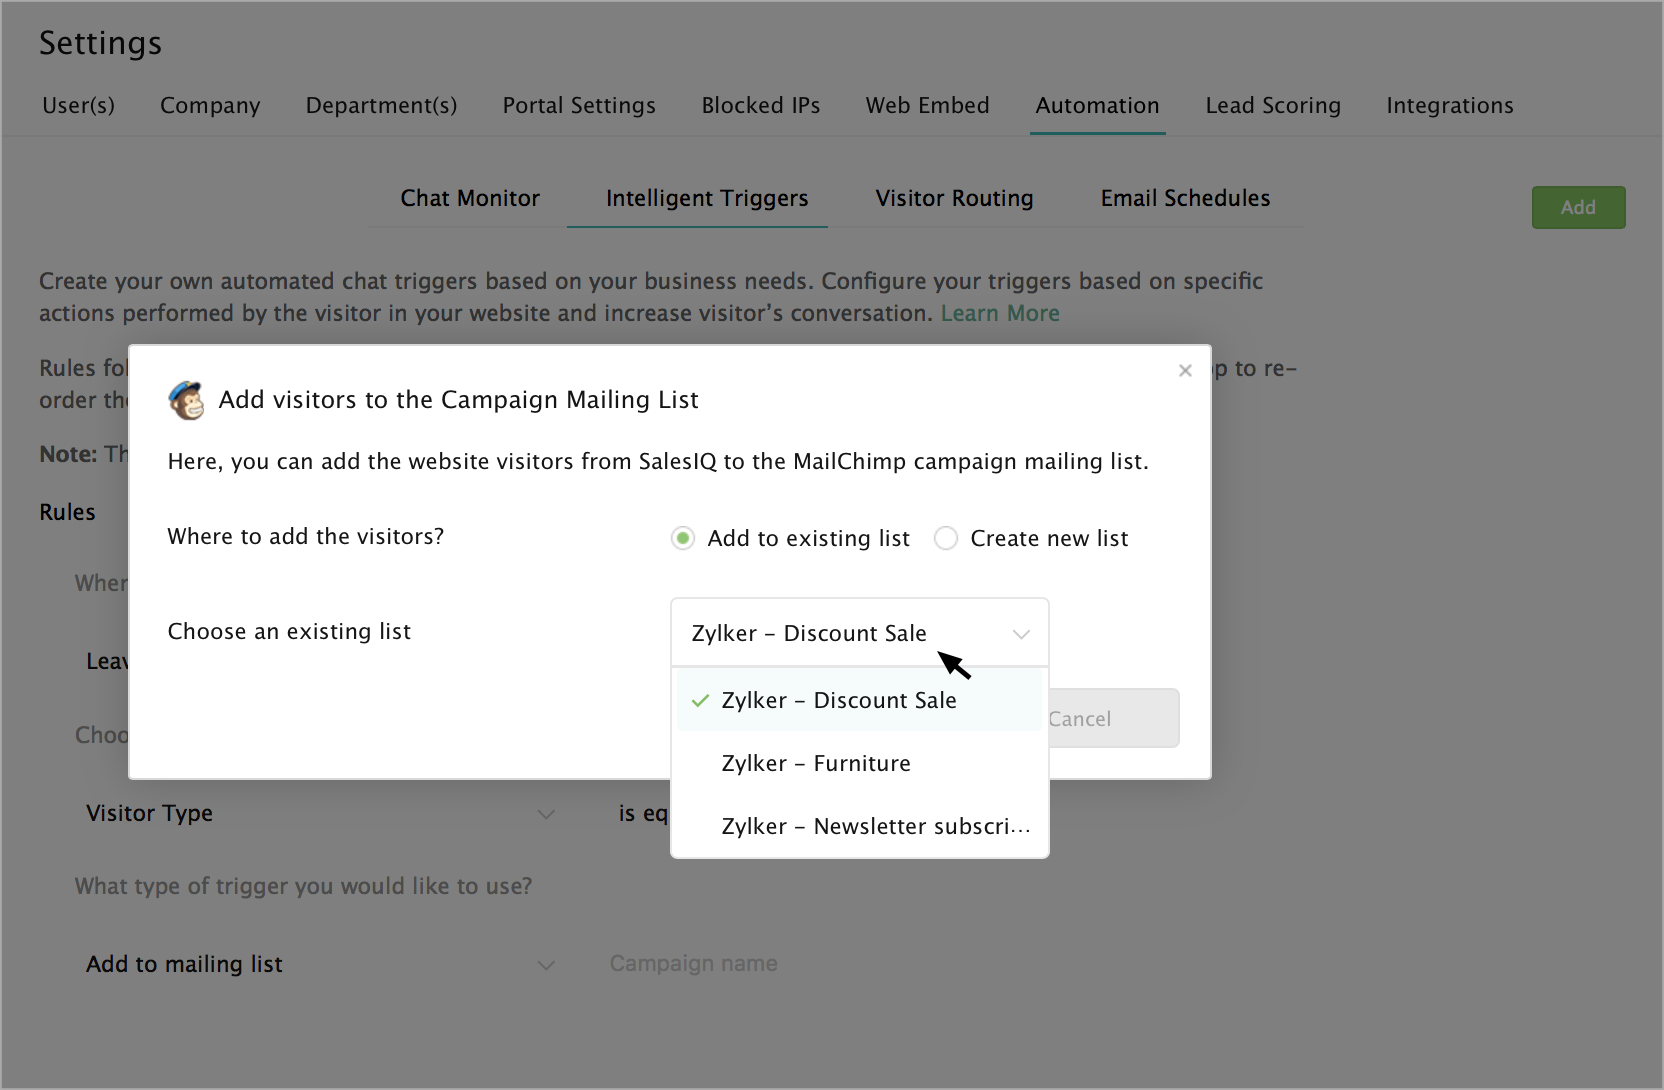
With the "Add to mailing list" option, you can add the visitors directly to the campaign email list when they leave your website.
- In Settings -> Automation -> Intelligent Triggers ->When the Visitor drop-down, select the "Leaves the Website" option. Then, set a condition and criteria.
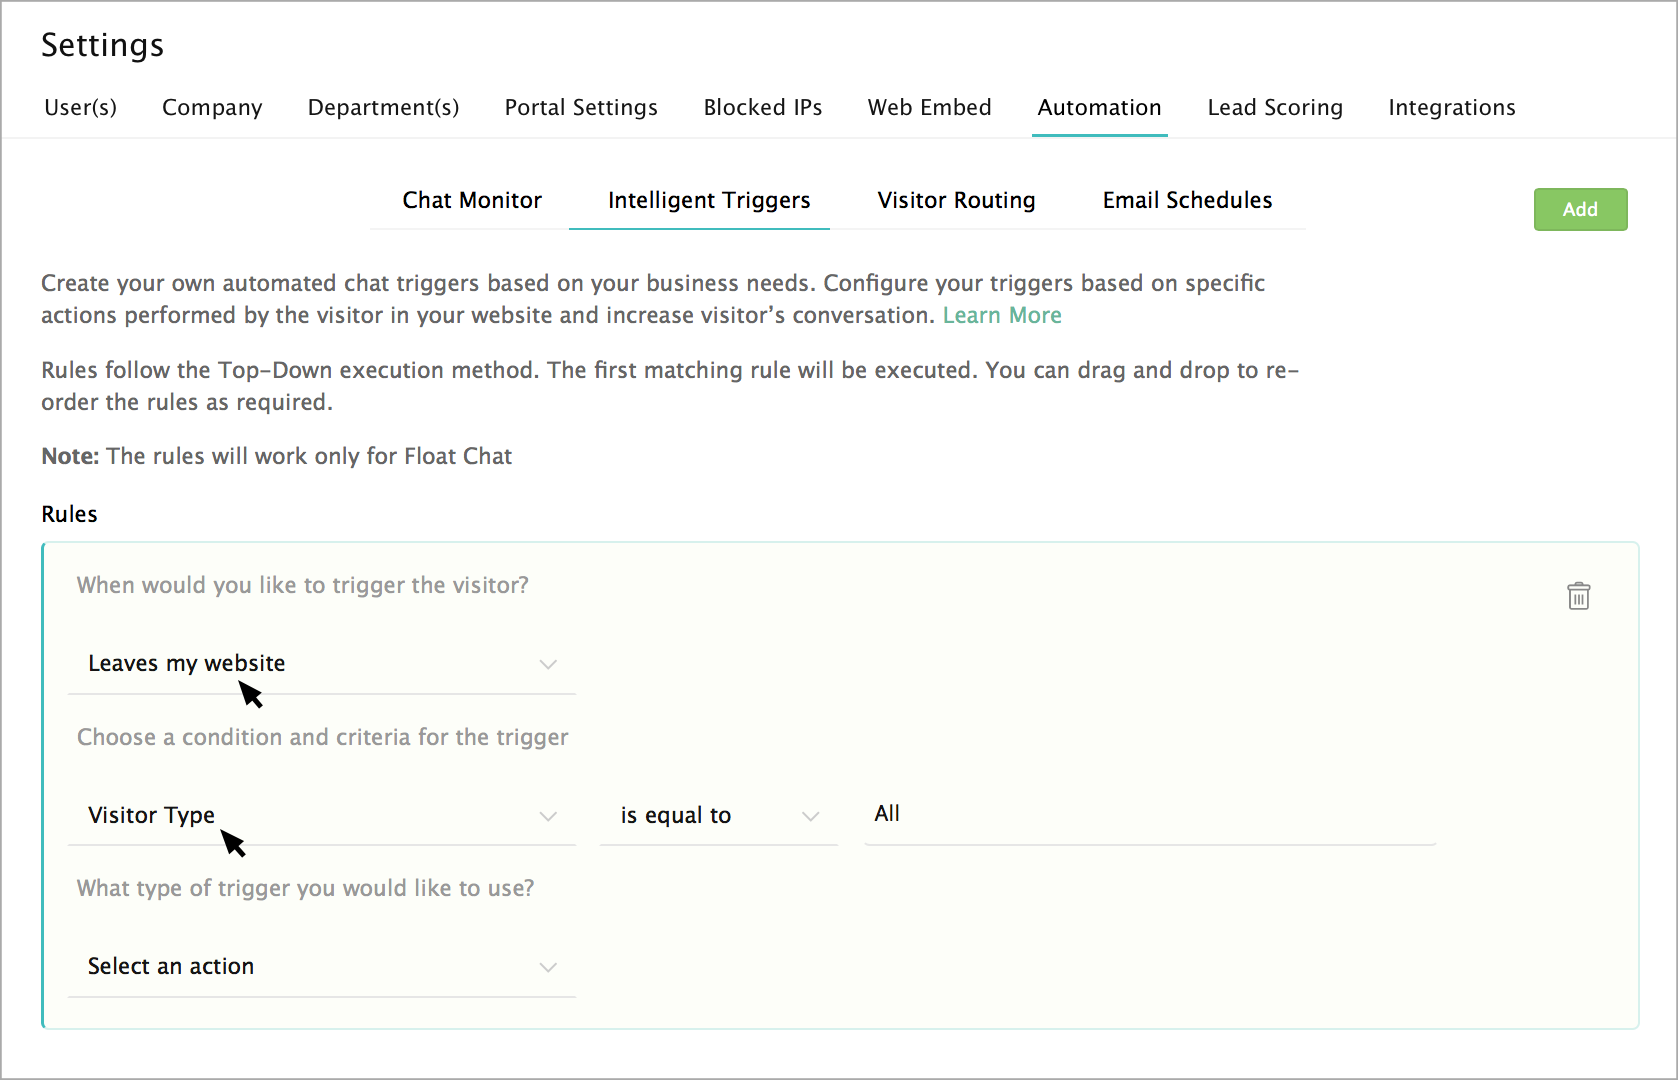
- Choose the “Add to mailing list” option in the select an action drop-down.
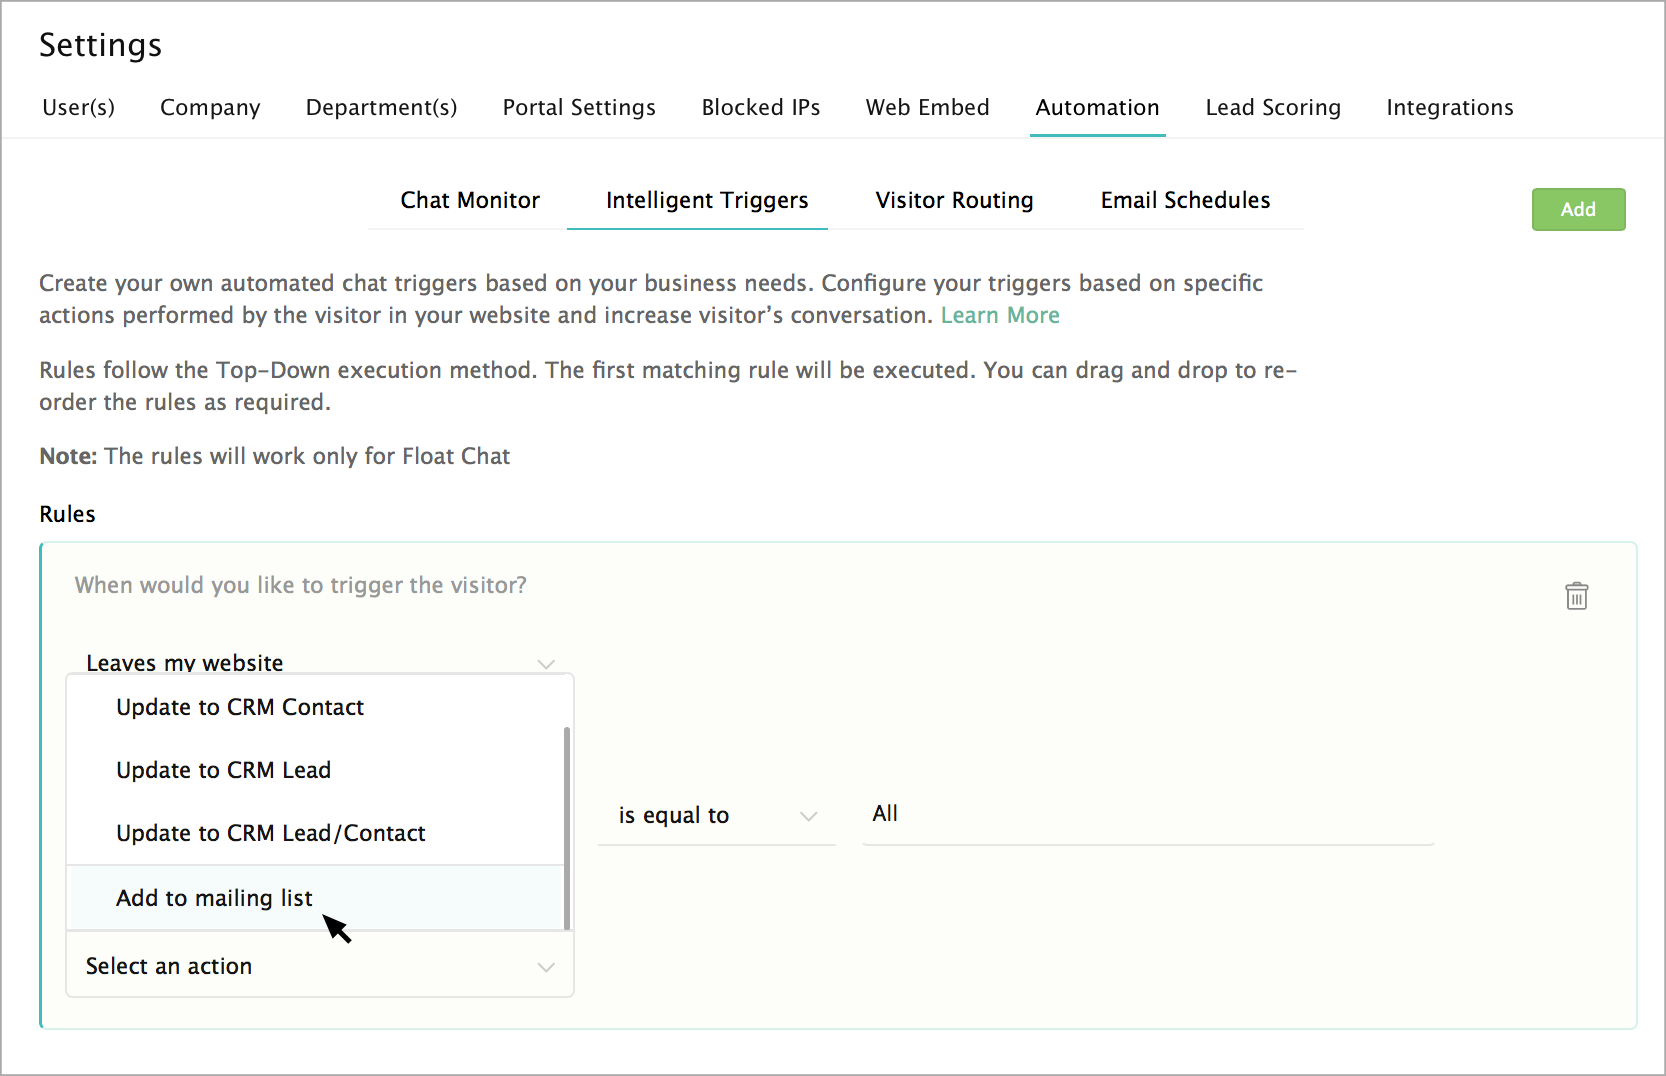
- The "Add visitors to the campaign mailing list" window will appear, which has two options:
- Add to the existing list
- Create a new list
- Add to the existing list
- Choose the "Add to existing list" option to view the list of campaigns available. You can select existing campaign from the "In which existing campaign you would like to add the visitors" drop-down.
- Choose the "Create a new list" option to generate a new list, and then enter a name for the new mailing list in the "Enter the list name" text box.
- In the "Default From Email Address" and "Default Name," enter the default email address and Name of your MailChimp Campaigns account.
- Then, provide a description you would like to remember about the recipient who joins this list.
- If you wish to accumulate and update the visitors at a periodic interval, choose between weekly and monthly. By default, "None" option is selected.
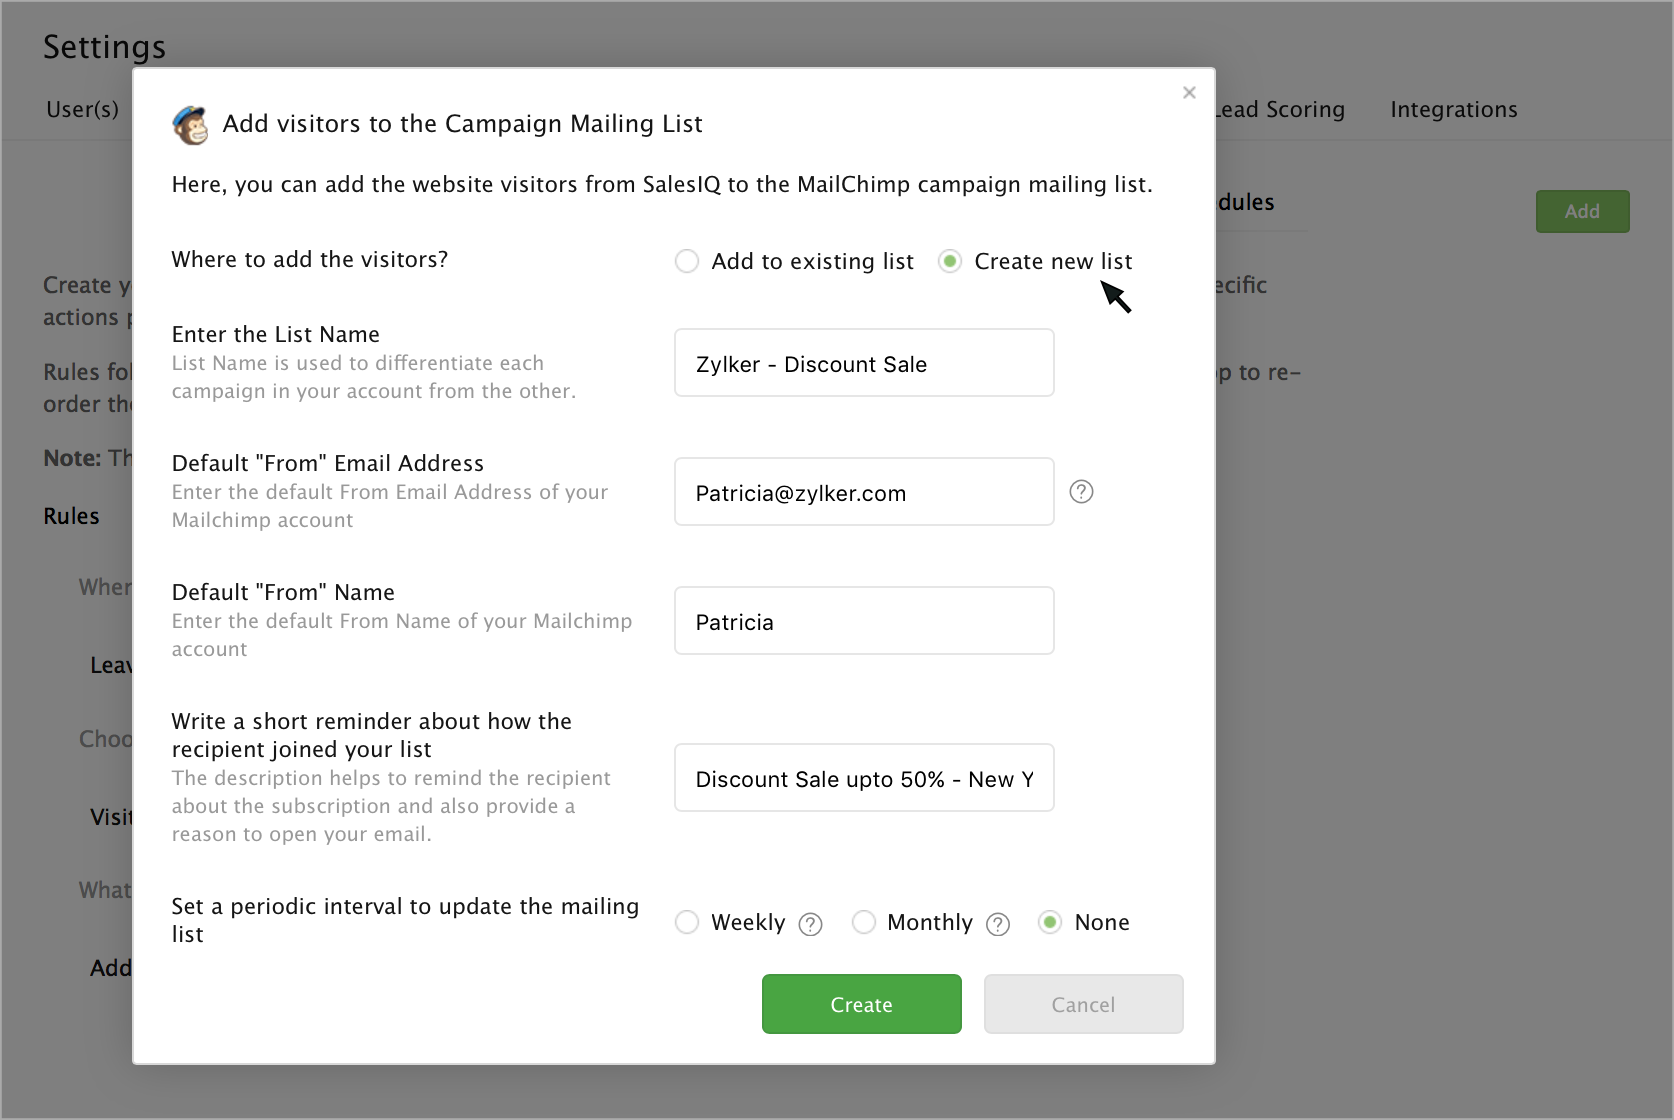
- Click on the Save button.
- If the condition and criteria of the visitor match then the visitor will be added to the email campaign list when they leave your website.
Identify website visitors name and email address referred from campaign emails
You can identify the website visitors from the Mail Chimp campaign by adding the below-mentioned SalesIQ parameter after the backlinks (which directs the customer to your website) in the campaign emails.
SalesIQ Params to be included in the backlinks
In case if the URL contains the question mark (?) at its suffix then include the backlink preceded by an ampersand (&) symbolExample: http://www.yourlink.com /index.php?module=Products&siq_name=*|FNAME|* *|LNAME|*&siq_email=*|EMAIL|*
If not, then include the backlink preceded by the question mark (?) as shown below.
Example: https://www.yourlink.com/?siq_name=* |FNAME|* *|LNAME|*&siq_email=*|EMAIL|*
Also, ensure that you have embedded the SalesIQ code into your website source file to start tracking. Click here to know more about embedding the SalesIQ code.
Categorize Website Visitors based on Campaign UTM variables
SalesIQ allows the users to modify and set their conditions based on campaign UTM variables for prioritizing the visitors in their dashboard.
In the visitor tracking operator console, click on the "customize." The "Prioritize your visitors" pop-up will then appear for prioritizing the visitors based on the campaign UTM values.
Initiate Chat Triggers based on Campaign UTM variables
- In the Settings , select the “Automation” tab, and click on the "Intelligent Triggers" to set your required Campaign UTM filters.
- Select the required "condition" from the list, followed by setting up your "criteria" for your conditions.
- Enter a value for the set condition.
- Then, "Select an action" from the list followed by setting up your required time to trigger the action.
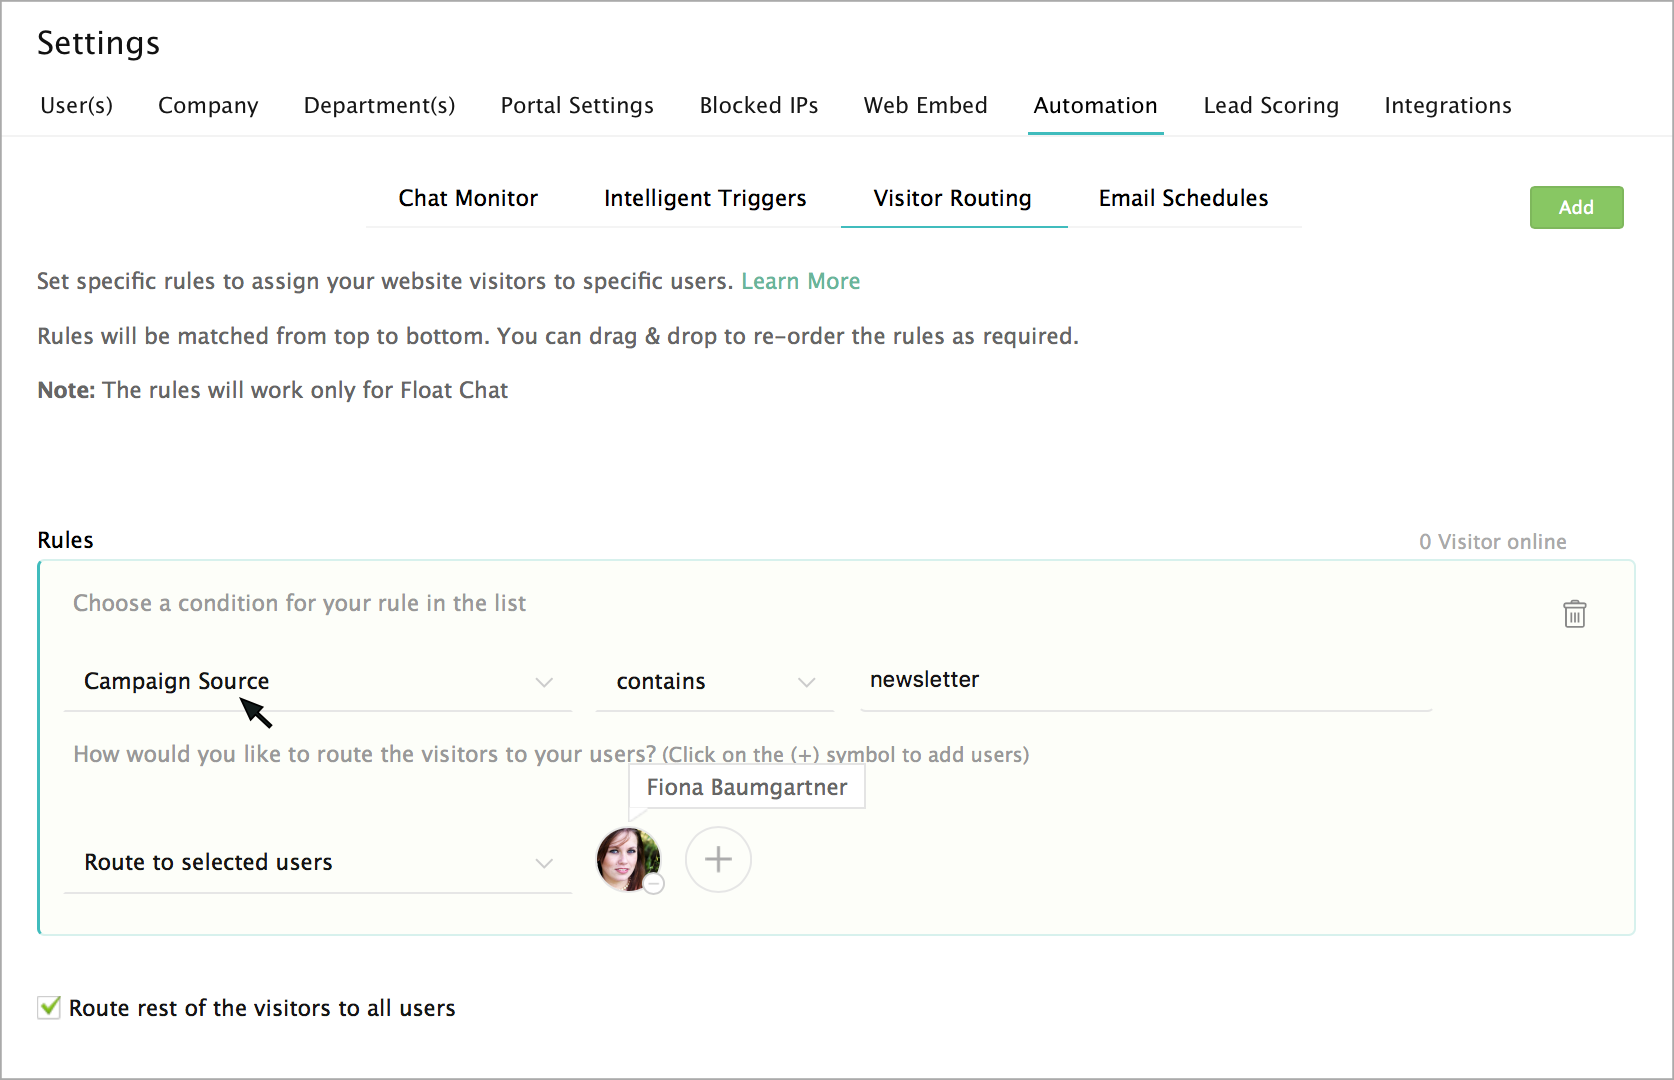
Route visitors based on the Campaign UTM variables
To route the tracked visitor to the specific agent and to personalize the visitor tracking according to your business needs, do the following:
- In the Settings , select the “Automation” tab, and click on the "Visitor Routing" to set your required Campaign UTM filters.
- Select the required "condition" from the list, followed by setting up your "criteria" for your conditions.
- Enter a value for the set condition.
- To add the agent's name in the “route to agents” section, click on the "+" symbol and enter the agent name in the textbox.
- To remove the added agents, hover over the agents and click "-" symbol.
Is it possible to add click on chat button in my campaign emails?
Yes, it is possible. Zoho SalesIQ is well equipped that you can add a chat button in your campaign emails and get chats directed into your SalesIQ. To know more about Signature Chat, click here .
Related Articles
Overview
Many organizations use different software systems to manage emails, calls, customer relationship management, etc. for their sales, marketing, and support teams. Since customer information is in silos, it's difficult to understand customer behavior, ...Overview
As your business grows, you will experience challenges in security and user administration. The more users you have, the more important it is to securely identify them and determine their level of access. The solution for effective security and user ...Overview
Zoho Assist is a cloud-based remote support and remote access software that allows technicians to provide support to remote customers and manage remote computers located anywhere in the world. You can start a remote support session, be it attended or ...Overview
Webinars are great platforms to influence, engage, and educate leads and prospects about your business. You can broadcast live presentations or demos, answer questions from attendees through Q&A, and launch live polls to gather opinion from your ...Overview
Conduct discussions and collaborate online through audio, video, and screen sharing. Share presentations or give a live demo of an app or product. Moderate meetings to focus on your agenda, reduce noise, and optimize results. Lock meetings to keep ...