Personalize your email
Personalize your email campaigns to give customers relevant and individualised attention. Email personalization will most likely get your campaigns opened and links clicked. Read on to know the various ways you can personalize your email campaigns.
Email Subject line
Personalize your subject -- the easiest shortcut to grab your contacts' attention when they see the email in their inbox. Our easy-to-use merge tags help tailoring the subject to the audience.
Using Emoji in email subject line
This allows you to grab the attention of your contacts by using emojis in your subject lines. It is an effective technique to increase your email open rates and get more contacts engagement. All you've got to do is click the Emoji icon next to the subject text box in the campaign creation flow and select the Emoji you want to use in your subject line.
Using first name in subject line
Use your customer's first name by inserting a merge tag like this,

"Hey $[FNAME|Jin]$, Your Weekly Updates" would look like "Hey Jin, Your Weekly Updates".
It is always suggested to use a standard subject rather than adding only merge tags in the subject line. For example, if you want to send an email to a recipient about an order delivery, then it should look like
Hi $[FNAME]$, Your Shipment is Delivered rather than $[FNAME]$.

Here are a few tips:
- Make your subject line crisp and to the point.
- Set a default value in the merge tags. That will act as a replacement if your customers' first names are not updated in the contact list.
- You can also use the last name in subject merge tags.
- Avoid using an email address within the subject line.
Sender Name
Sender Name should always be a recognizable name for the contacts. It is preferable to give your company or brand name in this field.

Note :
- Avoid using your personal name.
- Never use an email address in your sender name field.
Personalize your recipients
Add your recipients' name, address, and other details by using merge tags. Merge Tags are smart tags that pull recipient specific data directly from your mailing list into your email message. You can also add merge-tags to the subject and/or the content.
Adding Merge Tags to personalize your content
- Click the intended merge tag.
- Copy the merge tag related to the first name, last name, or email address.
- Paste the tag in an appropriate place in the content. (For example, if you want to replace address the recipient by his first name, copy the related merge tag ""$[FNAME]$"" and paste at the right place in the content.
- Click Save & Close.
Note
- If you plan to import your campaign, copy and paste relevant merge tags in your HTML.
- If you select HTML editor/Text editor, copy and paste relevant tags corresponding to their position within your content.
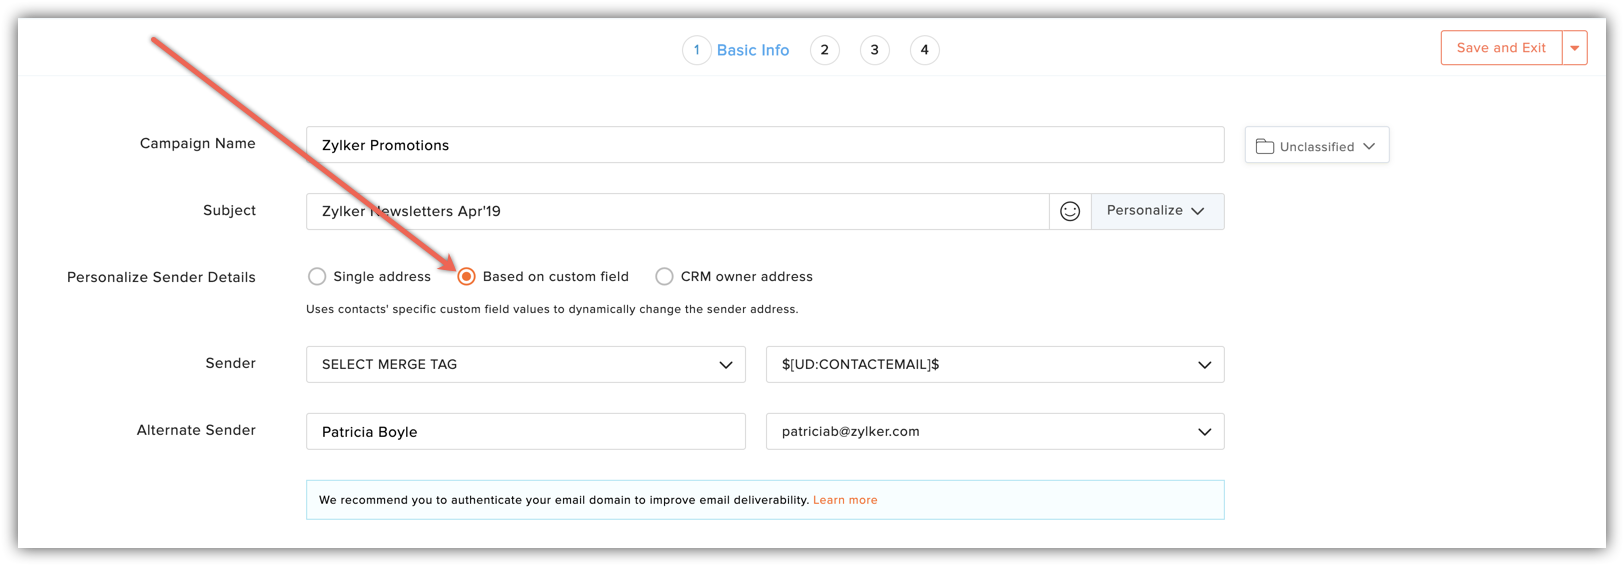
Personalize sender details using dynamic data
You can personalize your sender details such as from name and email address using custom fields and merge tags. This means a contact will receive the email campaign with the marketers' name and email address rather than a general email address like sales@zylker.com. It's easy to personalize the sender details if you've the contact details such as salesperson/marketers' name and email address in the mailing list.
Before you personalize your sender details, you must add custom fields and create corresponding merge tags for sender name and sender address.
Add custom field
To add custom fields that you can use for sender name and email address,
- From Navigation toolbar, choose Settings and select Custom Fields.
- Click Add New and select Contact Field from top-right corner of the screen.
- To add custom field for sender name, select field type as Text and give a name define the field length.
- To add custom field for sender address, select field type as Email Address and give a name.
- Click Add.
The custom fields are added successfully and now you'll create the corresponding merge tags for the newly added custom fields. You’ll select these merge tags while personalizing the sender details.
Create merge tag
- From Navigation toolbar, choose Settings and select Merge Tags.
- Click Create and select Contact Custom Tag from top-right corner of the screen.
- This will prompt a new window.
- In this window, do the following:
- Contact custom field - Select the field that you created for sender name and sender address.
- Merge tag – This is a tag replaced by the data from your contact details. You can have merge tags as $[UD:ACCOUNTMANAGER]$ for sender name and $[UD:AMEMAILADDRESS]$ for sender address.
Personalize sender details using Zoho CRM Data
Using Zoho Campaigns, you can send an email campaign with a personalized sender name and email address of a Contact/Lead owner who is associated with that record in CRM.
What is alternate sender name and sender email?
If the Contact/Lead owner's name/email address is not present in Zoho CRM, then you can add value in Alternate sender name and email which will be used to send the campaign.
Note: To avail this enhancement, the user must have integrated Zoho Campaigns with their Zoho CRM account and have at least one active sync running.
Using Zoho CRM data to personalize the content
You can also use CRM based merge tags, which automatically pull information from your CRM account. All you need to do is add relevant merge tags in your campaign content. The merge tags pull specific data from CRM based on how the information is requested within the email content.
This means you need to be cautious in placing the merge tags in an appropriate way. If a record field has missing data, you can provide a default value to replace the missing information in email content. For instance, if the merge tag for account manager's name is $[CRM:CONTACTOWNER]$, you can add a default value and social default value similar to this $[CRM:CONTACTOWNER | Patricia Boyle | Patricia]$.
Related Articles
How do I personalize the body of a triggered email with custom variables, URL parameters, or information from their response?
To personalize the content of your triggered email: Click the Hub tab. Click the Triggers section. Click Create in the Trigger Emails section. After filling in the From , Sender name , To , and Subject fields, you can write the body for the ...How do I edit and personalize the contents of the email invite being sent for my survey?
To edit the contents of the email: Go to the Launch tab. Click Distribution on the left pane. You can access this only after you publish the survey. The email distribution option is the default selection. Click Create Email to send and track ...How do I personalize the subject of a triggered email with custom variables, URL parameters, or information from their response?
To personalize the subject of your triggered email: Click the Hub tab. Click the Triggers section. Click Create in the Trigger Emails section. After filling in the From , Sender name , and To fields, you can add a subject for the trigger ...How can I personalize my subject line using my contact's name?
You can personalize the subject line by inserting the merge tag for the contact's first name $[FNAME|Contact]$. When your contacts see their own name in an email subject line, it will awaken their curiosity and make them more likely to open the ...Email Subject
Email subject line is the bridge between your subscriber and your email. Subject is one of the few things that your recipients notice before opening the email, the others being sender name and pre-header. Subject lines aren't always easy to write, ...