Project layouts & fields
What is a layout?
A project layout is used to create a form where the project details are collected. You can create different project layouts based on your project requirements.
Initially, all projects will be associated with the standard layout. If the standard layout is modified, the changes will be reflected in all the associated projects.
What is a section?
A set of sections form a layout. Similar attributes are placed inside a section. Every project layout will have two default sections - Project Information and Budget. You can also create your own section and use it in your layout. Learn more about customizing sections.
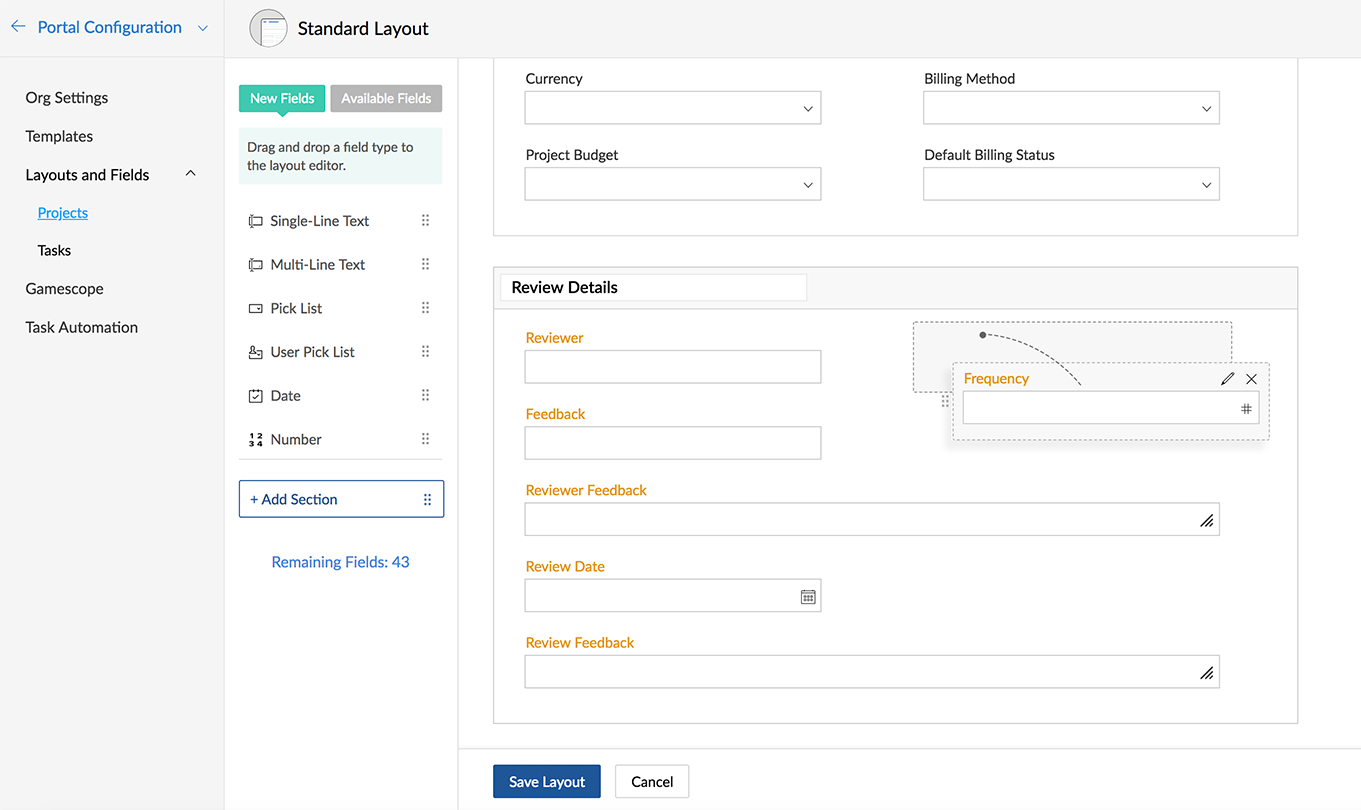
A section named Schedule Reviews can accommodate fields such as First Review, Second Review, and Third Review.
What is a field?
Customize fields to collect project details based on your project requirements. You can add a new field or an existing field to your layout.
The default fields can neither be edited nor deleted. They can only be reordered. The following are the default fields in Project Information and Budget sections of a project layout.
- The fields - Start Date, End Date, Project Overview, Status, Group Name, and Completion Percentage are the default fields in the Project Information section.
- The fields - Currency, Billing Method, Project Budget, and Default Billing Status are the default fields in the Budget section.

- Feature Availability: Enterprise plan
- Navigate to
 > Portal Configuration > Layouts and Fields > Projects to create custom fields for projects. If you are an admin but unable to access the above path, write to support@zohoprojects.com
Standard layout
- Every project will have a default layout called the Standard Layout. All the projects in the portal will be associated with this layout.
- The standard layout has two default sections - Project Information and Budget.
- The fields - Start Date, End Date, Project Overview, Status, Group Name, and Completion Percentage are the default fields in the Project Information section.
- The fields - Currency, Billing Method, Project Budget, and Default Billing Status are the default fields in the Budget section.
- The fields - Start Date, End Date, Project Overview, Status, Group Name, and Completion Percentage are the default fields in the Project Information section.
- The default fields can neither be edited nor deleted.
- You can add new sections and fields to the standard layout. Learn more about customizing sections.
Create layout
- Click
 in the upper-right corner of the top navigation bar.
 - Navigate to Portal Configuration > Layouts and Fields > Projects.
- Click Create Layout in the upper-right corner.
- Select a base layout that you want to build (clone) your new layout on. If you haven't created any layouts, the standard layout will be listed in the drop-down.
- Enter a Layout Name.
- In Layout Permissions, select the user profiles who can access the project layout.
- Click Create.
- Only the user based Enterprise plan can access this feature.
- A maximum of 40 layouts can be created.
- A layout can be associated while creating or editing a Project. You can also associate the layouts while creating or editing a Project Template.
- When a project is switched from Layout A to Layout B, the common fields available in A and B will be retained, however, the fields which are not common to the layouts will not be available and their data will be lost.
- Associating a project with a layout will overwrite its current layout mapping if any.
Associate layout with user profiles
- Click in the upper-right corner of the top navigation bar.
- Navigate to Portal Configuration > Layouts and Fields > projects.
- Click the plus icon
 to the right of the selected layout.
 - Select one or more user profiles from the drop-down to associate.
- Confirm your action.
- Click Associate.
- To view the list of associated user profiles of any layout, navigate to > Layouts and Fields > projects > Layouts.
- The associated user profile names will be displayed below every layout.
View or edit layout
- Click in the upper-right corner of the top navigation bar.
- Navigate to Portal Configuration > Layouts and Fields > Projects.
- In the Layouts section, you can view the list of project layouts that have been created already.
- The layouts that are listed can neither be deleted or reordered.
- You can associate a layout with any user profiles who can access that layout.
- The layouts that are listed can neither be deleted or reordered.
- Click the layout you want to edit, do the necessary changes, and save.
Delete layout
- Click in the upper-right corner of the top navigation bar.
- Navigate to Portal Configuration > Layouts and Fields > projects.
- Click the Layouts section.
- Hover over a layout that you would like to delete and click the trash icon
 .
. - Confirm your action.
- Hover over a layout that you would like to delete and click the trash icon
Create or edit section
A set of sections form a layout. Similar attributes are placed inside a section. The standard layout of the project will have two default sections- Project Information and Budget. You can also create your own section and use it in the standard layout.
- Click in the upper-right corner of the top navigation bar.
- Navigate to Portal Configuration >Layouts and Fields > Projects.
- Click a layout to add a section.
- Drag and drop the +Add Section component from the left tray to the layout editor (main panel). Initially, the sections will be named "Untitled Section", "Untitled Section 1", "Untitled Section 2" and so on as you keep adding new sections in the layout editor.
- Hover over the section name and edit it.
- You can also add new or existing custom fields to your section.
- You can also add new or existing custom fields to your section.
- Click Save Layout.
Delete section
- Click in the upper-right corner of the top navigation bar.
- Navigate to Portal Configuration > Layouts and Fields > Projects.
- Click a layout to delete a section in the layout.
- Hover over the section and click the trash icon.
- The icon will be visible only when all the custom fields inside the section are removed. We recommend you to remove the custom fields first and then delete the section.
- The
- Confirm your action.
Create custom fields
- Click in the upper-right corner of the top navigation bar.
- Navigate to Portal Configuration > Layouts and Fields > Projects.
- Click a layout to add a custom field.
- Drag and drop a field type from the New Fields tray into the layout editor (main panel).
- Set a Default Value if necessary.
- Select Mandatory checkbox if you want the field to be filled compulsorily.
- Select Insert Tooltip checkbox if you want to set tooltip information for the field.
- Click Add to Layout to include the field in the layout. When you Cancel, the field is never stored anywhere.
You can create the following custom fields:
- Single-line text field: Add one line of text. This field can be marked as Personally Identifiable Information (PII). If you select Encrypt Field, the data will be encrypted at the backend.
- Multi-line text field: Add multiple lines of text. Hit Enter to key in more information. This field can be marked as Personally Identifiable Information (PII). If you select Encrypt Field, the data will be encrypted at the backend.
- Pick List field: Create your own drop-down using a pick list. Set values and wrap them under a pick list as per your business needs. Enter valid data in the editable text area and click Add Value. Click the cross icon
 beside a value to delete it.
 - Multi Select Pick List field: Create drop-downs with multiple selections.
- User Pick List field: Use this field when you have to store usernames.
- Multi User Pick List: Use this field when you have to store and select multiple users from the drop-down.
- Date: Store dates in this field.
- Number: Store numbers in this field. A number can have a maximum of 19 digits. You can either store an integer or a decimal in this field. This field can be marked as Personally Identifiable Information (PII). If you select Encrypt Field, the data will be encrypted at the backend.

- Phone: Store contact numbers in this field. This field can be marked as Personally Identifiable Information (PII). If you select Encrypt Field, the data will be encrypted at the backend.
- Email: Store email addresses in this field. This field can be marked as Personally Identifiable Information (PII). If you select Encrypt Field, the data will be encrypted at the backend.
- URL: Store URLs or links in this field. This field can be marked as Personally Identifiable Information (PII). If you select Encrypt Field, the data will be encrypted at the backend.
- A maximum of 105 custom fields can be created.
- These fields cannot be duplicated.
- Removing a field’s association from a layout will not incur data loss in the project. However, deleting a field from the portal will do so.
Edit custom field
- Navigate to > Portal Configuration > Layouts and Fields > Projects.
- Open the standard layout editor and hover over the custom field you would like to edit.
- Click the pencil icon
 .
. - Edit the field properties except the field name. You can change the field name also but the new name will be reflected in all the projects.
- Click Save Changes.
Custom fields can be edited only in the Enterprise plan.
Reorder custom fields
- Navigate to > Portal Configuration > Layouts and Fields > Projects.
- Open the standard layout editor and hover over the custom field you would like to reorder.
- Drag and swap with another field in the editor. You can reorder fields as many times as you want until you get the desired order.
- Click Save Field Order.
Remove custom field from layout
- Navigate to > Portal Configuration > Layouts and Fields > Projects.
- Open the standard layout editor and hover over the custom field you would like to dissociate.
- Click the cross icon
 .
. - Confirm your action.
- Removing a project custom field will not permanently delete it from the database.
- The custom field will be moved to the Available Fields tray and it can be reused anytime later from this tray.
- The data stored in the field will not be lost.
Delete custom field from portal
- Navigate to > Portal Configuration > Layouts and Fields > Projects > Fields.
- Hover over the field you would like to delete.
- Click the trash icon
 .
.- Deleting a custom field will affect all the projects in the portal.
- The data stored in the field will be lost.
- Deleting a custom field will affect all the projects in the portal.
- Confirm your action.
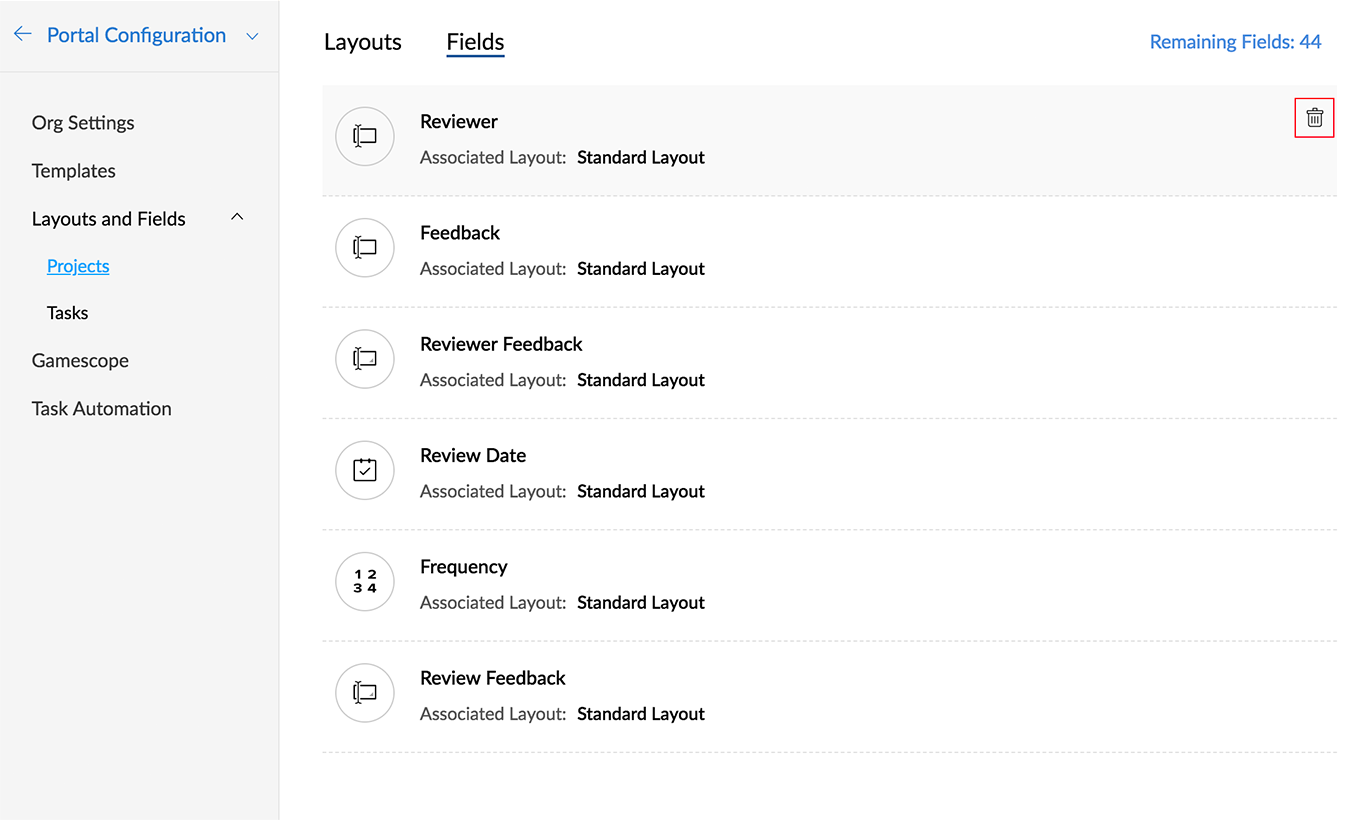 Deleting a field from a portal will permanently delete it from the database.
Create or edit custom project status
- Navigate to > Portal Configuration > Layouts and Fields > Projects.
- Click Standard Layout and hover over the Status field in the Project Information section.
- Click the Customize link with a gear icon at the top of the field.
- Click the +Add Status link to create a new status.
- Give a status name.
- Click
 or
or to the left of the status name to assign a color. Pick any color from the palette that matches the status name and type.
- Click
- Click Apply Changes.
Related Articles
Task layouts & fields
Zoho Projects supports custom fields and layouts for tasks. Create your own fields and task layouts and use them for creating tasks as per your business requirements. Click here to learn more about access privileges for Custom Fields and Task ...Issue layouts & fields
Feature availability Feature Availability: Enterprise plan Navigate to > Portal Configuration > Layouts and Fields > Issues to create custom fields and layouts for Issues. If you are an admin but unable to access the above path, write ...Create and manage layouts
Create your own custom layouts, associate it with relevant projects, and get your work done effortlessly. Available: Professional Accessibility: Only the Team Owner, Admin, and Manager can create, edit, and delete a layout. Members can't access ...Create and manage fields
Custom fields are the important aspect in shaping a layout. A layout is structured with a list of fields that are specific to your requirements. Once the user creates a layout they can start adding custom fields. Default Fields: The default fields ...Marking Personal Fields
GDPR defines personal data as any information relating to an identified or identifiable natural person (i.e. the data subject). There is a wide range of personal data that includes email addresses, location, mobile numbers, identification numbers, ...