Salesforce
Overview
Amplify the value of every other conversation that your users have with your visitors by integrating Salesforce - CRM with your SalesIQ account, as Salesforce improvises every nuance of customer relationship management. Salesforce records, accumulates, manipulates and manages the visitor data efficiently by drawing out valuable information out of the raw data procured. The information extracted is held in a common reserve thus every other user of the firm will have access to it, thus an user need not make a big study about the visitor by scrutinizing the details about him/her beforehand to understand the visitor's needs and assist them better, thus reducing the response time. Moreover, Salesforce automates a few tasks to take the big burdens like filling form data, generating reports, addressing certain legal issues, setting up follow up tasks for the visitors and remind the users periodically about the coming up events etc., off the users' shoulders thus leaving their focus over visitor's assistance undisturbed.
Integrating your Zoho SalesIQ account with a Salesforce account
Unravel the best techniques to bag customer satisfaction by integrating your Salesforce account with your SalesIQ account.
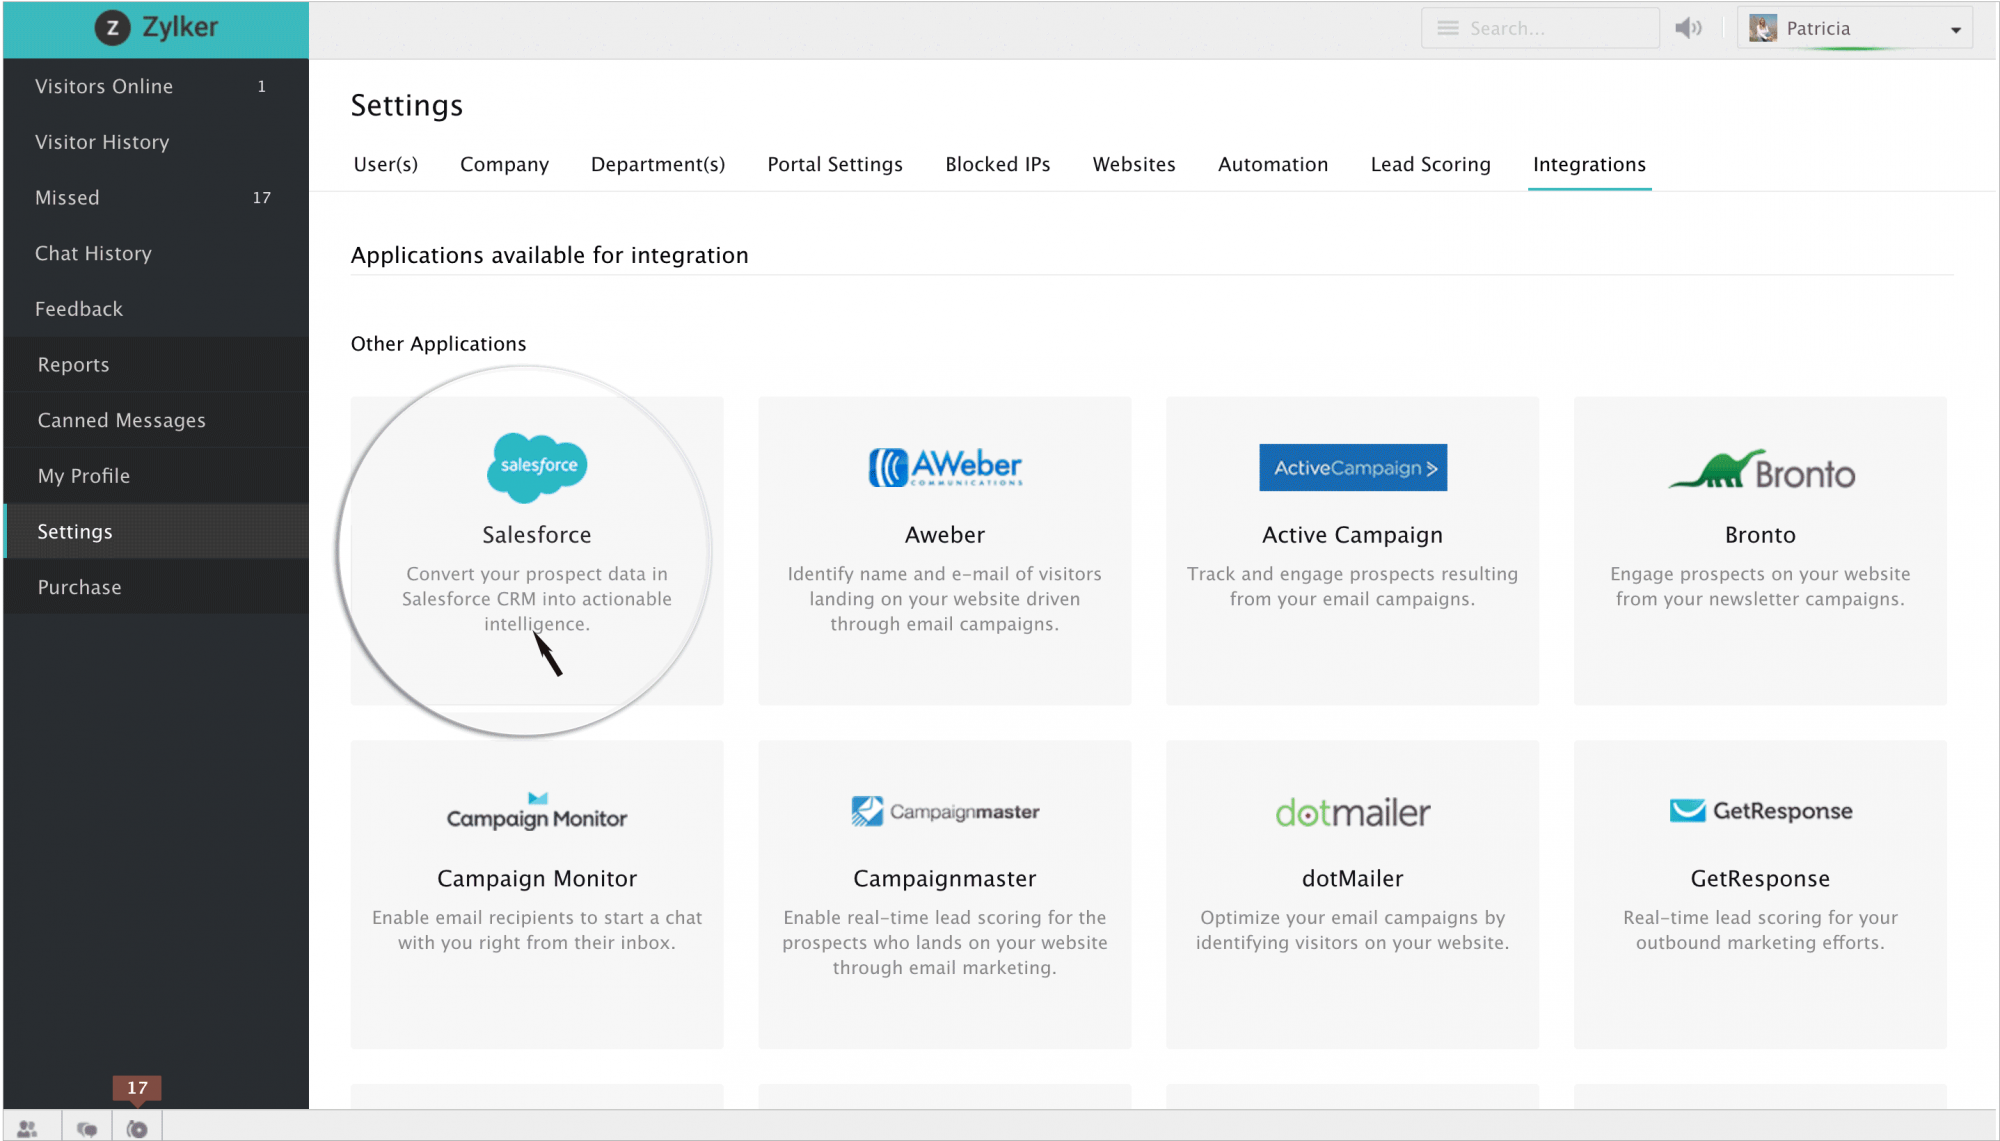
- Login into your “Zoho SalesIQ” account.
- Navigate through Settings -> Integrations -> Other Applications section.
- Choose "Salesforce".
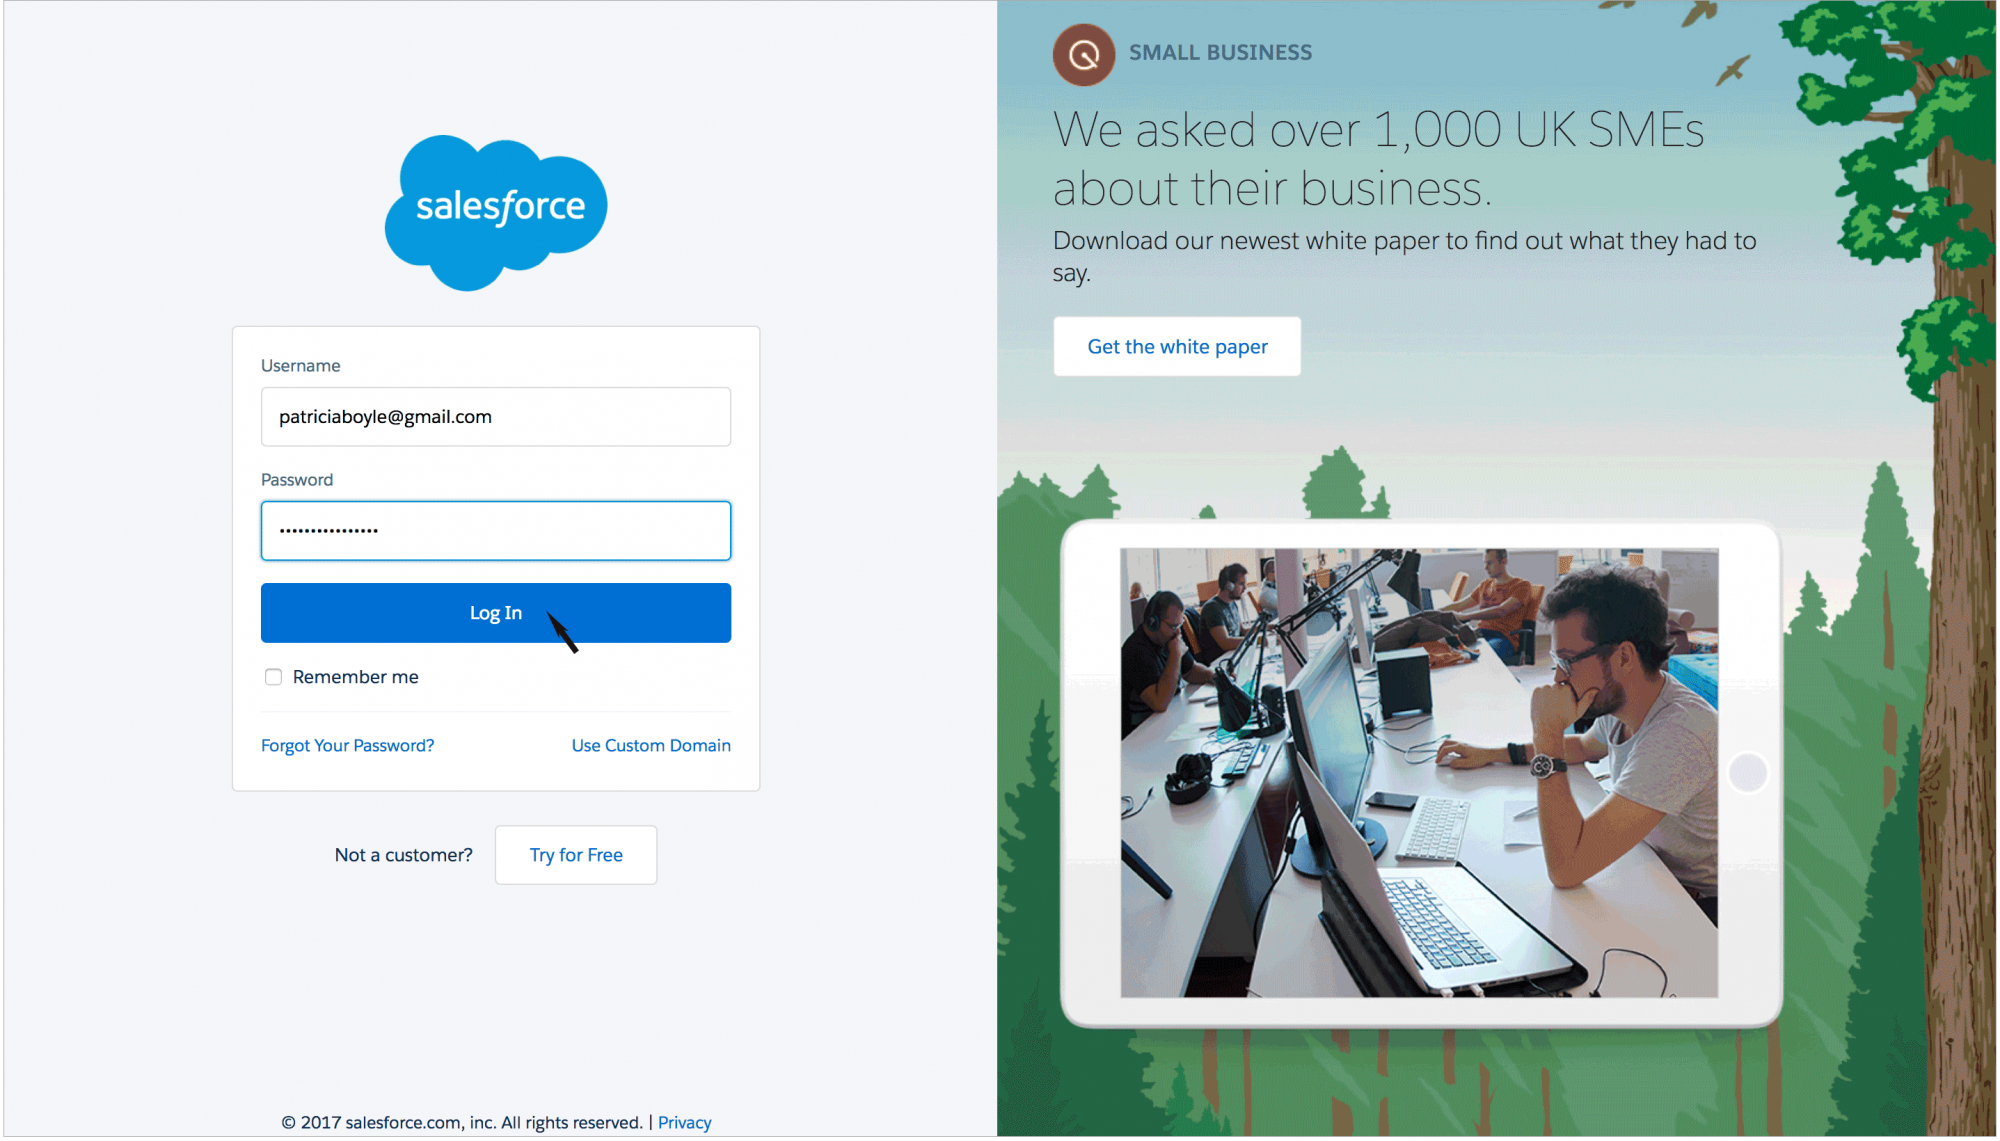
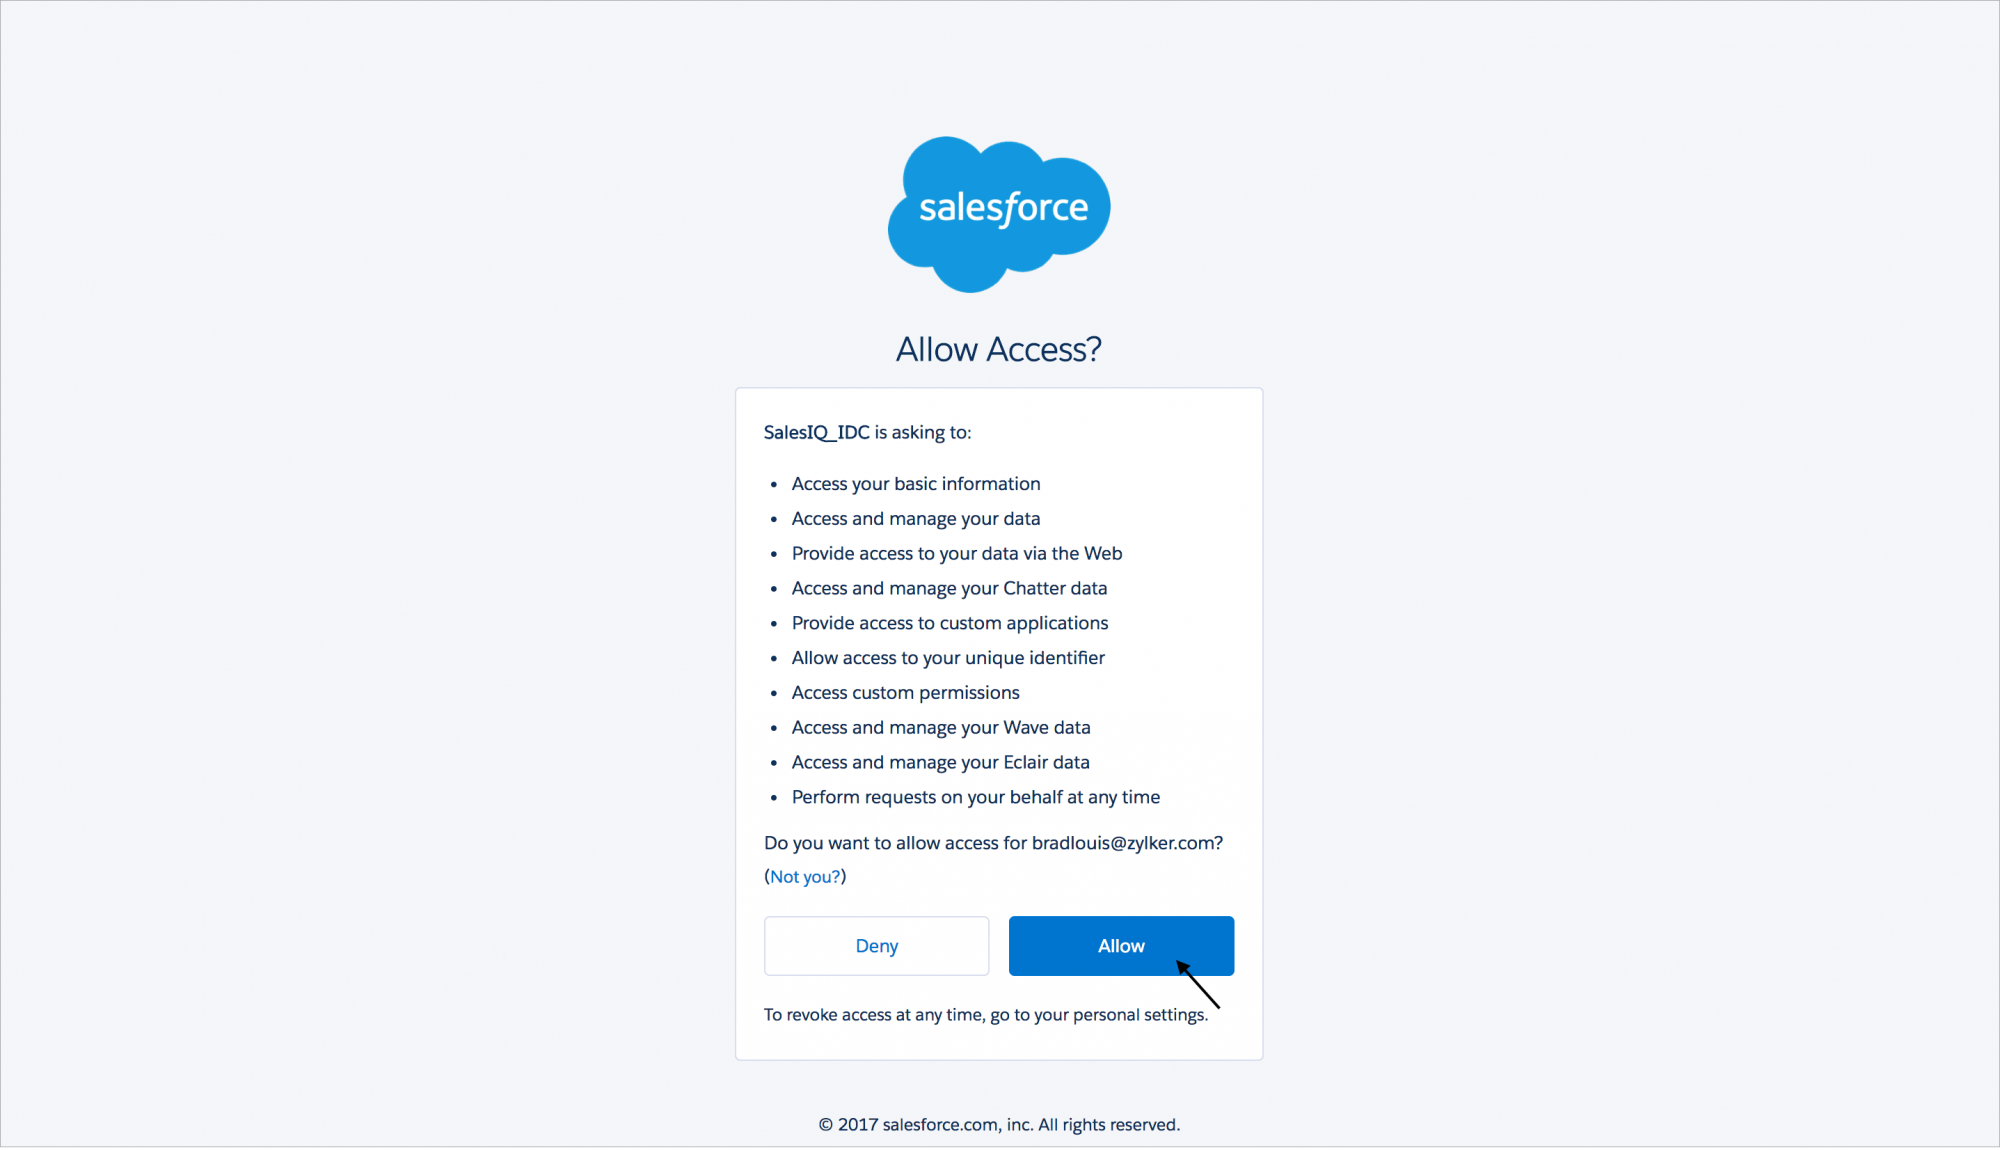
- You will be redirected to the Salesforce website, where you have to type in the login credentials of the Salesforce account, which you would want to integrate with your existing SalesIQ account.
- Then click on "Log in".
- After which a confirmation box appears, listing out the privileges that you would like to grant that particular SalesIQ account.
- By clicking on "Allow", SalesIQ will receive an OAuth token from Salesforce. Indicating a successful integration of the two accounts.
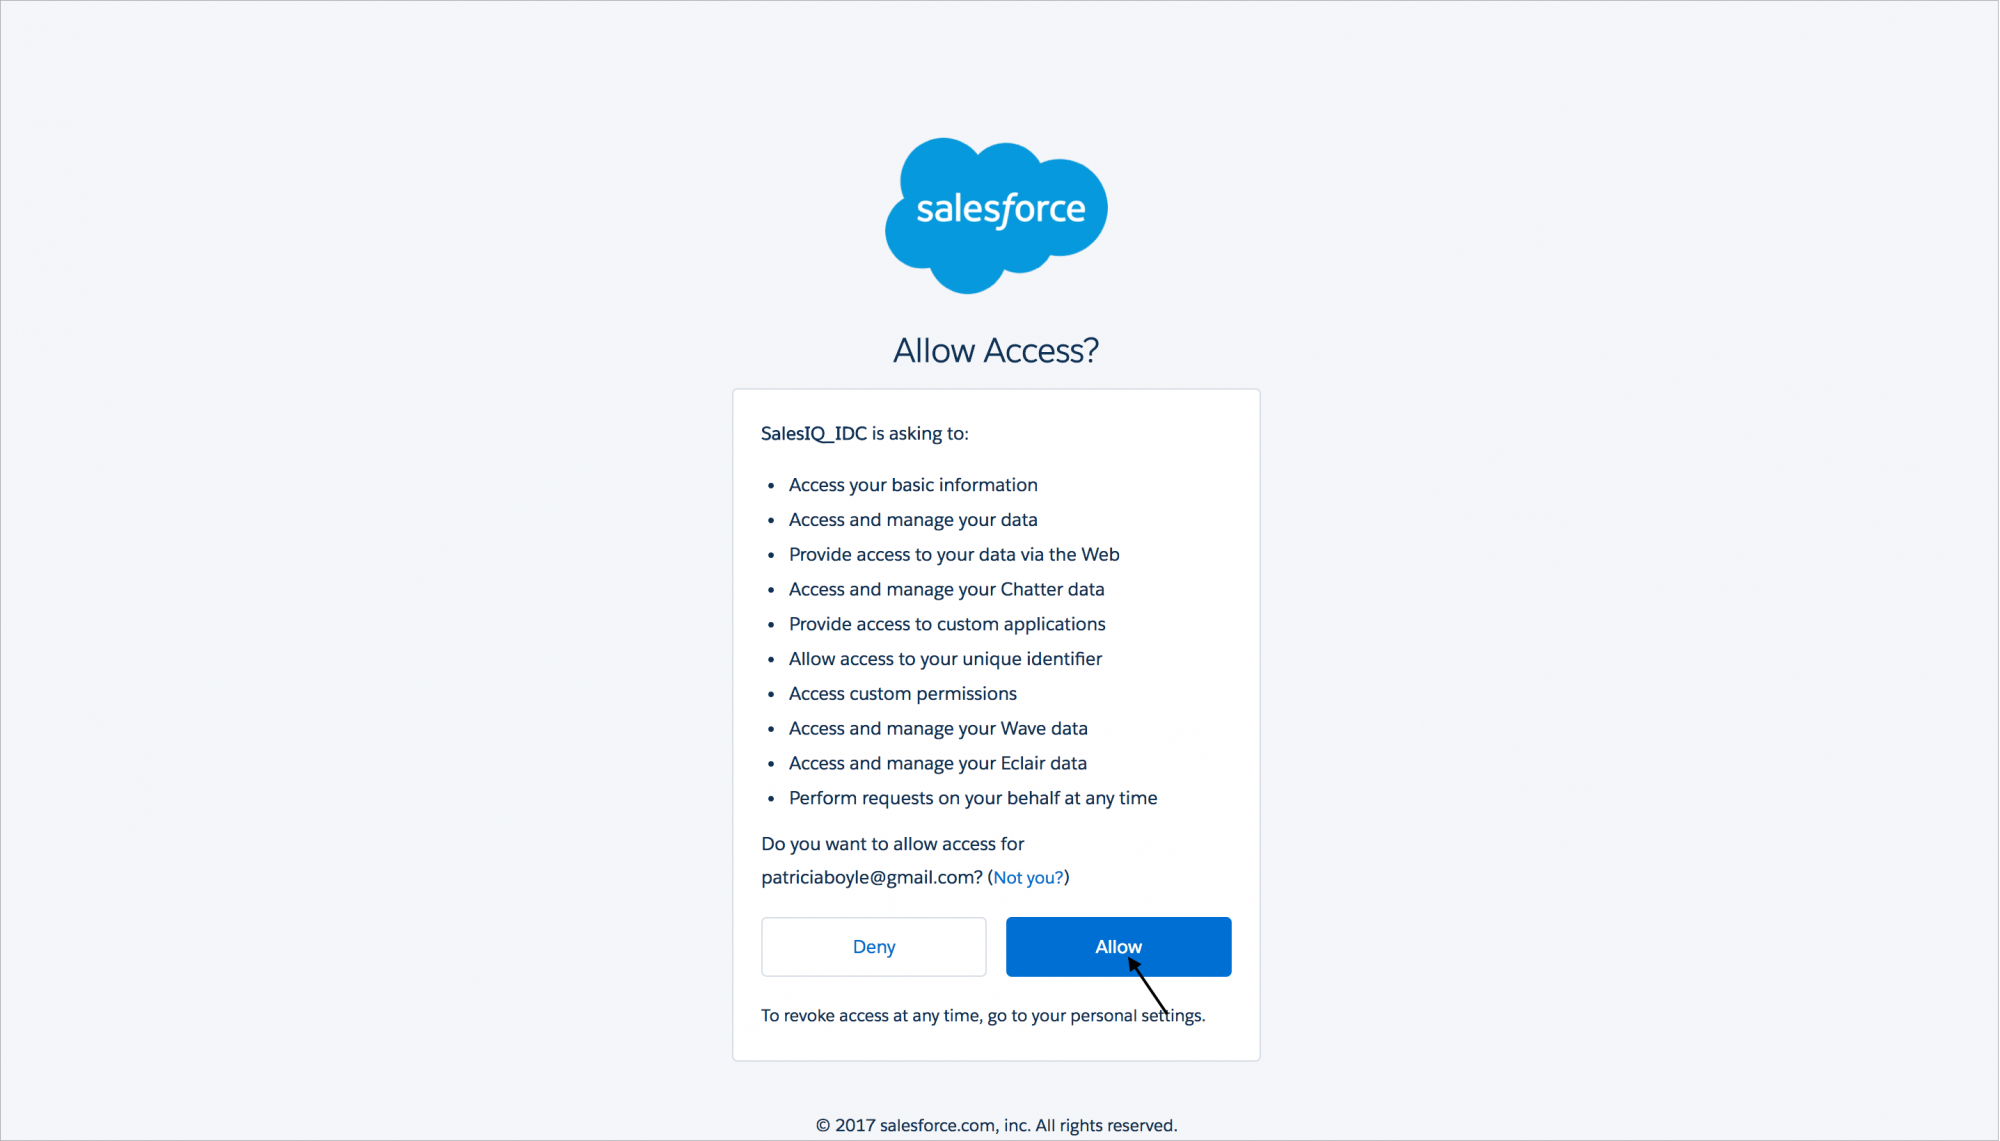
- Then you will be redirected back to the Salesforce integration page in your SalesIQ account.

- Integration of Salesforce with Zoho SalesIQ can be done only if you own a paid account of the former (developer edition will also do) as well as the latter. You can also avail this feature during the initial fifteen-day trial of Zoho SalesIQ.
- To use Salesforce's Apex Web Services API, you must be using any of these Salesforce editions (Enterprise Edition/Unlimited Edition/Developer Edition/Performance Edition). The API is enabled by default in these editions.
- Do remember that you can't enable Salesforce integration if you have already associated your SalesIQ with another CRM product, for instance, say, Zoho CRM.
Switch Salesforce accounts
- Navigate through Settings -> Integrations -> Salesforce
- Click on "Change" which you can find right beside the current Salesforce CRM administrator's name.

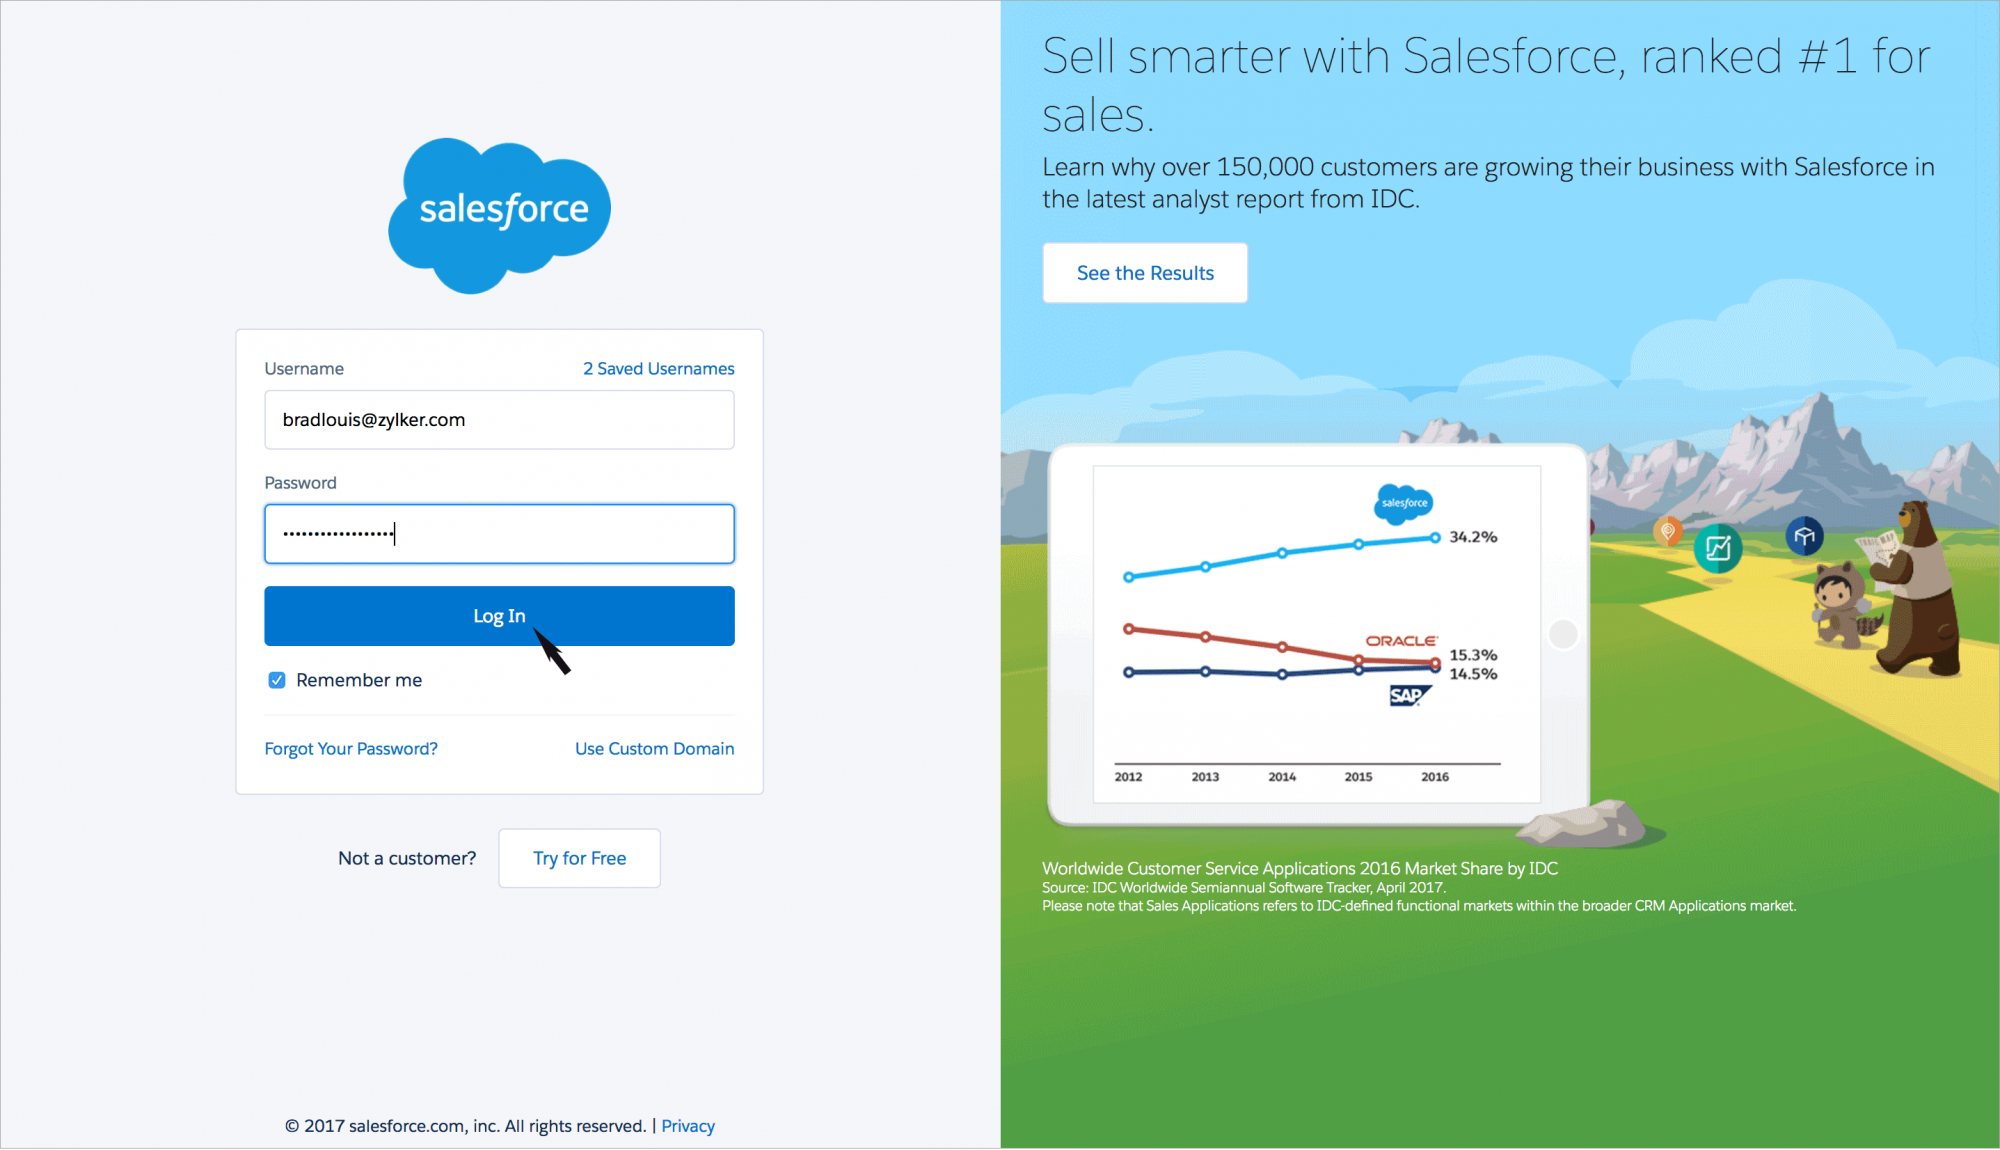
- You will be redirected to the Salesforce website, where you have to type in the log in credentials of the Salesforce account to which you would want to switch to.
- Then click on "Log in".
- After which a confirmation box appears, listing out the privileges that you would like to grant that particular SalesIQ account.
- By clicking on "Allow", SalesIQ will receive an OAuth token from Salesforce. Indicating a successful integration of the two accounts.
- Then you will be redirected back to the Salesforce integration page in your SalesIQ account.
Disable Salesforce integration with your SalesIQ account
- Navigate to Settings > Integrations > Salesforce.
- Click on the Disable button, which you can find in the top right corner of the window.
Enable the disabled Salesforce integration with your SalesIQ account
- Navigate through Settings -> Integrations -> Salesforce.
- Click on the "Enable" button, which you can find in the top right corner of the window.
Salesforce integration configurations
Once you are done integrating the two accounts, you would have to configure a bunch of settings to ensure that Salesforce functions according to your needs. Following sections would guide you through the Salesforce configurations set up.
Type of visitors to be pushed into your Salesforce account
Salesforce integration section allows you to choose the type of visitor base that you would like to push into your Salesforce account automatically.
- Only Missed – Missed visitors will alone be pushed.
- Only Attended - Visitors who had already been assisted by the users alone will be pushed.
- Only Accessed - Visitors who had browsed through your website alone will be pushed .
- Selecting all – Will push the entire visitor base of your website to your Salesforce account.
- Selecting None - Visitors will not be pushed into your Salesforce account automatically, yet you can push them in manually.
- Else you can also club two categories of visitor base and push them into your Salesforce account automatically as in "Attended AND Accessed", "Accessed AND Missed" and "Attended AND Missed"
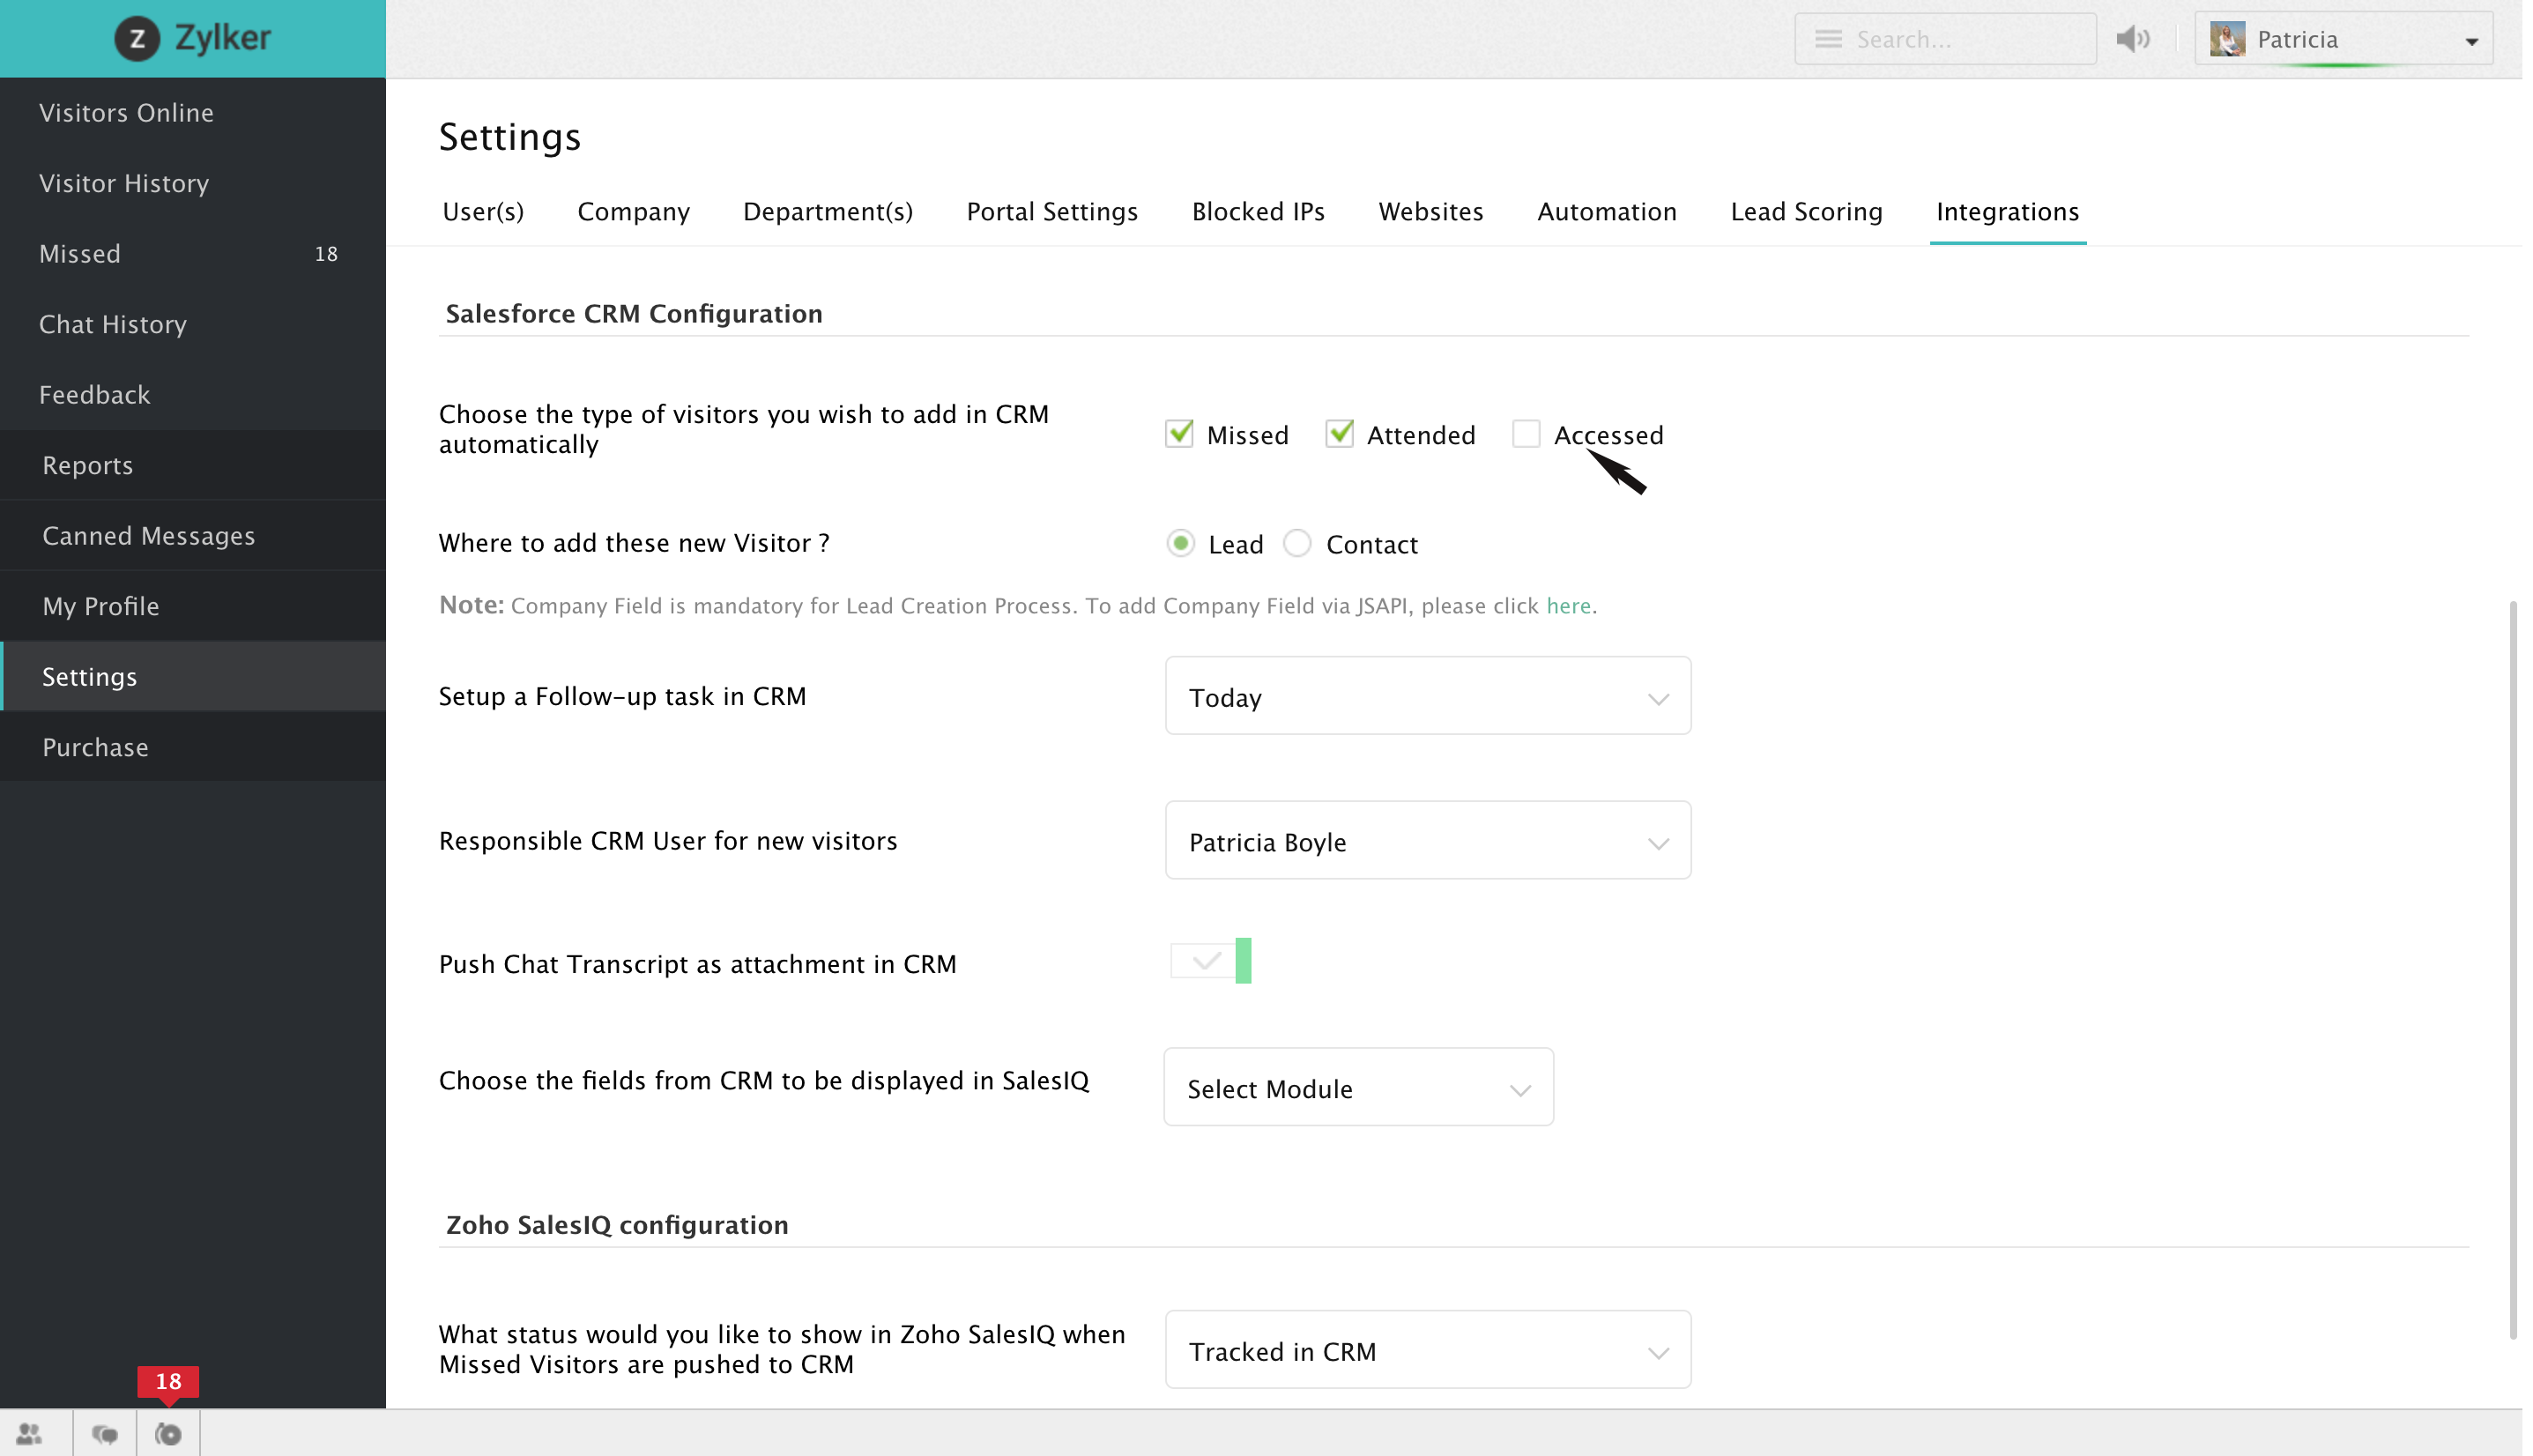
Add as Leads or Contacts
- After choosing the categories of visitor base to be pushed into your Salesforce account. Choose a tag for the filtered visitors which can either be Leads or Contacts.
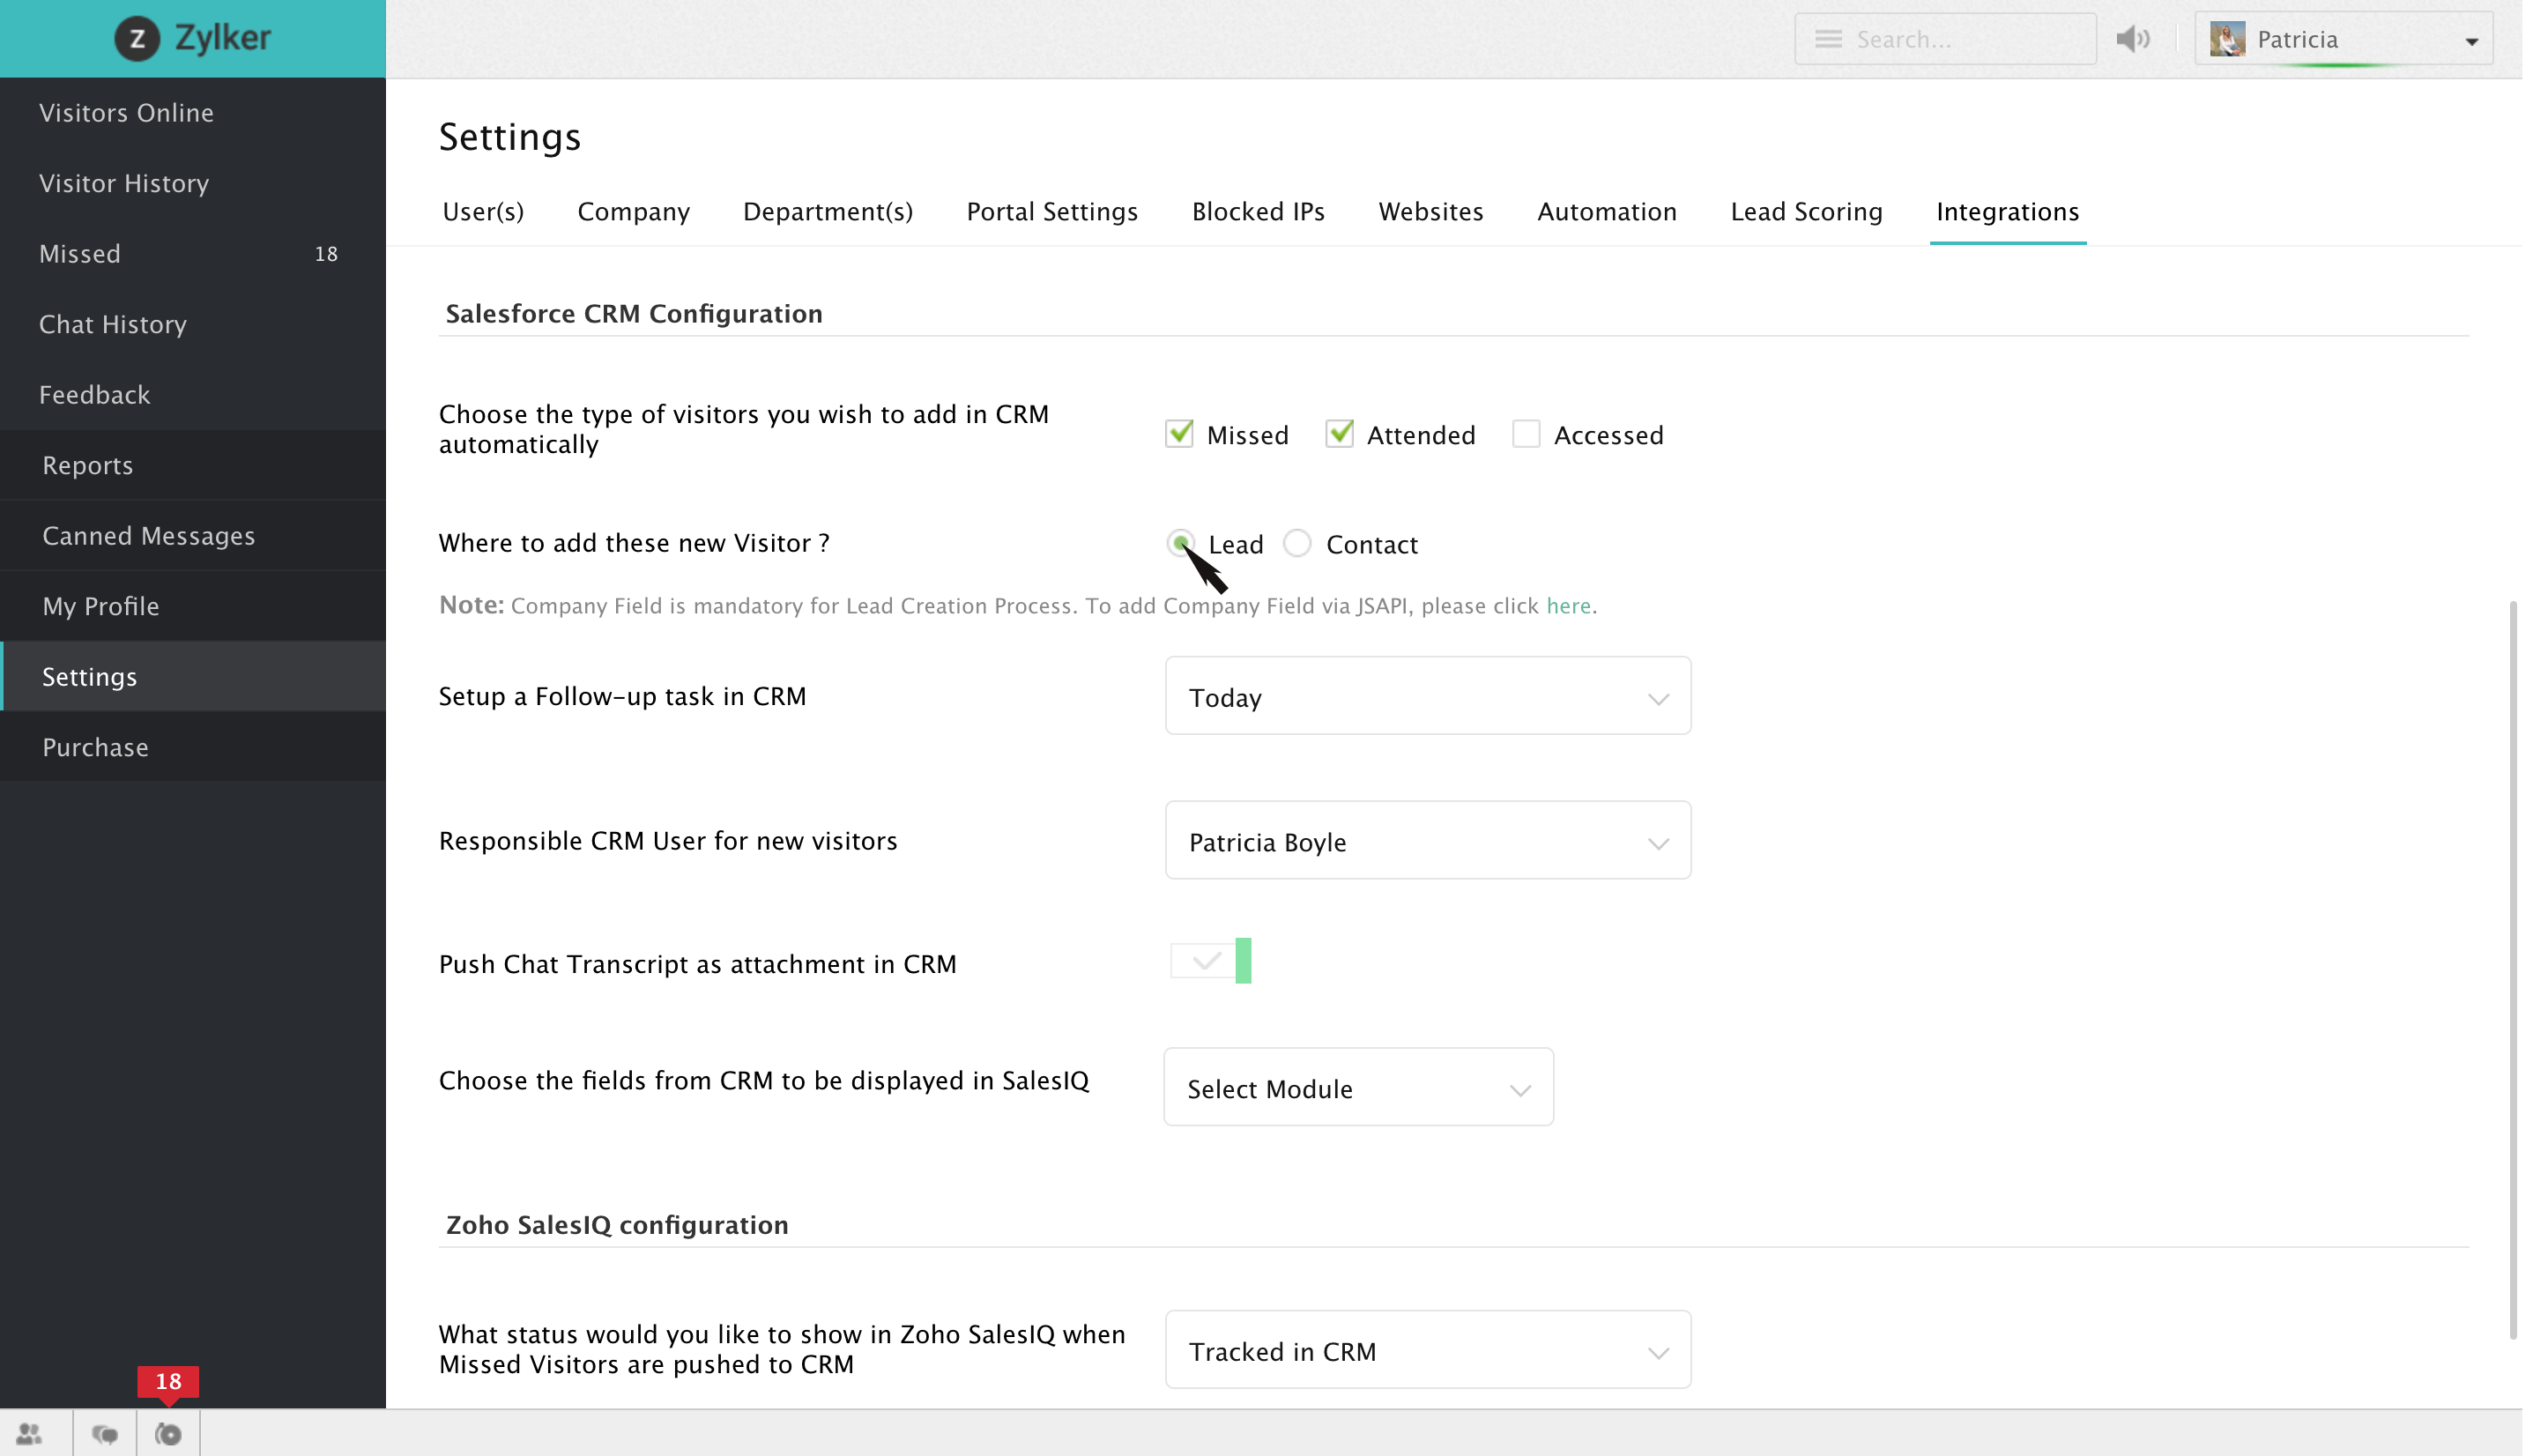
Heads up!!
- Do remember that all the visitors who would fall under the categories that you have chosen would automatically be pushed into your Salesforce account.
- For creating a lead it is necessary that the field " Company " is associated with a value.
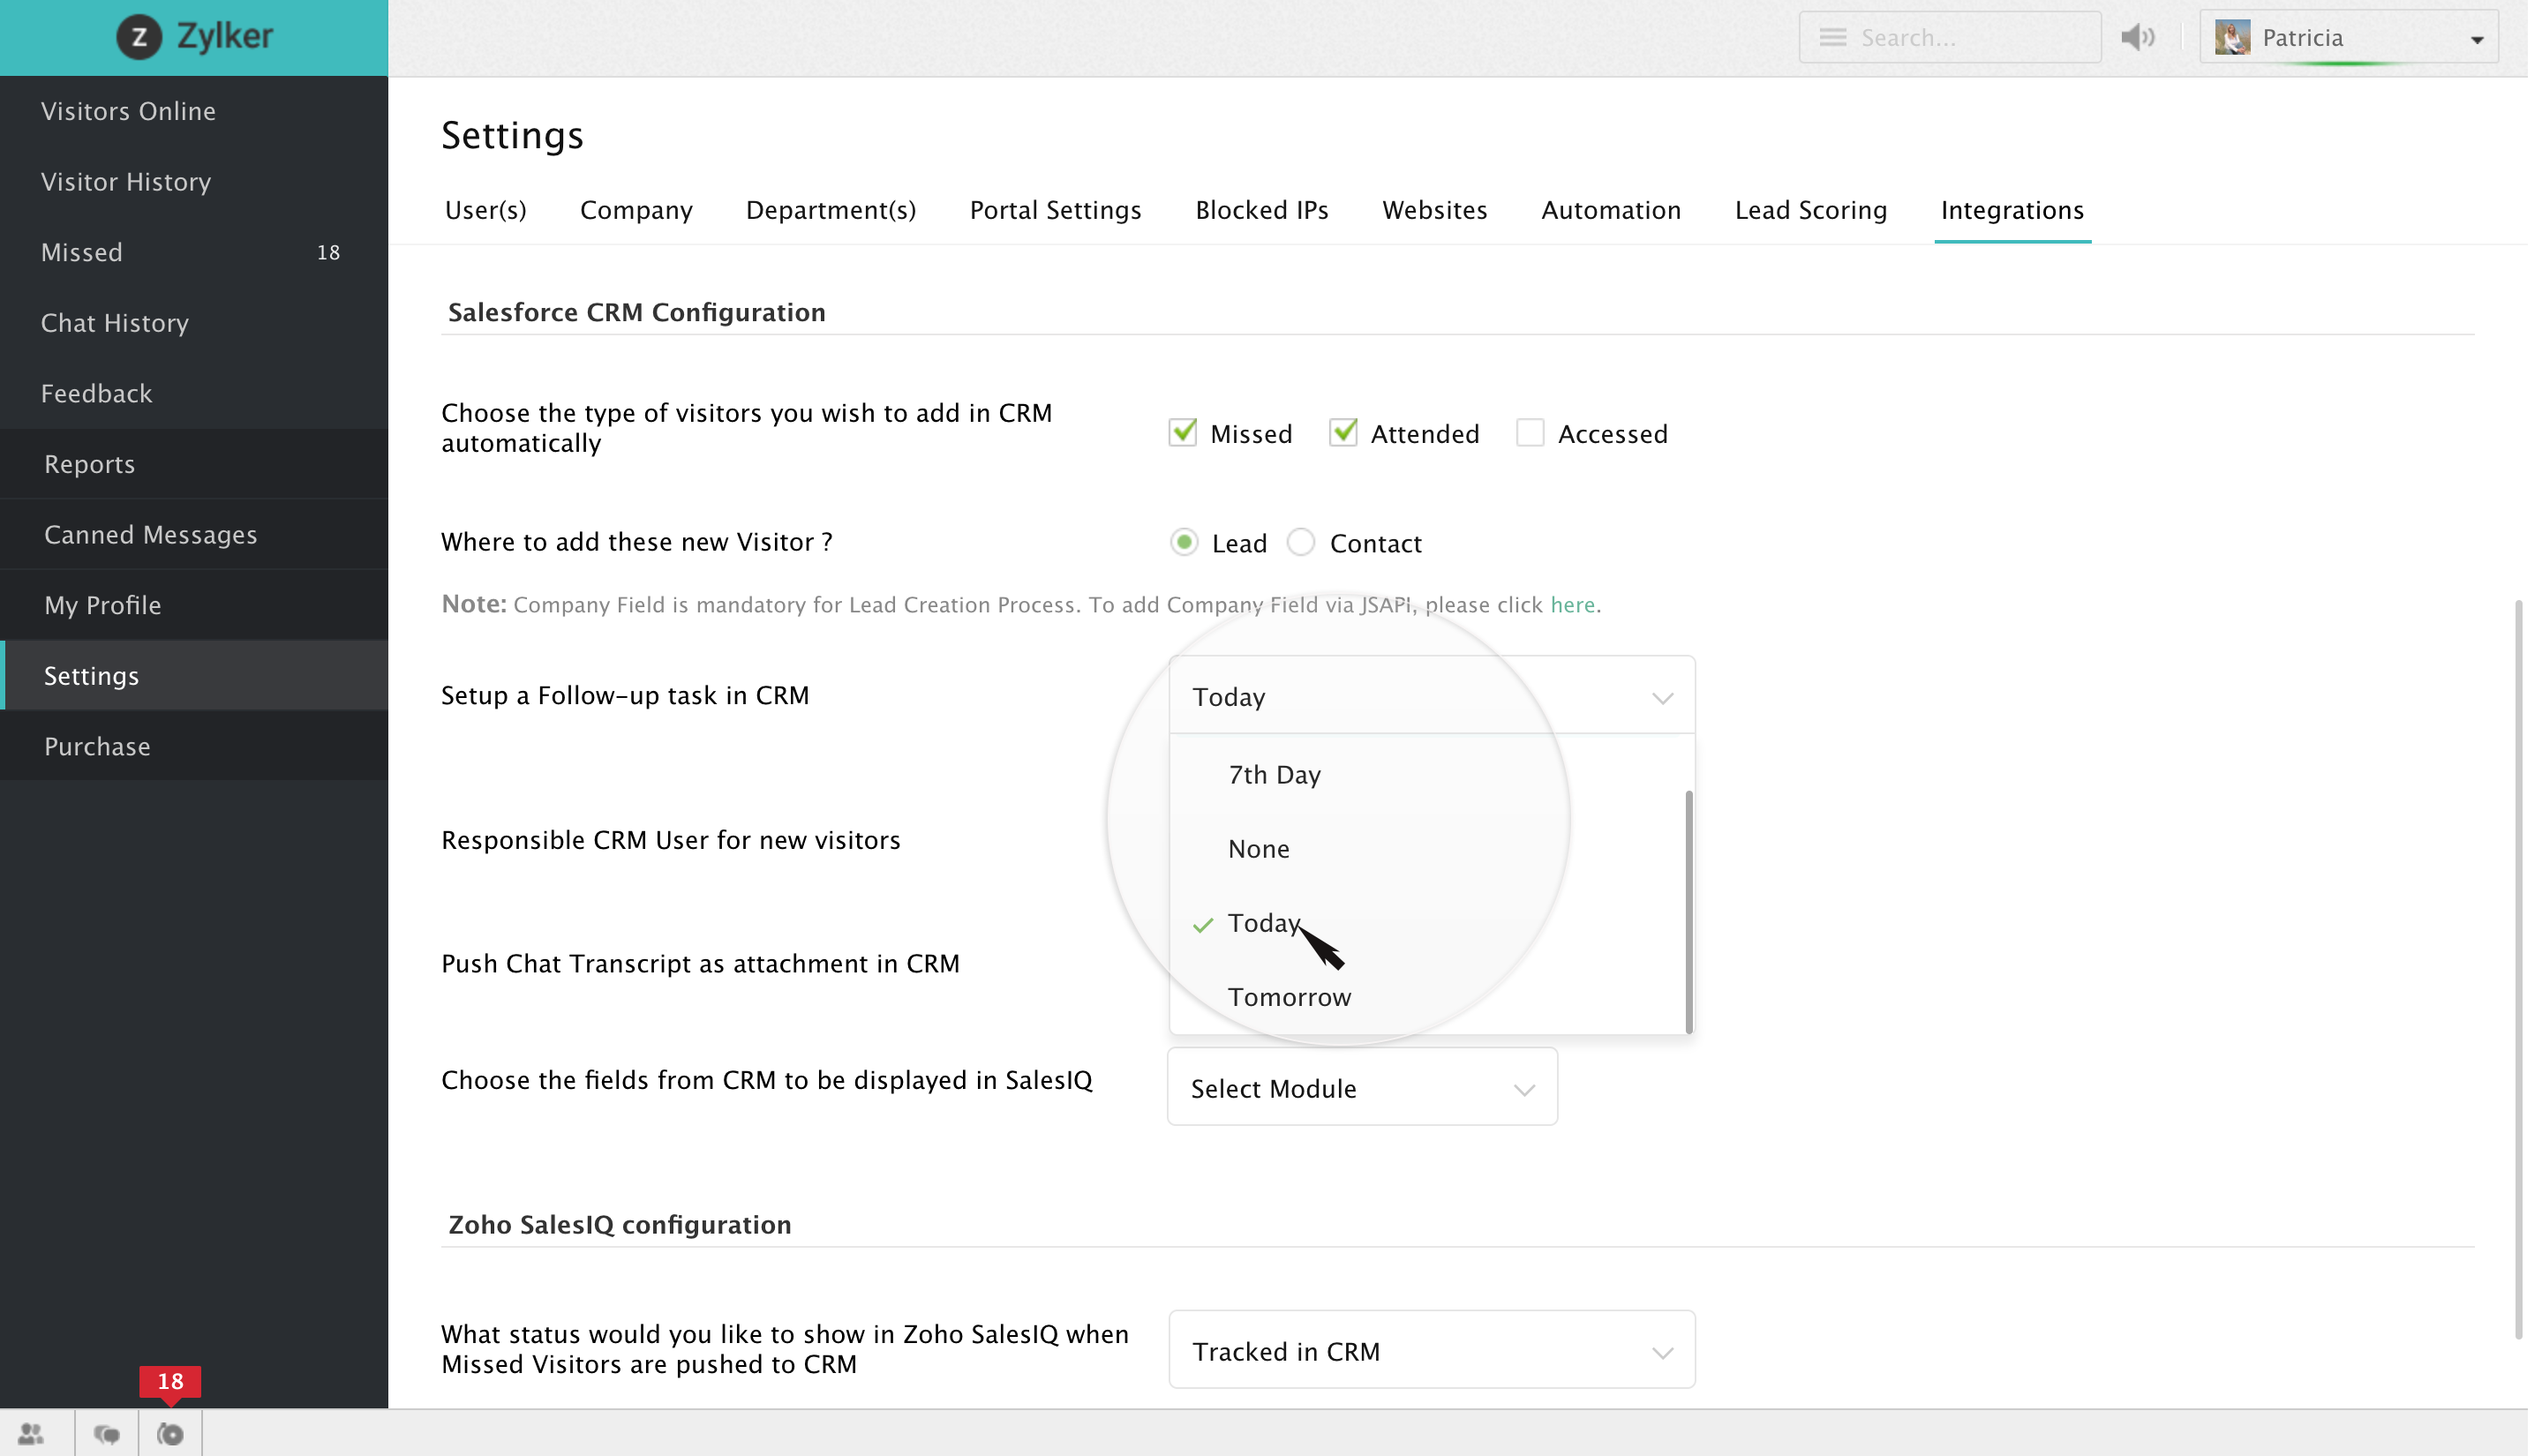
Automatically add a follow-up task
After choosing a tag for your filtered visitors, you can choose a time frame, within which you would like to set a follow-up task for the visitor base pushed into your Salesforce account to just keep track of them. The time frame can either be set for a week or two weeks or as today or tomorrow. If you do not really want to set a follow-up task for your filtered visitors then you can choose "None" in the drop-down box.
Operator responsible for the visitors pushed into your Salesforce
- Select the operator responsible for the filtered visitors by running through the list of Salesforce CRM operators in the drop-down box right beside the label "Responsible CRM user for new visitors"
- Else you can choose "Zoho SalesIQ Attender" if you would like to assign the visitors to the operators who have assisted them.
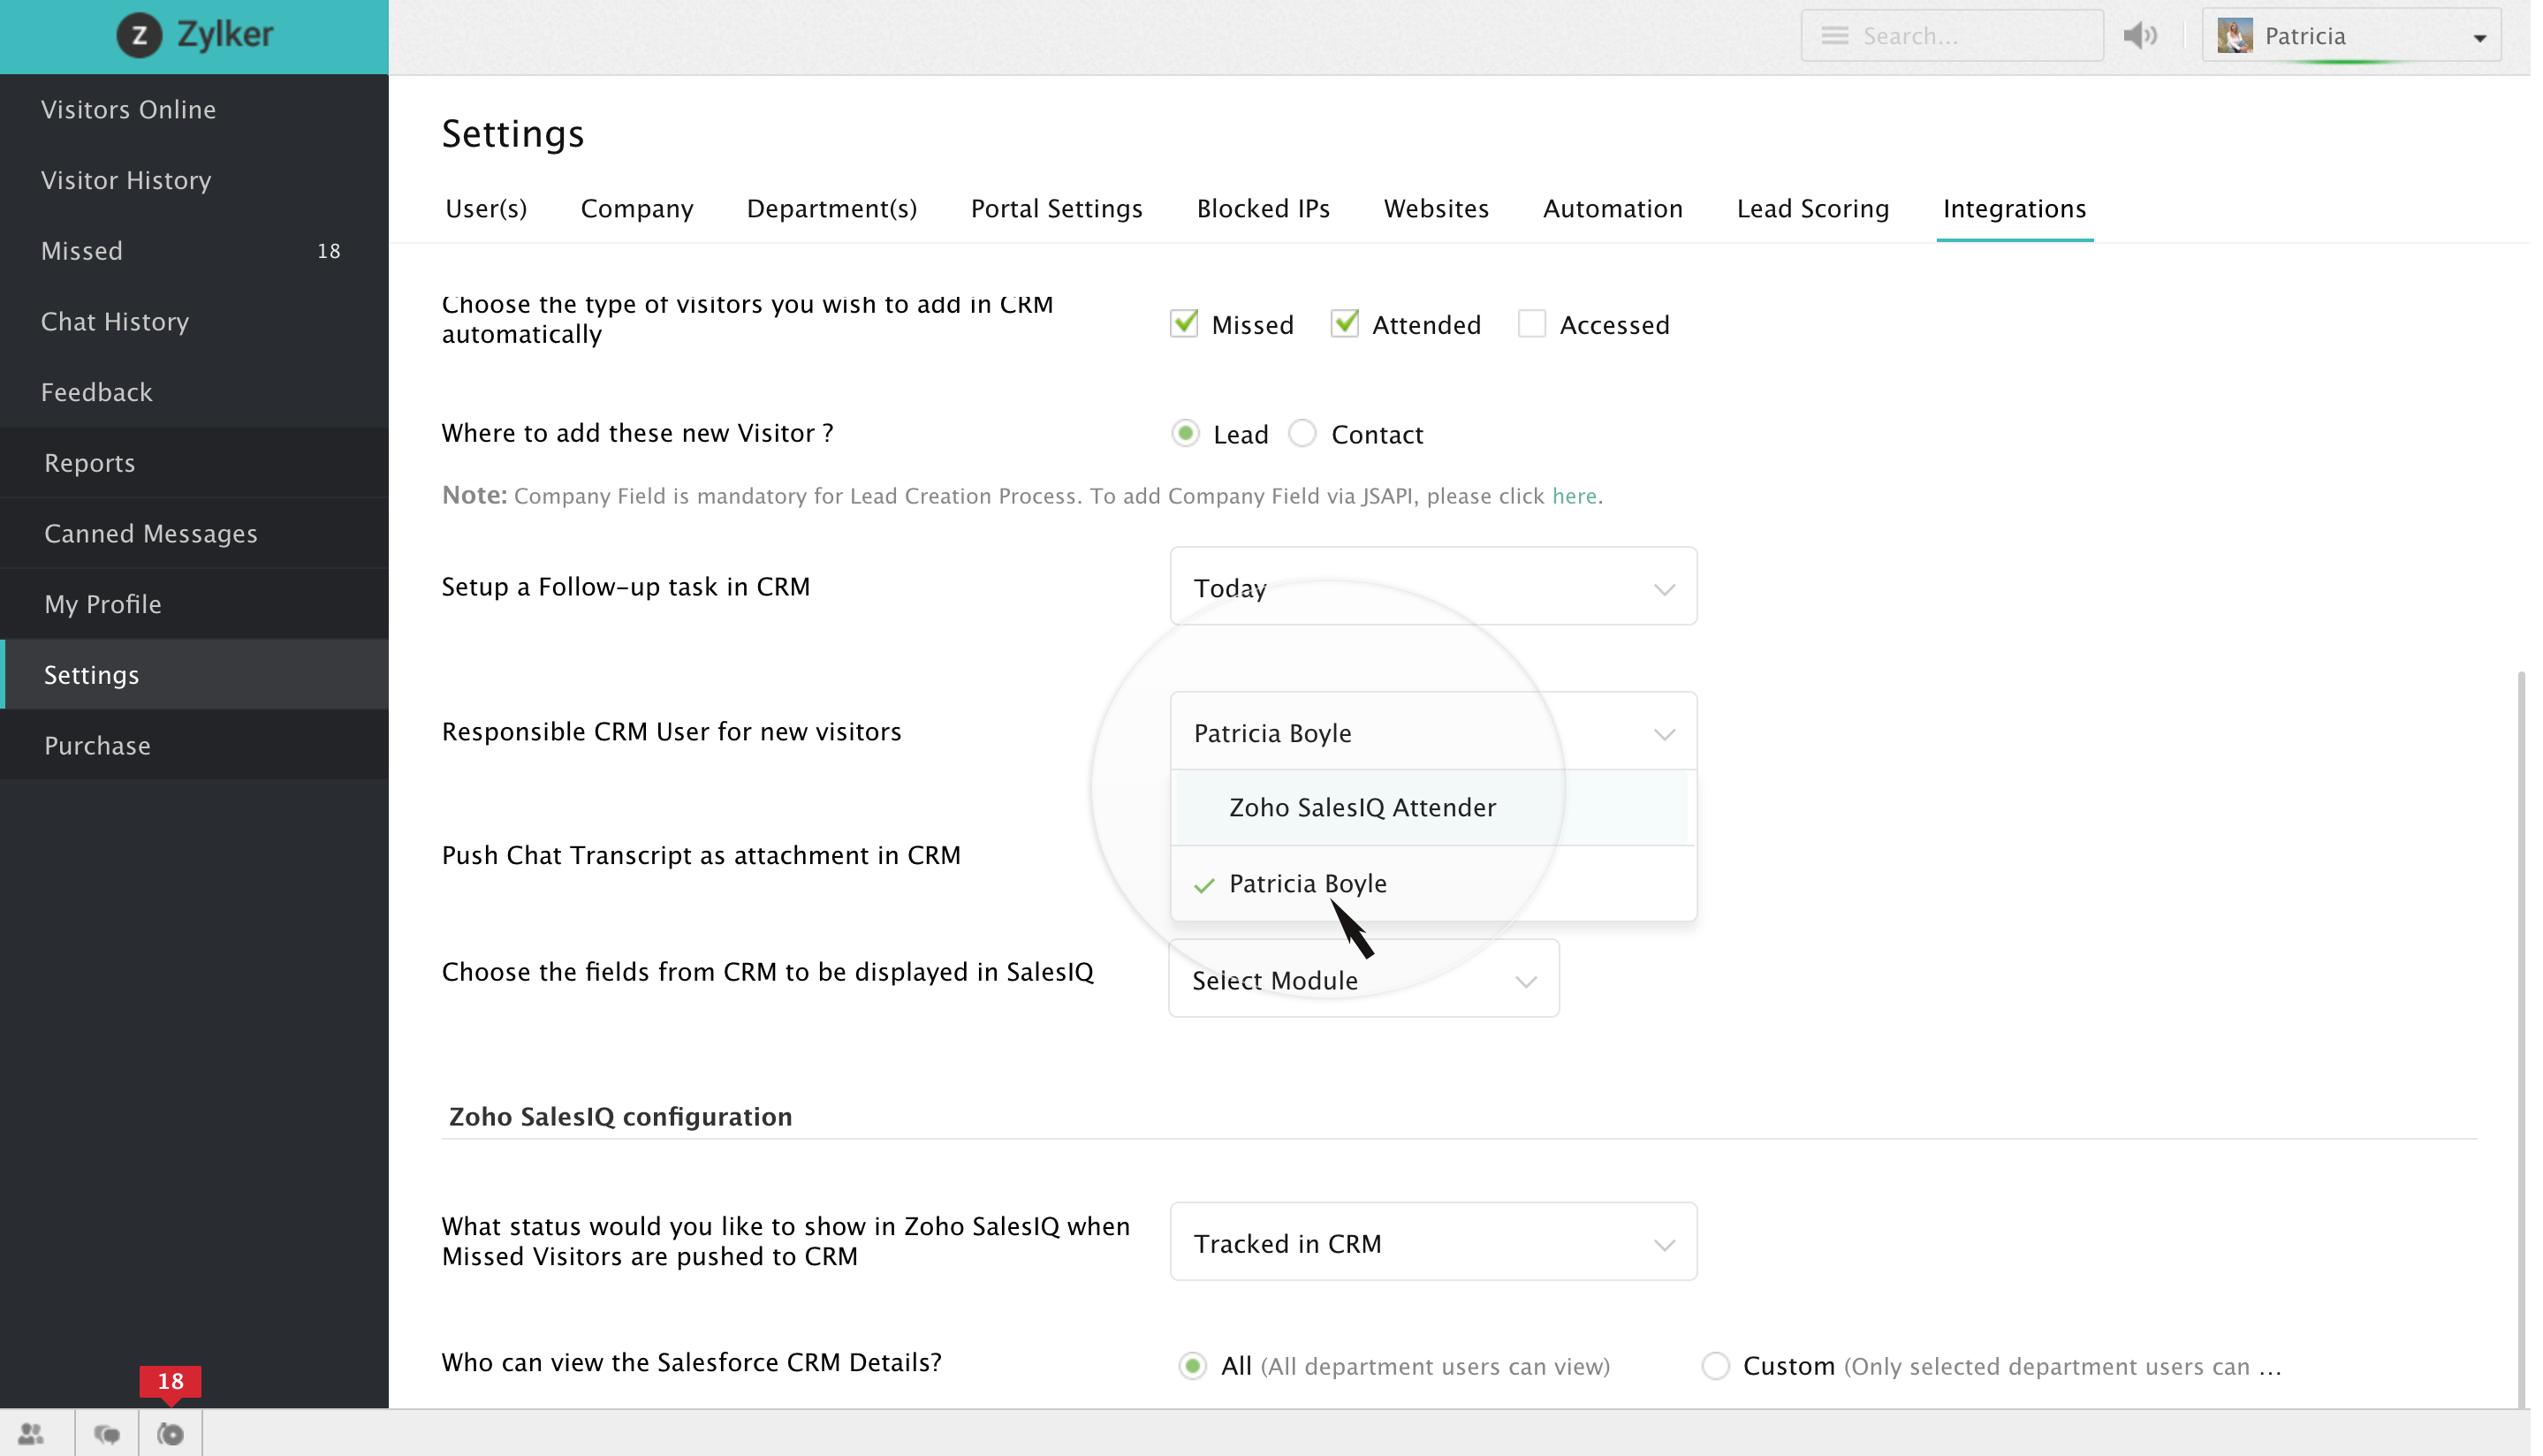
Heads up!!
- Do remember that if you choose to assign the visitors to the SalesIQ attender and if they aren't a part of your Salesforce account, then they will be assigned to the Salesforce admin.
Pushing your chat transcripts automatically
You can enable or disable the option for pushing the chat transcripts as an attachment to your Salesforce account automatically by just clicking on the slide bar right beside "Push chat transcript as an attachment in CRM".
Choose the Salesforce CRM fields to be displayed inside your SalesIQ account
- Here choose either one of the tags specified below,
- Contact
- Lead
- Opportunity
- Then choose the fields which you would like to display inside your SalesIQ account, after which you can drag and drop them into the box right beside the list. Similarly you can choose a bunch of fields for each tag depending upon your requirements.
- To delete a chosen field, click on that particular field once, a cross icon would appear, click on it to remove.

Zoho SalesIQ configurations
This section will guide you through the steps that you will have to follow to configure all the Zoho SalesIQ related settings in the Salesforce integration section.
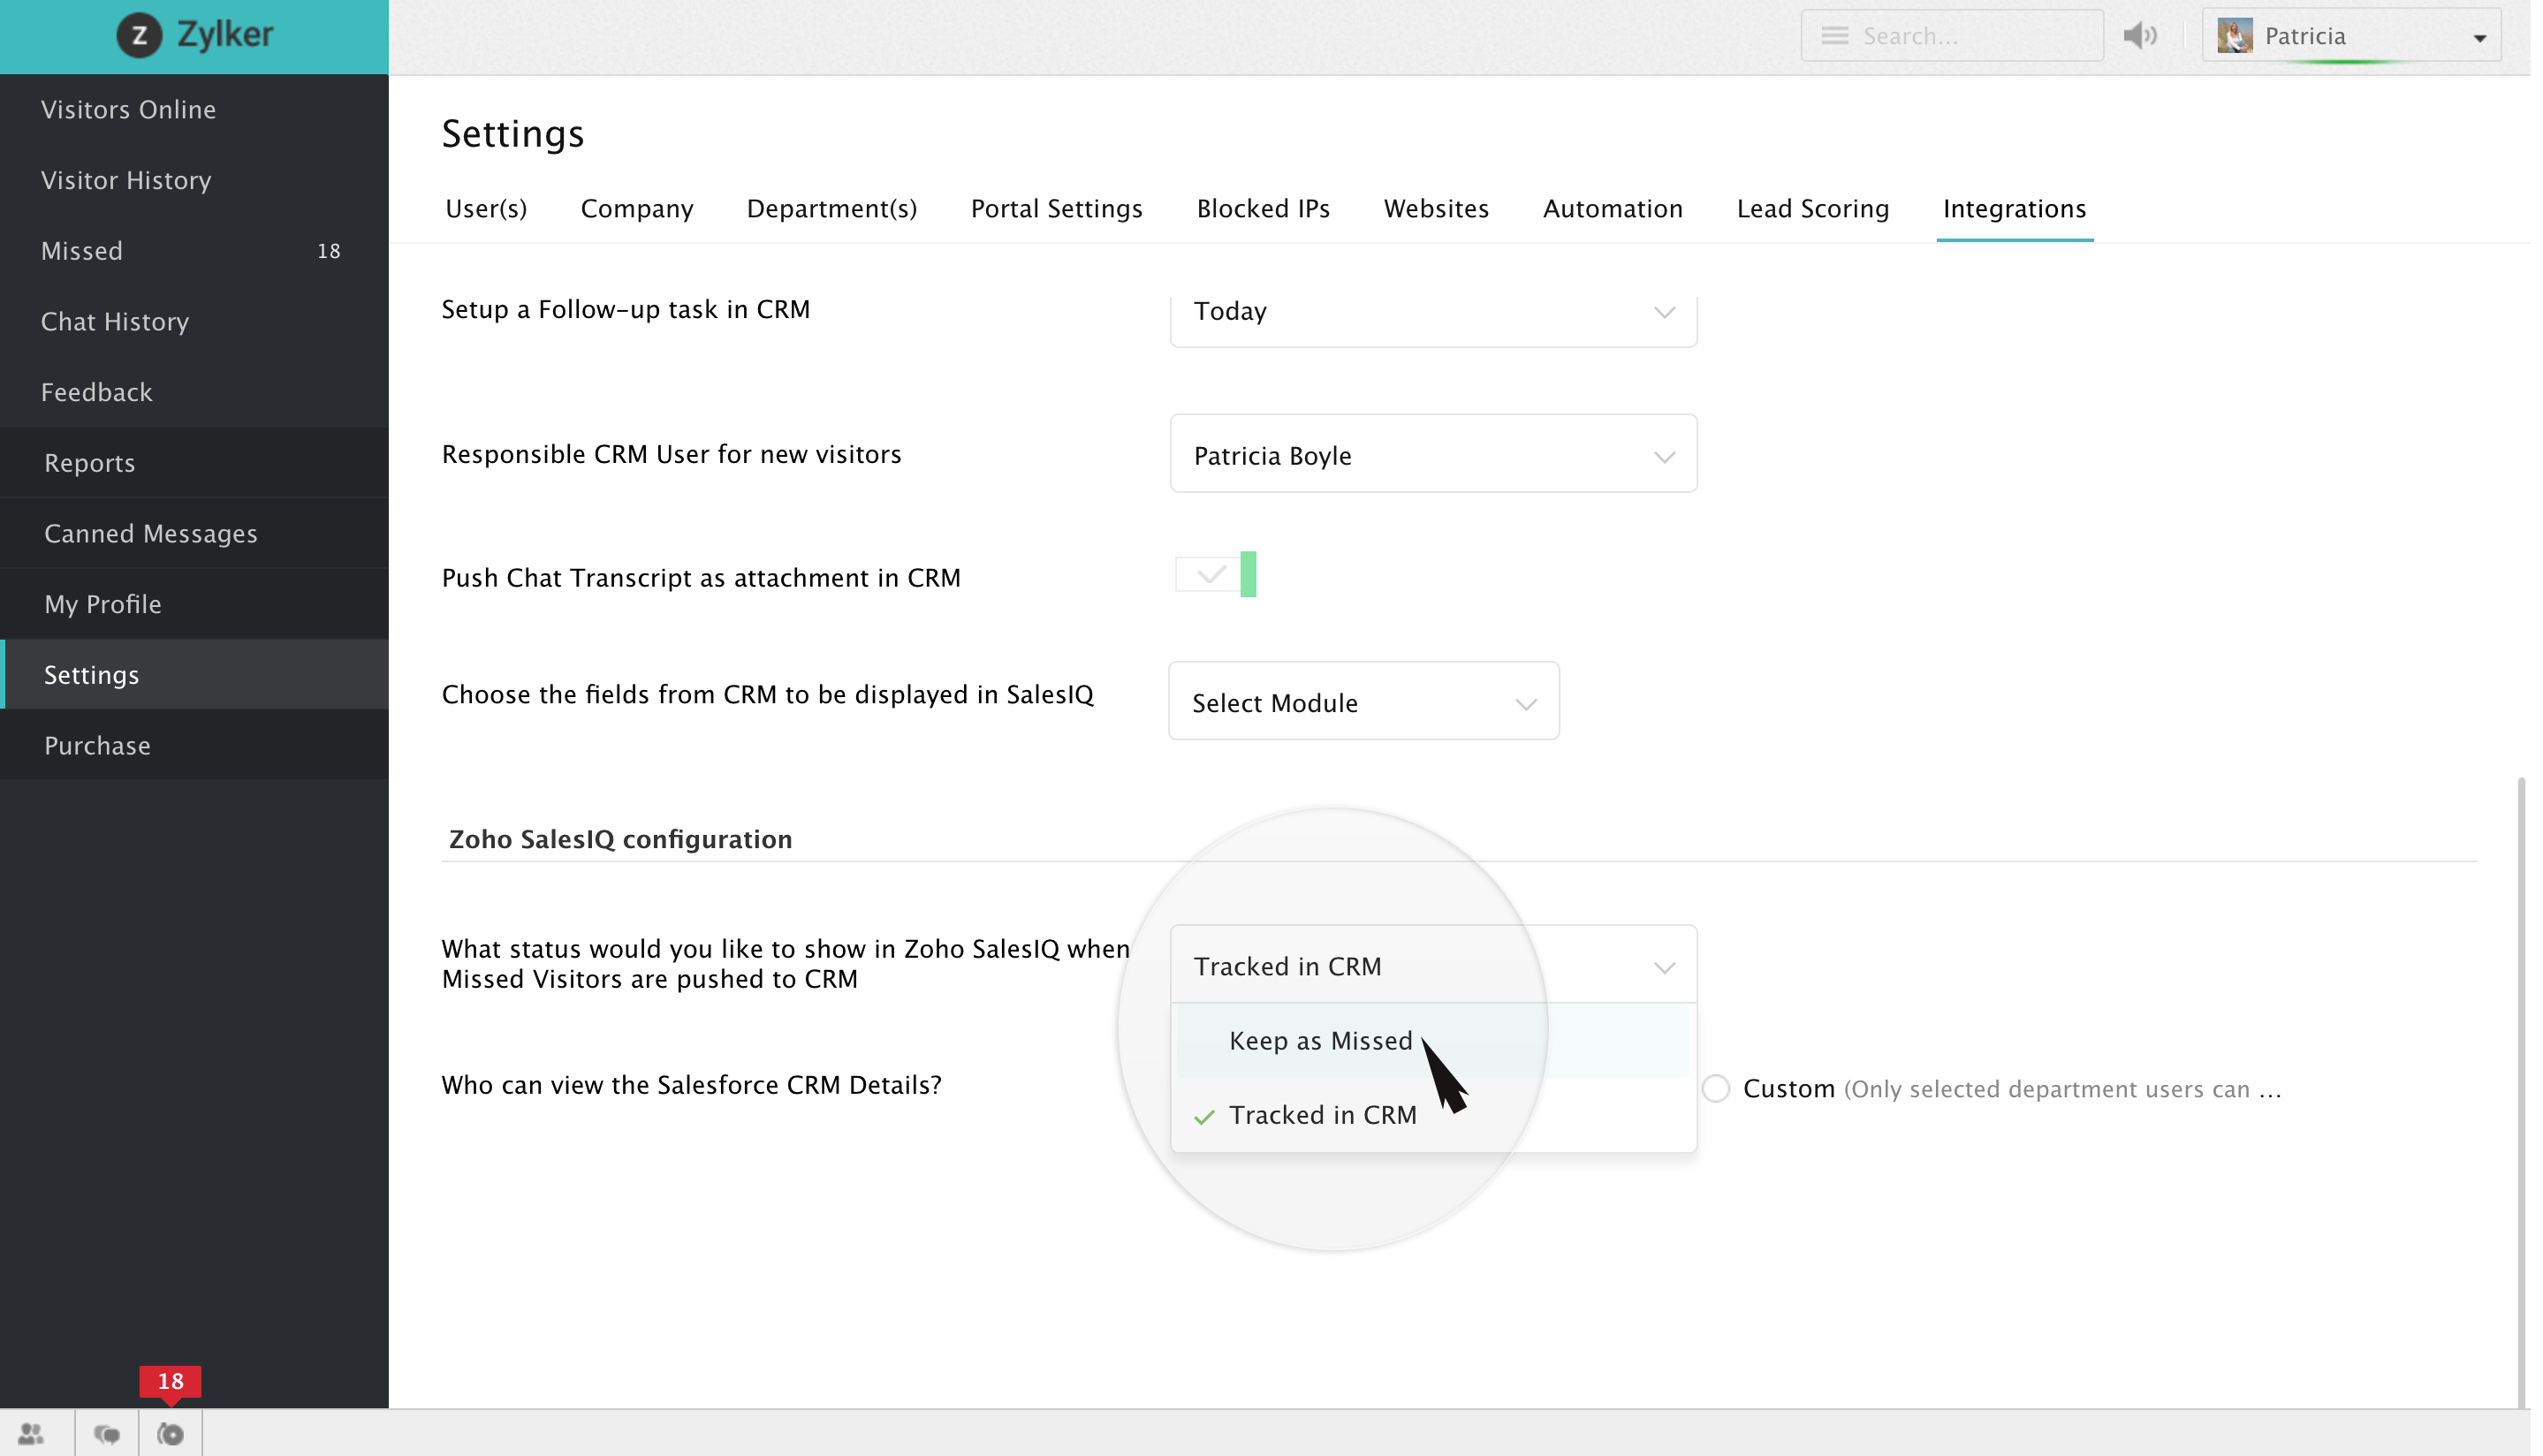
Status of missed visitors in your Zoho SalesIQ account
- If you are planning on pushing your missed visitor base into Salesforce CRM, you get to decide whether you would like to handle the missed visitor chats either in your Zoho SalesIQ account itself or in your Salesforce account.
- If you would want to handle the missed visitors in your Zoho SalesIQ account, then choose "Keep as missed". On doing so you will be able to handle your missed visitor's chats right away from your Zoho SalesIQ account and close them once you are done. But still your missed visitor base will be pushed to your Salesforce account under the tag name that you had chosen earlier.
- If you would want to handle the missed visitors in your Salesforce account, then choose "Tracked in CRM". On doing so the missed visitor chats will be pushed to your Salesforce CRM where you can assist the visitors via mail and close them when you are done, and the missed visitor chats will be moved to "Chat history" tab in your Zoho SalesIQ account.
Departments to which the Salesforce CRM details are to be displayed
- If you are planning on displaying the Salesforce CRM details to every other department in your firm, then choose "All".
- Else choose "Custom", after which you will be displayed with a list of departments associated with your firm. Choose the desired departments to which you would like to display the Salesforce CRM details by either scrolling over or by searching for a particular department in the search box provided.
- If you would want to remove a particular department from the list of selected departments, then hover over that particular department, delete icon will appear in the right corner. Click on it and you will be done.
How to enable visitor tracking in a Salesforce CRM Web Form?
SalesIQ can identify the visitors visiting your website by extracting the details from the Salesforce CRM web forms that were submitted by them earlier. This can be achieved by appending the visitor tracking code with the web form code generated.
Follow the steps given below to enable tracking in your web form:
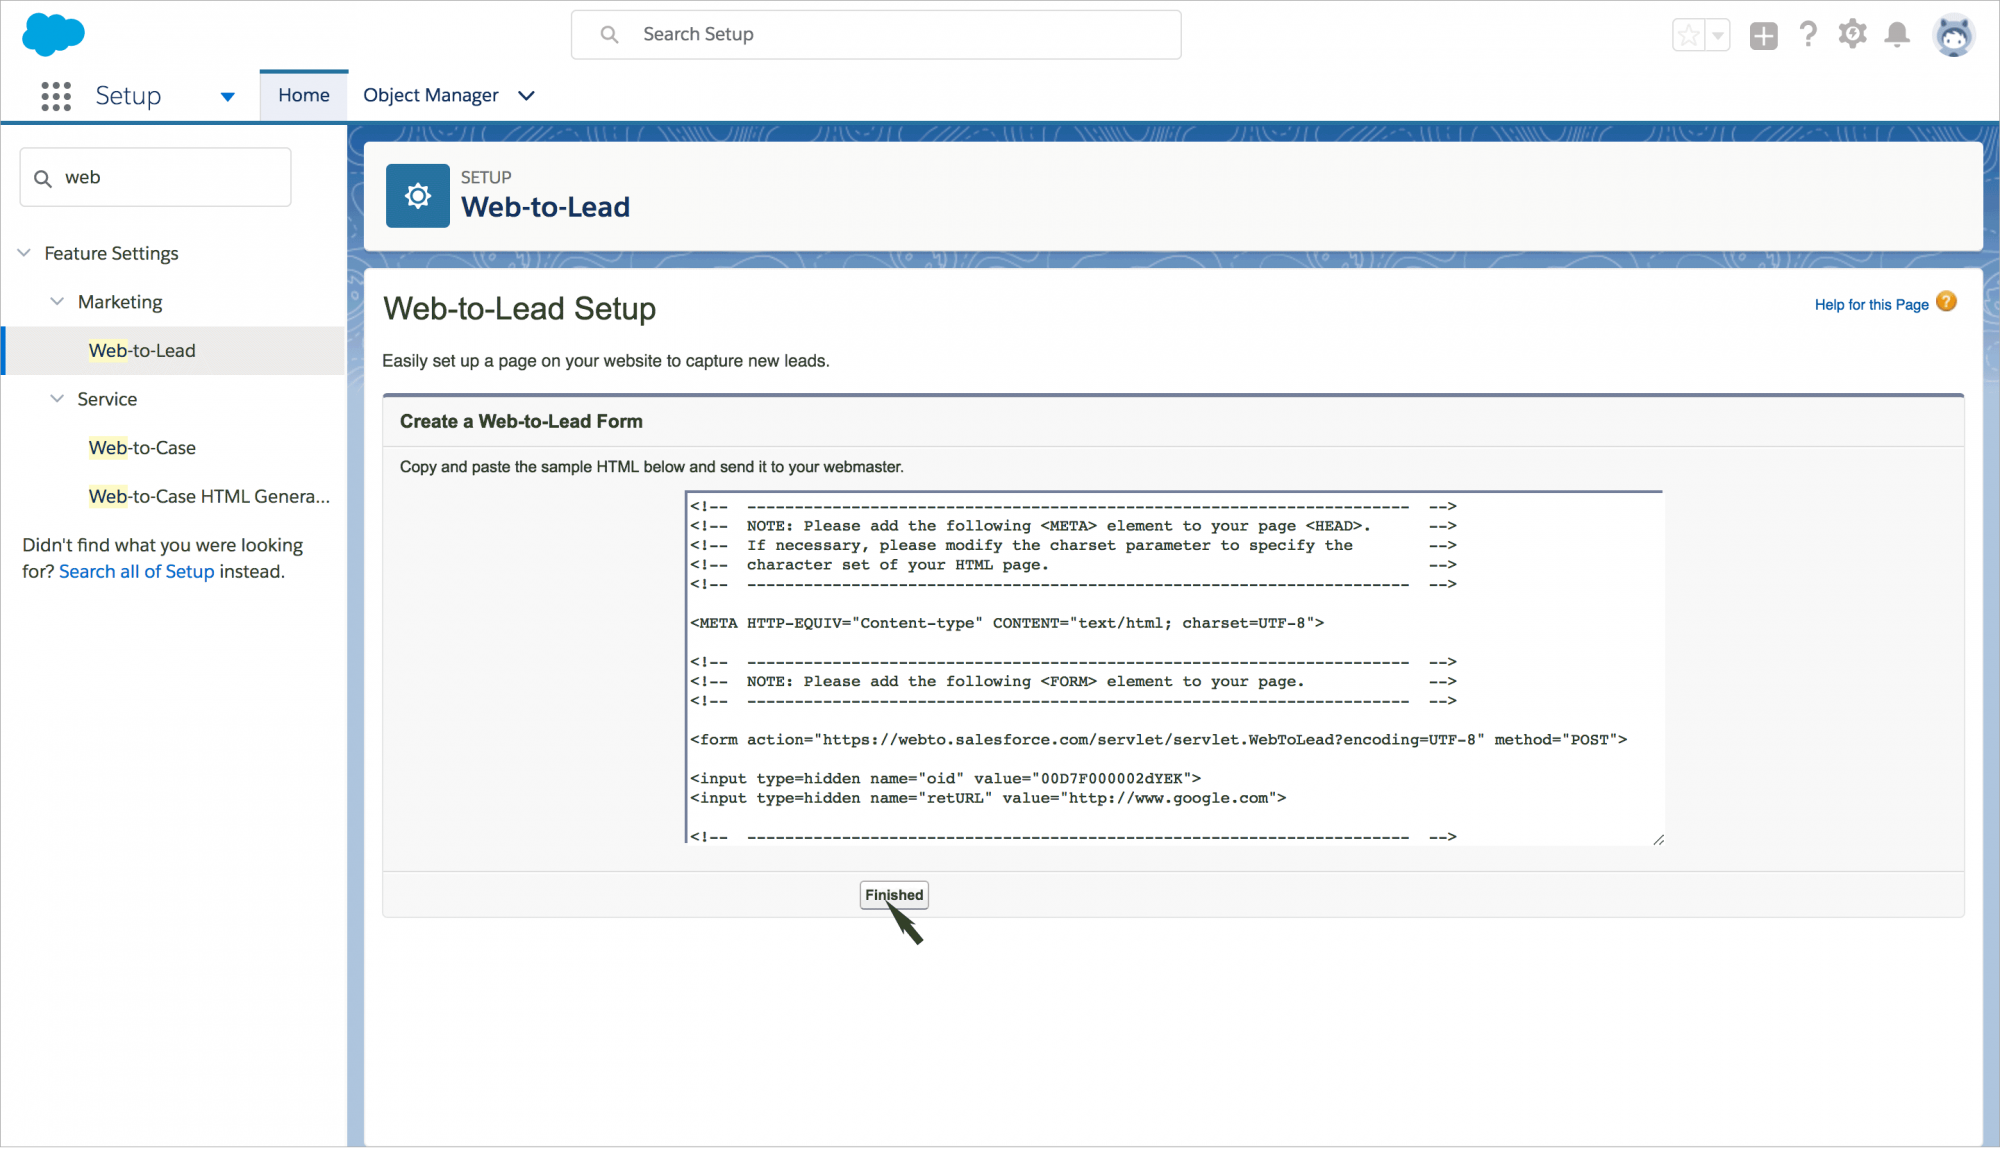
- Log into your Salesforce account.
- Click on the Setup icon which you can find in the top right corner. (Fourth icon form the left)
- Onto your left Quick find pane appears, in that type in Web, in the options that appear choose Web-to-Lead.
- In the window that appears choose the fields that you would like to include in your Web-to-Lead form from the list.
- Then specify the return URL. (The URL to which the visitor is to be redirected after submitting the form data).
- Now, click on generate. You will be provided with a HTML code.
- Copy the code and click on Finished.
- Append the copied code with the visitors tracking code which you can avail from your SalesIQ account.
- Once you are done appending, incorporate this code snippet in the source code of your website or send it to your webmaster.
Make sure to append your visitor tracking code within the same scope as that of the web form code.
Integrated information
Utilizing the integrated values and information
This section will list out all the possible ways that you can consider using to get the maximum out of the integrated information.
Prioritizing the visitors based on Salesforce CRM values
On integrating Salesforce with your SalesIQ account, you will be generating a powerful package that would enhance every other hue of customer relationship management which might turn out to be quite profitable to your firm. To be more precise, Salesforce accumulates and enriches the data extracted from SalesIQ into valuable information which in fact acts as a powerful resource in augmenting the visitor base of your website. The following sections would explain the ways in which you can utilize the CRM values and information based on your needs. Prioritize visitors based on CRM valuesSalesforce allows you to prioritize and filter your website visitors based on the CRM values. To avail this option,
- Navigate to Visitors online tab.
- Click on "Customize", which you can find in the top right corner of the window.
- Run through the list of filters in the drop-down box which you can find in the top right corner of the window that pops up right beside the label "Sort your visitors by".
- Choose "CRM values".
- If the conditions associated with the predefined CRM filter seems not to be apt for your requirements, then you can edit the conditions and create your own customized filter by using the predefined CRM options like Salesforce CRM contact, CRM lead, CRM opportunity and Visitor stage in Salesforce CRM to make things function according to your needs.
- Metrics associated with these predefined Salesforce CRM options are as follows:
- Salesforce CRM Lead: Mailing country, Mailing state, Mailing zip, First name etc.,
- Salesforce CRM Contact: City, Company, First name, Country, Annual revenue etc.,
- Salesforce CRM opportunity: Closed won, Closing date, Number of opportunities, Number of open opportunities and Revenue in pipeline.
- Visitor stage: Contact, Customer, Lead, Not available and prospect.
- Once you've chosen an apt metric, you can associate it with an appropriate value(s) by using the association rule like equal to, not equal to, greater than, less than etc.,
- Then click on "Apply".
Routing visitors to operators based on CRM values
- SalesIQ allows you to route the visitor base to the operators of your firm based on the various Salesforce CRM values.
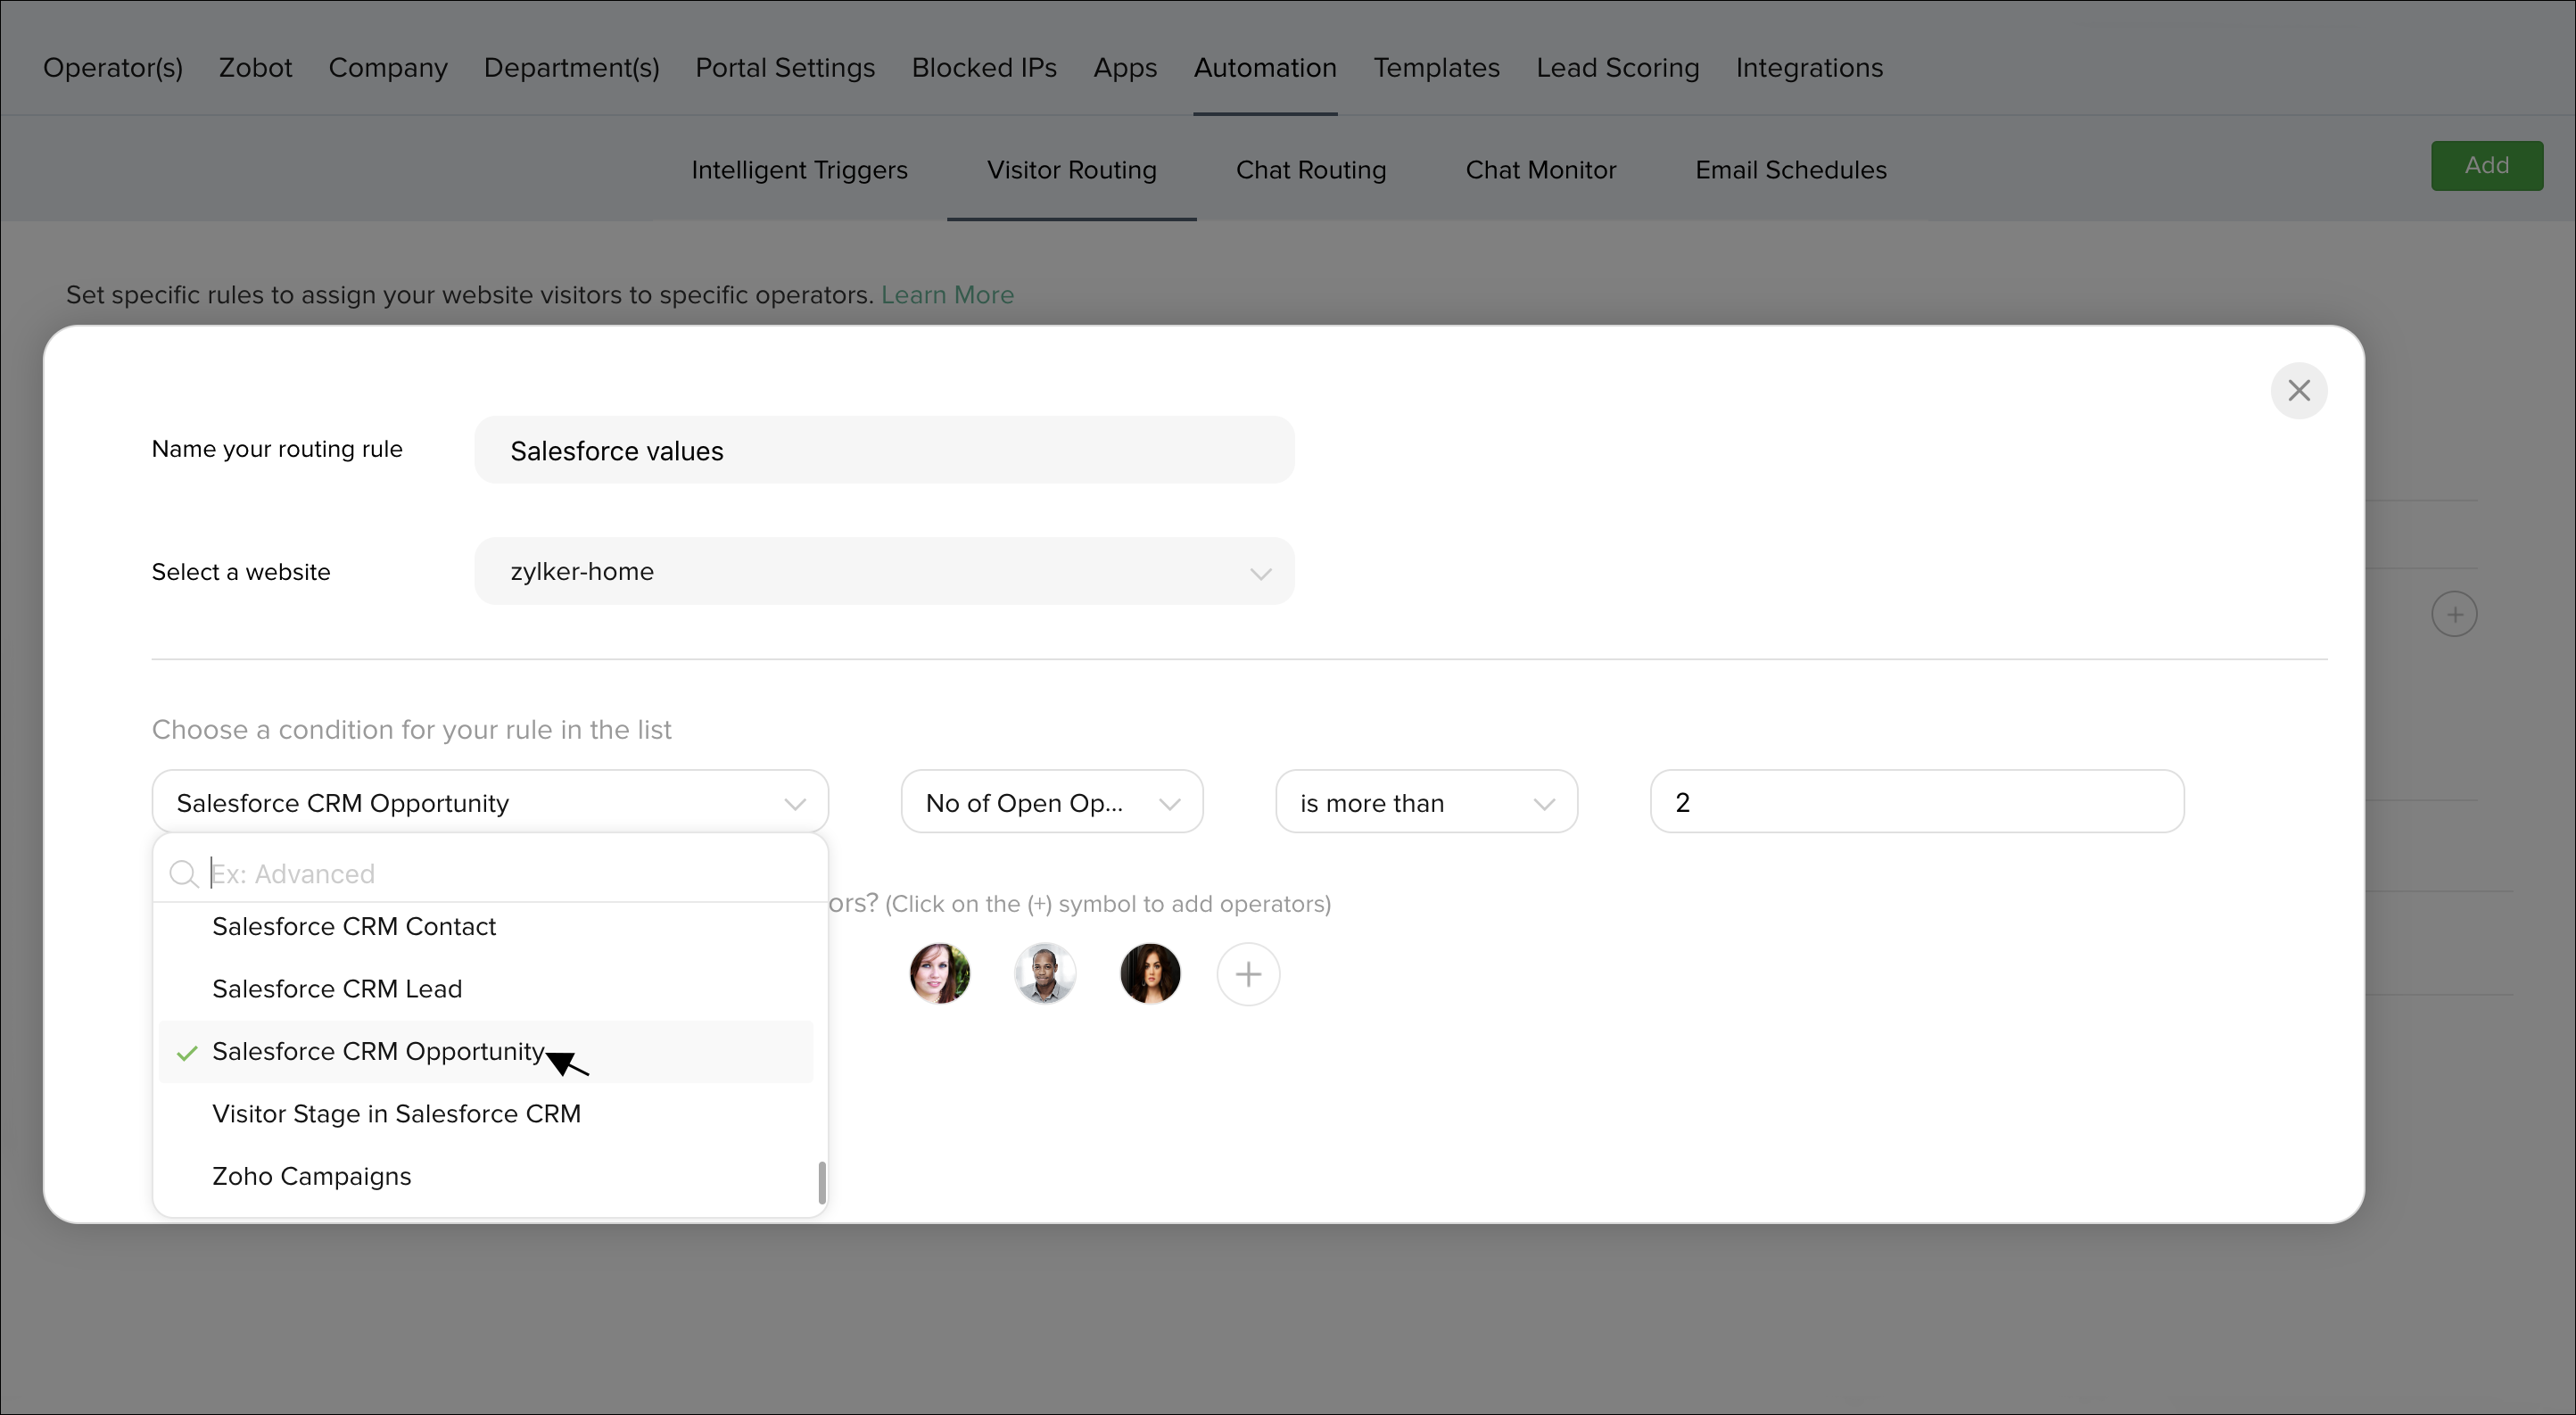
- Navigate to Settings > Automation > Visitor routing.
- Click on Add which you can find in the top right corner of the window.
- Specify a name for the rule.
- Choose a website in which you would like to activate the rule.
- Under "Choose a condition" label, there would be drop down box, clicking on which you will be displayed with a bunch of predefined options, run through it to find the Salesforce CRM values,
- Salesforce CRM Lead.
- Salesforce CRM Contact.
- Salesforce CRM Opportunity.
- Visitor stage in Salesforce CRM.
- Metrics associated with these predefined Salesforce CRM options are as follows:
- Salesforce CRM Lead: Mailing country, Mailing state, Mailing zip, First name etc.,
- Salesforce CRM Contact: City, Company, First name, Country, Annual revenue etc.,
- Salesforce CRM opportunity: Closed won, Closing date, Number of opportunities, Number of open opportunities and Revenue in pipeline.
- Visitor stage: Contact, Customer, Lead, Not available and prospect.
- Once you've chosen an apt metric, you can associate it with an appropriate value(s) by using the relational operators like equal to, not equal to, greater than, less than etc.,
- Then choose a routine according to which the visitors are to be routed to your operators and then select the operators you would like to assign the filtered visitor base to, by clicking on the "+" icon right beside the drop-down box.
- If you would like to remove a chosen user, then click on the "-" symbol that appears when you hover over that particular user.
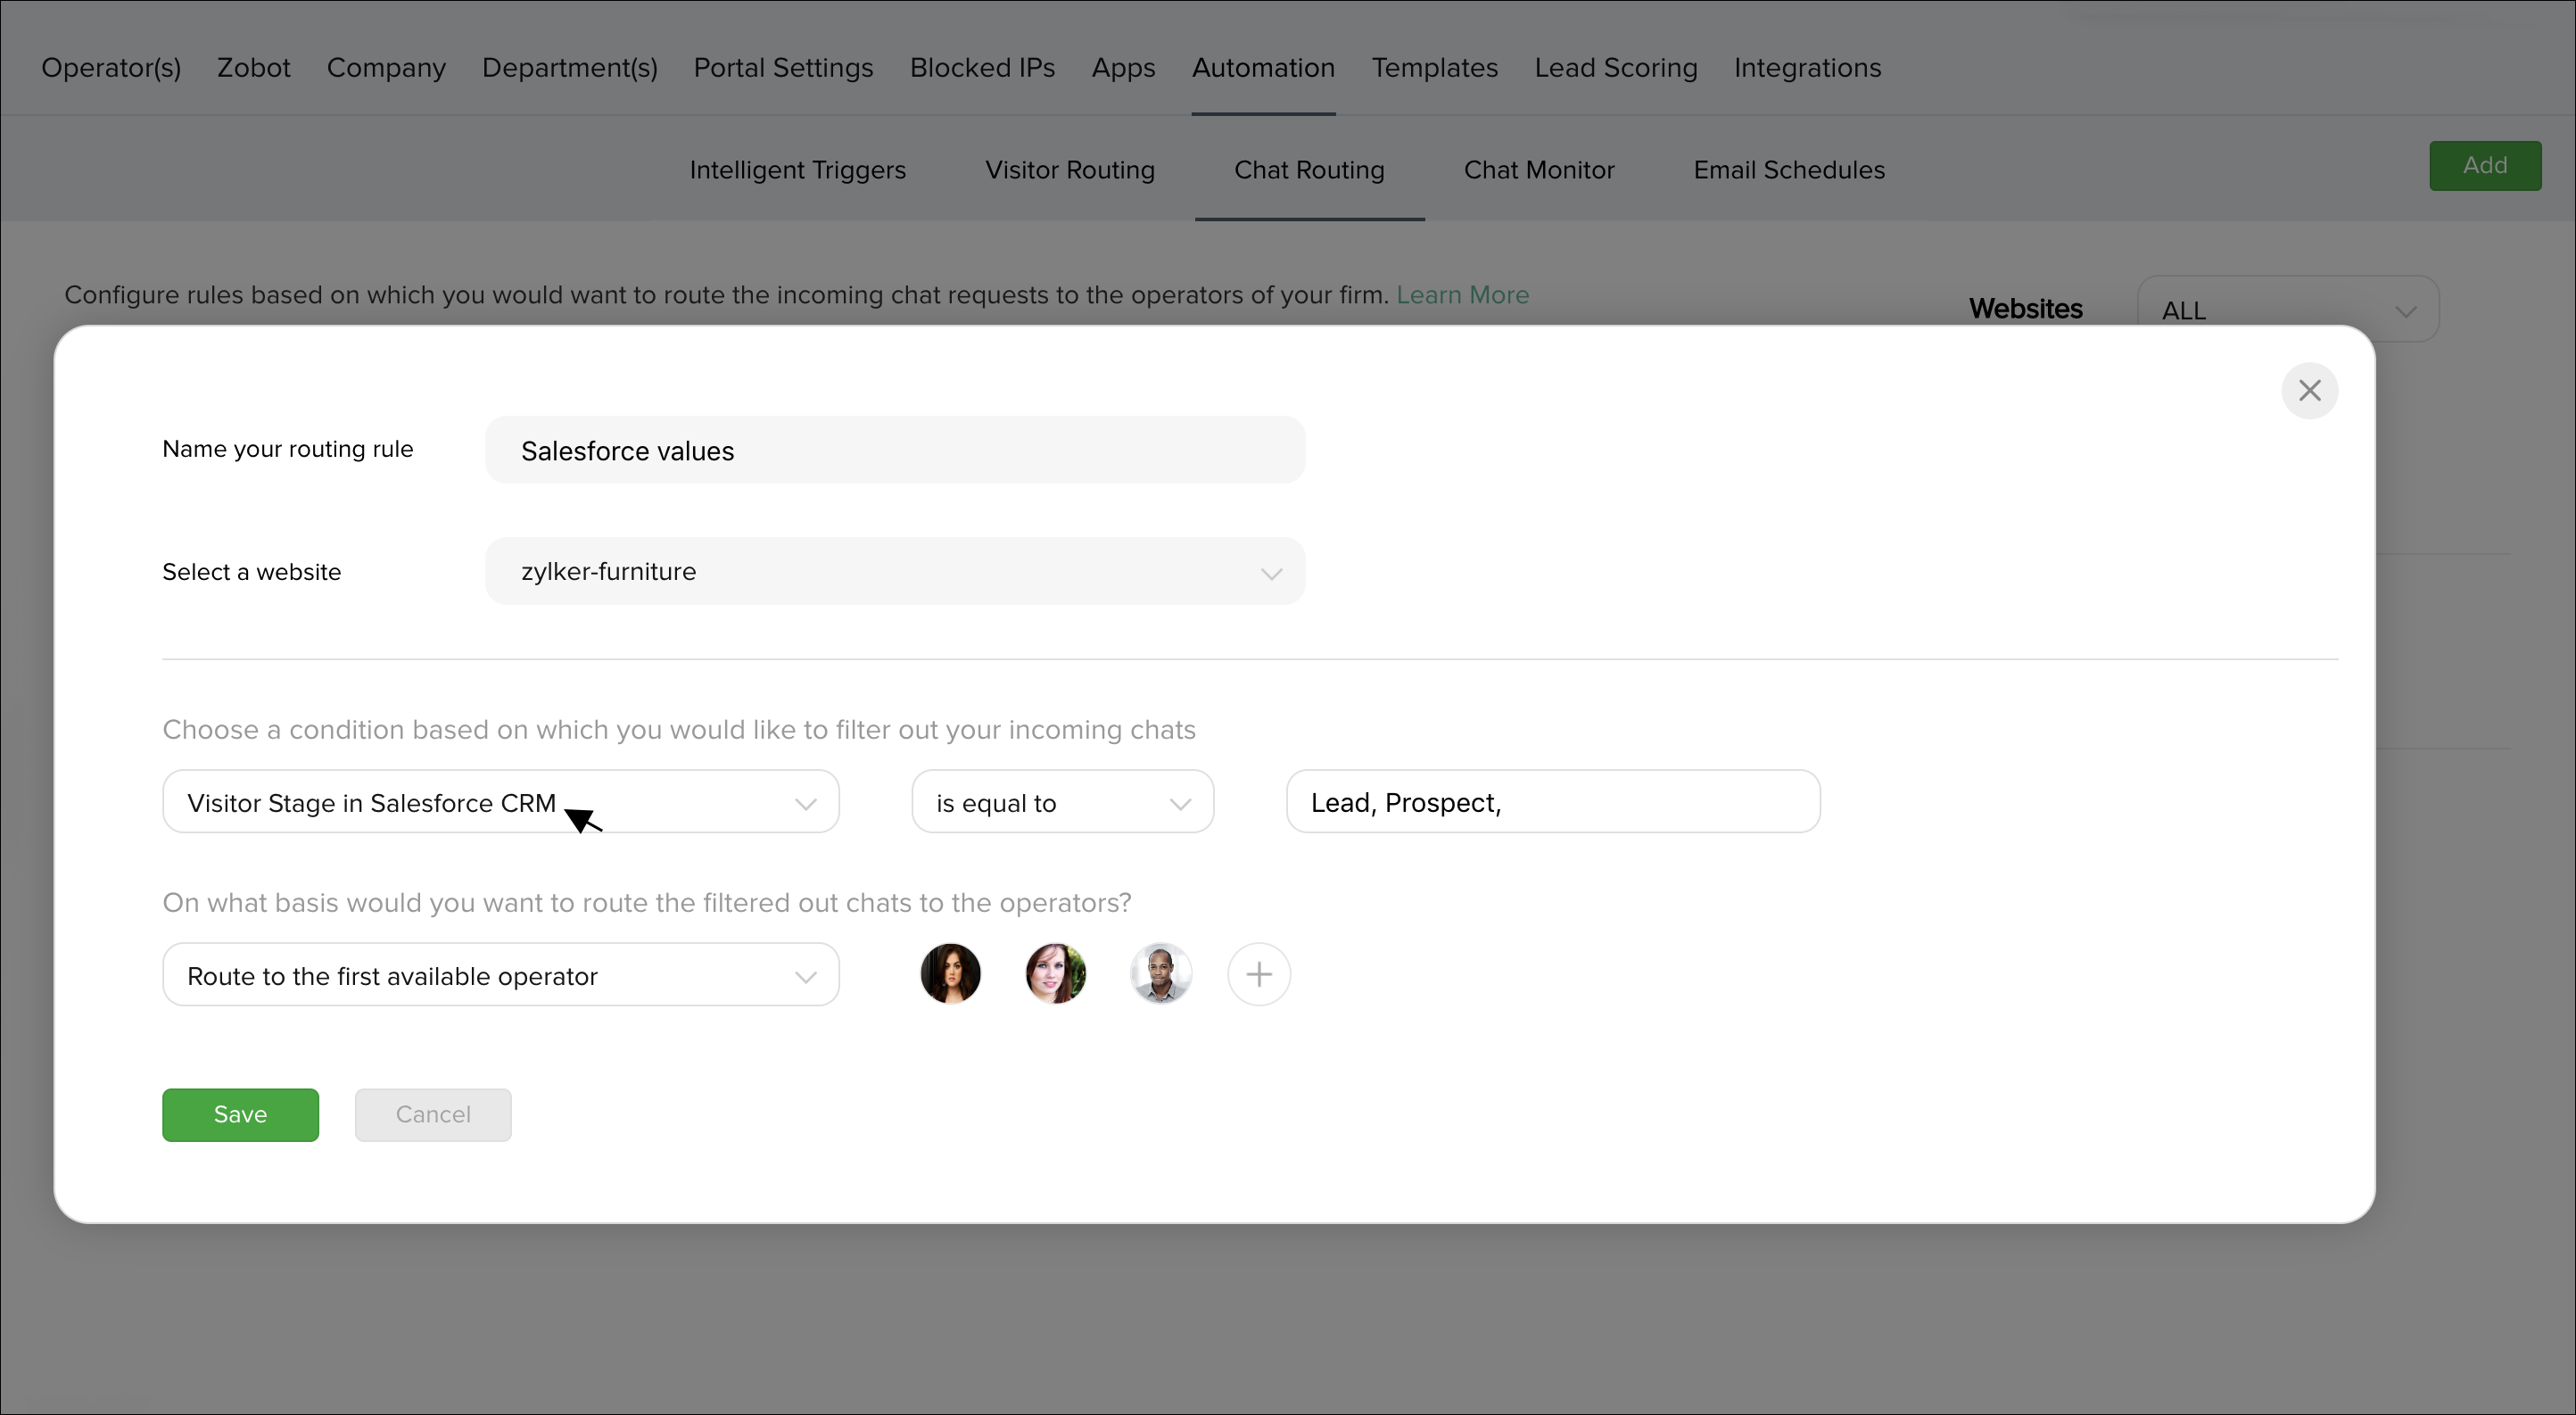
Routing visitor chats to operators based on CRM values
- SalesIQ allows you to route visitor chat requests to operators of your firm based on various Salesforce CRM values.
- Navigate to Settings > Automation > Chat routing.
- Click on Add which you can find in the top right corner of the window.
- Specify a name for the rule.
- Choose a website in which you would like to activate the rule.
- Under "Choose a condition" label, there would be drop down box, clicking on which you will be displayed with a bunch of predefined options, run through it to find the Salesforce CRM values,
- Salesforce CRM Lead.
- Salesforce CRM Contact.
- Salesforce CRM Opportunity.
- Visitor stage in Salesforce CRM.
- Metrics associated with these predefined Salesforce CRM options are as follows:
- Salesforce CRM Lead: Mailing country, Mailing state, Mailing zip, First name etc.,
- Salesforce CRM Contact: City, Company, First name, Country, Annual revenue etc.,
- Salesforce CRM opportunity: Closed won, Closing date, Number of opportunities, Number of open opportunities and Revenue in pipeline.
- Visitor stage: Contact, Customer, Lead, Not available and prospect.
- Once you've chosen an apt metric, you can associate it with an appropriate value(s) by using the relational operators like equal to, not equal to, greater than, less than etc.,
- Then choose a routine according to which the chat requests are to be routed to your operators and then select the operators you would like to assign the filtered chat requests to, by clicking on the "+" icon right beside the drop-down box.
- If you would like to remove a chosen operator, then click on the "-" symbol that appears when you hover over that particular operator.
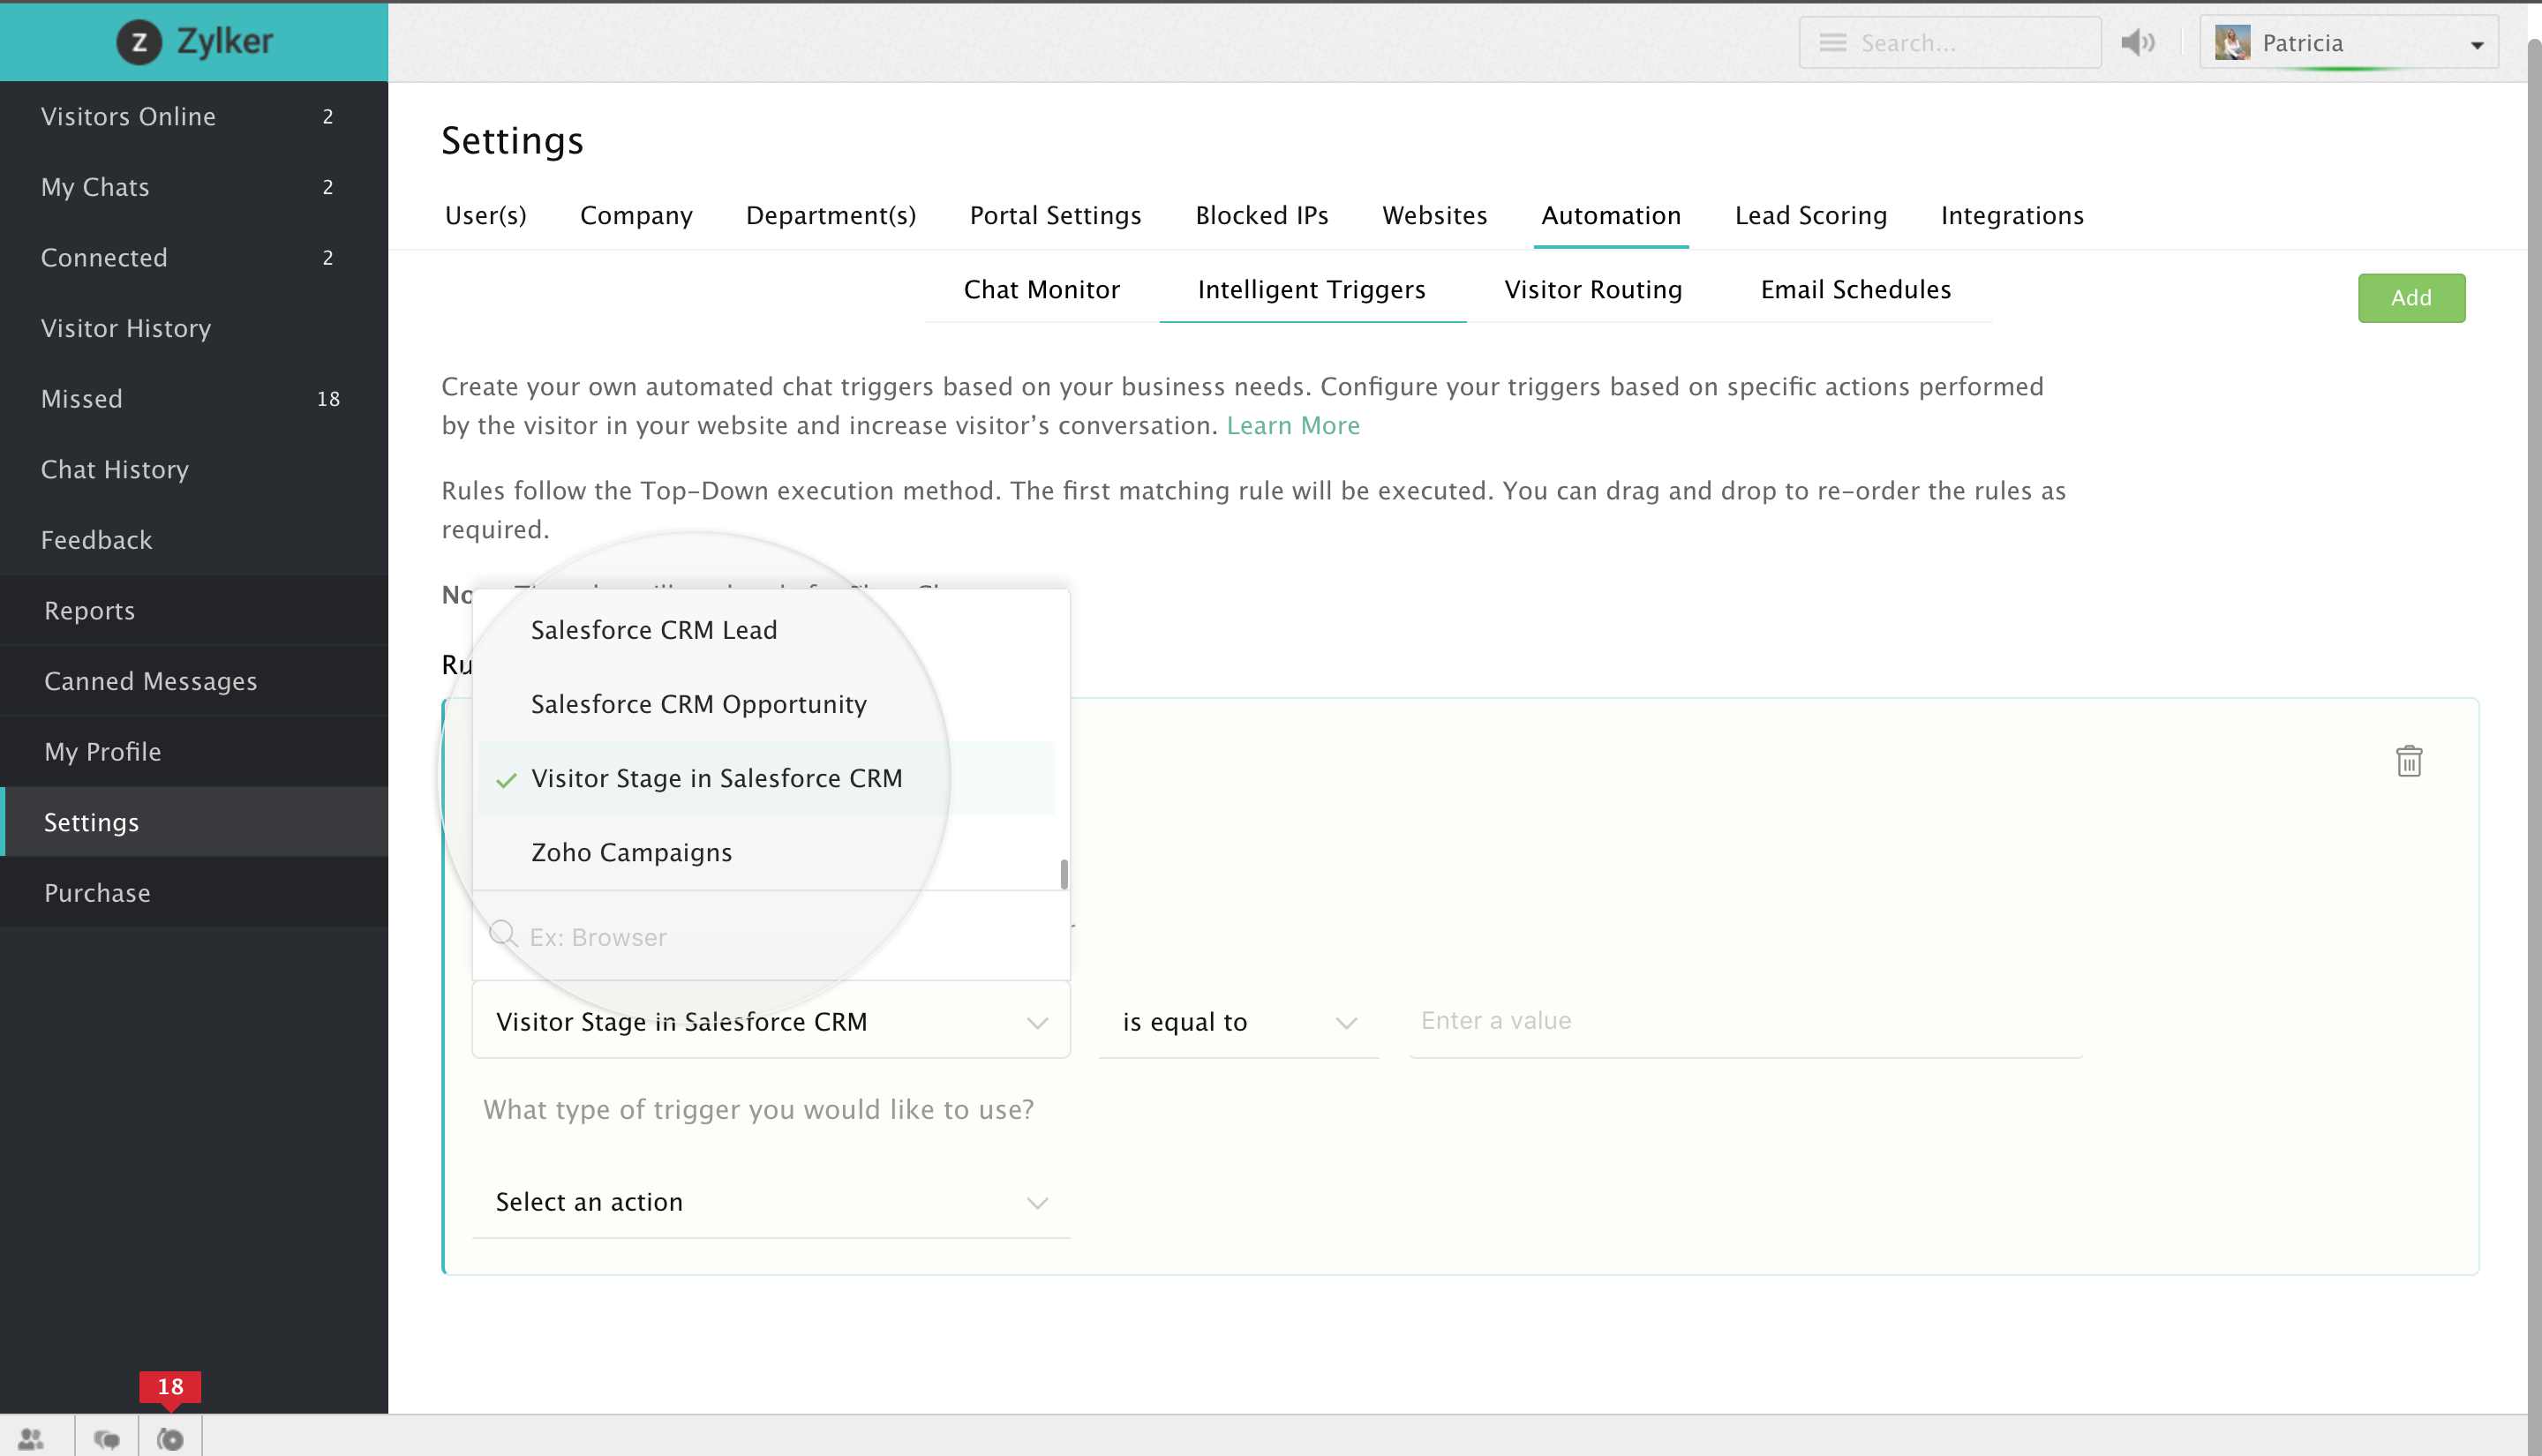
Configure triggers based on Salesforce CRM values
Salesforce allows you to configure triggers based on CRM values, exclusively for the visitor base pushed into your Salesforce CRM account.
- Navigate through Settings -> Automation -> Intelligent triggers.
- In the drop-down box right below the label "When would you like to trigger the visitor", select the instant at which you would like to set the trigger off.
- Once you are done, choose a condition based on which you would like to filter the visitor base of your website. This is where you can utilize the predefined Salesforce CRM options which are,
- Salesforce CRM Lead.
- Salesforce CRM Contact.
- Salesforce CRM Opportunity.
- Visitor stage in Salesforce CRM.
- Metrics associated with these predefined Salesforce CRM options are as follows:
- CRM Lead: Mailing country, Mailing state, Mailing zip, First name etc.,
- CRM Contact: City, Company, First name, Country, Annual revenue etc.,
- CRM opportunity: Closed won, Closing date, Number of opportunities, Number of open opportunities and Revenue in pipeline.
- Visitor stage: Contact, Customer, Lead, Not available and prospect.
- Once you've chosen an apt metric, you can associate it with an appropriate value(s) by using the relational operators like equal to, not equal to, greater than, less than etc.,
- After which choose a type of trigger that you would like to use and set the time after which you would like to set the trigger off. (Time frame after the user performs a particular configured action)
Visitor CRM information
This section lists out all the modules inside your Zoho SalesIQ portal in which you can view the integrated CRM information of the visitors hitting your site.
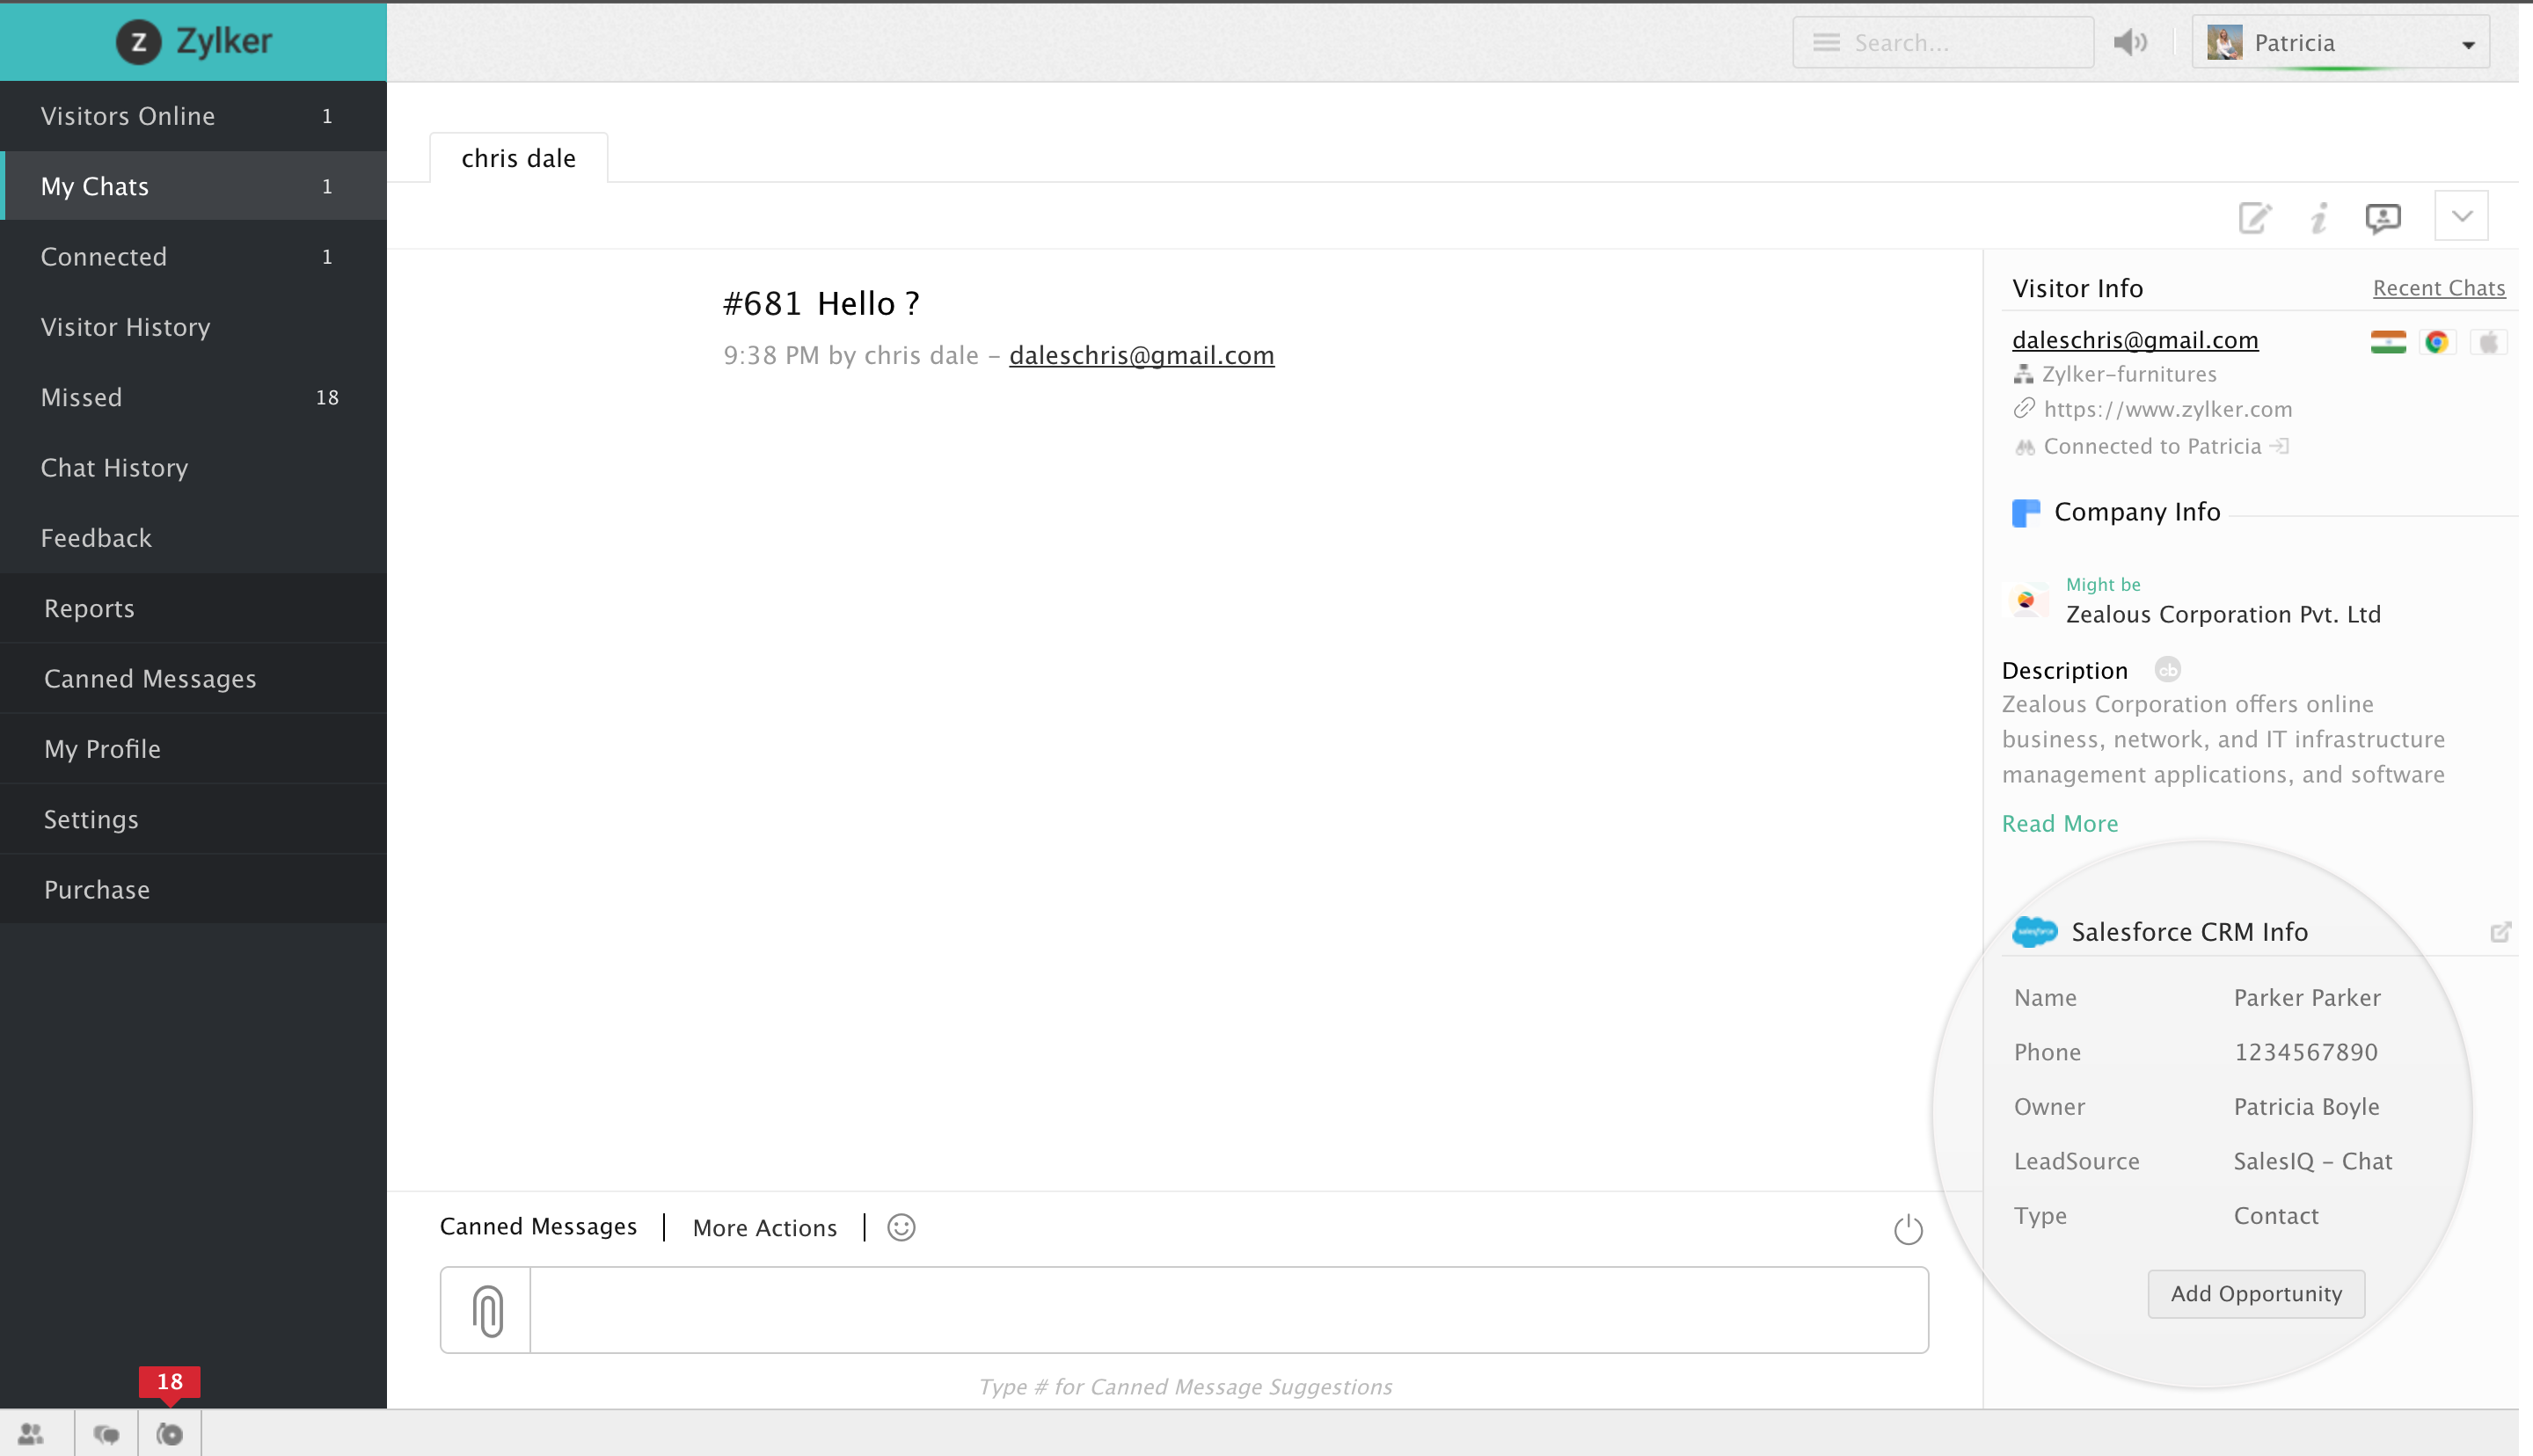
Operator Chat Window
Every time you are involved in a chat session with your visitors, you can view their CRM information in the pane which you can find onto your right. If the visitor with whom you are chatting is a newbie, then the details that he/she had provided while initiating the chat will be extracted and pushed to your Salesforce account and will also be displayed in the right pane.
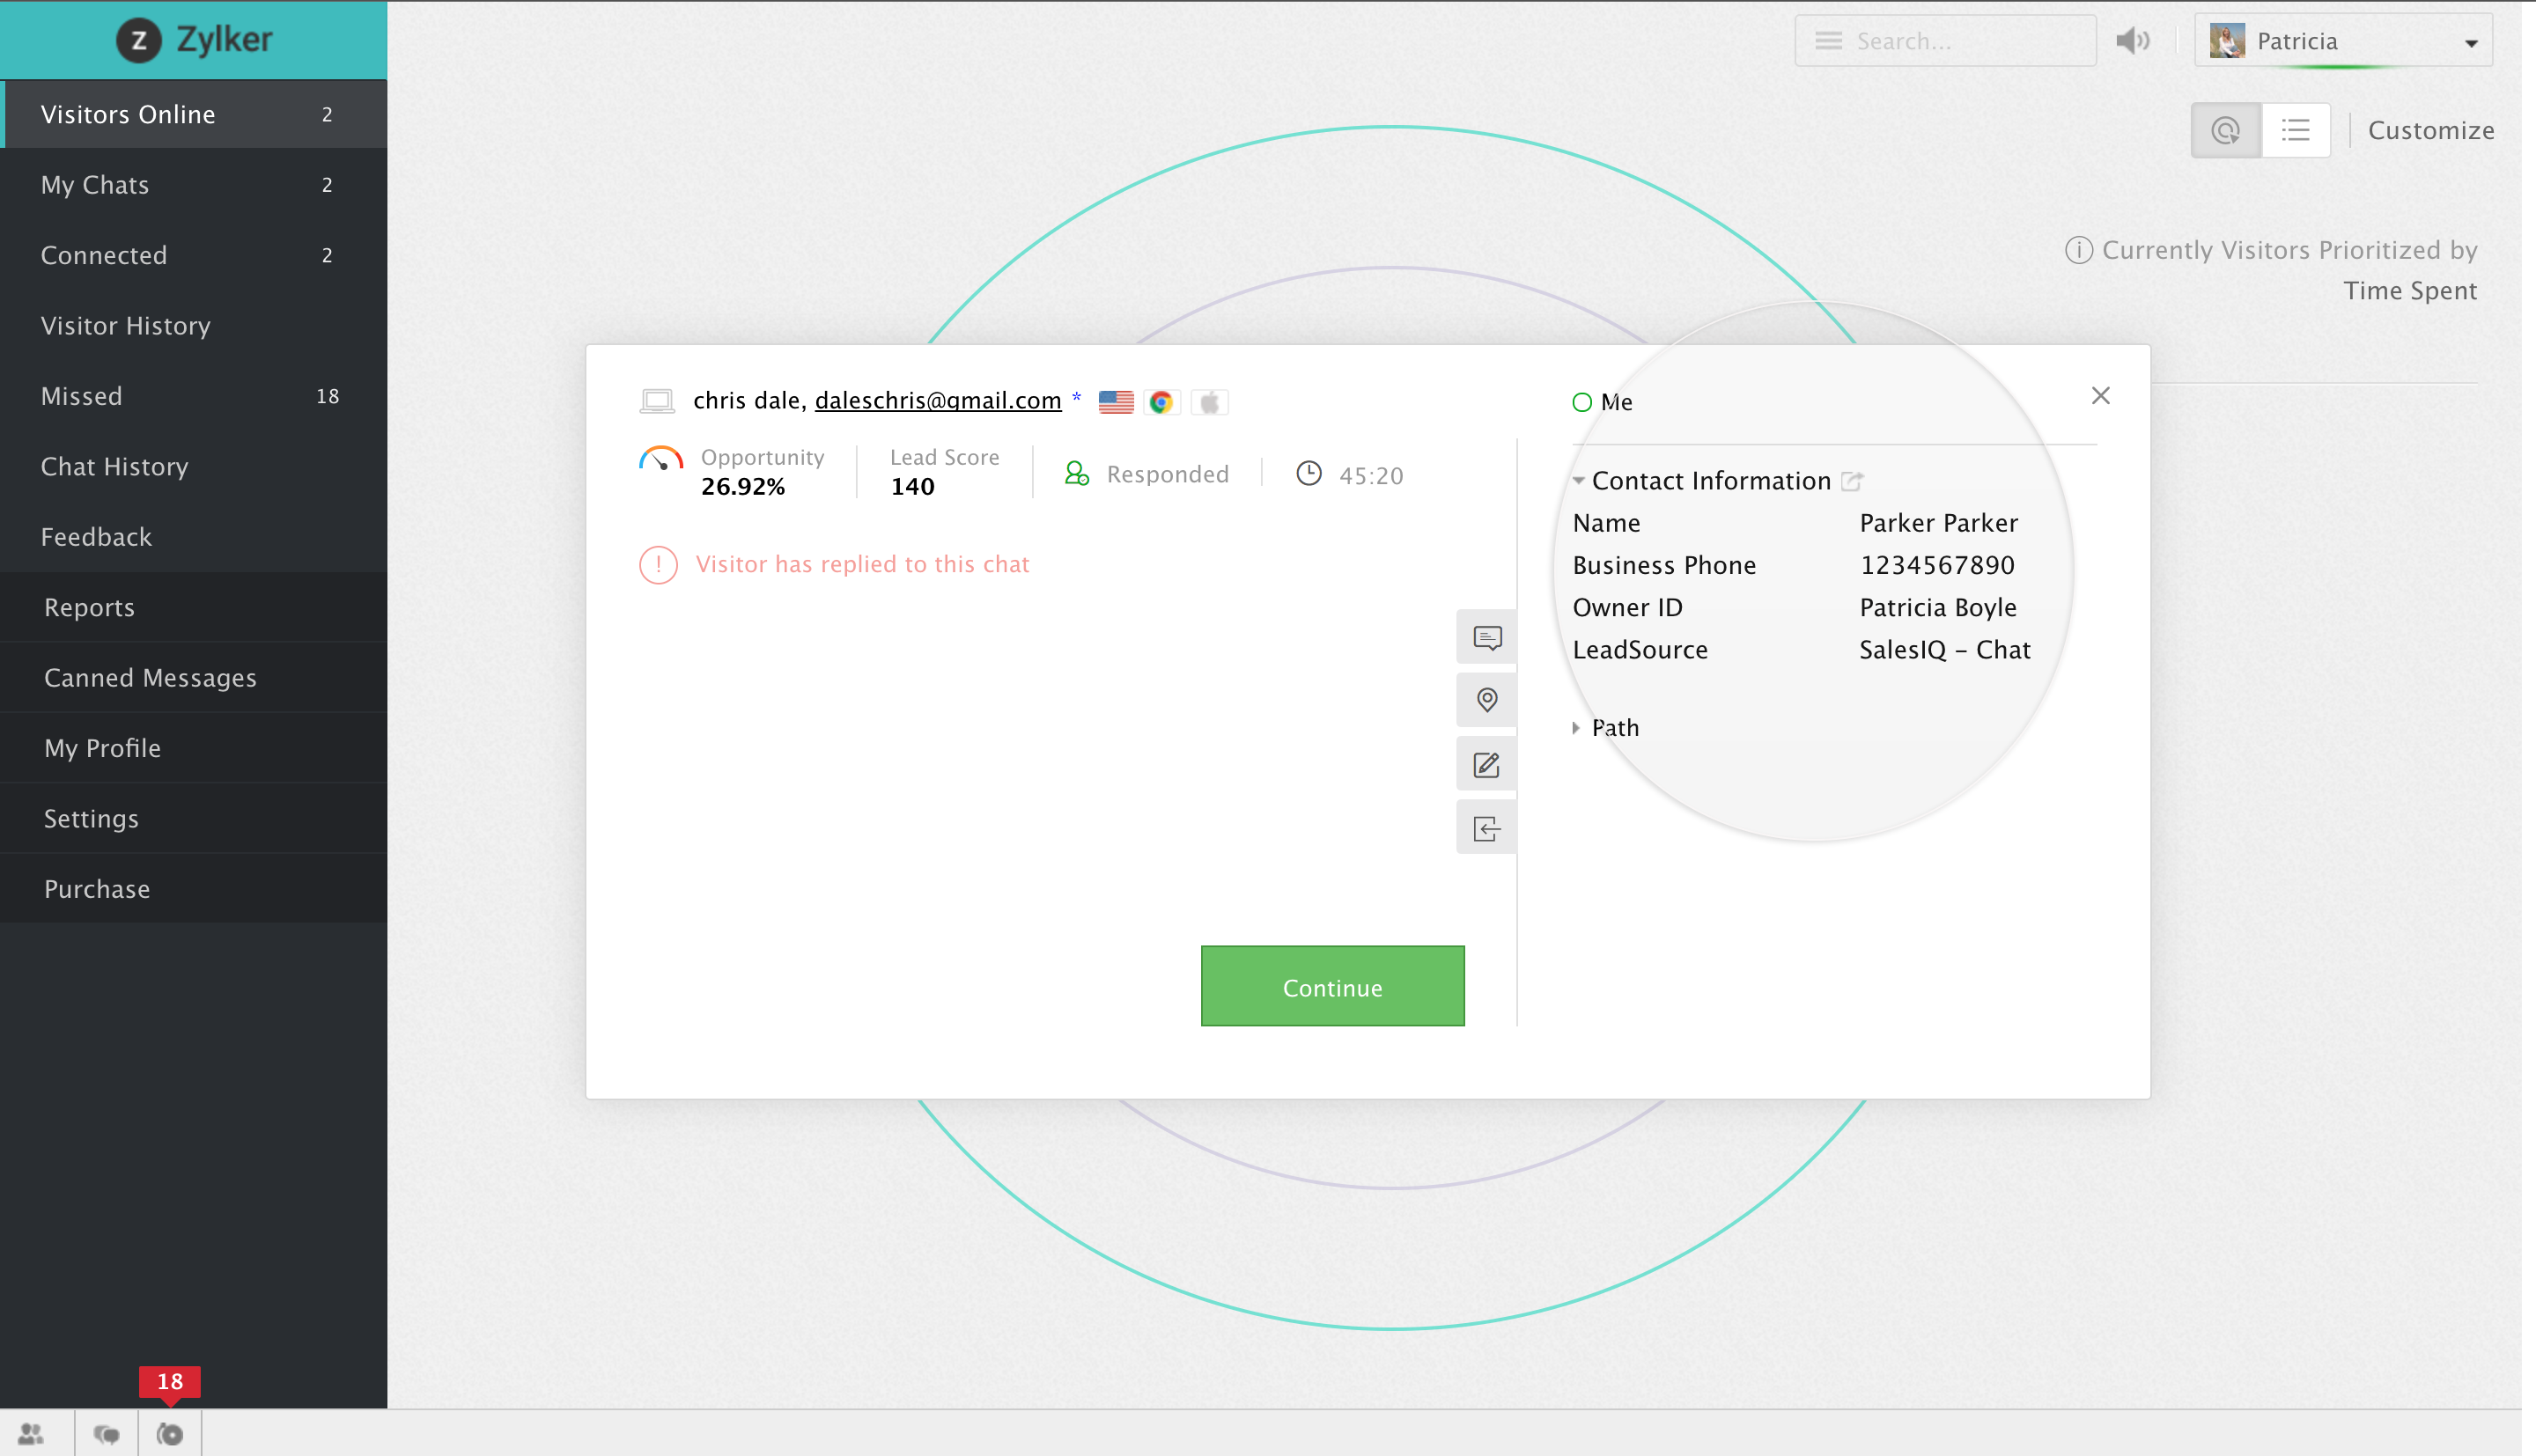
Proactive Window
On a visitor tile
- Navigate to Visitors online tab.
- Click on a visitor, visitor tile appears.
- Onto the right, you would find a pane, in which Salesforce CRM details of that particular visitor will be displayed.
- If the visitor belongs to the tag "Lead" then following details will be displayed,
- Company
- Phone
- Lead Status
- Lead Owner
- Lead Source
- Annual Revenue
- No of Employees
- If the visitor belongs to the tag "Contact" then the following details will be displayed,
- Account Name
- Phone
- Contact Owner
- Lead source
- Number of open opportunities
- Revenue in pipeline
- You can also view these details in a pane, right beside the user chat window.
- If SalesIQ couldn't find a corresponding value for a particular field in Salesforce CRM, then those fields won't be displayed in the chat window as well as the visitor tile.
- And also only the fields that you chose in the integration section will be displayed, above specified are just the fields that Salesforce CRM generally offers.
Visitor History
In the Visitor history tab
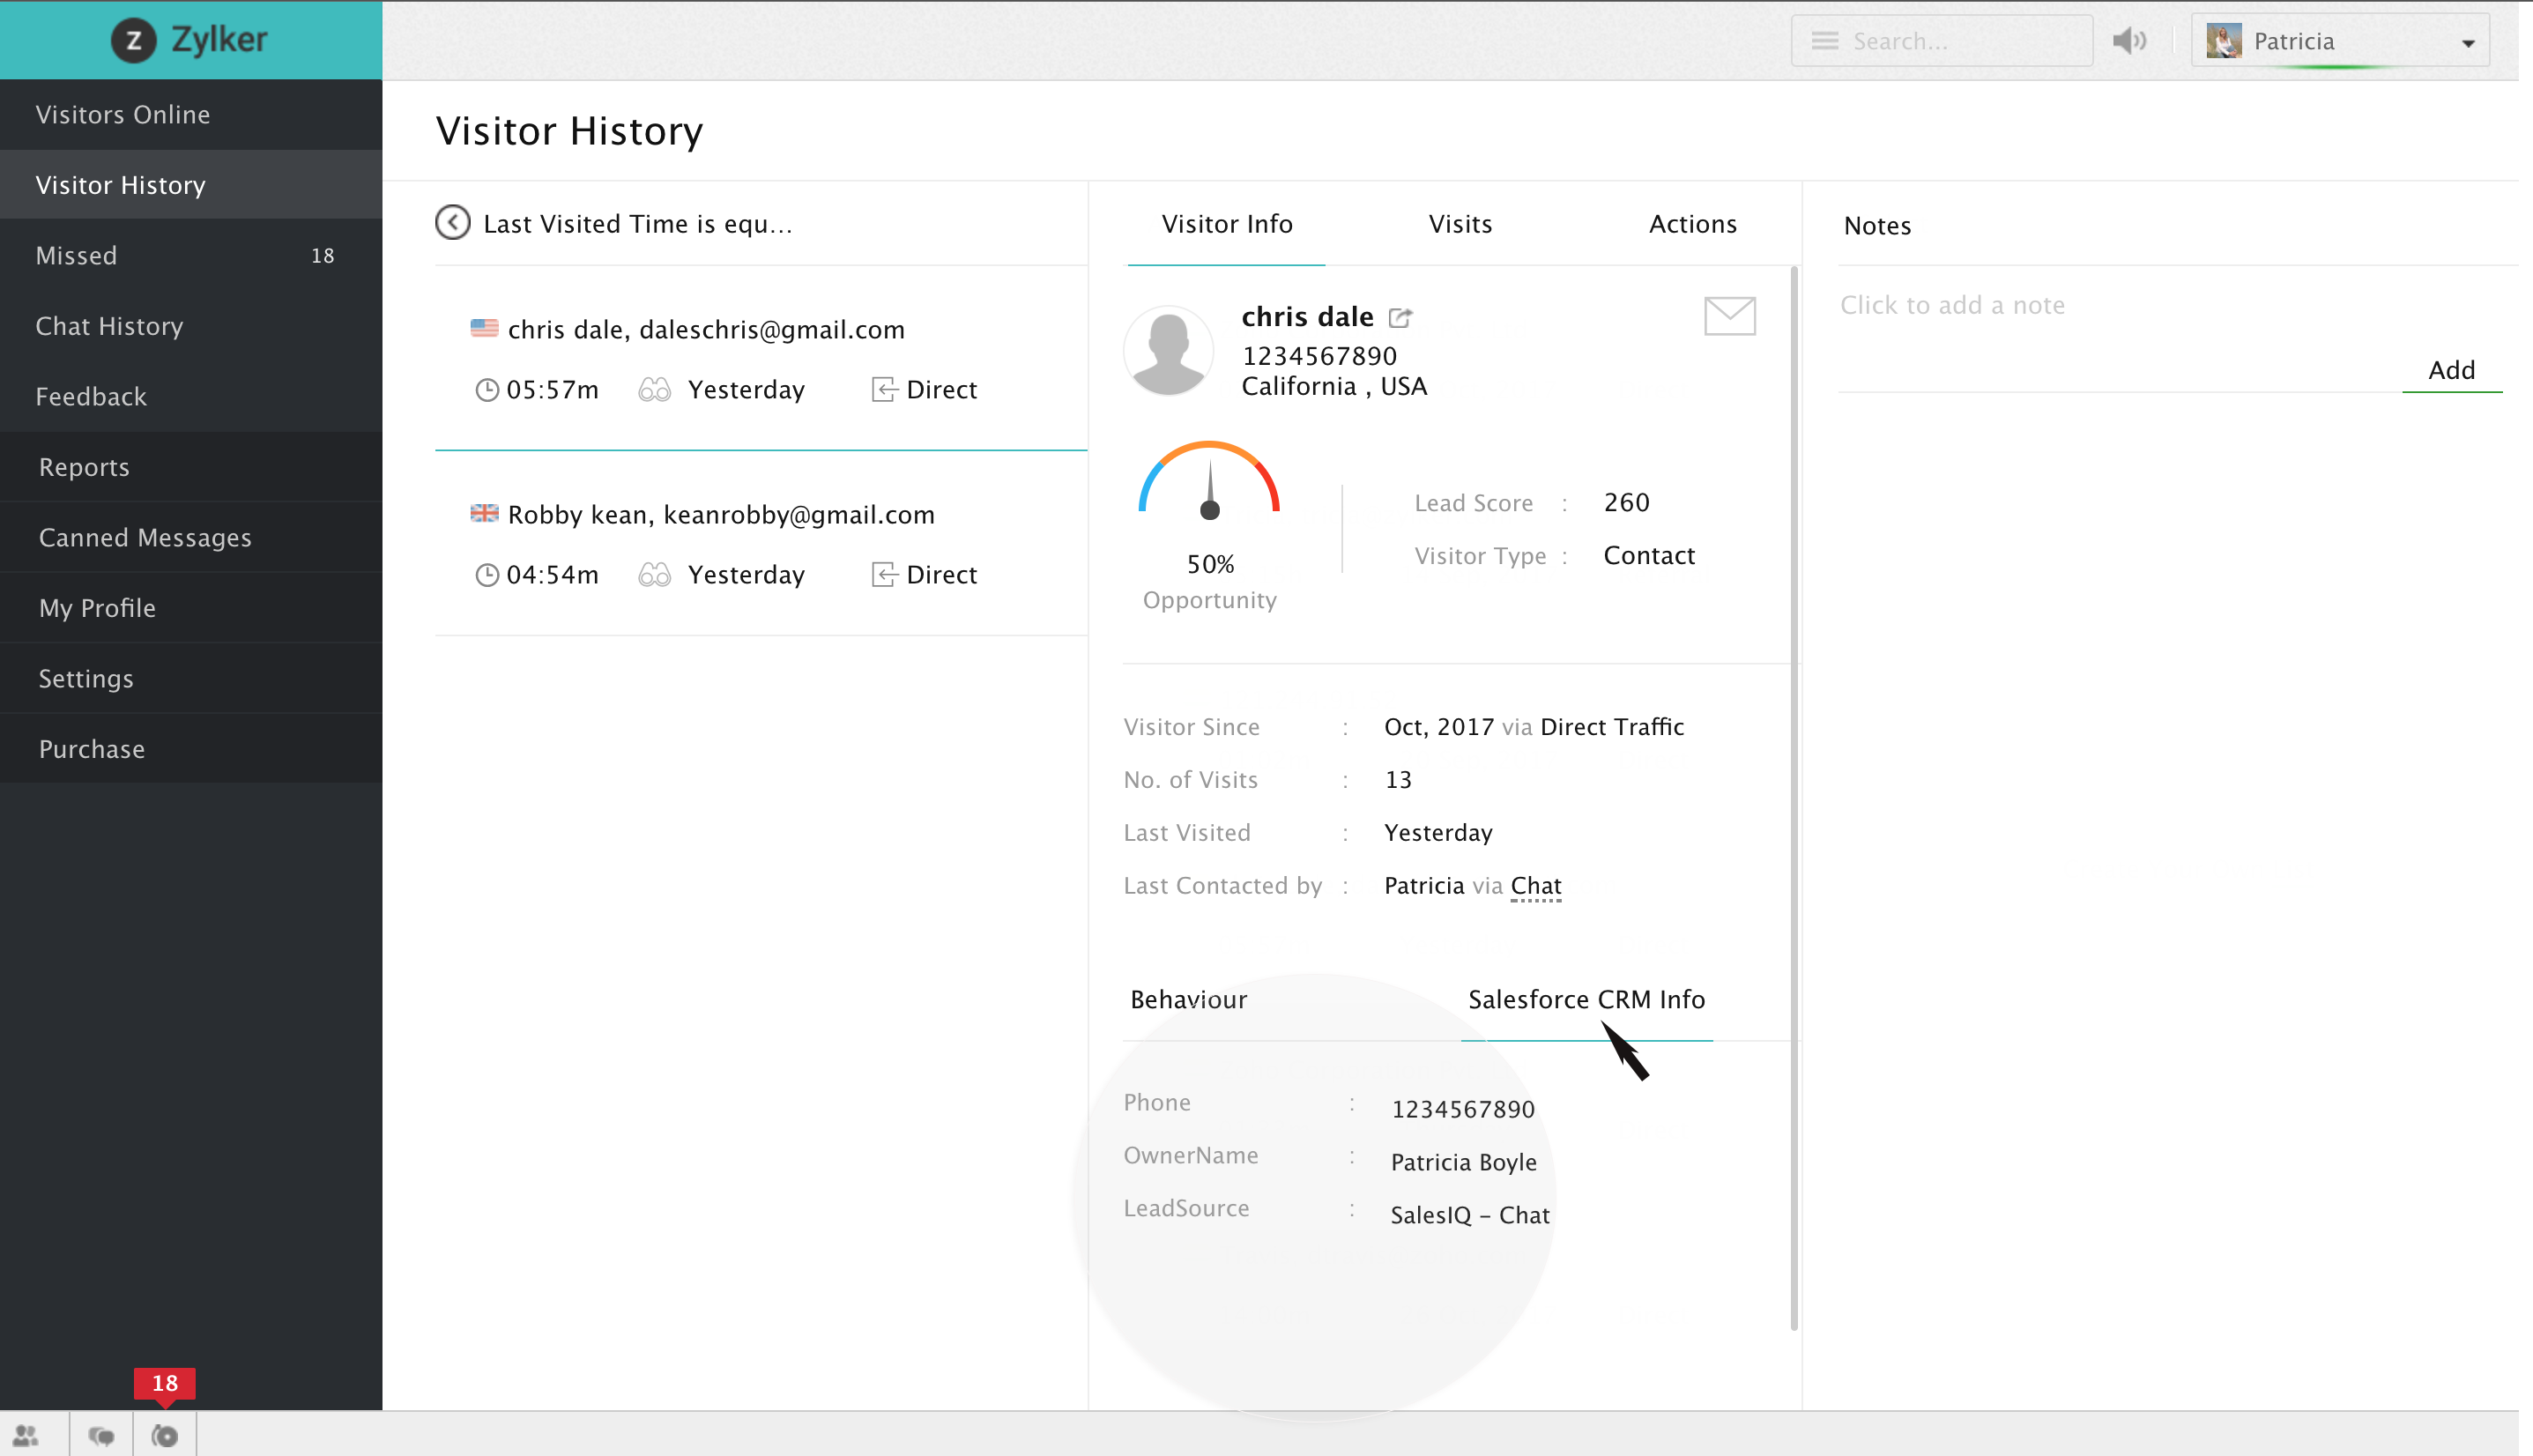
You can also view a visitor's CRM information in the visitor history tab,
- Navigate to Visitor history tab.
- Click on a particular visitor from the list displayed.
- In the window that slides in scroll through down.
- Beside the Behaviour tab, you would find a tab Salesforce CRM info.
- Click on it to view the details.
Visitor details in Salesforce
Viewing visitor’s details inside your Salesforce CRM account
If you would want to view detailed information about a visitor rather than just the excerpts, then click on the redirect icon which you can find in the right pane beside the label "Salesforce CRM info". Clicking on which you will be re-directed to your Salesforce account in a separate tab, where you can view and manipulate the details of that particular visitor.
Add visitors to Salesforce
Manually adding visitors to your Salesforce CRM from Zoho SalesIQ
A visitor who did not fall under the categories of visitor base that you had chosen earlier to be pushed into your Salesforce account automatically and seems to be quite prospective can be pushed in manually right away from your chat window.
- All that you have to do is click on "Push to CRM", which you can find in a pane onto your right.
- Then choose the tag of the visitor which can either be a Lead or Contact.
- Fill in the details asked for :
- Lead: Company name, status, phone number, assign a lead owner and add a follow-up task if required (Check in the checkbox).
- Contact: Account name, phone number, assign contact owner, add a follow-up task and create an opportunity for the contact if required.
- And click on "Add Lead" or "Add Contact" depending upon the tag that you chose.

Do remember that the field "Company" under the tag Lead is mandatory. You can either use JS API .visitor.info() to set Company's name dynamically else you can use Clearbit to identify the visitor's organization/firm that he/she is from using his/her IP address.
Converting a lead into a contact
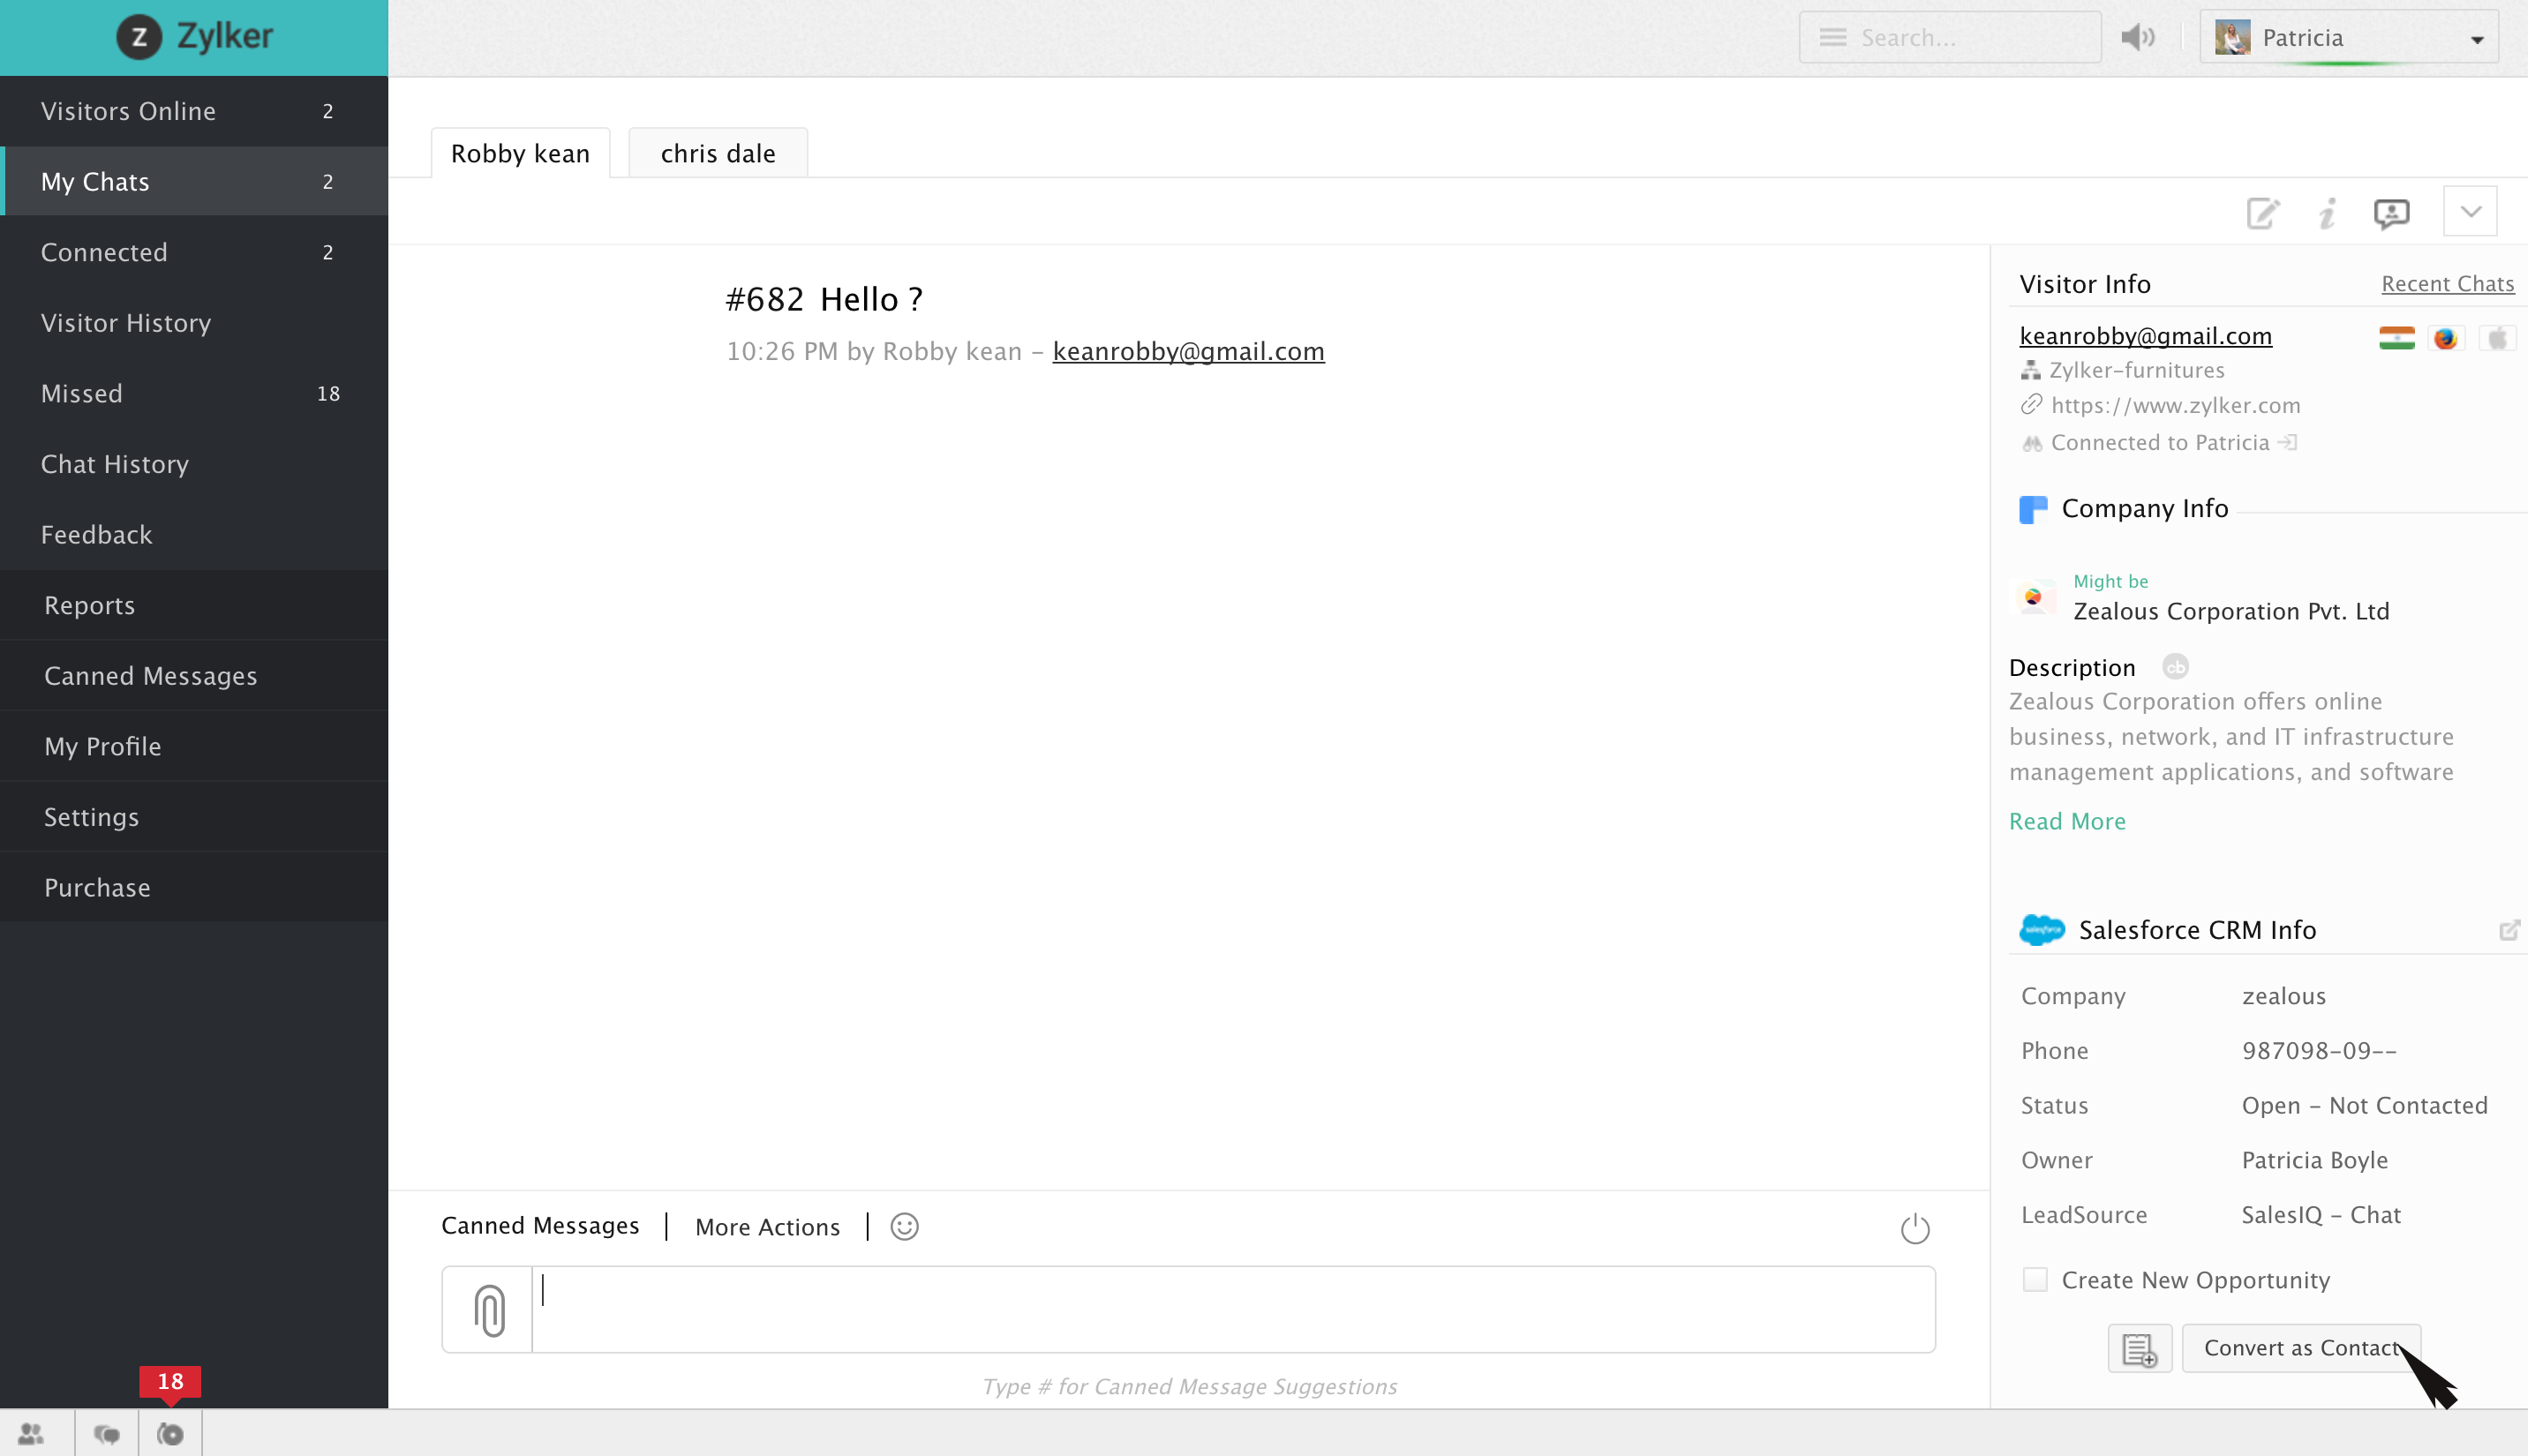
Salesforce allows you to convert a CRM Lead into a Contact right away from the chat window,
- Onto the right of the user's chat window, the particular visitor's CRM information will be displayed.
- Below which you would find a checkbox saying "Create new opportunity".
- Check in the checkbox, after which the following fields would appear,
- Opportunity name
- Opportunity stage
- Amount
- Close date
- You can add a follow-up task if required by clicking on the Add task icon right before Convert as contact button.
- Fill in these fields and click on "Convert as contact".
- If you would not want to add up an opportunity for the lead and straight away convert him/her into a Contact, then just click on "Convert as contact" without checking in the checkbox given.
Add a Lead
Adding an Opportunity for your contact
Salesforce allows you to add an Opportunity for your contacts right away from the chat window,
- Onto the right of the operator's chat window, the particular visitor's CRM information will be displayed.
- Click on "Add opportunity".
- Following fields would appear,
- Opportunity name
- Opportunity stage
- Amount
- Close date
- Fill in these fields and click on "Save".
Viewing SalesIQ data inside your Salesforce CRM account
To view the pushed SalesIQ data inside your Salesforce account it is necessary that you follow the below-given steps,
- Click on the Setup icon which you can find in the top right corner ( Fourth icon from the left)
- Then click on Object manager which you can find in the top left corner beside the Home tab.
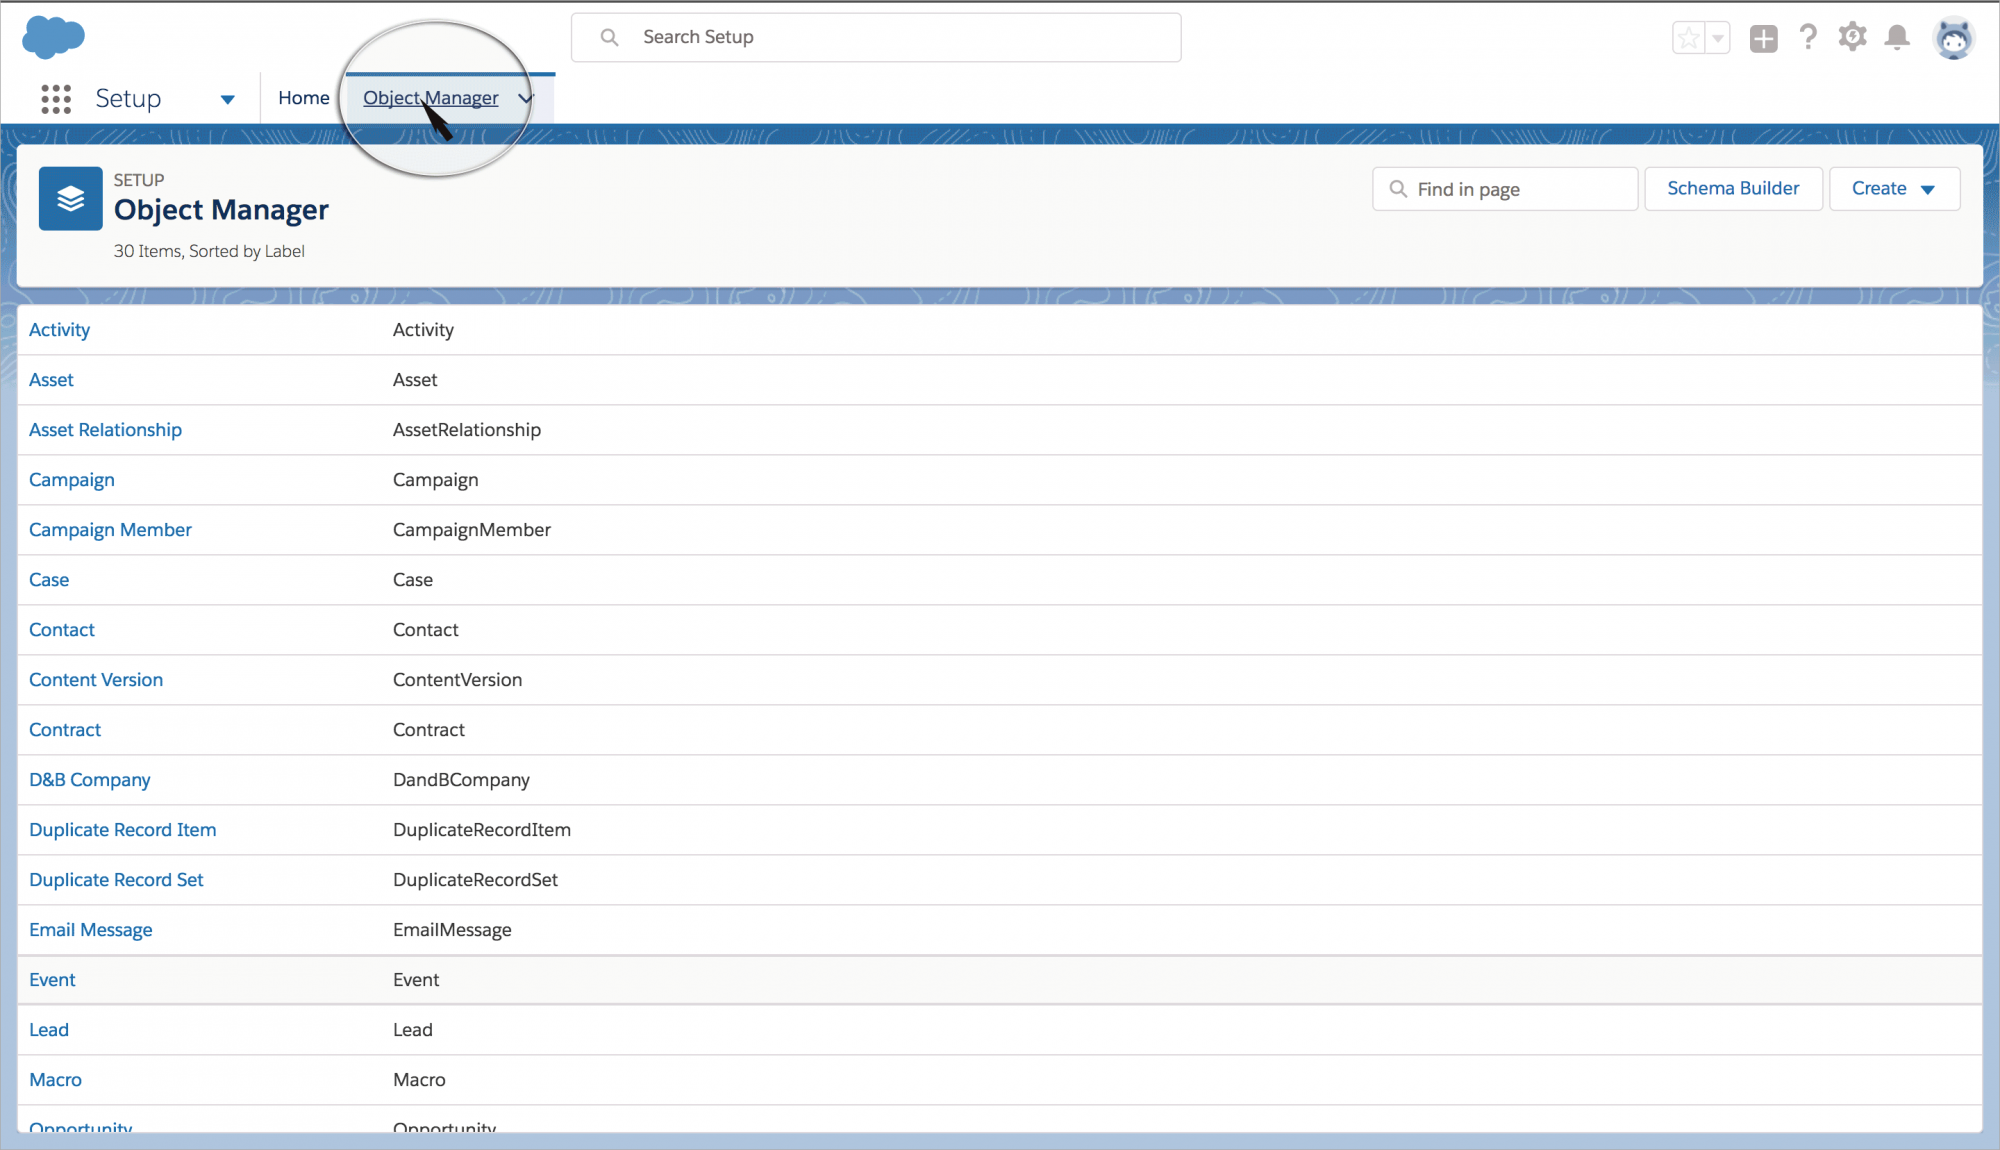
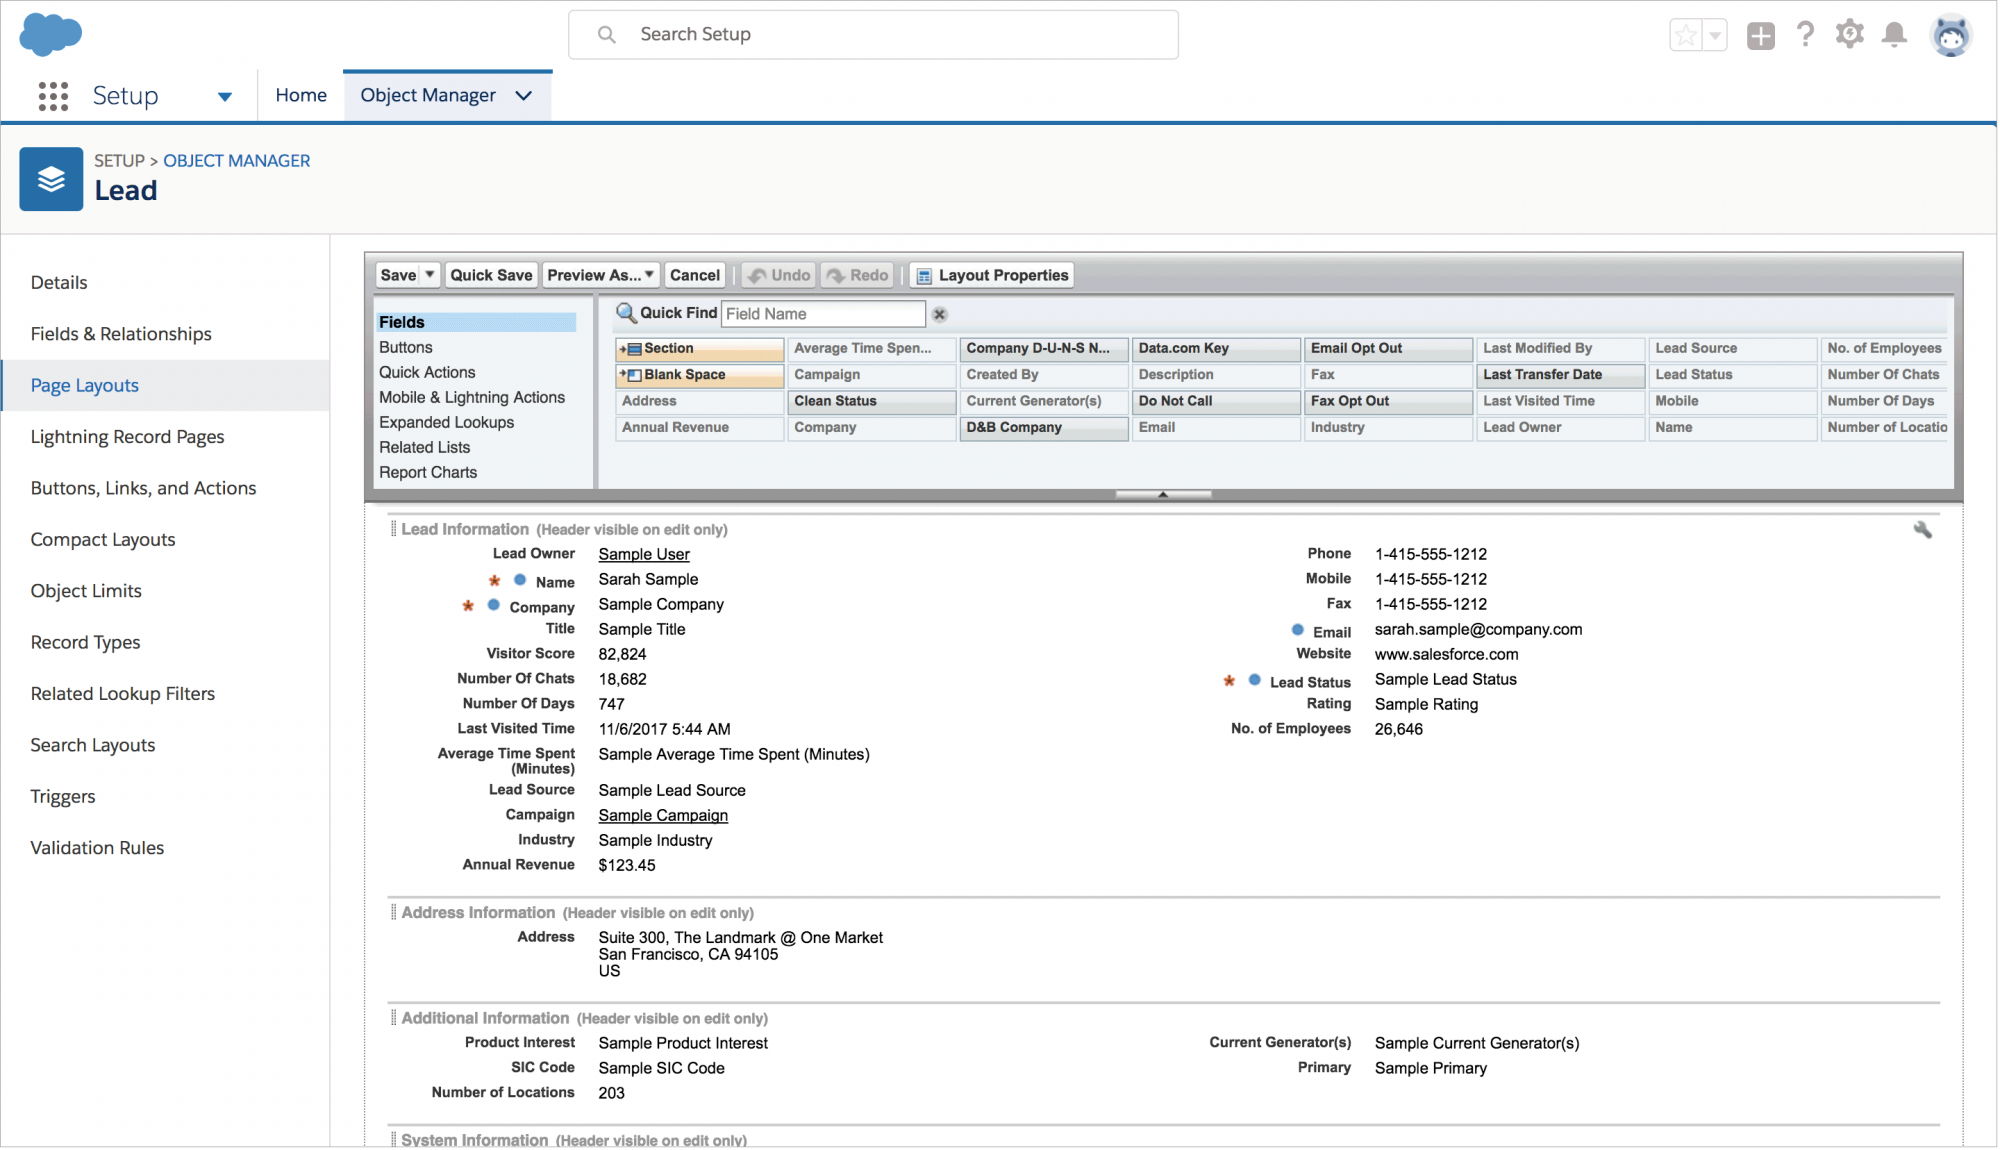
- In the list of options that appears choose either Lead or Contact .

- Then click on Page layout, which you can find in the pane onto your left .
- After which choose a layout from the list that appears.

- Then choose the following specified custom fields,
- Number of chats
- Average time spent
- Visitor score
- Last visited time
- Number of days
- Drag and drop them under the appropriate titles that you would find right below.
- Then click on save.
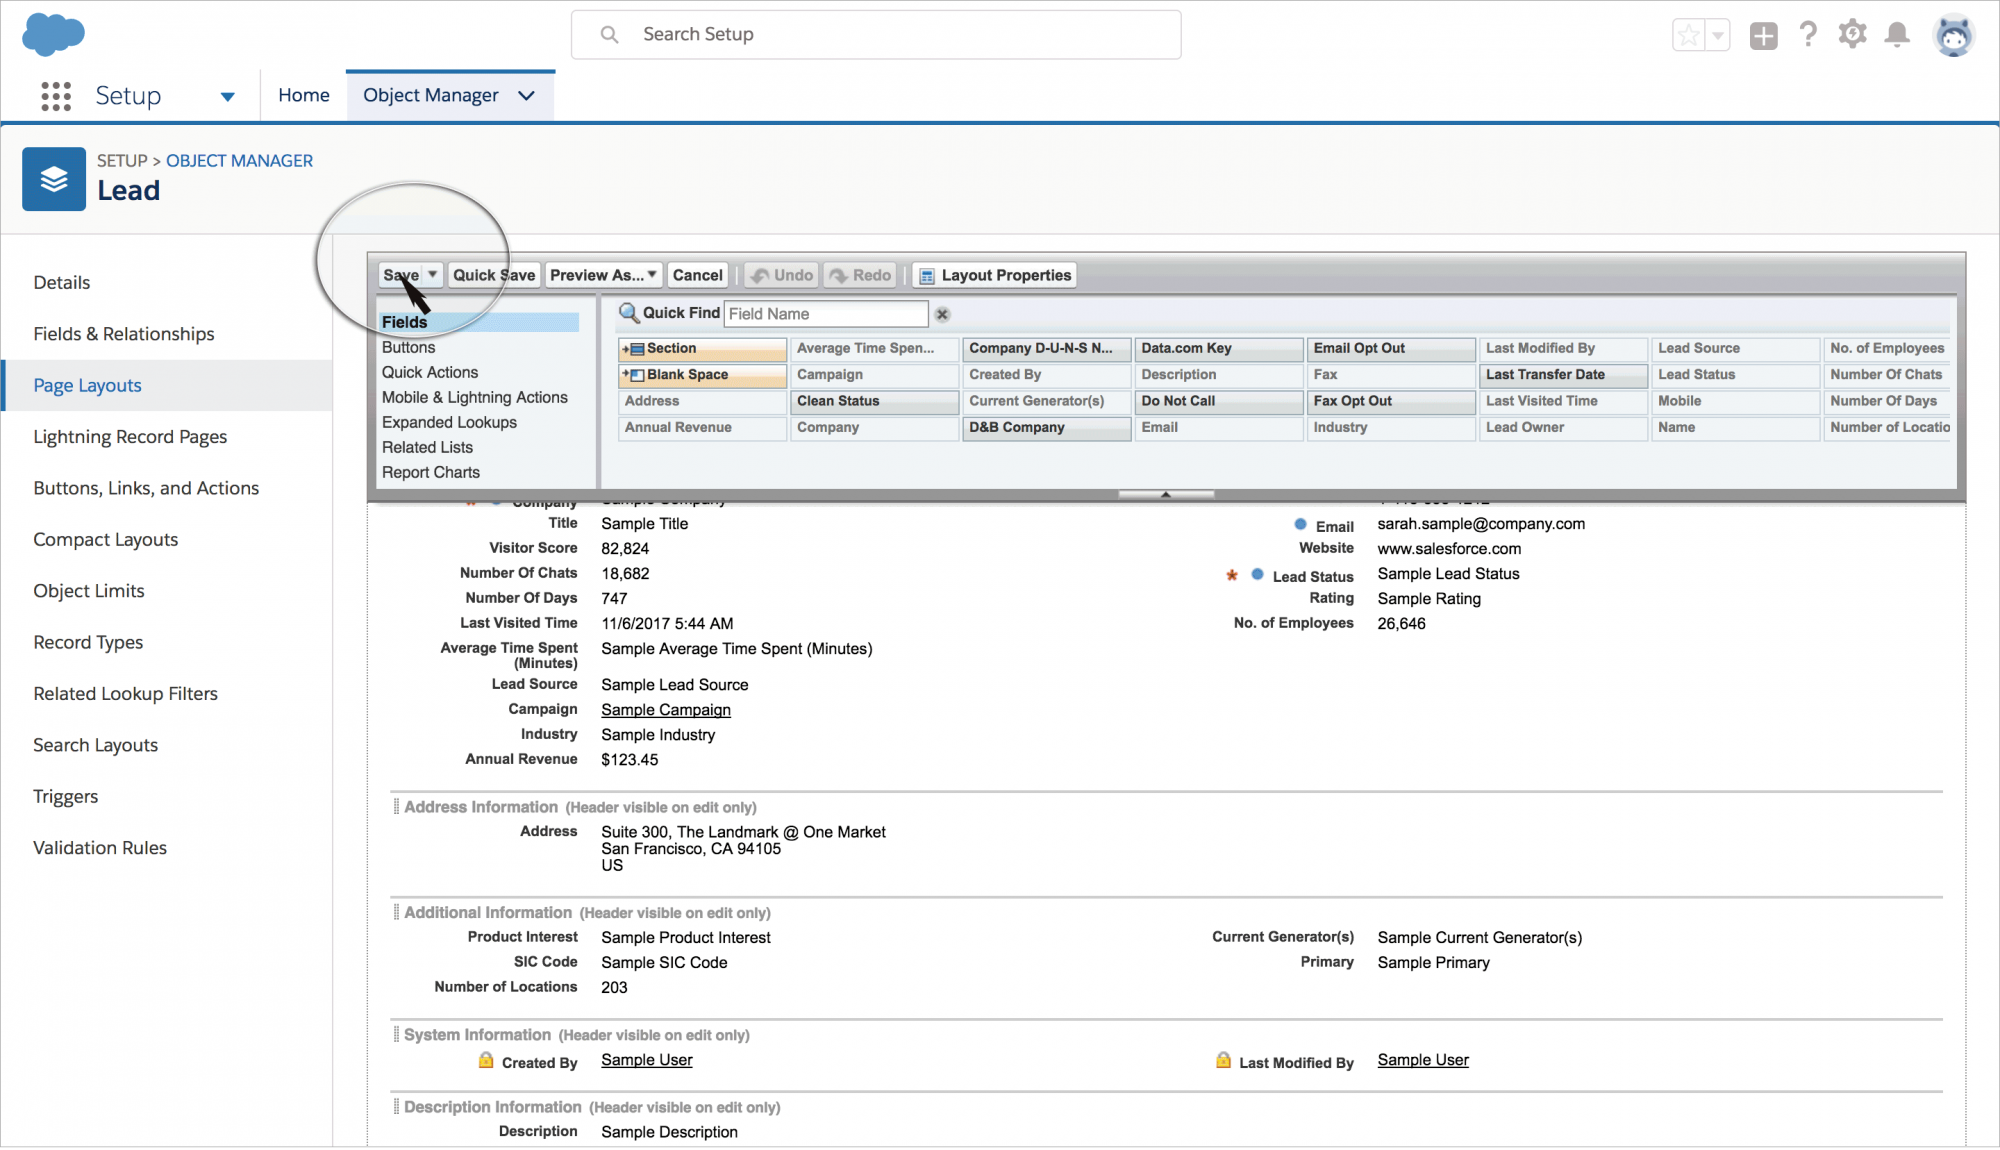
- Now you can scoot back to view the added details by clicking on a Contact or a Lead under Lead or Contact tab.
Viewing chat transcripts inside your CRM portal
If you had enabled the option for pushing in the chat transcripts from your SalesIQ account into your Salesforce CRM portal, you can access and view those chat transcripts by,
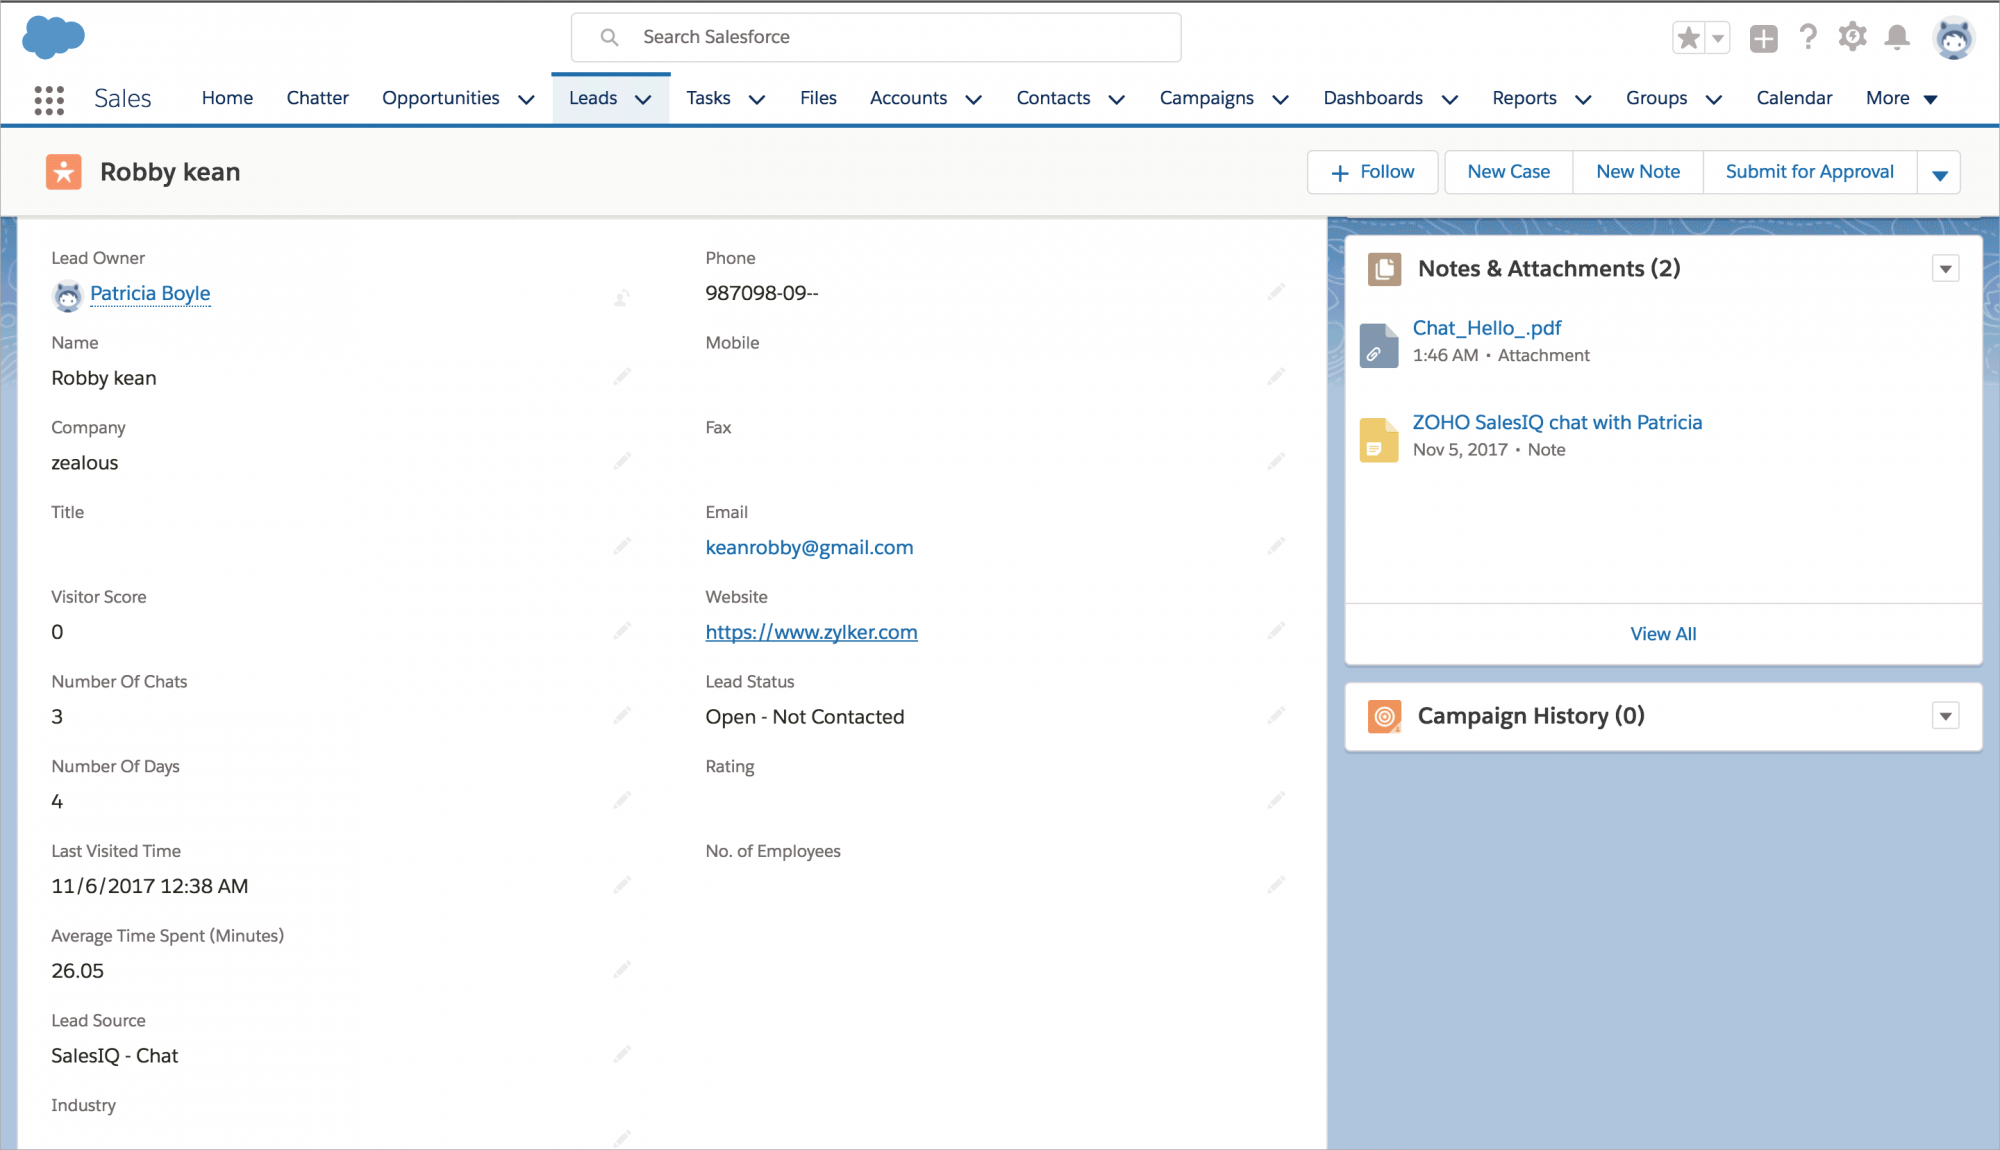
- Navigating to either Leads or Contacts tab.
- Click on any one of the visitor from the list displayed.
- In the window that appears, you can view the chat transcripts saved in PDF format with chat subjects as the file name onto your right under the label Notes & Attachments .
- Click on the desired chat transcript, to view it.
Lead Source as chat and website visit
- To identify the visitors pushed into your Salesforce CRM account right away from your SalesIQ account:
- Check the Details column of a particular Lead or a Contact.
- All the entries with the value " SalesIQ- Chat" or " Website visit " for the field Lead source are those that are pushed in from your SalesIQ account.
Notes: Auto-added and manually added
Every time your users have a chat session with the visitors, SalesIQ will automatically add a note to the ones that are to be pushed into your Salesforce account automatically with the following details,
- User's name
- Visit ID
- Time frame of the chat session
- Question brought in by the particular visitor
If you had chosen the missed visitor category in the integration section earlier, then a note will be added for those visitors too while pushing them into your Salesforce account.
Salesforce also allows you to add notes manually,
- This can be done by clicking on the add notes icon, which is the first icon above the label "Visitor info".
- Add a desired note, for future reference.
- Then click on "Save".
To view these notes,
- Navigate to either Leads or Contacts tab.
- Click on any one of the visitor from the list displayed.
- In the window that appears, you can view the added notes onto your right under the label Notes & Attacments .
- Click on one, to view it.

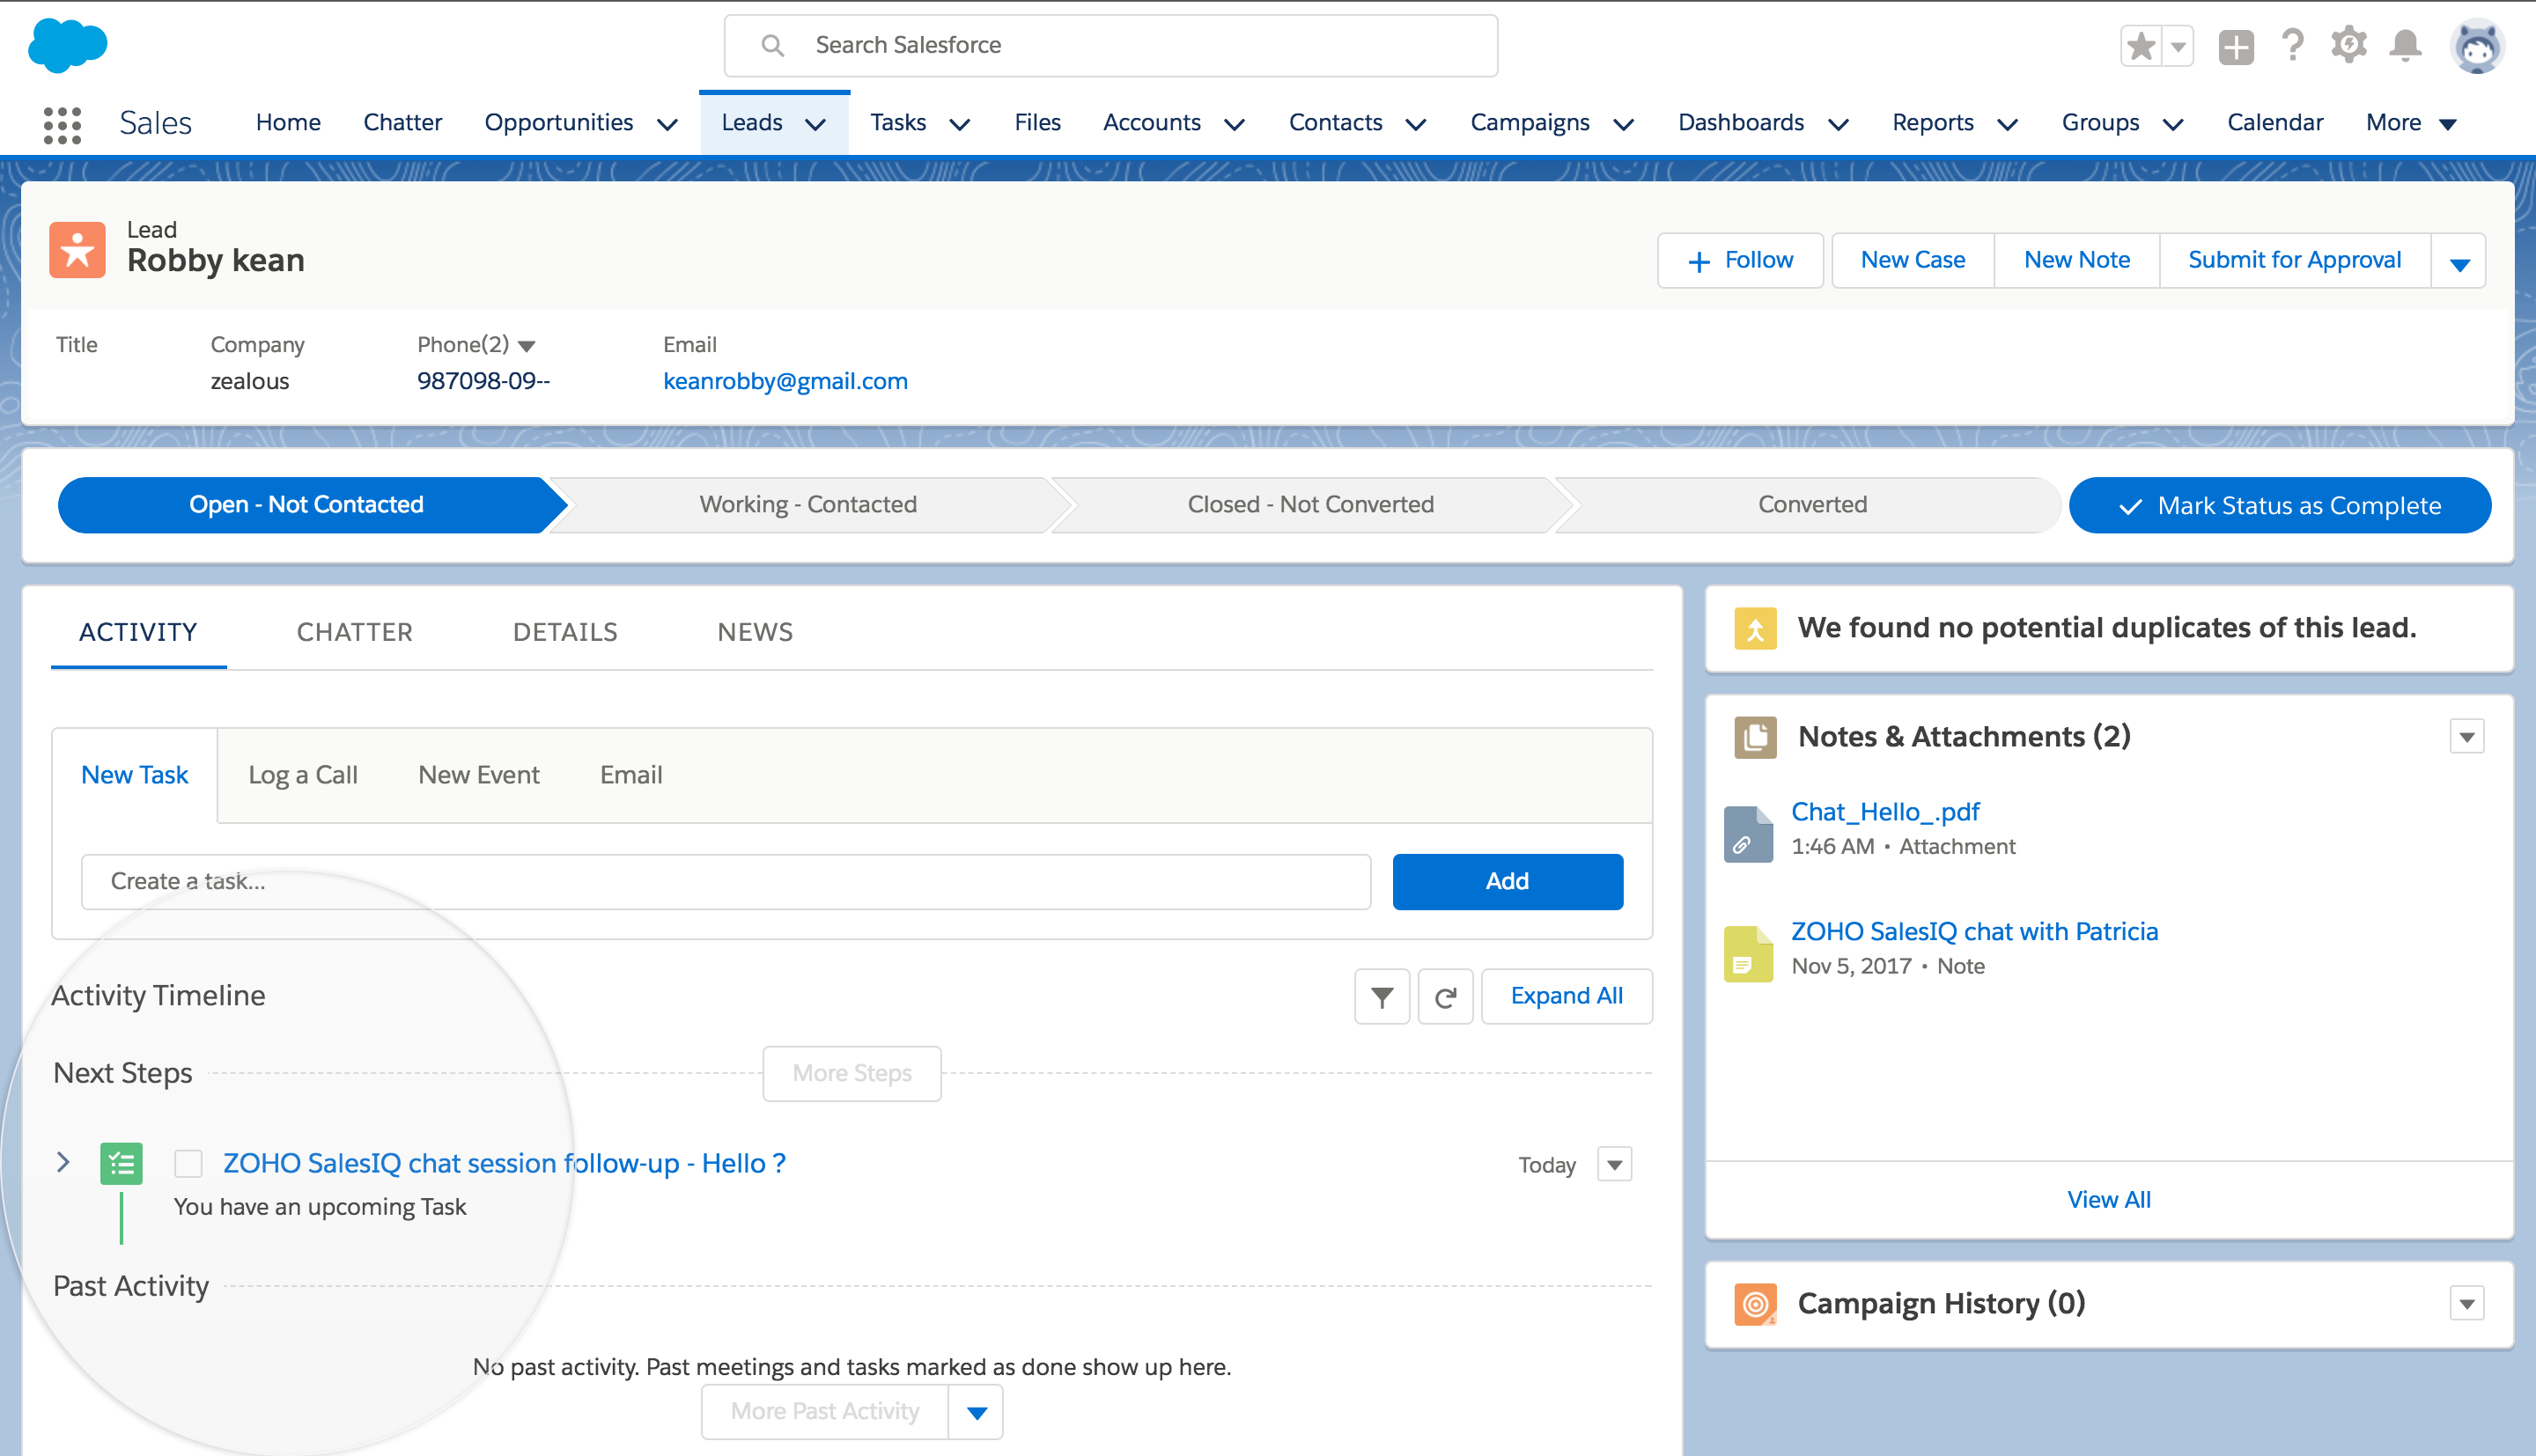
Follow-up tasks
Follow up tasks can be either added automatically by enabling this option in the integration section or by manually adding one right away from the users chat window. To view these tasks,
- Navigate to either the Leads or Contacts tab.
- Click on any one of the visitor from the list displayed.
- Then click on the Activity tab.
- A list of upcoming activities will be displayed below the label " Activity Timeline ". And below these activities, all your past activities will be listed down.
- Click on any one of the upcoming activity.
- Details like Assigned to, Subject, Due date, status, due date, from, to, User to whom the activity is assigned to etc., will be displayed.
- To change the status of a particular task click on the drop-down icon right beside the task name, in the options that appear choose Change status option.
- You can also avail a bunch of options for manipulating task related data under this drop down icon like edit comments, change priority, change due date etc.,
Related Articles
Integrating with Salesforce account
Unravel the best techniques to bag customer satisfaction by integrating your Salesforce account with your SalesIQ account. Login into your “Zoho SalesIQ” account. Navigate through Settings -> Integrations -> Other Applications section. Choose ...Salesforce for Zoho Directory
Configure SAML in Zoho One Sign in to the Zoho One Admin Panel. Go to Marketplace, then use the search bar to find and install Salesforce. Name your app and enter your Salesforce.com Organization ID. Note: You can find your Salesforce.com ...Configure your Salesforce Integrations
Type of visitors to be pushed into your Salesforce account Salesforce integration section allows you to choose the type of visitor base that you would like to push into your Salesforce account automatically. Only Missed – Missed visitors will alone ...Migrating Data from Salesforce
Follow the steps in this document to migrate your Salesforce data into Zoho CRM. Data files from Salesforce The zip file you upload should contain all the files in CSV format and a folder named Attachments. This folder contains the source files used ...Set up sync with Salesforce
Using Zoho Campaigns' integration with Salesforce, create well designed branded email campaigns and send targeted emails to your contacts in Salesforce. Improve your engagement with your contacts using emails and measure how these email campaigns ...