Setting Up Webforms
Creating a web form involves three steps:
- Building the form: Drag and drop fields to build a form and format it in the WYSIWYG editor
- Specifying the form details: Add details such as the form name, landing page URL, record assignment rule, and notification details
- Generating the code for the form: Embed the form using various code formats, including in third-party sites (WordPress, Google Sites, Facebook, and Joomla)
You can build web forms to generate records for the Candidates and Contacts modules. The following elements are available when building a web form:
Option | Description |
Add Fields | Drag and drop the fields you need in the form. Some of the fields are already added by default when you build a new form. |
Set fields' font and form layout | Use the WYSIWYG editor to change the font style and size, background color, and alignment of the fields in the form. |
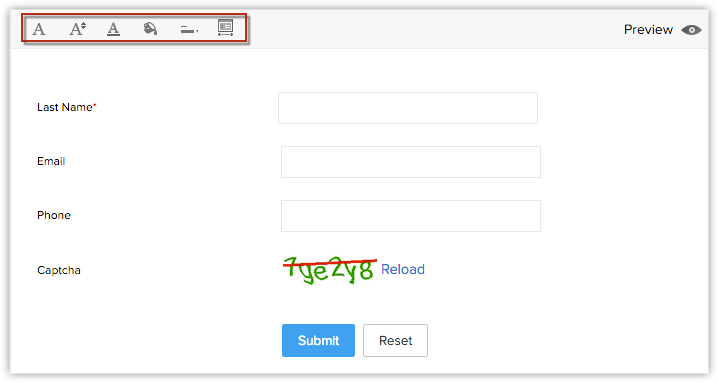
Insert CAPTCHA | CAPTCHA can be used for added security in feedback forms, website registration, and comments from applicants. Add captcha so that the Zoho Recruit system can prevent unauthorized automated spamming programs from filling in the web form. This option is only available in the Paid Editions. |
Upload files in the form | Use this option to store files uploaded through your candidate or contact forms, such as screenshots of an issue, quote requests, or candidate photos... Users can upload up to 25 files and the total size of all the files cannot exceed 10 MB. If the total file size exceeds this limit, the form will not be submitted and the record will not be added to Zoho Recruit. This option is available in all editions. |
Mark fields as mandatory | Collect important information such as a candidate's name, email address, and mobile number when they fill in the web form by marking these fields as mandatory. |
Mark fields as hidden | Add a hidden field and its value to the form. These hidden values are submitted along with the web form but are hidden to the applicants who fill the form. |
Add help link for a field | A field you provide may require data to be filled in a specific format. For example, the date format may need to be specified in DD-MM-YYYY. You can use this option to add a tip or hint to let the applicant know which format to use. |
Change button name | You can change the name of the call-to-action button from the default Save or Submit to meet your requirements. |
Specify the location URL of the form | The location URL is the URL of the page where you plan to host the web form. Specifying the URL helps prevent spam and allows only forms submitted through the right domain to be captured as valid information. |
Specify landing page URL | This is the URL of the web page which the applicant will be redirected to when the web form is submitted. |
Select record assignment rule | Records generated through the web forms can be automatically assigned to users in Recruit using assignment rules. |
Specify notification options | Set notifications to be sent to the record owners and the applicants who submit the forms. Email templates or autoresponse rules can be used to send notification emails. If the email needs to be sent to users in your organization, it is sent as a notification from the email address support@zohorecruit.com. |
Embed form code | Embed the web form's code in your web page. The code is available in two different formats: embed code and iFrame code. |
Generate Web Forms
To generate web forms for candidates. clients, or contacts:
- Navigate to Setup > Careers Website > Web Forms.
- Choose the module from the dropdown list in the Web Forms page.
The existing web forms for the selected module will be listed. - Click Create Web Form.
- In the web form builder:
- Build a form
- Drag and drop the fields that you need to the web form
- Insert CAPTCHA
- Add the option to upload files
- Mark fields as mandatory
- Make fields hidden in the form
- Provide hint or help links for fields
- Set font and layout of the form
- Change button names
- Drag and drop the fields that you need to the web form
- Specify form details and other options
- Add form details including form name, landing page URL, and form location URL
- Set record assignment rule
- Set notification options
- Add form details including form name, landing page URL, and form location URL
- Copy web form code and embed options
- Get the code to embed your web form in your site and other third-party sites
- The code is available in two formats: Embed code and iFrame code.
- Get the code to embed your web form in your site and other third-party sites
Step 1: Build a Form
Add Fields
Drag and drop the fields you need in the form and change the font style and size, background color, alignment of the fields, and other elements of the form design.
To add fields and set the font and layout of the form:
- In the Fields List tab, click on a field and drag and drop it to the form builder.
- Make changes to the font, background color, field label alignment, and form width using the icons at the top-left of the builder.

Note
Some fields are already added to the form by default.
For candidates, clients, and contacts, the Last Name, Email, and Phone fields are added by default.
- You cannot remove the Last Name field from the form, for candidates, clients, or contacts as it is mandatory for creating a record.
- To add custom fields, you first need to create them in the relevant module.
- If you add the Account Name field to a web form for contacts and contact details are submitted, an account will be automatically created in Zoho Recruit. If an account with the same name already exists in your Recruit account, a new account will not be created when the form details are submitted.
- An account will be created even if mandatory field details are not provided. Later, when the account is edited, you will need to provide the other mandatory details before saving the record.
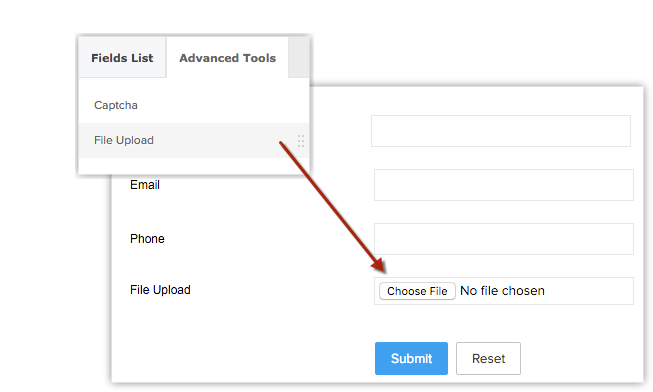
Upload Files
You can collect files using your candidate or contact forms, such as screenshots of an issue, quote requests, or photo of individuals. The size of the file must not exceed 10 MB. If the file size exceeds this limit, the form will not be submitted and the record will not be added in Zoho Recruit. This option is available in all editions.
To add the option to upload files:
Click the Advanced Tools tab.
Drag and drop the File Upload field.
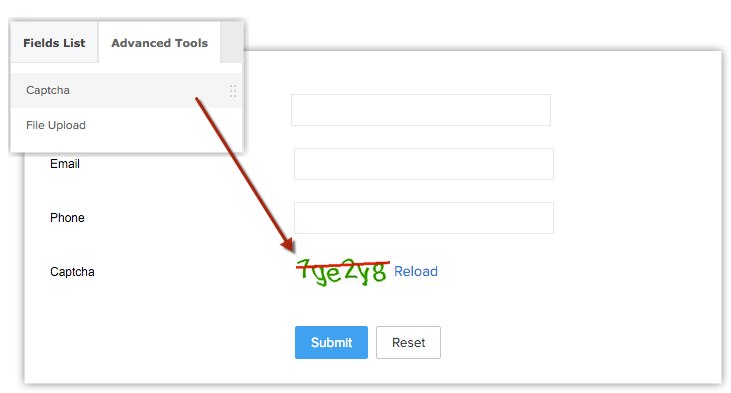
Insert CAPTCHA
Add CAPTCHA to prevent unauthorized automated spamming programs from filling the web form. This option is available in all Editions.
To insert CAPTCHA:
- Click the Advanced Tools tab.
- Drag and drop the Captcha field.
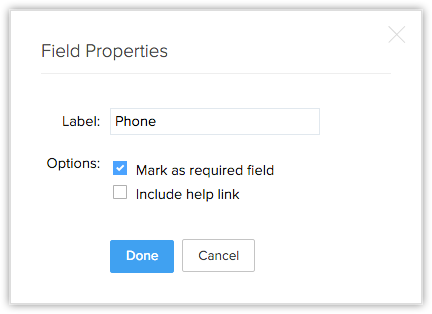
Mark Fields as Mandatory
Ensure you collect important information such as your respondent's name, email address, and mobile number by marking fields as mandatory.
To mark fields as mandatory:
- Move your mouse to the field that you want to mark as mandatory.
- Click the Settings icon.
- In the Field Properties pop-up, select the Mark as required field checkbox.
- Click Done.
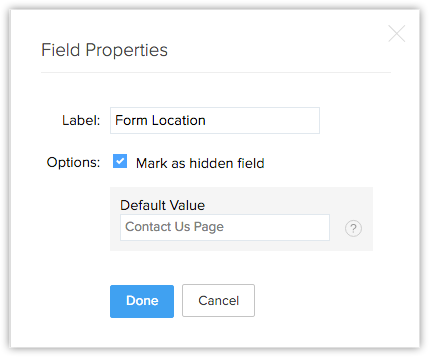
Mark Fields as Hidden
Add a hidden field and its value to the form. These hidden values are submitted along with the web form but are hidden to the applicants who fill in the form. For example, if you have hosted the same form on various web pages, a hidden field can help you identify which record is generated from a web form hosted on which web page.
To make fields hidden in the form:
- Move your mouse to the field that you want to hide in the form.
- Click the Settings icon.
- In the Field Properties pop-up, select the Mark as hidden field checkbox.
- Specify the value for the field and click Done.
Provide Help Link
A field you add to your form may require data to be filled in a specific format. For example, the date format may need to be specified as DD-MM-YYYY. You can use the option to add a tip or hint to ket the applicant know which format to use.
To provide a hint or help links for fields:
- Move your mouse to the field you want to provide a hint or help link for.
- Click the Settings icon.
- In the Field Properties pop-up, select the Include help link check box.
- Choose one of the following options:
- Link & Text: Enter the link URL and text to display for the link.
- Link Only: Enter the help or hint text. For example, "The date field must be in the format MM-DD-YYYY"
- Link & Text: Enter the link URL and text to display for the link.
- Click Done.

Change Button Name
There are two default call-to action-buttons: Submit and Reset. You can rename these buttons to whatever you want.
To change the button names:
- Move your mouse to the field you want to rename in the form.
- Click the Settings icon.
- In the Field Properties pop-up, modify the field name.
The name of the field will only be changed in this form, not elsewhere. - Click Done.

Remove Field from the Form
You can easily remove unwanted fields from the web form.
To remove a field from the form:
- Move your mouse to the field that you want to remove from the form.
- Click the Delete icon.
Preview the Web Form
See what your web form looks like before publishing it on your web site.
To preview the form, click the Preview link in the form builder.
A preview of the form will open.

Step 2: Specify Form Details
- Enter a Form Name, for example Feedback, Contact Us.
- Specify a Landing page URL. When an applicant submits the form, they will be redirected to the URL you specify here. It must start with "http://" or "https://".
The length of the Return URL must not exceed 255 characters, for example: https://www.zylker.com/thank-you.html. - Specify a Form Location URL. This should be the web page where the web form will be hosted. It must start with "http://" or "https://", for example: https://www.zylker.com/contact-us.html.
If you plan to host the web form on multiple websites or you are not sure where the web form will be hosted, enter * in this field. This prevents spam as only forms submitted through the correct domain will be captured as valid information.

Choose one of the following options for Assign Owner to assign the records that are submitted via web form to a Recruit user.
- Choose a User: Select a user from the dropdown list. All the records generated through the form will be assigned to the selected user.
- Create or Choose [Module] Assignment rule to assign ownership: Select an existing assignment rule or create a new one. Records will be assigned to users based on this rule. You can choose to implement the Round Robin method to assign records to the users.
- Enable Notify [Record] Owner if required and select an email template to be sent to the record owner. If the email is sent to users in the organization, it will be sent as a notification from the email address support@zohorecruit.com.Enable Acknowledge Applicant if you want to send an email to the person who submitted the web form. After you select an email template, you will be prompted to enter the From and Reply to addresses.
Choose one of these options in the dropdown list:
- Your account email address
- The organization email address
- The email address of the record owner
- Another user's email address
Using Autoresponse Rule: Use one of the existing autoresponse rules. Autoresponse rules can be triggered by details gathered using the web form to send specific emails.
If the details gathered through the web form do not satisfy the autoresponse rule criteria, the email template selected in the second option will be sent as an acknowledgment email.Default response for all applicants: Choose an email template to store the candidates, clients, or contacts added via this web form.

Step 3: Use Web Form Code to Embed
The code for the web form is available in two formats: code to embed an iFrame code. The code is also available for some third-party sites: WordPress, Facebook, Google Sites, and Joomla. Please note that the Script and iFrame codes are available in all editions.
Select Embed or iFrame from the dropdown list.
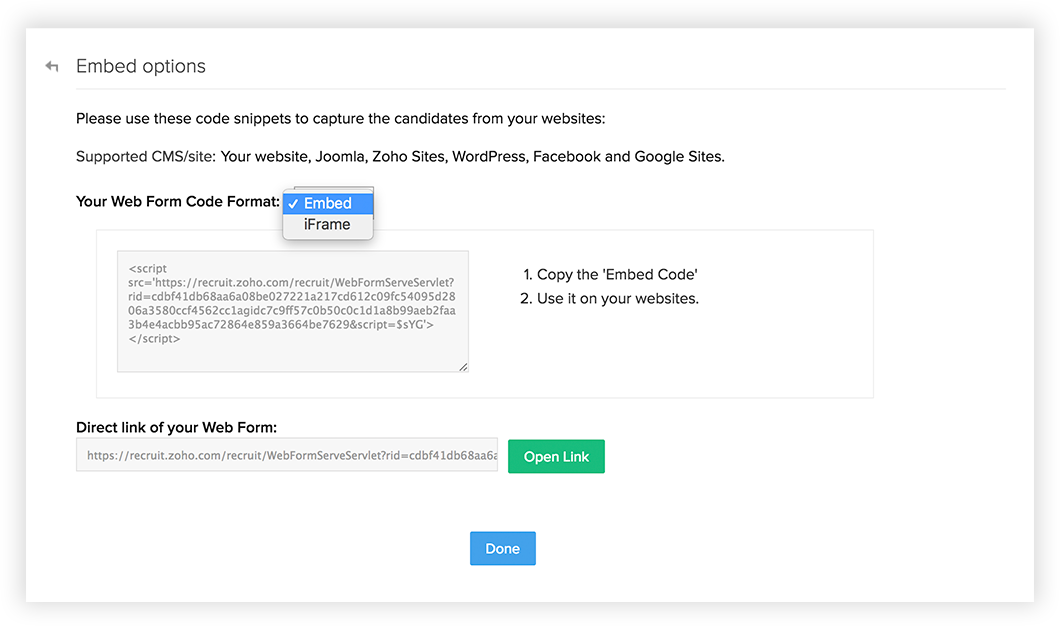
Copy the code and paste it to the website where you want the web form.
Click Done.
Note
- In order to avoid spam, the web form (HTML file) must be published on an active web server (Apache, Microsoft, IIS, etc.).
- The web form will not work if you submit the form values from your desktop.
- When the HTML code is generated for the web form, some entities are hidden by default. If you remove these hidden entities, the web form will not work. Here is the code snippet that must not be removed from your web form code: <input type="hidden" name="xnQsjsdp" value="" /> <input type="hidden" name="xmIwtLD" value="" /> <input type="hidden" name="actionType" value=""
Related Articles
Webforms
Web Forms simplify the method of capturing visitors or users information from your website into your ATS system. They are designed to automate the import of data from other websites into Zoho Recruit. Non-technical users find it easy to design and ...Setting up SalesIQ Integration
Zoho SalesIQ integration with Zoho CRM, also called as Visitor Tracking, allows you to engage with people visiting your website through chat and push their information into CRM. You can also embed a chat widget on your webpage and converse with the ...Webforms for Google Sites
Web forms simplify the process of capturing visitors' or users' information from your website in your Recruit system. They are designed to automate importing data from your website into Zoho Recruit and to enable users to design and publish their own ...Setting up Zoho Workerly for your organization
The Setup page in Zoho Workerly helps you configure all settings necessary to get your account up and running. Be it personalization, automation or third-party integrations, you can initiate all functions from the minimalist Setup screen of Zoho ...Setting up Web Forms
Creating a web form involves three steps Building the form - Drag and drop fields to build a form and format it easily with the WYSIWYG editor. Specifying the form details - Add details such as form name, landing page URL (where the visitor needs ...