Signup Autoresponder
Zoho Campaigns' autoresponders are tools designed to help you engage better with your contacts. Autoresponders help you to send a series of automated messages based on contact activity. You can automate communication such as welcome messages, birthday wishes, sending onboard training series, and more.
There are seven different types of autoresponders, with each one fulfilling a specific function. Pick the autoresponder that matches your needs. In this guide we will guide you through
Understanding signup autoresponder
Signup based autoresponder triggers when a contact enters or signs up to the mailing list associated to it. You can schedule the messages based on the contact signup.
Listed below are few scenarios where sign-up based autoresponder can be made use of.
- Introduce new customers to your company information, brochures and archives.
- Sending an online email tutorial at periodic time intervals.
- Nurture new leads with series of emails.
- Promotion of a product or website.
- Send a confirmation email after a purchase.
User scenario
Harry owns a web designing application. He has embedded a signup form in his website. His needs are to send his contacts a welcome email as soon as they sign up, introduce them to his product benefits and follow them up with feature updates. For this he sets up a sign-up based autoresponder and schedules the first welcome message as 'Immediately after signup'. He schedules the next message as 'Two days from joining the mailing list' and so on. Thus he can with much ease keep his contacts updated about his application.
Create a signup based autoresponder
- From the Navigation Toolbar choose Automation and select Autoresponders .
- Click Create Autoresponder . Mouse over the Signup autoresponder and click Create .
- Fill in the following information:
- Name the autoresponder for your future reference.
- Select a mailing list that should be associated with your autoresponder. If necessary, you can create a new mailing list.
- Select segment of the mailing list if you want to send messages only to the segmented contacts.
- Include contacts added to your mailing list via Import and CRM Sync provided you have requirement.
- Click Create .
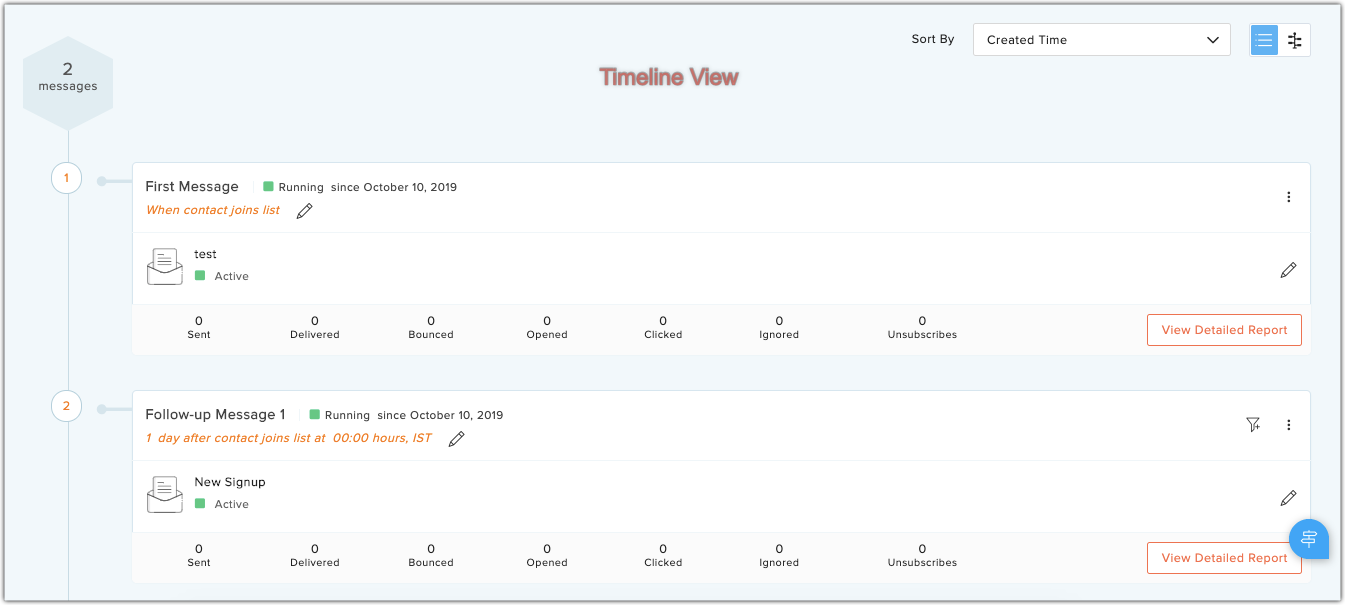
Signup autoresponder has two views: the timeline view, and the tree view. You can toggle between these two views using the switch in the top-right corner.
Create the signup series
- Click Create Message button.
- Add message details and content. Learn how.
- Click Send for Review to send your message to our spam compliance team.
- Once the message has been reviewed, click the Set Delay button. Here you need to define when your message should be sent relative to your contacts' sign up.
- Click Create Follow-up Message and create the follow-ups in the similar manner.
Click Activate to start sending your messages. Each message's schedule is based on the contact signup. To stop the whole series you can disable the autoresponder.
Managing autoresponder messages
To edit the message schedule:
- Click the Edit icon to the right of your message schedule details.
- Select a time to send your message, then save your changes.

Notes :
- Any timing changes may take up to 24 hours to take effect.
- It may take up to 30 minutes from the scheduled delivery time for the autoresponder message to be sent.
To edit an email:
- Click the More icon next to the email you want to edit.
- Select Edit from the list.
- Make the intended changes and click Save and Exit .
Note :- Emails in an autoresponder can be edited only before activating the autoresponder.
- Any changes in the reviewed email content must be sent for another review.
To delete an email:
- Click the More icon next to the email you wish to delete.
- Select the Delete option. A pop-up window will appear asking you to confirm. Click Delete to confirm.
Note : Only a message in draft can be deleted.
To delete a message:
- Click the Delete icon on the right side of your message. A pop-up will appear, asking you to confirm.
- Click Delete to confirm.
Note : Deleting a message will delete all the emails associated with it. End-of-series action
Once the autoresponder message series comes to an end, you can take further actions on contacts present in the mailing list to which the autoresponder was associated. You can remove contacts from the existing mailing list and/or add them to a new one.
Configuring End of series actions is as follows:
From the autoresponder summary page, navigate to the End-of-Series section at the bottom of the page.
To remove contacts from the list:
- Click the Configure Now link found in the R emove contacts section.
- Provide your preference as to when you wish the action to take place (either immediately or scheduled for later).
- Click Save to confirm.
To add contacts to another list:
- Click the Configure Now link found in the Add Contacts section.
- Select a mailing list to add the contacts to. You can also create a new mailing list here.
- Provide your preference as to when you wish the action to take place (either immediately or scheduled for later).
- Click Save to confirm.
Note : The end-of-series actions' schedule is dependent on the last message of the series Click the View Reports link to see contacts that were removed from the list or added to a new mailing list. You can pause these actions any time you want and enable it later clicking on the Pause/Enable link.
To filter recipients for messages:
Use criteria to filter the recipients of each message. Criteria can be based on contact information or recipient activity. Only contacts who meet the specified criteria will receive that particular message.
- Navigate to the message that you want to add criteria to.
- In Tree view: Click the Add criteria to filter recipients link.
- In Timeline view: Click the Add criteria icon.
- Choose Contact information or Recipient activity .
- Define the condition by which to filter your contacts.
Note :
- You cannot filter contacts for the first message of the series.
- To filter contacts by recipient activity the previous message should have been sent to at least one recipient.
Editing the source of contacts
- Navigate to the recipient details section at the top of the screen.
- Click the Edit icon.
- Check or uncheck the Include contacts added via Import and CRM sync option to change the source of contacts.
Creating and managing multiple email versions
The signup autoresponder lets you create multiple emails under one message and have one active at any given time.
To create alternate message content:
- Navigate to the intended message and click Create another version . You'll be redirected to the message creation page.
- Add the message details and the content.
- Click Send for Review to send it to our compliance team.
To manage the alternate content:
After you have created alternate email, it will be listed under your existing content. Click Show more to view all of your message content. You can activate them by clicking the Activate option next to the message content. Other versions will be deactivated automatically.
Sending campaigns to autoresponder opened and clicked recipients
You can send campaigns to recipients who have opened and clicked your autoresponder messages.
- From the autoresponder timeline, navigate to the Reports section and click Send email button on the top-left corner of the screen
- Select from the options Opened or Clicked from the drop-down menu.
- Select from the options All messages or Any message from the drop-down menu.
- Click Create .
You can now create the message, configure content and schedule the campaign.
Sending a message to missed contacts
If you want to send a message to the contacts who were in your mailing list before the autoresponder was started, click the Settings icon in the top-right corner of the message and select Send to Missed Contacts . You will then need to schedule the message.
Freezing a signup autoresponder
Freeze a running signup autoresponder to stop it from sending messages to new contacts. All the autoresponder messages will be sent to the contacts who had entered the autoresponder before you freeze it.
To freeze a signup autoresponder, click the More button from the top right corner of the autoresponder detail view and click Freeze from the drop-down menu.
Related Articles
When does a signup-based autoresponder trigger?
When a contact joins the mailing list associated with an autoresponder, the autoresponder will trigger according to the schedule you've set. For example, you can schedule the first message to be sent immediately after a contact joins your mailing ...Email Action Autoresponder
Understanding email action autoresponder Gaining and retaining contacts is about creating a personalized experience for your reader. Email-action based autoresponders allow you to send targeted messages and follow up with contacts based on their ...How do I edit contact sources in a signup-based autoresponder?
To change the contact source: Navigate to the Details section of the autoresponder. Click the Edit icon in the top-left corner. Check/uncheck the Include contacts added via Import and CRM sync option to change the source.Adding Thank You Pages and Signup Response Emails
When a visitor submits information through a signup form, they will be redirected to a 'Thank you' page. You can customize this page, or use our default thank you page. Select Leads from the Navigation toolbar and choose Manage Lists. Select the ...Add Thank You Pages and Signup Response Emails
When a visitor submits information through a signup form, they will be redirected to a 'Thank you' page. You can customize this page, or use our default thank you page. In this section, you will learn how to design and host your own thank you page, ...