Task layouts & fields

Feature availability
- Feature Availability: Enterprise plan
- Navigate to
 > Portal Configuration > Layouts and Fields > Tasks to create custom fields and layouts for tasks. If you are an admin but unable to access the above path, write to support@zohoprojects.com
What is a layout?
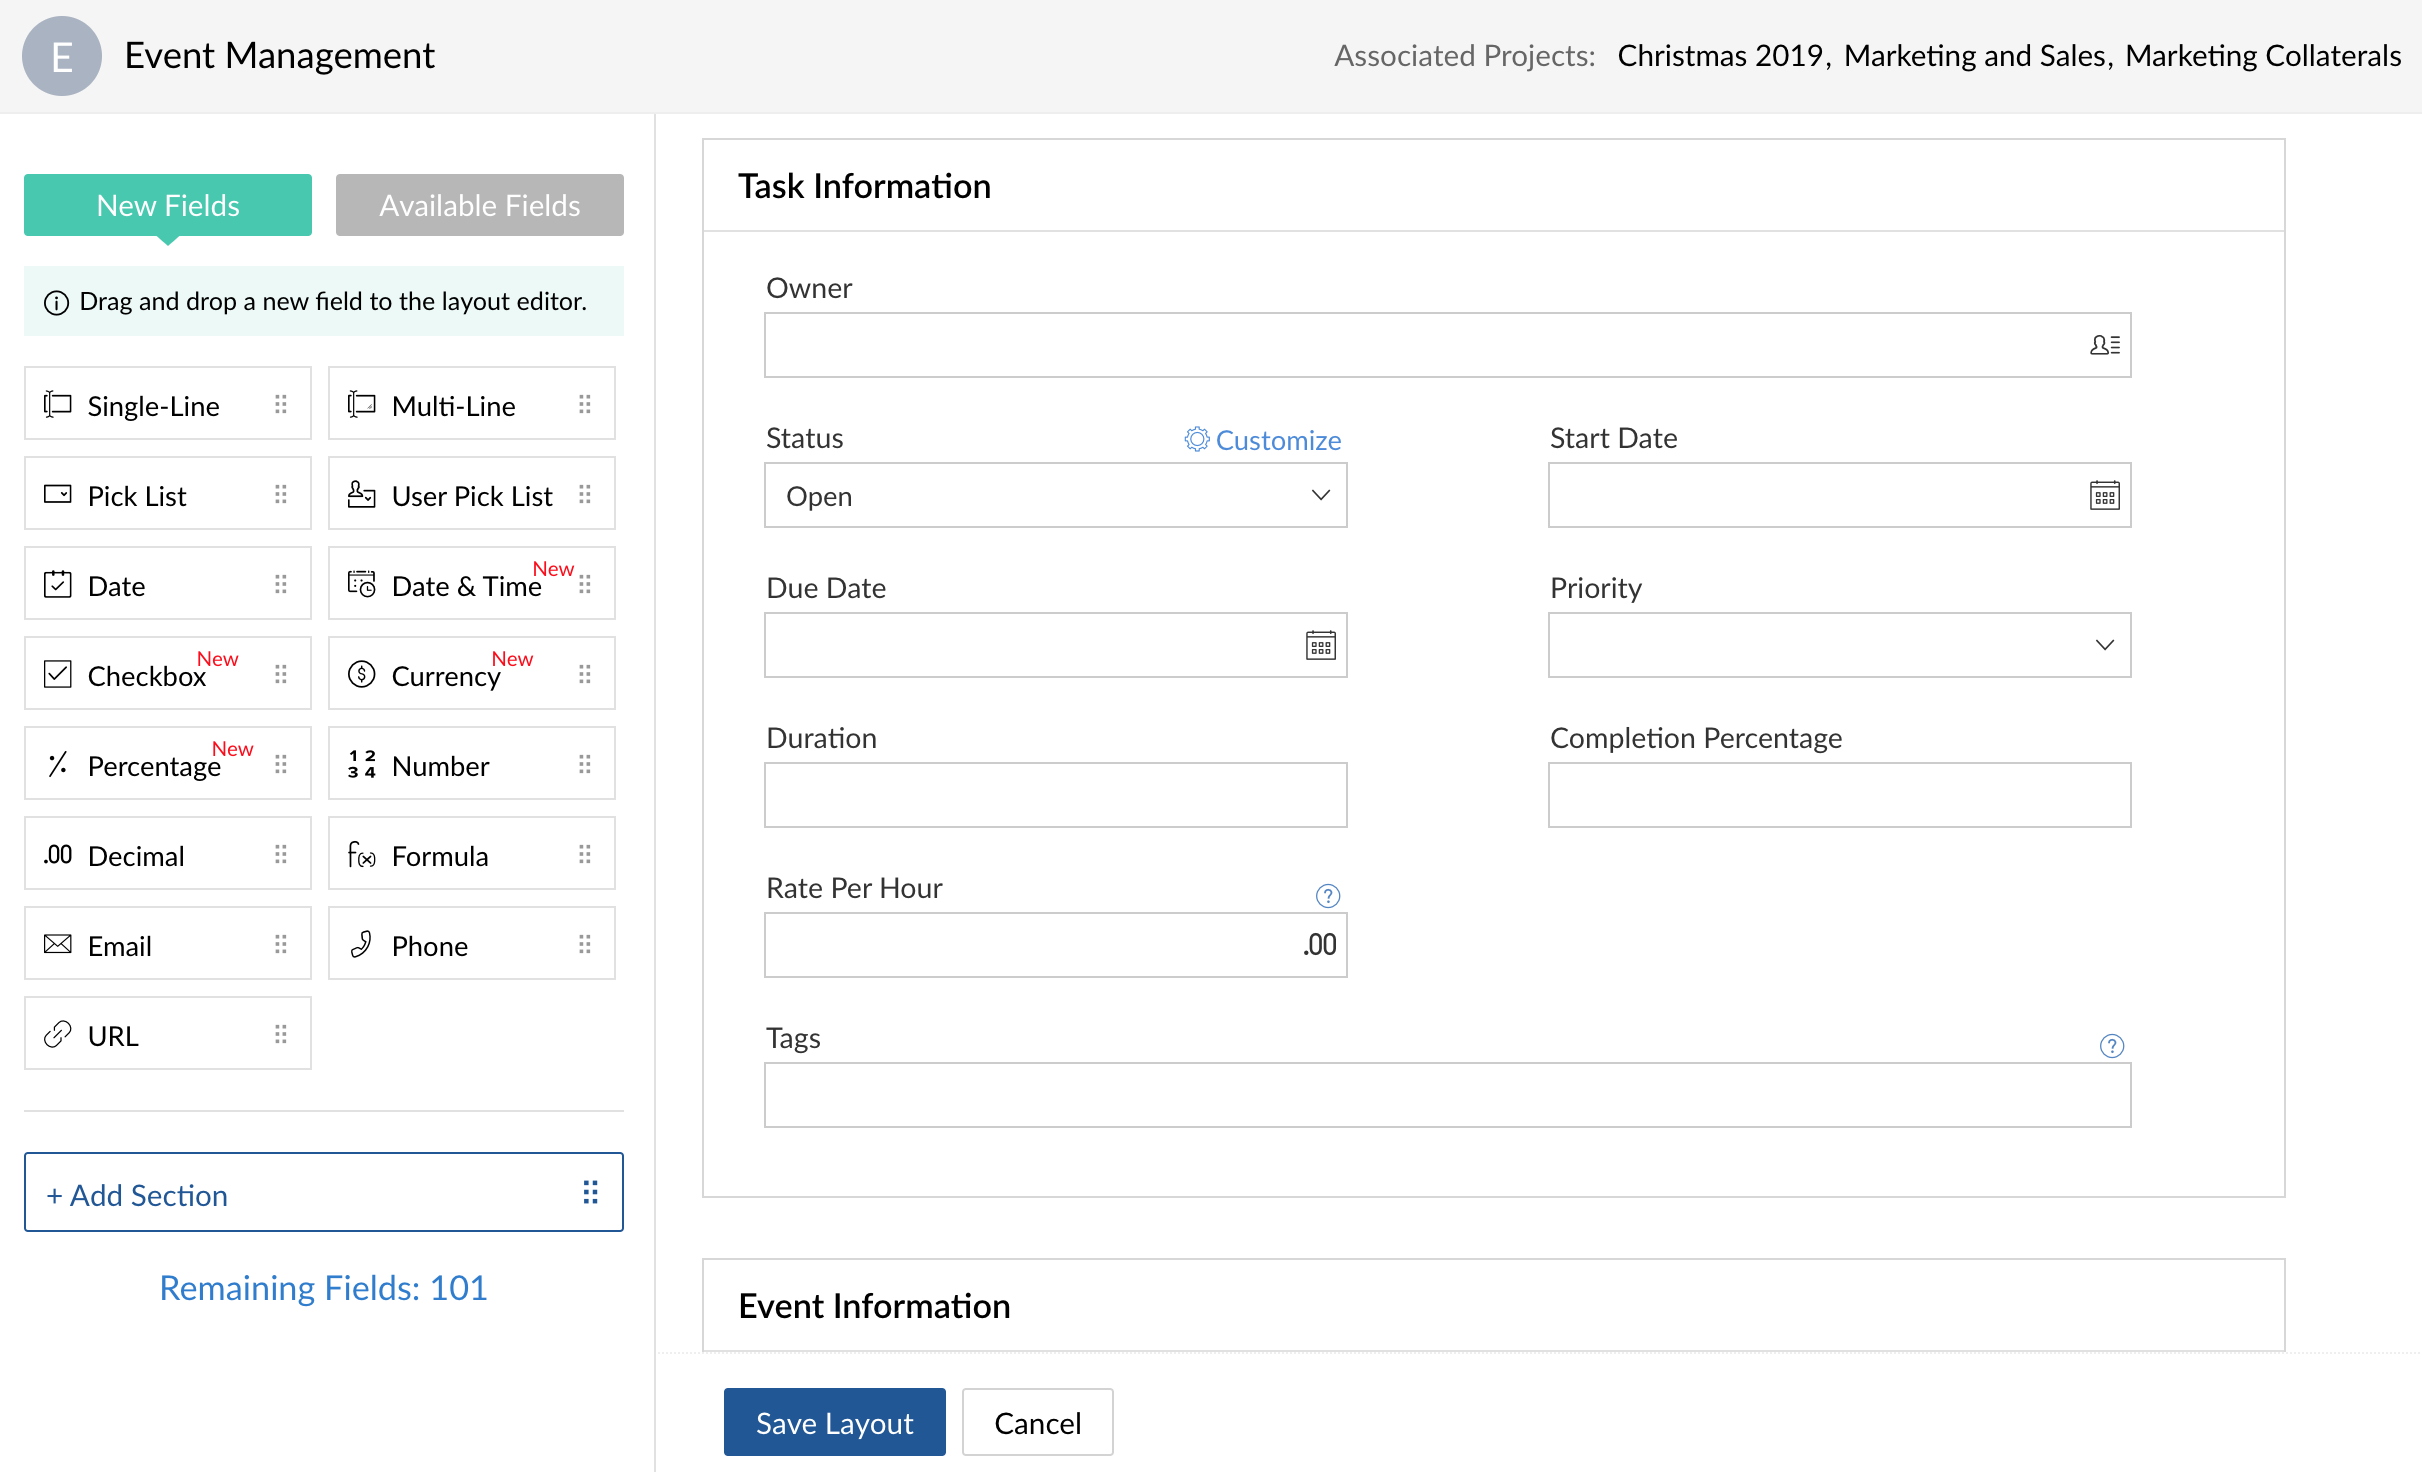
A layout is a graphical interface that is used to design a form. A task layout is used to create a task form.
Initially, all projects will be associated with the standard layout. If the standard layout is modified, the changes will be reflected in all the associated projects.
What is a section?
A set of sections form a layout. Similar attributes are placed inside a section. Every layout will have a default section. You can also create your own section and use it in your layout.
A section named Schedule Reviews can accommodate fields such as First Review, Second Review, and Third Review.
What is a field?
A field is an integral part of a layout. You can add a new field or an existing field to your layout. Owner, Status, Start Date, Due Date, Duration, Priority, and Completion Percentage are the default fields in a layout.
- Excepting Status, default fields can neither be edited nor deleted. They can only be reordered.
- The Status field can be modified but cannot be deleted. It can also be reordered.
Difference between a new field and an available field
A new field is a custom field that is yet to be created. An available field is a custom field that has already been created but not used in the current layout. You can always associate an available field to your current layout anytime.
Standard layout
- Every portal will have a default layout to start with. We call it a Standard Layout.
- The standard layout has one default section and five default fields.
- The fields - Status, Due Date, Duration, Priority, and Completion Percentage are the default fields.
- The default fields can neither be edited nor deleted. They can only be reordered.
- When a user tries to create a new layout for the first time, they can clone it from the standard layout initially. After cloning, they will be able to add new sections and fields to their new layout.
Create layout
- Click in the upper-right corner of the top navigation bar.
- Navigate to Portal Configuration > Layouts and Fields > Tasks.
- Click Create Layout in the upper-right corner. This button is enabled for Premium and Enterprise users only.
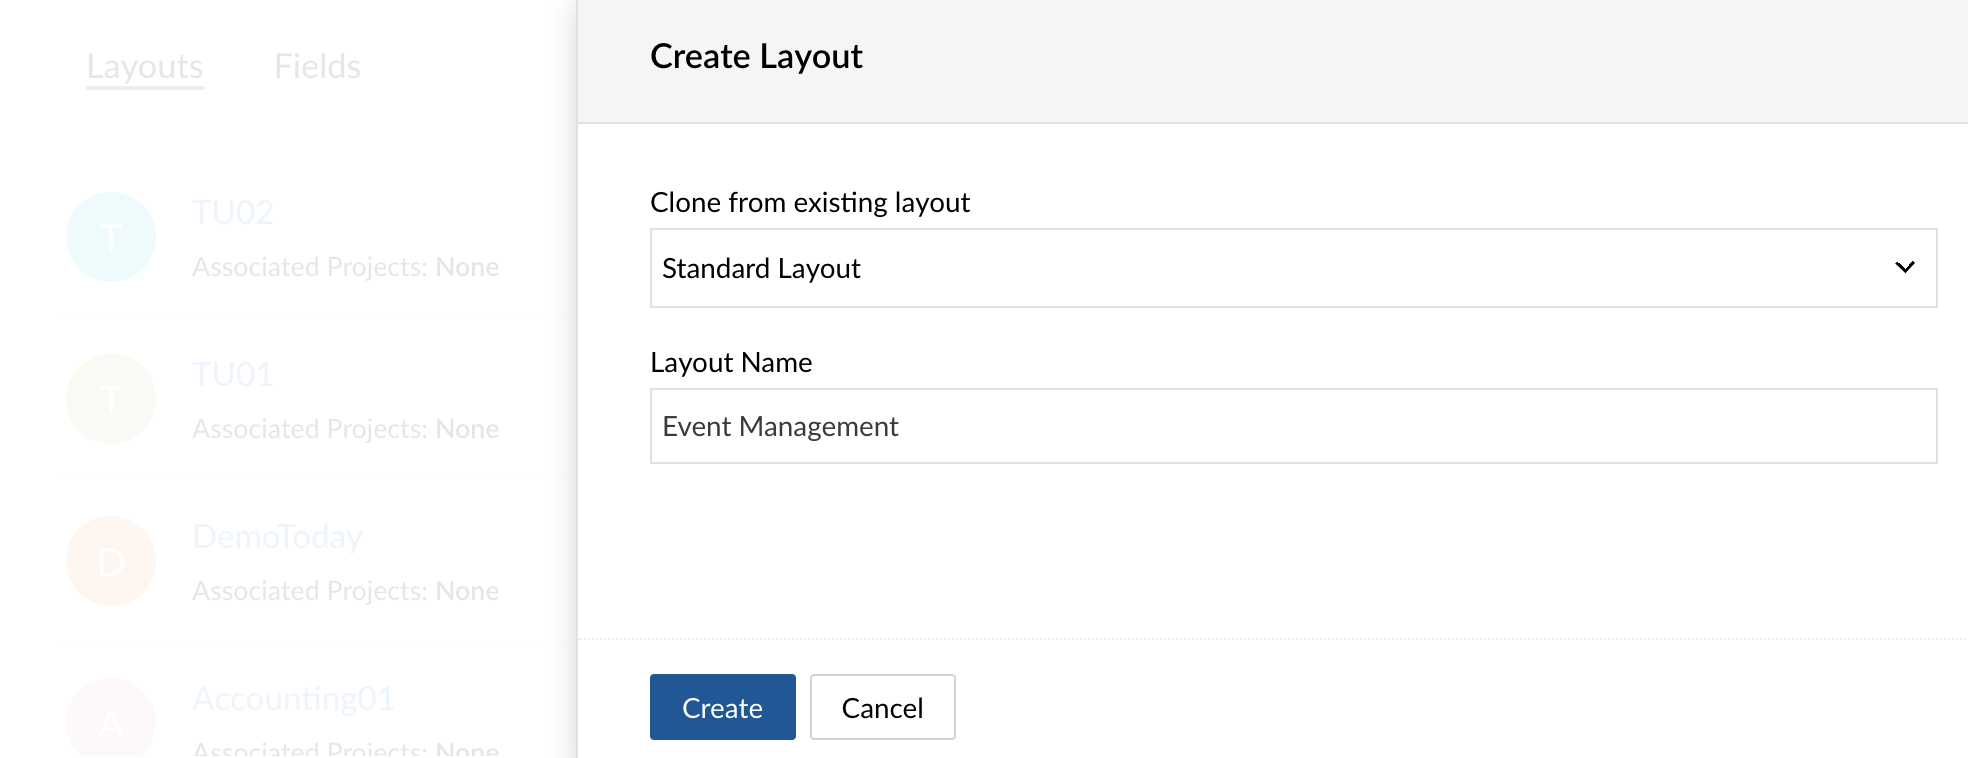
- Select a base layout that you want to build (clone) your new layout on. If there aren't any created layouts, the system will only list the default layout in the dropdown.
- Enter a Layout Name.
- Click Create.
- A layout cannot be deleted or reordered. However, it can be edited as many times as necessary.
- Only the Premium and Enterprise users will be able to create and edit layouts, however the users in all plans (Free, Express, Premium, and Enterprise) will be able to access the Layouts section and edit the Standard Layout.
- To view the list of layouts available in a portal, navigate to > Layouts and Fields > Tasks > Layouts.
- You can also edit a layout's name by directly editing its name in the layout editor screen.
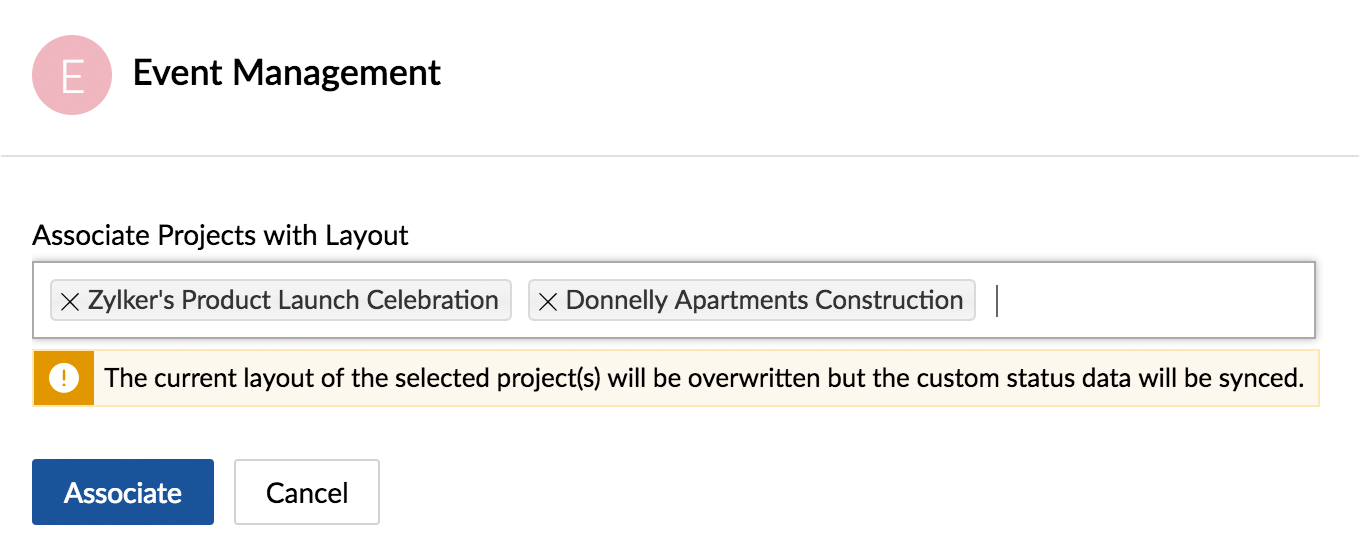
Associate layout with project
- Click in the upper-right corner of the top navigation bar.
- Navigate to Portal Configuration > Layouts and Fields > Tasks.
- Click the plus icon
 to the right of the selected layout.
 - Select one or more projects from the dropdown to associate. You can also associate project templates with a layout.
- When a project is switched from Layout A to Layout B, the fields in A will not be available in the project after the layout change but the data stored in those fields will not be lost.
- Associating a project with a layout will overwrite its current layout mapping, if any.
- When a project is switched from Layout A to Layout B, the fields in A will not be available in the project after the layout change but the data stored in those fields will not be lost.
- Confirm your action.
- Click Associate.
View layout
- Click in the upper-right corner of the top navigation bar.
- Navigate to Portal Configuration > Layouts and Fields > Tasks.
- Click the Layouts section to view the list of task layouts that have been created already.
- The layouts that are listed can neither be deleted or reordered.
- You can associate a layout with any project or project template that matches your business requirements.
- The layouts that are listed can neither be deleted or reordered.
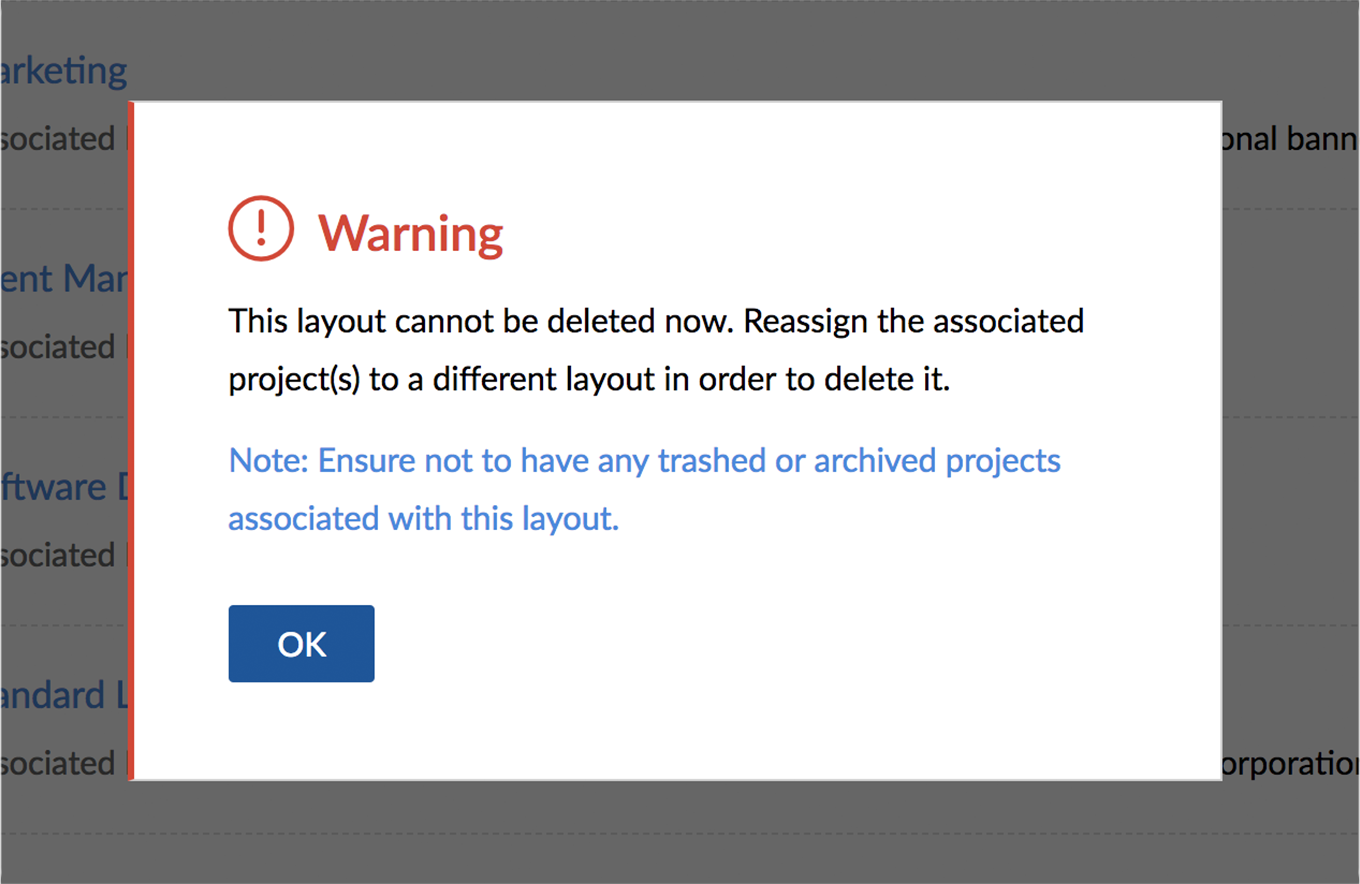
Delete layout
- Click in the upper-right corner of the top navigation bar.
- Navigate to Portal Configuration > Layouts and Fields > Tasks.

- Click the Layouts section.
- Hover over a layout that you would like to delete and click the trash icon
 .
. - Confirm your action.
- Hover over a layout that you would like to delete and click the trash icon
You might get the following warning message when you try deleting a layout:
Manage default fields
The following fields are present by default in a task layout:
| Field Name | Editable? | Removable? |
| Owner | No | No |
| Status | Yes | No |
| Start Date | No | No |
| Due Date | No | No |
| Duration | No | No |
| Priority | No | No |
| Completion Percentage | No | No |
- A default field can neither be modified nor removed from a layout. It can only be reordered.
- Though Status is a default field, it can be customized but cannot be removed from the layout.
- Users in all plans (Free, Express, Premium, and Enterprise) will be able to reorder the default fields.
Create custom field
- Click in the upper-right corner of the top navigation bar.
- Navigate to Portal Configuration > Layouts and Fields > Tasks.
- Click a layout to add a custom field.
- Drag and drop a field type from the New Fields tray into the layout editor (main panel).
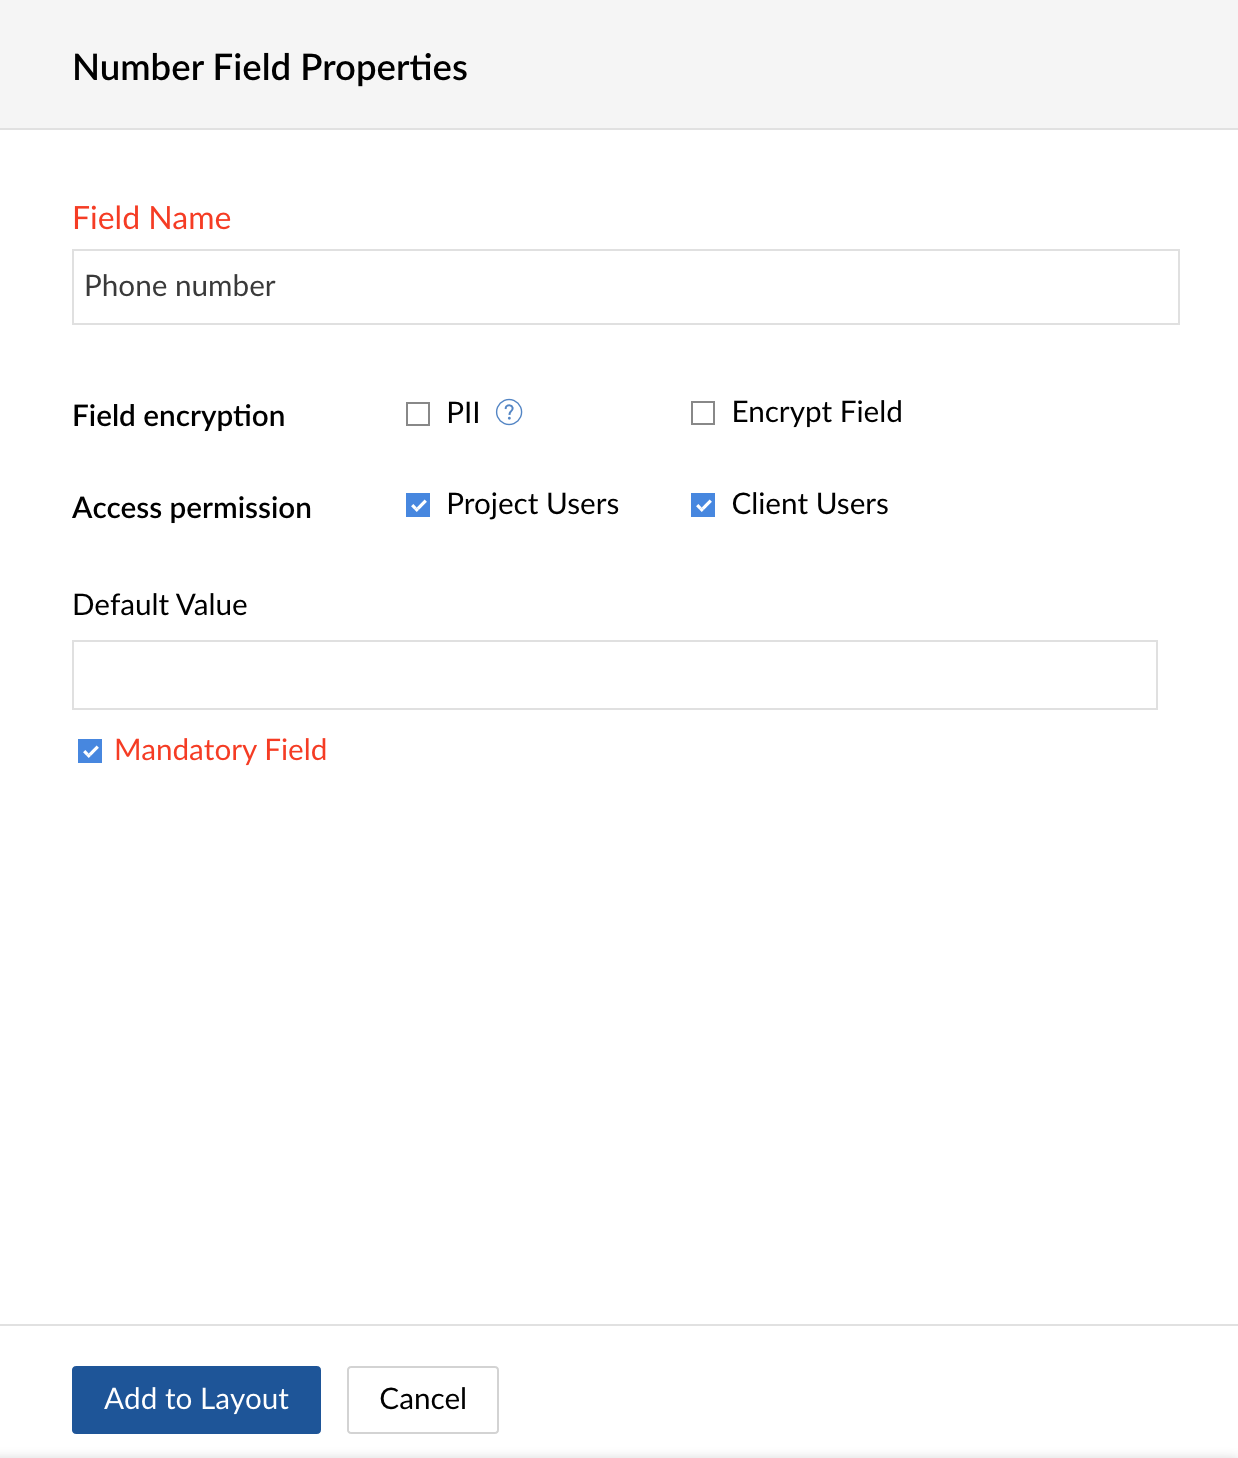
- Single-line text field: Add one line of text. Single line text fields can be marked as containing Personally Identifiable Information (PII). If you select Encrypt Field, the data will be encrypted at the backend.
- Multi-line text field: Add multiple lines of text. Hit Enter to key in more information. Multi-line text fields can be marked as containing Personally Identifiable Information (PII). If you select Encrypt Field, the data will be encrypted at the backend.
- Pick List field: Create your own dropdown using a pick list. Set values and wrap them under a pick list as per your business needs.
- User Pick List field: Use this field when you need to store usernames.
- Date: Store dates in this field.
- Number: Store numbers in this field. A number can have a maximum of 19 digits. Number fields can be marked as containing Personally Identifiable Information (PII). If you select Encrypt Field, the data will be encrypted at the backend.
- Decimal: Store decimal numbers in this field. A number can have a maximum of 14 digits before the decimal point. Decimal fields can be marked as containing Personally Identifiable Information (PII). If you select Encrypt Field, the data will be encrypted at the backend.
- Formula field: Formula field will automatically calculate and derives its value by referring to the value of the specified fields or the numeric, text, or date values given in the formula. Learn more.
- Phone: Store contact numbers in this field. This field can be marked as Personally Identifiable Information (PII). If you select Encrypt Field, the data will be encrypted at the backend.
- Email: Store email addresses in this field. This field can be marked as Personally Identifiable Information (PII). If you select Encrypt Field, the data will be encrypted at the backend.
- URL: Store URLs or links in this field. This field can be marked as Personally Identifiable Information (PII). If you select Encrypt Field, the data will be encrypted at the backend.
- Percentage: Enter percentage value in this field.
- Currency: Store currency value in this field. This field can be marked as Personally Identifiable Information (PII). If you select Encrypt Field, the data will be encrypted at the backend.
- Checkbox: Create checkbox type fields.
- Date & Time: Store date and time in this field.
- Single-line text field: Add one line of text. Single line text fields can be marked as containing Personally Identifiable Information (PII). If you select Encrypt Field, the data will be encrypted at the backend.
- Click Add to Layout to include the field in the layout. When you Cancel, the field is never stored anywhere.
- Click Save Layout.
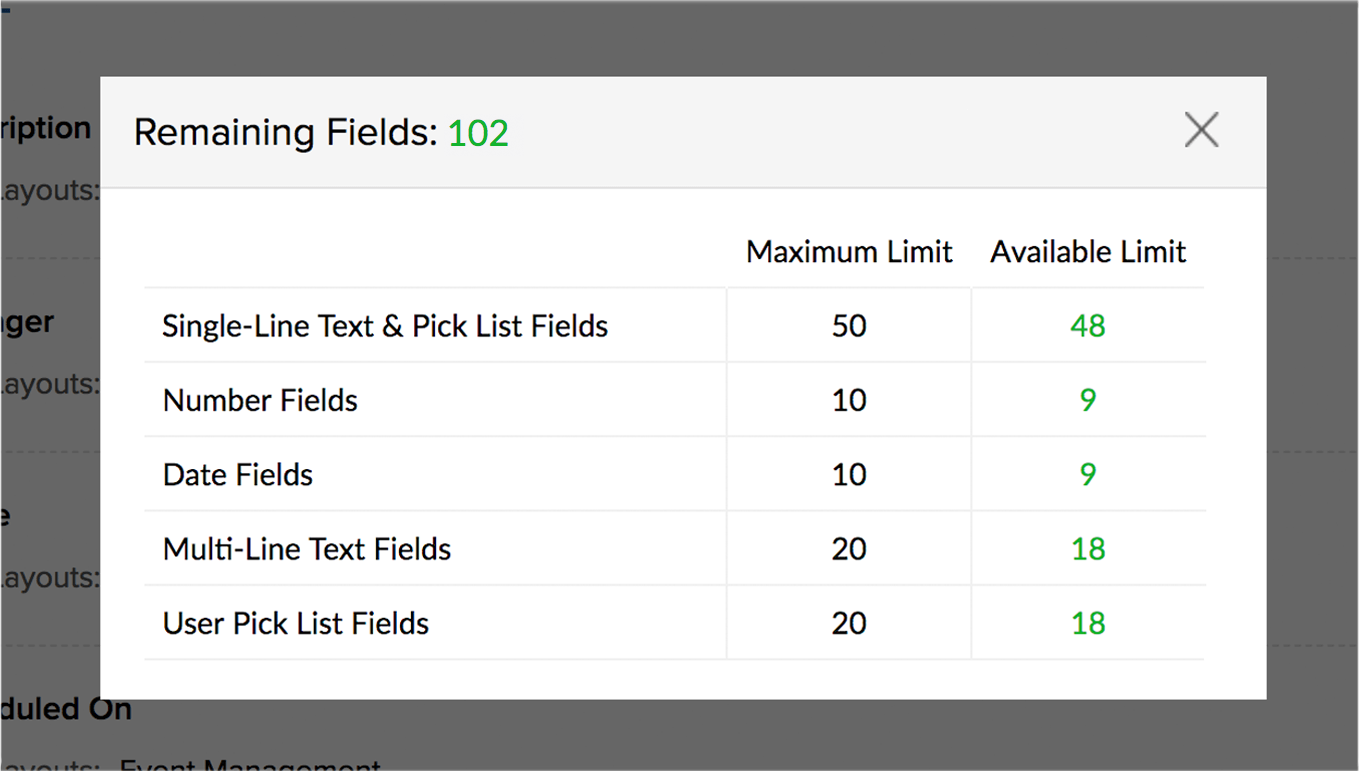
- A maximum of 110 custom fields can be created and they cannot be duplicated.
- Only Enterprise users can create custom fields.
- Custom fields can be edited in Enterprise plan only.
- When a custom field is renamed, the new name will be reflected in all the associated layouts. However, its other properties may vary between two different layouts.
Edit custom fields
- Navigate to > Portal Configuration > Layouts and Fields > Tasks.
- Open the specific layout editor and hover over the custom field you would like to edit.
- Click
 to make changes to the custom field.
Remove custom field from layout
- Navigate to > Portal Configuration > Layouts and Fields > Tasks.
- Open the specific layout editor and hover over the custom field you would like to delete.
- Click the cross icon
 .
. - Confirm your action.

- Removing a field from a layout will not permanently delete it from the database.
- The field will be moved to the Available Fields tray and can be reused anytime later from this tray.
- The data stored in the field will not be lost. However, deleting a field from the portal will do so.
Manage available fields
- Click in the upper-right corner of the top navigation bar.
- Navigate to Portal Configuration > Layouts and Fields > Tasks.
- Click a layout to add an available custom field.
- Click the Available Fields tray.
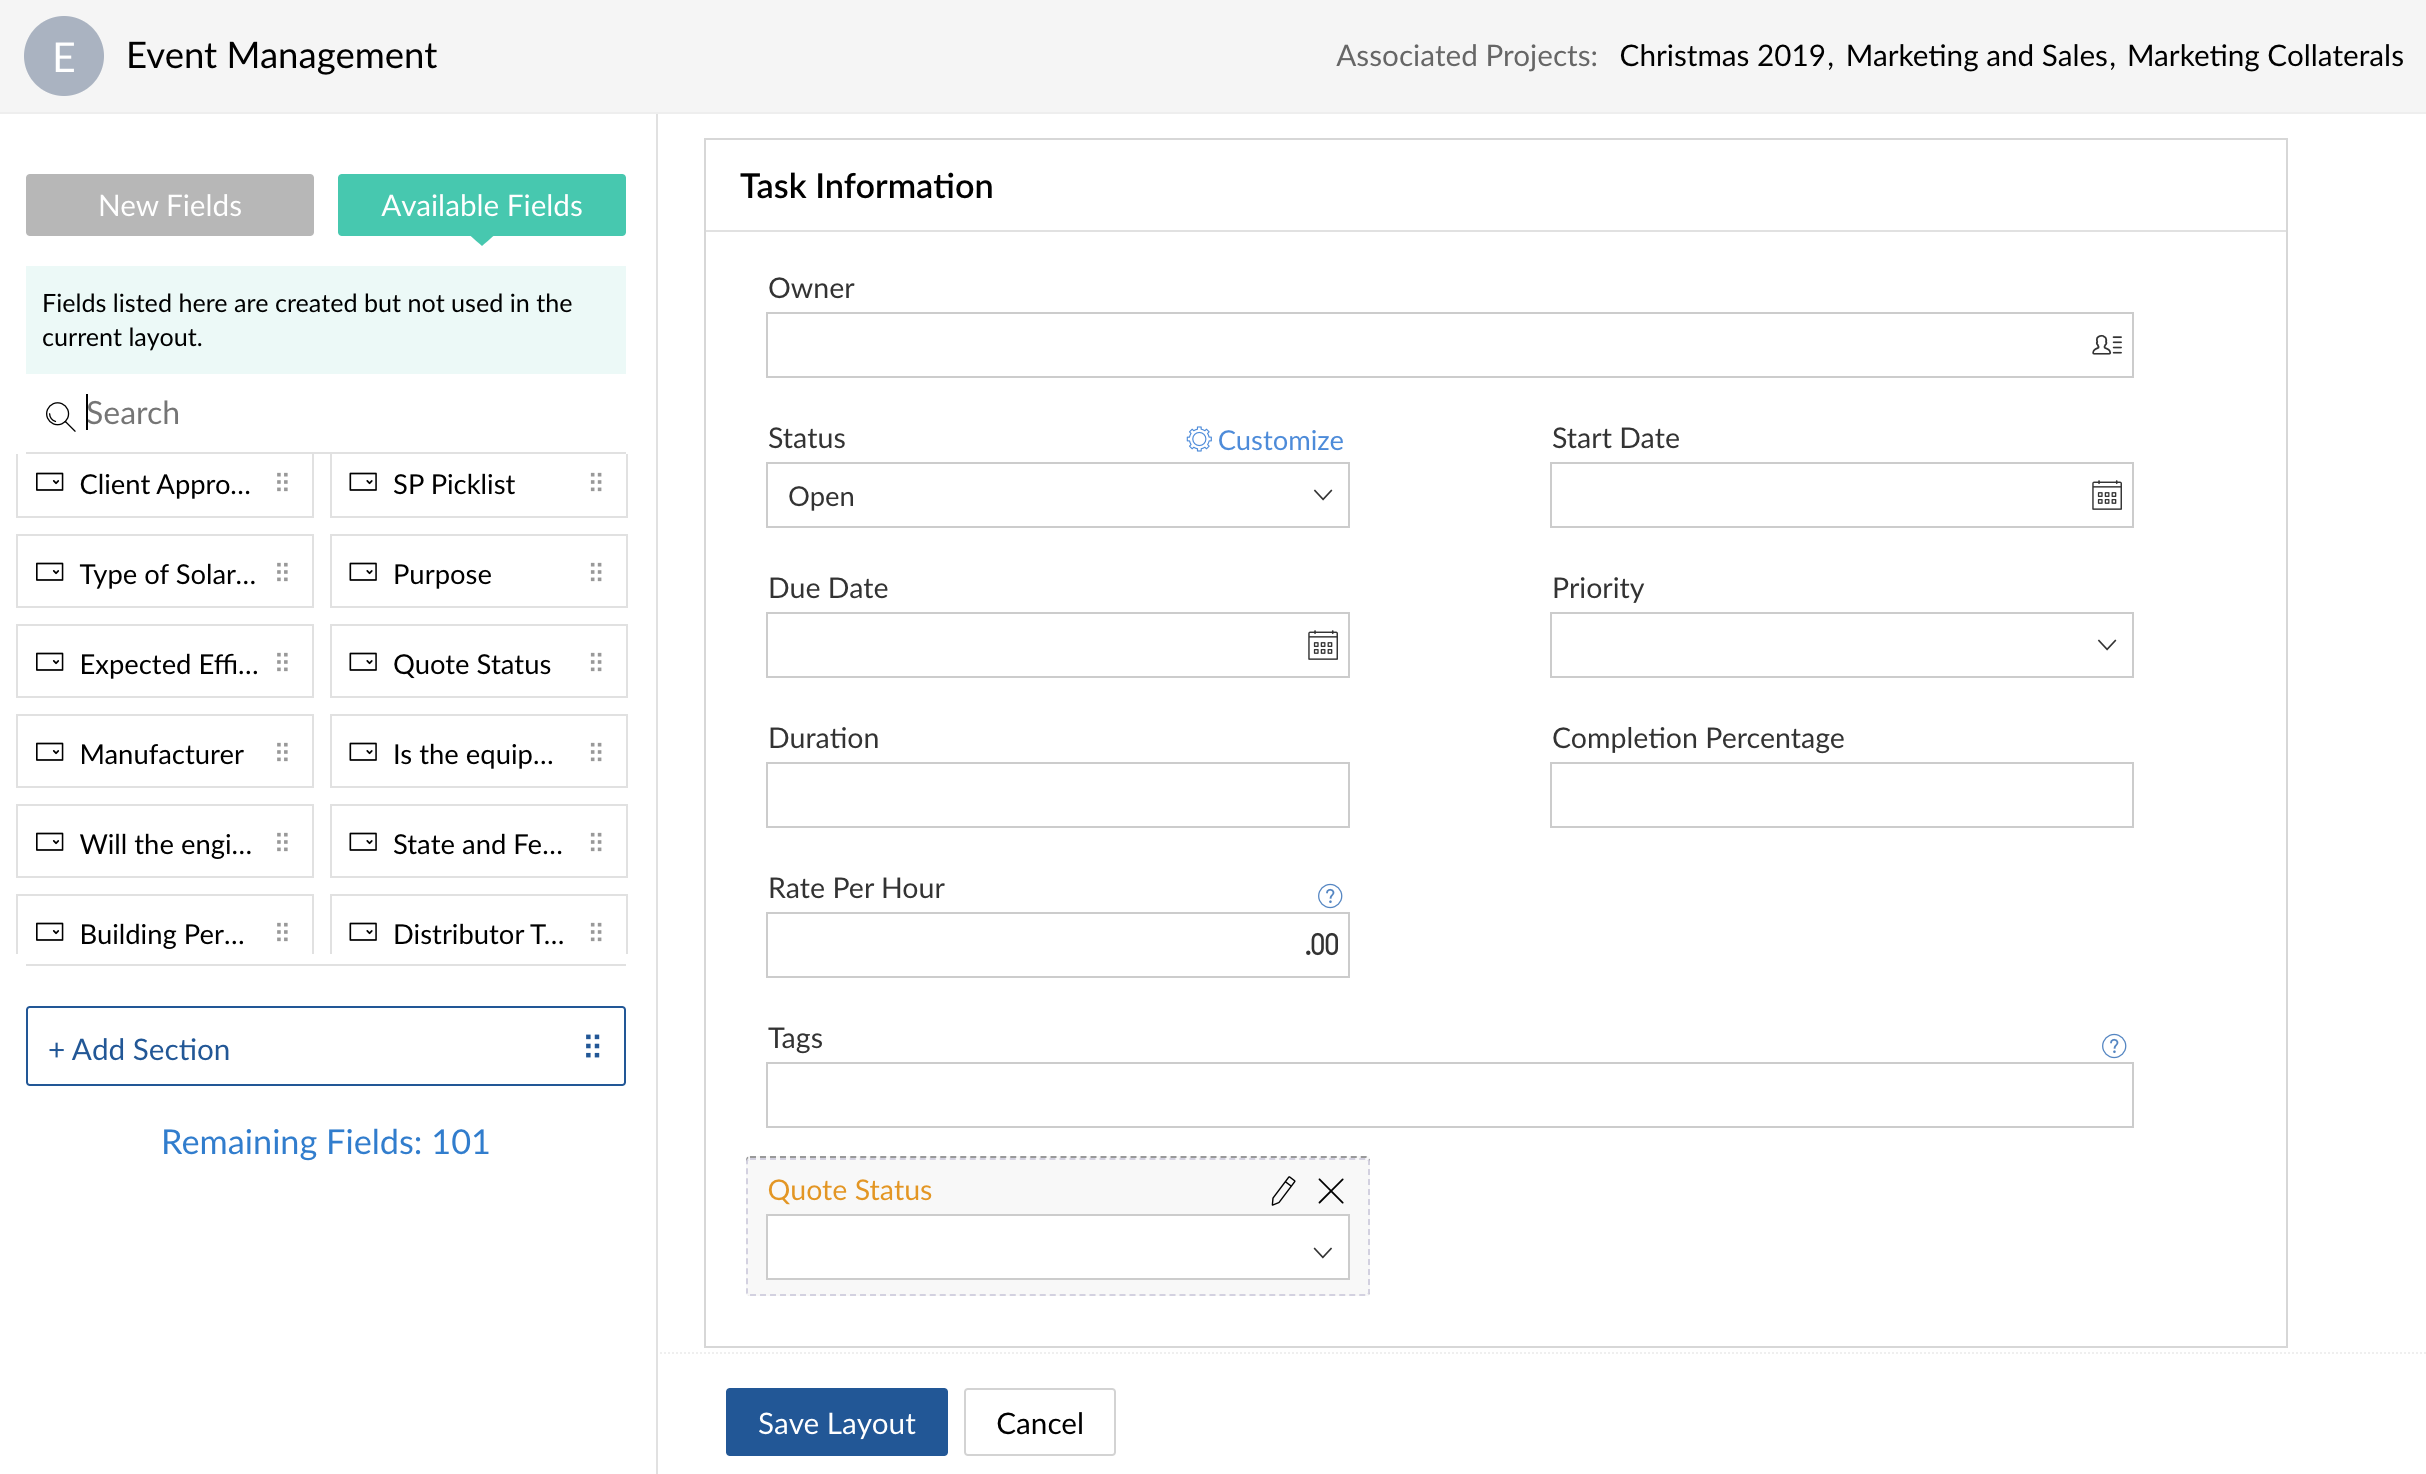
- Drag and drop a field into the layout editor (main panel).
- If you have to search for an available field, type the field's name in the search bar present inside the tray.
- If you have to search for an available field, type the field's name in the search bar present inside the tray.
- Edit the properties of the field as necessary.
- When you edit field's name, the new name will be reflected in all the associated layouts across projects in the portal.
- Changes made to properties except the field name will remain intact and apply to the specific layout only.
- When you edit field's name, the new name will be reflected in all the associated layouts across projects in the portal.
- Click Add to Layout.
- Click Save Layout.
View number of remaining fields
- Click in the upper-right corner of the top navigation bar.
- Navigate to Portal Configuration > Layouts and Fields > Tasks.
- Click a layout for which you would like to view the split-up of the used-up fields count and the number of fields left under every field type.
- Click the Remaining Fields link in the left panel below the Add Section component.
- You can get the count of how many fields under each category have been created already and how many are in hand.
Delete custom field from portal
- Navigate to -> Portal Configuration -> Layouts and Fields -> Tasks -> Fields.
- Hover over the field you would like to delete.
- Click the trash icon.
- Deleting a custom field will affect the associated tasks.
- The data stored in the field will be lost.

- Deleting a custom field will affect the associated tasks.
- Confirm your action.
- Deleting a field from a portal will permanently delete it from the database.
- If a field is associated with more than 1000 tasks you will not be able to delete it.
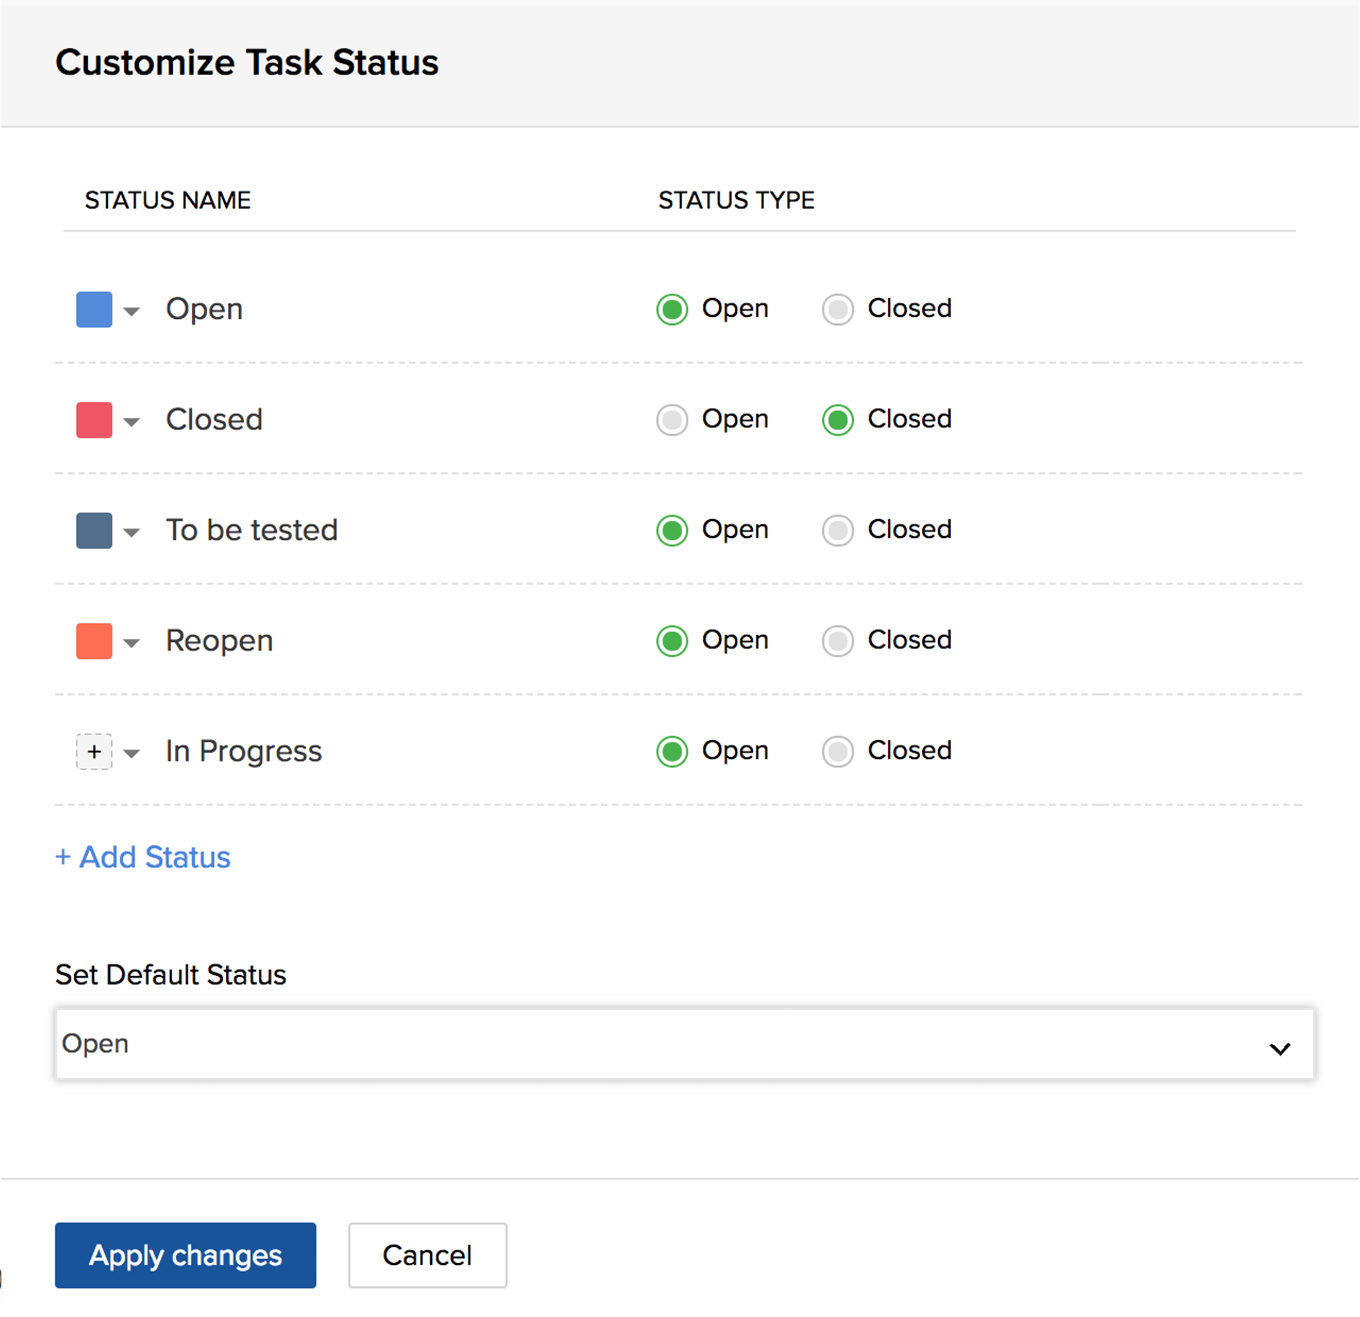
Create or edit custom task status
- Navigate to > Portal Configuration > Layouts and Fields > Tasks.
- Open the specific layout editor and hover over the Status field in the Task Information section.
- Click the Customize link with a gear icon at the top of the field.
- Click the +Add Status link to create a new task status.
- Open and Closed are the two default status types and they cannot be deleted.
- The new status that you create will fall under either of the above two status types.
- Open and Closed are the two default status types and they cannot be deleted.
- Give a status name.
- Click
 or
or  to the left of the status name to assign a color. Pick any color from the palette that matches the status name and type.
- Click
- Click Apply Changes.
The status color can be set while editing the Status field in the layout editor or the task Kanban view.
Create or edit section
- Click in the upper-right corner of the top navigation bar.
- Navigate to Portal Configuration > Layouts and Fields > Tasks.
- Click a layout to add a section.
- Drag and drop the Add New Section component from the left tray to the layout editor (main panel). Initially the sections will be named "Untitled Section", "Untitled Section 1", "Untitled Section 2" and so on as you keep adding new sections in the layout editor.
- Hover over the section name and edit it.
- You can also add new or existing custom fields to your section.
- You can also add new or existing custom fields to your section.
- Click Save Layout.
Delete section
- Click in the upper-right corner of the top navigation bar.
- Navigate to Portal Configuration > Layouts and Fields > Tasks.
- Click a layout to add a section.
- Hover over the section and click the trash icon.
- The icon will be visible only when all the custom fields inside the section are removed. We recommend you to remove the custom fields first and then delete the section.
- The
- Confirm your action.
Related Articles
Working with Page Layouts
Understand page layouts with a scenario Here is a simple scenario in which we will demonstrate the use of page layouts in Zoho CRM. With this as an example, you will be able to implement page layouts for your organization depending on your company’s ...Working with Page Layouts
Understand page layouts with a scenario Here is a simple scenario in which we will demonstrate the use of page layouts in Zoho CRM. With this as an example, you will be able to implement page layouts for your organization depending on your company’s ...Creating Conditional Layouts
Conditional layouts in Zoho CRM offer an interface for you to seamlessly manage dependency between fields in a layout. Your sales data are often inter-dependant. Consider the following examples. In a real estate company, the particulars required from ...Creating Conditional Layouts
Conditional layouts in Zoho CRM offer an interface for you to seamlessly manage dependency between fields in a layout. Your sales data are often inter-dependant. Consider the following examples. In a real estate company, the particulars required from ...Creating Conditional Layouts using Layout Rules
What is a layout rule? Your recruitment data is often inter-dependent. When you are creating a record for a candidate, not all the fields in the layout are utilized. For example, if the candidate is a fresher he would not need the Previous Experience ...