Workflows
Workflow in Bigin helps you automate the repetitive tasks that you perform in your business process.
When you are pitching a sale, your major task is to cater the needs of your customers. But at times, you might be caught up in repetitive follow-ups, that consumes all your valuable time.
Workflows in Bigin, takes those repetitive tasks out of your hands and performs it for you, the way you want.
Creating Workflows
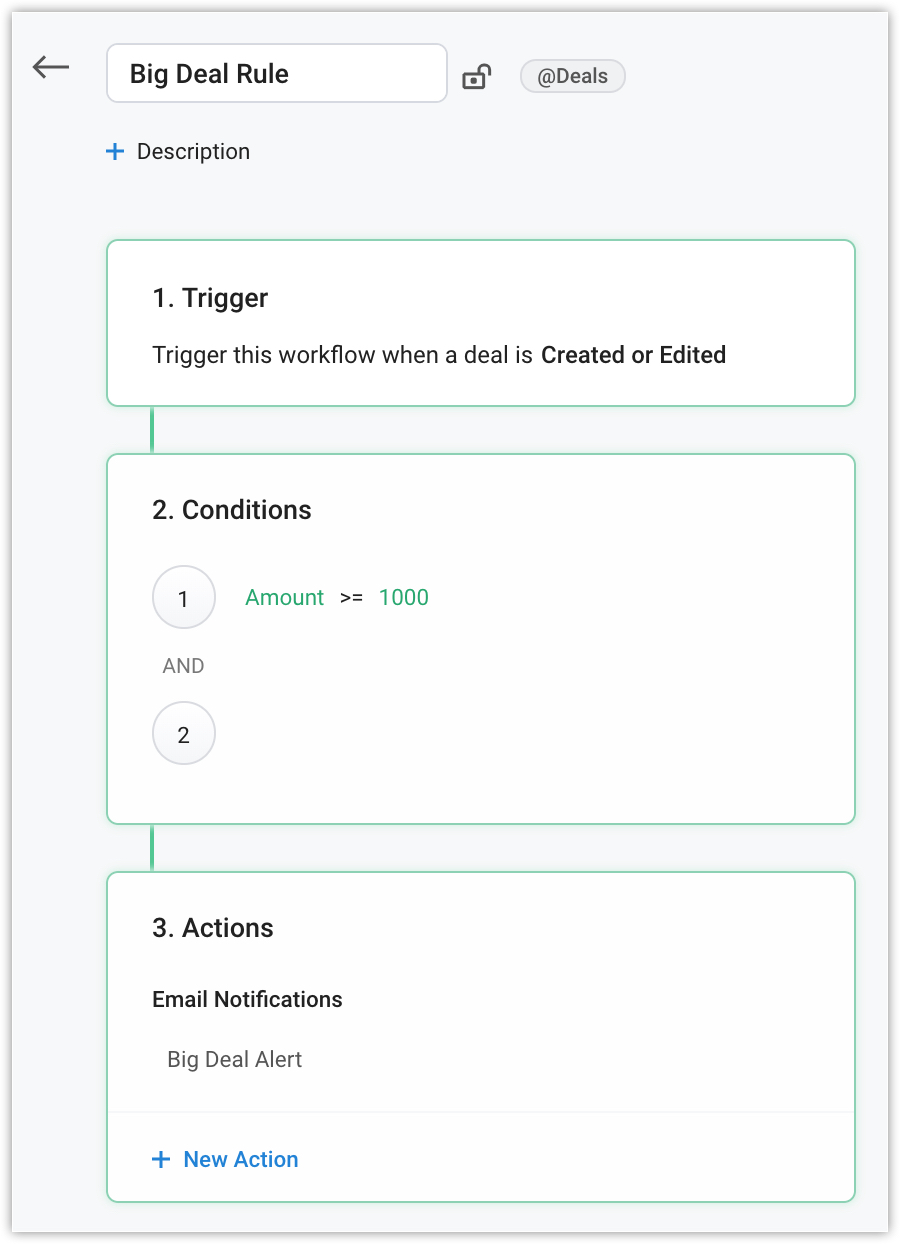
Creating a workflow involves 3 stages:
- Choosing when the workflow should be triggered
- Set Conditions for the rule
- Choose Actions to be executed
Set Trigger:
You can specify when the rule should be triggered.
Rule will be executed:
- When the record is created - The workflow rule will be triggered when a record is created.
- When the record is edited - The workflow rule will be triggered, every time a record is edited.
- When the record is created or edited - The workflow rule will be triggered when a record is created or edited.
Specify Conditions:
Conditions determine the records for which the workflow rule should be triggered. You can either specify criteria for the records or choose all records.
- Records that match the criteria - The rule will be executed only for the records which satisfy these criteria.
- All records - The workflow will be executed for all records in the chosen module.
Edit criteria pattern
When you have more than one criteria defined for a workflow rule, you can specify the pattern to be followed for those criteria.
What is a criteria pattern?
Criteria pattern follows a simple logical operation such as AND, OR.
- Use AND operator if all the criteria you add must be true to trigger the workflow rule.
- Use OR operator if one of your criteria should be true to trigger the workflow rule.
Choose Actions to be executed
Specify the actions to be automated for records matching the specified criteria.
The following actions can be triggered when the rule is executed: Email Notification, Task, Update Field, Tags.
Create Workflow rules in Bigin
Creating workflow rule can be subdivided into 4 parts.
Part 1: Enter Basic Details
Select the module for which you are creating a workflow rule, enter the rule name and a description of your choice.
- Go to Setup > Workflows.
- Click + Create Rule.
- In the Create New Rule popup, do the following:
- Select the Module for which you are creating the workflow rule from the drop down list.
- Enter the Rule Name.
- Click +Description, to add a description for your workflow rule.
- Click Next.
Part 2: Specify Rule trigger
Here you can specify when the workflow rule should be triggered.
- Select one of the following:
- Created - Workflow rule will be executed when a record is created.
- Edited - Workflow rule will be executed when a record is edited.
- Created or edited - Workflow rule will be executed when a record is created or edited.
- Click Next.
Part 3: Specify workflow condition
You can specify the conditions which should be satisfied for the workflow to be executed.
Choose one of the following:
- Records matching certain conditions - Rule will be triggered for records matching the criteria specified.
- Specify the criteria.
- Click + to add more criteria.
- All records - Rule will be executed for all the records.
Click Next.
Note:
- You can add a maximum of 5 criteria to a workflow rule.
- When you have more than one criterion, you can edit the criteria pattern.
Part 4: Associate instant actions
The main purpose of a workflow rule is to execute certain actions automatically.
The following instant actions can be triggered automatically.
To set up Email notification, do the following:
- Click + Email Notification
- In the Create Email Notification window, do the following:
- Enter the name.
- Choose the Email recipients from the drop-down list.
People associated with the module will be listed. - In the additional recipients field, enter the emails separated by comma, to notify more recipients.
- Choose an email template from the drop-down list or create a new template of your choice and click Save.
To create a task, do the following:
- Click + Create Task.
- In the Add Workflow task window, do the following:
- Enter the Task Name.
You can type # and include merge fields. - Choose the Owner from the drop down list.
- Select the priority from the drop-down list.
- Select the due date and click Save.
To update field, do the following:
- Click + Update Field.
- Enter the name.
- Select the Module from the drop-down list.
- Choose the field to be updated from the Update drop-down list and enter the value to be updated.
- Click Save.
To add or remove tags:
To add tags, do the following:
- Click + Tags > Add Tags.
- In the Add tags pop-up, enter the tag for the record.
If you want to add more tags, superate them using comma. - Enable the Checkbox to overwrite existing tags with the tags specified here.
- Click Save.
To remove tags, do the following:
- Click + Tags > Remove Tags.
- In the Remove tags pop-up, select the existing tags that you would like to remove and click Remove.
To add more actions to your workflow rule.
- After adding an instant action, click + New Action and add any other action of your choice.
Note:
- You can add a maximum of 3 Instant actions.
Related Articles
Managing workflows
How do I edit a workflow? From the Navigation toolbar, select Leads and choose Workflows Mouse over the workflow you wish to edit. Click the Edit icon in the far-right corner. You can also edit a workflow by navigating to its Details page and ...Manage Conditional Workflows
Edit a Conditional Workflow From the Navigation toolbar, select Automation and choose Workflows. Select the conditional workflow you wish to edit. Click Manage Workflows on the top-right and select Edit. Note: You can edit a workflow only when in ...Manage custom workflows
Edit a workflow To edit a workflow in draft: From the Navigation toolbar, select Automation and choose Workflows. Select the intended workflow from the list view. This will open the workflow canvas, where you can make the necessary changes. To edit a ...Time-based Workflows
This Workflow triggers at the time you specify, either once or recurring. User scenario One-time workflow Jane sends promotional campaigns to all workflows in her mailing list. She wants to give special offers to her active contacts. To decide who ...What will happen if I reorder Time-based workflows?
Reordering time-based workflows in the list view will not have any impact on the execution order of your workflows, as time-based workflows trigger on the scheduled date and time.