Working with Validation Rules
One of the most challenging tasks in CRM system is ensuring the validity of data in it. A poorly maintained set of data can cost a company in more ways than one - your activities are slowed down, you will have inaccurate reports and it's plain annoying to have to manually verify details of each record when you have more important activities to deal with.
Validation rules help you overcome this problem by arresting the wrong kind of data even before it can enter CRM.
Basics of Validation Rules
- Validation rules in Zoho CRM will allow you to define the accuracy and validity of the data that enters CRM. That is, you will define the undesirable values for a field in a validation rule. If a field value entered for a record matches the criteria defined in the rule, CRM will throw an alert and will not allow the record to be saved.
- While defining the validation rule you can choose whether throw an alert when specific condition is met or when the condition is not met. Example : You want the deal discounts to be 15%. You can define a validation rule in two ways:
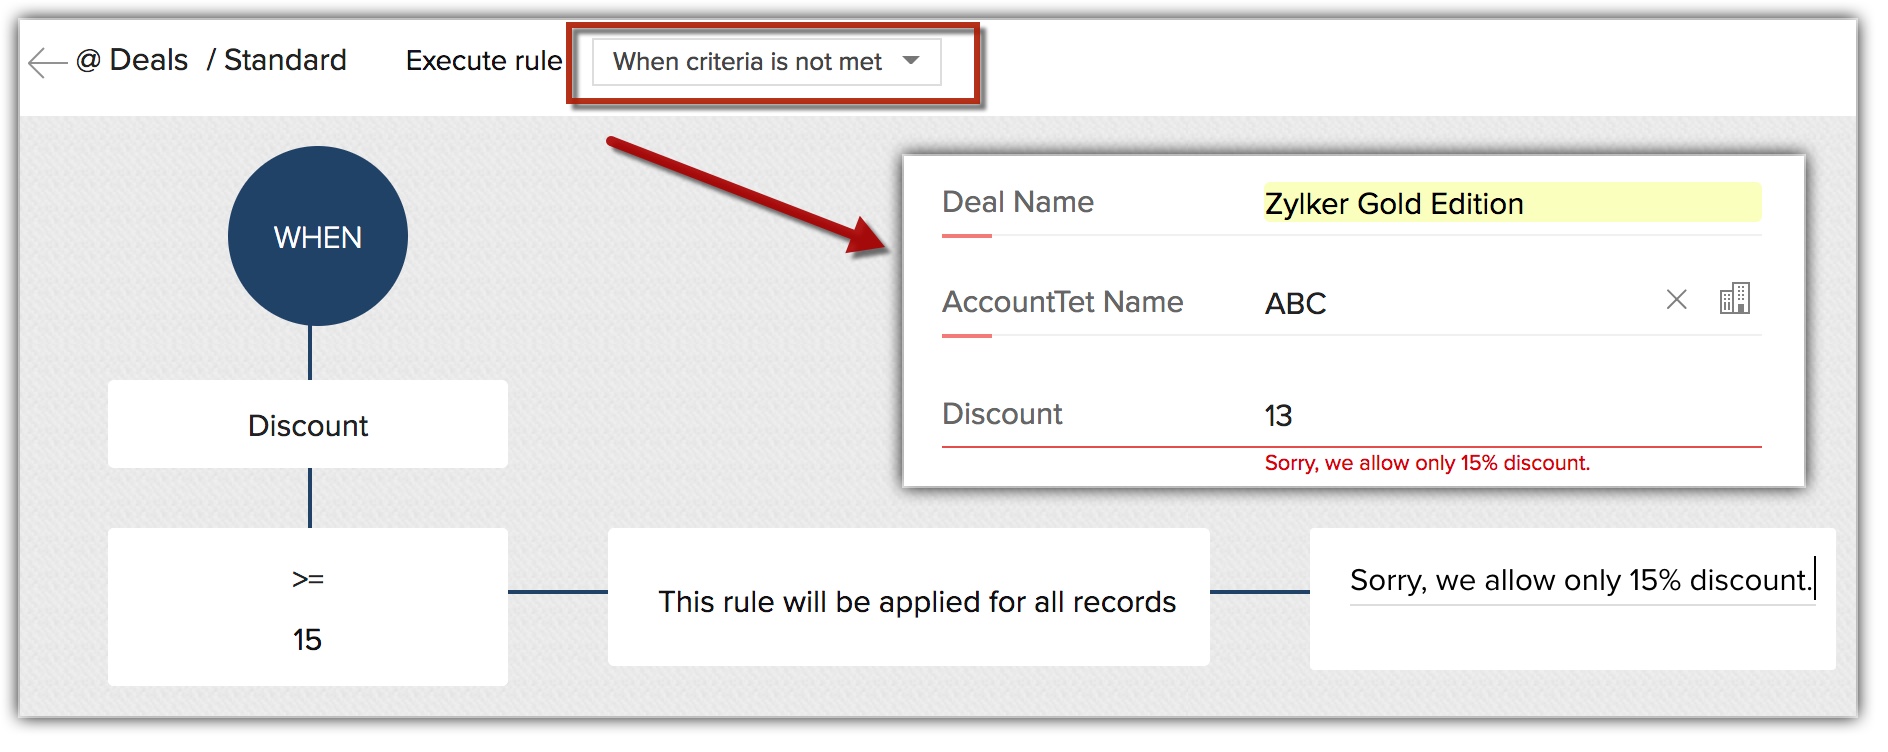
- Throw alert when condition is not met - User will be alerted whenever the condition is not met or the amount entered is less than 15%.
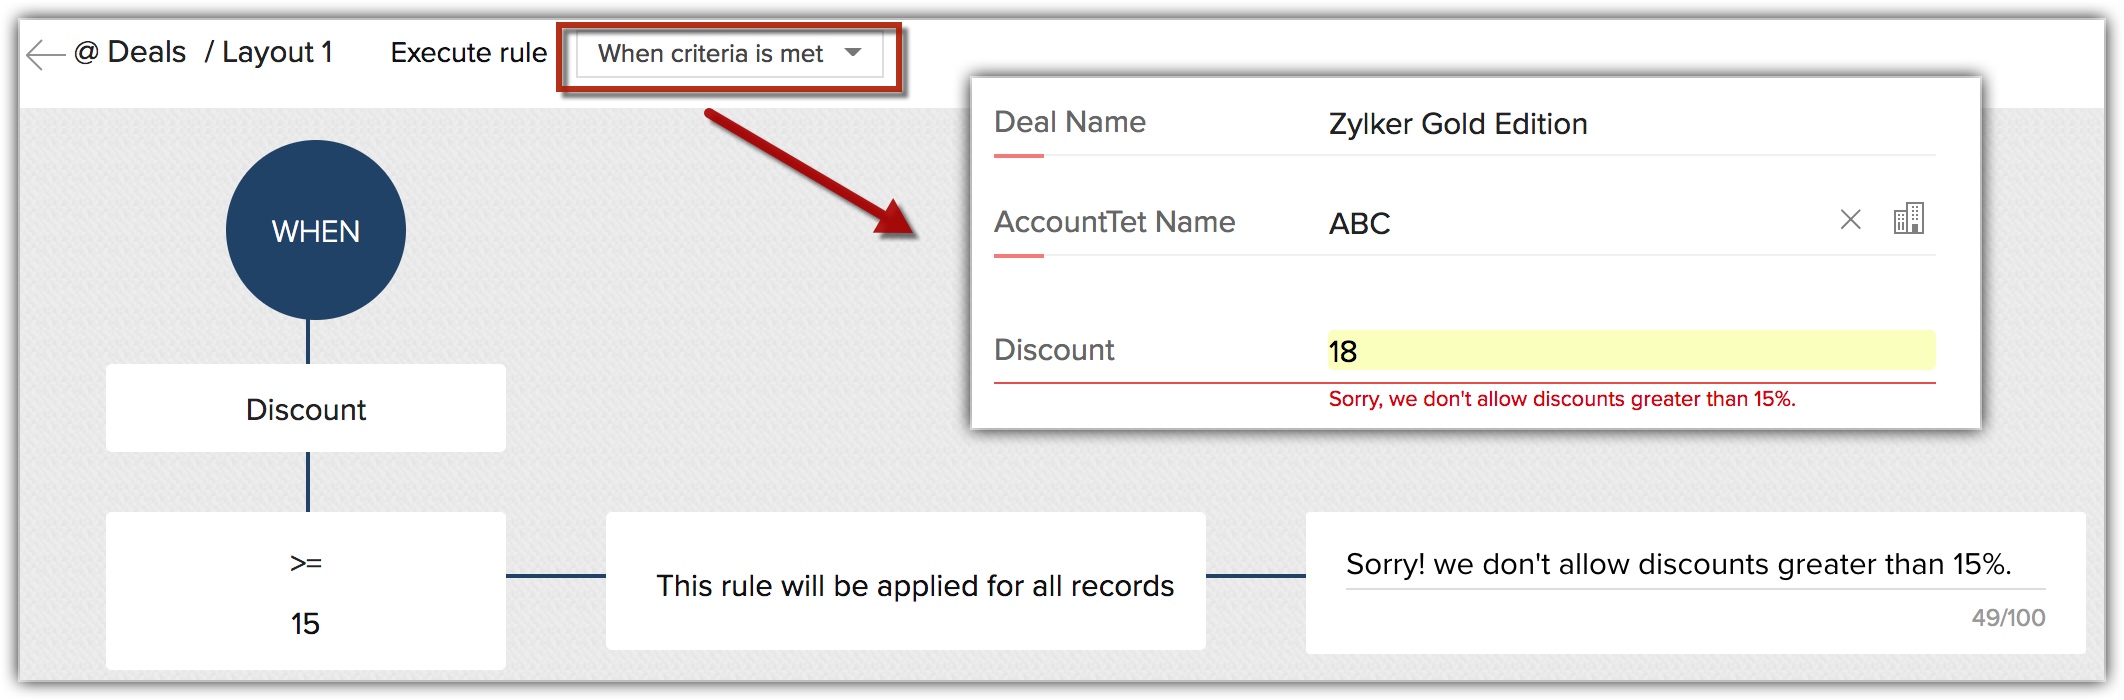
- Throw alert when condition is met - User will be alerted whenever the discount amount entered meets the specified condition or is more than 15%.
- Throw alert when condition is not met - User will be alerted whenever the condition is not met or the amount entered is less than 15%.
- The error message is customizable. Example : You don't want deal discounts ever to be greater than 15%. If you were to set this validation rule in CRM, the essence of your validation rule would be the following:
- "If Discount is greater than 15% throw an alert message".
 Error to be displayed: "Sorry! We don't allow a discount greater than 15%".
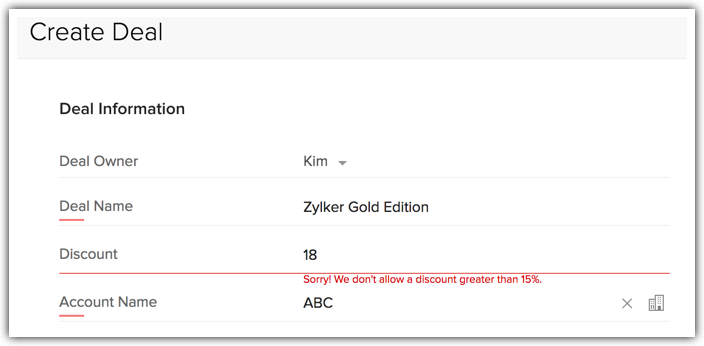
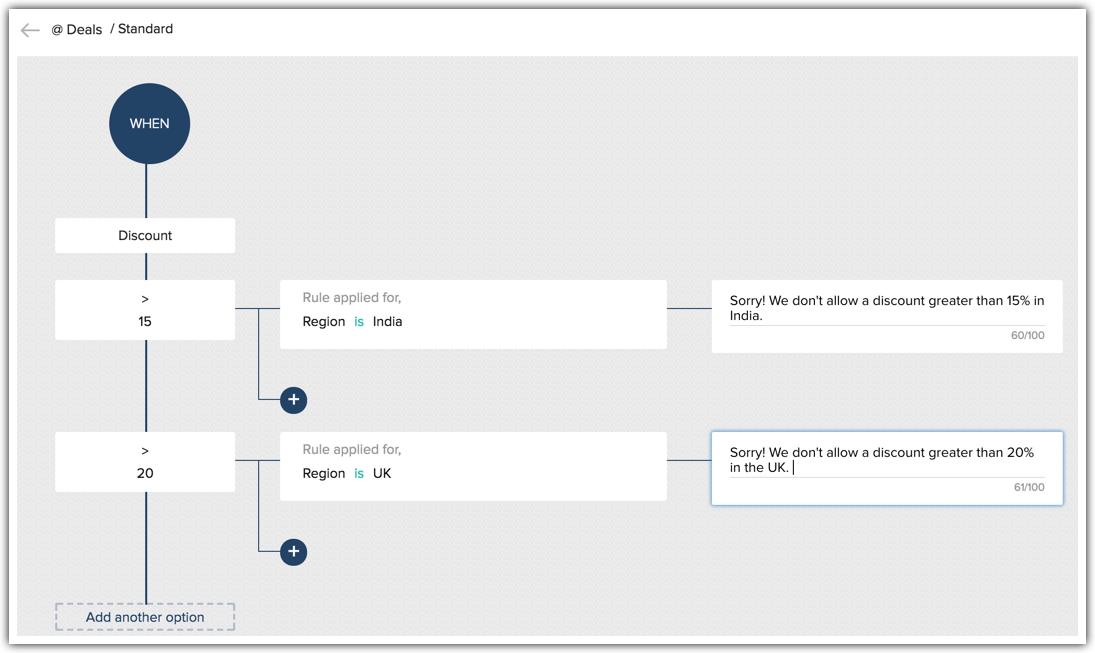
- You can further drill down the rule by defining different custom error messages based on specific criteria. For instance, the discount for India should not be greater than 15%, but the discount for the UK can be upto 20%. Here you will have branch conditions for the discount fields and specify appropriate error messages. You learn more about these multiple conditions in the following sections.
Create a validation rule
- Go to Setup > Customization > Modules and Fields.
- Select the module for which you want to create the validation rules.
- In the [Module] page, click the Validation Rules tab.
- Click + Create Validation Rule.
- In the Create Validation Rule Popup window, perform the following actions:
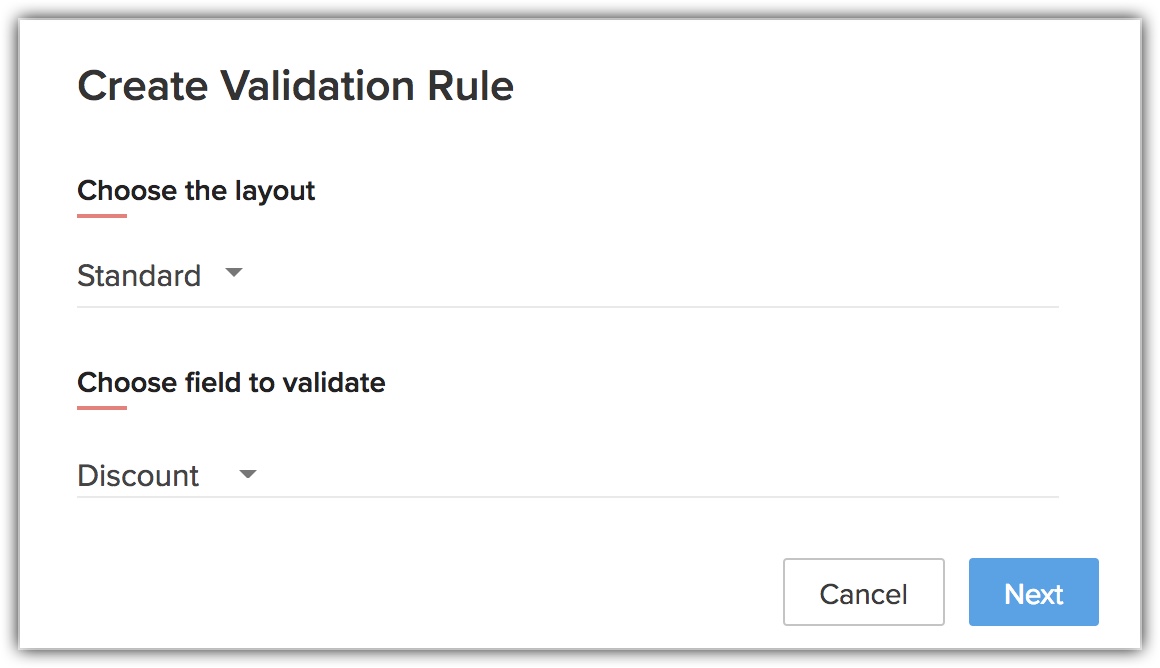
- Choose the layout that the field you wish to validate, belongs to.
- Choose the field and define the primary condition to initiate the rule.For instance, if you want to validate the discount field to keep out discounts more than 15%, your primary condition will be, "Discount > 15%" .
- Choose the layout that the field you wish to validate, belongs to.
- Click Next .
- In the Validation Rule Editor , specify the criteria for validation.

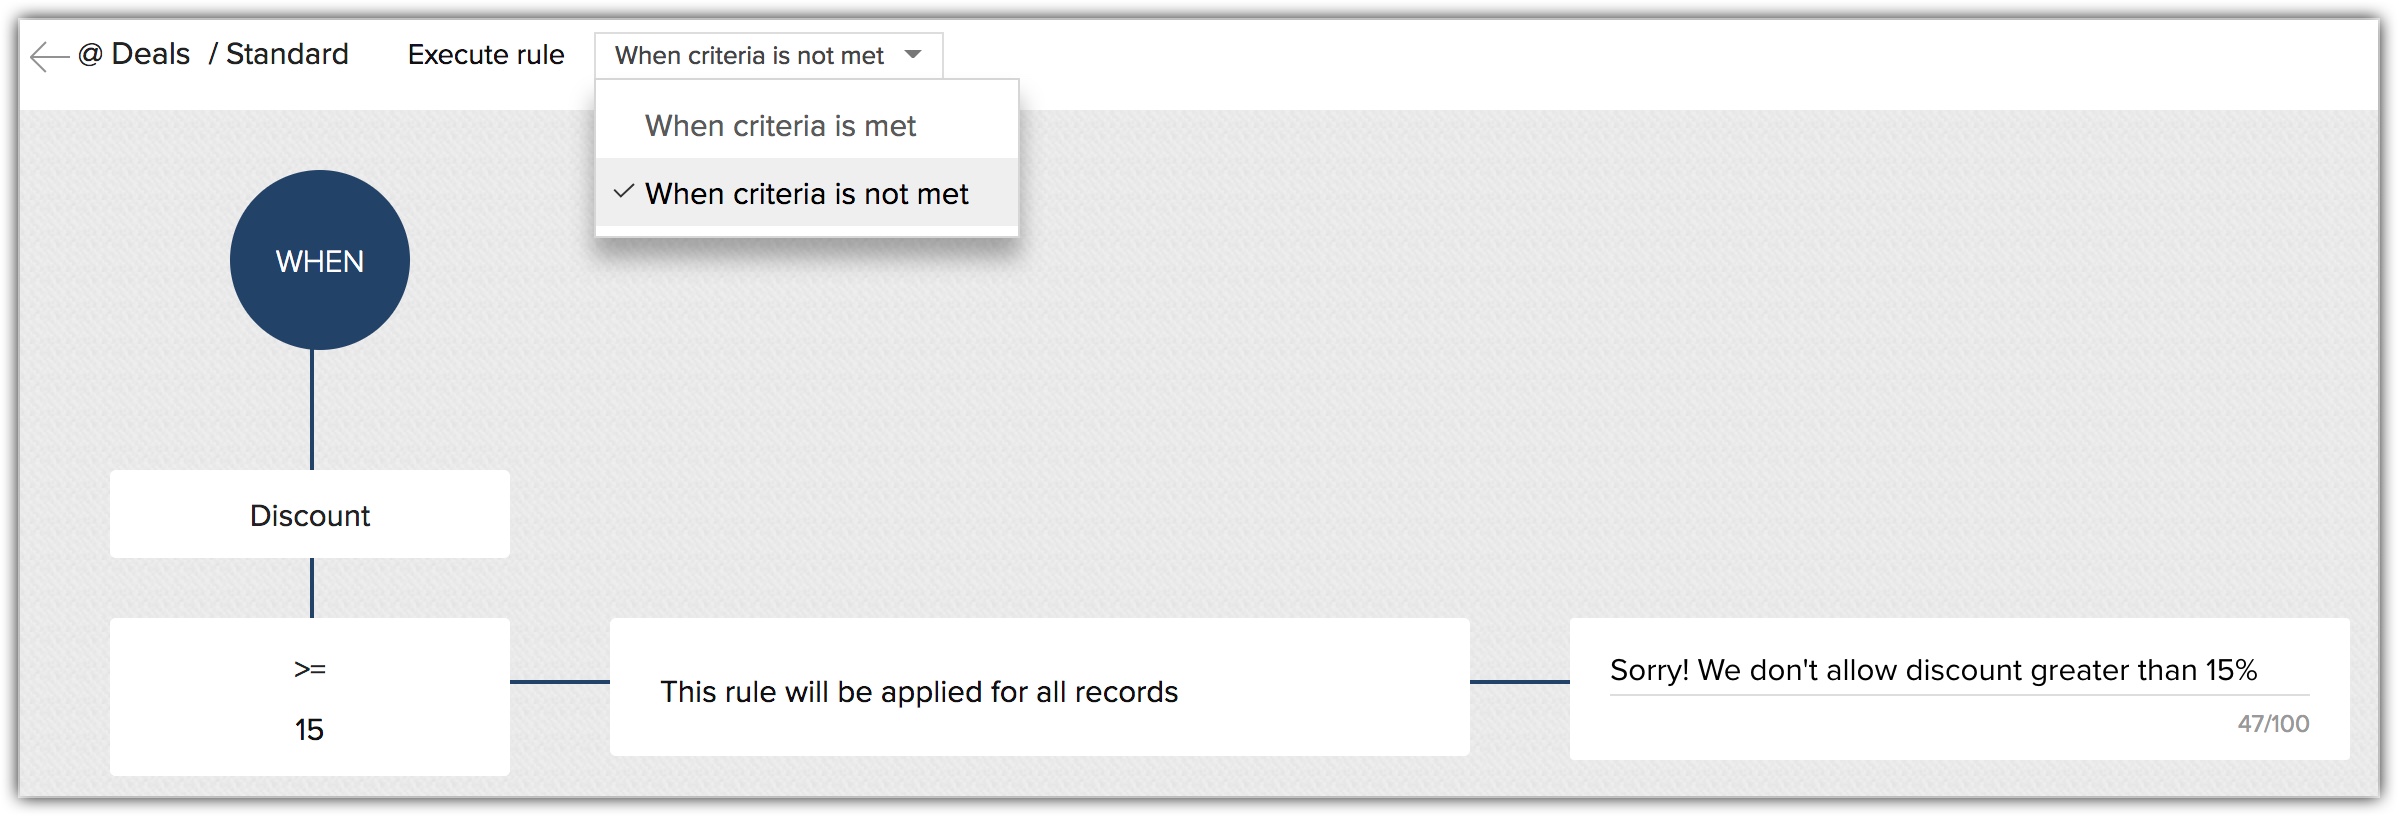
- Select an Execute rule from the drop-down list.
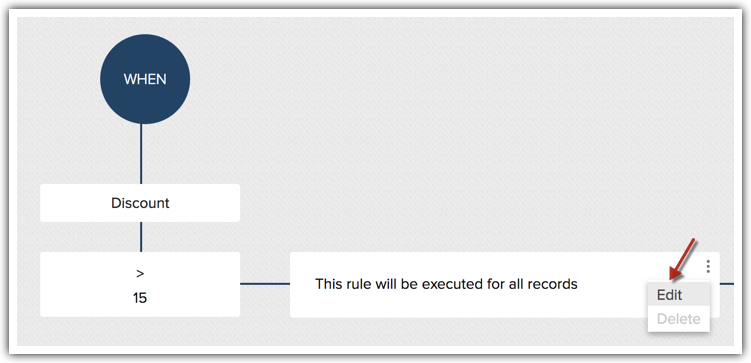
- In the Validation Rule Editor,enter the alert message that should be thrown for records that meet the condition.Example: Sorry! We don't allow discount greater than 15%.Note that this error message will be displayed for all the records that meet the criteria. Which means, whenever a deal is created with more than 15% discount, this error message will be displayed.
- Move your mouse over to the More icon and click Edit , when you have to create multiple conditions.For instance, sometimes you may have policies that define discounts based on the region. Say for India, the maximum discount that can be offered is 15%, but in the USA, it can go up to 20% and so on. You can define these additional conditions in the validation rule and customize the error messages as required.
- To Which records would you like to apply the rule on? select Choose based on specific conditions.
- Define each condition and specify the appropriate error message.
- Click Add another option to change the value of the primary field and configure different alert messages as required.
- Click Save .
 Now, depending on the validation rule, different error messages are displayed when the Region is chosen as UK and India.
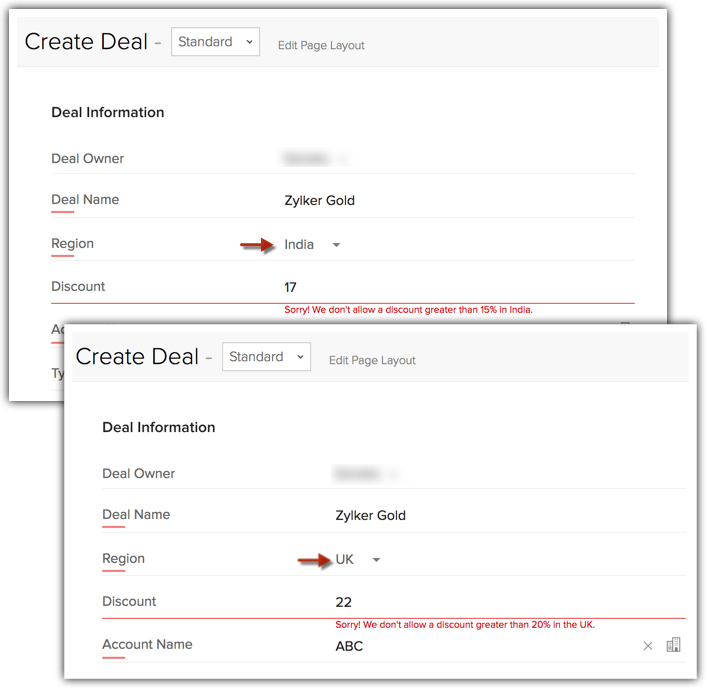

- If a primary field or a secondary field used in a validation rule gets updated via workflows, Blueprint, APIs, Import or Webforms, this field update takes precedence. Which means, the validation rule gets overwritten by the field update. As a consequence, CRM will accept the value entered a result of the field update over the validation rule. Learn more about the consequences here .
- Following is the split up of number of conditions within a validation rule.
- 10 Parent Conditions per rule
- 5 Child Condition per parent condition
- 5 criteria per child condition
- Validation rules are layout-specific. This means, under a single module, say Leads, you can configure different validation rules on the same field for different layouts.
- Validation rules are executed in the order in which they have been created.
- Validation rules cannot be supported for Lookup, Multi-select lookup, Multi-picklist, Formula, Auto-number and Multi-line field types.
- When you create a validation rule as well as Blueprint validation for the same field, and if the two conditions are different, Blueprint overrides the validation rule.That is, as long as the field is within a process, the Blueprint validation is applicable. When a record has exited a process, the validation rule is effective.
- Validation rules are supported in the following areas:
- Create (Web version)
- Quick create (Web version)
- Edit (Web version)
- Quick edit (Ajax - Web version)
- APIs
- Copy customization
- Sandbox
- If records generated via webforms meet the validation rule criteria, they will be submitted for manual approval of records
- For existing rules, if you want to specify whether the alert be thrown when the condition is met or not met, you can simply edit the rule and choose When criteria is not met or When criteria is met under Execute Rule.
Example Scenarios
Following are a few more day-to-day example scenarios in which you can configure validation rules.
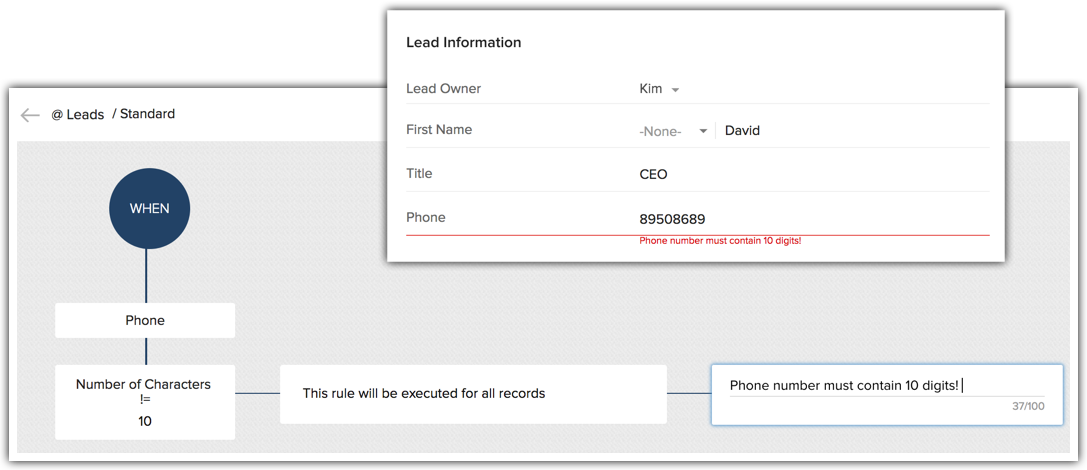
- If the Phone Number field does not contain 10 digits, throw an alert.
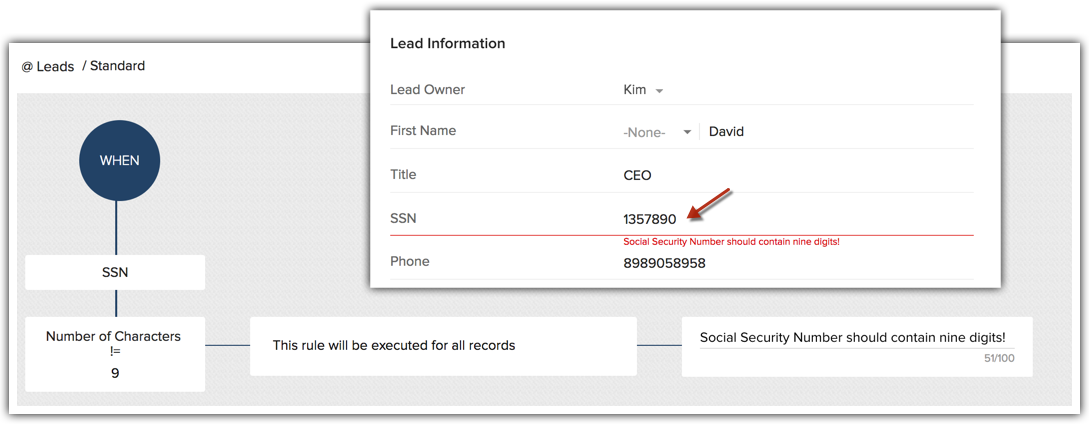
- If the SSN field does not contain 9 characters, throw an alert.
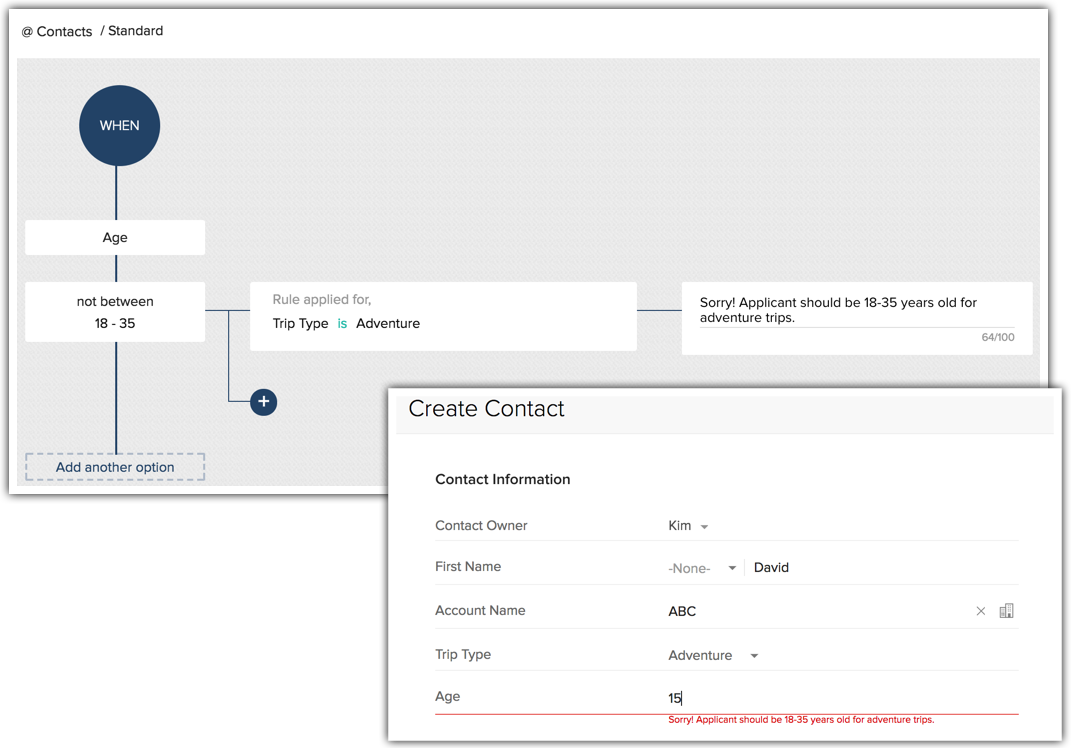
- Holiday Inc needs to validate the age of their travellers in special cases. Anyone under 18 or over 35 cannot be enrolled in adventure trips. So here, the validation rule could say, If Age is Not Between18 and 35 , throw an alert.
- Zylker Inc is a software company that offers in-person product training as a separate service. However, for a customer to request personal training, they should have purchased at least 10 user licenses of their software. Otherwise a training request cannot be accepted.So a validation rule could be created to address this situation. If Training is selected as Required , but Number of Users is less than 10 , throw an alert - Sorry, we need a minimum of 10 users for training request to be accepted. This can be further drilled down, based on the product chosen.
- If Product is A - 10 users
- If Product is B - 20 users
- If Product is C - 30 users and so on.
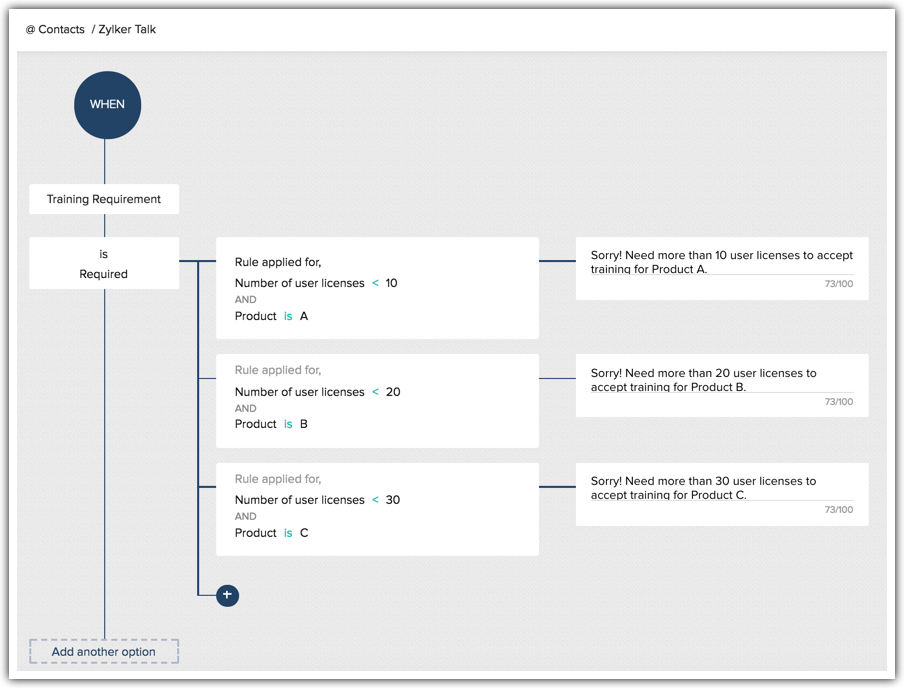
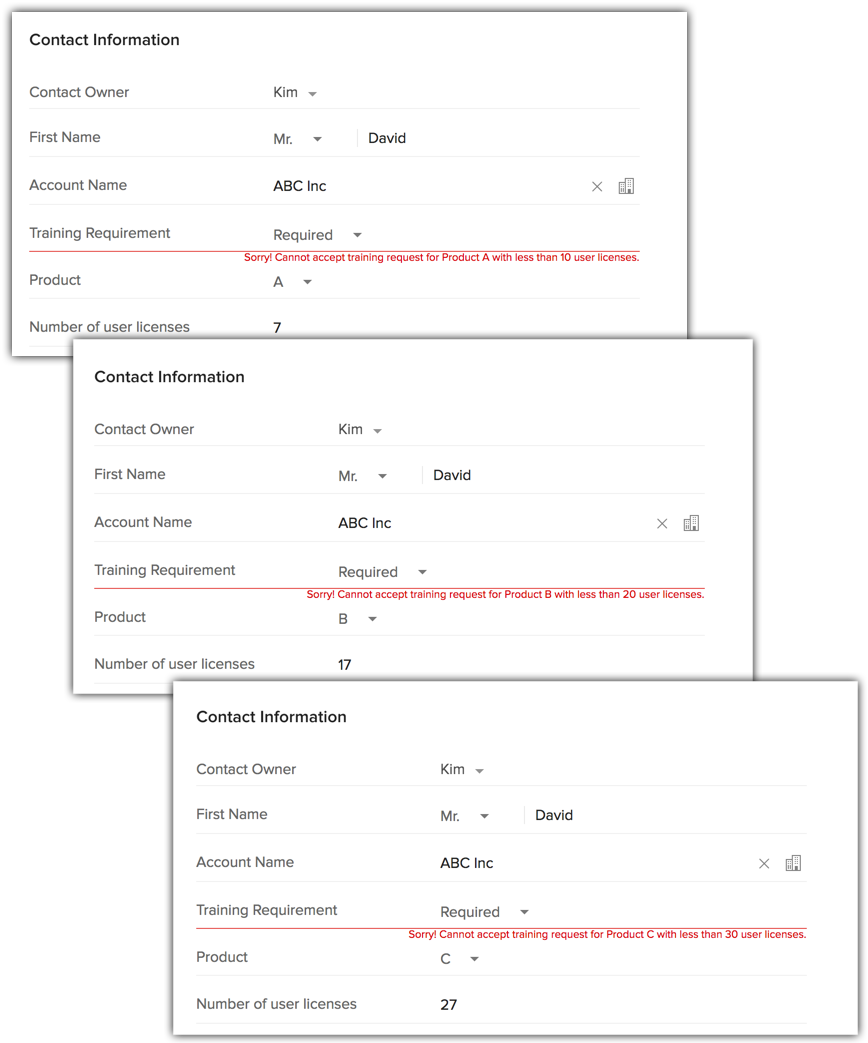
- If Product is A - 10 users
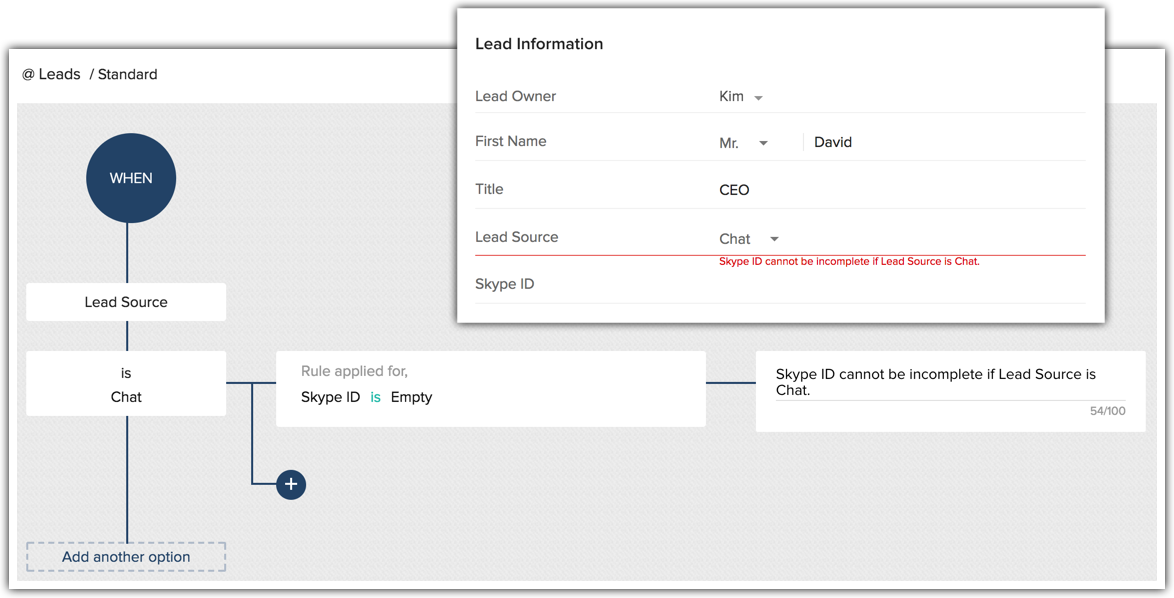
- If Lead Source is Chat , but the Skype field is {Empty}, throw an alert.
Delete a validation rule
When you delete a validation rule, the rule as well as the alert message associated with it will be deleted. When you attempt to delete a field associated with a validation rule, you will be prompted to first delete the rule, after which you are free to delete the field.
To delete a validation rule
- Go to Setup > Customization > Modules and Fields .
- Select the module for which you want to delete the validation rules.
- In the [Module] page, click the Validation Rules tab.
- Point to the rule you wish to delete and click the Trash icon and confirm the action.
Related Articles
Validation Rules
Ensure the accuracy of data that enters CRM using Validation Rules Help guide Working with Validation Rules Exceptions to Validation RulesWorking with Leads
Leads are the details gathered about an individual or representatives of an organization. They play a very important role in an organization's Sales & Marketing department and are useful in identifying potential customers. Collecting leads and ...Creating Validation Rules Using Functions
By using function you can create a validation rule where the value entered by the user needs to be verified outside the CRM database. You can even validate the fields like phone numbers, zip code and so on for a particular pattern by mentioning the ...Use Cases for Validation Rules Using Functions
Make detailed description mandatory if specific terms are entered in the field Zylker Tech manufactures electronic assemblies and similar other products. Their manufactured items are outsourced for quality check to a third-party service provider. The ...Behavioral Rules
Behaviors define the CRM activities you'd like to track or motivate. For example, you can define a behavior to motivate your team to "create more lead records with telephone numbers", and award one point per record to the record owner. Add behavior ...