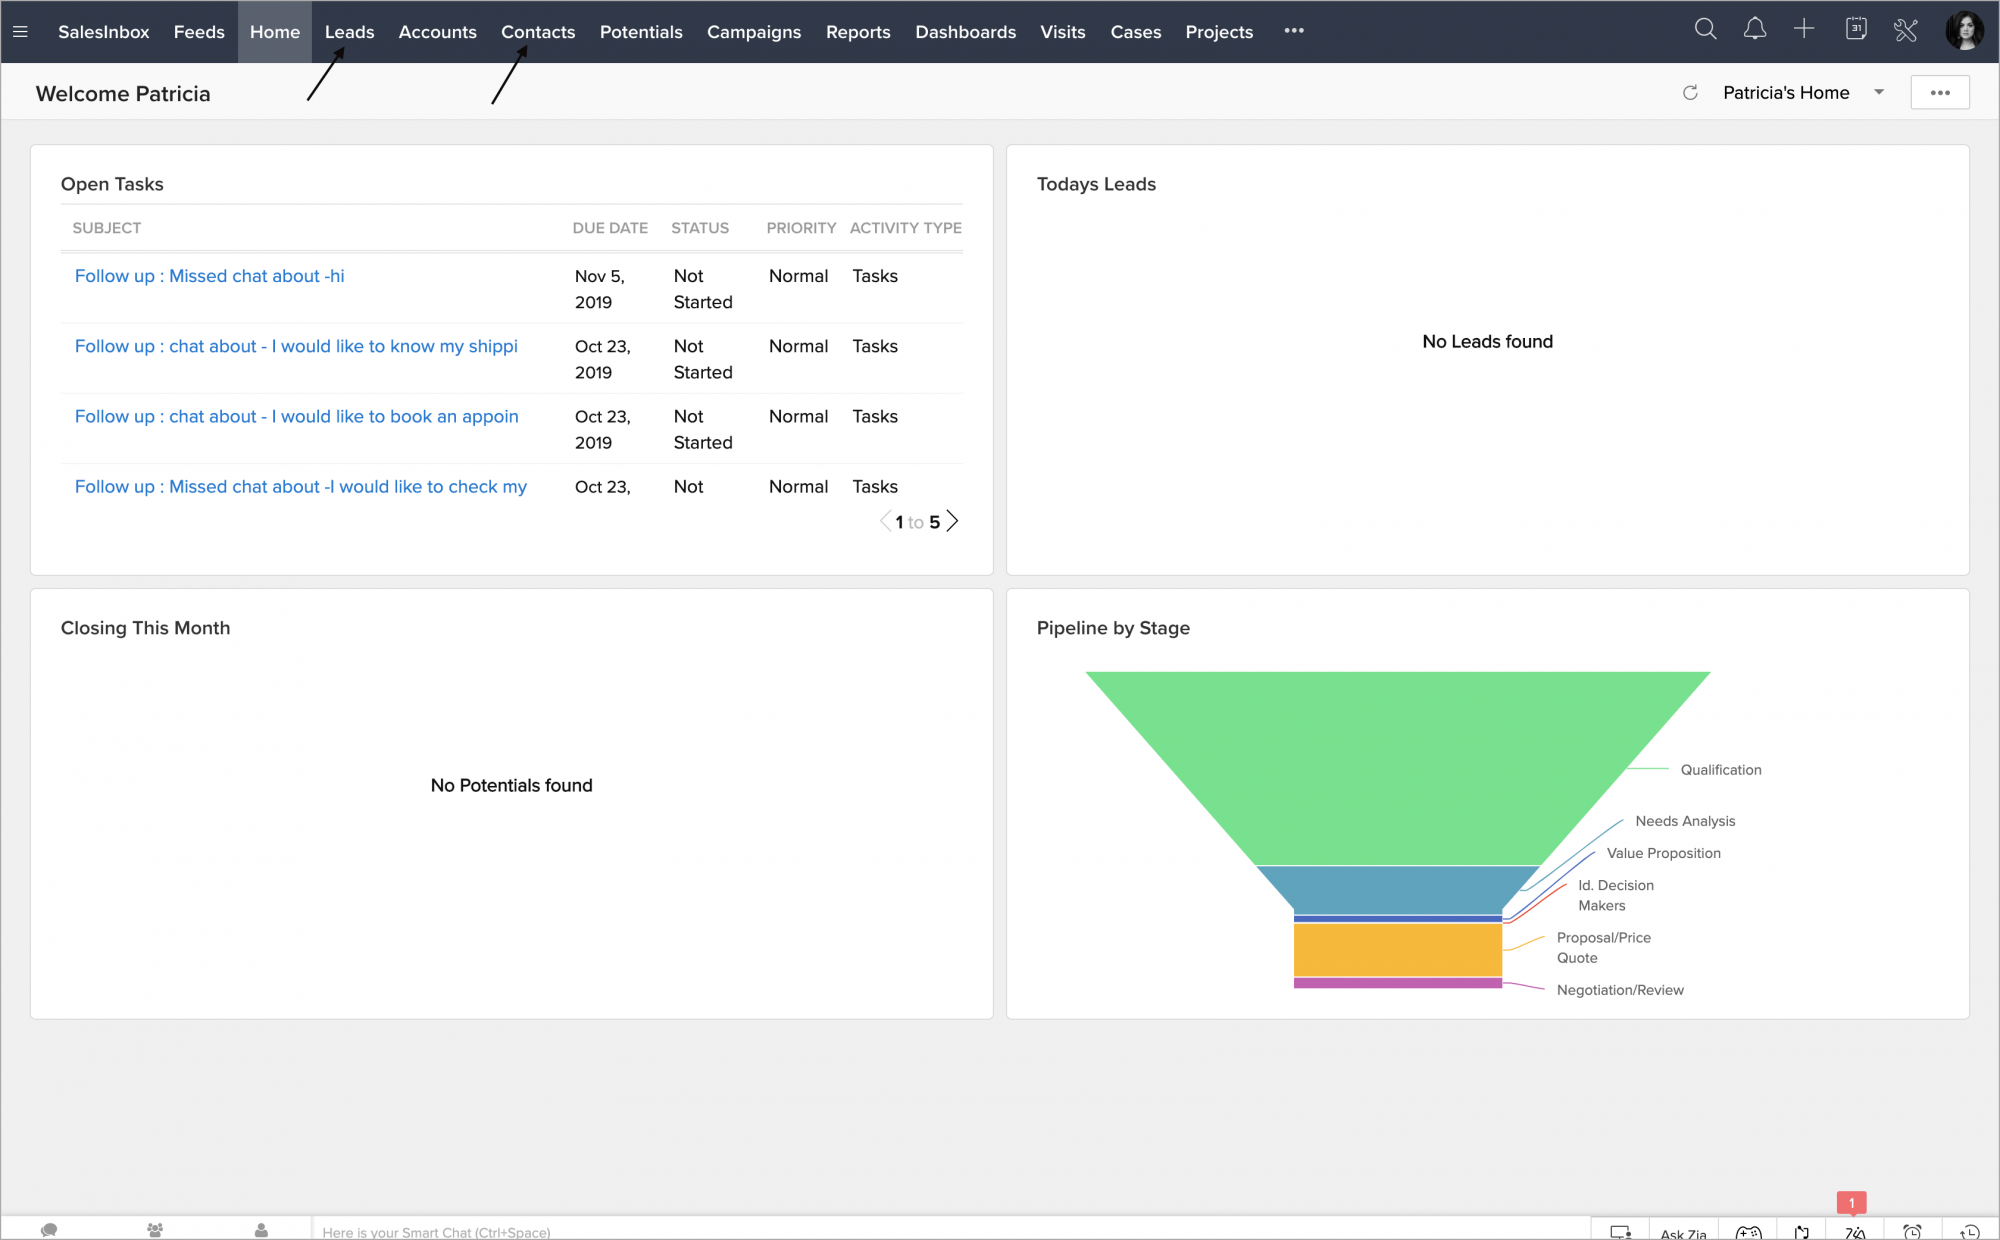
Zoho CRM
Overview
Maximize the value of each-and-every interaction your team has with your customers, and add the ability to provide on-demand customer support through live chat.
Integrate Zoho SalesIQ with Zoho CRM and organize all your customer data in one place. By adding Zoho SalesIQ into your existing CRM, you extend your ability to connect with customers, and give your team the tools to support customers instantly, while keeping all interactions organized.
With instant access to your comprehensive customer database and easy-to-use live support software working together, it is all possible.


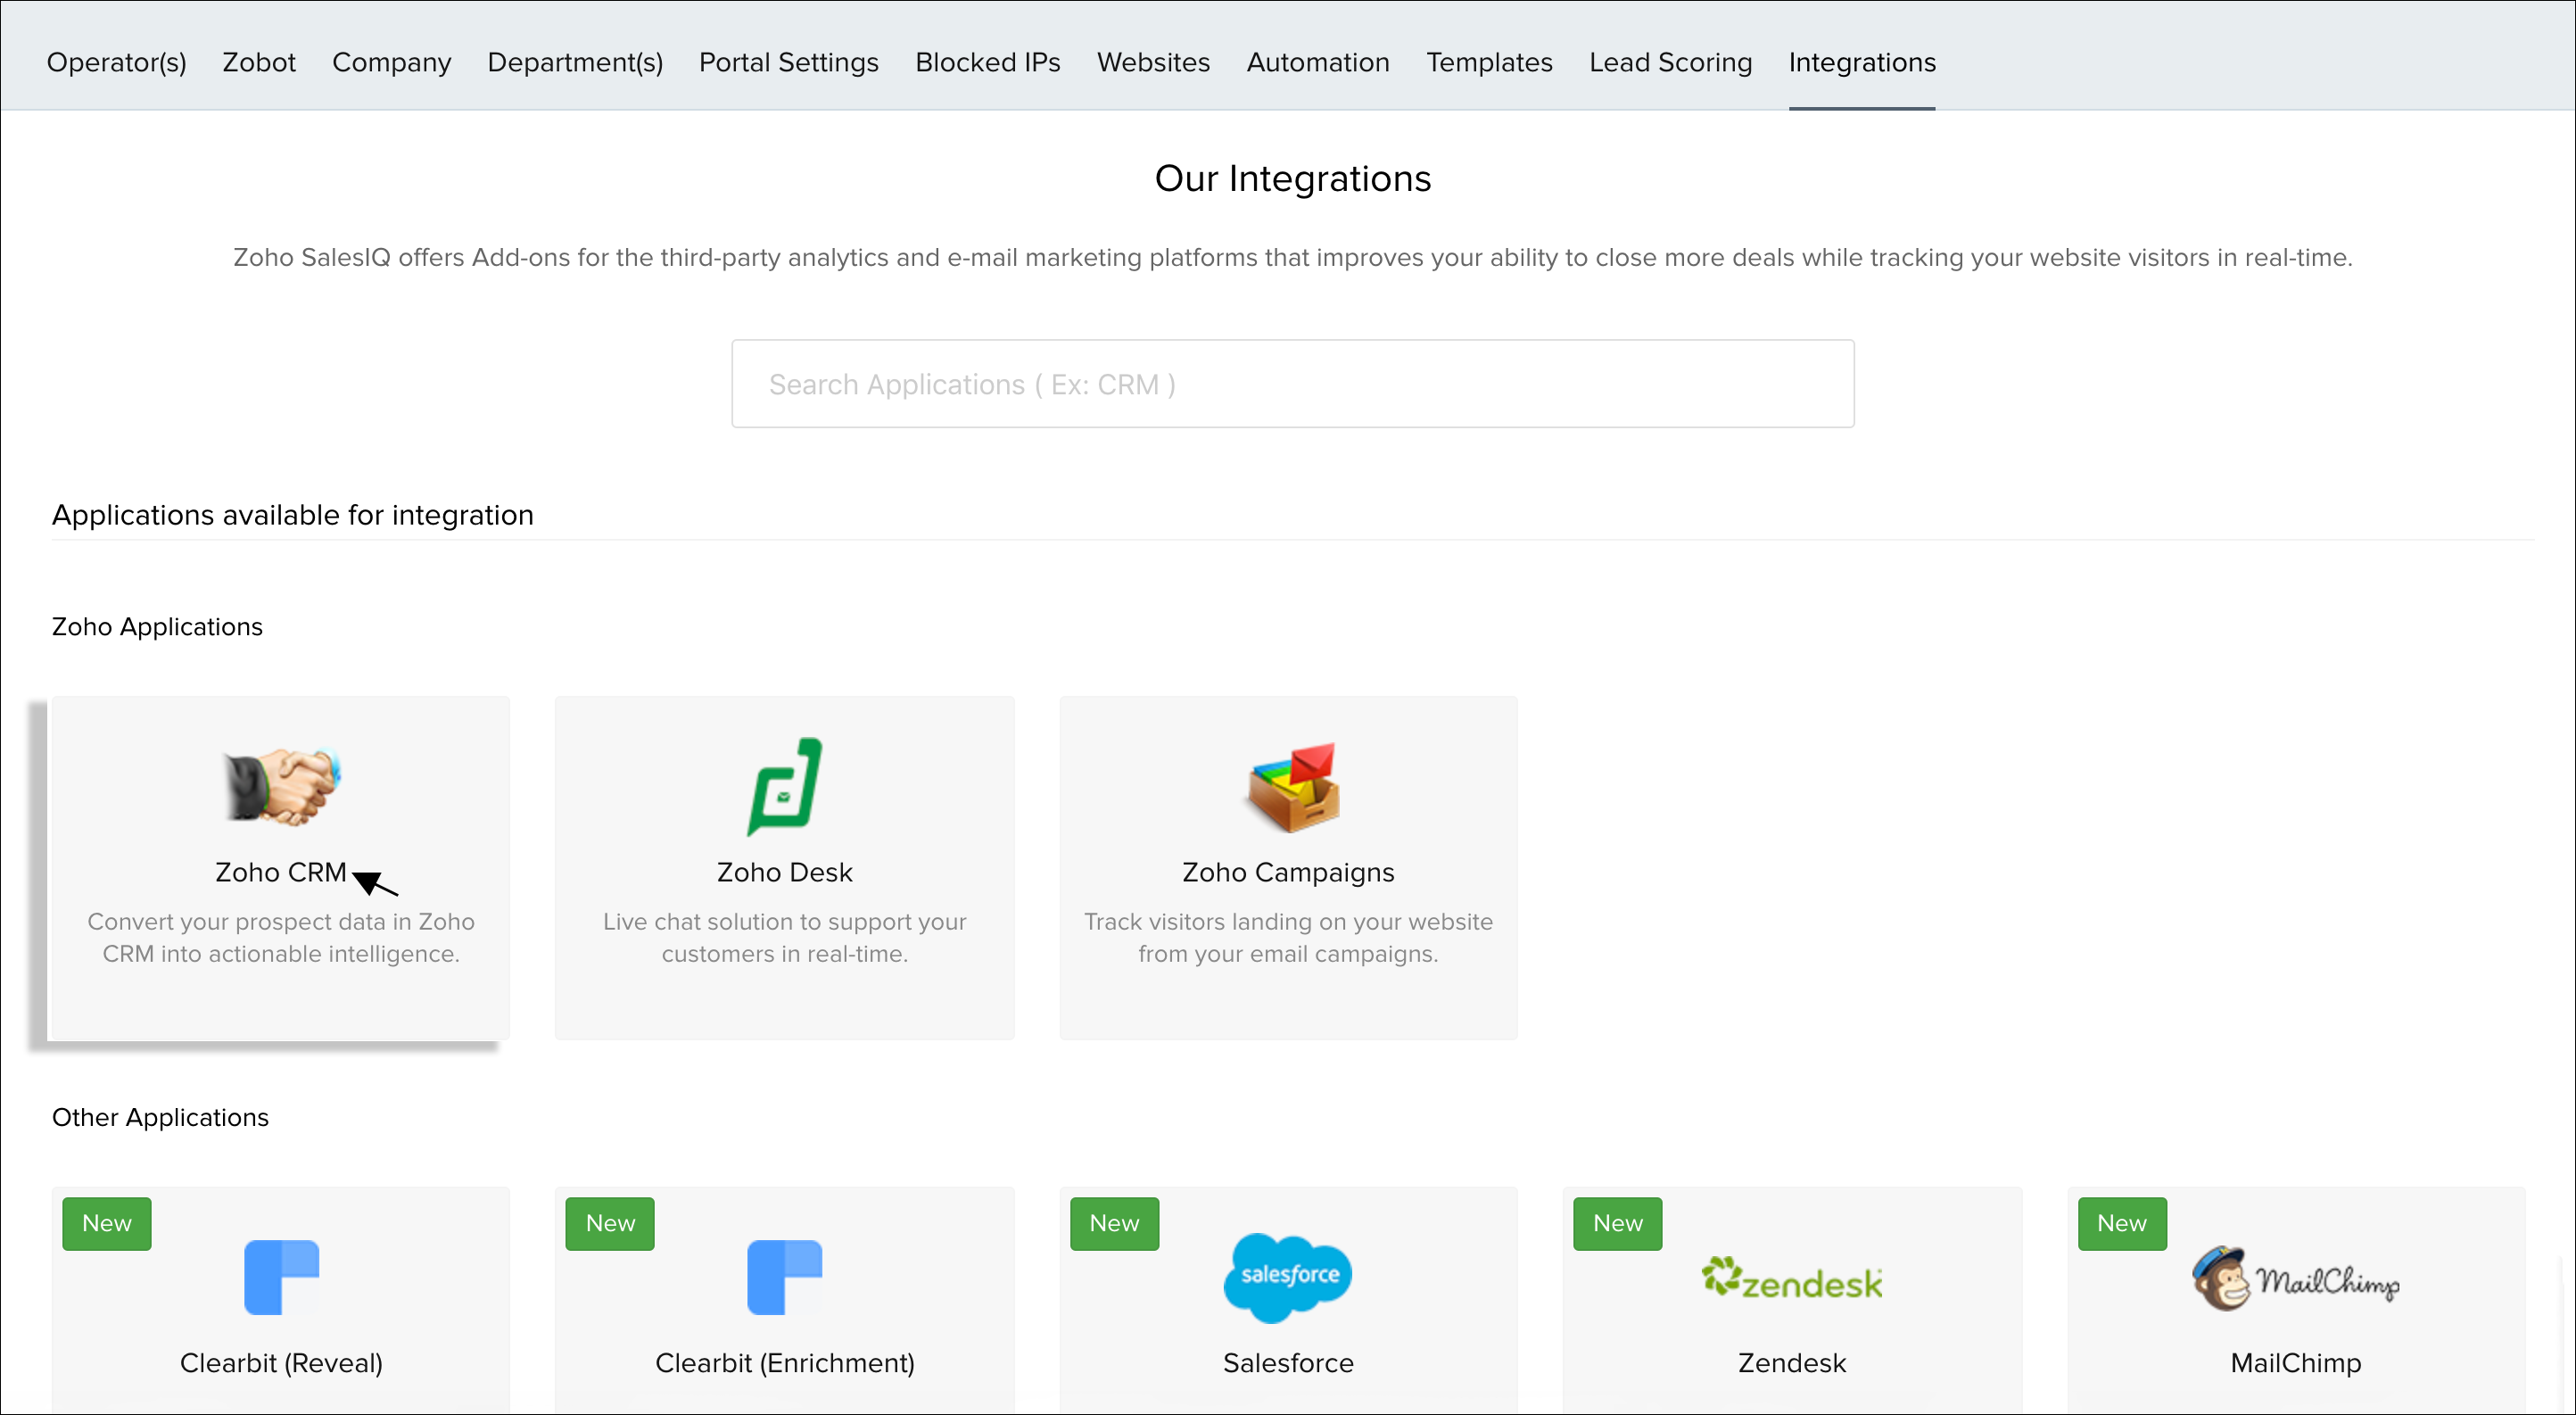
Integrate Zoho CRM
How to integrate your Zoho CRM account with your Zoho SalesIQ account?
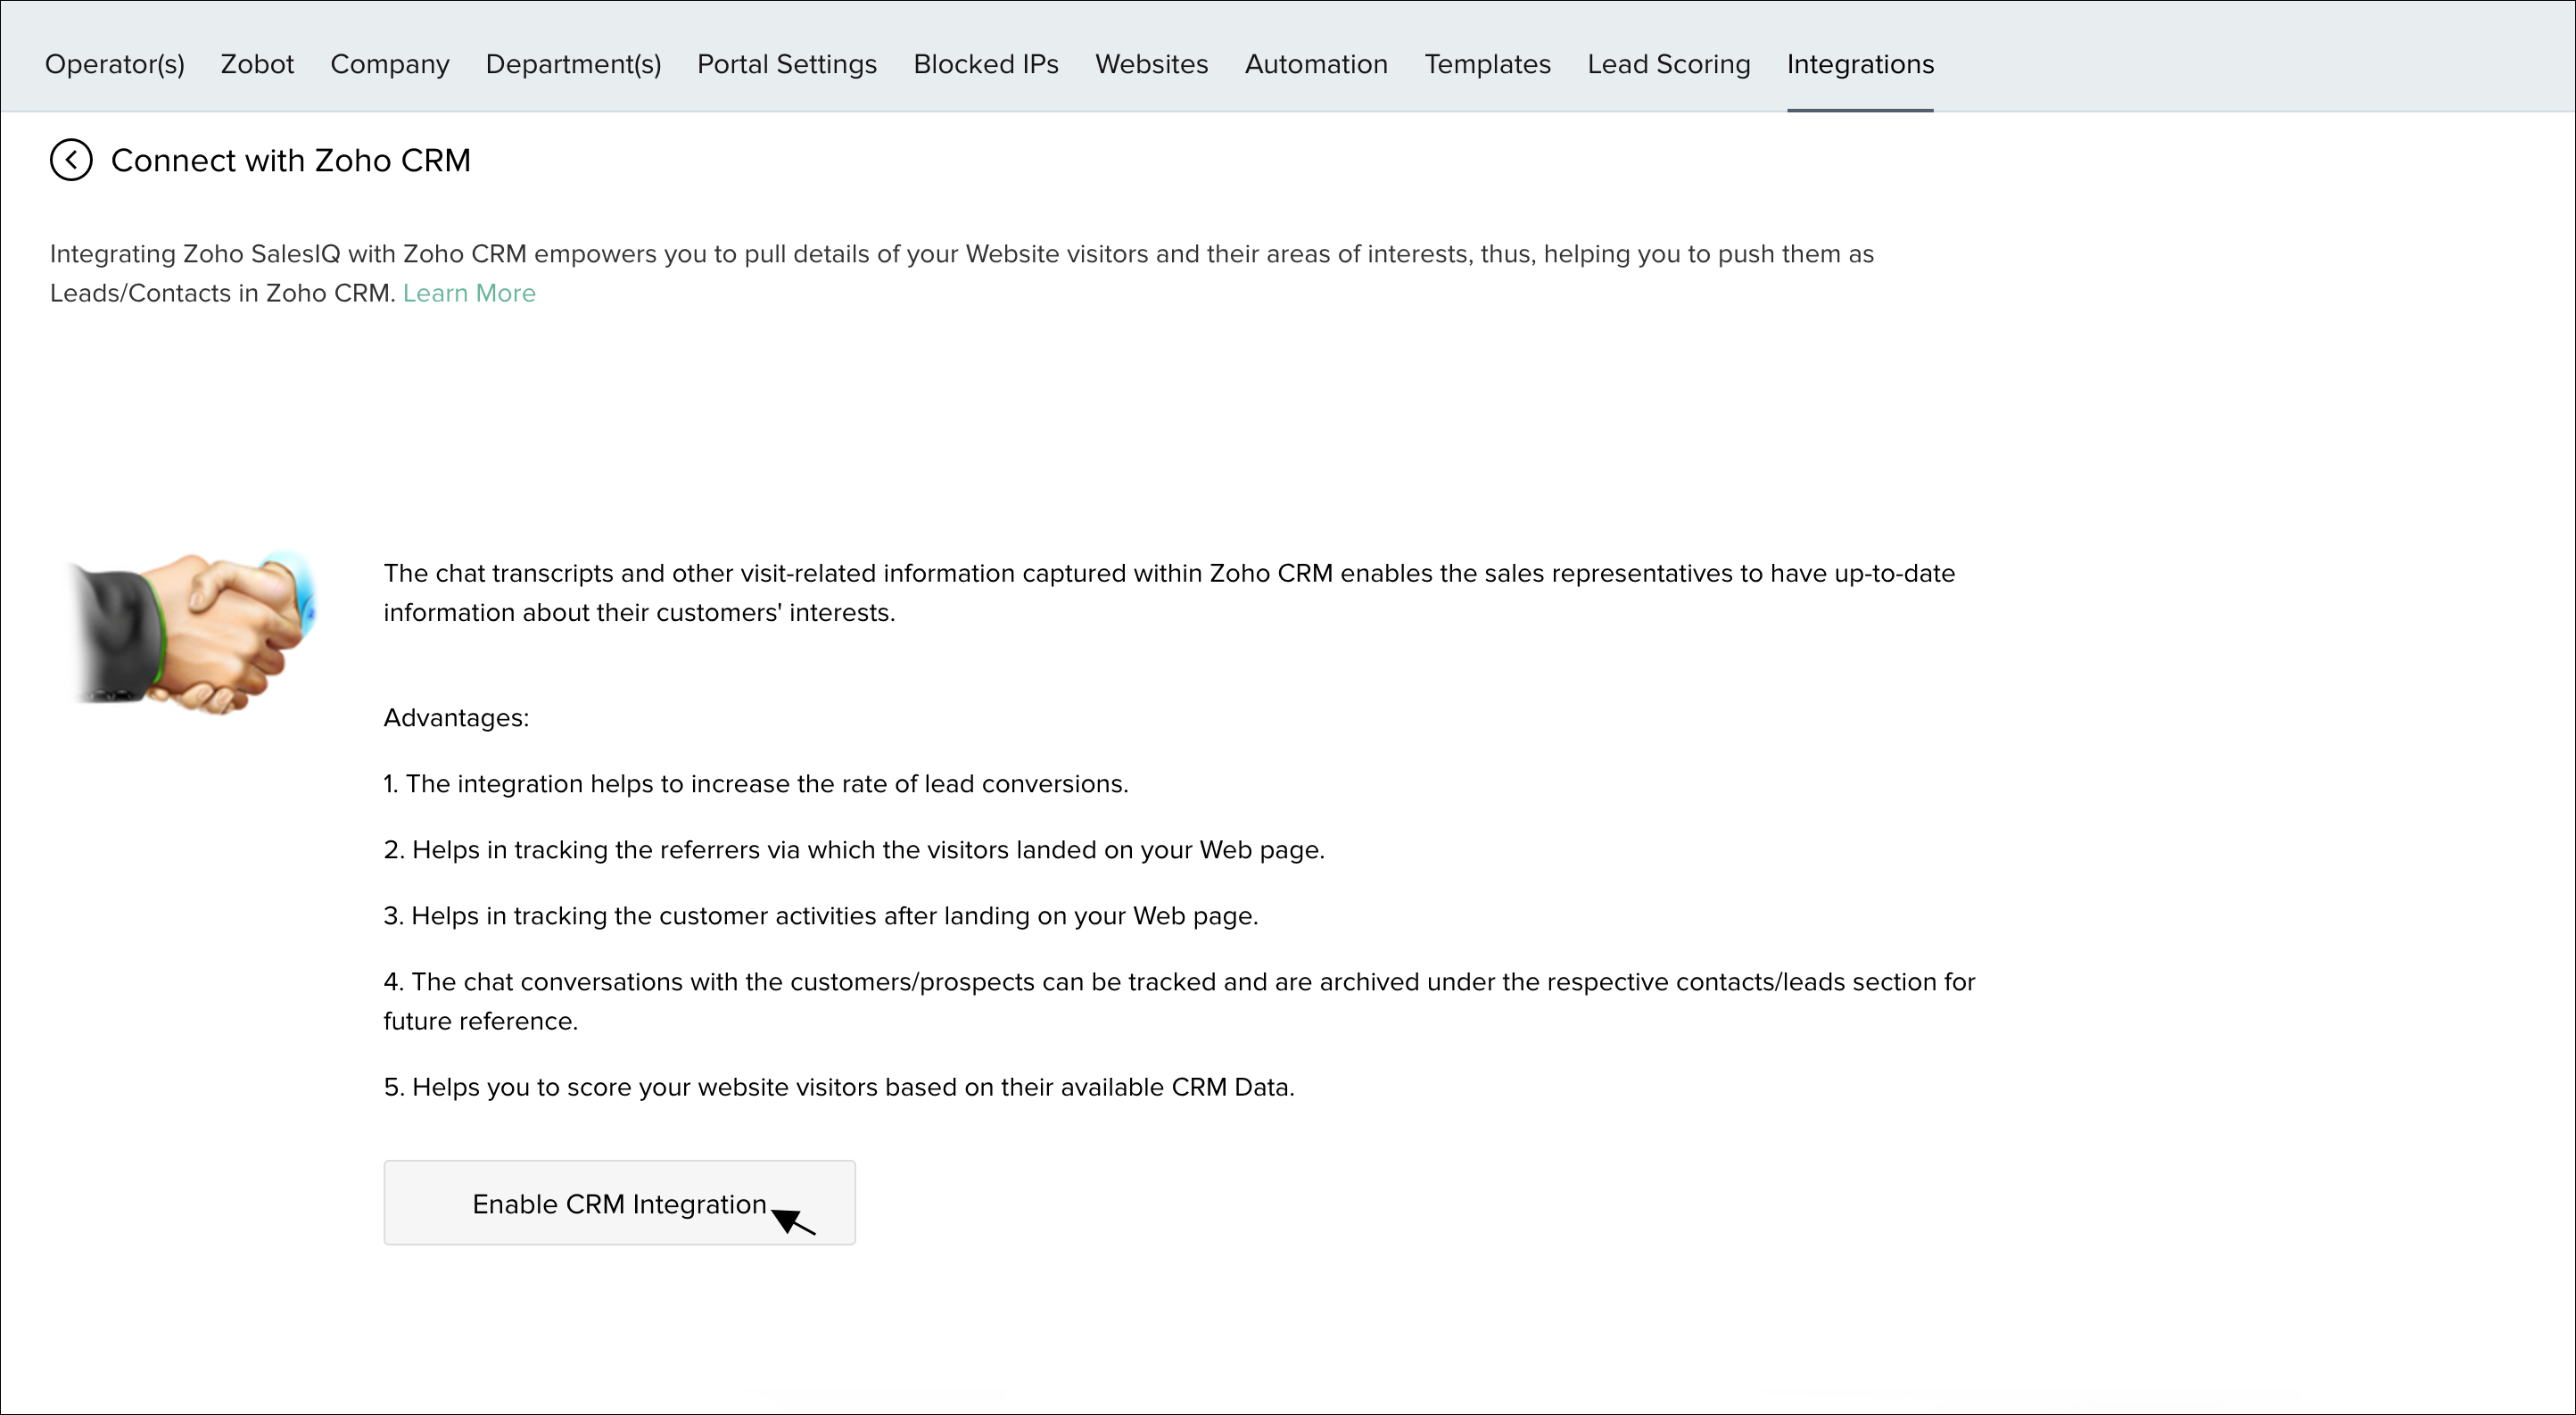
Before you can unlock the customer supporting power within your existing customer database, you need to link your Zoho SalesIQ and CRM together.
To make things as simple as possible for you, we recommend having Zoho CRM administrator must also have an account and be an administrator inside your Zoho SalesIQ account.
Pairing your Zoho CRM and SalesIQ account as a CRM admin
- Login to “Zoho SalesIQ”.
- In Settings, click Zoho CRM.
- In the Connect with Zoho CRM page, click the Enable CRM Integration button. This will link Zoho SalesIQ to your CRM account upon successful generation of Zoho CRM ZSC key.
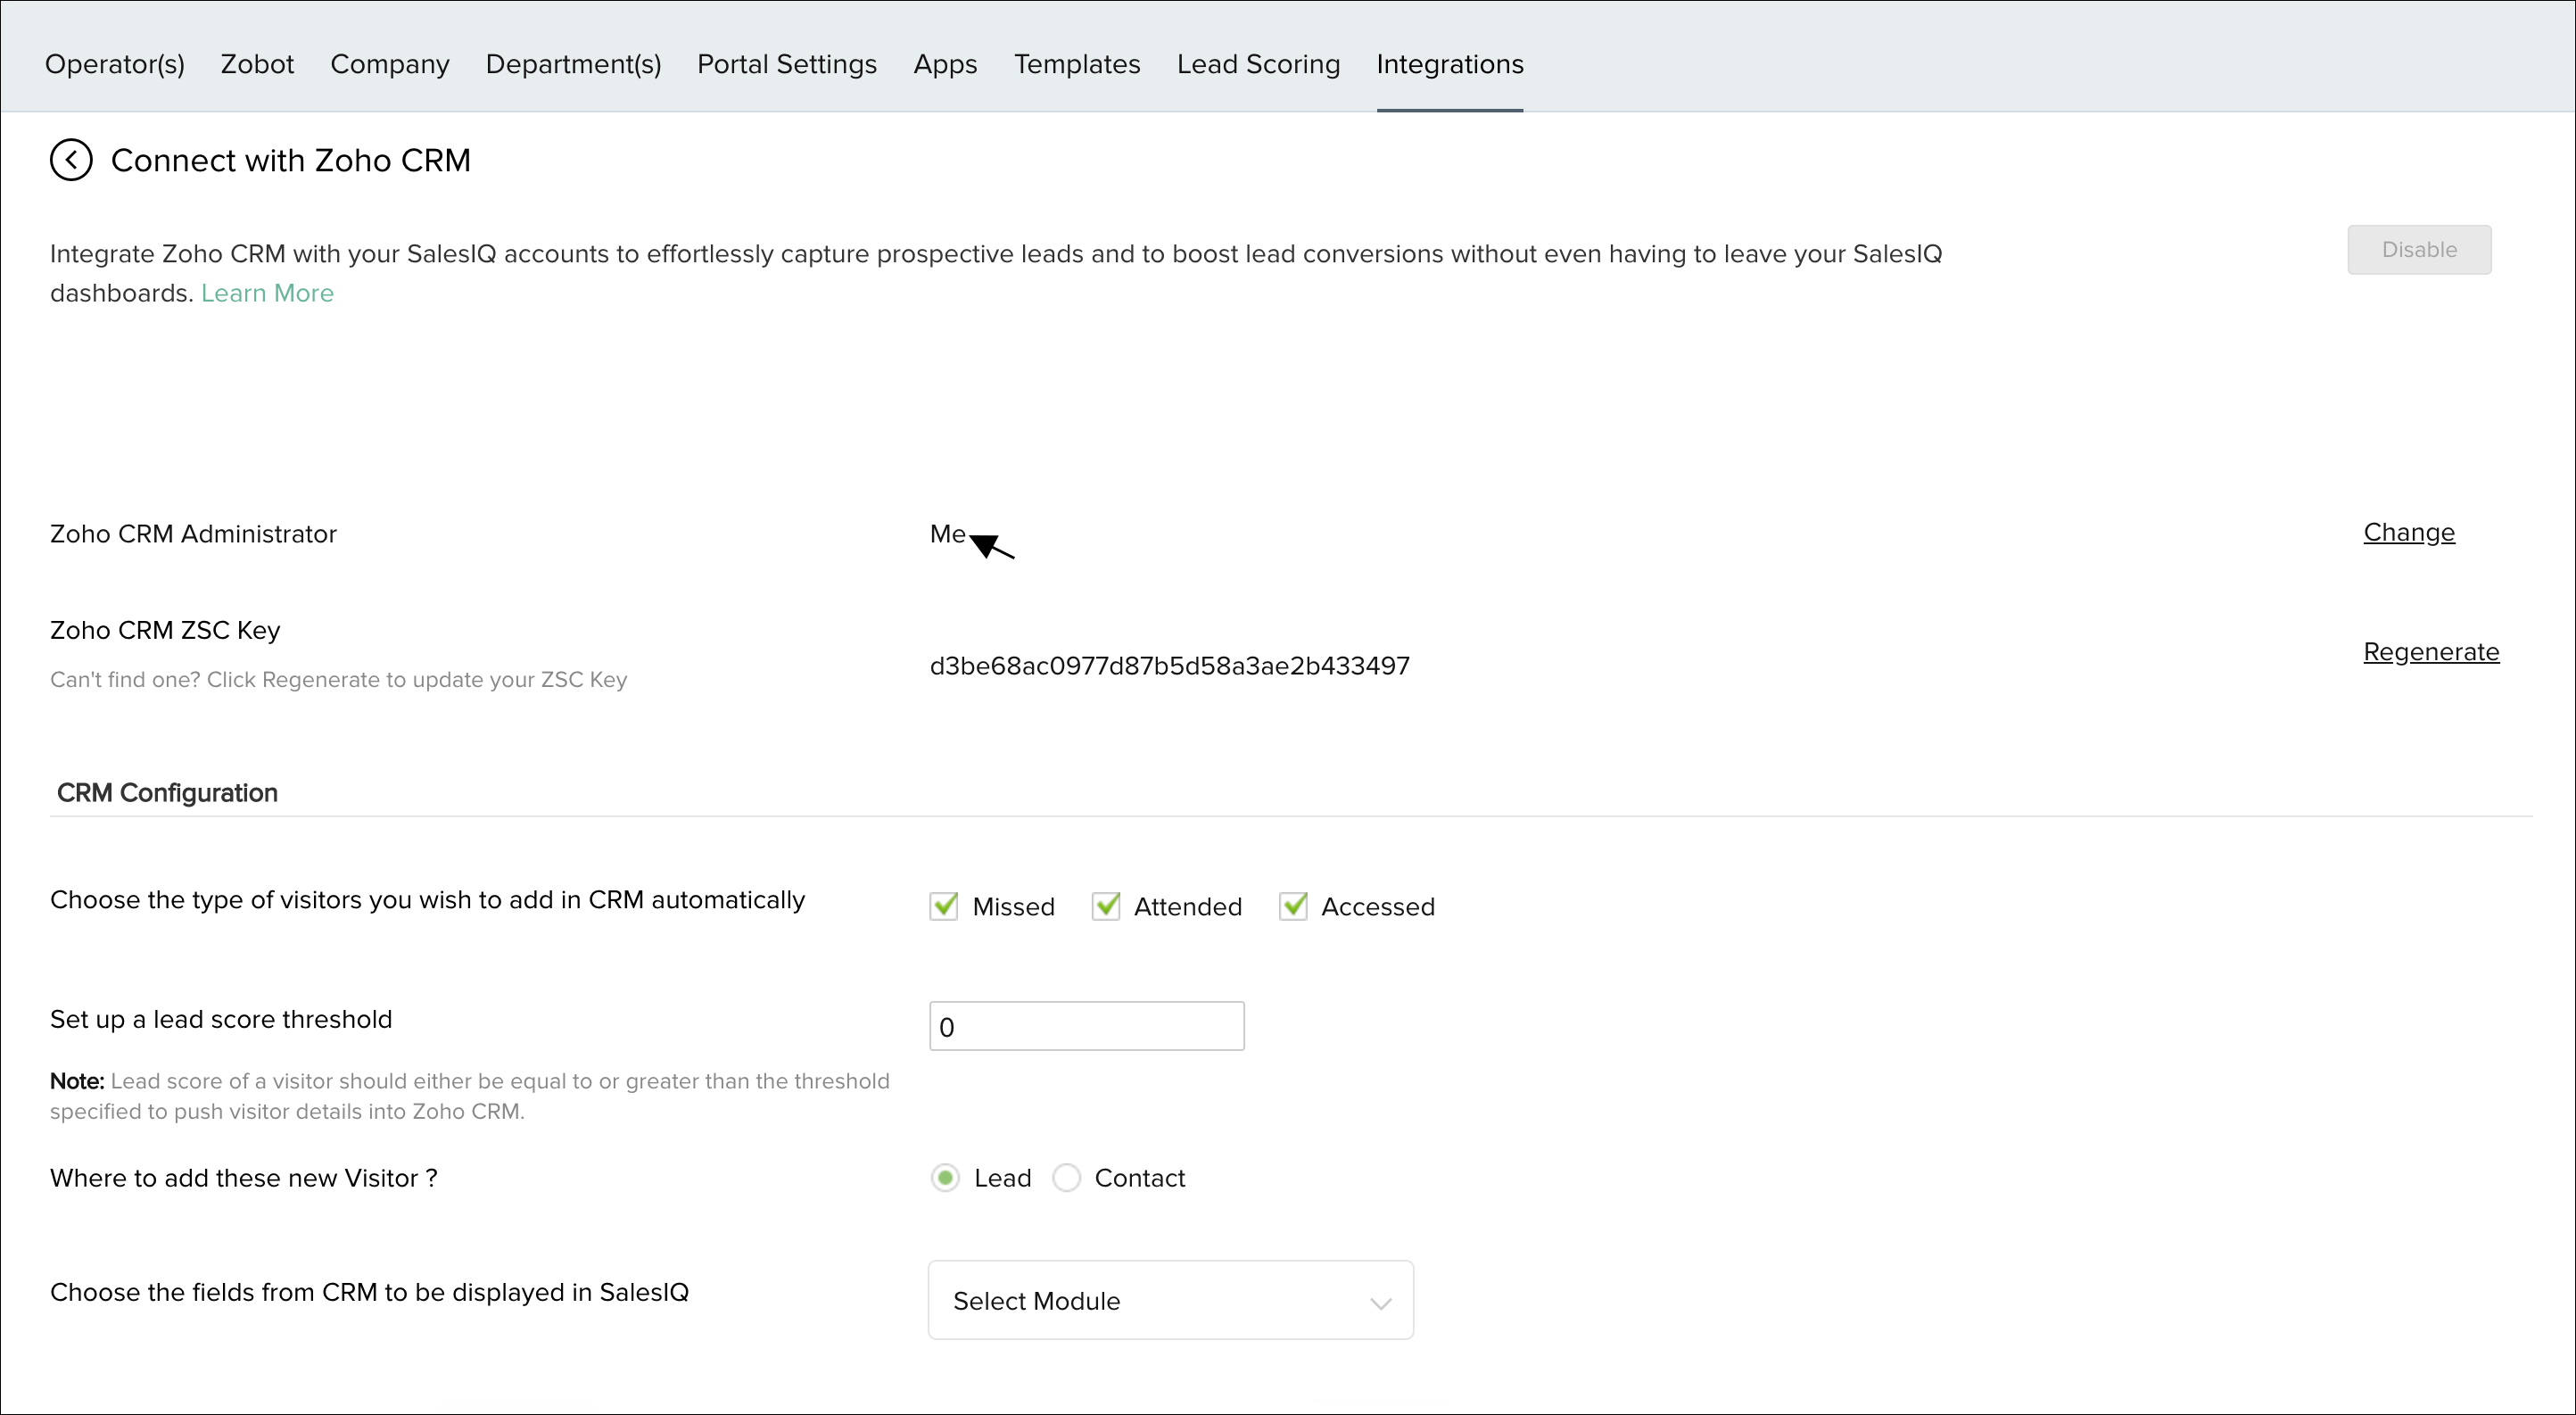
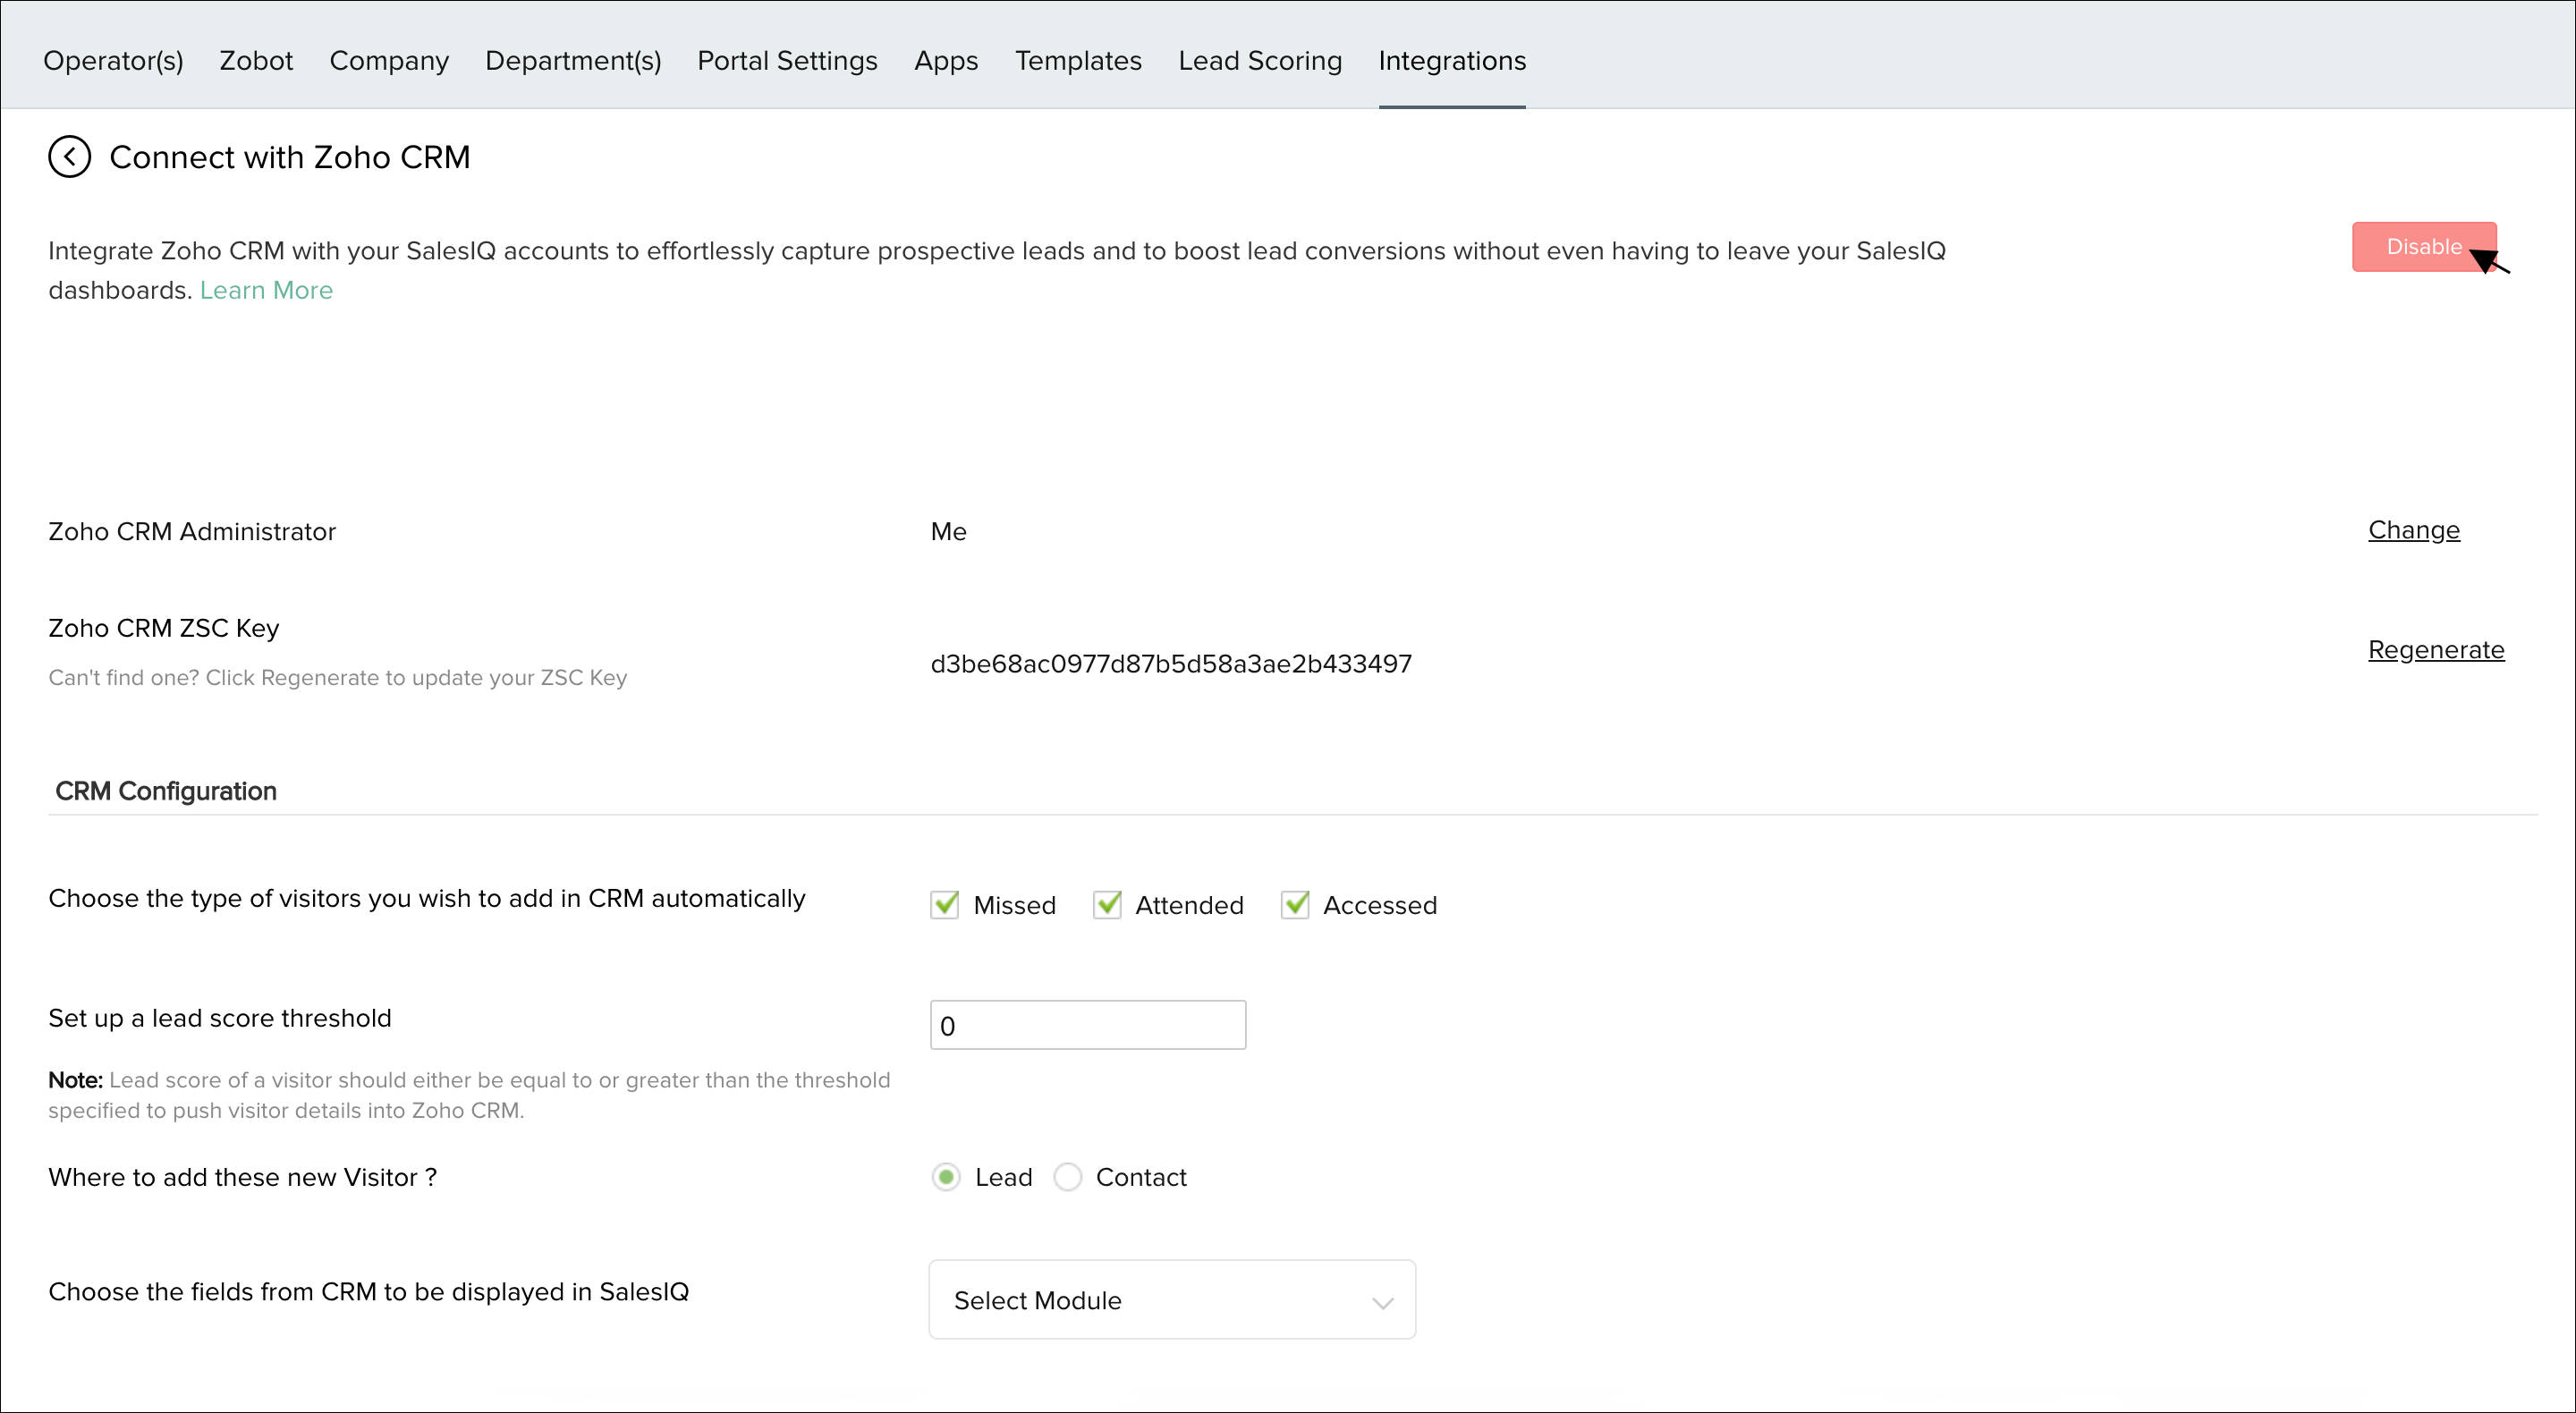
Upon successful integration of Zoho SalesIQ account to the Zoho CRM account for which you are the CRM administrator. You will now see the Zoho CRM administrator as “Me” and the Zoho CRM ZSC Key will be displayed below.
Pair Accounts - Non CRM Admin
Pairing accounts without being a CRM admin
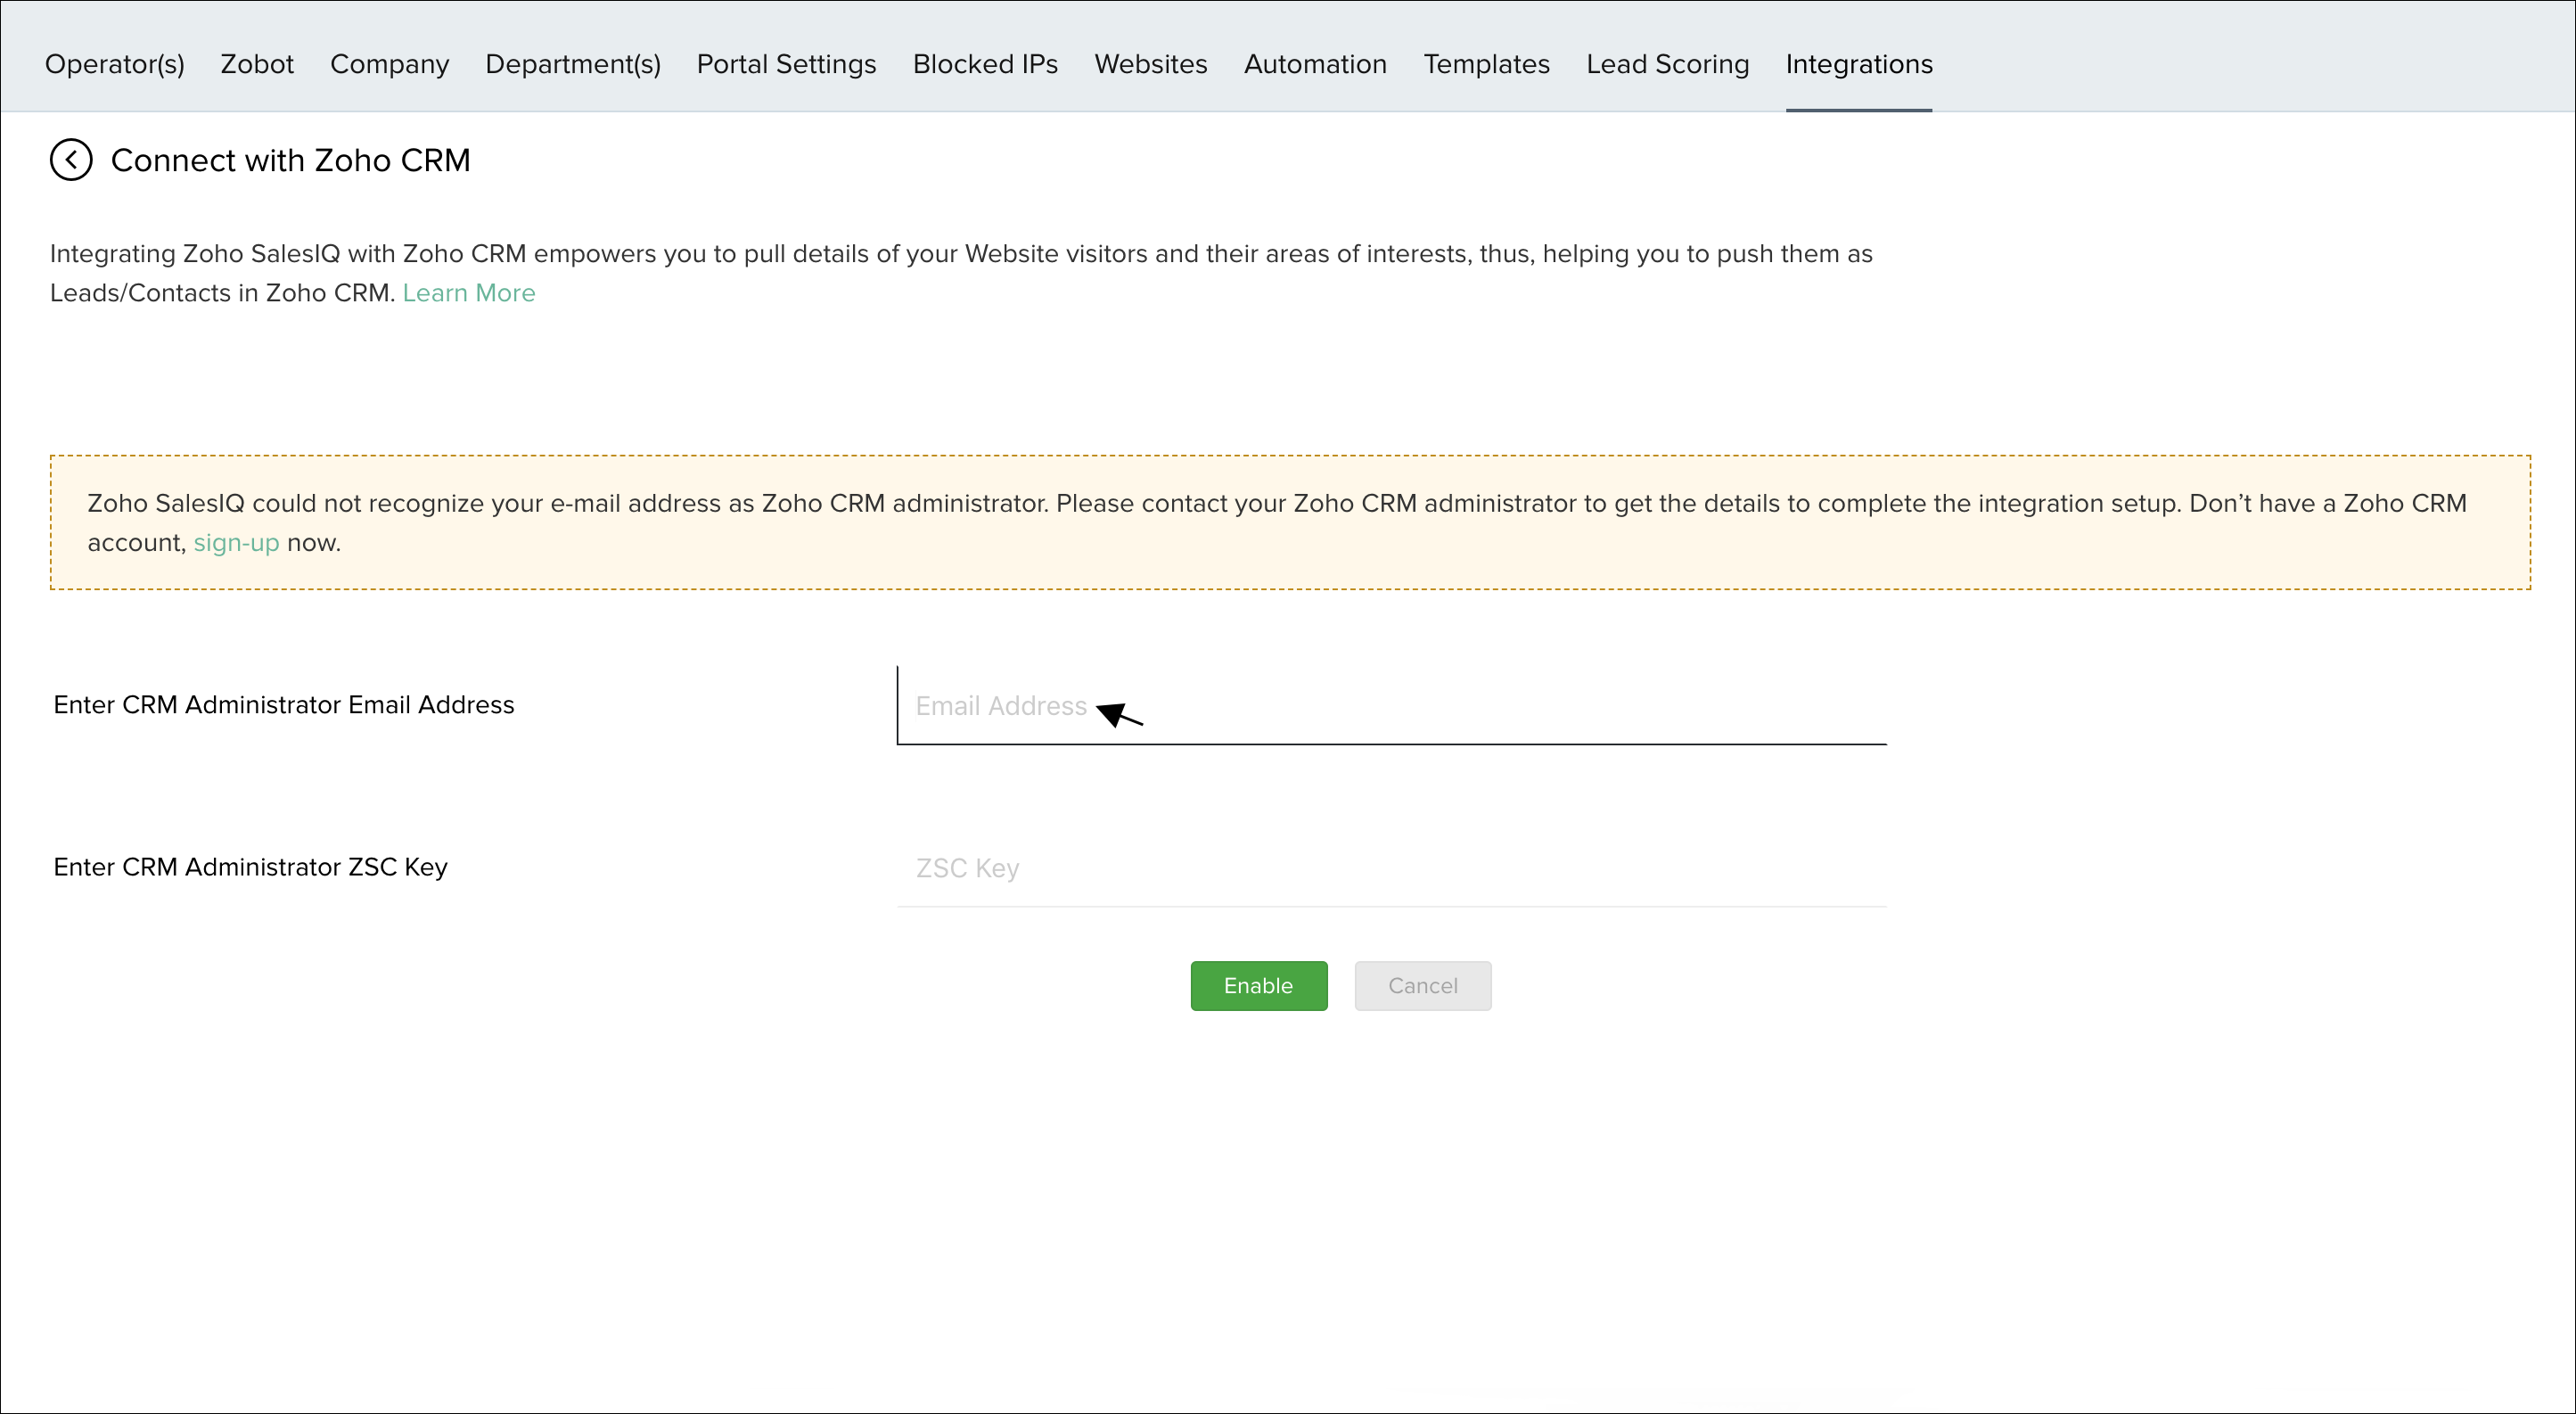
If you are not the administrator of the CRM account that you need to integrate with Zoho SalesIQ, no worries, all you need is the administrator’s e-mail address, and the account’s specific CRM ZSC key.
You can share the below instructions on how to generate a ZSC key with your CRM administrator.
How to generate a ZSC key?
- In the desired Zoho CRM account, click “Setup” above the navigation bar at the top-right of the screen.
- In the “Developer Space” section, click “Zoho Service Communication (ZSC) Key”.
- In the ZSC Key section, click the green “Generate Now” button.
- You will then see the ZSC information, including the administrator’s e-mail address and the unique ZSC key. You will need to provide both pieces of information to have yourself, or someone else, link up this CRM account to a Zoho SalesIQ account.


If the administrator had already generated a ZSC key in the past, they can find the existing key by following the same navigation.
Linking Zoho SalesIQ without being a CRM admin
If you are not a Zoho CRM administrator and when you click the “Enable CRM Integration” button in Zoho SalesIQ you will see a message informing you that: “Zoho SalesIQ could not recognize your e-mail address as Zoho CRM administrator. Please contact your Zoho CRM administrator to get the details to complete the integration setup. Don't have a Zoho CRM account, sign-up now.”
- You will also see two boxes below where you can enter the “email address” of the desired CRM account administrator and the box to enter the “ZSC key” for the account you wish to link your Zoho SalesIQ.
- Update the fields with the generated CRM admin's email address and ZSC key.
- Click "Enable" to link your Zoho SalesIQ to the CRM account you entered the information for.
Change CRM Account
Changing system generated pairings to your desired CRM account.
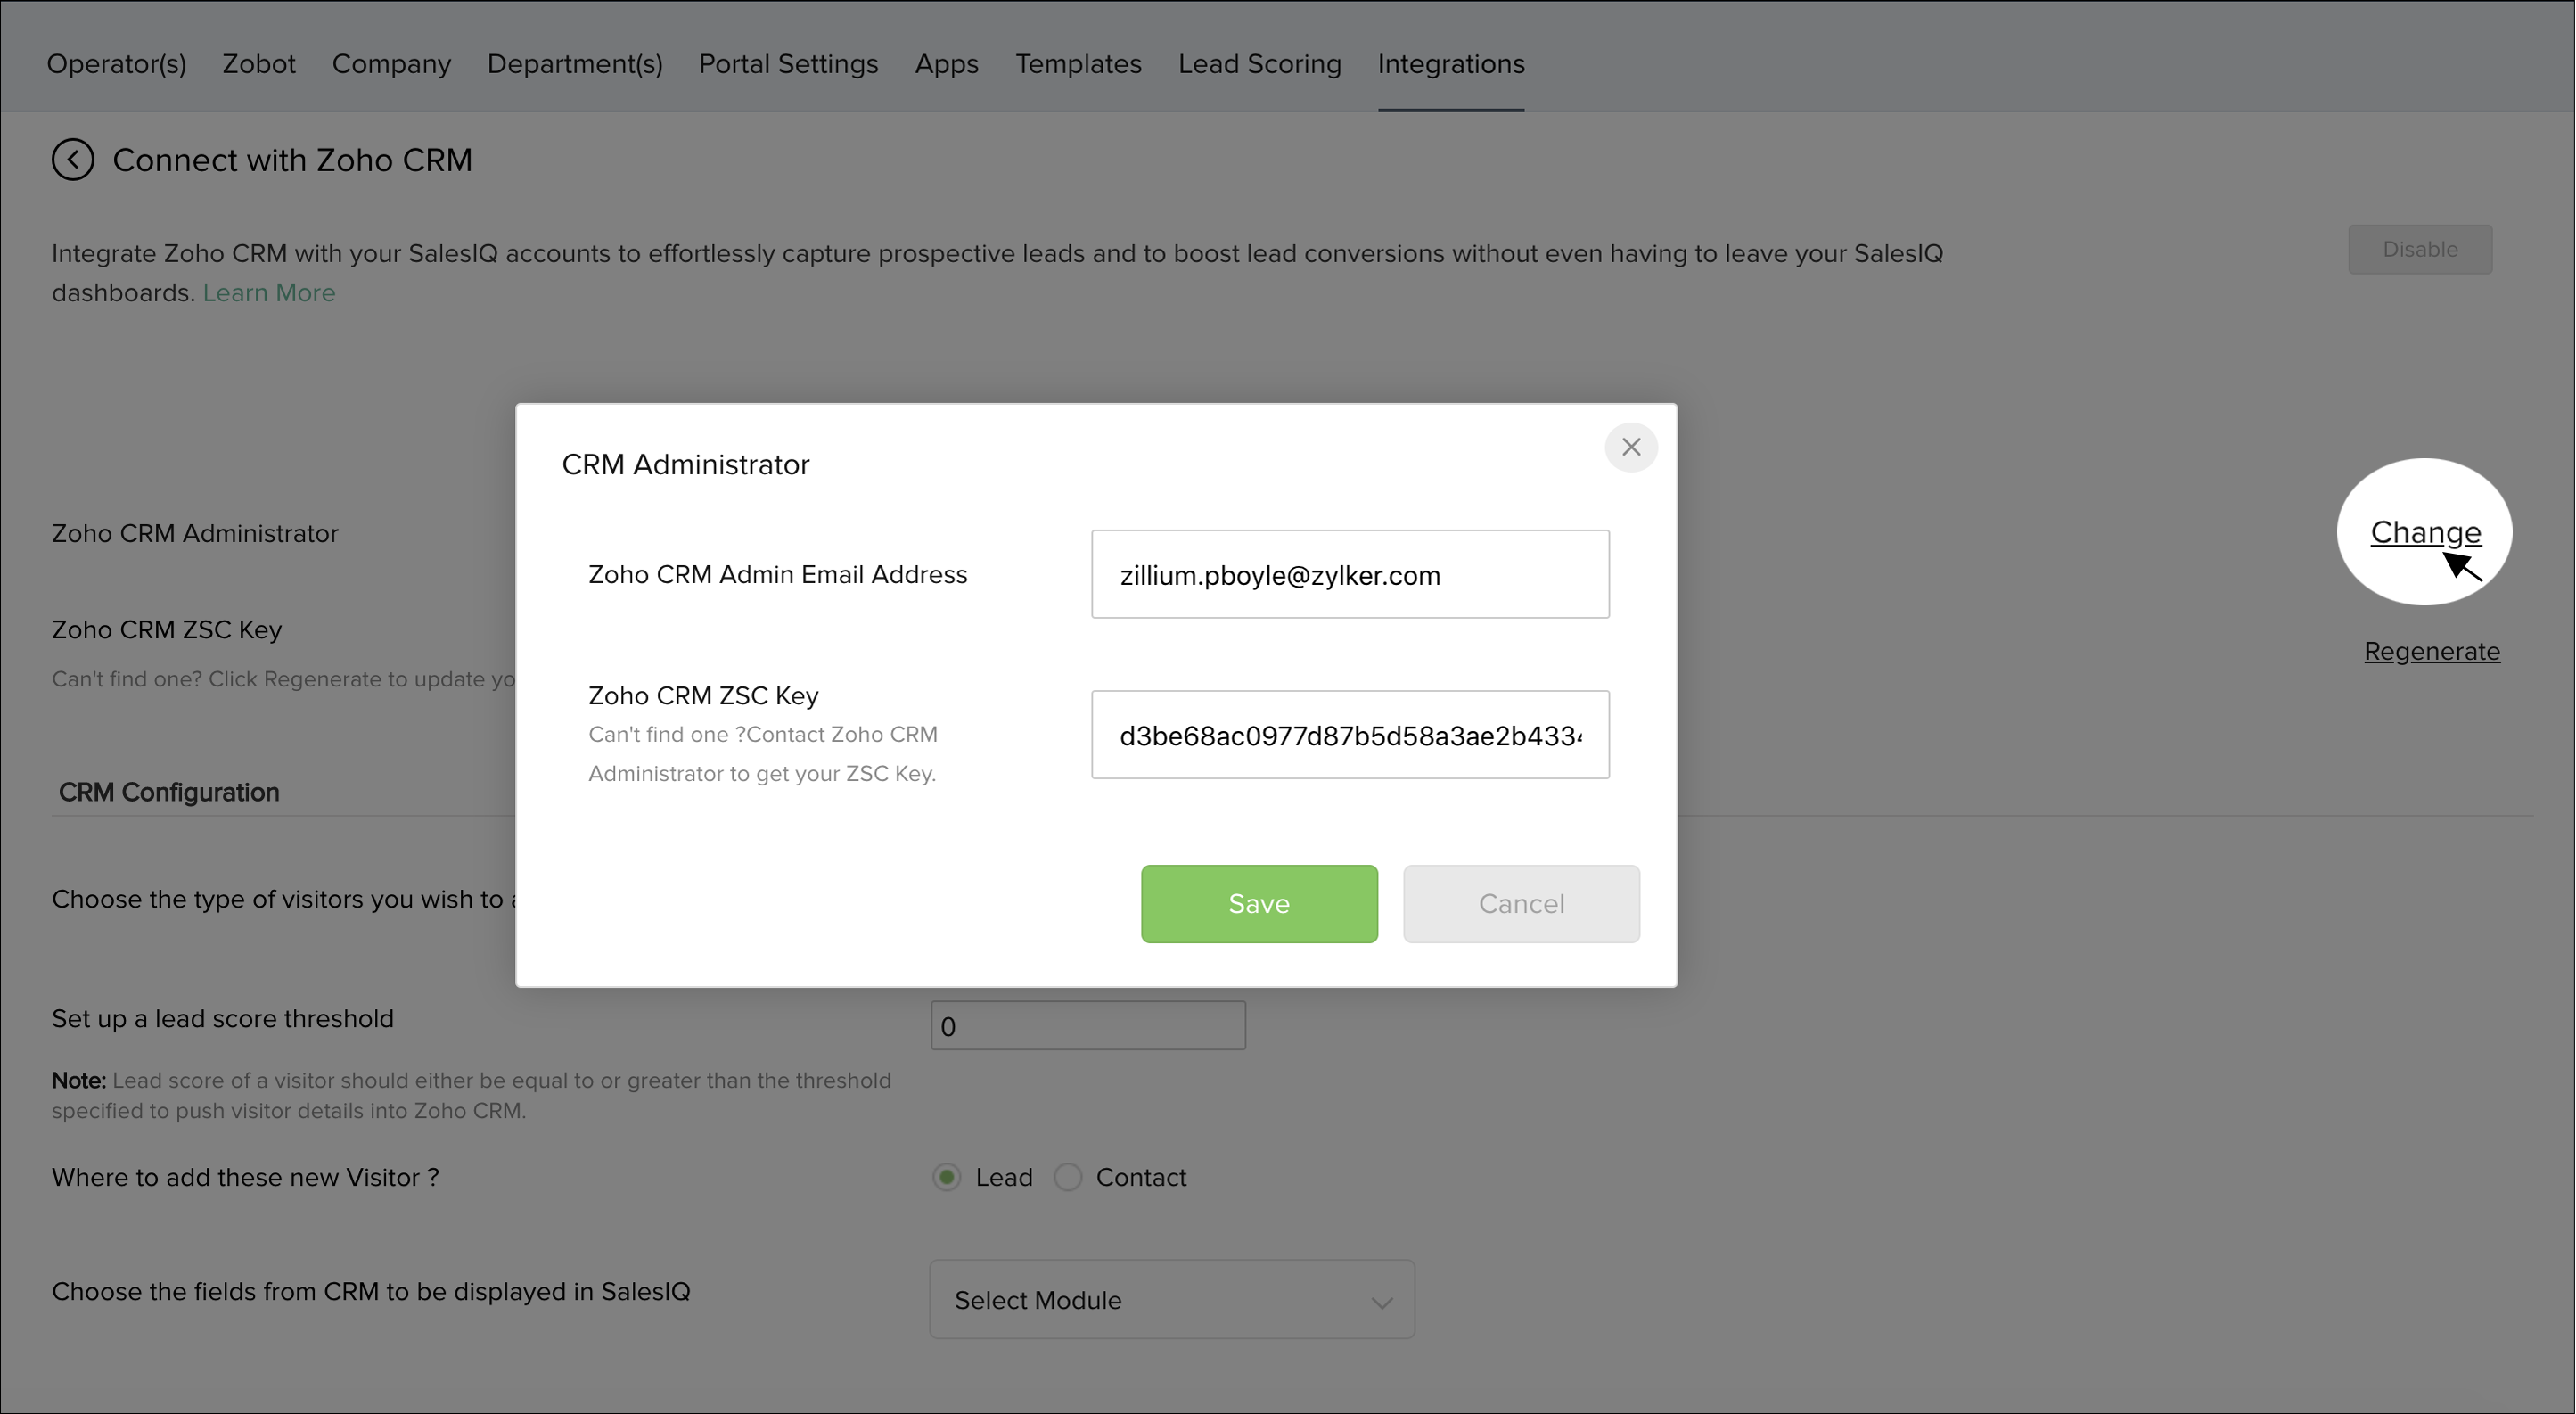
- In Settings > Integration > Zoho CRM, under the Zoho CRM Administrator sub-section, click “Change”.
- In the CRM Administrator box that pops-out, edit the Zoho CRM Admin Email Address field to add your e-mail address.
- Paste in the ZSC key that you just copied from the CRM account.
- Click “Save” to make the changes.
Changing CRM Account - Non-CRM Admin
Changing the paired non-CRM admin account
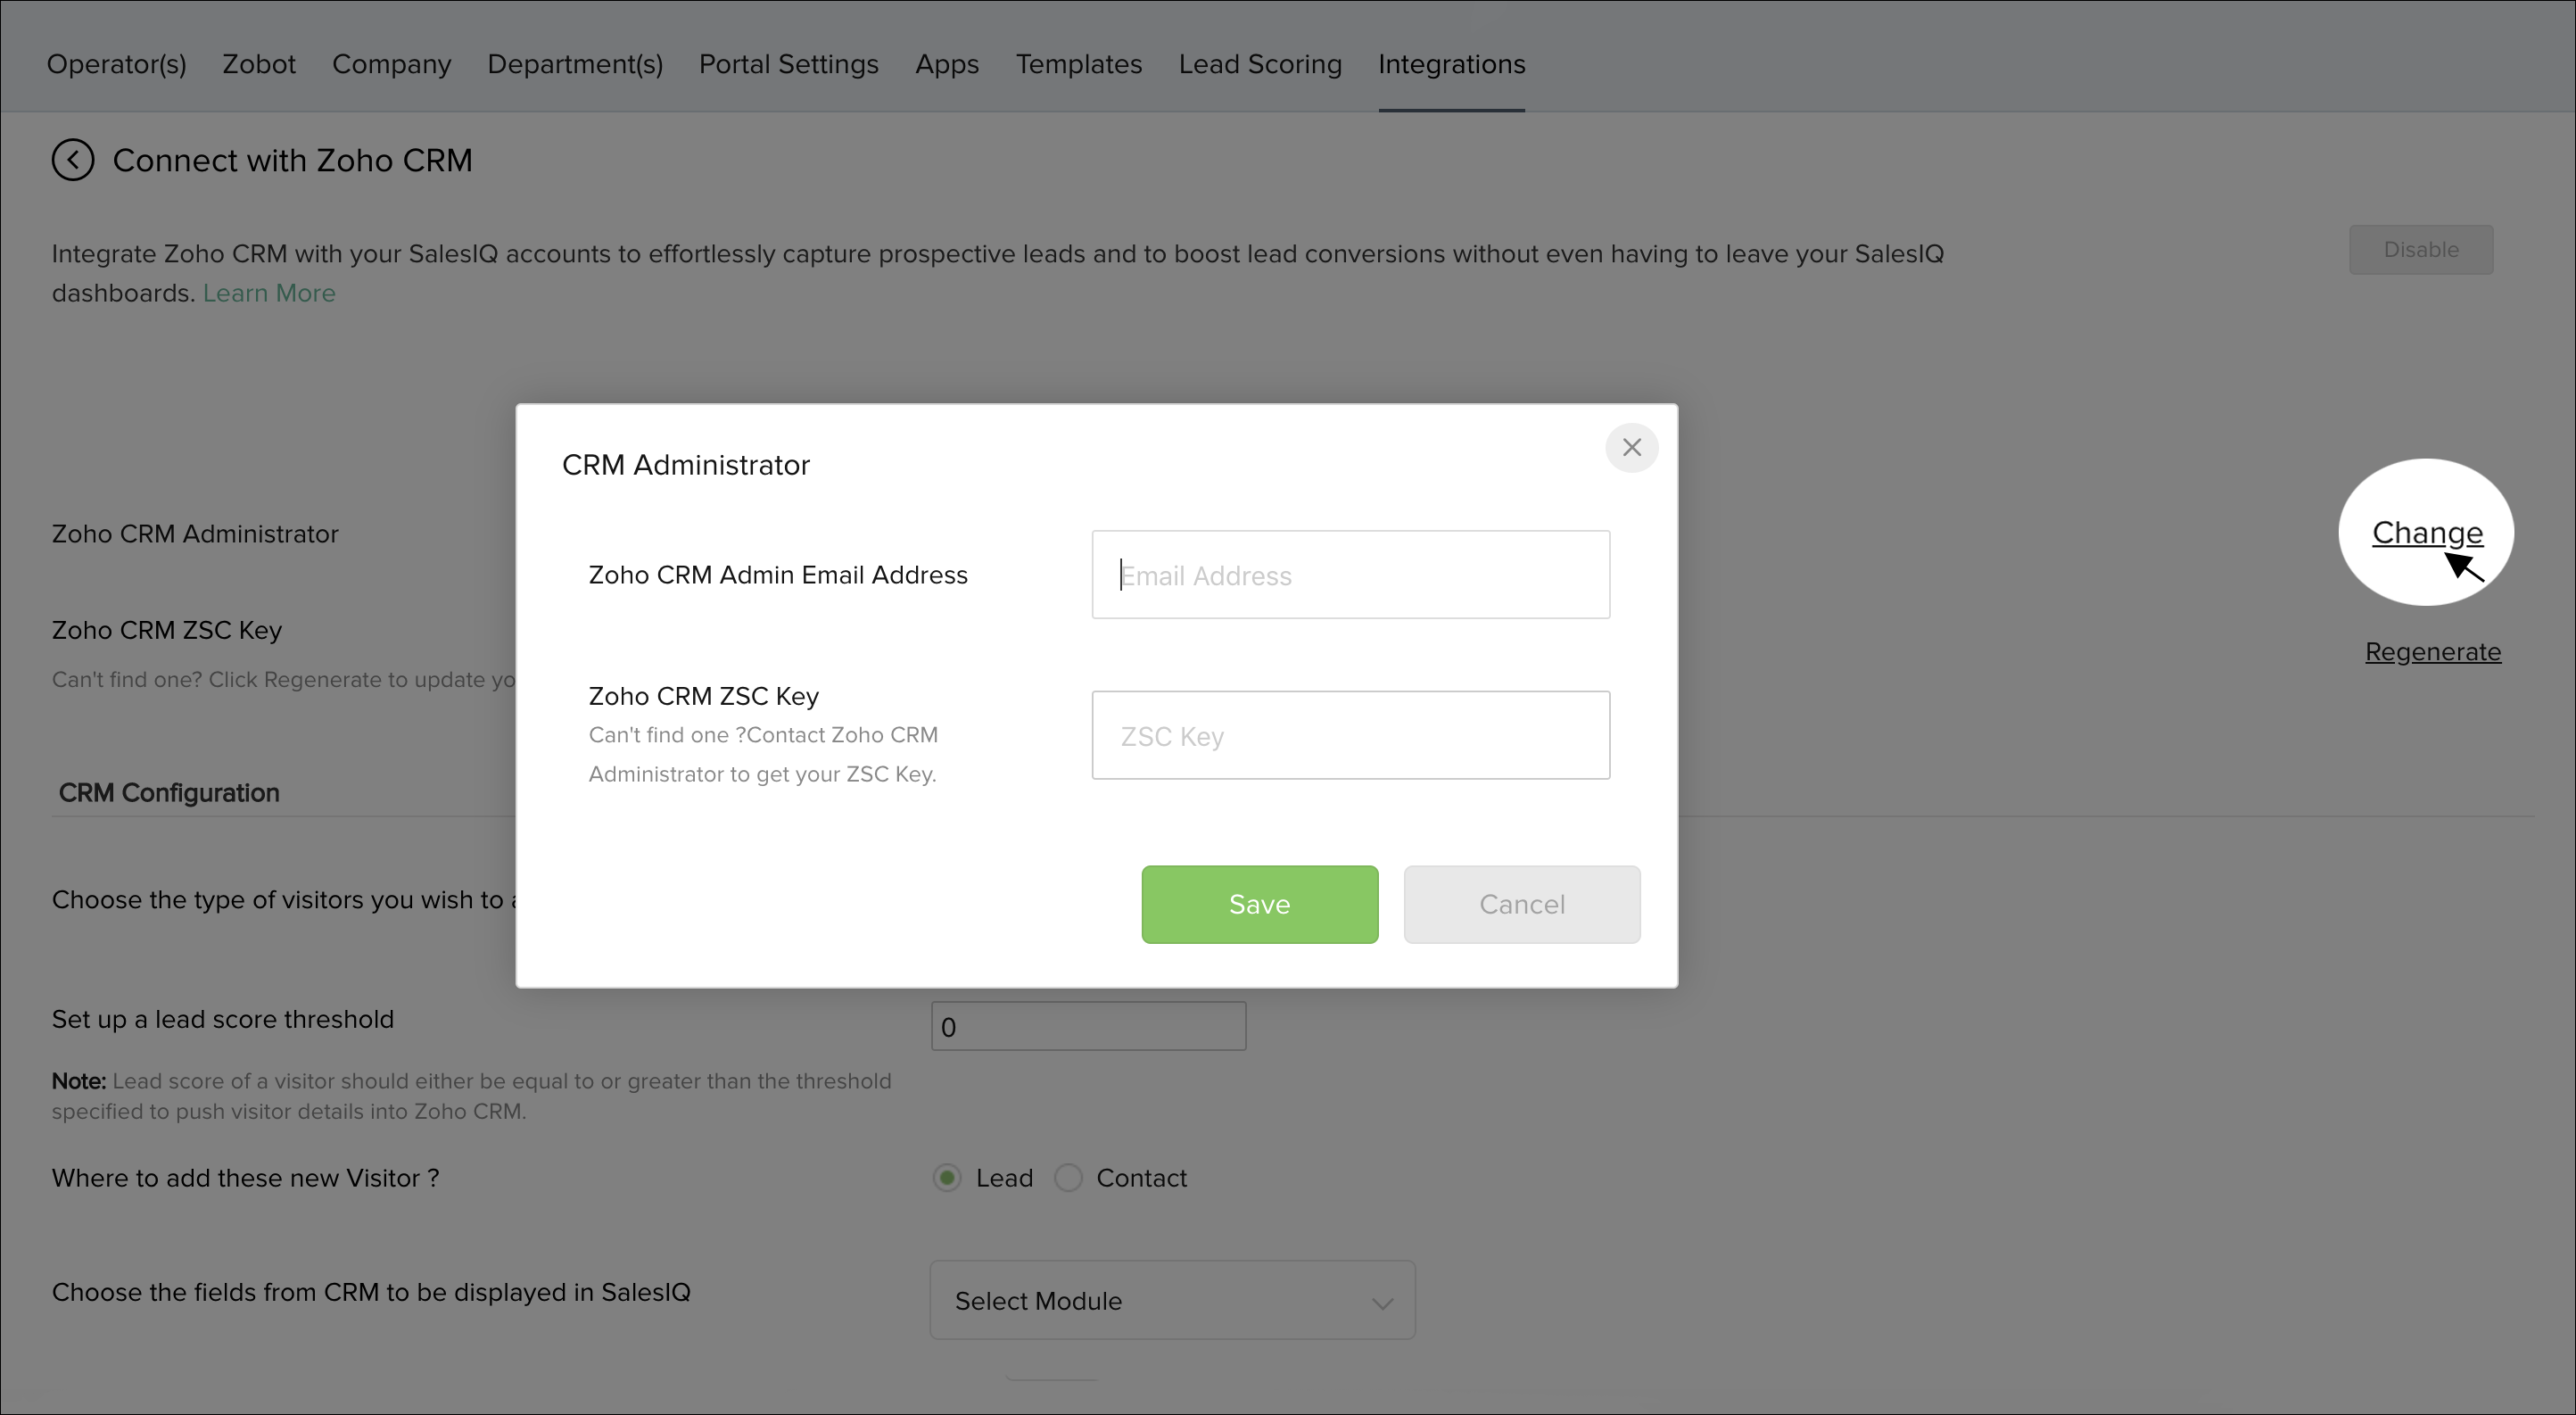
- In Settings -> Integration -> Zoho CRM, under the Zoho CRM Administrator sub-section, click “Change”.
- In the CRM Administrator box that pops-out, edit the Zoho CRM Admin Email Address field to add the e-mail address of the admin of the Zoho CRM account you wish to associate. Also, add the ZSC key for the account as provided to you by that CRM admin.
- Click “Save” to make the changes.
Enable/Disable Integration
Disable Integration with CRM
If needed, you can disable your Zoho SalesIQ’s integration with a CRM account at any time.
- In Settings > Integration > Zoho CRM, click on the "Disable" button on the top right.
Re-enable Integration with CRM
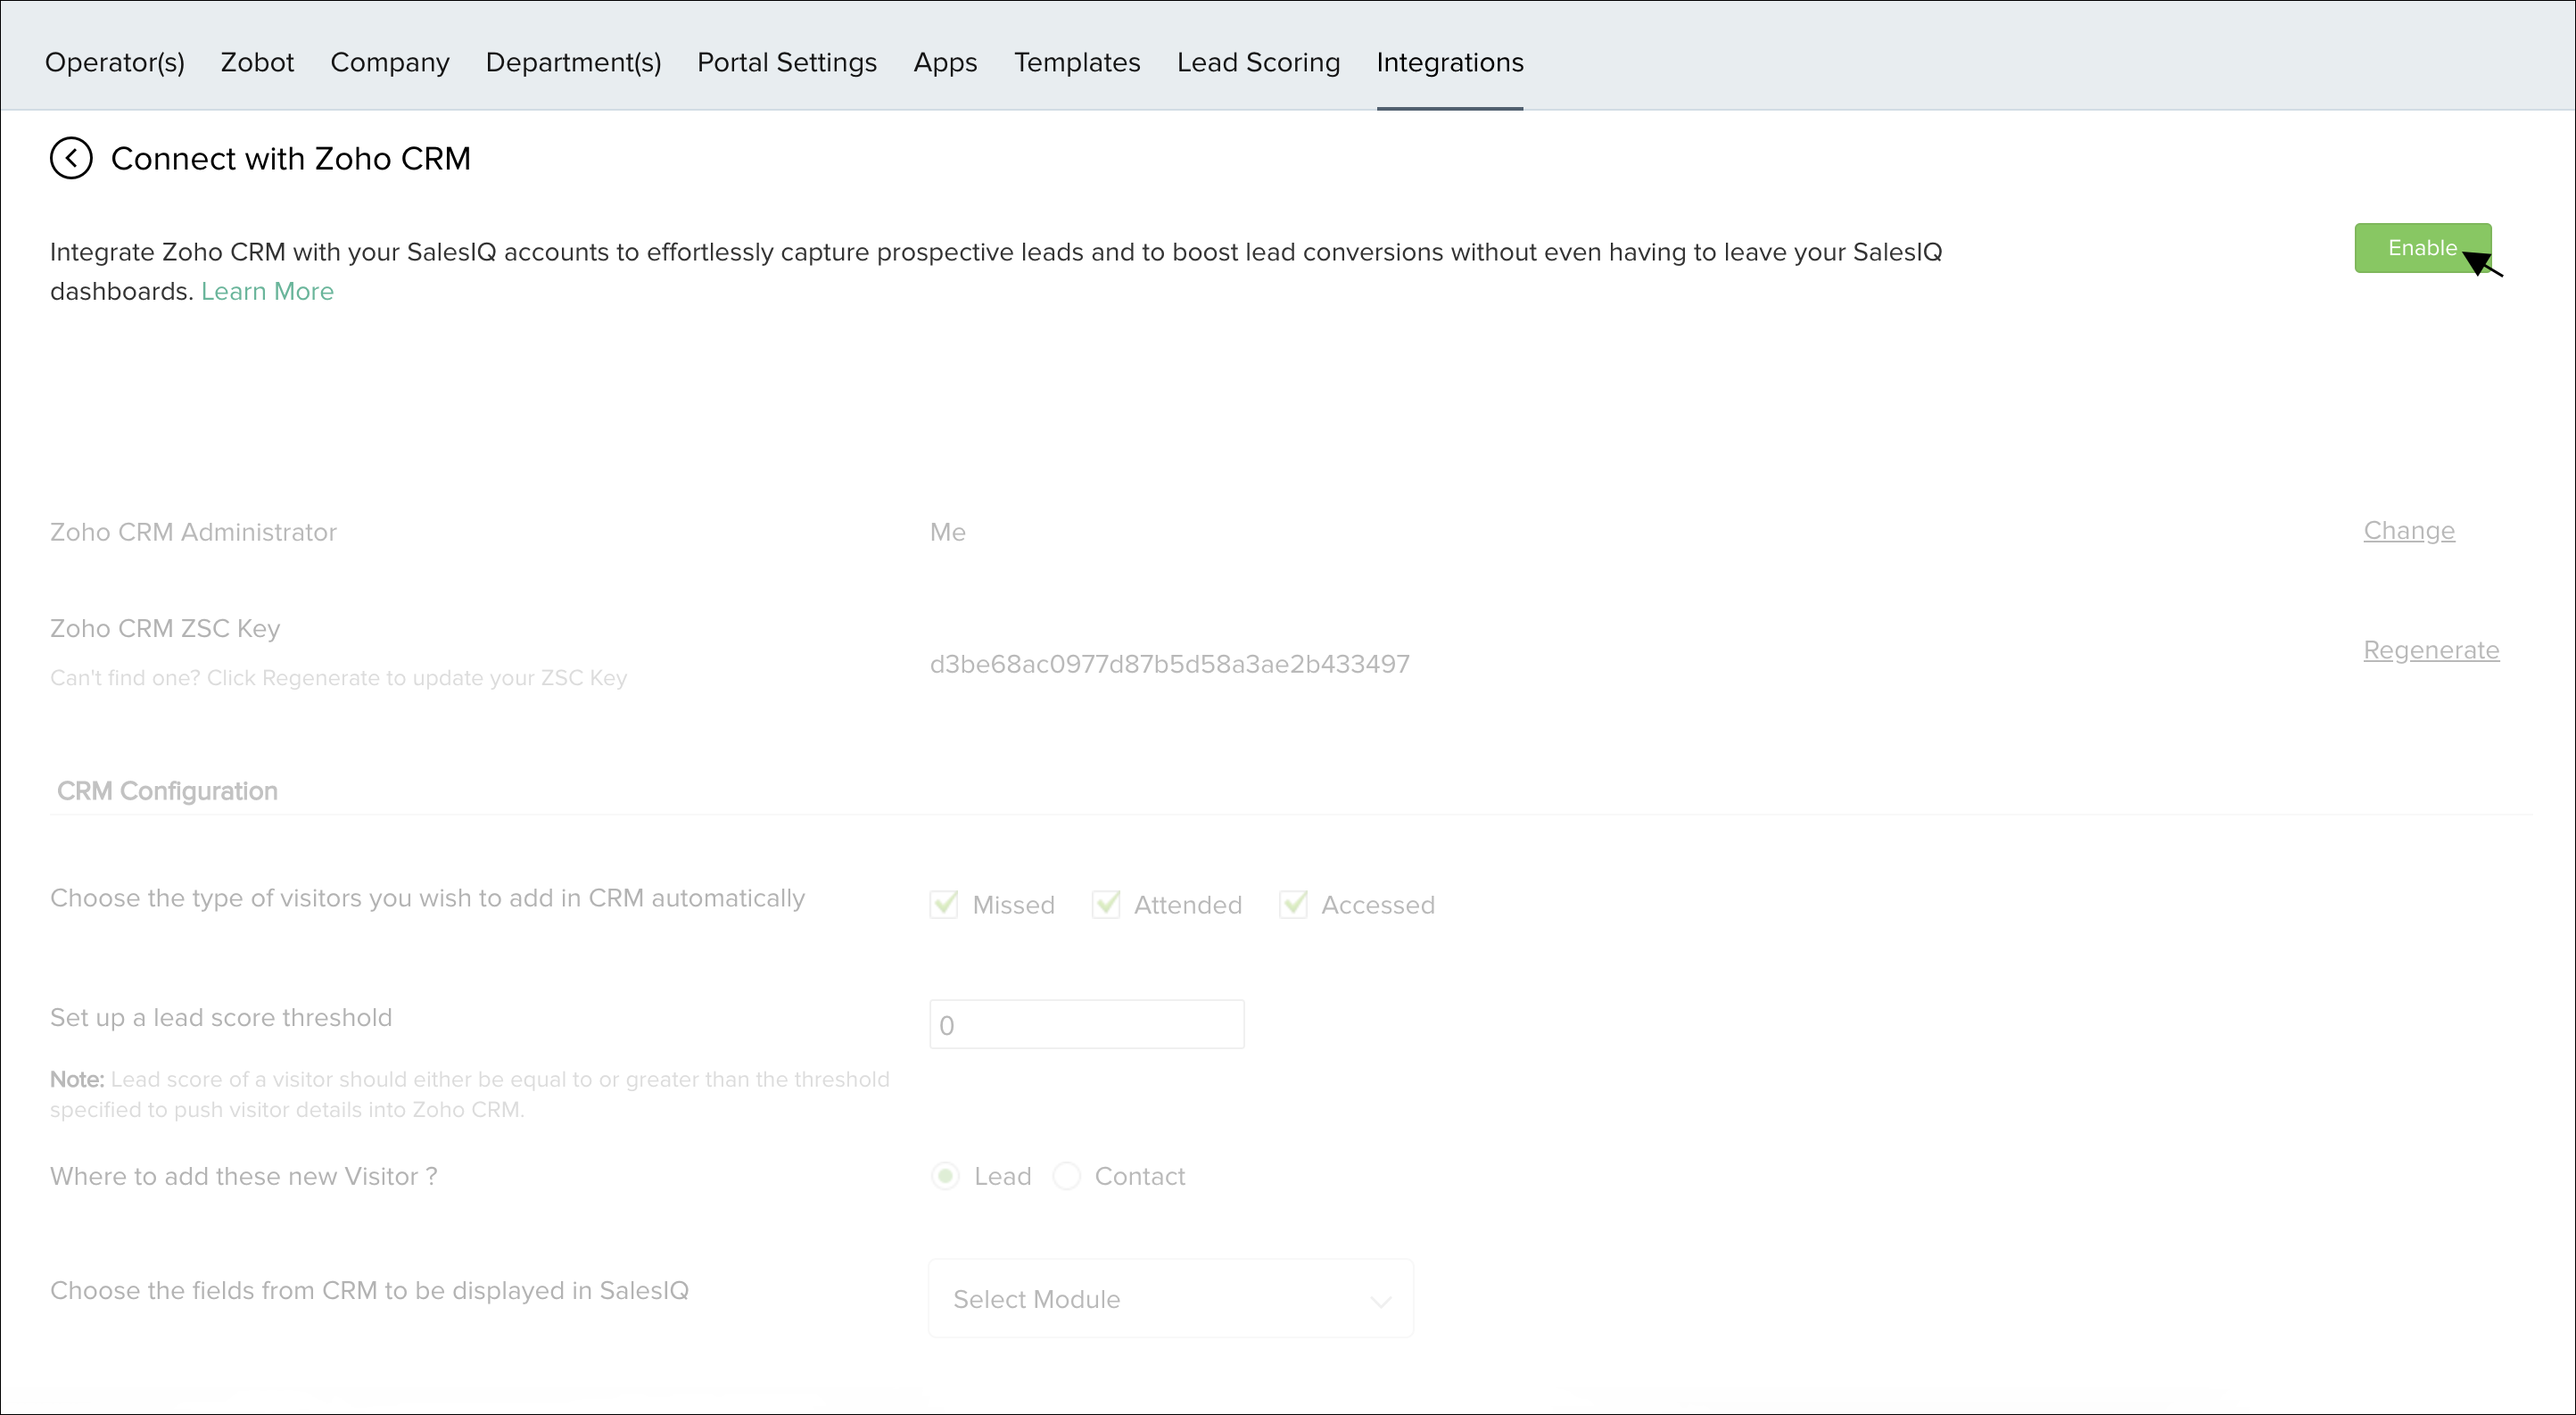
In Settings -> Integration -> Zoho CRM, click on the "Enable" button on the top right.
CRM integration Configurations
Now that you have linked your Zoho SalesIQ to your Zoho CRM account, you need to configure the integration to fit your team’s specific needs. Read below to explore the options of how you can configure the integration.
Visitors to be added
The integration also lets you configure which segment of new visitors you would like to automatically add to your CRM. Your choices are
- Only Missed – Missed visitor will be automatically pushed to your CRM.
- Only Attended - Attended visitor will be automatically pushed to your CRM.
- Only Accessed - Visitor accessing the website will be pushed into your CRM
- Attended & Missed - All the visitors irrespective of missed or attended will be pushed to your CRM.
- Selecting all – All new visitors irrespective of missed or attended will be pushed to your CRM.
- Selecting None - No visitors will be pushed into your CRM automatically. However, you can manually push it to CRM from the chat window.
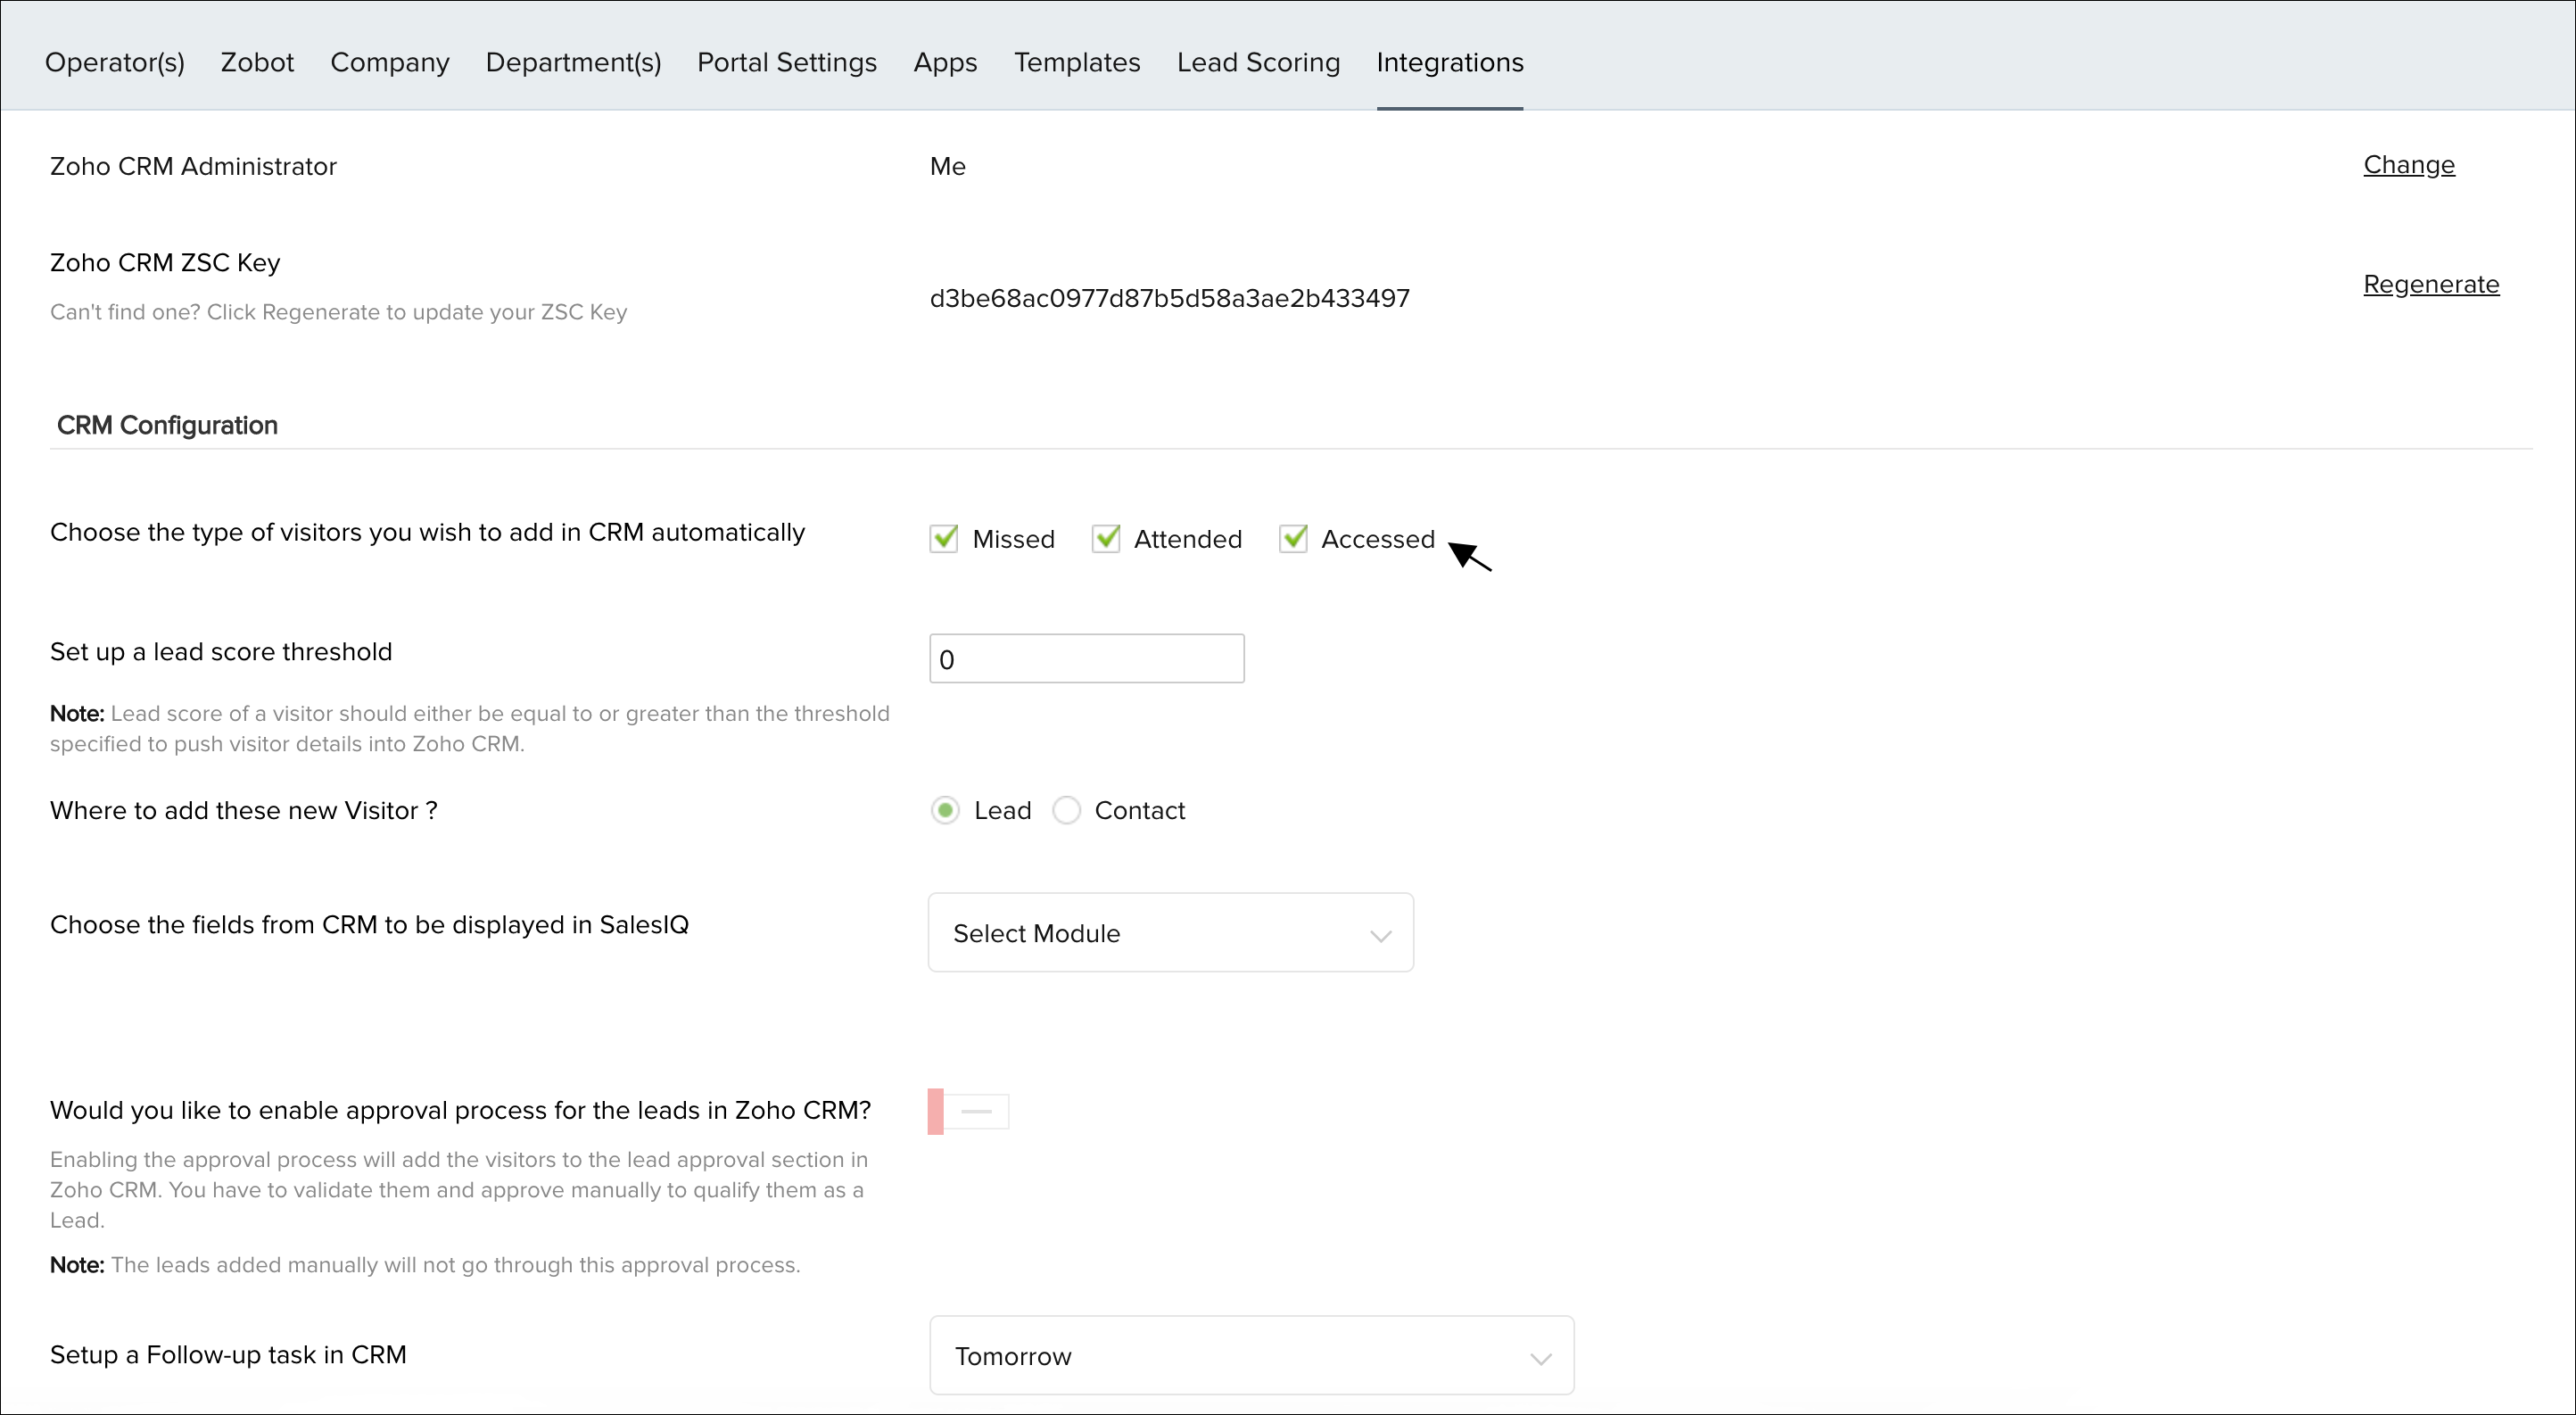
Add Leads/Contacts
You can also configure as to whether you want to add these visitors as Leads or Contacts automatically in your CRM.
- In Settings -> Integration -> Zoho CRM, under the CRM configuration sub-section, click the button to select either “Lead or Contact”.

This configuration will apply to all visitors added automatically, so be aware of what visitors you configure in the next option to add so you can choose the best option.
Add Follow-up task
The third option you can configure in the CRM configurations is whether or not you push a follow-up task to the customers your Zoho SalesIQ automatically adds to your CRM—and when that task is due. You can set up the system to create a follow-up task in CRM for today, tomorrow, the 7th day, or 14th day, to ensure your customer-centric culture extends beyond the initial live support encounter, and your entire team can check in with customers and see how things are working out.

Assign Operators to Push Visitors in CRM
You can also assign an operator in Zoho CRM for all the new visitors pushed from Zoho SalesIQ to CRM.
- In Settings -> Integration -> Zoho CRM, under the CRM configuration sub-section, Select the drop down next to “Responsible CRM User for new visitors”.
- You will be listed with the operator from CRM and with an option “Zoho SalesIQ Attender”
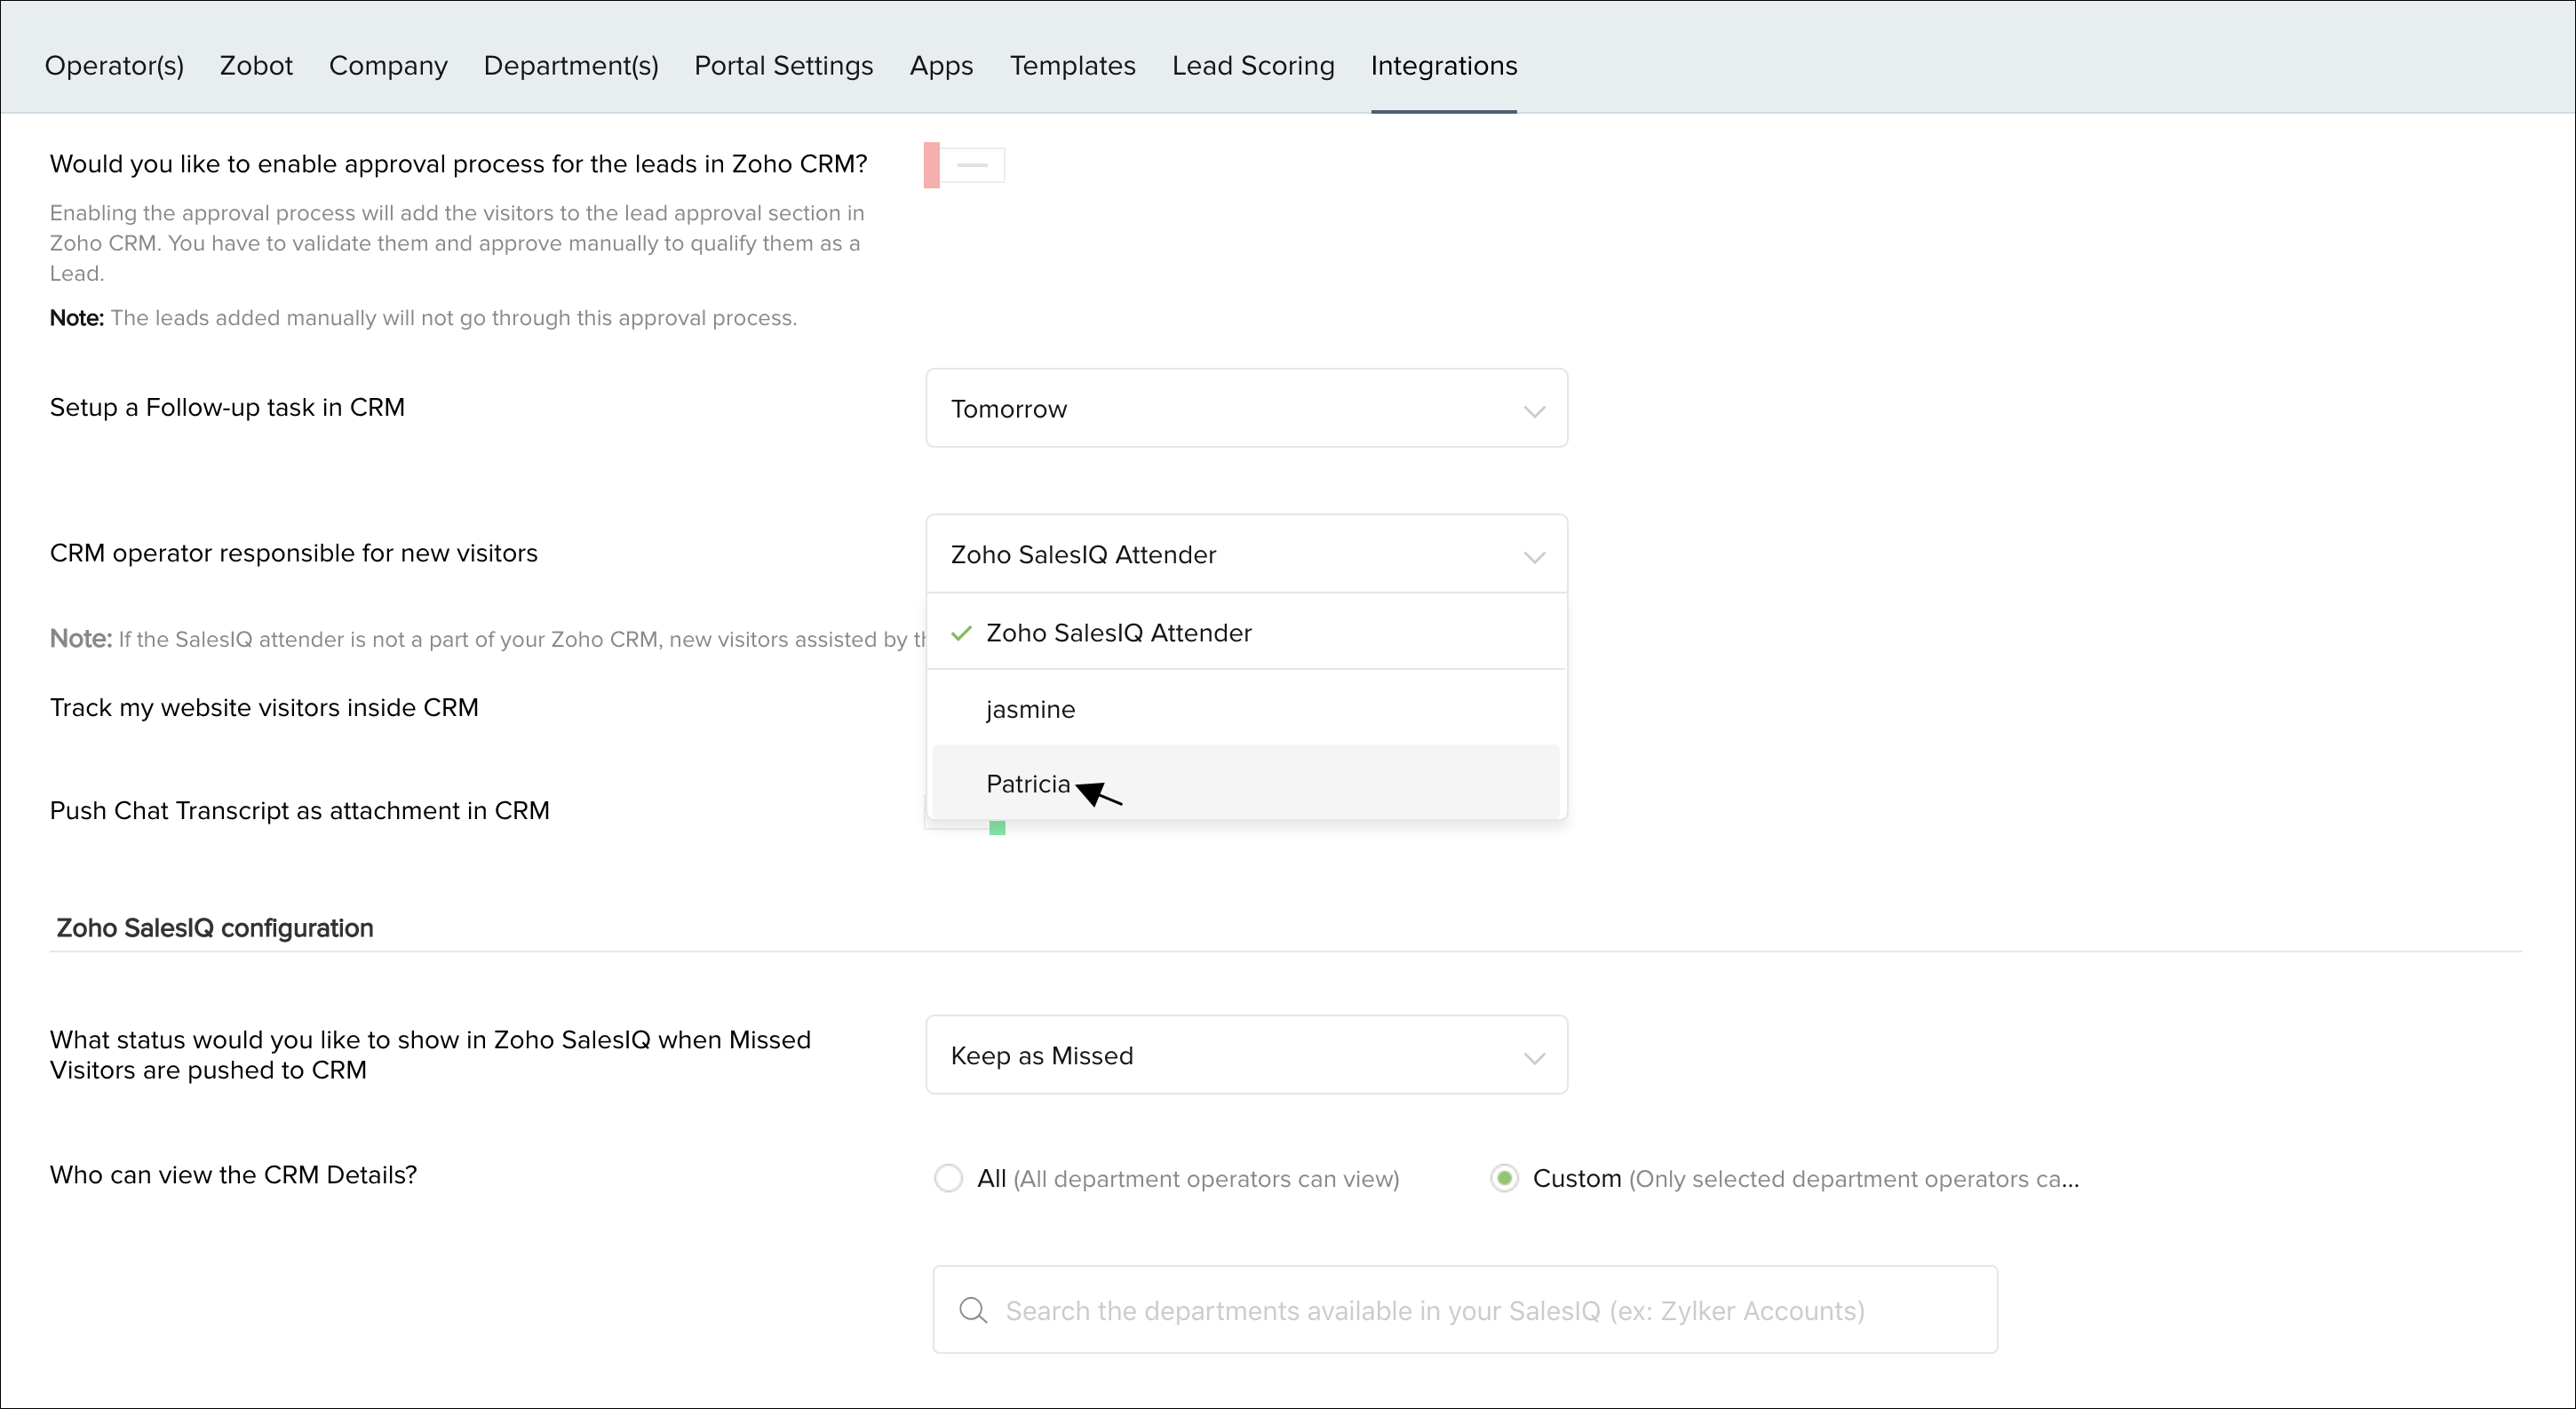
Note:
Selecting the operator name will ensure all the new visitors are assigned to them.
Zoho SalesIQ Attender - On selecting this option the operator who attends the chat will be the responsible CRM user for new visitors. If the operators are not associated in Zoho CRM these chats will be assigned to the Zoho CRM Administrator.
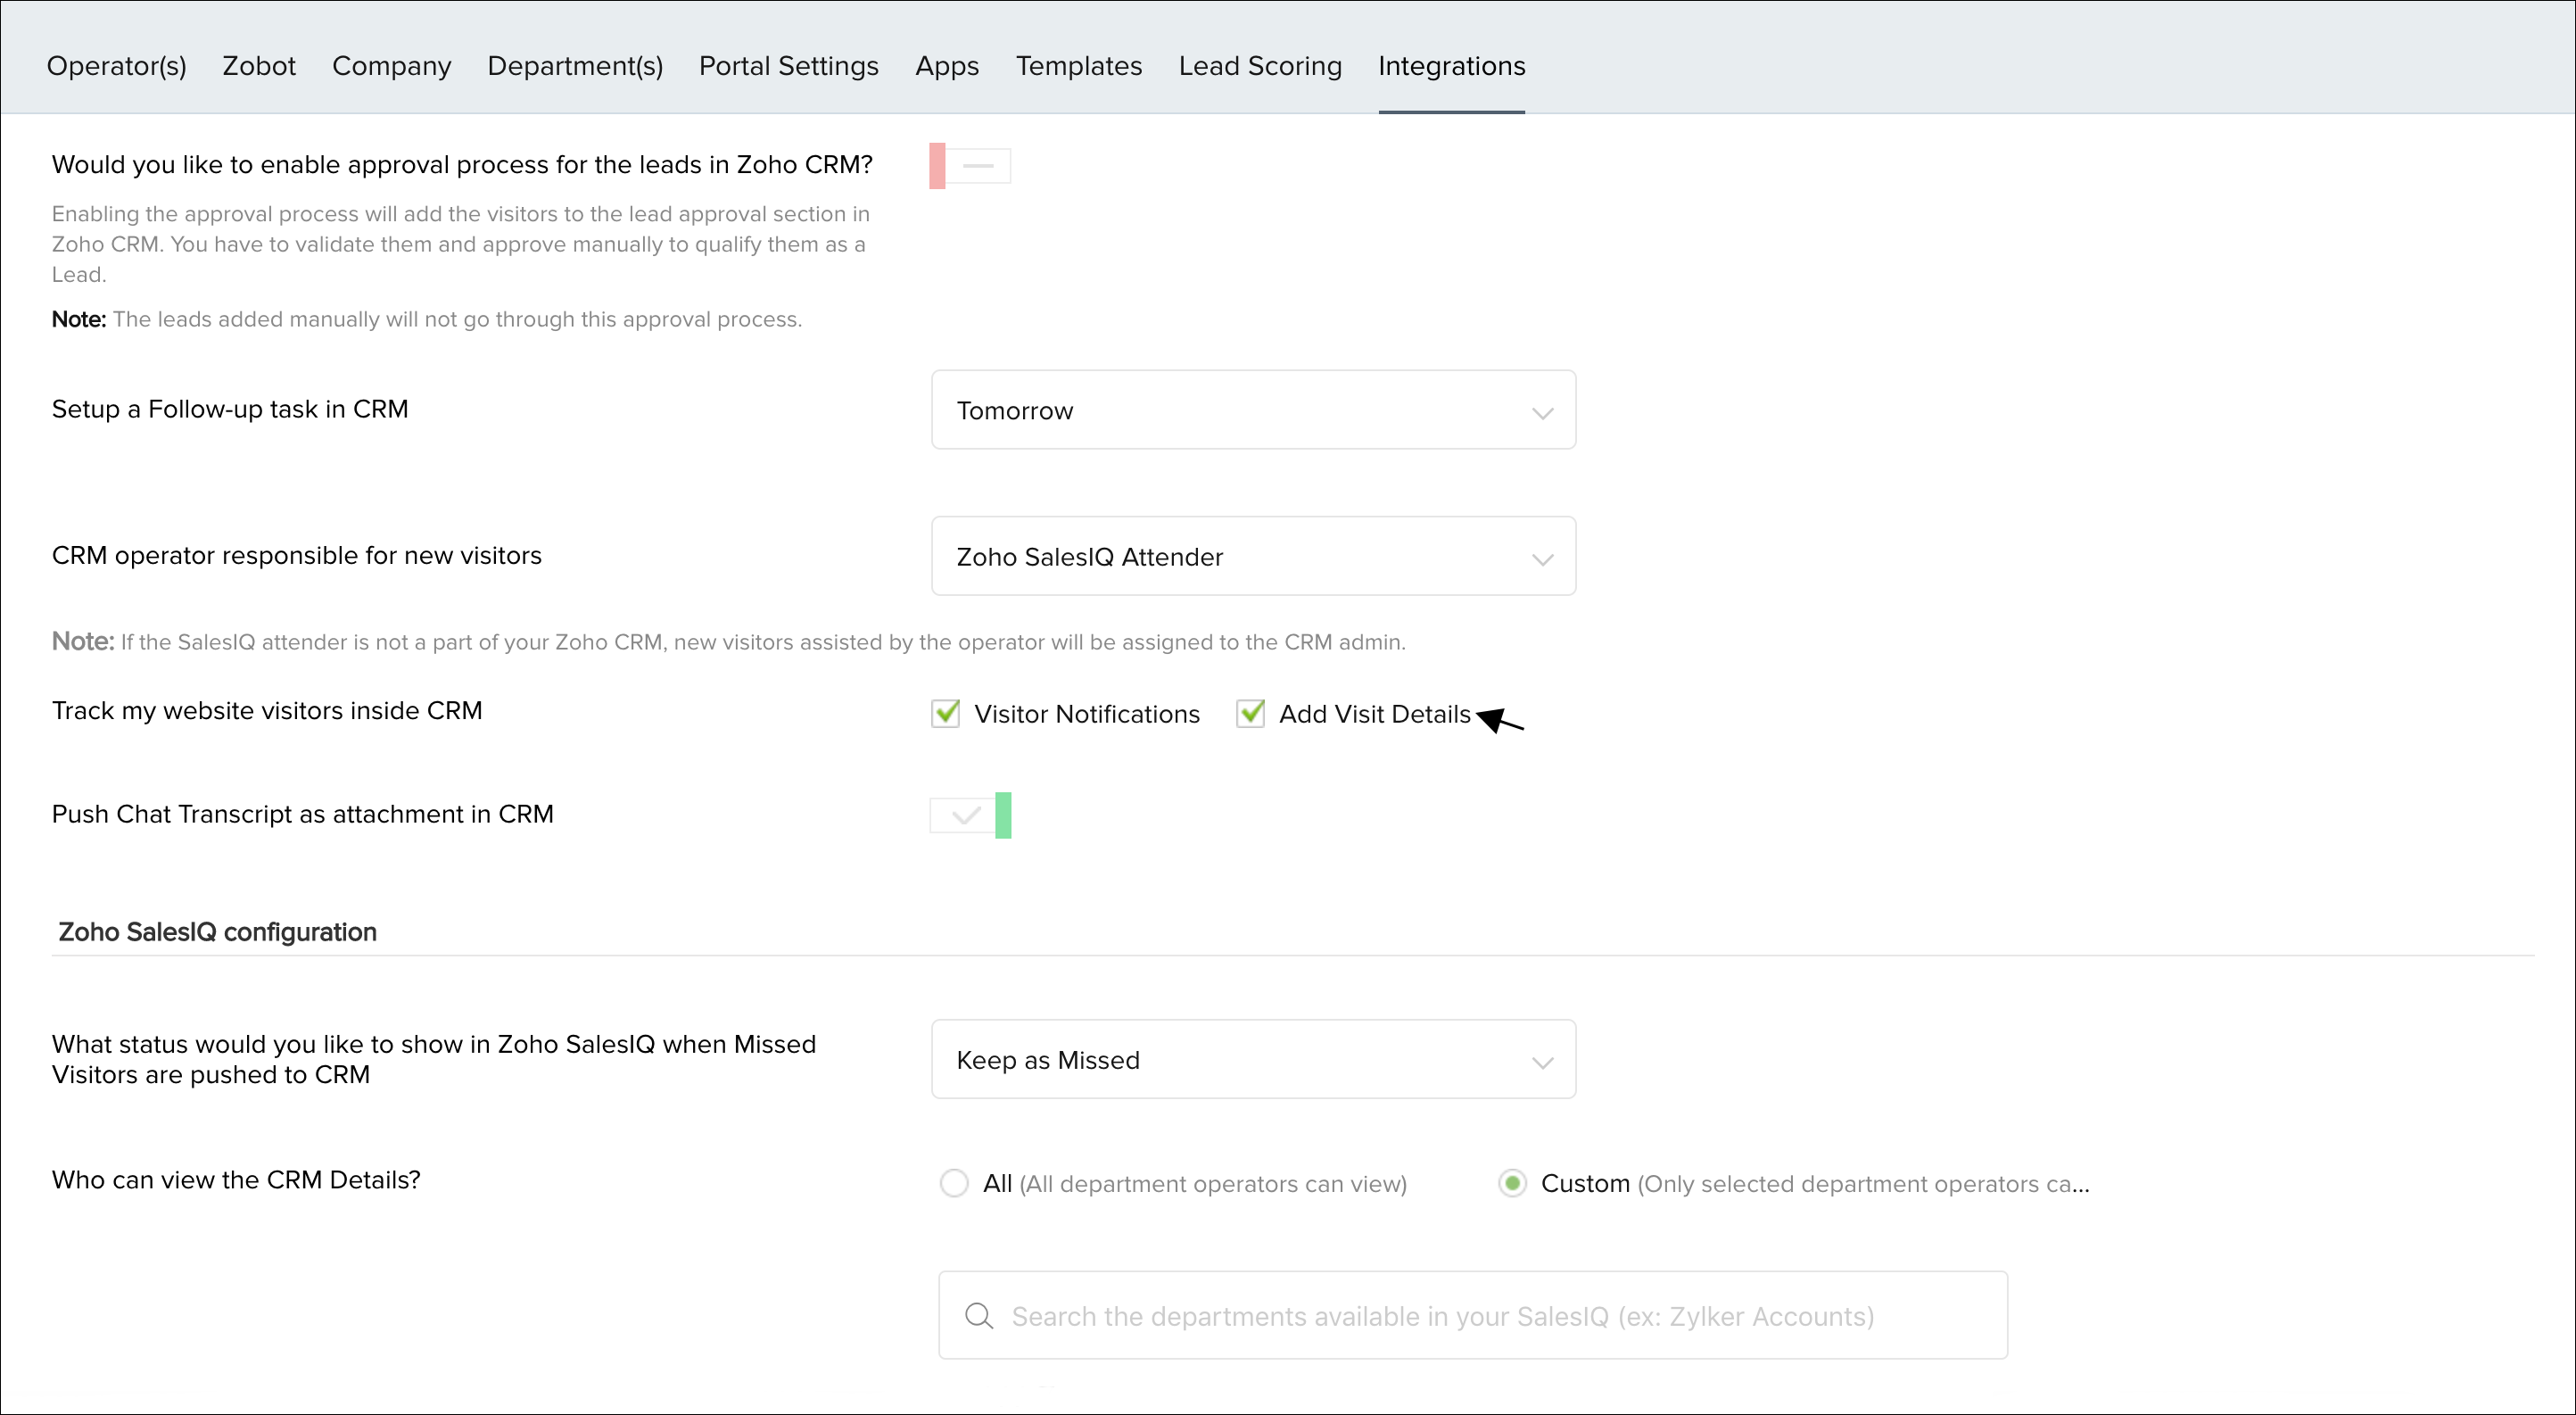
Track Visitors inside CRM
Zoho SalesIQ allows you to track visitors inside your CRM in real time. Get notified inside your CRM when a visitor visits your website. See the time spent by the potentials/lead/contact and the pages visited organized and stored inside your Zoho CRM
- Visitor Notification – Enable/Disable website visitor notification inside your Zoho CRM.
- Add visit details – Enable/Disable adding website visitors page access details to the related visit fields of Leads/Contacts
Visitor Notification
See how you get notified inside your CRM when a visitor visits your website in real time. Engage and get connected on seeing the visitor information stored n Zoho CRM.
Viewing up your visitor visit details
Add your visitor visit details inside your CRM. Track your site visitors and the action performed by them in your site organized in the CRM visit module based on customers/potentials/lead/contact.
Attach Chat Transcripts automatically
Zoho SalesIQ Configurations
Status of missed visitors
You have the option to configure what happens when missed visitors from Zoho SalesIQ are pushed into CRM so they can be tracked, or followed-up on as a part of your existing customer engagement system.
If missed visitors are pushed across as a new lead, or contact, into your CRM automatically, you can choose whether you want their status inside Zoho SalesIQ to be displayed as “Tracked in CRM,” or see them as “Missed” visitors.
Viewing CRM details
You will get to choose the departments that can view the CRM details of visitors. You can either choose All and let all the operators associated with the configured departments to view CRM data, or choose Custom and select certain departments and let the operators associated with those departments alone to view the CRM data.

Web Form
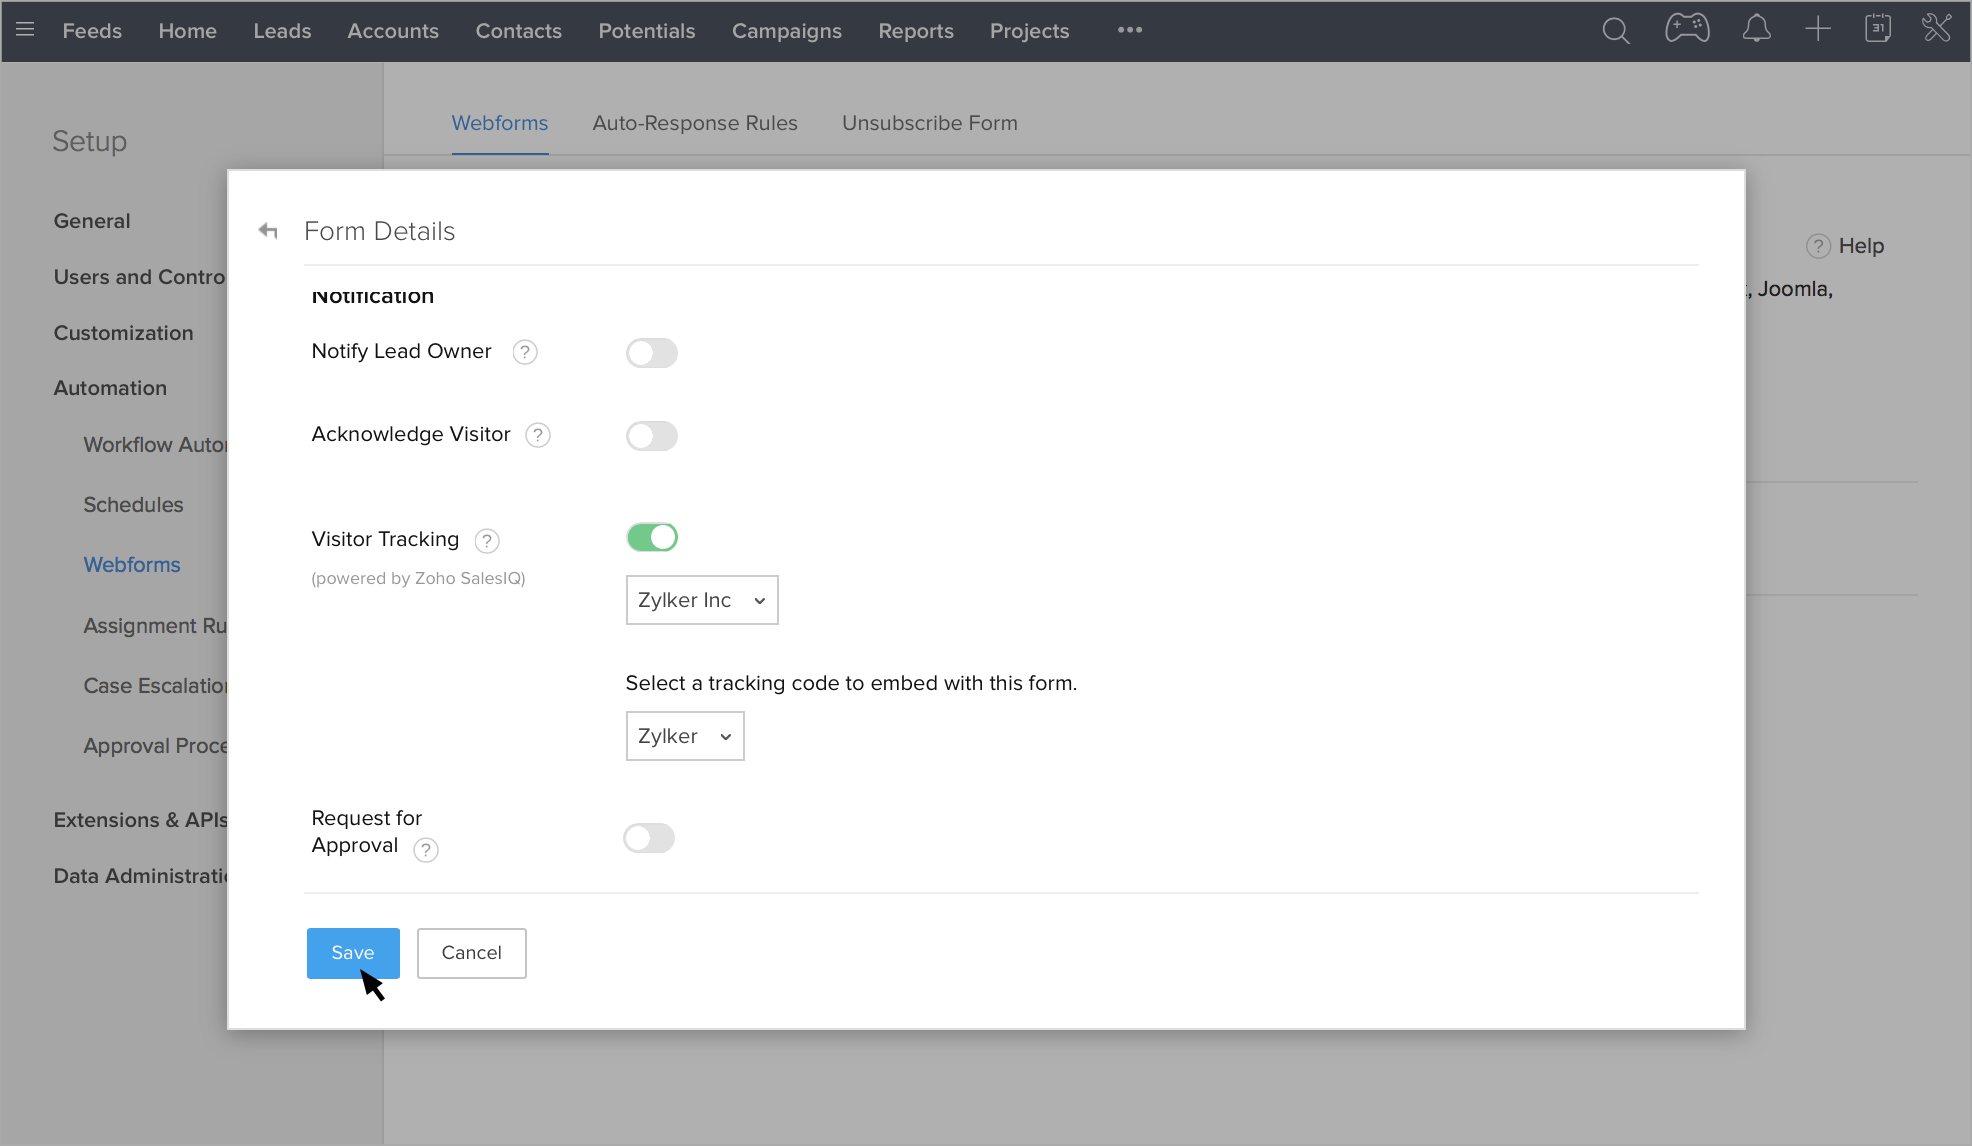
How to enable visitor tracking in the CRM Web form?
You can track the visitors visiting your website also through CRM web forms. While creating a CRM web form enable the Visitor tracking option in the web form and track the visitor visiting your website in SalesIQ. Follow the steps below to enable tracking in your web form:
First, Build a Zoho CRM Web form. How to build a Zoho CRM Web Form?
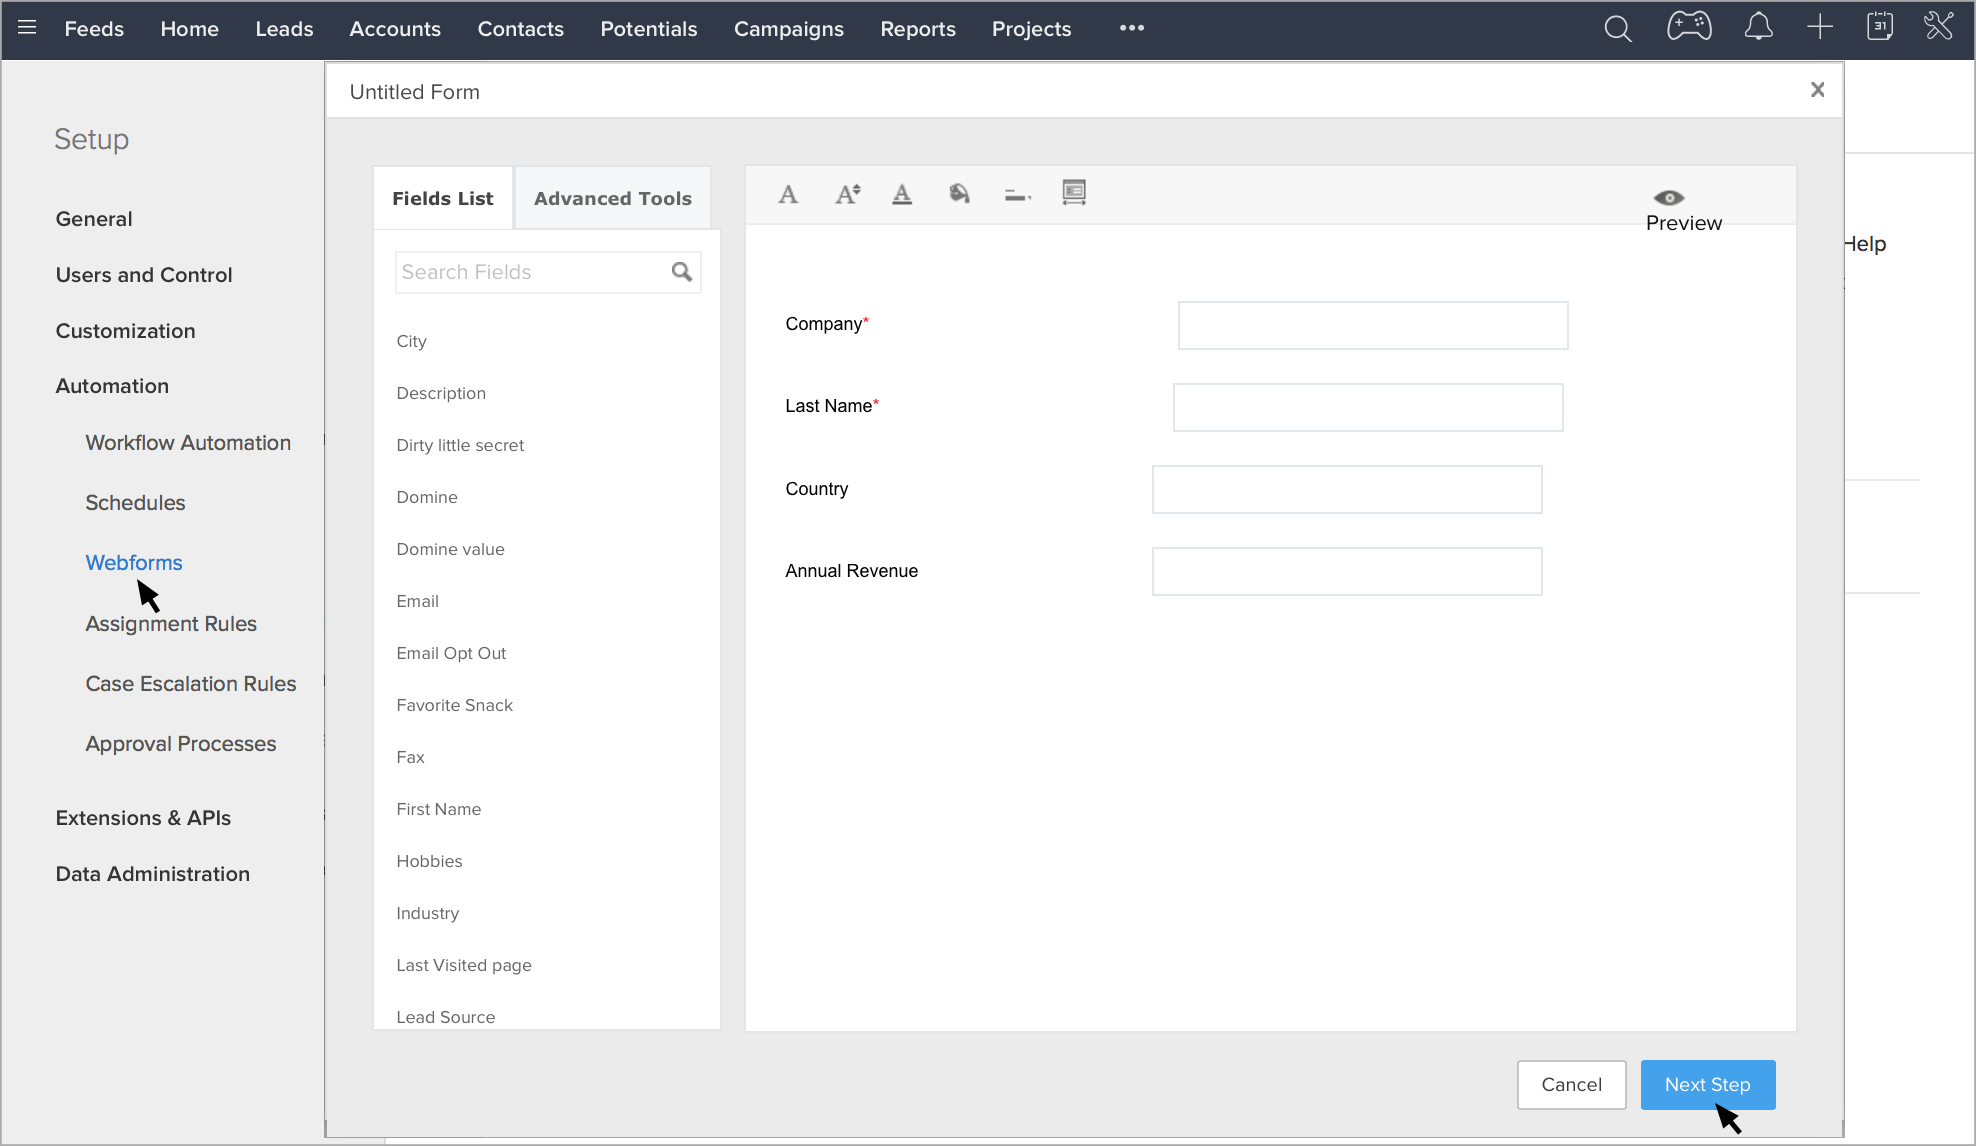
Click on the Next Step button, the Notification Section of the form will then appear. Now turn on the Visitor Tracking option.
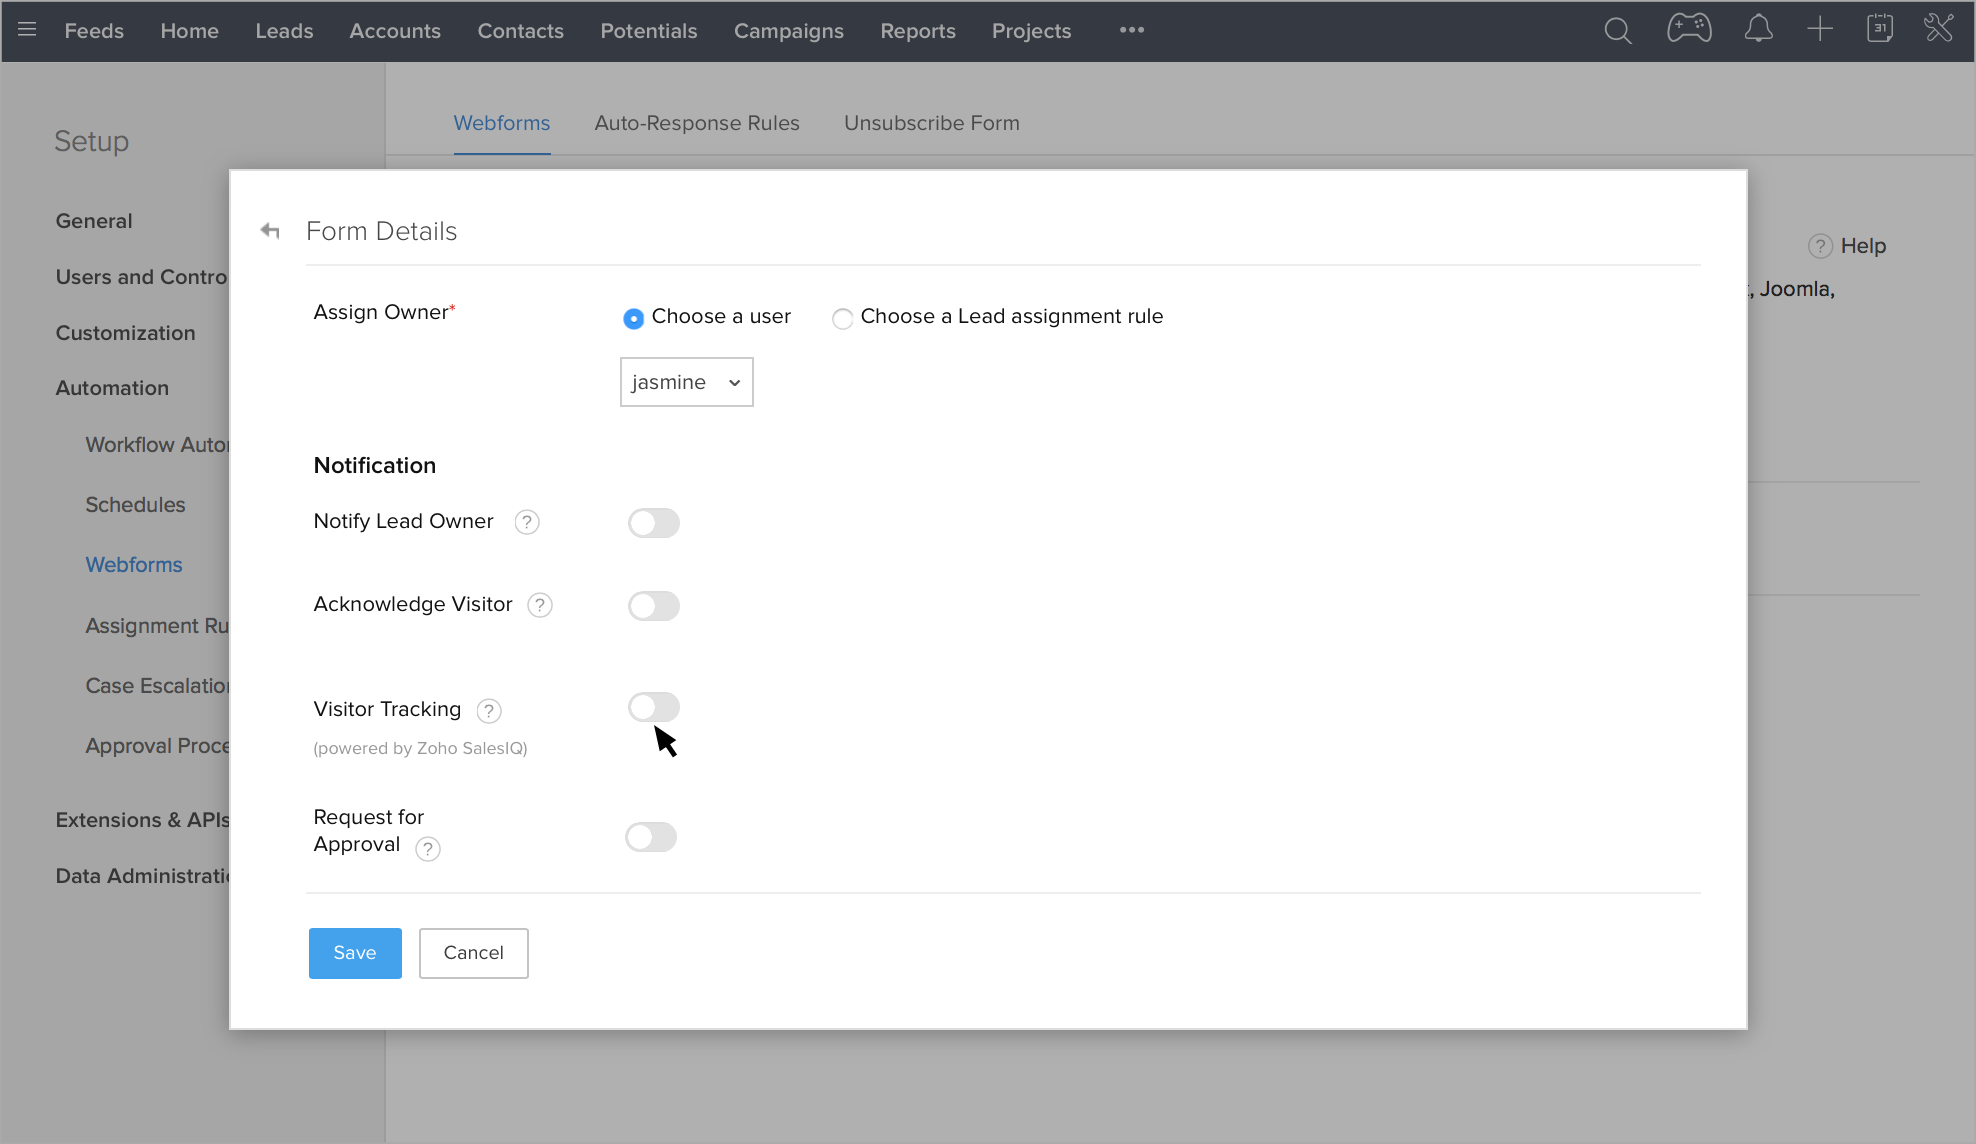
You can view a box with the default Web Embed selected, clicking on which will list the Web Embeds that are available. Choose a Web Embed from the drop down list.
Note: If no portal is available then you will be prompted to create a new portal.
Finally, click on the Save button to update the changes.
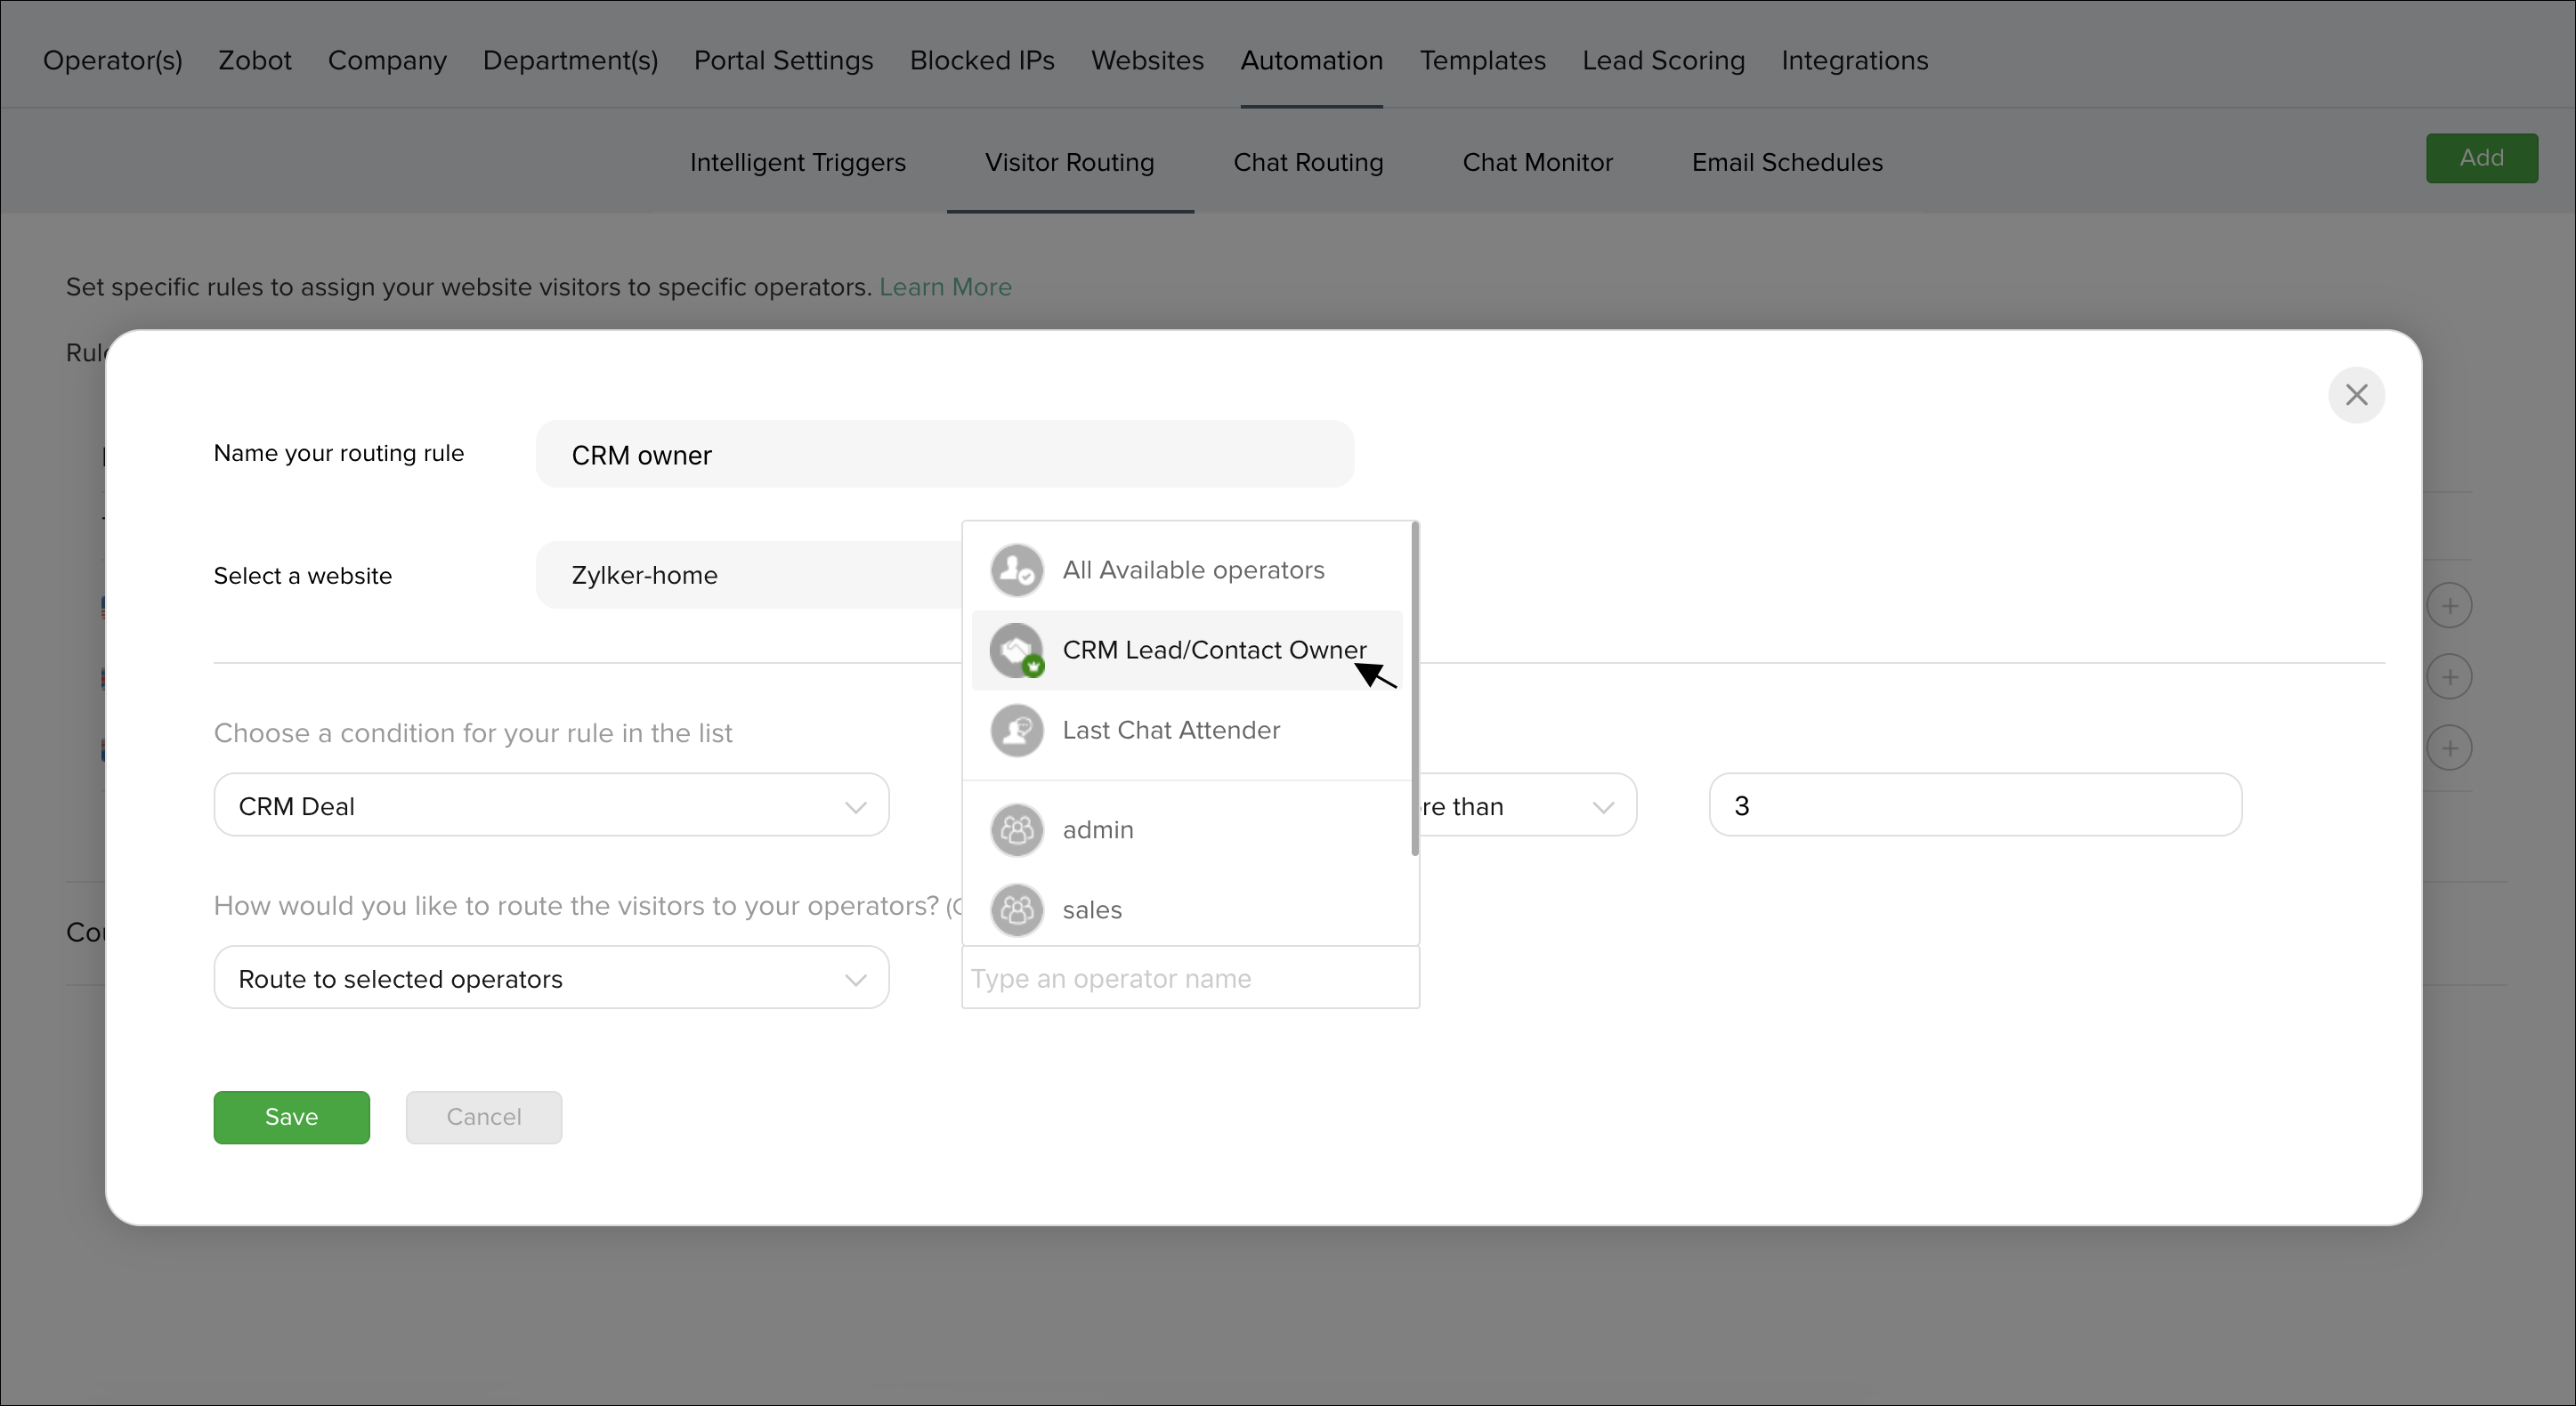
Visitor Routing
Route visitors to their respective CRM Owners
You can now route your returning website visitors to the owners who created the lead or contact in the CRM and track the website visitor in the Visitor Online screen. When the visitor visits your website the owner of the Lead/Contact will get the visitor’s registered information in the tracking screen.
To route the visitors, do the following:
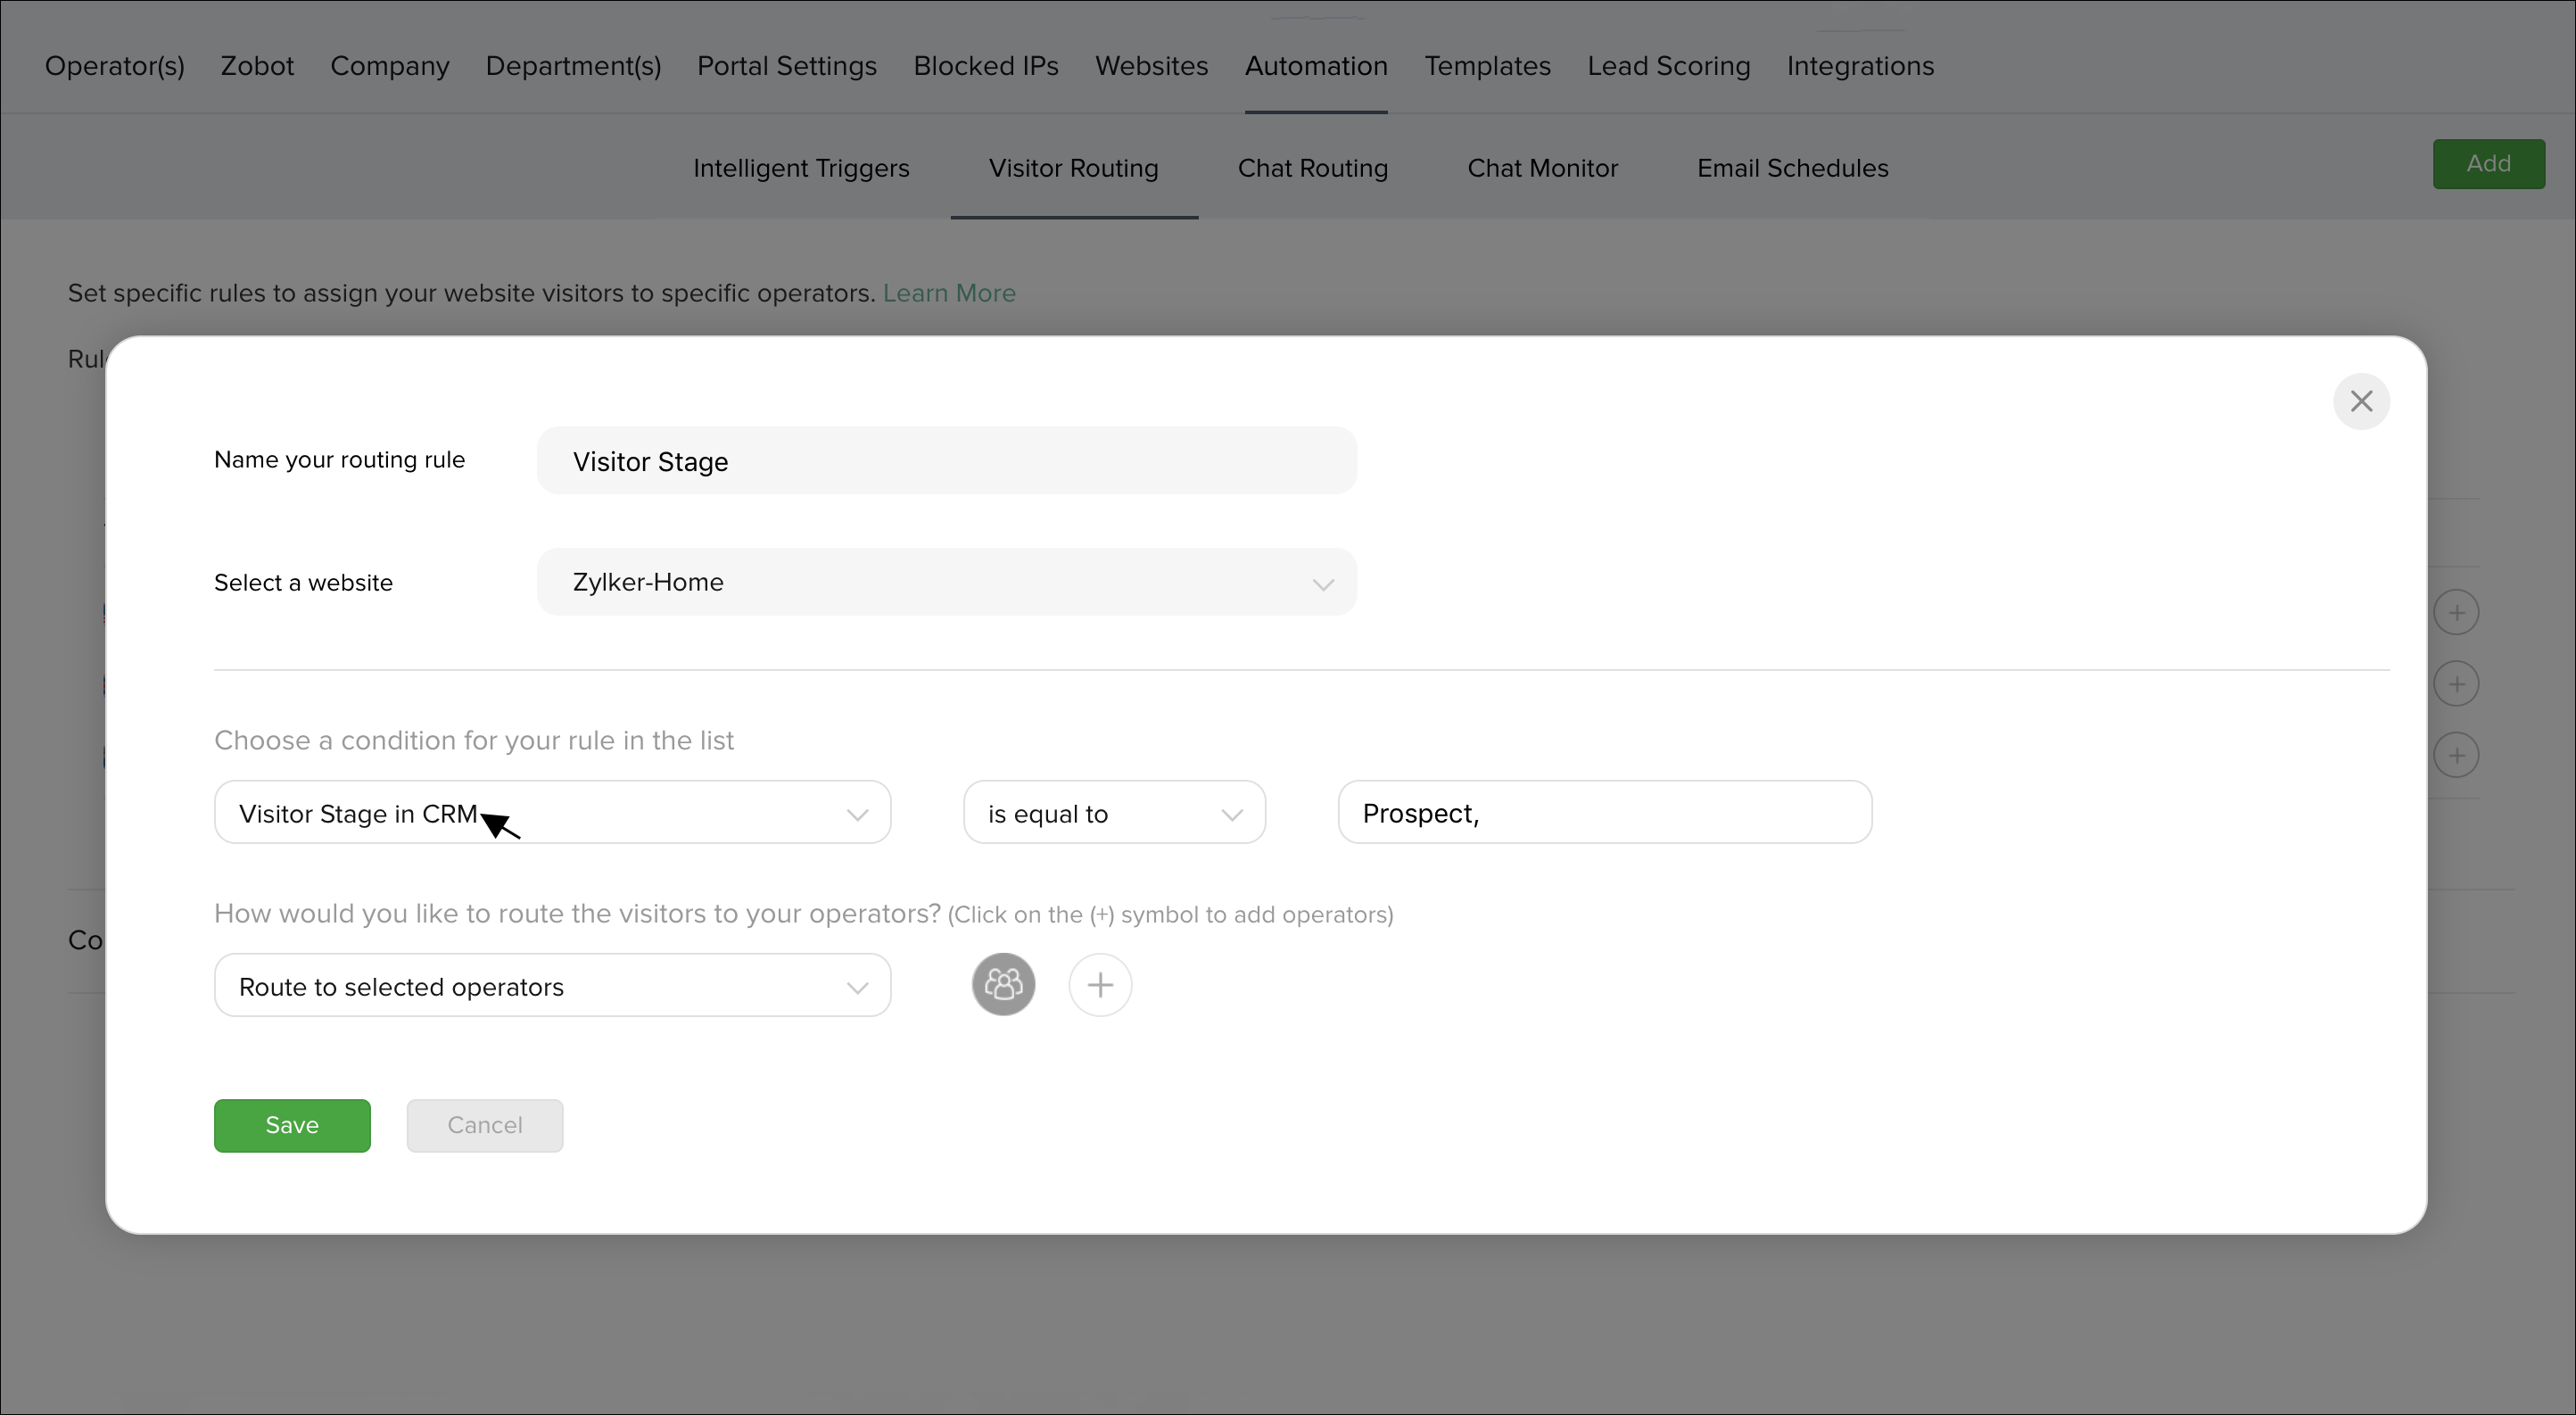
- Go to Settings > Automation > Visitor Routing.
- Select the condition and criteria for the rule. Then, select Route to the selected operators option.
- Now when you click the (+) plus symbol, the list of options and the users will appear. Select the CRM Lead/Contact Owner option above the users list.
- Now the Visitors will be routed to the CRM owner of the respective lead or contact.
Integrated Info
Using the integrated information
When you know how to use the instantly available information, you get the most value from your integrating live chat support with your existing customer database.
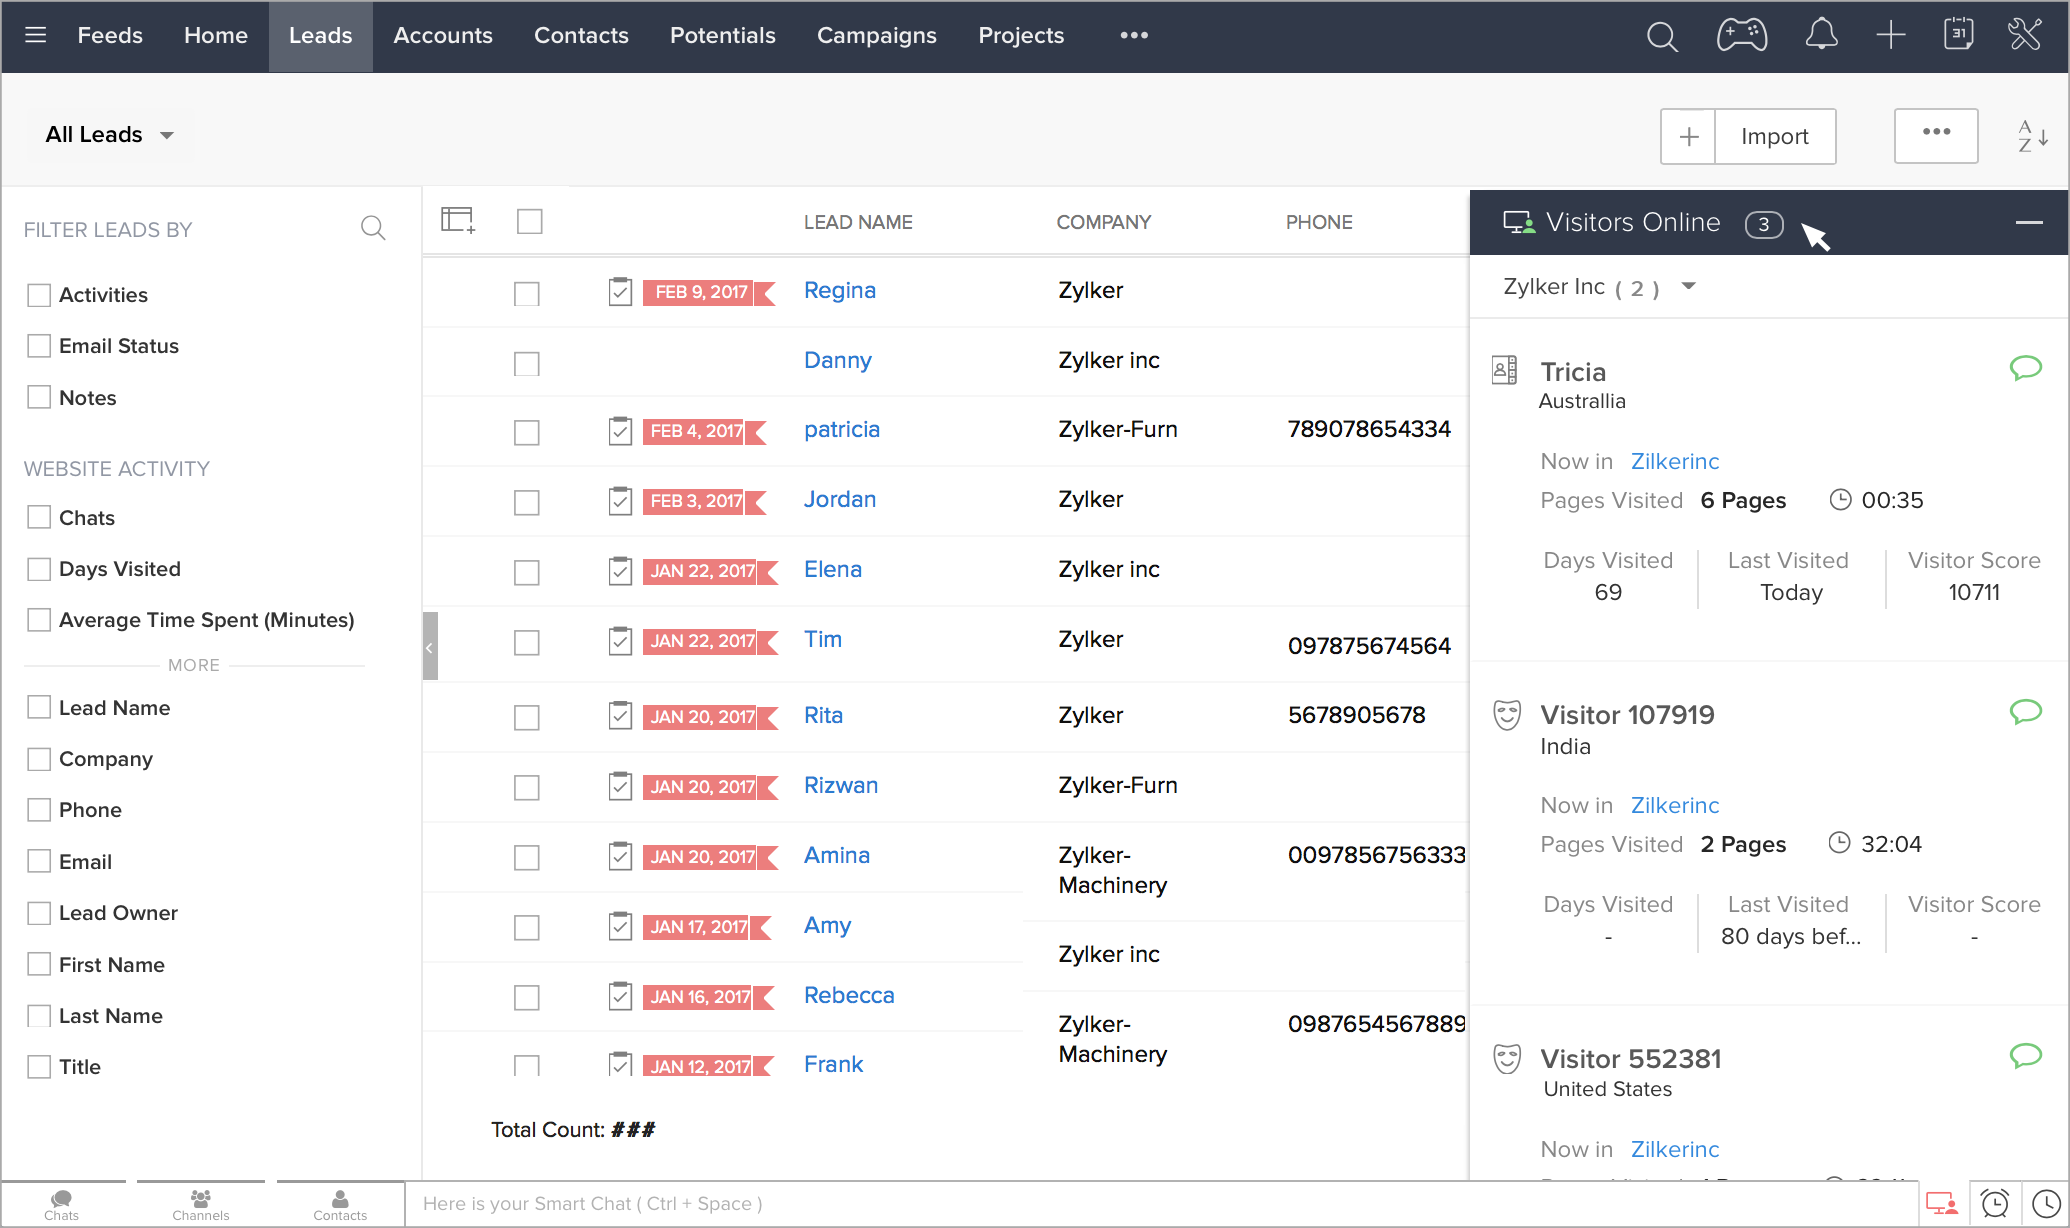
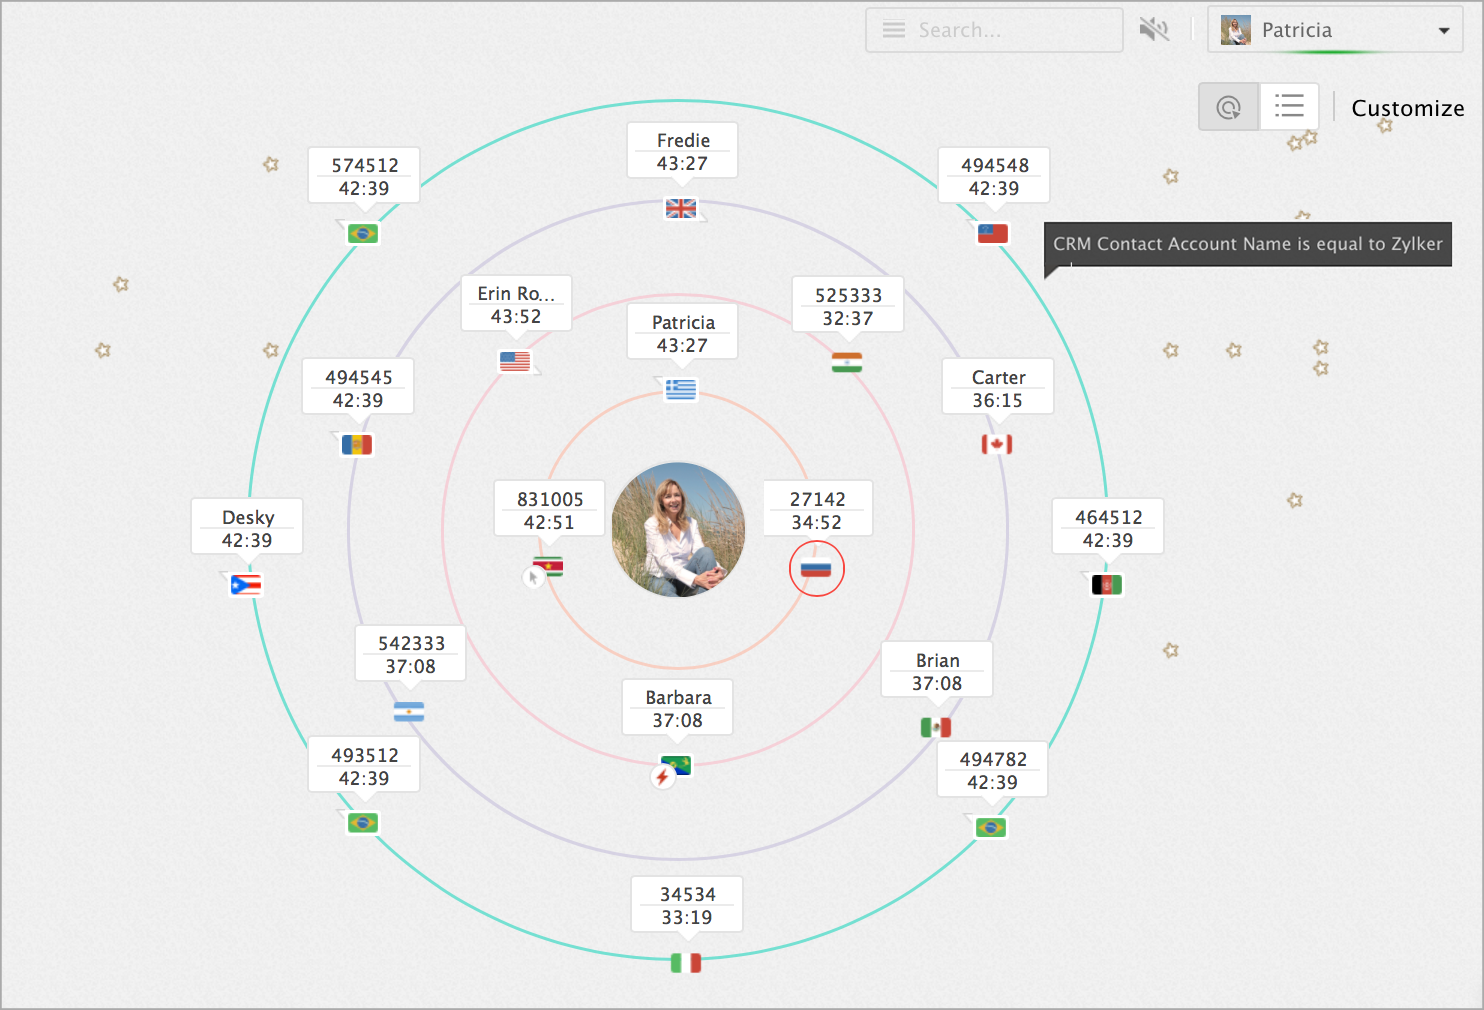
Prioritize Visitors Using CRM Values
You can now prioritize your CRM visitors in the Visitors online section by choosing the By CRM Values option in the Customize section.

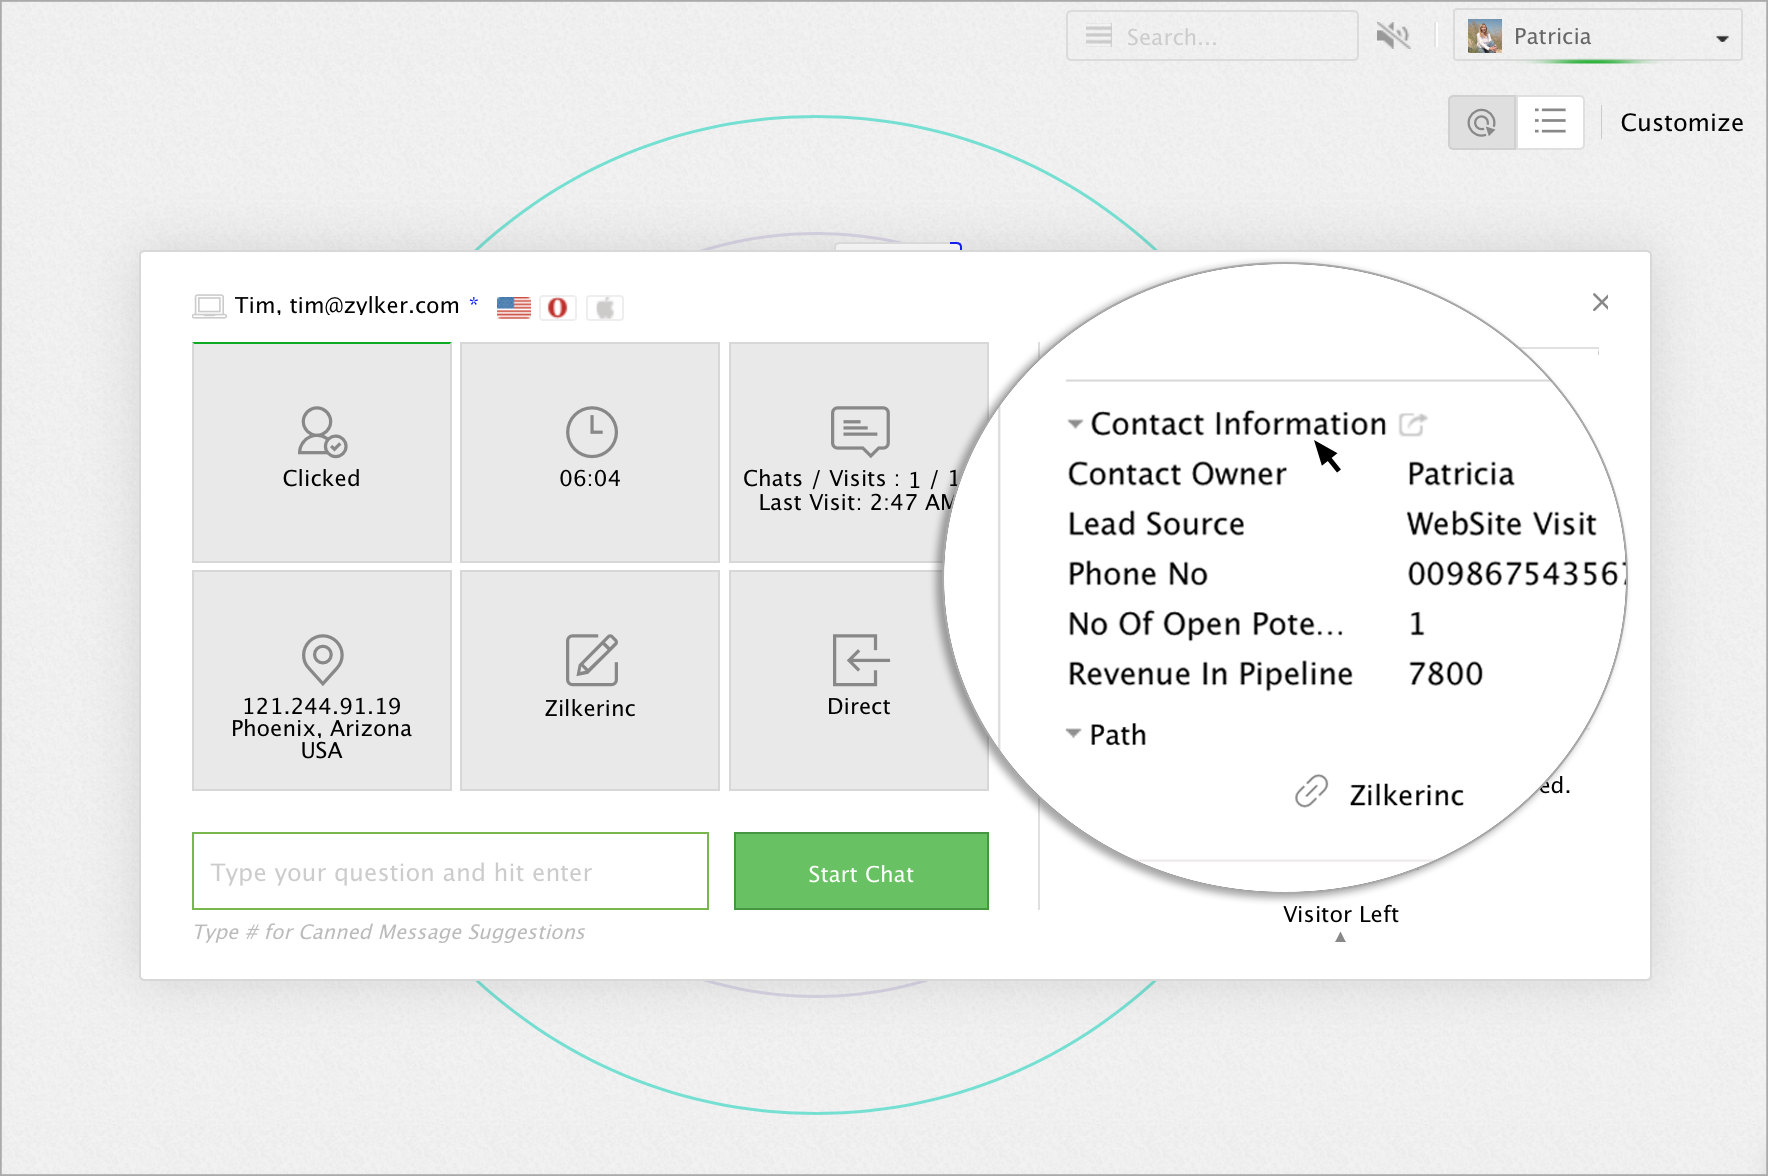
View CRM Visitor's Information
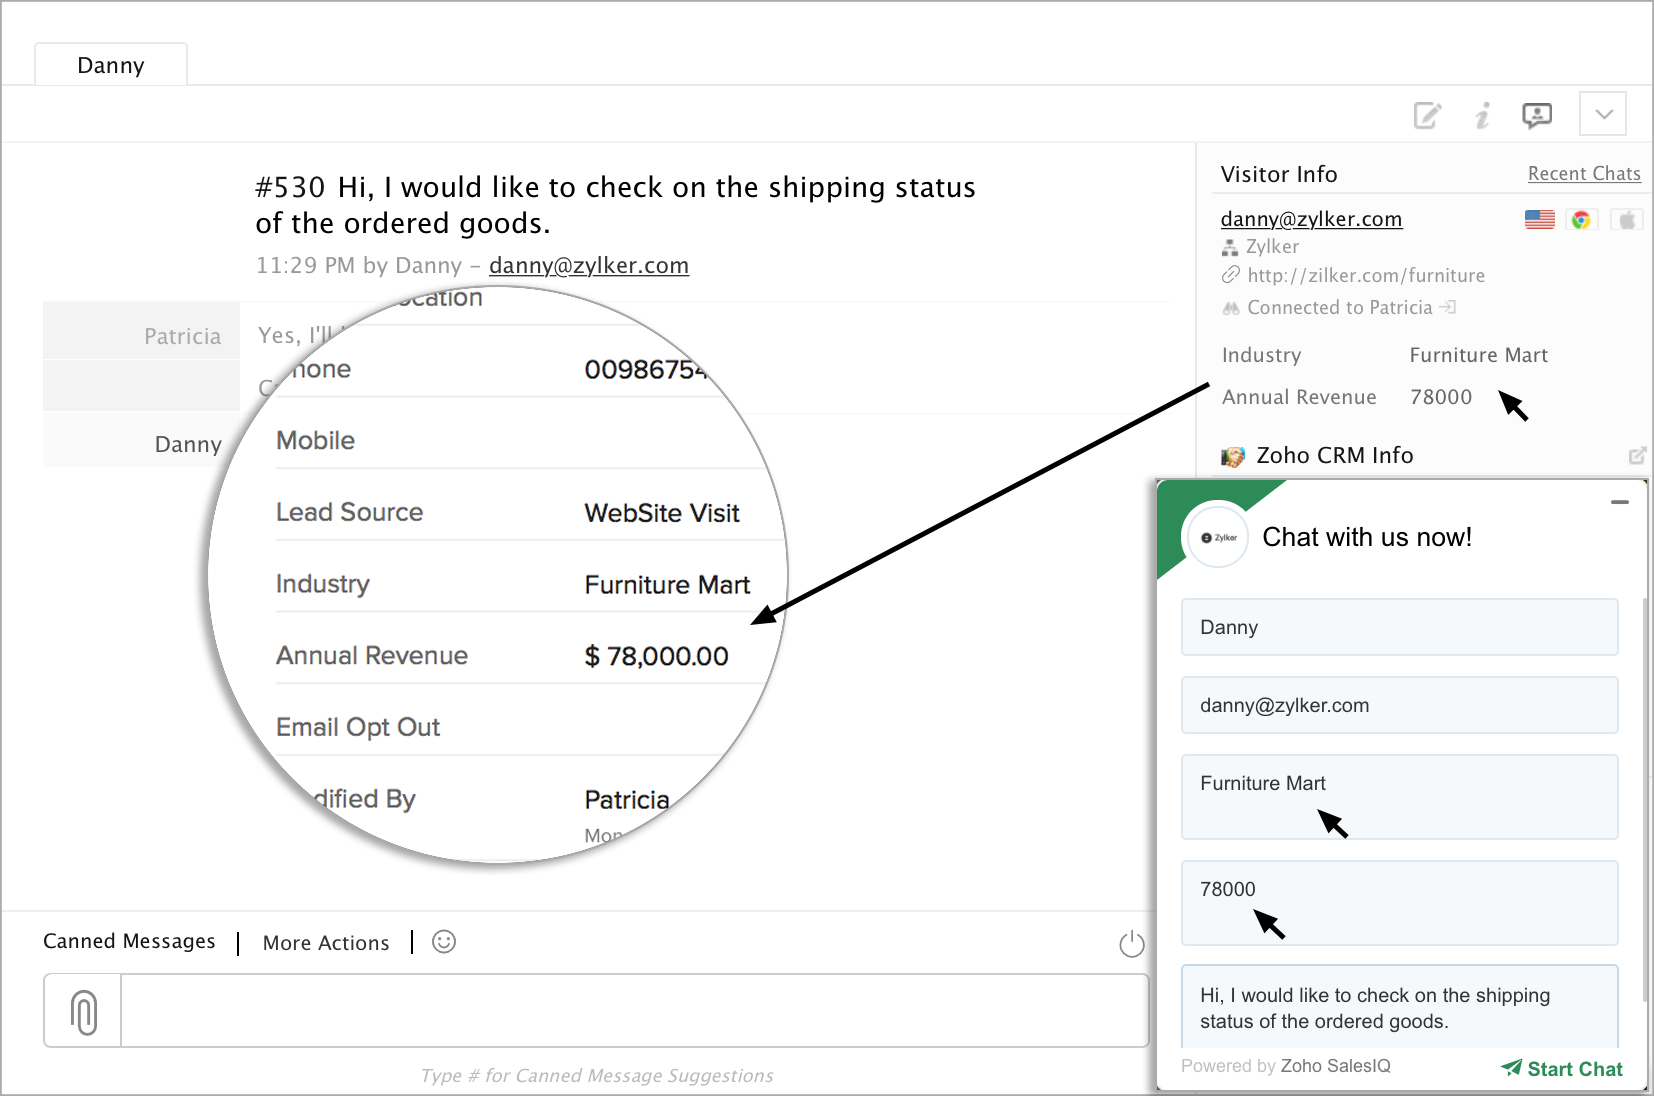
Whenever a customer (or visitor) initiates a chat with you through your Zoho SalesIQ, that visitors’ information they provided to initiate the chat, is automatically screened through your CRM database. If a customer matches one already in your database, the information from the CRM is automatically displayed just below the standard Zoho SalesIQ visitor information—on the column just to the right of the live chat window.
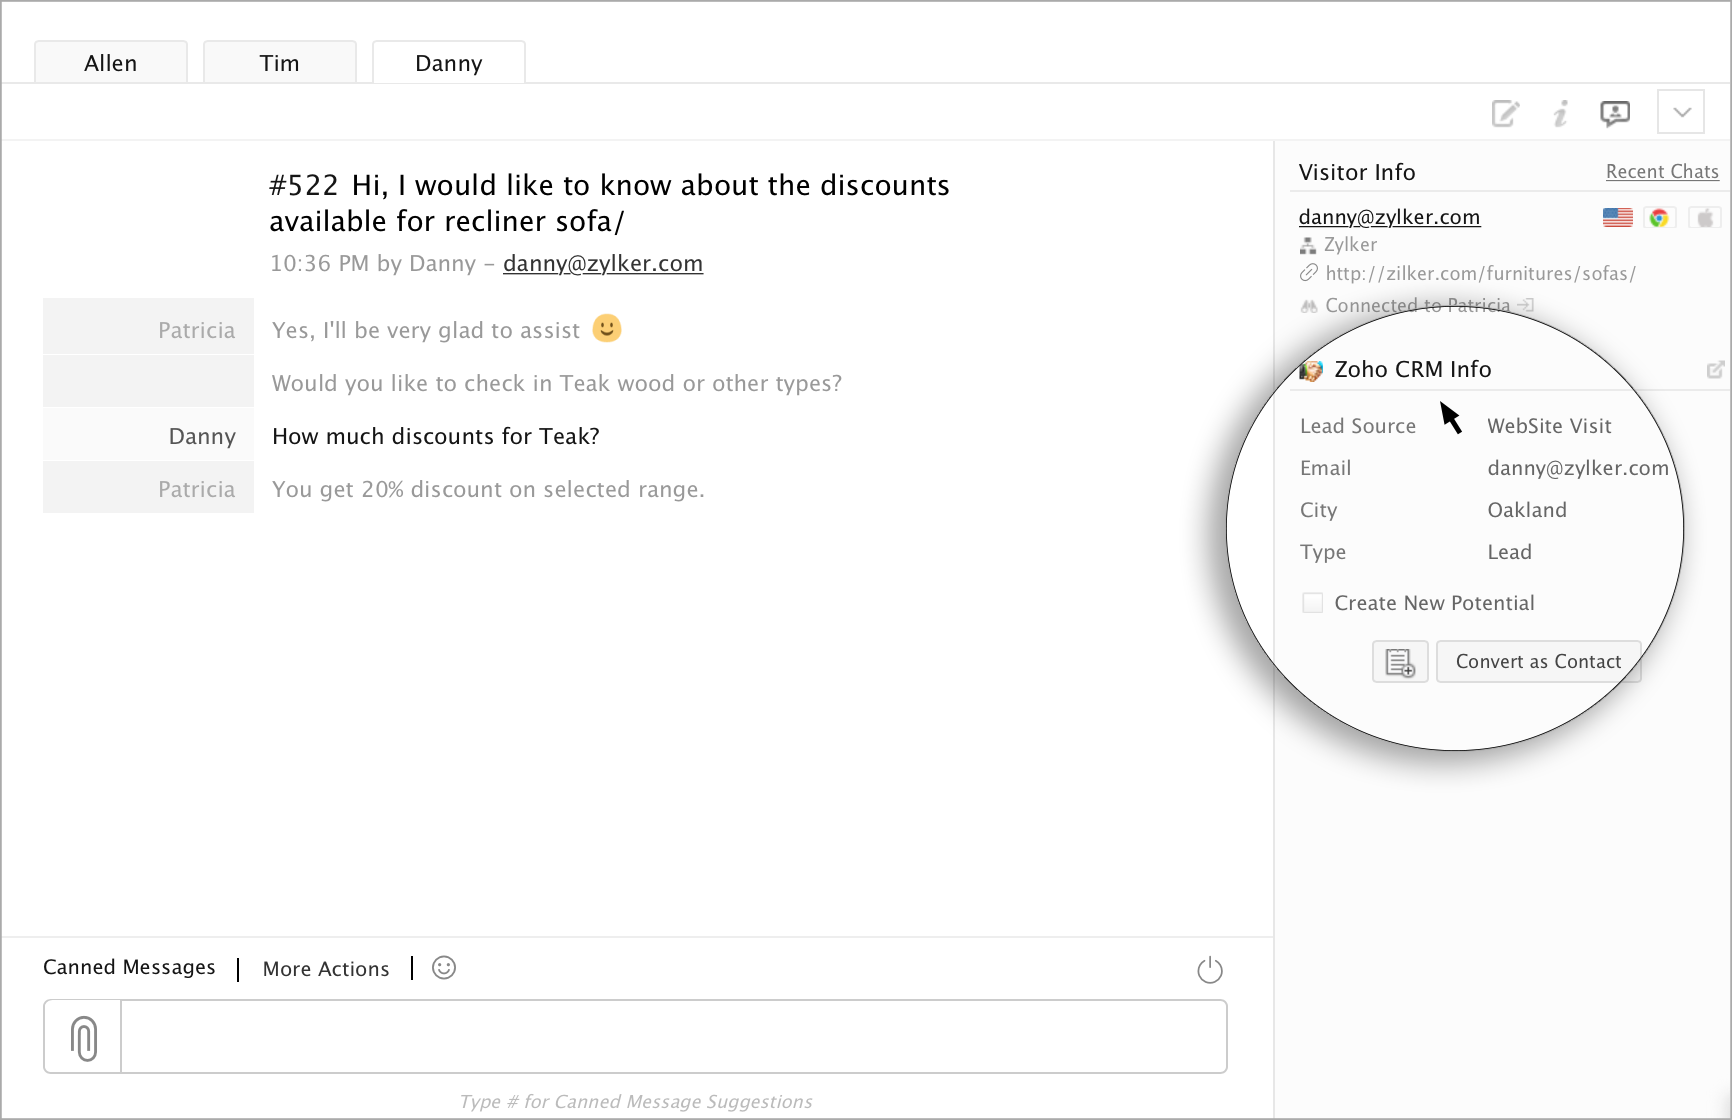
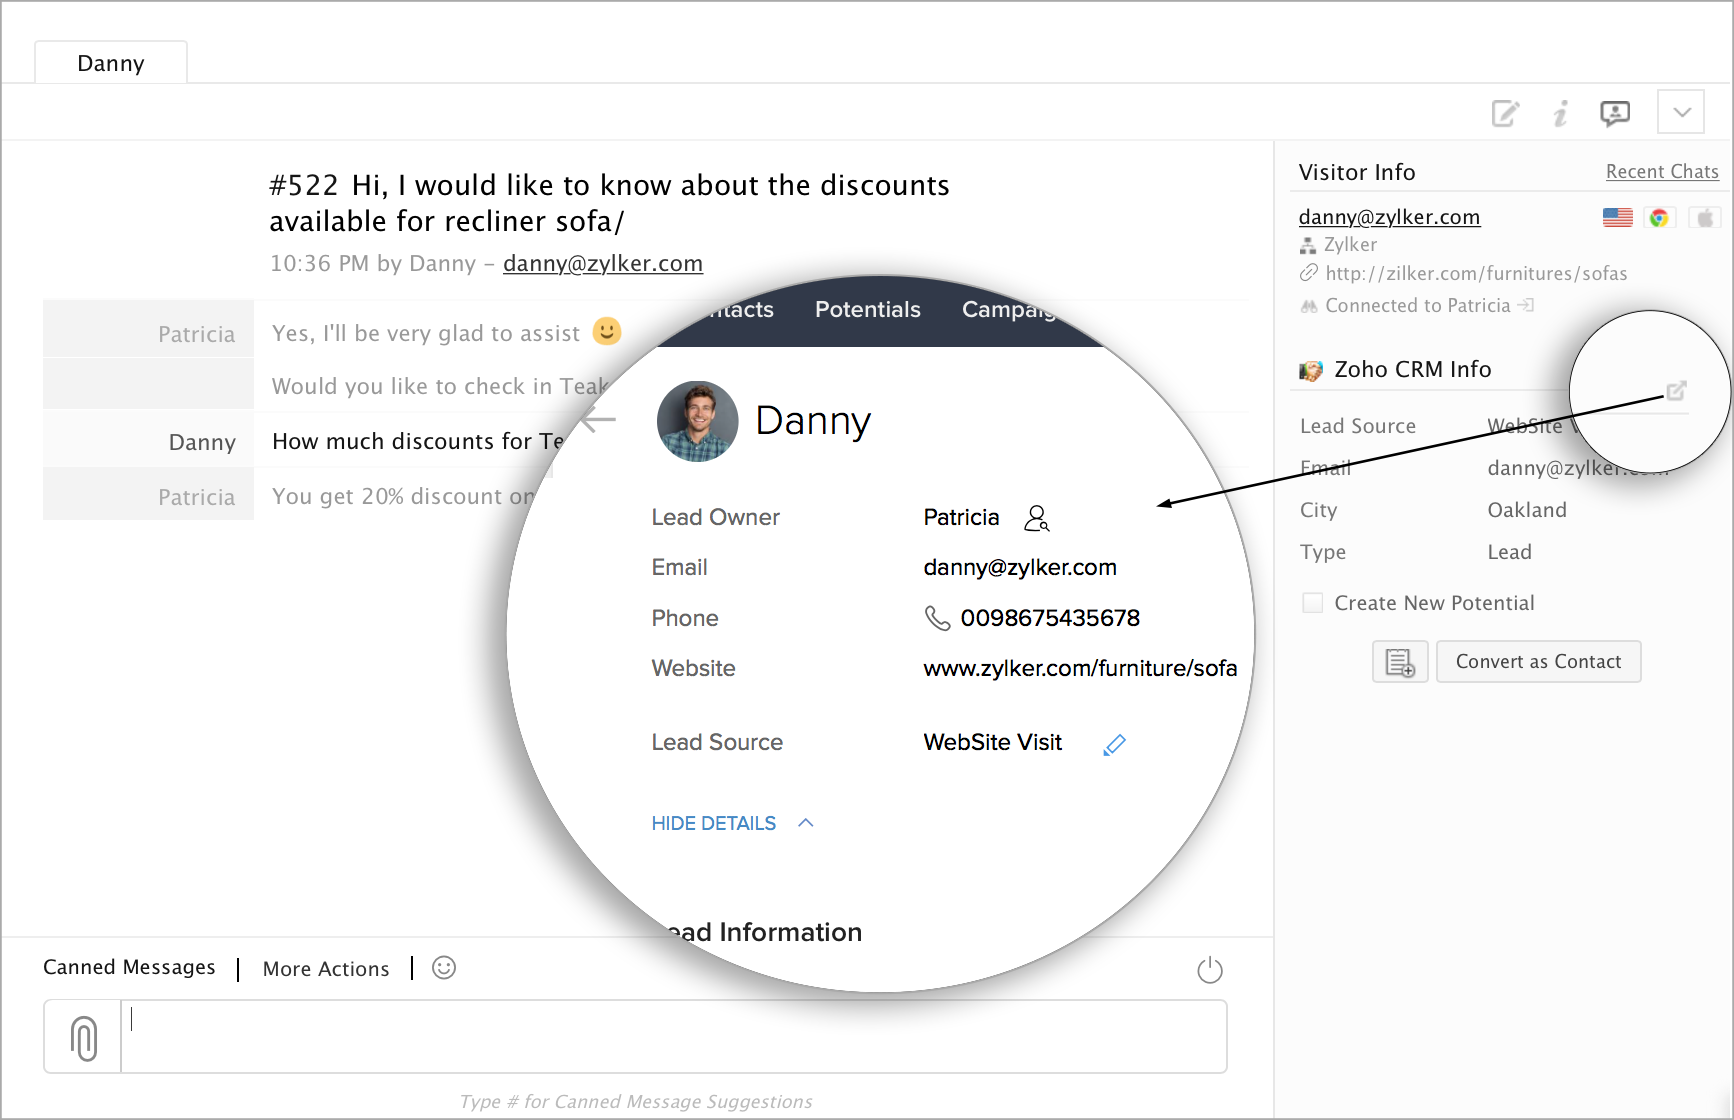
View Visitor Info in CRM
If you want a detailed picture, beyond the quick-view of your customer’s information (both for Contacts and Leads), you have one-click direct access to the complete details inside your CRM.
- Click the expand information icon.
- The complete view of your customer’s details inside Zoho CRM will open in a new browser tab.
Add data SalesIQ-CRM
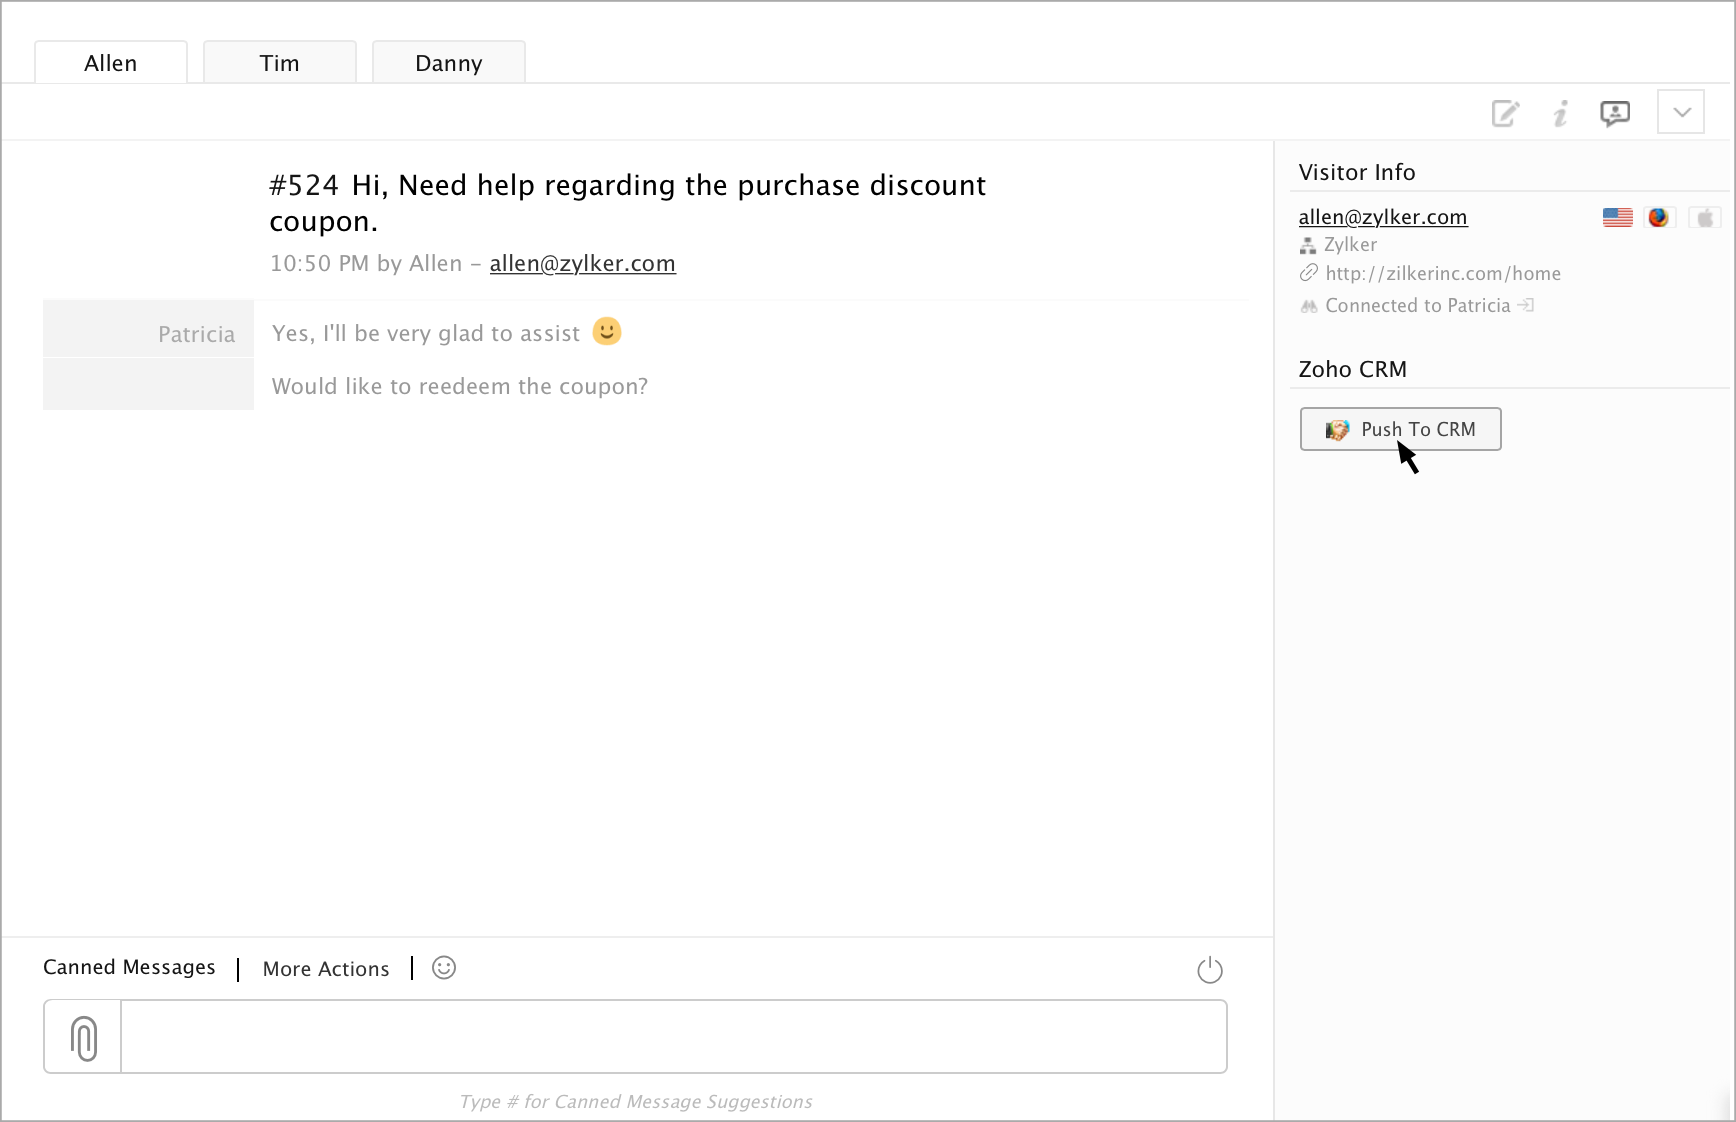
Manually add data to CRM from Zoho SalesIQ
When you are chatting with a visitor who hasn’t been automatically added to your CRM based upon your configurations or doesn’t already exist inside your CRM database, you will have the ability to manually push these visitors to your CRM as either Leads or Contacts.
Auto-push SalesIQ Visitor data to CRM custom fields
SalesIQ can push the visitor data to CRM custom fields automatically. Add the custom fields manually in your CRM Contact/Lead module, the visitor data gathered in SalesIQ will automatically propel into the CRM custom fields. Learn how to add custom field in Zoho CRM
The list of custom fields that you can add in CRM Lead/Contact module are:
- City
- State-Province-Region
- Country
- IP
- Browser-Type
- Campaign Source
- Campaign Medium
- Campaign Term
- Campaign Content
- Campaign Name
- Operating-System
Push Visitor Data from SalesIQ to CRM Visits Module
You can also push the visitor data automatically from SalesIQ to CRM visits module. Add the custom fields manually in CRM visits module, the visitor data gathered in SalesIQ will be pushed to the fields automatically. Learn how to add custom field in Zoho CRM
The list of custom fields that you can add in the CRM Visits Module are:
- Lead Score
- Screen-Resolution
- Character-Encoding
- Current-Page
- User-Agent
- Platform
- Referrer
- Browser-Type
- Browser-Version
- Operating-System
- Color-Depth
- Script-Version
- Java-Support
- Cookie-Support
- Page-Title
- Search-Engine
- Search-Query
- Protocol
- Scheme
- Visitor-Indicator
- FlashPlayer-Version
- Geolocation
- Local-Timezone
- City
- State-Province-Region
- Country
- IP
- Accept-Language
- Longitude
- Latitude
- Code
- Campaign Source
- Campaign Medium
- Campaign Term
- Campaign Content
- Campaign Name
- Visitor ID
- Name
- Email Address
- Question
- Department
- Embed
- Phone
- Missed Reason
- In Time
- End Time
- Missed Time
- Waiting Time
- Chat Duration
- Last Mail Send At
- Customer Info
Lead Configurations
Adding a new lead
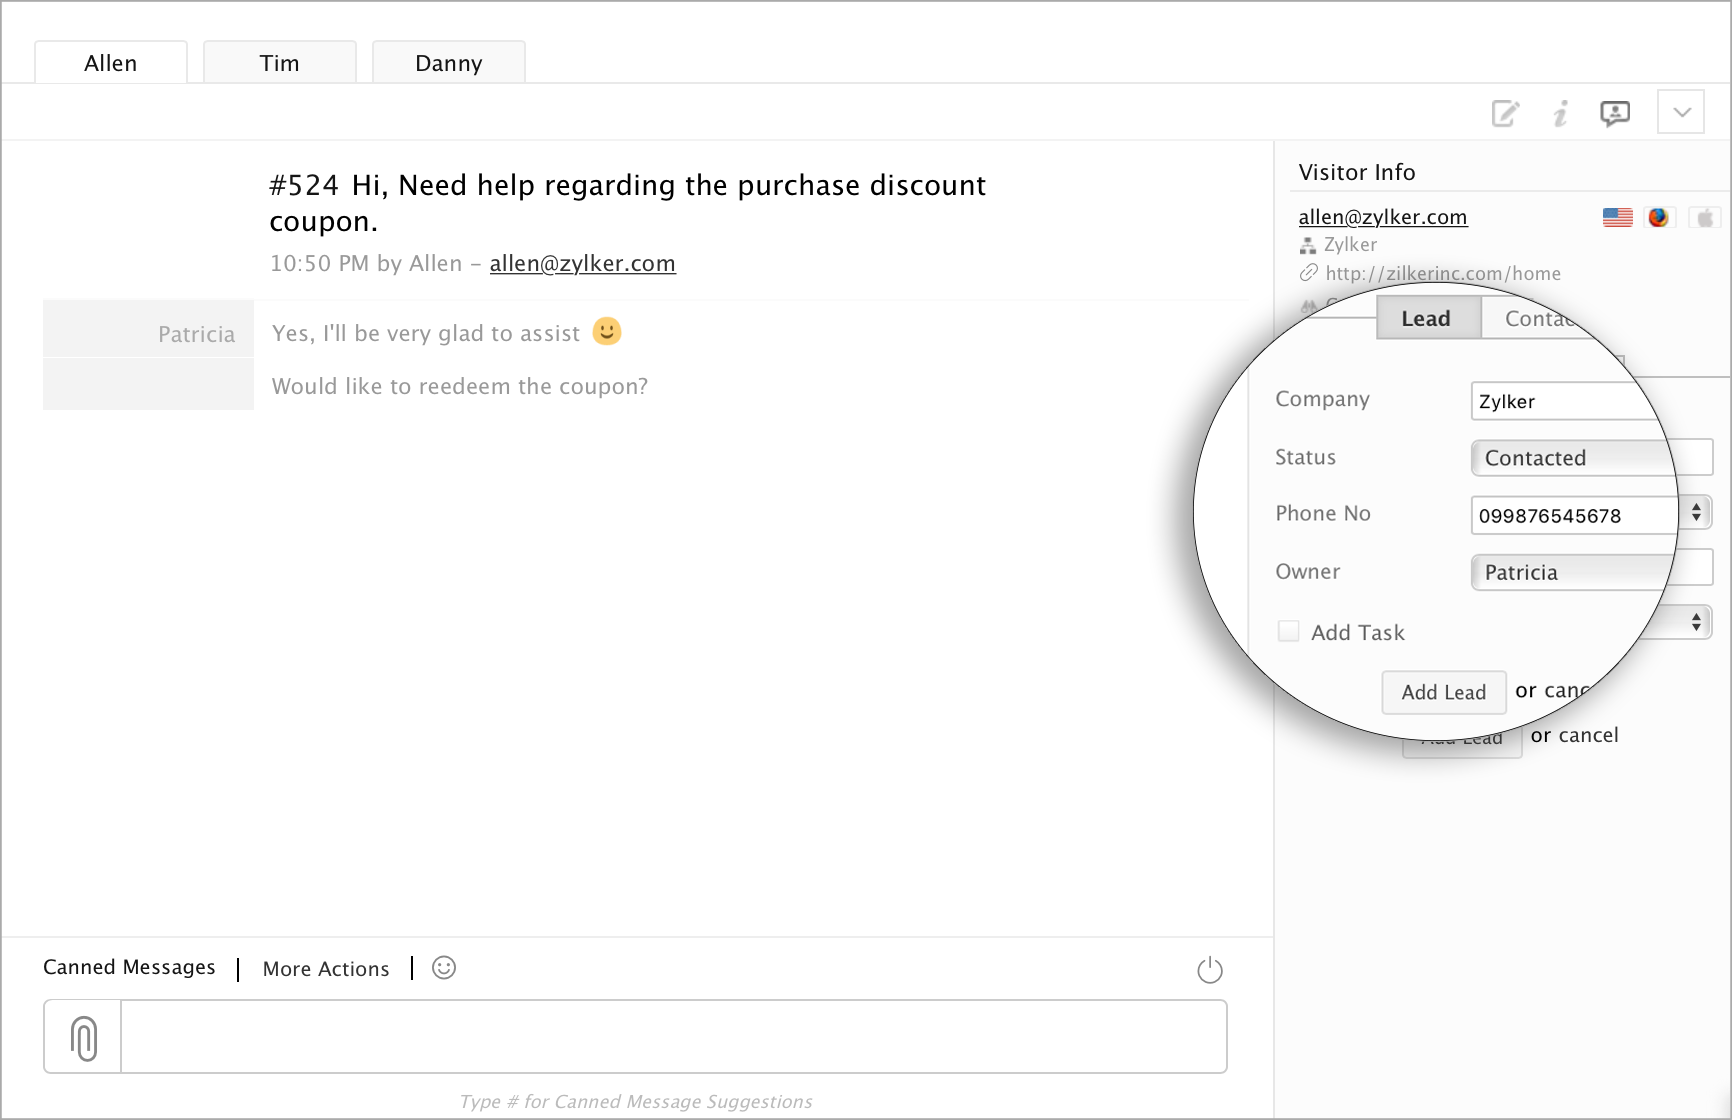
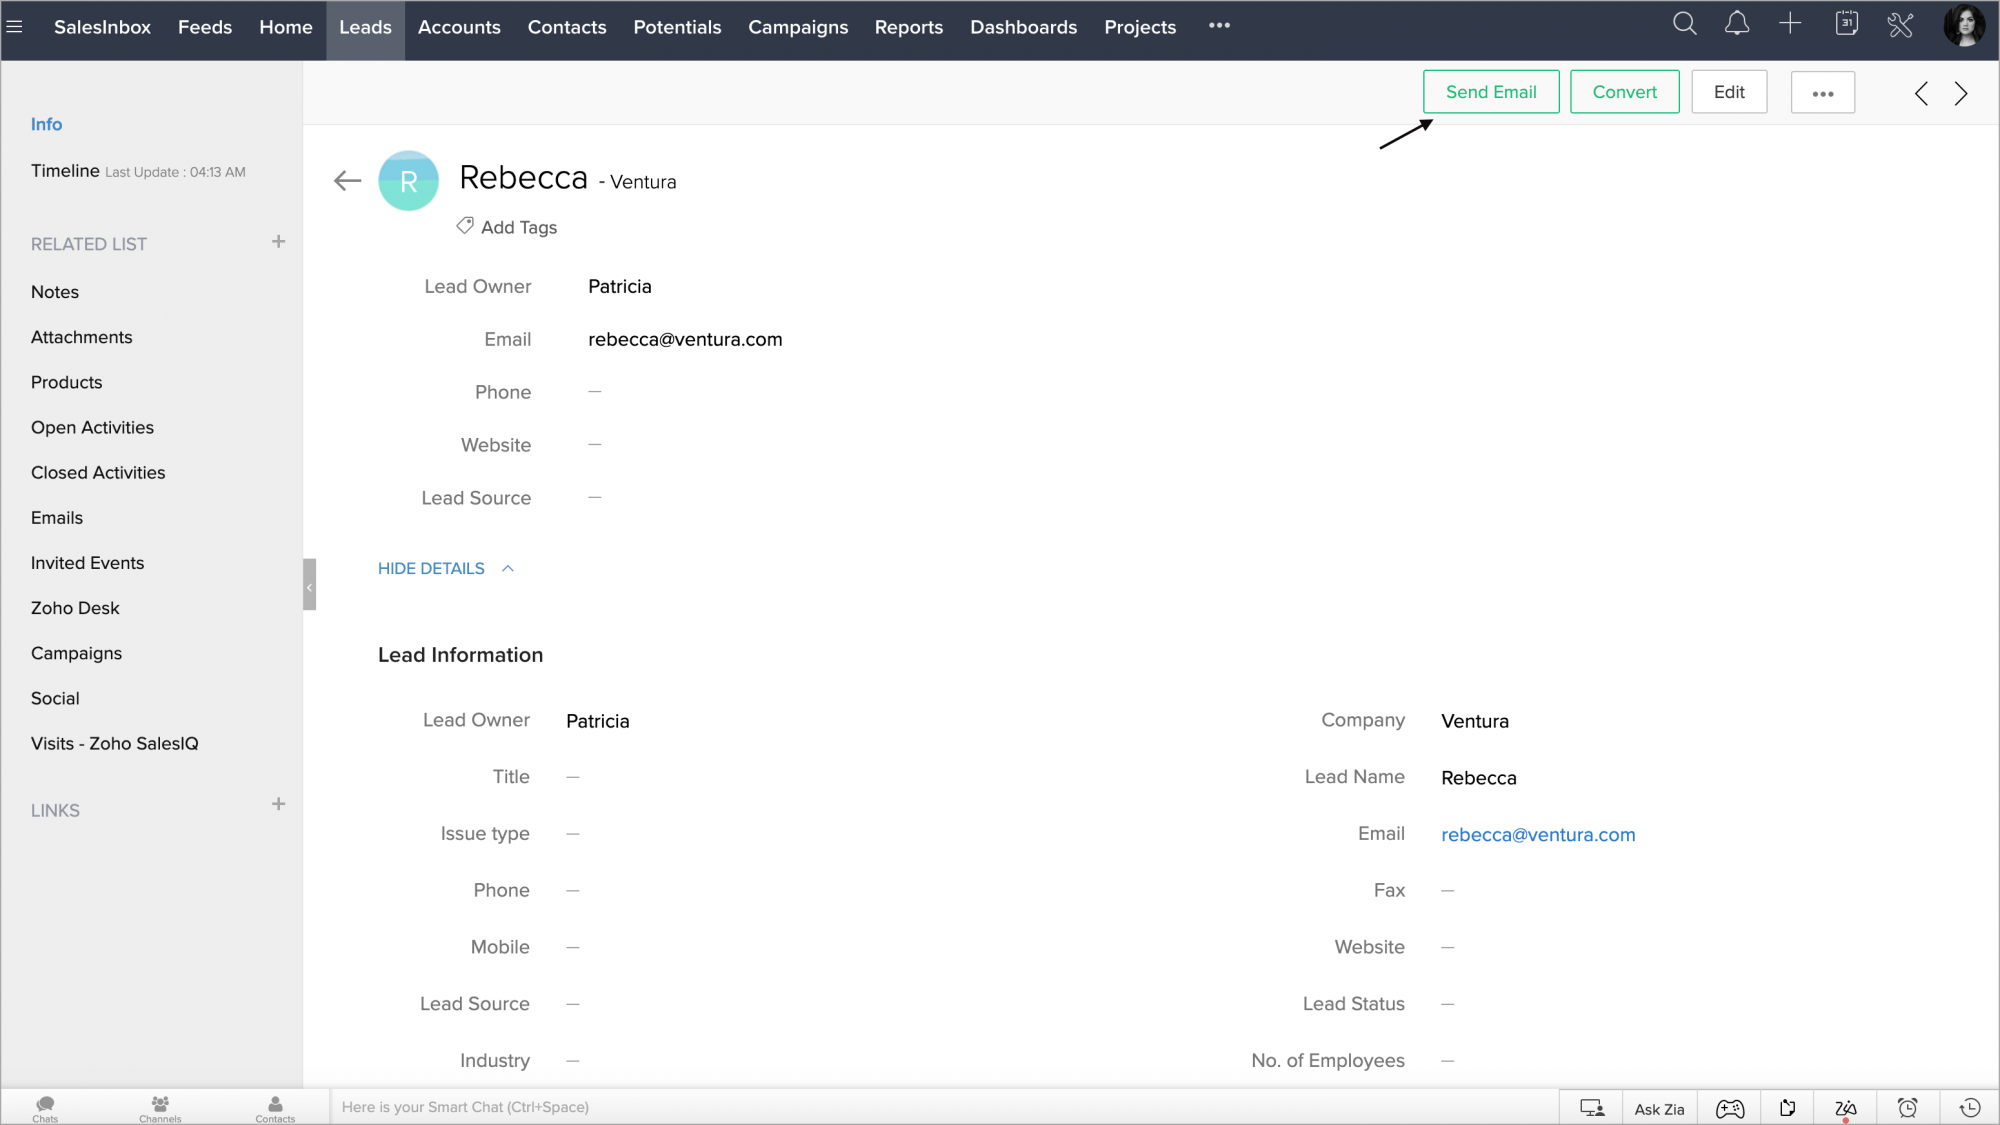
When chatting with a prospective customer, perhaps a customer who has questions about a trial, you can quickly add the customer as a new lead, from the same window you are chatting with them from.
After you click the “Push to CRM” button, you will see the add Lead/Contact box. This will default to bringing up the information for adding a new Lead, but you can click either Lead or Contact, to switch between the two add boxes.
When adding a new lead from Zoho SalesIQ manually, it is mandatory that you enter the visitor’s company name. Here you can also add phone number, lead status and assign an owner.
Track CRM Leads
Track Visitors with CRM Lead information
Tracking allows the agents to monitor the visitors in your website. It also allows them to set their predefined conditions to prioritize and route the visitors into their dashboard to initiate a proactive chat based on Zoho CRM Lead information.

Route CRM Leads
Route visitors with Lead information
Lead generated in Zoho CRM can be routed to particular sales rep provided the assignment rules are defined.
- To route your leads go to Settings, and select the Automation tab.
- Now select the Visitor Routing, and click on the "Add" to set your required filters.
- Select the required "CRM Lead" from the list, followed by selecting the fields available for the Leads in CRM.
- Define a "criteria" for your conditions.
- Enter a value for the set condition.
- Add the agents name in the “route to Users” section by clicking on the "+" symbol, to get the visitors assigned to your agents.
- To remove the added agents, hover over the agents and click "-" symbol.

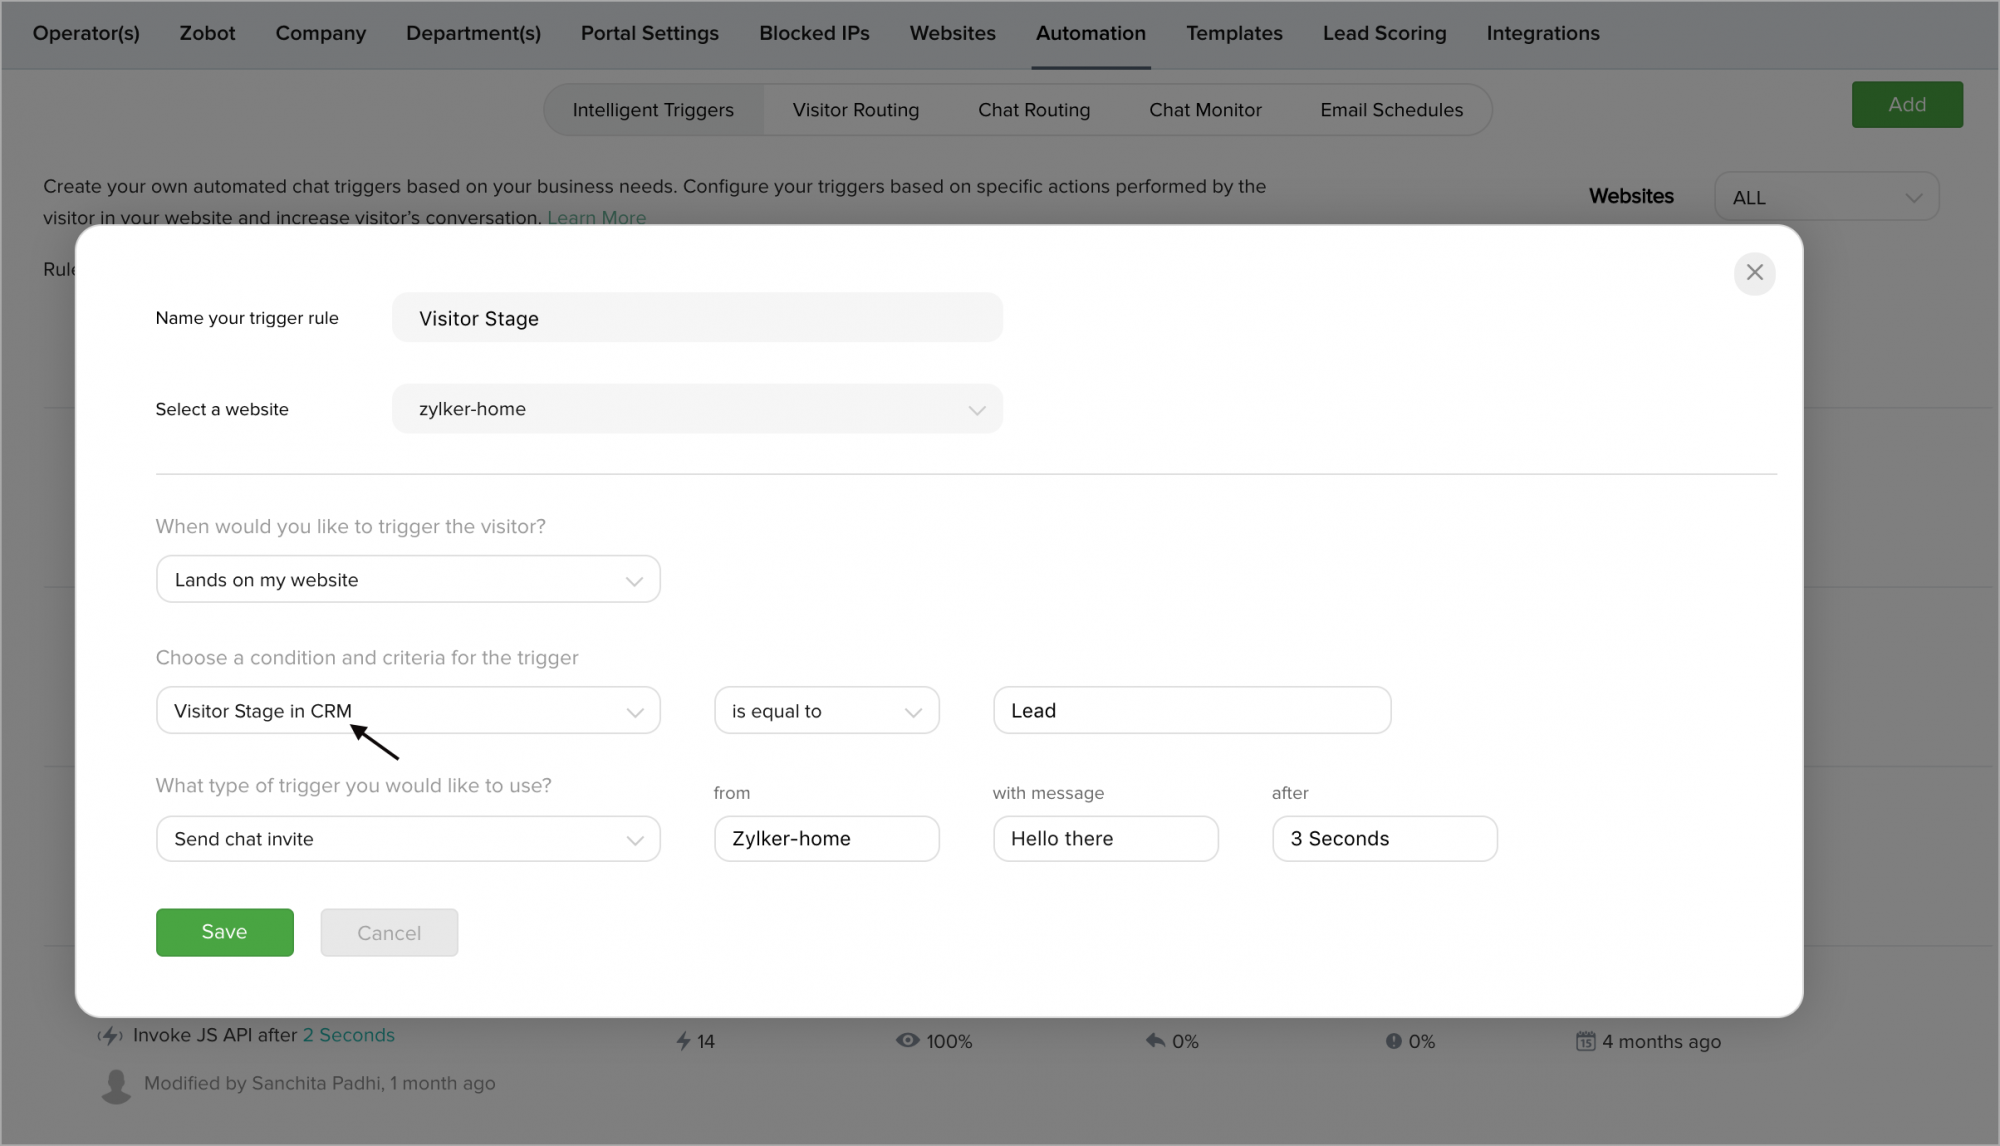
Trigger Action-CRM Lead
Trigger an Action to your CRM Lead
You can now trigger an action to your CRM lead while visiting your website or accessing any page on your website based on the lead information available in the Zoho CRM.
To trigger your Lead with an Action, do the following:
- Go to the Settings panel, and click on the Automation tab.
- Now, select the Intelligent triggers option in the automation tab.
- In the “When would you like to trigger to the visitor?” drop-down, select where would you like to trigger the visitor in your website (on the landing page or while accessing any page on the website).
- Then select the CRM Lead option from the “Choose a condition and criteria for the trigger” dropdown. Now select criteria, and provide a value in the text box.
- Choose a type of action you would like to perform from the “What type of trigger you would like to use?” drop-down.
- Finally, set the time after which you would like to perform the action in the “after” text box.

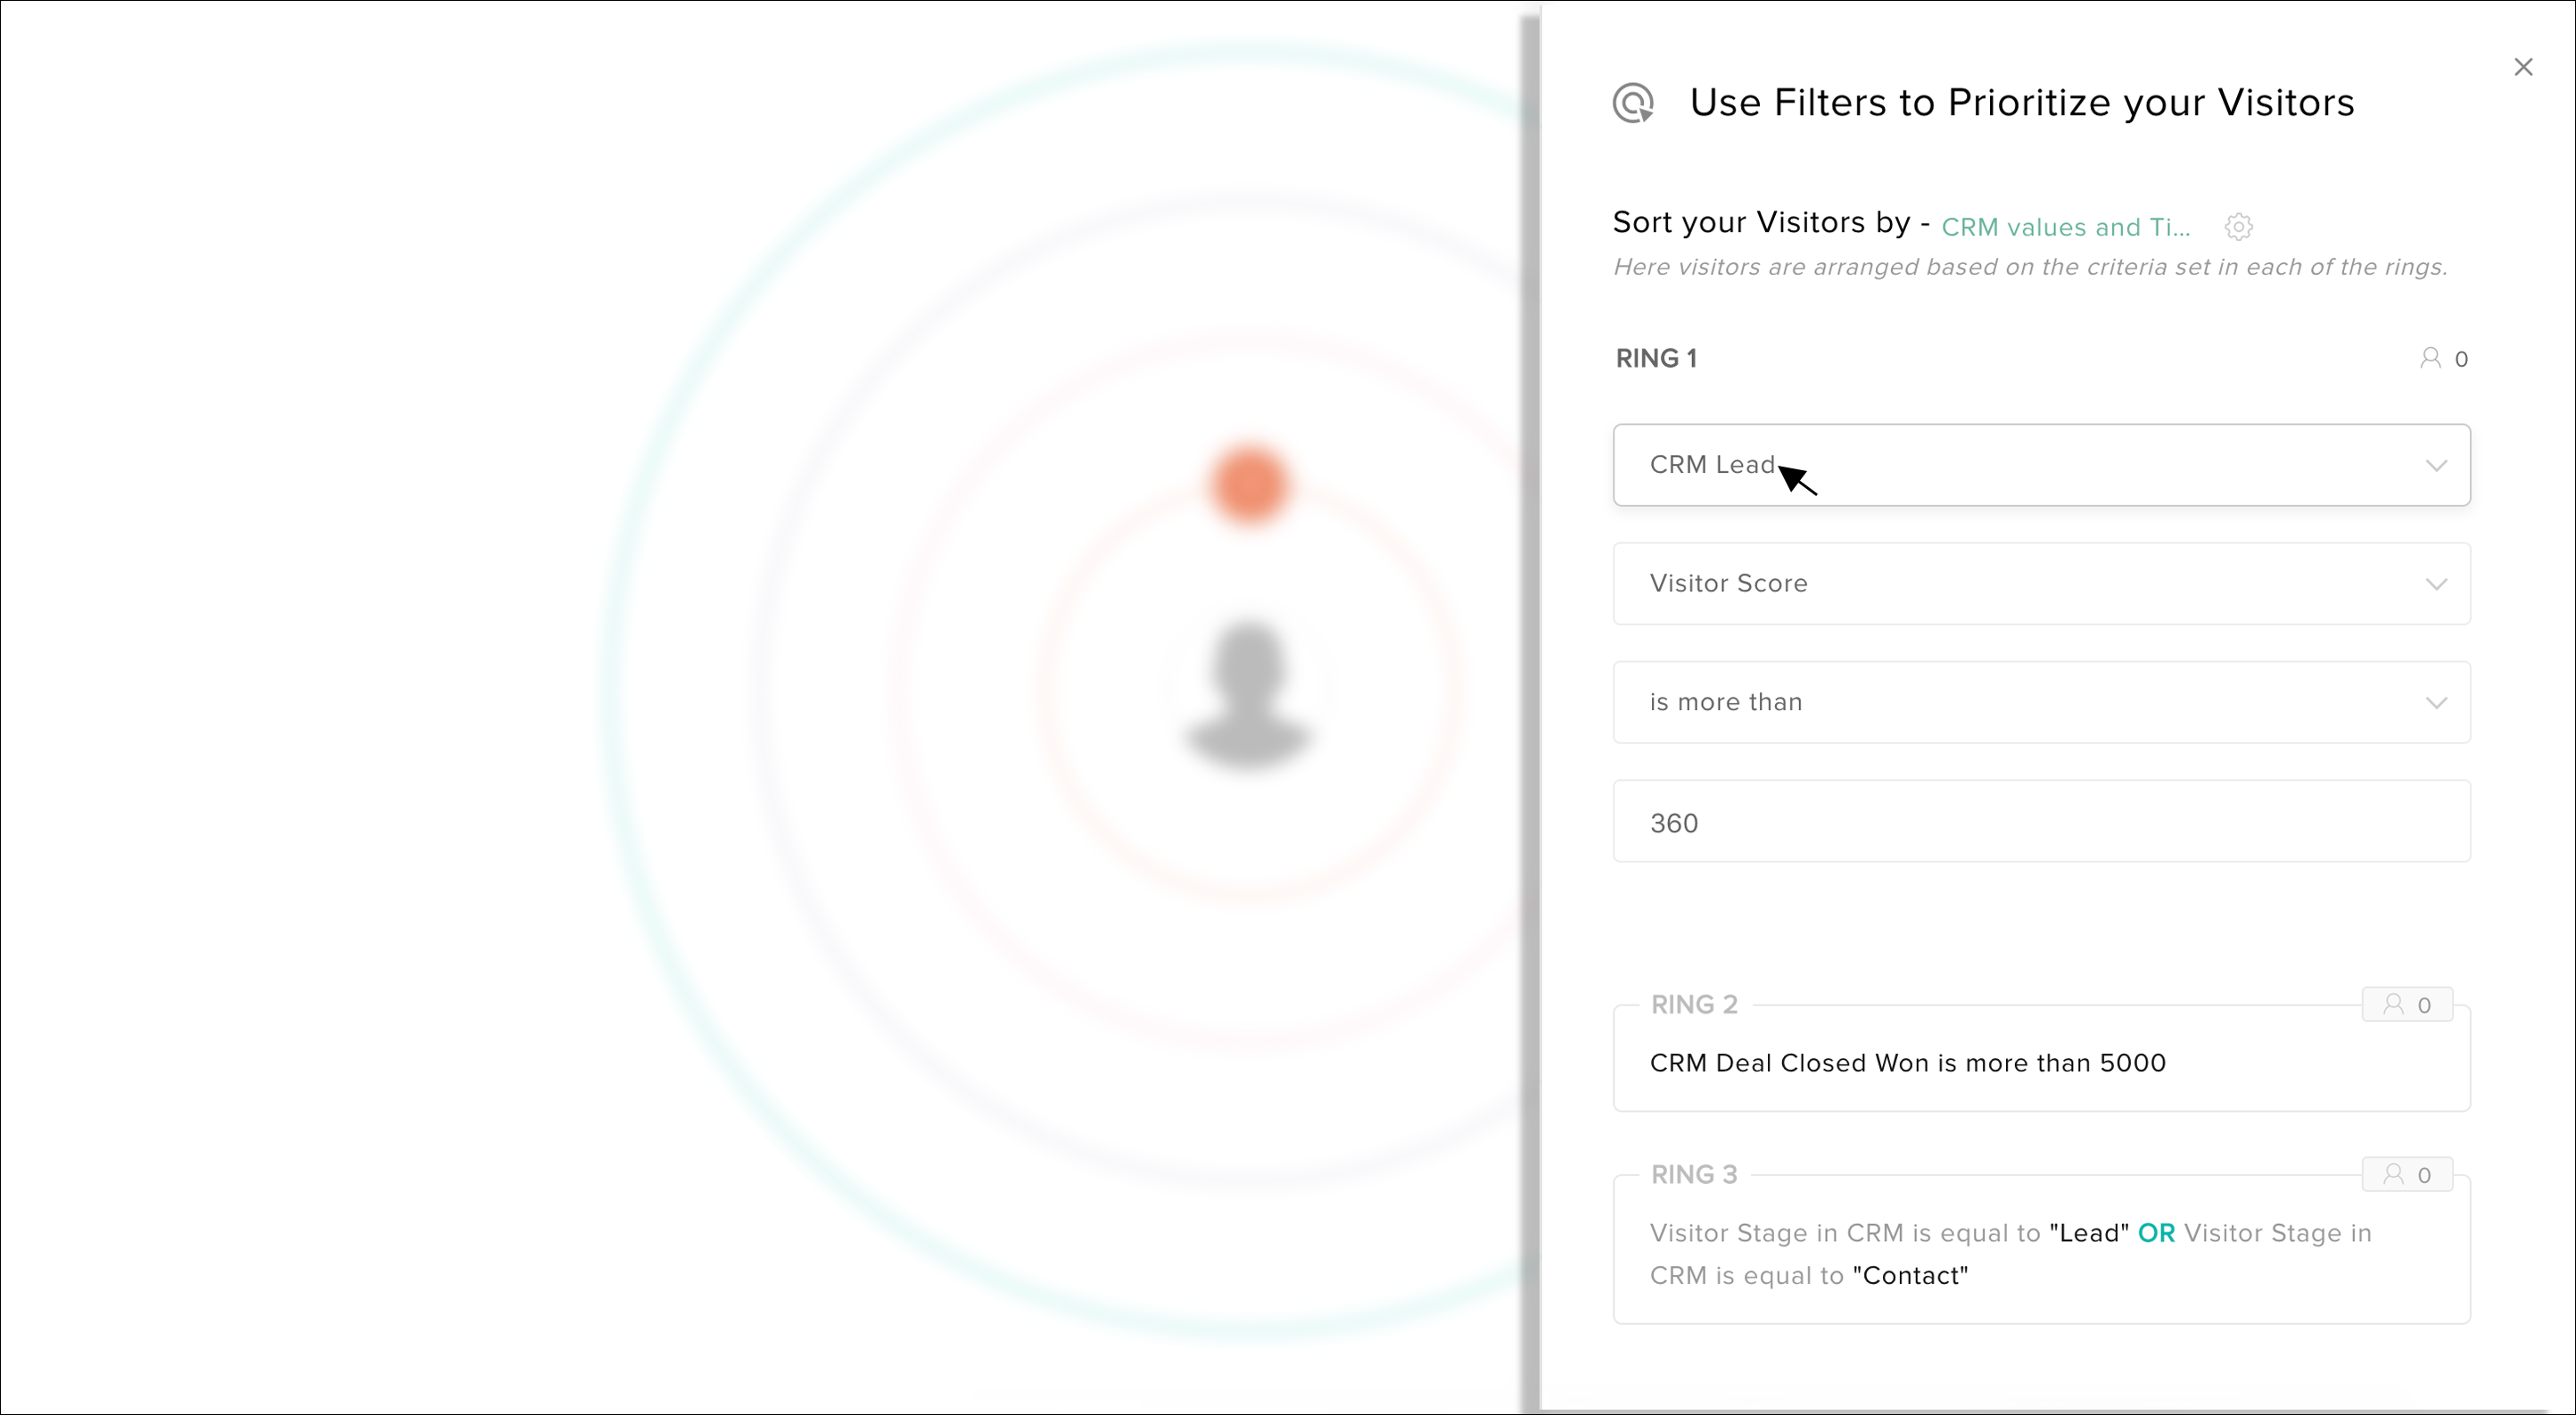
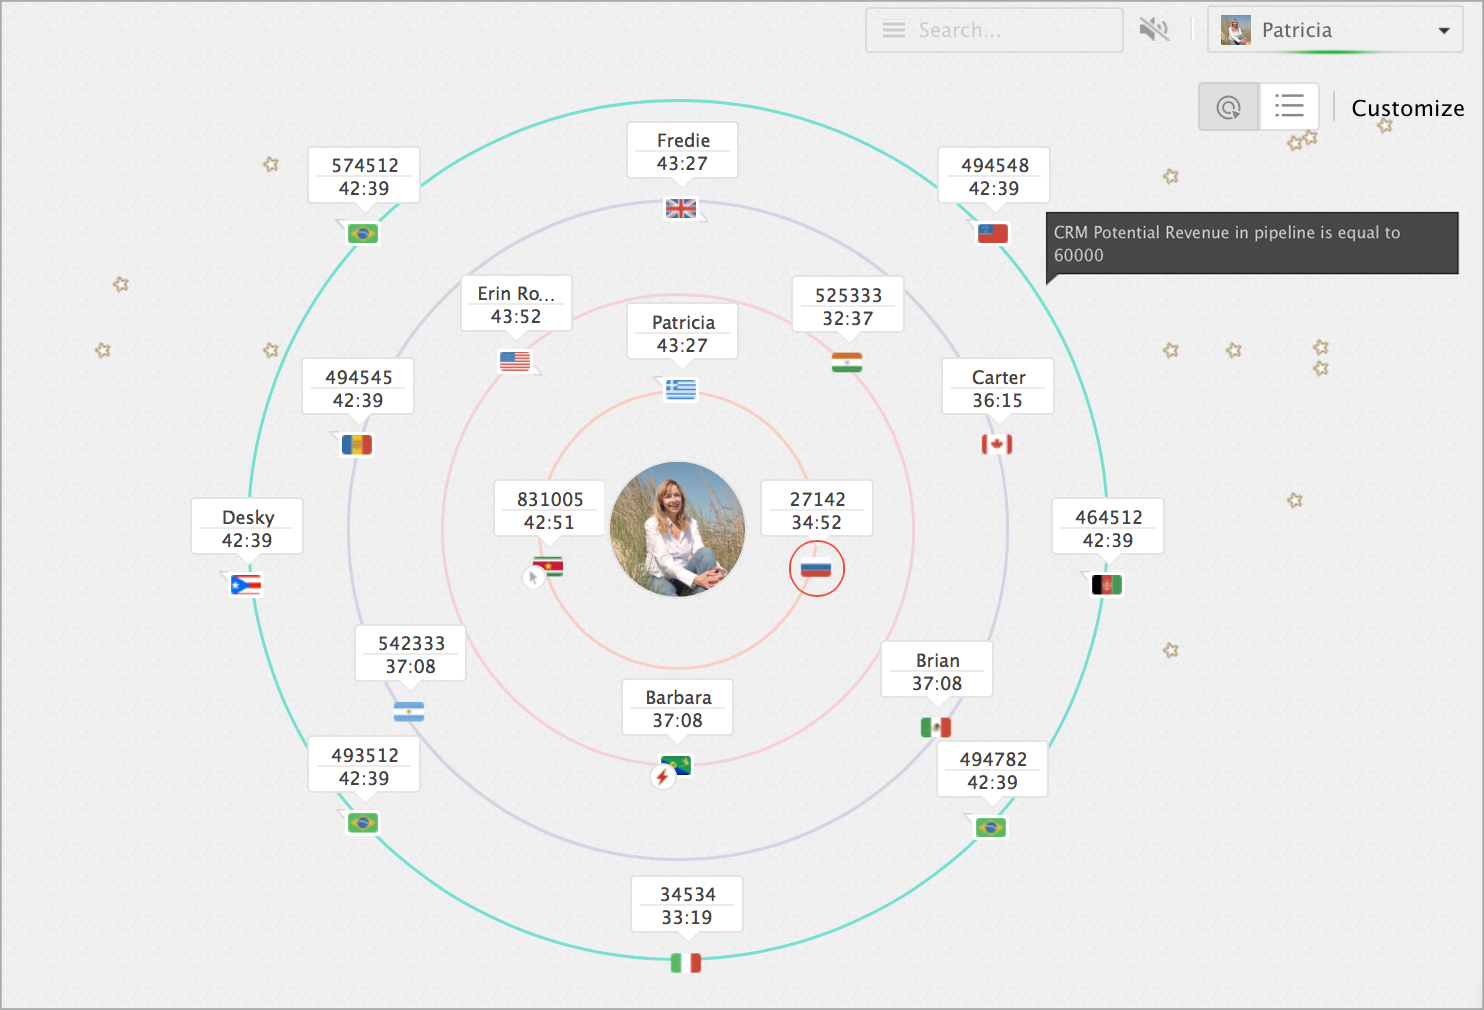
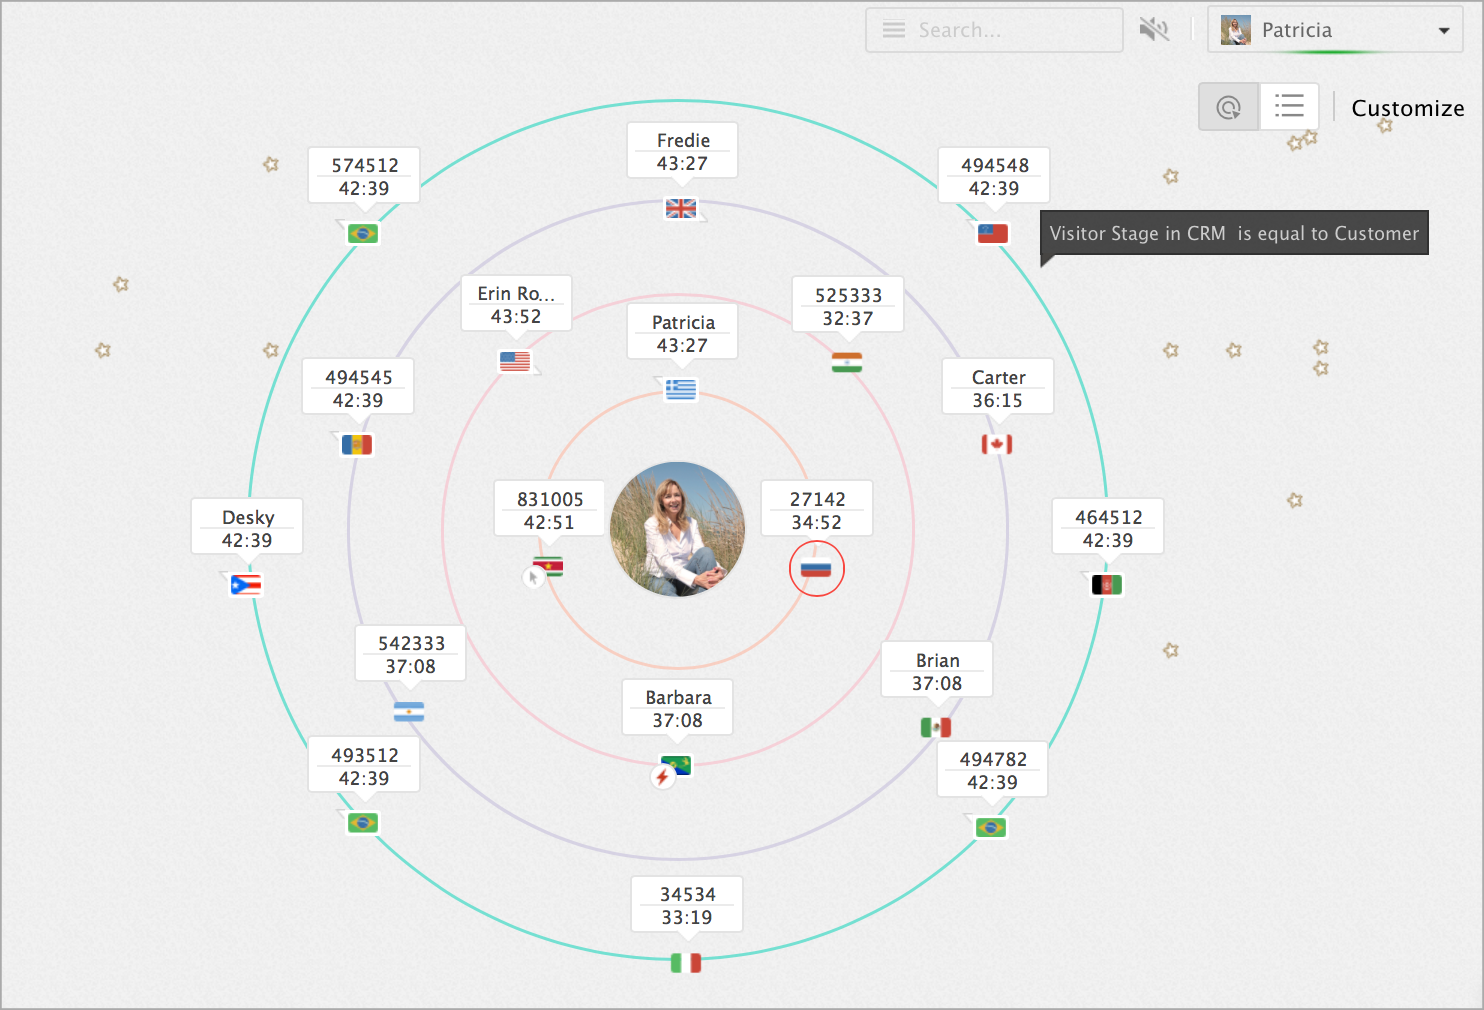
Customize Priority Rings
Customize Priority Rings based on Lead information
Tracking allows the agents to set their predefined conditions for prioritizing the visitors into their dashboard based on Zoho CRM Lead information.
- To customize the priority circle, go to "customize" on the right side the tracking tab.
- Click on the space below "Prioritize your visitor", select "CRM Lead" followed by selecting the fields available for the Leads in CRM.
- Define a "criteria" for your conditions.
- Click "Apply".
Lead Info in Proactive Window
View Tracked Visitor CRM Lead information
On the top right, of your proactive chat window, you can find the CRM Lead information above the visitor page navigation area.
Below are the lead fields displayed in the proactive chat window.
- Company
- Phone
- Lead Status
- Lead Owner
- Lead Source
- Annual Revenue
- No of Employees
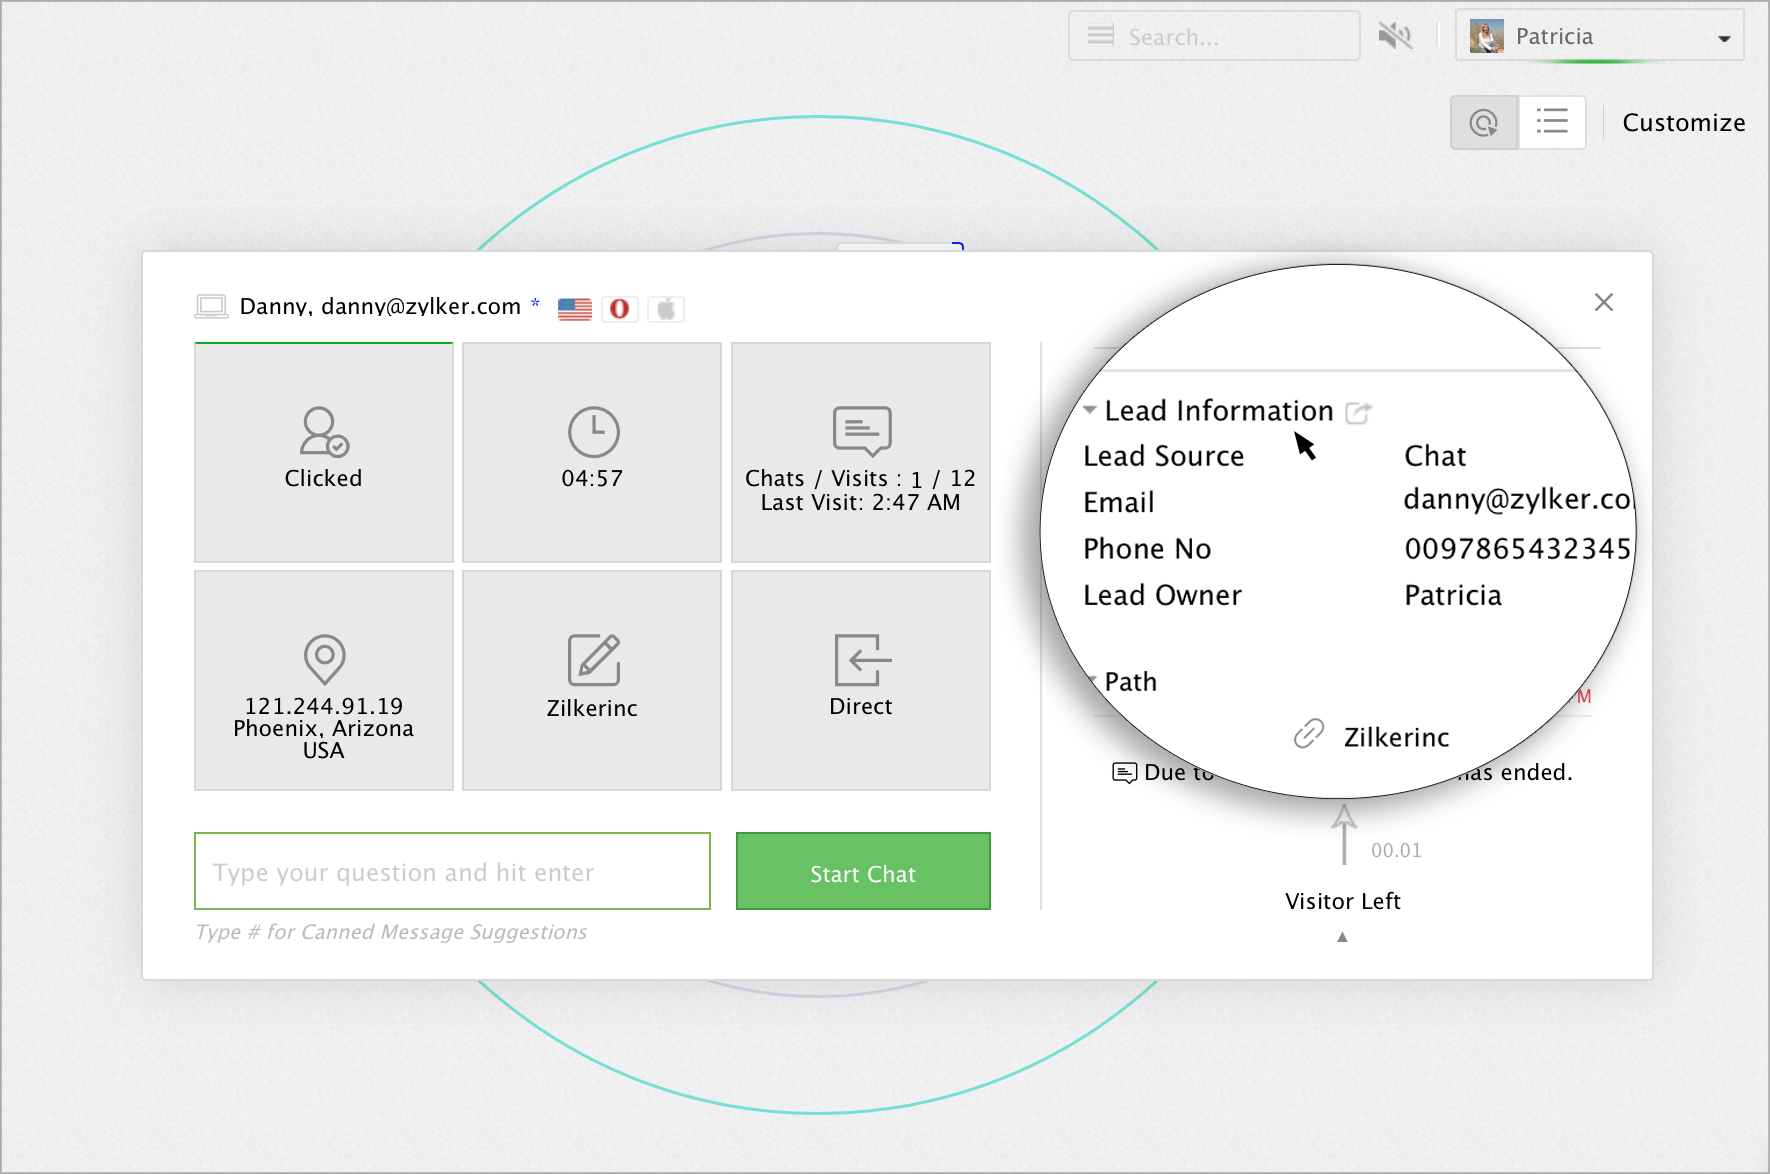
The field does not have any value in CRM it will not be displayed in Zoho SalesIQ, Instead rest of other fields will be displayed.
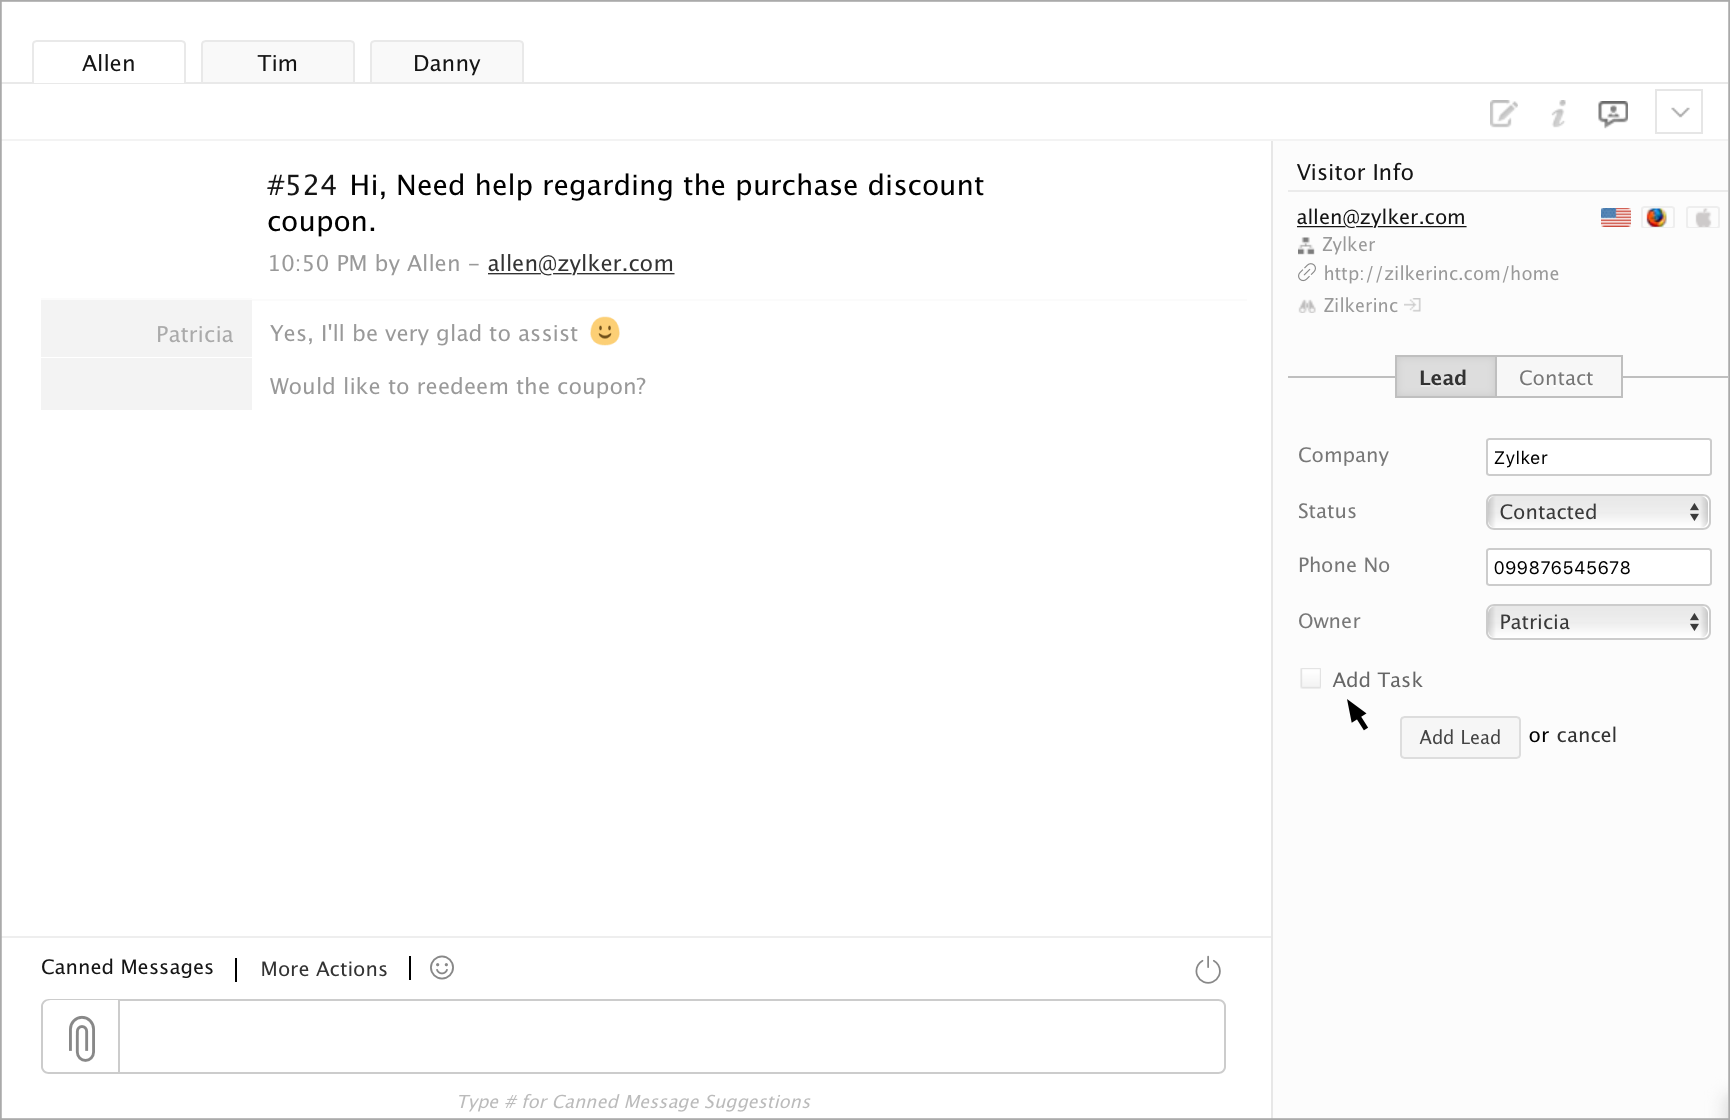
Lead Info in Chat Window
View CRM Lead Information in the Chat Window
When you are chatting with a customer, or visitor, who is a Lead in your CRM, you will be able to see in the quick-view their company, phone number, and lead status
Add Task to Lead in CRM
You can also manually create a follow-up task for your Lead in CRM from Zoho SalesIQ. All you have to do is click on the add task Icon.
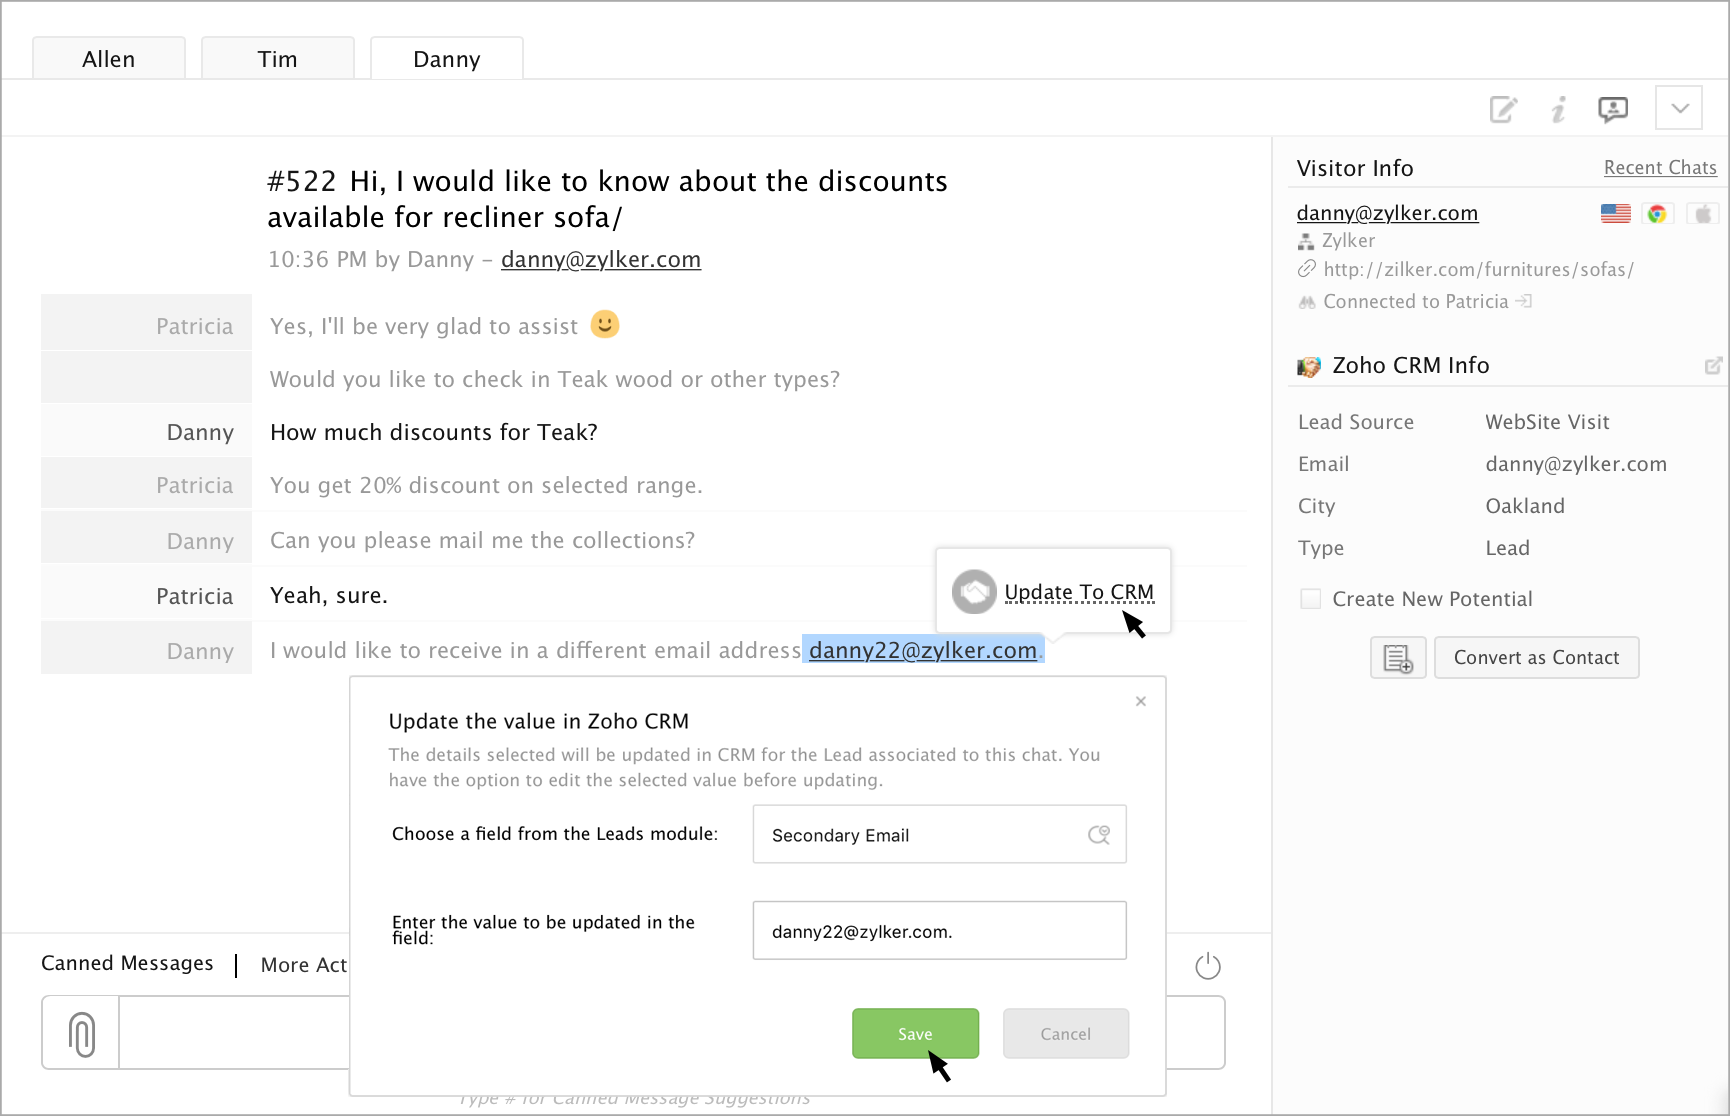
Update Lead information to CRM Custom Fields
Zoho SalesIQ allows you to update the Lead information in the into your Zoho CRM custom field while you are in chat. All you have to do is to select the information, which you need to add in CRM.
- Select the information, which you need to add in CRM.
- Click on the “CRM Icon”.
- Select a custom field, where you like to add the information in CRM.
- The selected value will be auto-filled into the text box below, you can edit it as per your need and hit “save”.
- At any time if you like to discard click “cancel”.
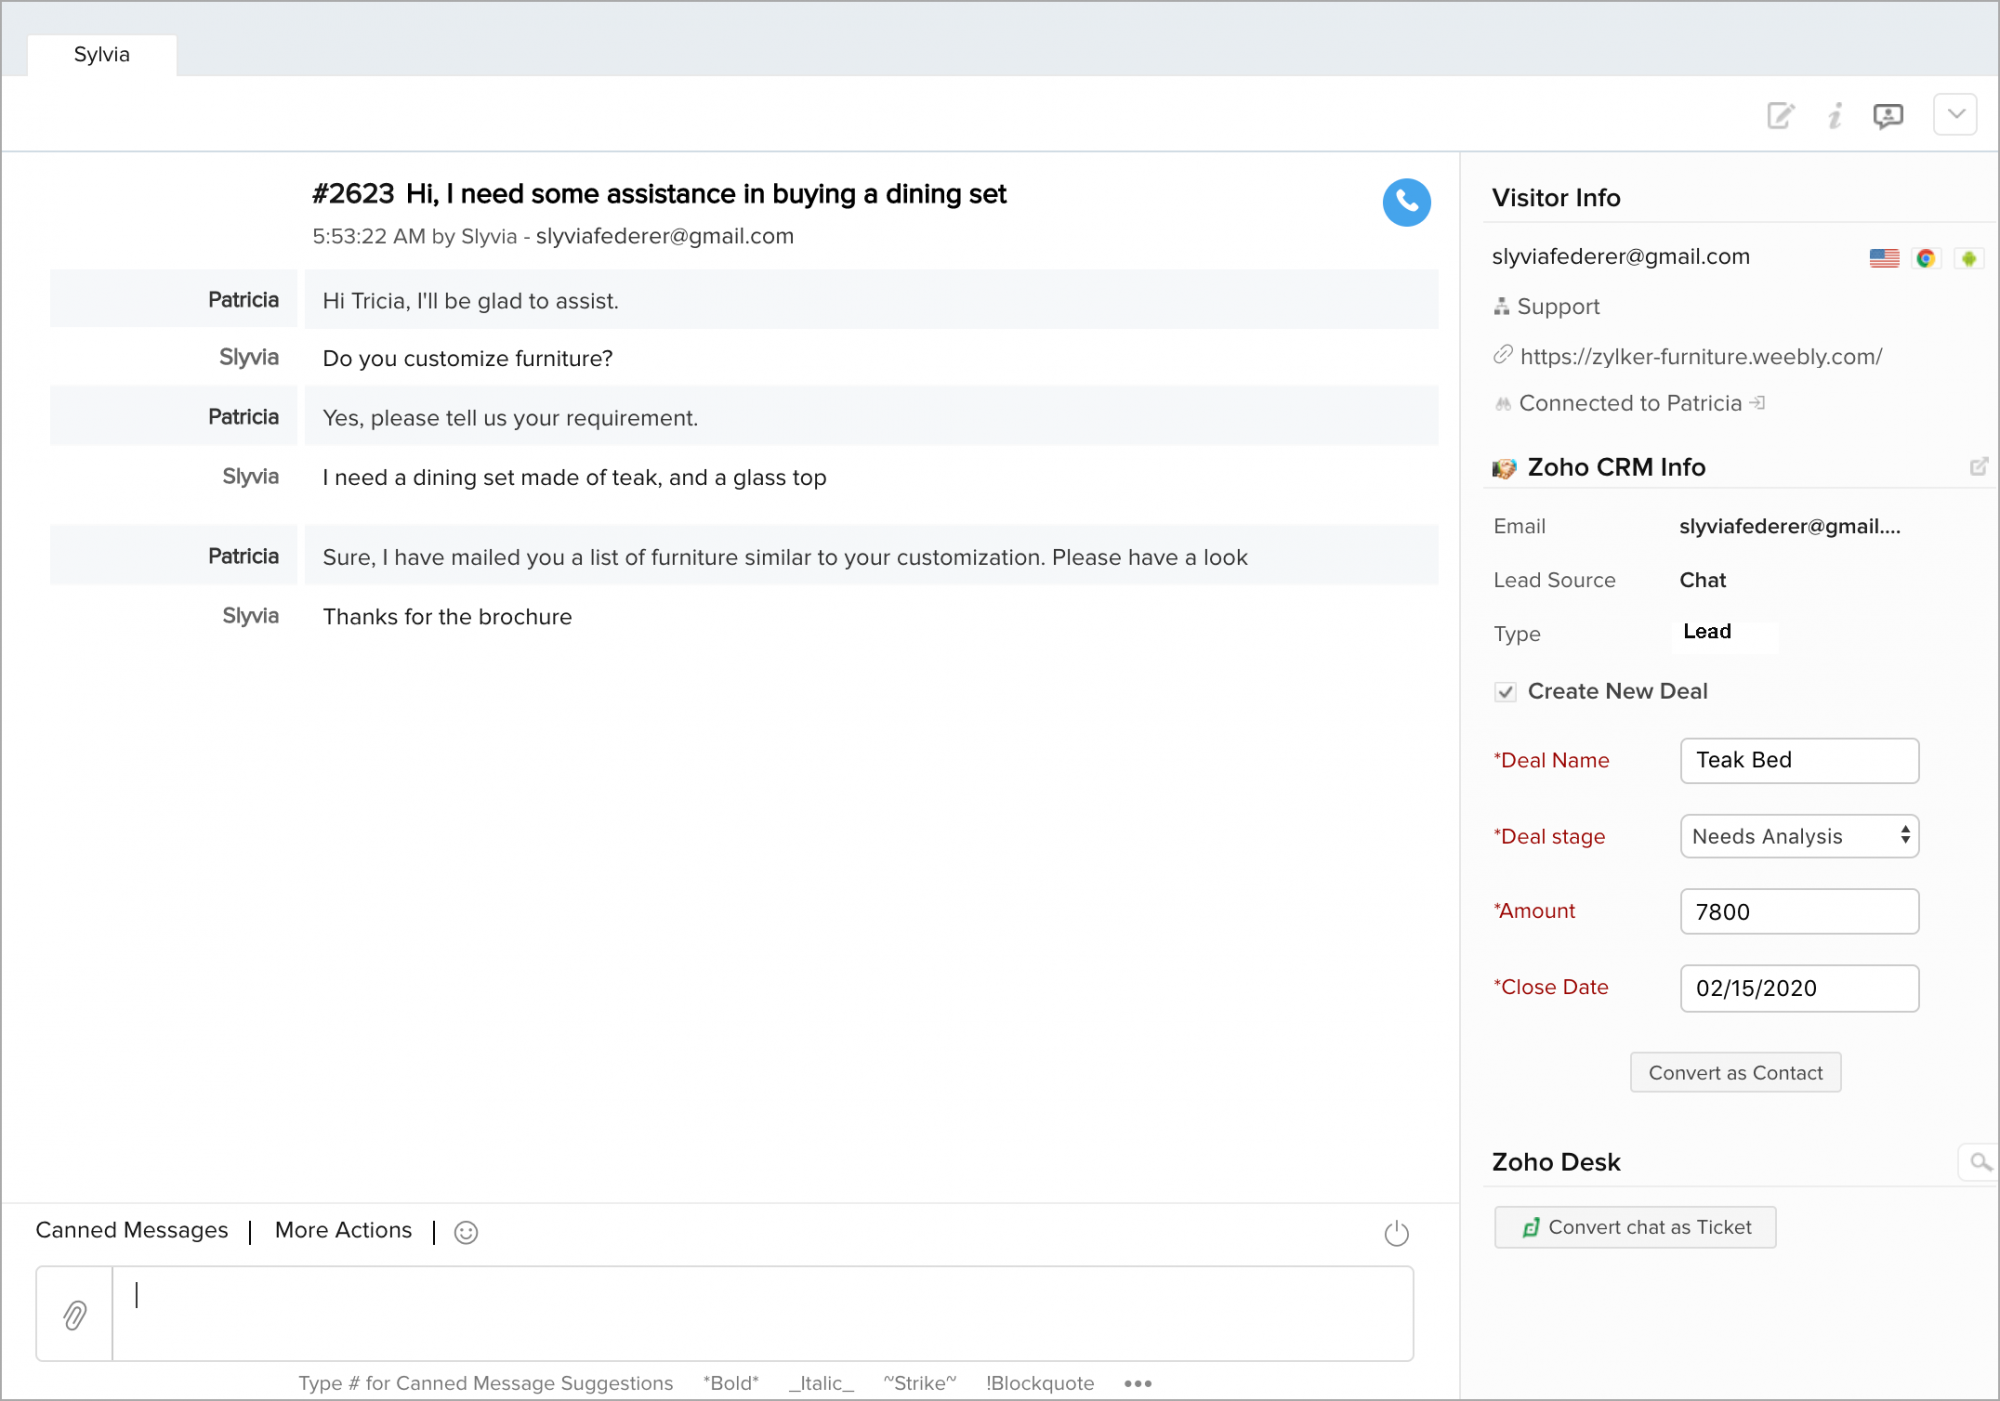
Convert Lead to Contact
You also have the ability to convert the lead to a Deal. You can display the new Deal fields, by clicking the box Create New Deal. Here, from the same window, you are chatting with a lead, you can enter the new Deal's name, the stage the new Deal is in, how much this Deal represents and when you target to close.
Once you enter this information click the "Covert Lead" button to convert the Lead to a contact with the deal information inside your CRM, which your team can now follow-up with later.
Contact Configurations
Adding as a new contact
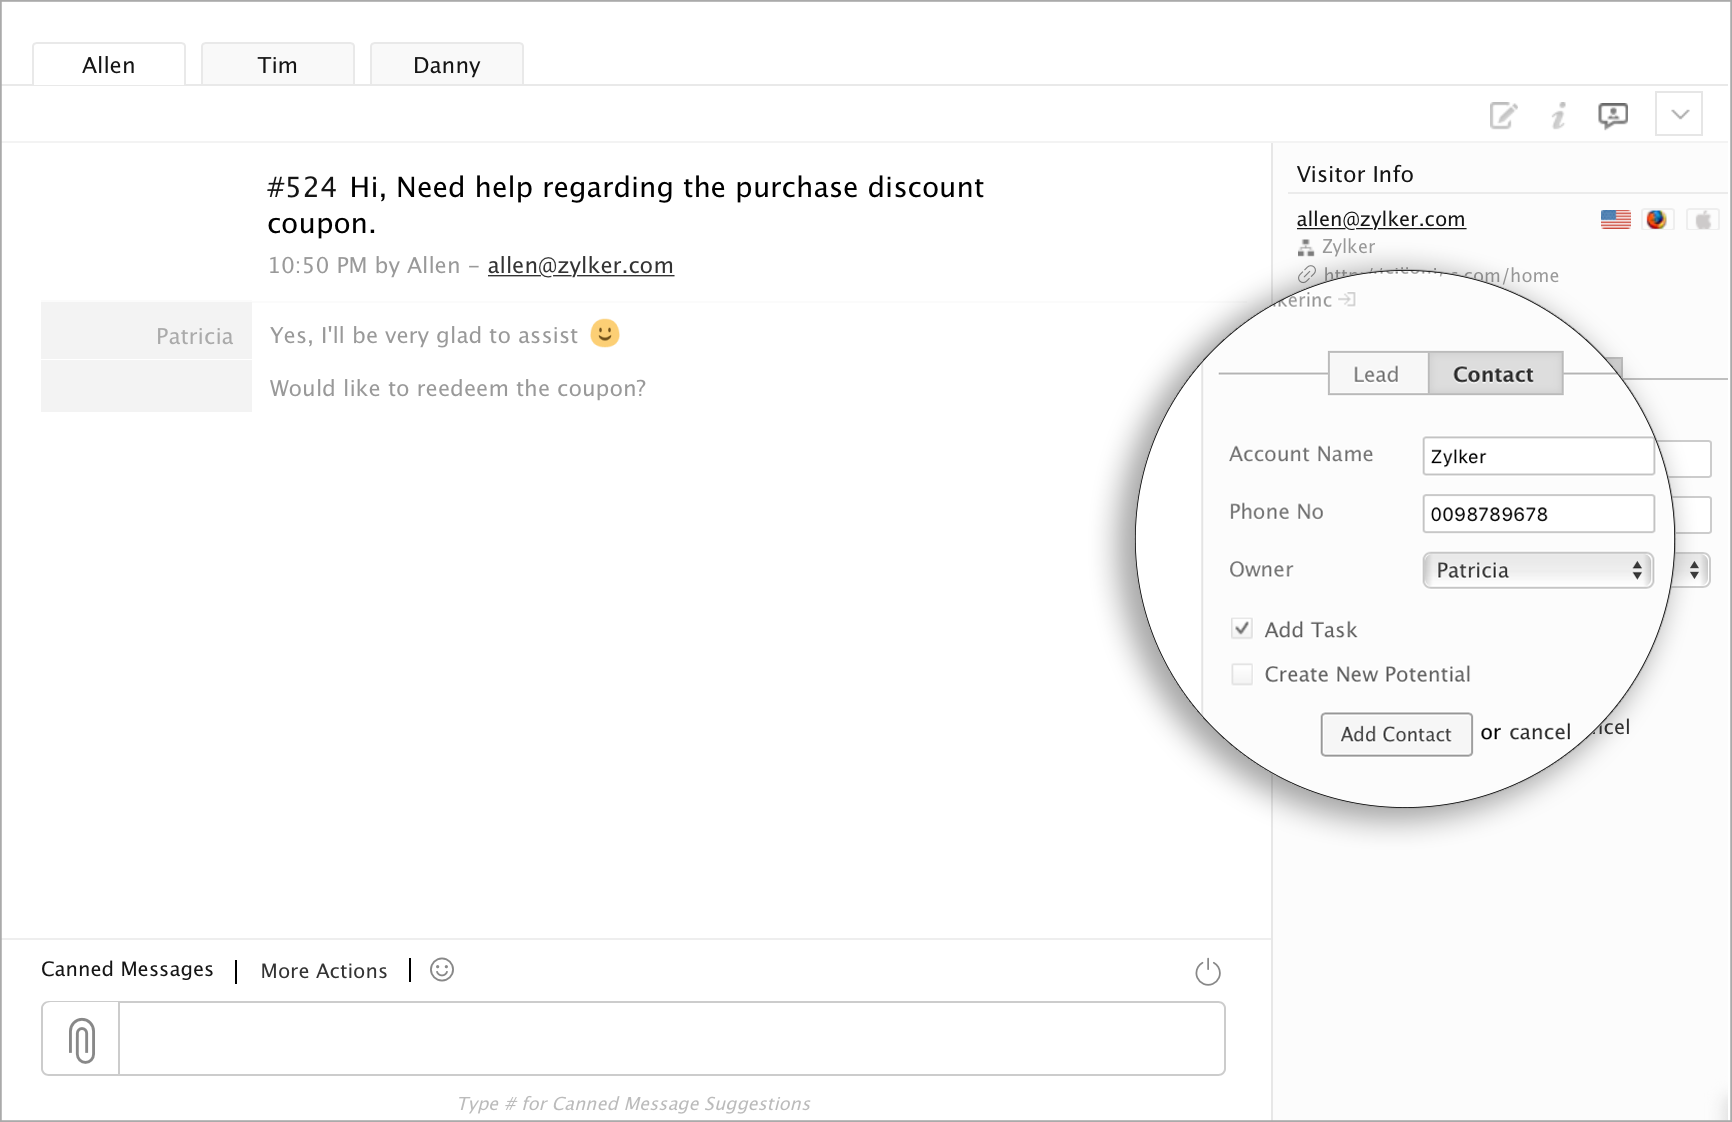
If after chatting a while with a customer, you realize this is a contact from an existing or new account, who hasn’t been added into your CRM for some reason, you can easily add them as a new contact while you answer their questions.
To add a new contact:
- Click on "Push to CRM" button on the right column of the chat window.
- Click "Contact" to display the options for adding a new contact.
- Enter the "Account name" to the contact.
- Phone number for the contact.
- You can also assign the new contact an owner from the drop-down list.
- Lastly, create a follow-up task for today, so the new owner can further connect with the new contact, or even create new deal.
Track CRM Contact
Track Visitors with CRM Contact information
Tracking allows the agents to monitor the visitors in your website. It also allows them to set their predefined conditions to prioritize and route the visitors into their dashboard to initiate a proactive chat based on Zoho CRM Contact information.
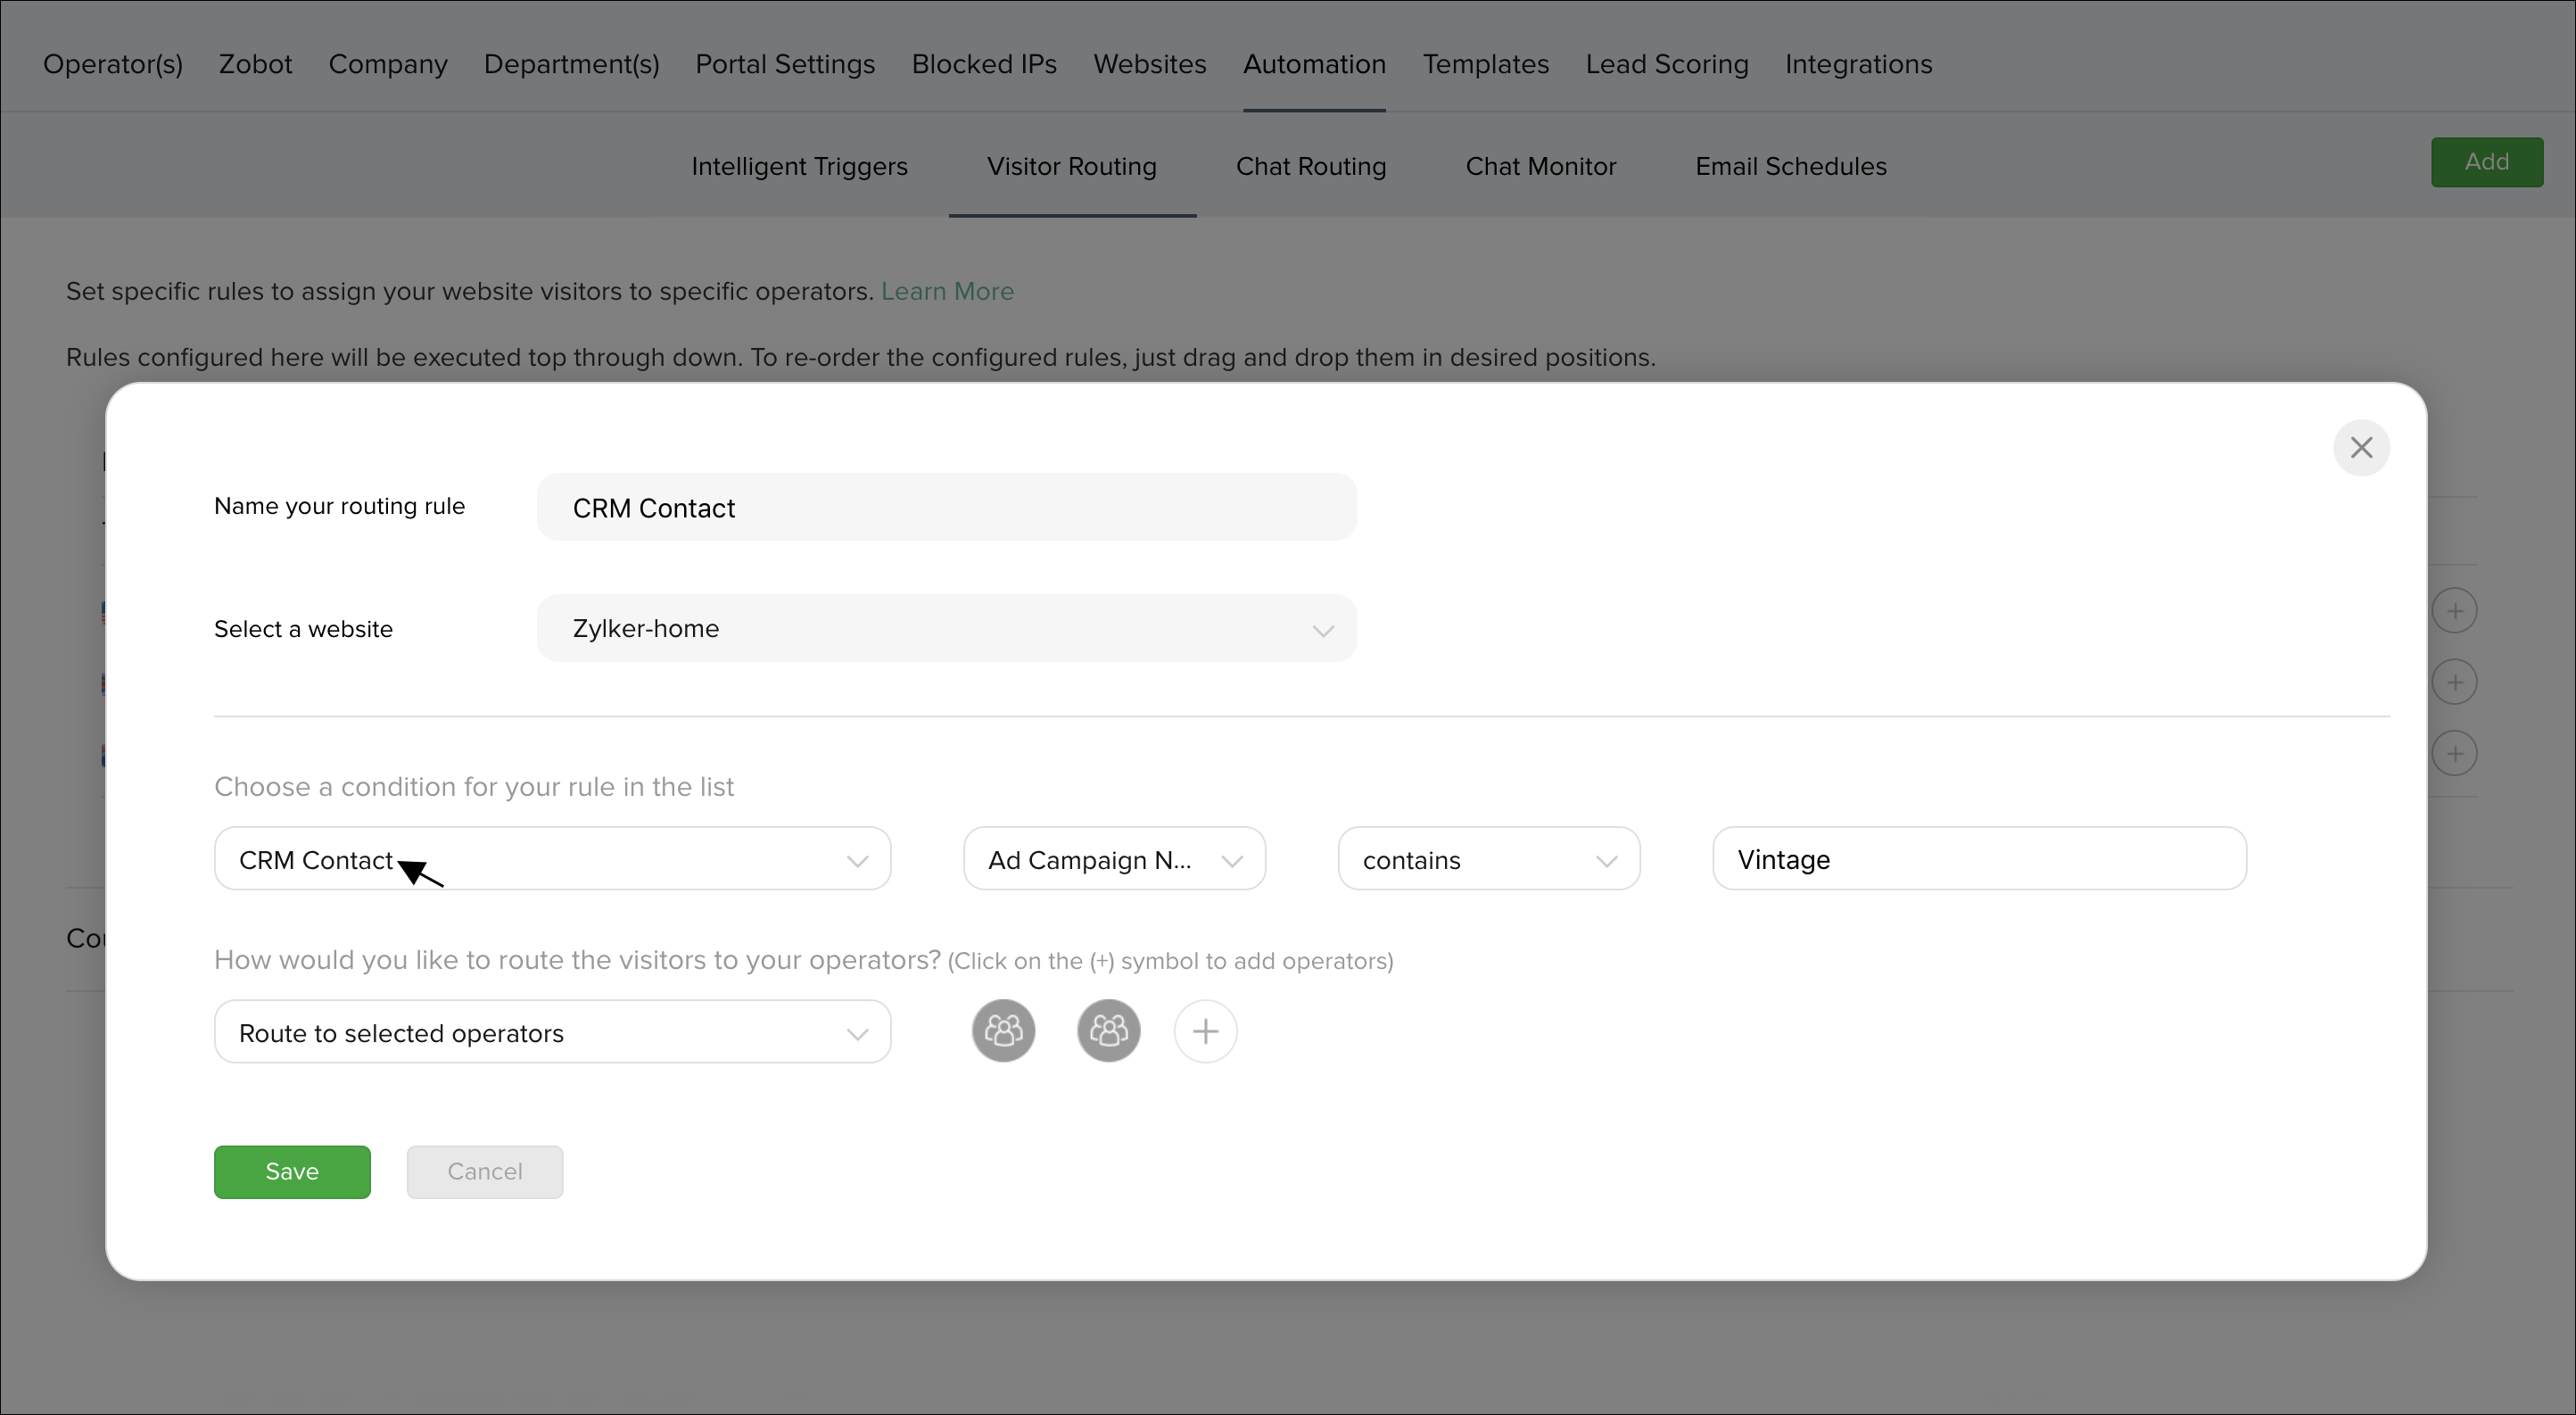
Route CRM Contacts
Route CRM Visitors based on Contact information
Contact added in Zoho CRM can be routed to particular sales rep provided the assignment rules are defined.
- To route your visitor based on the CRM contact information go to Settings and select the Automation tab.
- Now select the Visitor Routing, and click on the "Add" to set your required filters.
- Select the required "CRM Contact" from the list, followed by selecting the fields available for the Contacts in CRM.
- Define a "criteria" for your conditions.
- Enter a value for the set condition.
- Add the agent's name in the “route to agents” section by clicking on the "+" symbol, to get the visitors assigned to your agents.
- To remove the added agents, hover over the agents and click "-" symbol.
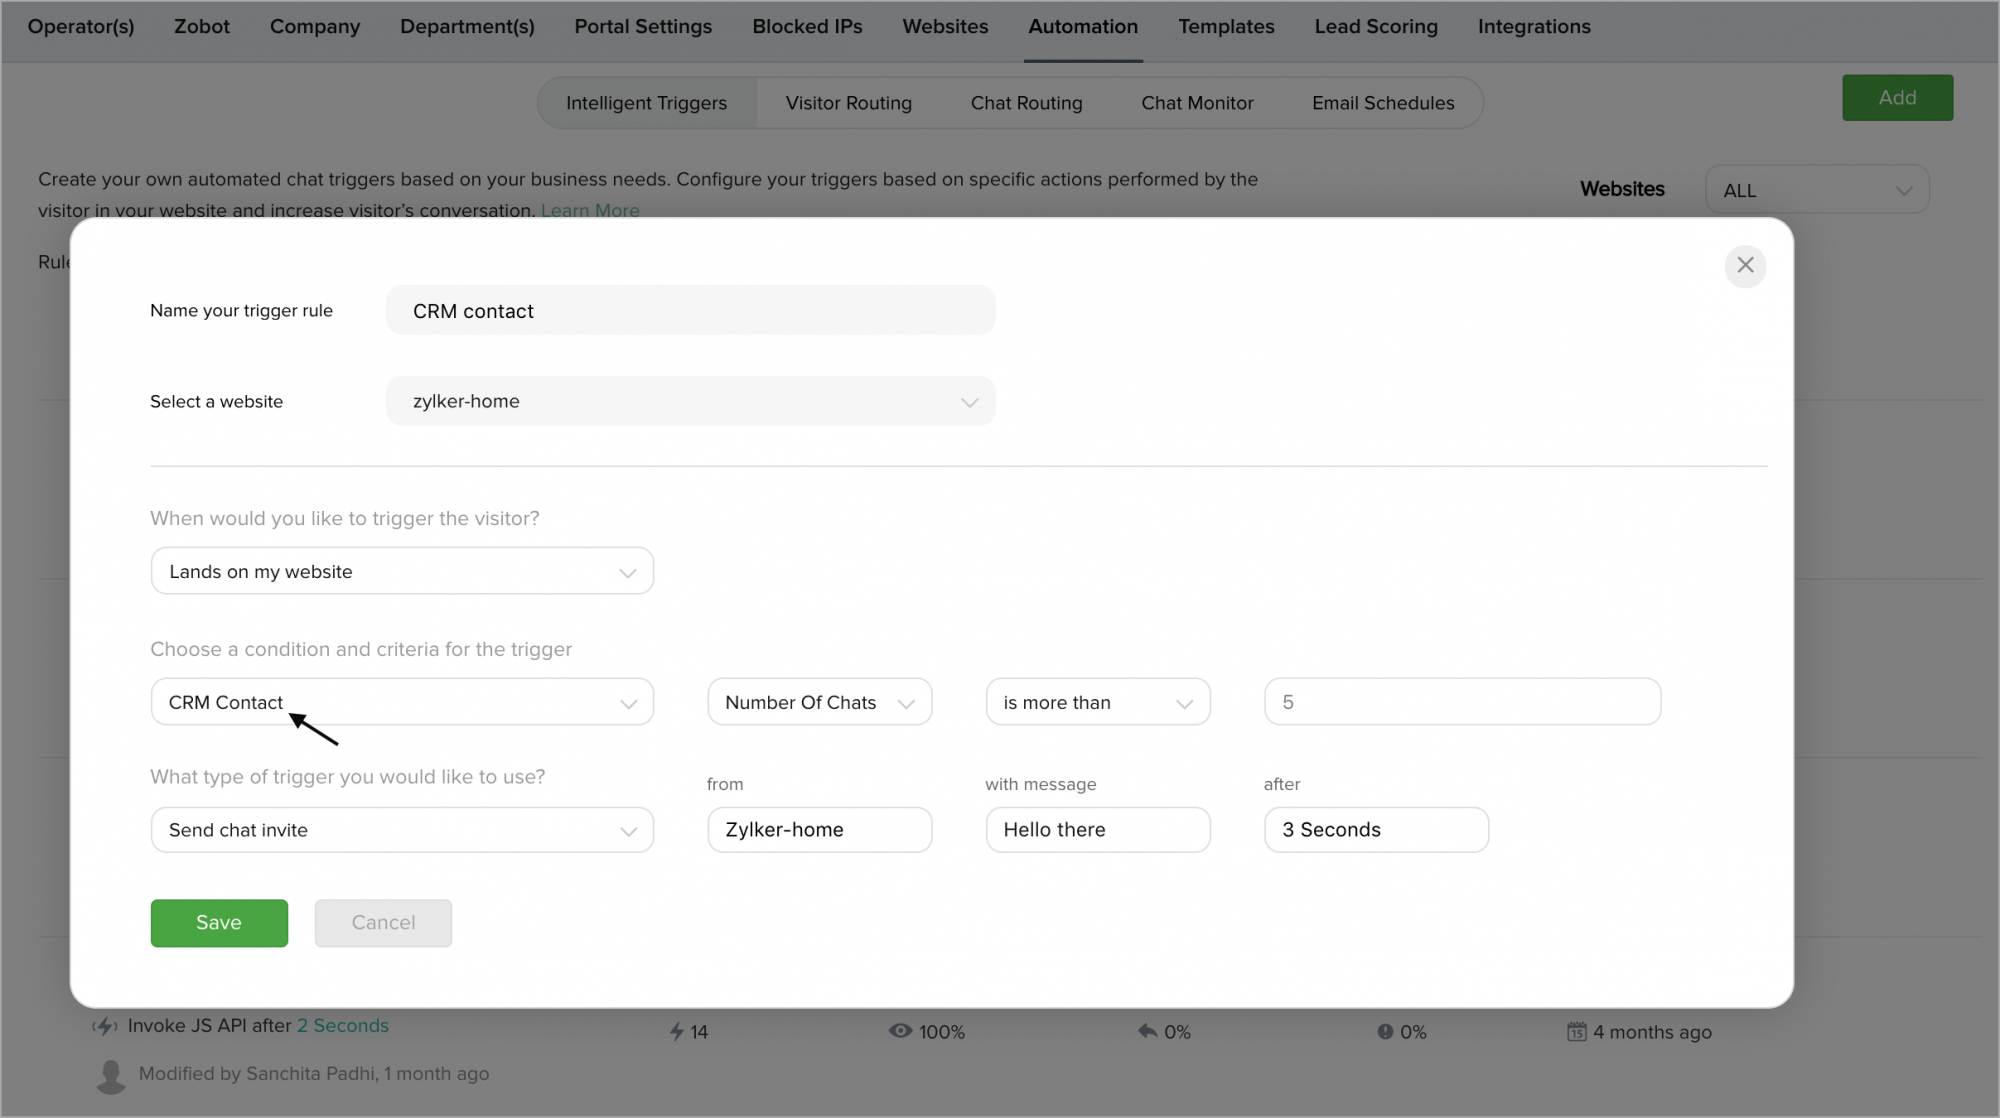
Trigger an action to your CRM Contact
You can now trigger an action to your CRM Contact while visiting your website or accessing any page on your website based on the contact information available in the Zoho CRM.
To trigger an action to your CRM Contact, do the following:
- Go to the Settings panel, and click on the Automation tab.
- Now, select the Intelligent triggers option in the automation tab.
- In the “When would you like to trigger to the visitor?” drop-down, select where would you like to trigger the visitor in your website.
- Then select the CRM Contact option from the “Choose a condition and criteria for the trigger” dropdown. Now select criteria, and provide a value in the text box.
- Choose a type of action you would like to perform from the “What type of trigger you would like to use?” drop-down.
- Finally, set the time after which you would like to perform the action in the “after” text box.
Customize Priority Rings
Customize Priority Rings based on Contact information
Tracking allows the agents to set their predefined conditions for prioritizing the visitors into their dashboard based on Zoho CRM Contact information.
- To customize the priority circle, go to "customize" on the right side the tracking tab.
- Click on the space below "Prioritize your visitor", select "CRM Contact" followed by selecting the fields available for the Contact in CRM.
- Define a "criteria" for your conditions.
- Click "Apply".

Contact info in proactive Window
View Tracked Contact Information of Visitors
On the top right, of the proactive chat window you can find the CRM Contact information above the visitor page navigation area.
Below are the contact fields displayed in the proactive chat window.
- Account Name
- Phone
- Contact Owner
- Lead Source
The field does not have any value in CRM it will not be displayed in Zoho SalesIQ, Instead rest of other fields will be displayed.
Contact Info in Chat Window
View Visitor Contact information in the Chat Window
For a Contact you will get a quick view of the below
- Account name - the account (Company) that they belong too.
- Phone number – Contact number.
- Owner - who owns this contact.
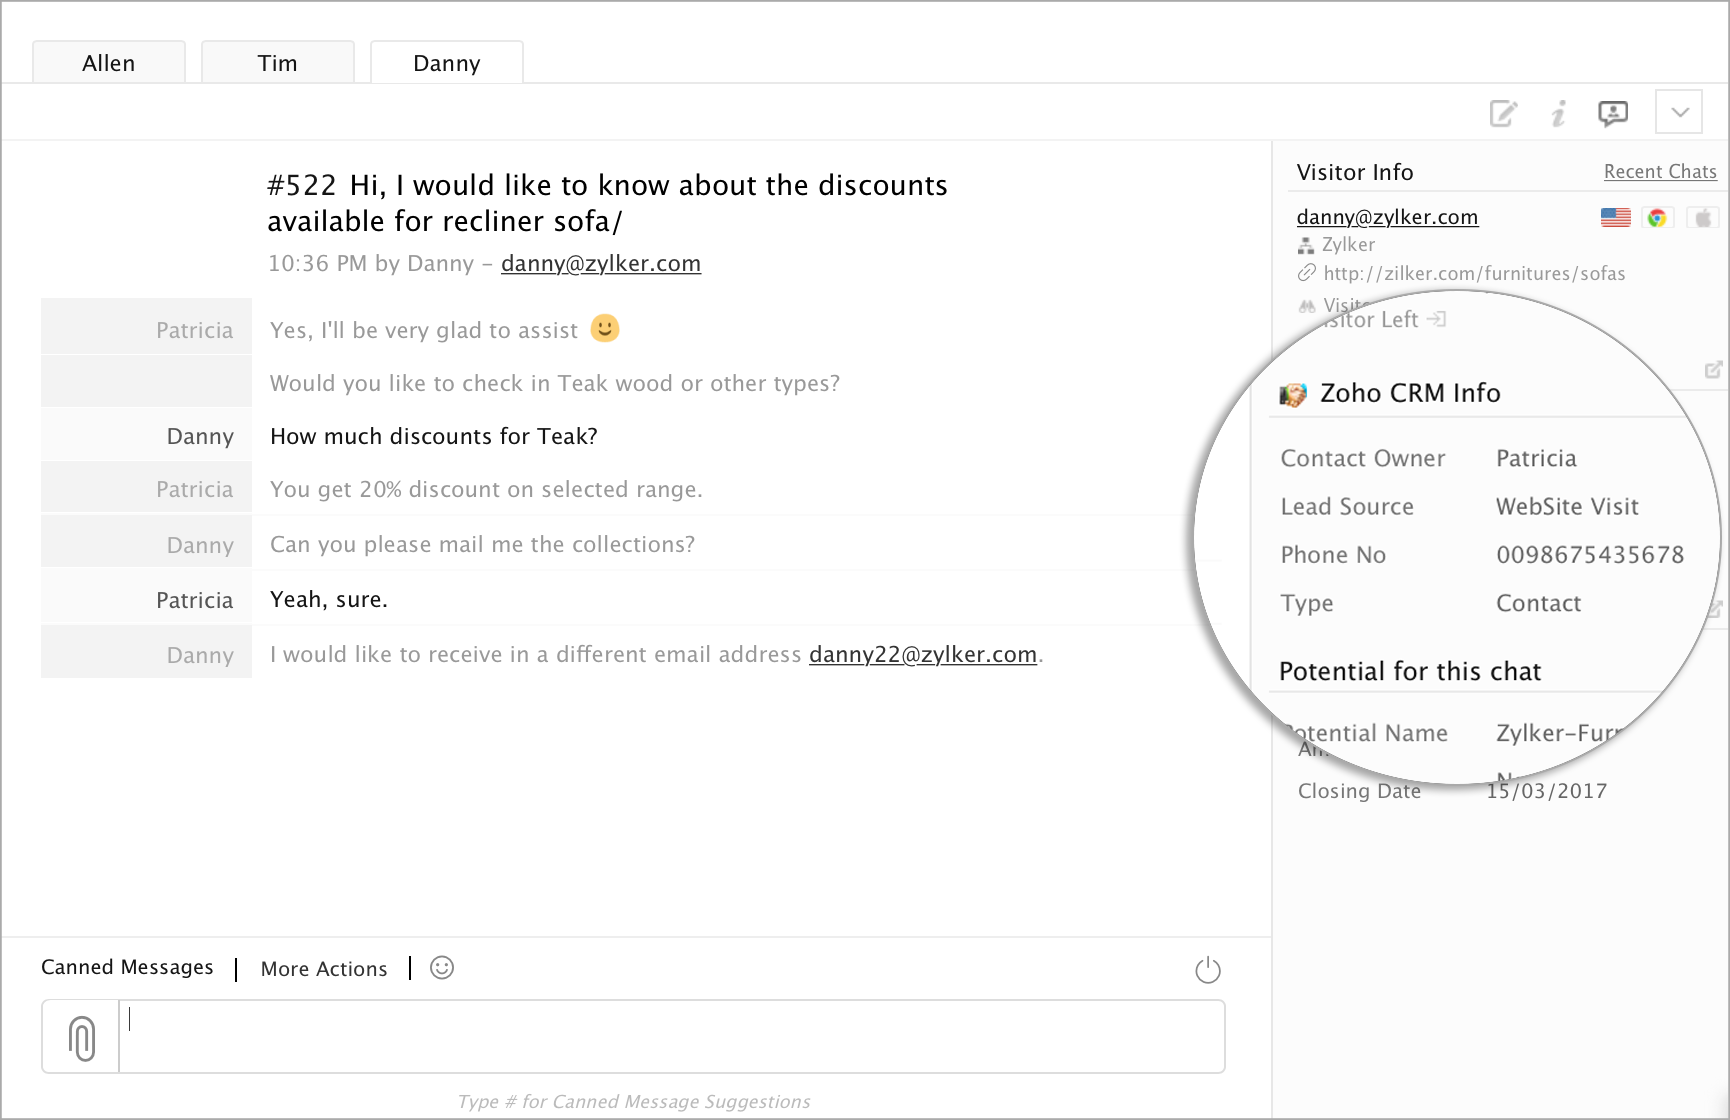
You can view the account details, by clicking the account name, which is underlined and a direct link to the complete account details inside your CRM, which will open a new tab.
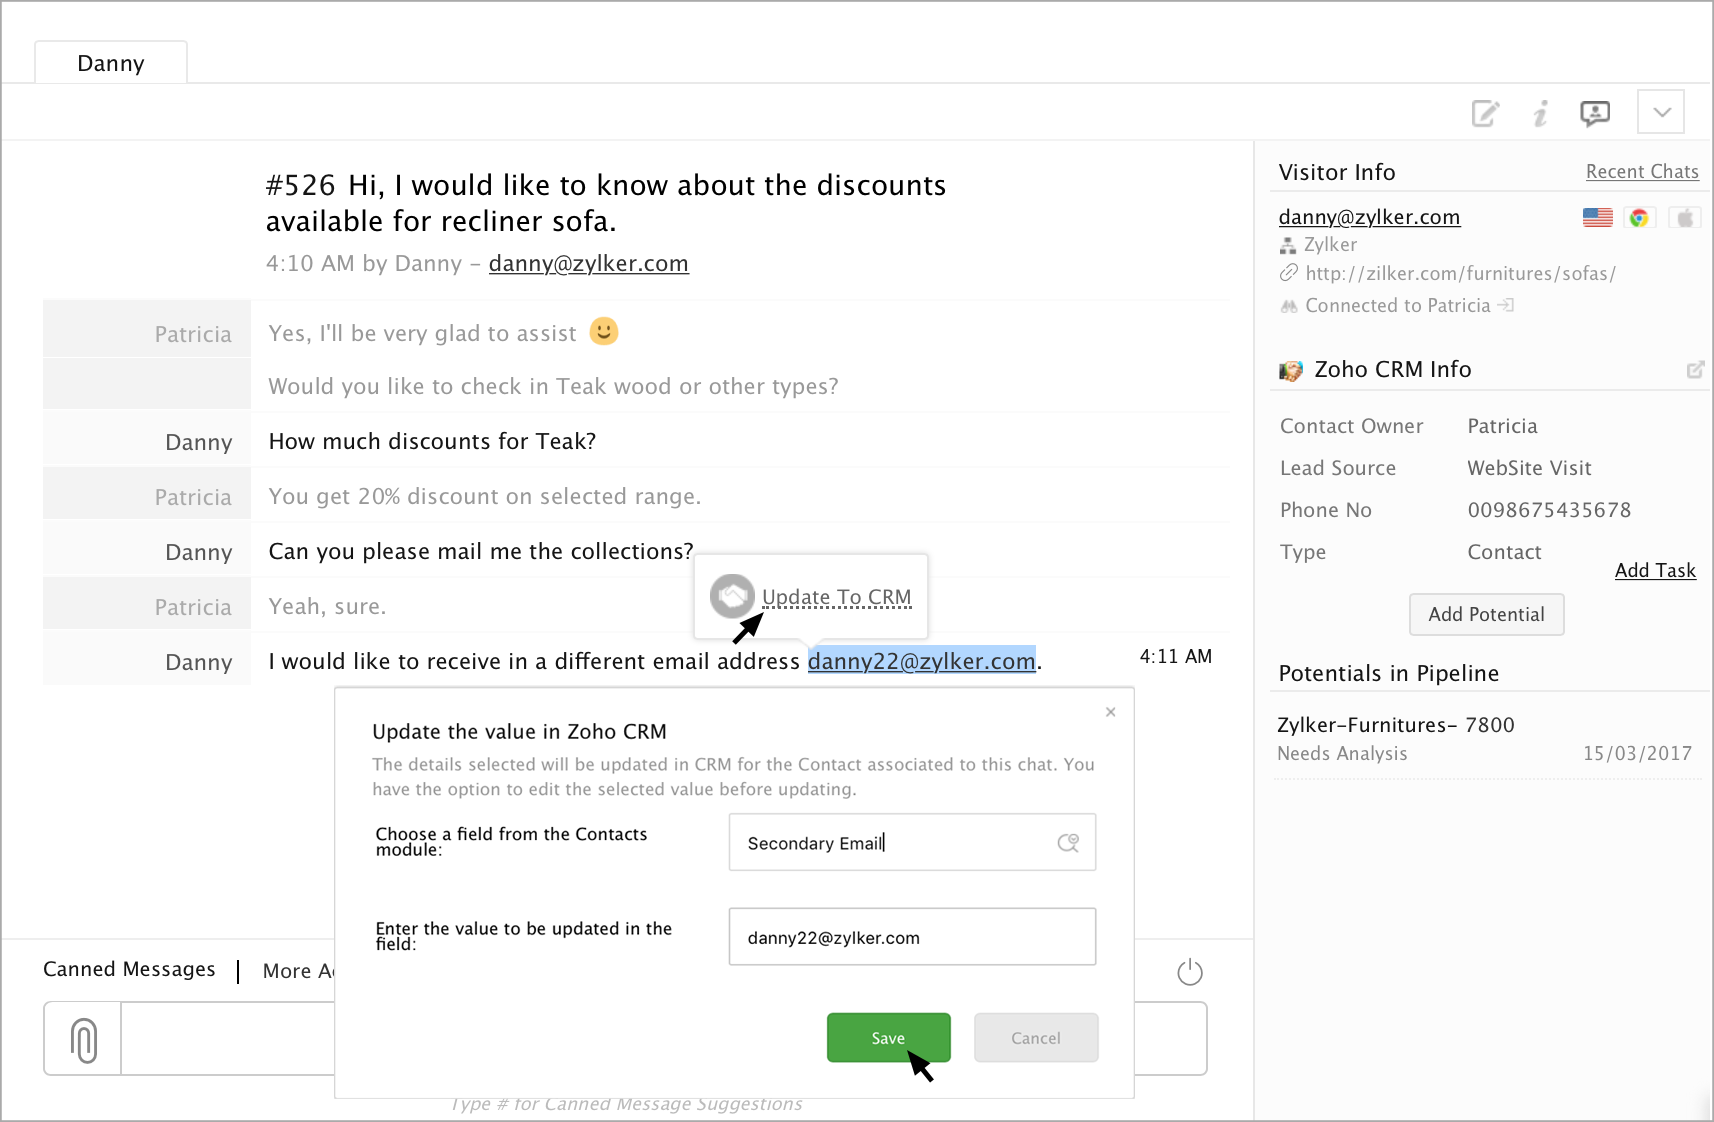
Update Contact Information to CRM Custom Fields
Zoho SalesIQ allows you to update the contact information in the into your Zoho CRM custom field while you are in chat.
- Select the information, which you need to add in CRM.
- Click on the “CRM Icon”.
- Select a custom field, where you like to add the information in CRM.
- The selected value will be auto-filled into the text box below, you can edit it as per your need and hit “save”.
- At any time if you like to discard click “cancel”.
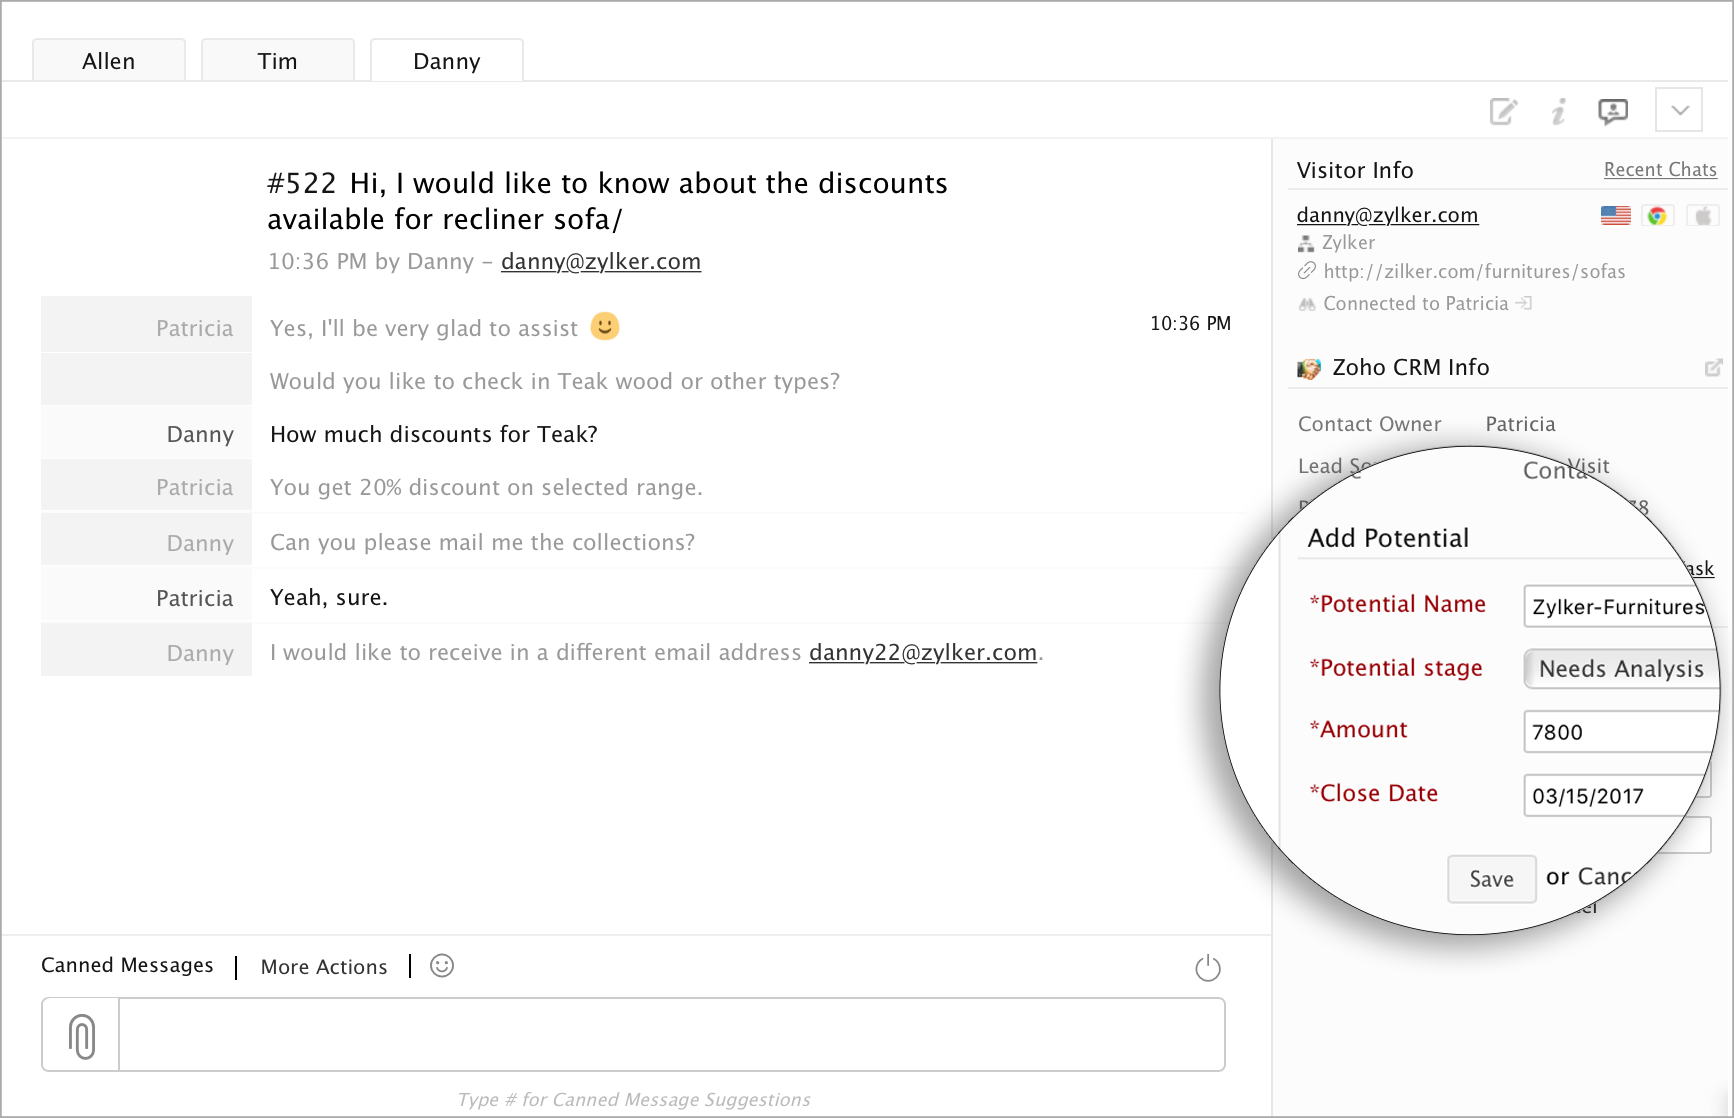
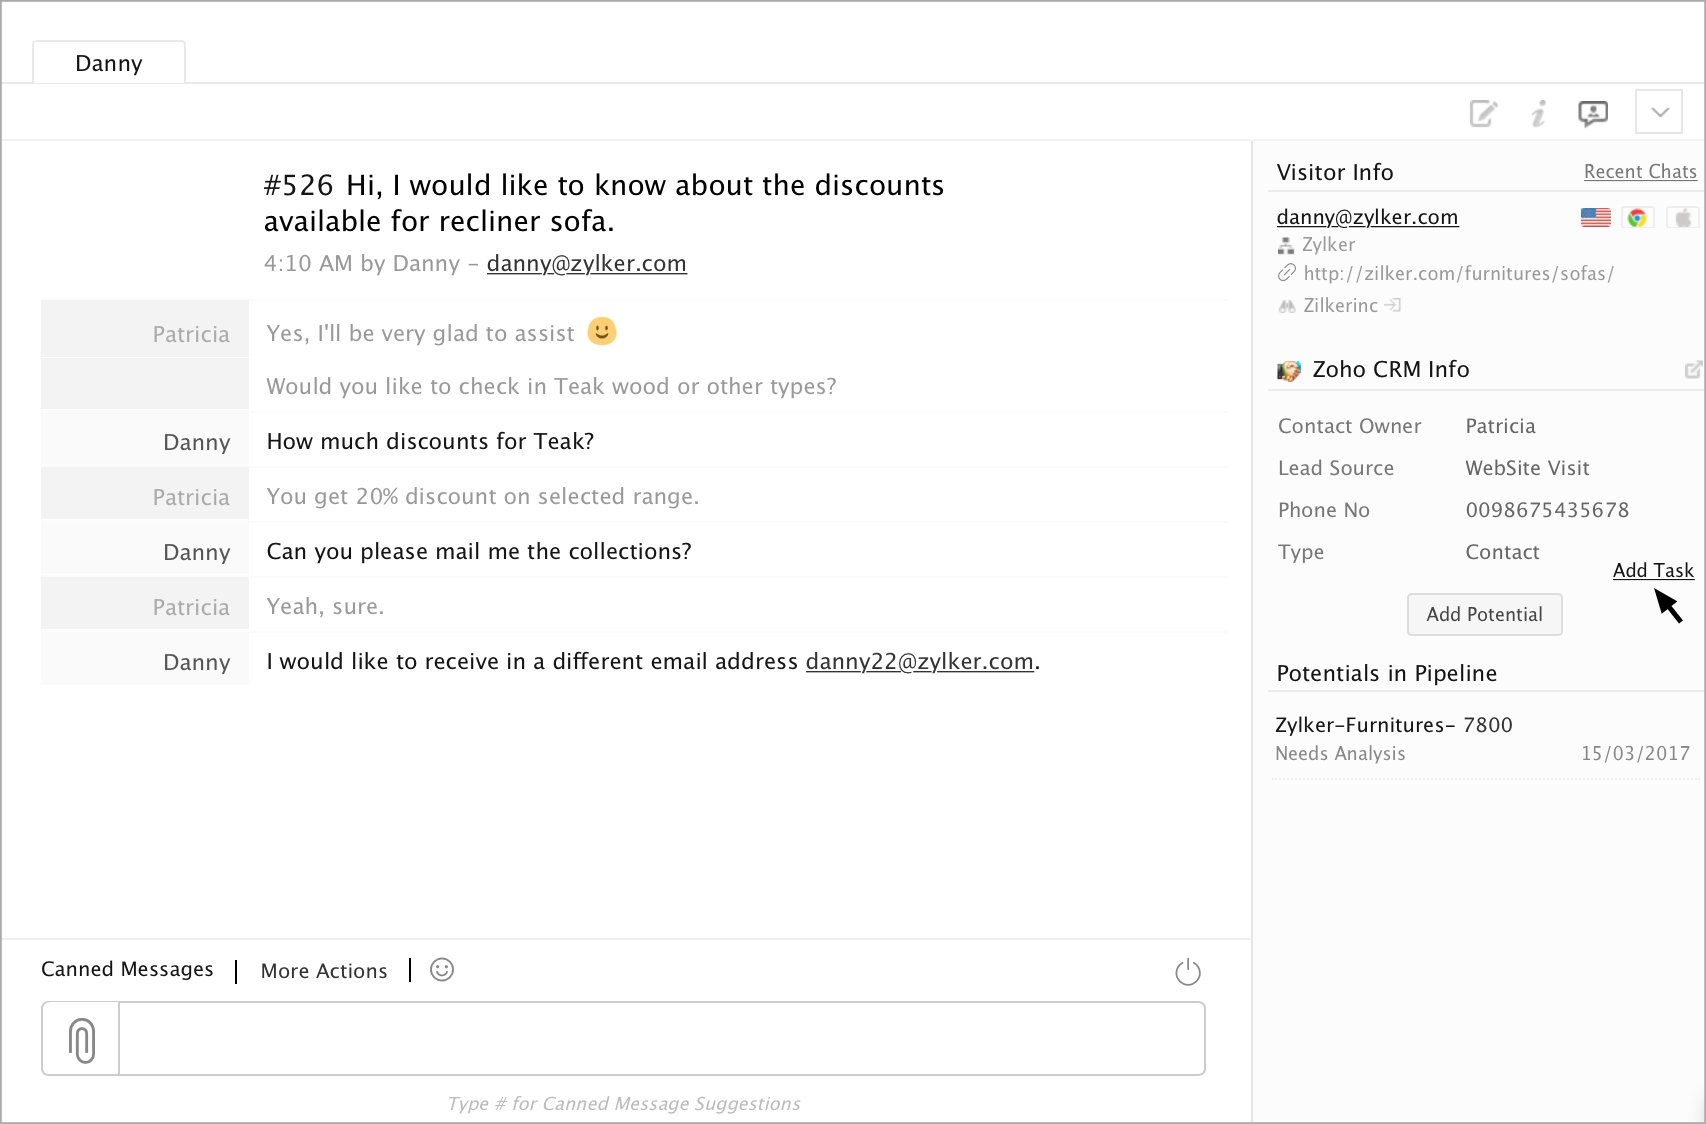
Add Deal for CRM Contact
You also have the ability to add a deal value for your lead. You can display the new deal fields, by clicking on the Create New Deal. Here, from the same window you are chatting with a lead, you can enter the new deal name, the stage the new contact is in, how much value this deal represents, and when you target to close. If the visitor is already a contact, you can simply add the deal information and click Save.
Once you enter the deal information, you can view the deal value for your contact inside CRM, your team can follow-up later.
Add Task to a Contact in CRM
You can also manually create a follow-up task for your contact in CRM from Zoho SalesIQ. All you have to do is click on the add task Icon.
Deal Configuration
Tracking visitors based on CRM Deal information
Tracking allows the agents to monitor the visitors on your website. It also allows them to set their predefined conditions to prioritize and route the visitors into their dashboard to initiate a proactive chat based on Zoho CRM Deal information.
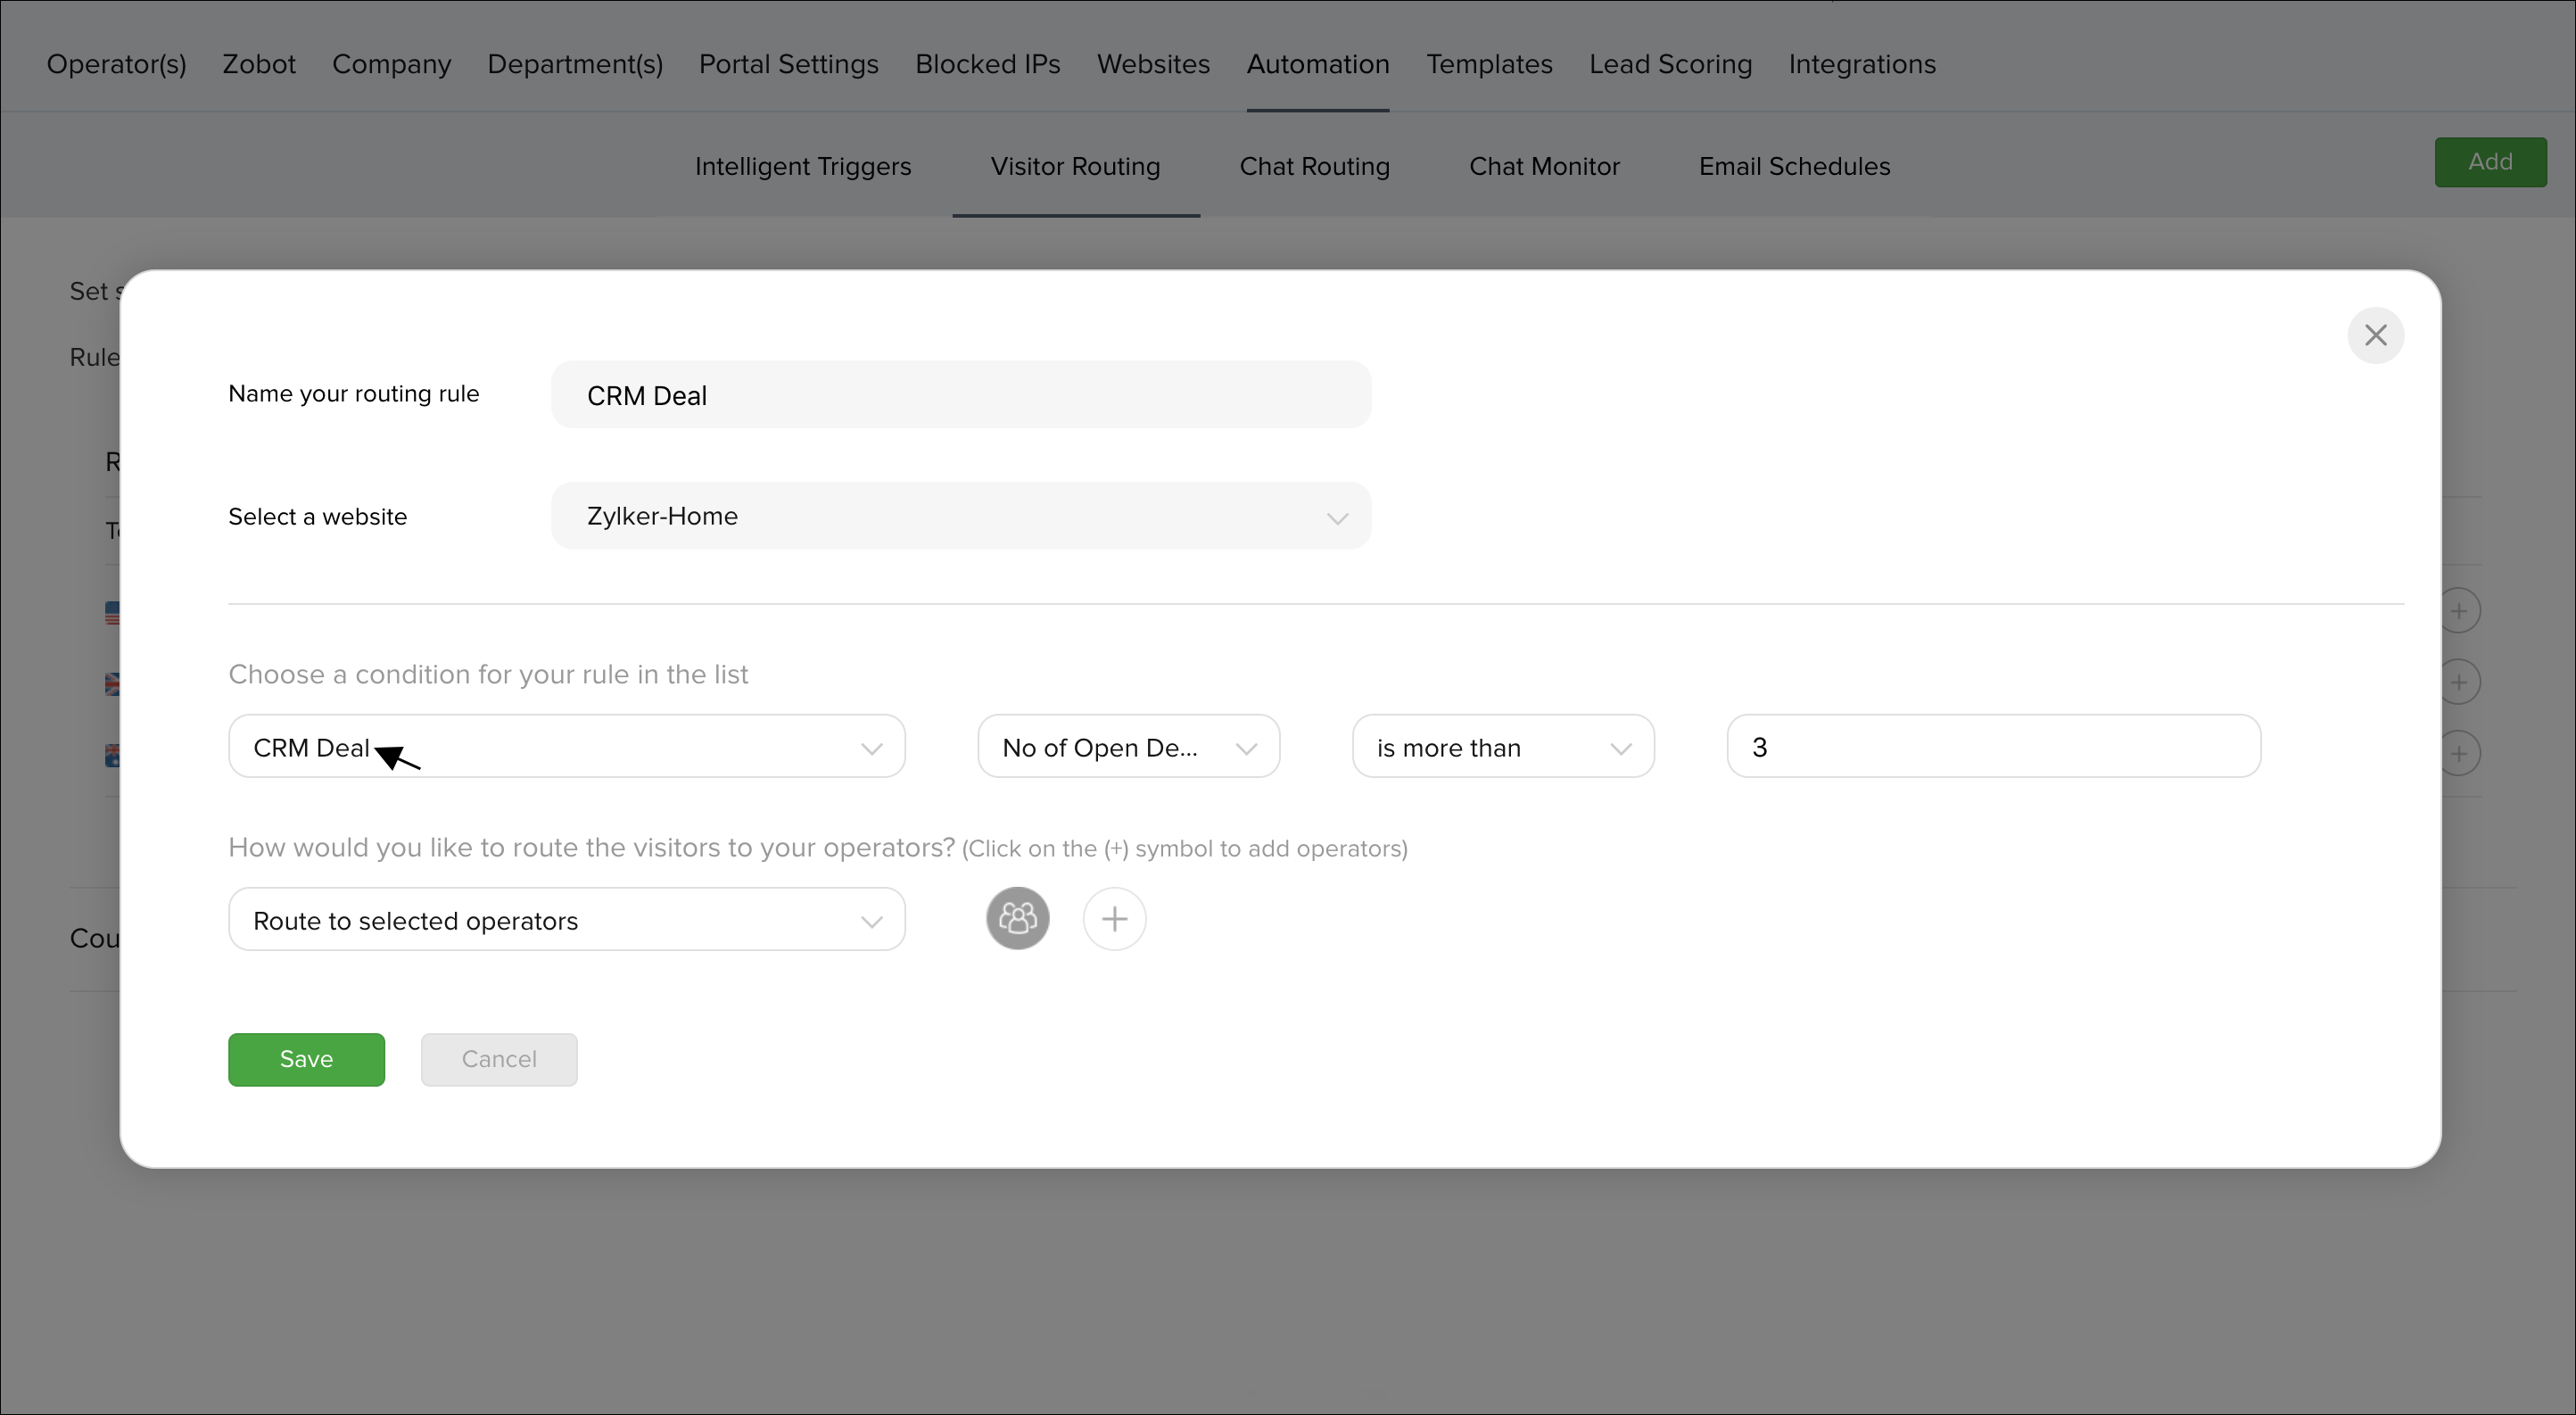
Routing visitors based on CRM Deal
Visitors can be routed based on the deal value to a particular sales rep provided the assignment rules are defined.
- To route your visitor based on the CRM Deal go to Settings and select the Automation tab.
- Now select the Visitor Routing, and click on the "Add" to set your required filters.
- Select "CRM Deal" from the list, followed by selecting “No of Open Deals” or “Revenue in pipeline”.
- Define the "criteria" for your conditions.
- Enter a value for the set condition.
- Add the agent's name in the “route to agents” section by clicking on the "+" symbol, to get the visitors assigned to your agents.
- To remove the added agents, hover over the agents and click "-" symbol.
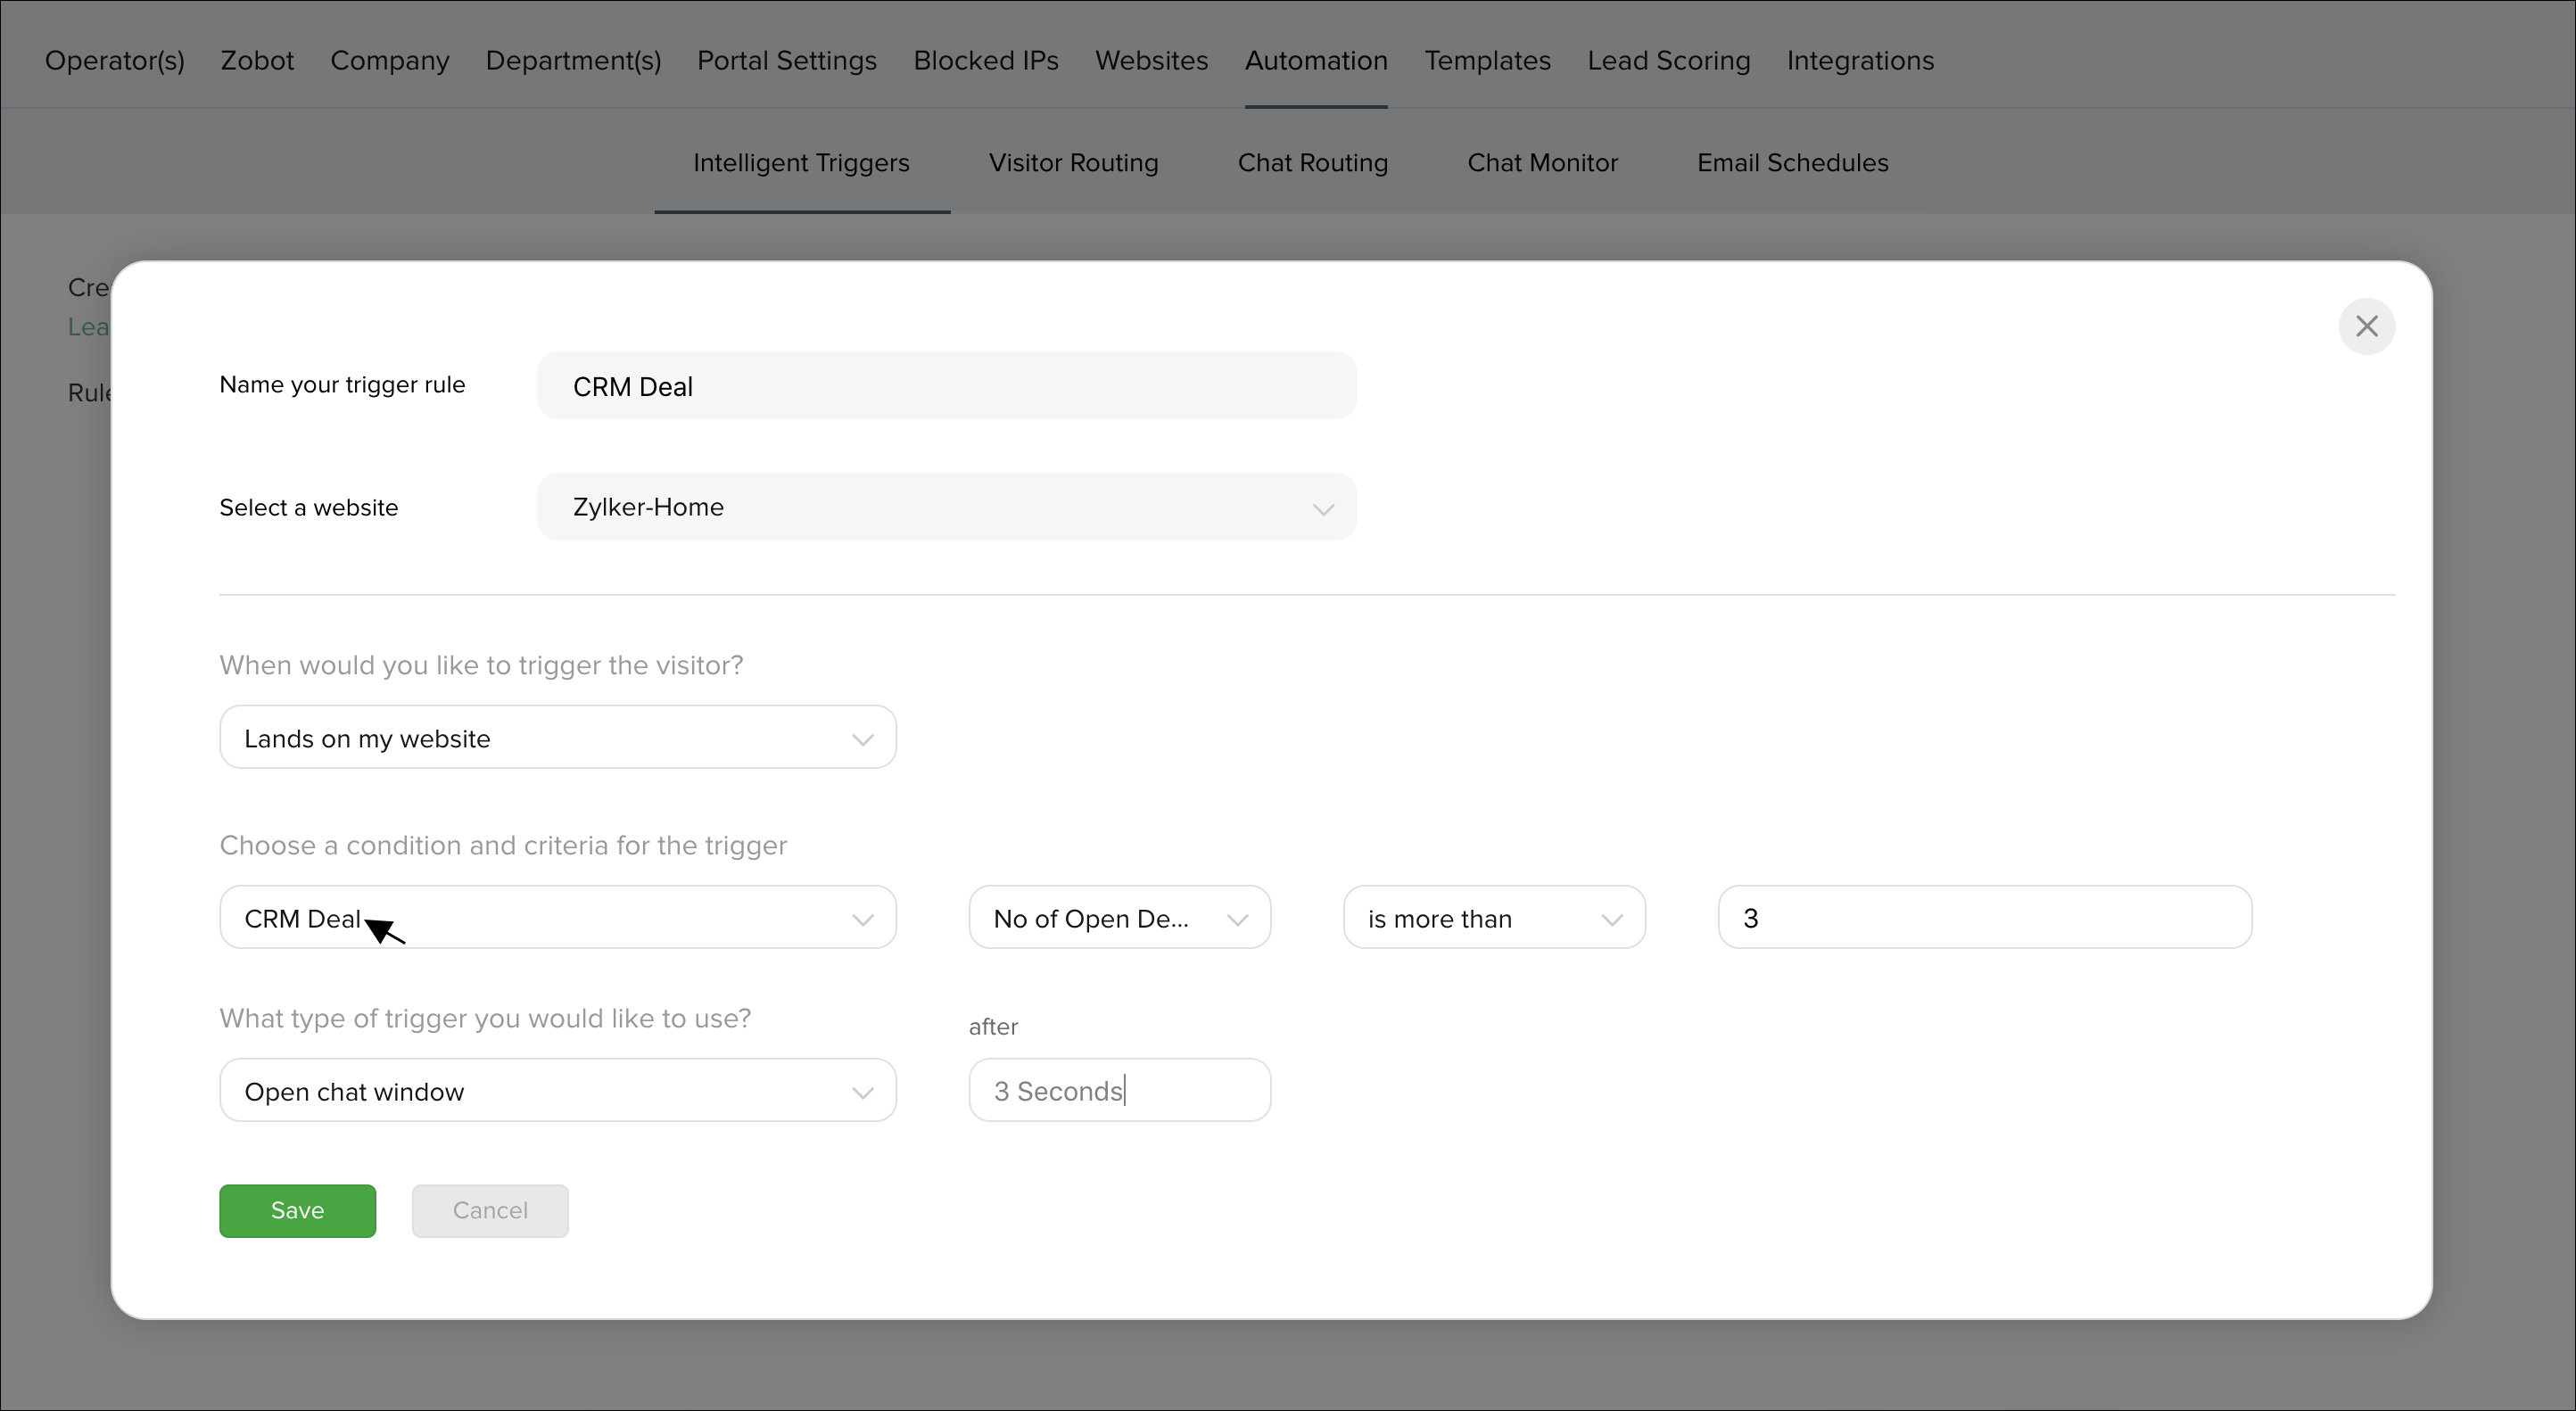
Trigger an Action based on the Deal value in Zoho CRM
You can now trigger an action to your CRM Deal while visiting your website based on the information available in the Zoho CRM.
To trigger an action to your CRM Deal, do the following:
- Go to the Settings panel, and click on the Automation tab.
- Now, select the Intelligent triggers option in the automation tab.
- In the “When would you like to trigger to the visitor?” drop-down, select where would you like to trigger the visitor in your website.
- Then select the CRM Deal option from the “Choose a condition and criteria for the trigger” dropdown. Now select criteria, and provide a value in the text box.
- Choose a type of action you would like to perform from the “What type of trigger you would like to use?” drop-down.
- Finally, set the time after which you would like to perform the action in the “after” text box.
Customize Priority Rings based on CRM Deal
Tracking allows the agents to set their predefined conditions for prioritizing the visitors into their dashboard based on Zoho CRM Deal information.
- To customize the priority circle, go to "customize" on the right side the tracking tab.
- Select "CRM Deal" from the list, followed by selecting “No of Open Deals” or “Revenue in pipeline”.
- Define a "criteria" for your conditions.
- Enter a value for the set condition.
- Click "Apply".

No. open Deal - Number of Deal available for a contact not in " Closed won" stage.
Revenue in pipeline - Deal value for a contact.
View tracked deal information
On the top right, of your proactive chat window you can find the CRM Deal information above the visitor page navigation area.

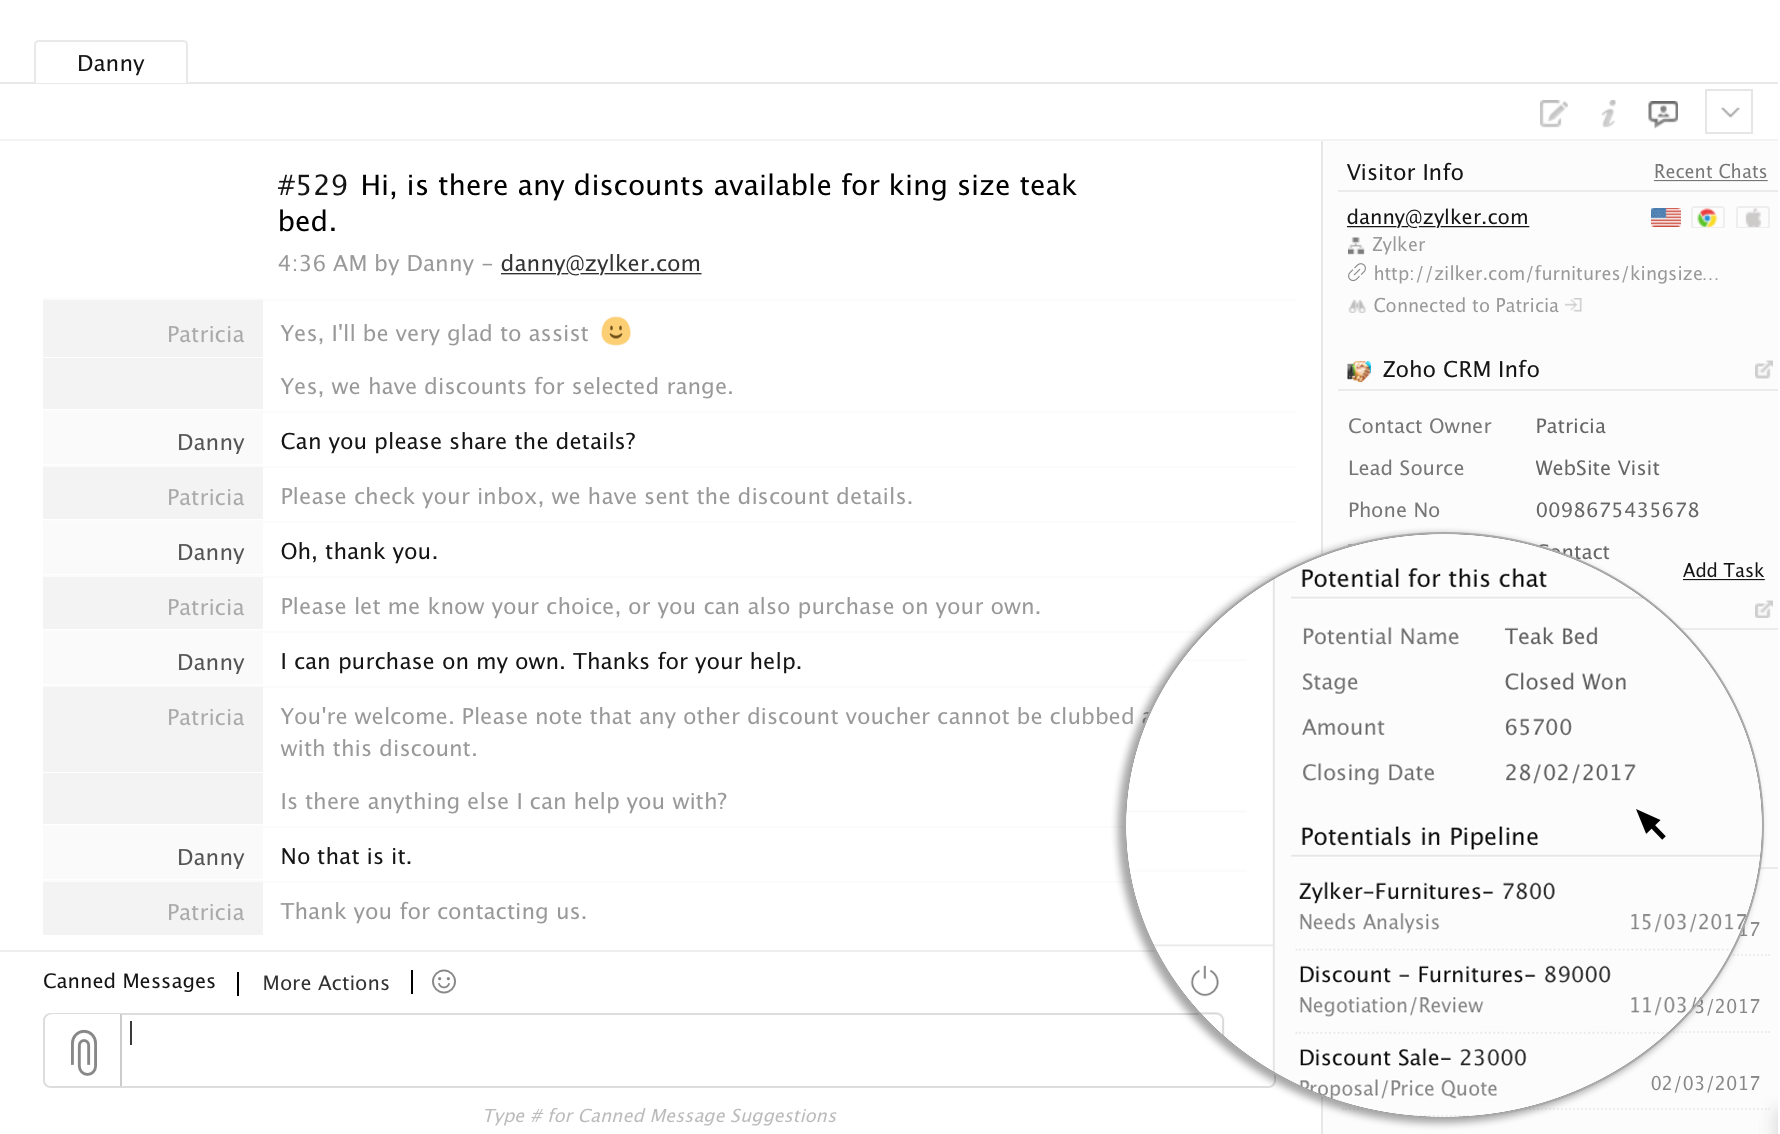
Deal info in Chat Window
View deal value of visitors on your chat window
You will also get a quick view of the deal information. As an existing customer with an established relationship with your company, these details can help you provide better support.
Visitor Type in CRM
Tracking visitors based on Visitor type in CRM
Tracking allows the agent to monitor the visitors visiting your website. It also allows them to set their predefined conditions to prioritize and route the visitors into their dashboard to initiate a proactive chat based on the Visitor Type in CRM.
Route visitors based on Visitor type
You can route your website visitors to your sales executives based on the visitor type information that is available in the Zoho CRM.
- To route your visitors go to Settings, and select the Automation tab.
- Now select the Visitor Routing, and click on the "Add" to set your required filters.
- Select "Visitor Type in CRM" option from the list, followed by selecting the fields available for the Visitor Type in CRM.
- Add the agents name in the “route to agents” section by clicking on the "+" symbol, to get the visitors assigned to your agents.
- To remove the added agents, hover over the agents and click "-" symbol.
Customize Priority Rings based on Visitor type
Tracking allows the agents to set their predefined conditions for prioritizing the visitors into their dashboard based on Zoho CRM Visitor Type.
- To customize the priority circle, go to "customize" on the right side of the Visitors Online tab. The “Prioritize your visitors” window will then appear.
- Select the "Visitor Type in CRM" option, followed by selecting the fields available for the visitor type.
- Define the "criteria" for your conditions.
- Click "Apply".
Trigger an action to your Website Visitor
You can now trigger an action to your CRM Visitors while visiting your website based on the visitor information available in the Zoho CRM.
To trigger an action to your Visitors, do the following:
- Go to the Settings panel, and click on the Automation tab.
- Now, select the Intelligent triggers option in the automation tab.
- In the “When would you like to trigger to the visitor?” drop-down, select where would you like to trigger the visitor in your website (on the landing page or while accessing any page on the website).
- Then select the Visitor Stage in CRM option from the “Choose a condition and criteria for the trigger” drop-down. Now select criteria, and provide a value in the text box.
- Choose a type of action you would like to perform from the “What type of trigger you would like to use?” drop-down.
- Finally, set the time after which you would like to perform the action in the “after” text box.
Chat Widget-Custom Field
Updating visitor data from chat widget to CRM custom field
If the custom field name in the Zoho SalesIQ chat widget matches with the Custom field in the CRM, Zoho SalesIQ updates those data directly into your CRM in real time.
Click here to know more on adding custom fields in chat widget though JavaScript Apis.
These visitor information will be updated only when adding a new visitor in CRM
Chat Transcripts-Attachments
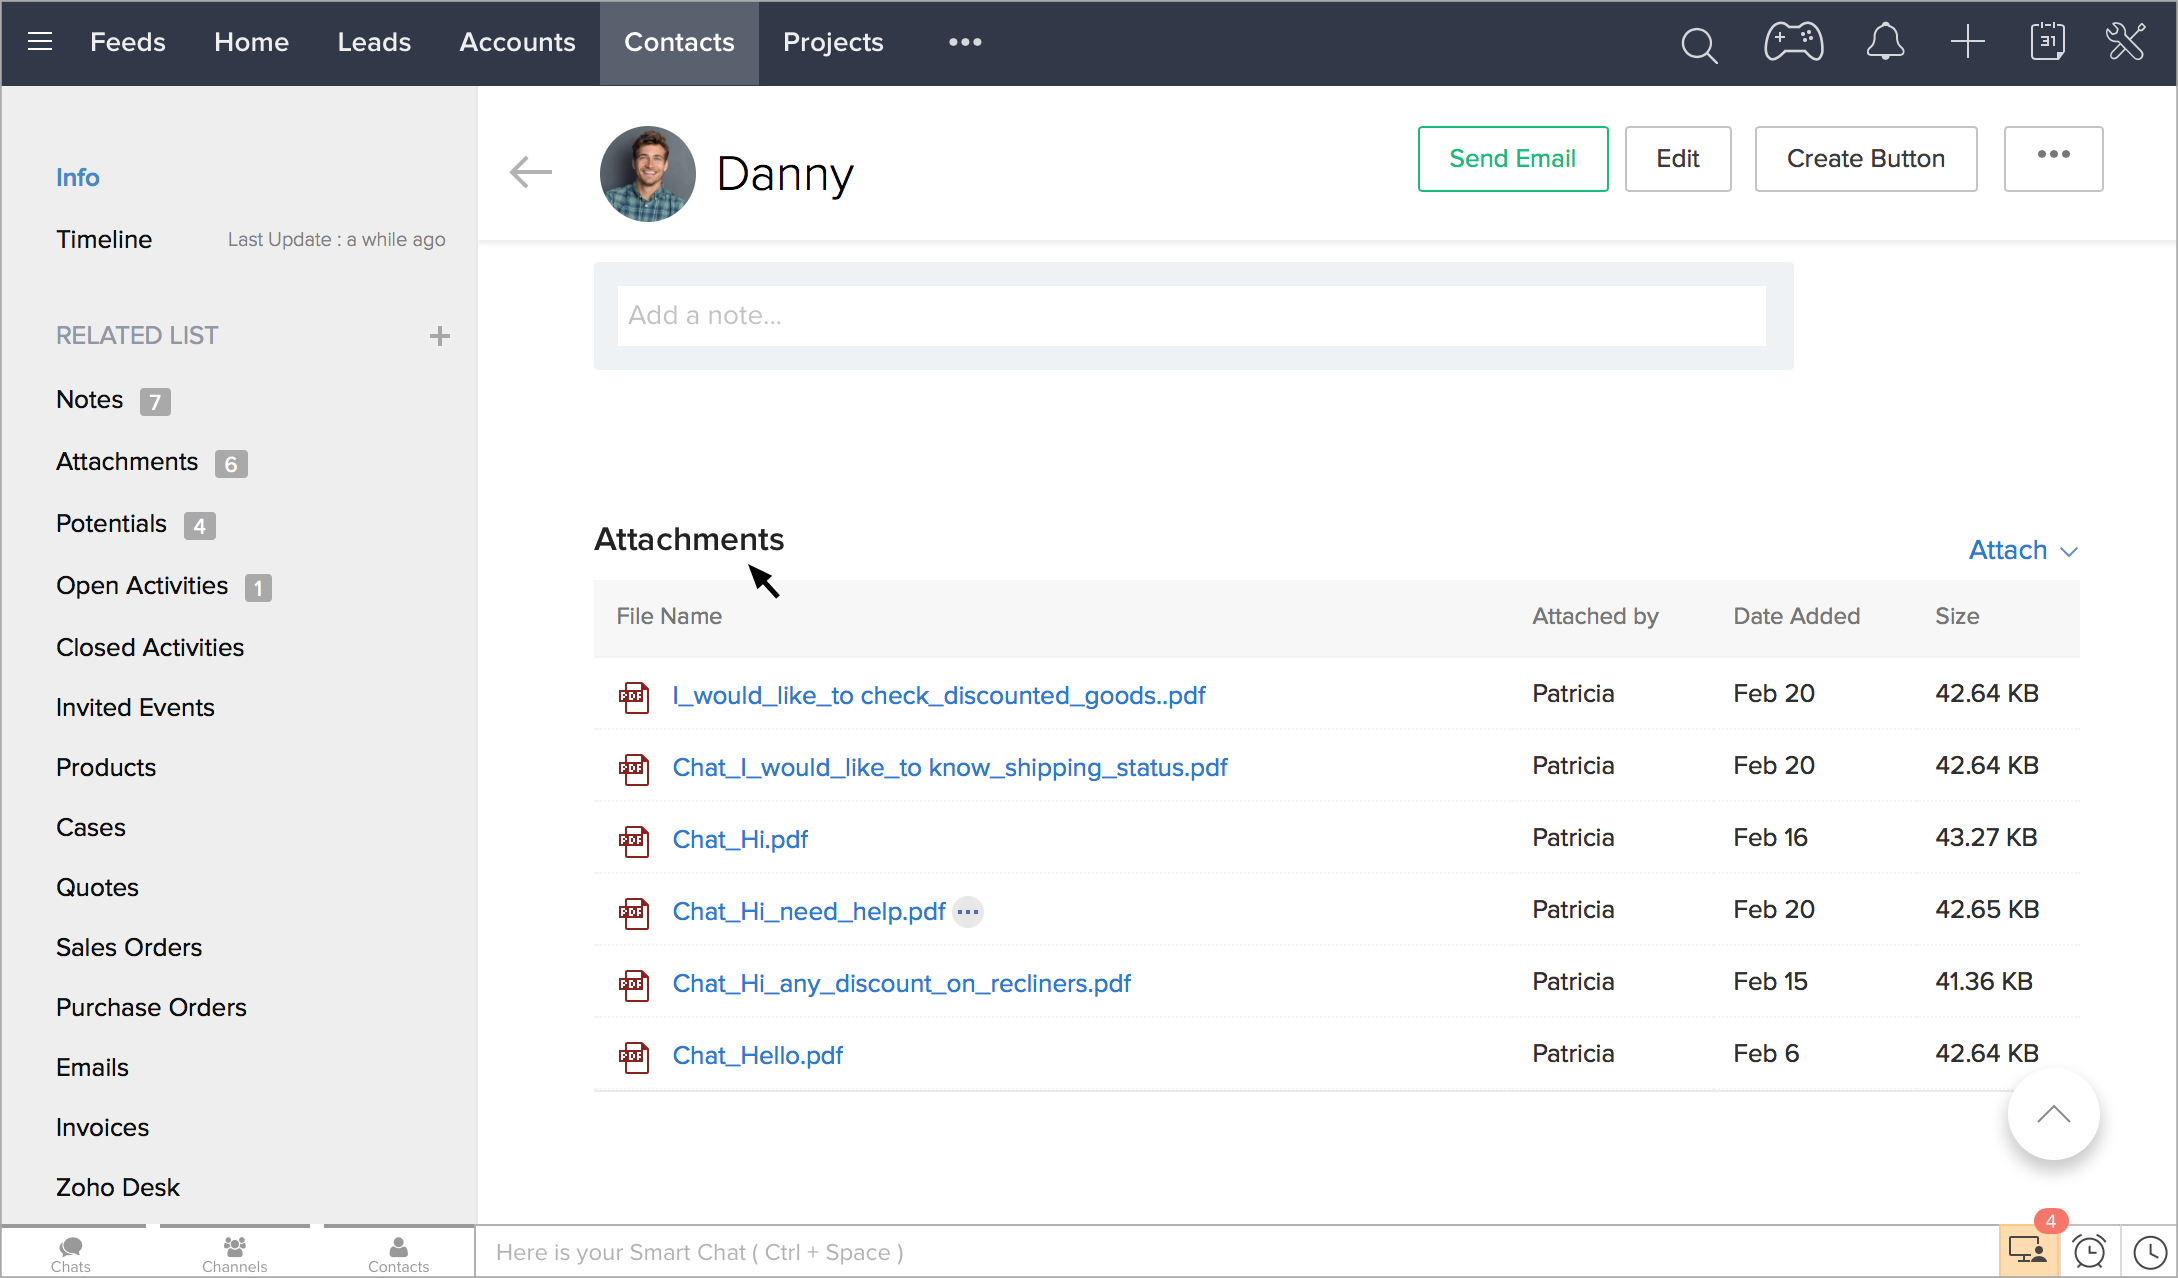
Viewing Zoho SalesIQ data inside CRM
Viewing chat transcripts as attachments
If you do configure your Zoho SalesIQ to push completed chats as transcripts into CRM, you will be able to view all your chats with Leads and Contacts inside of your CRM. When you view a Lead or Contact, scroll down to the attachments section and you will see each chat you had with that person, listed with the chat subject as the file name, in PDF form. Click these transcripts, and choose either Open or Download, to either view or download the transcripts for review.
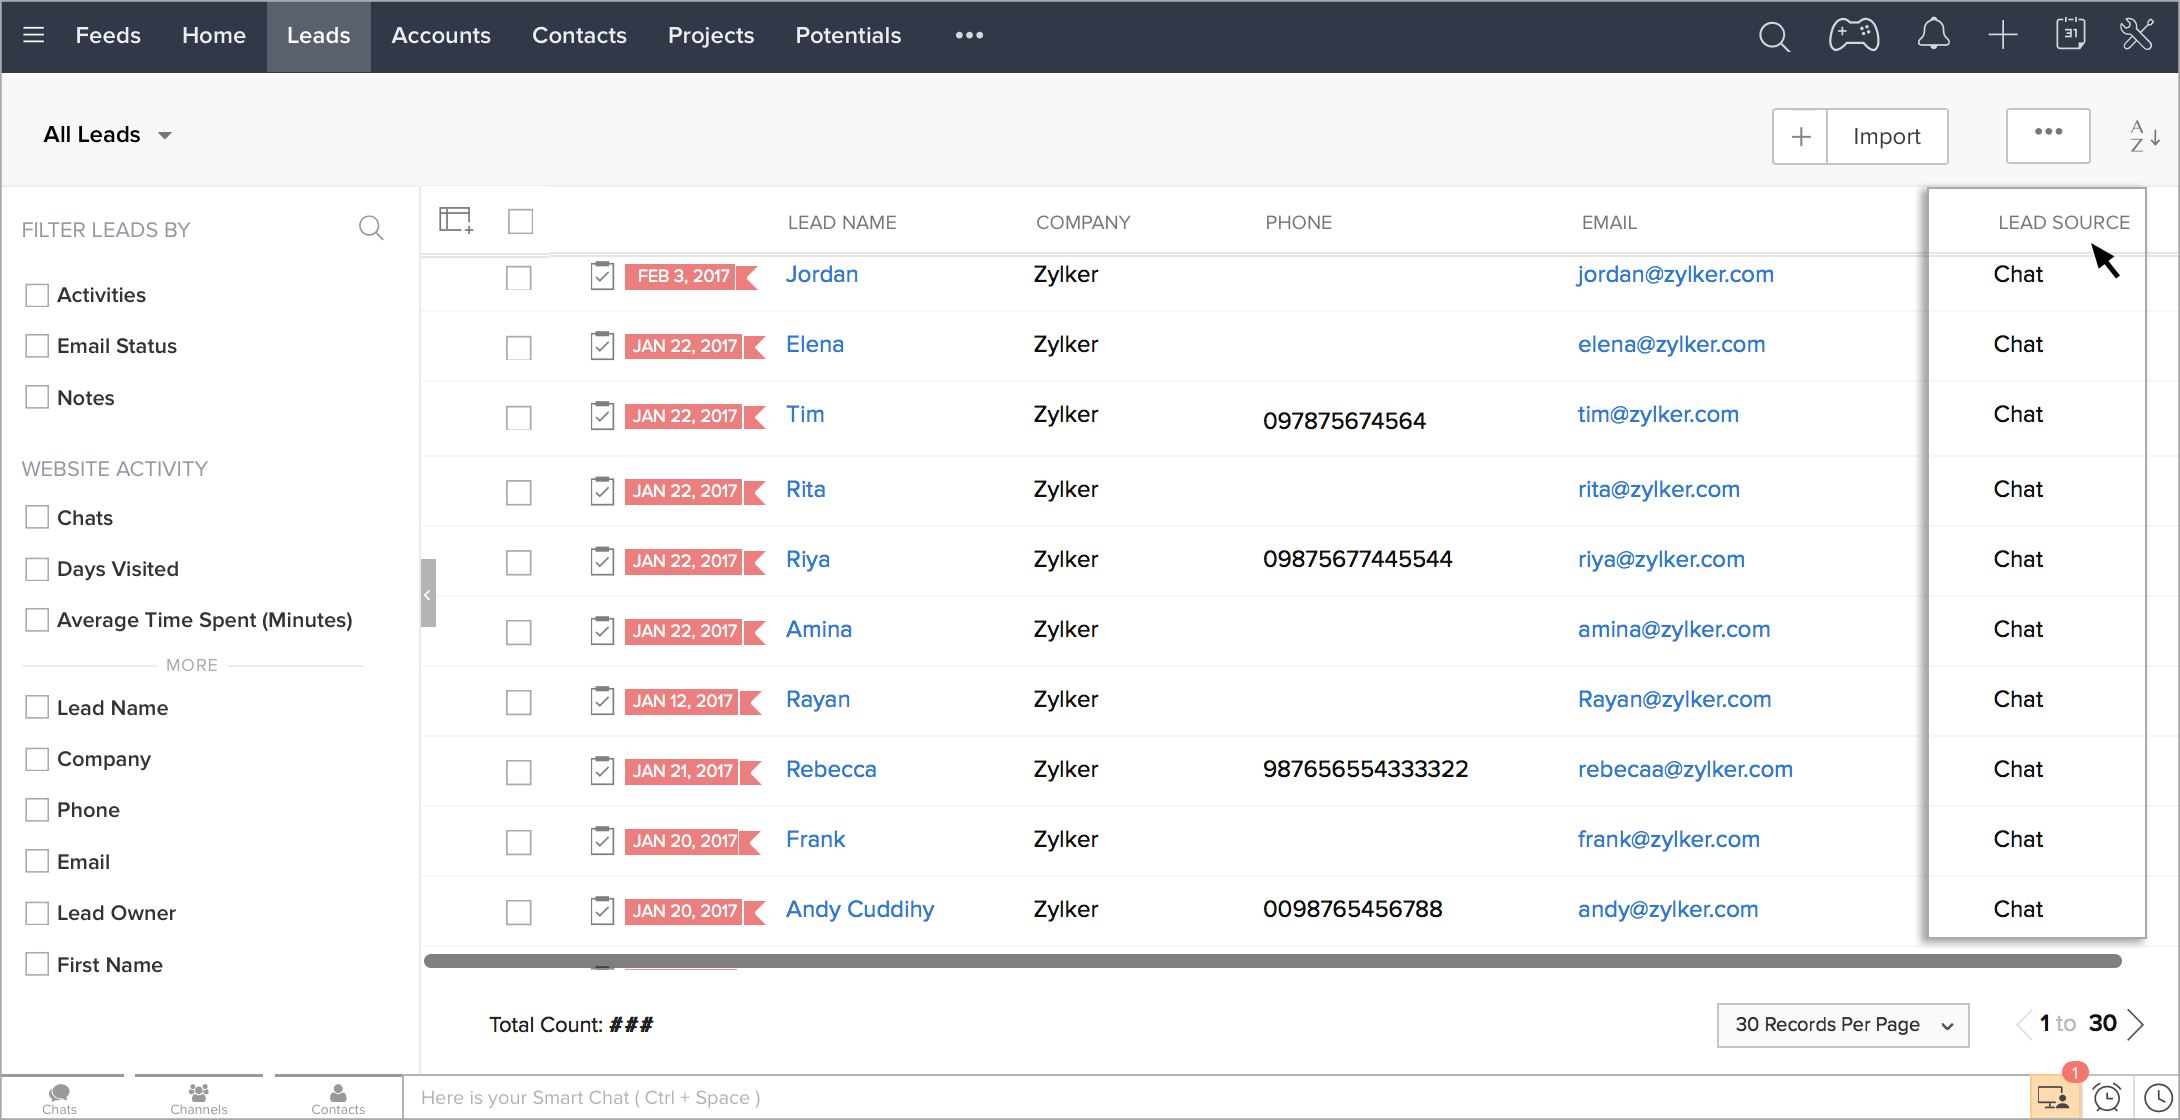
Lead Source as chat
See how many leads you are adding through your Zoho SalesIQ, and view and search by lead source—in this case you will see chat as the source.
Notes (auto-added) and manually added
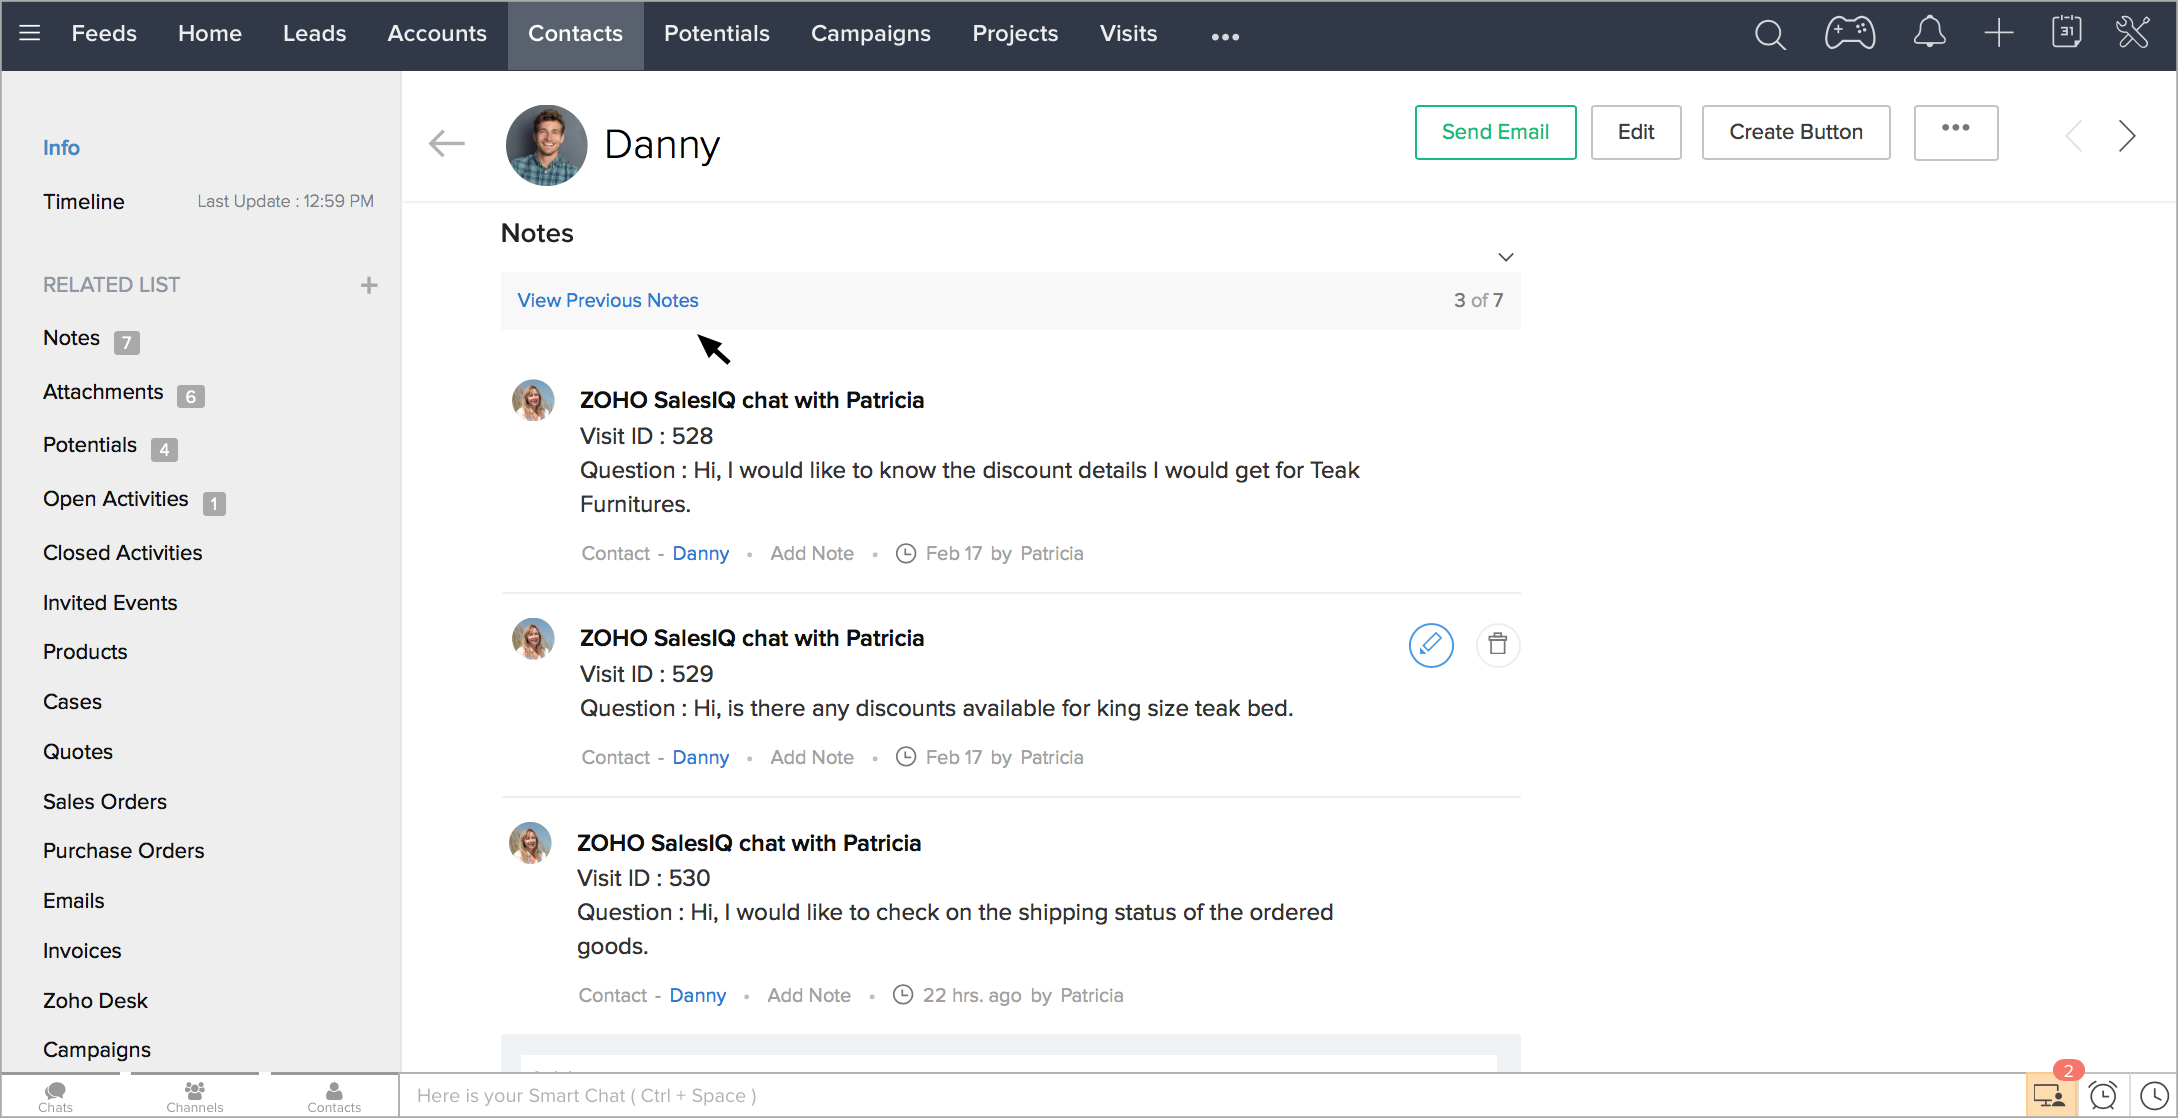
Each time you chat with a Lead or Contact, Zoho SalesIQ will automatically add a note for this chat—including who they had the chat with, their visit ID, when the chat was, and the question they asked as the initial subject. A note will also be automatically added for customers whose attempts to initiate chats with your Zoho SalesIQ are missed.
You can also manually add notes directly from the notes section in Zoho SalesIQ, which when on a Lead or Contact, will push these notes directly to CRM so the rest of your team can learn more about your Customers and visitors.
Follow-up tasks
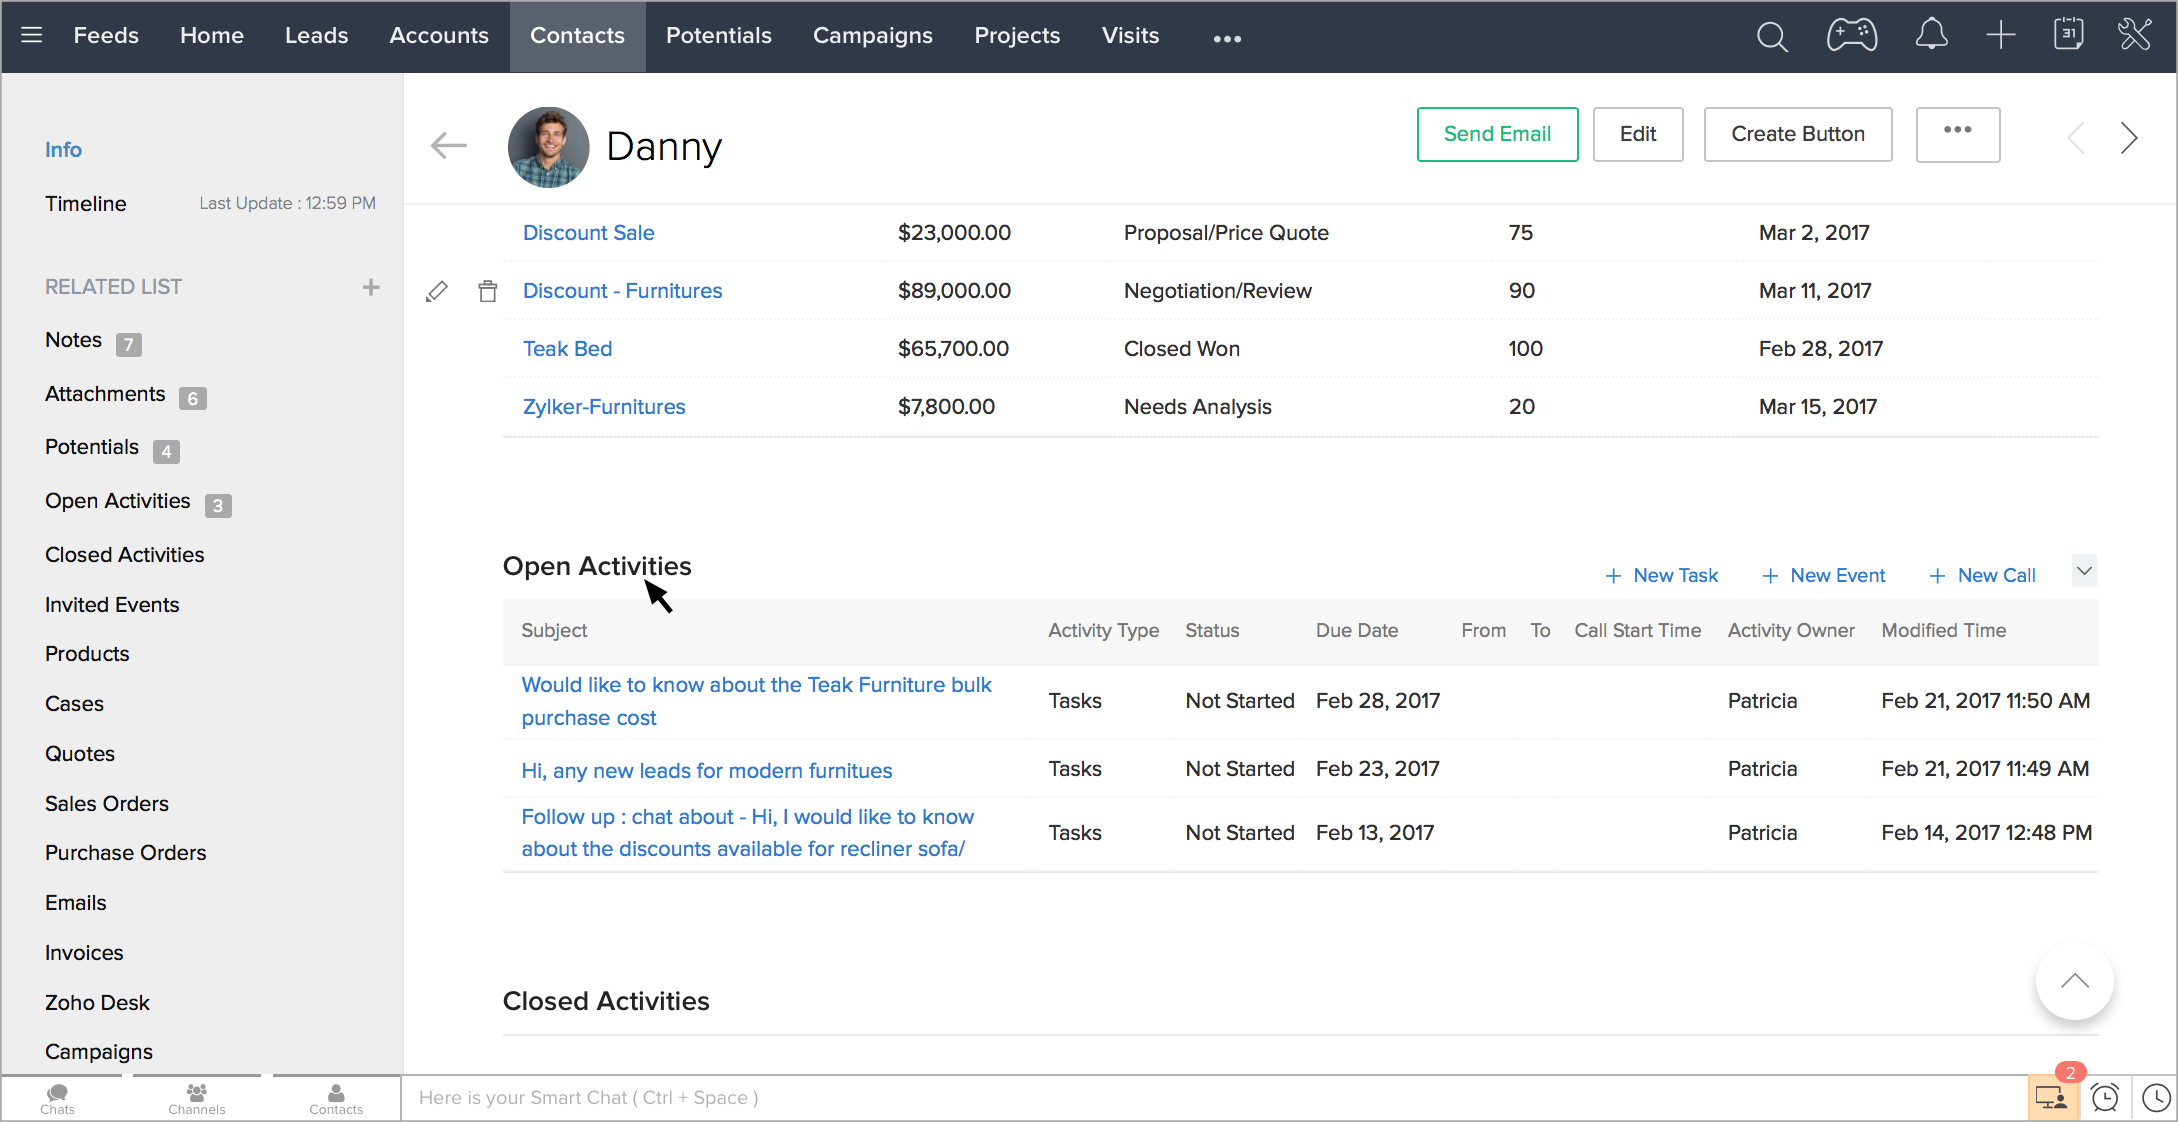
When your Zoho SalesIQ creates a follow-up task, either automatically, or manually, you can see these tasks yet to be completed in the Open Activities section in each Lead or Contact’s detail page inside CRM. Here you will see the tasks subject “Zoho SalesIQ chat session follow-up” followed by the subject of the chat, the activity type—tasks, the status and the due date. You can also view who owns this task.
View Website Visitors
How to view your website visitors in Zoho CRM?
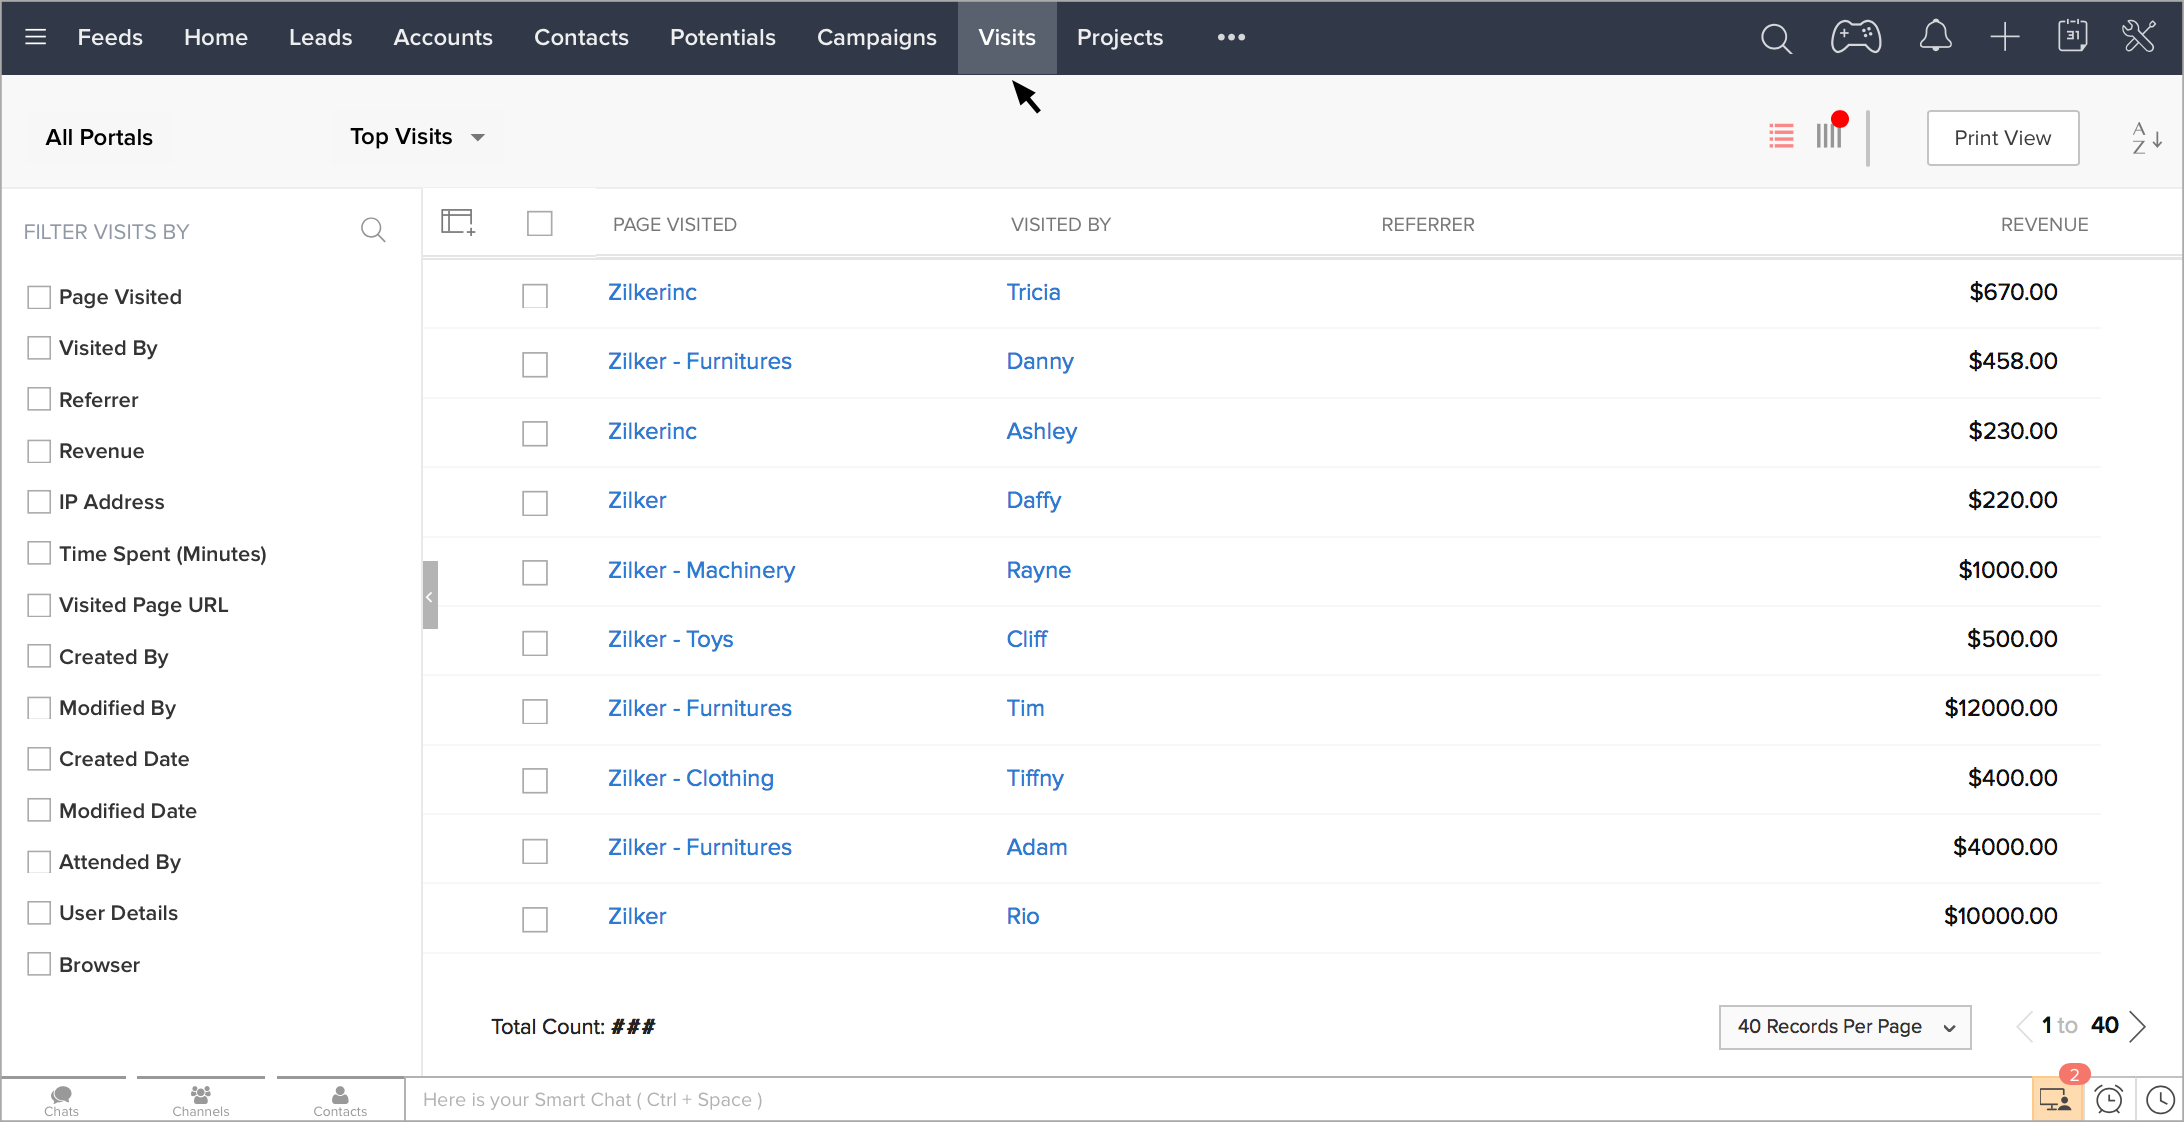
You can now view the visitors visiting your website in the “Visits” tab of Zoho CRM. When a visitor visits your website and the identity of the visitor is captured then the details of the visitor will be listed in the Visits tab. If the visitor had a chat conversation with the sales representative then the Chat transcript will also be attached.
List View
Some predefined list views are provided for the Visits tab, clicking on which will change the view of the list. They are:
- All Visits
- Today's Visits
- Top Visits
- Today's Top Visits
- Visits by Leads
- Visits by Contacts
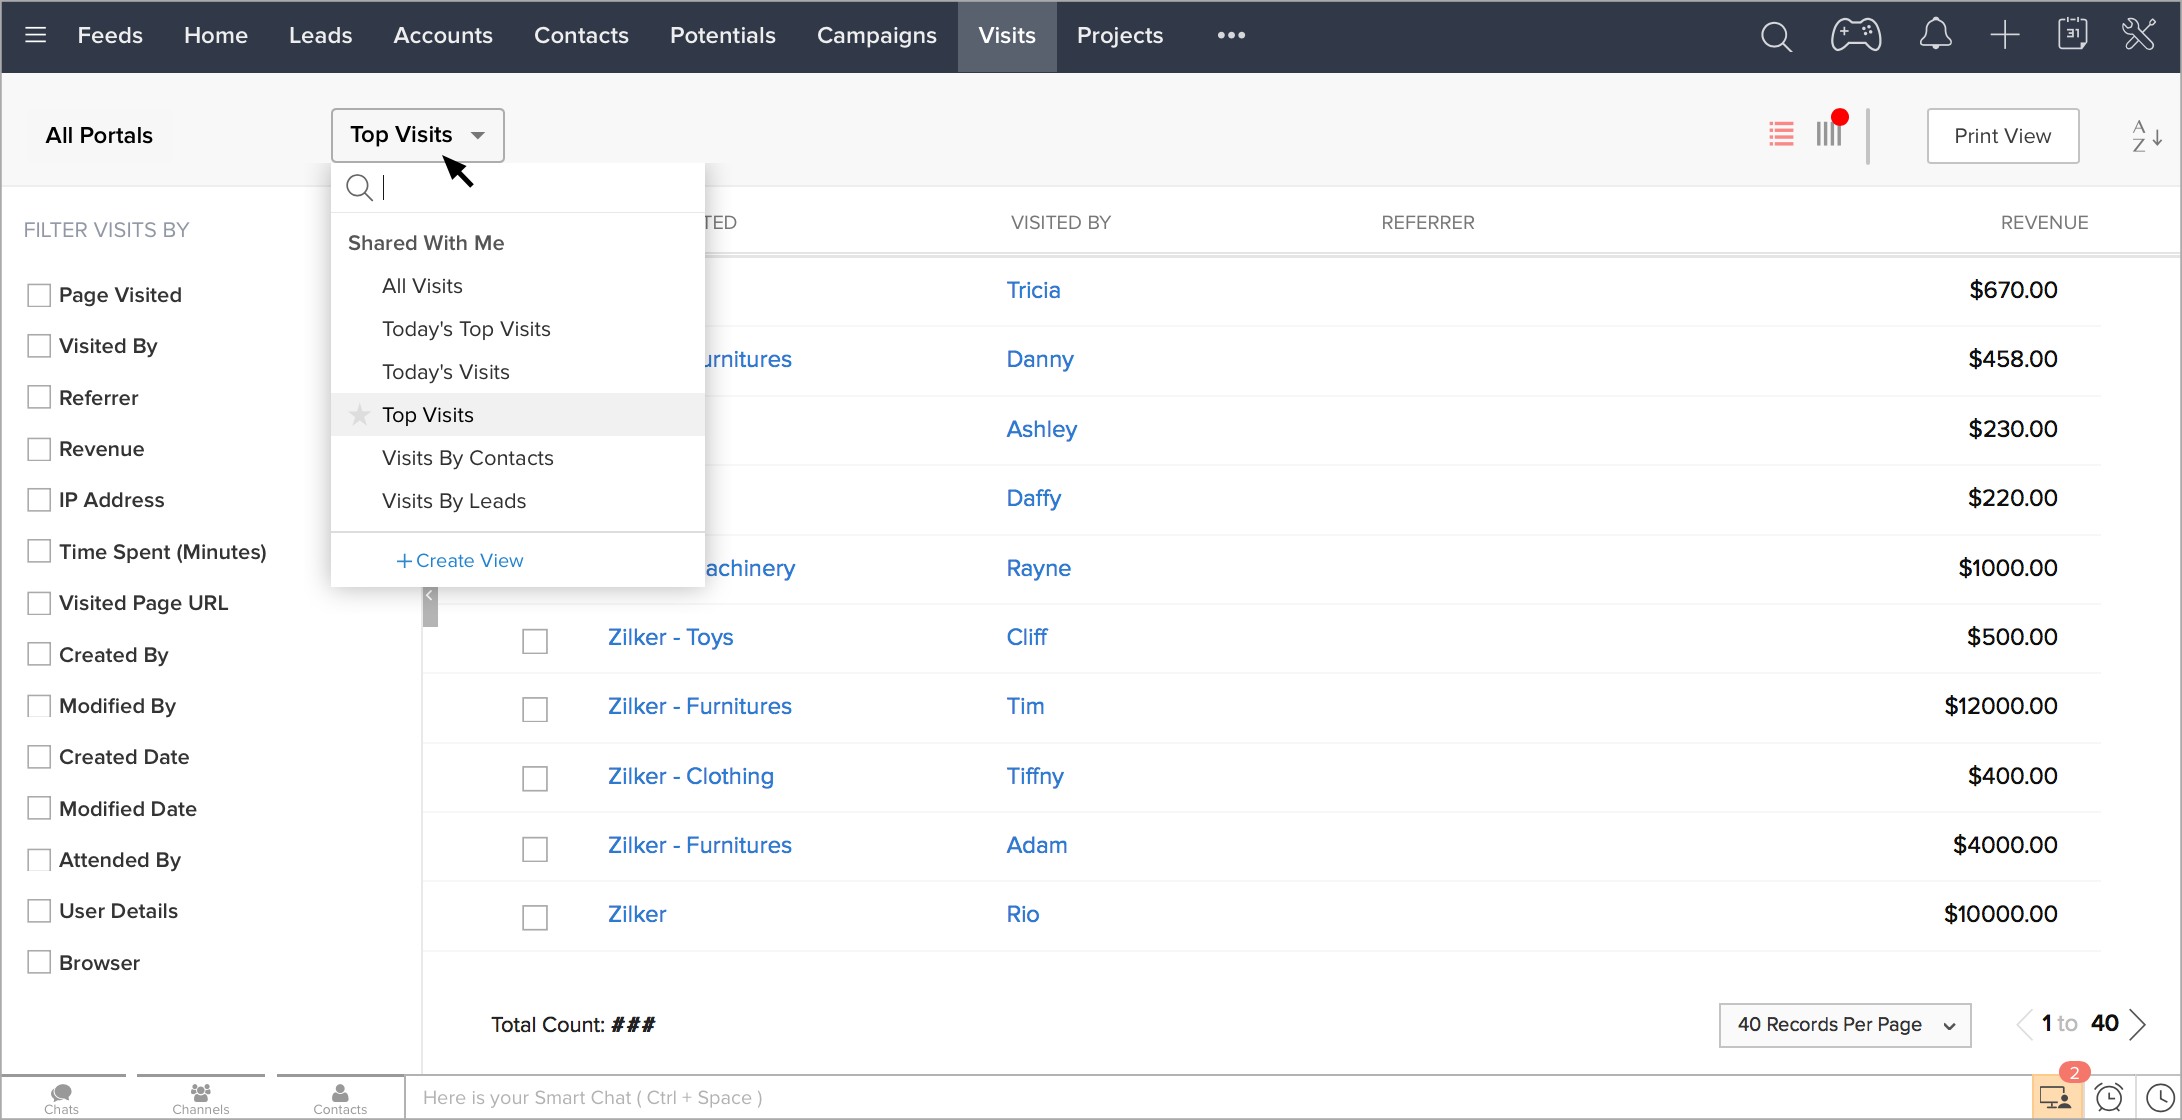
The List view can also be changed by clicking on the Edit option that appears near the drop-down in the left corner.
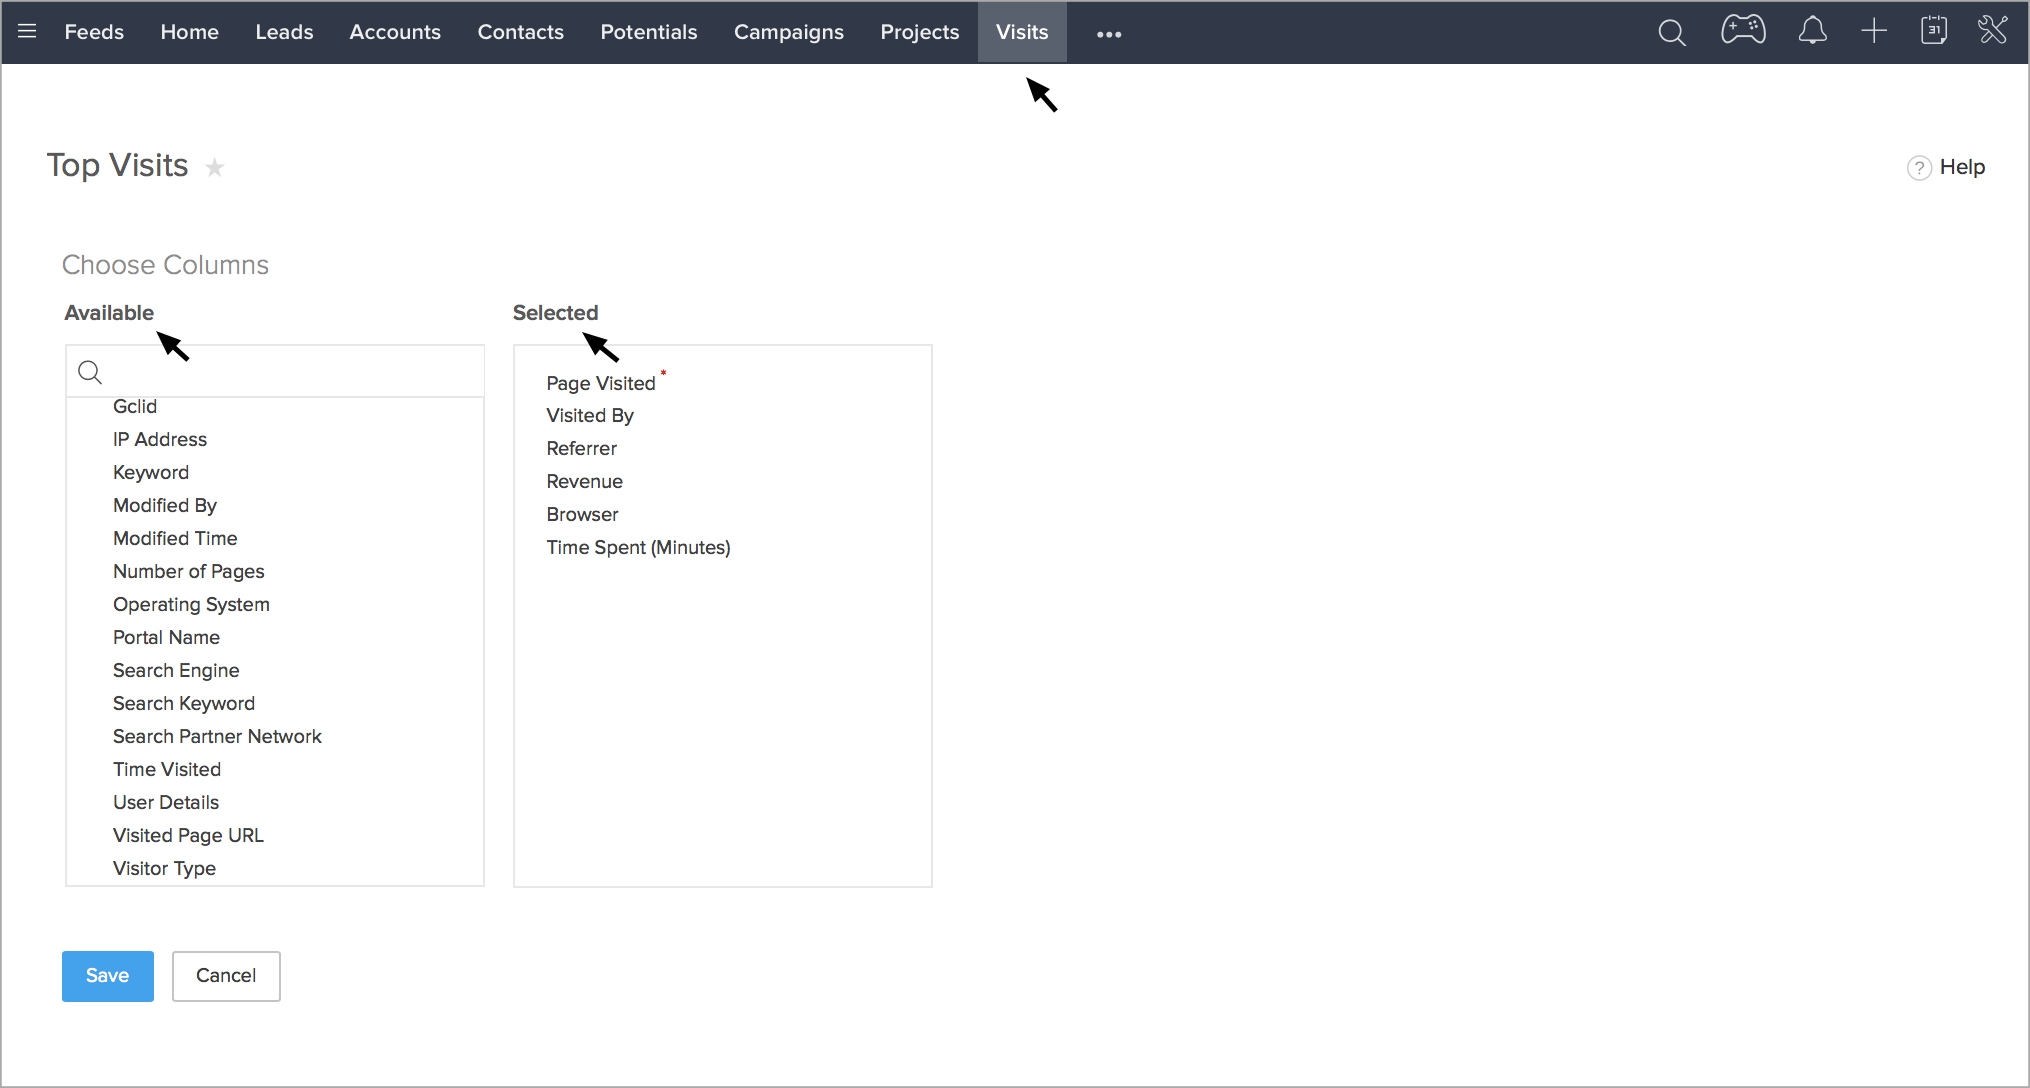
Default data available in the Visits tab
The General Information section details the visitor information like Visited By, Visitor Page, Time Spent, etc. These fields are non-editable.
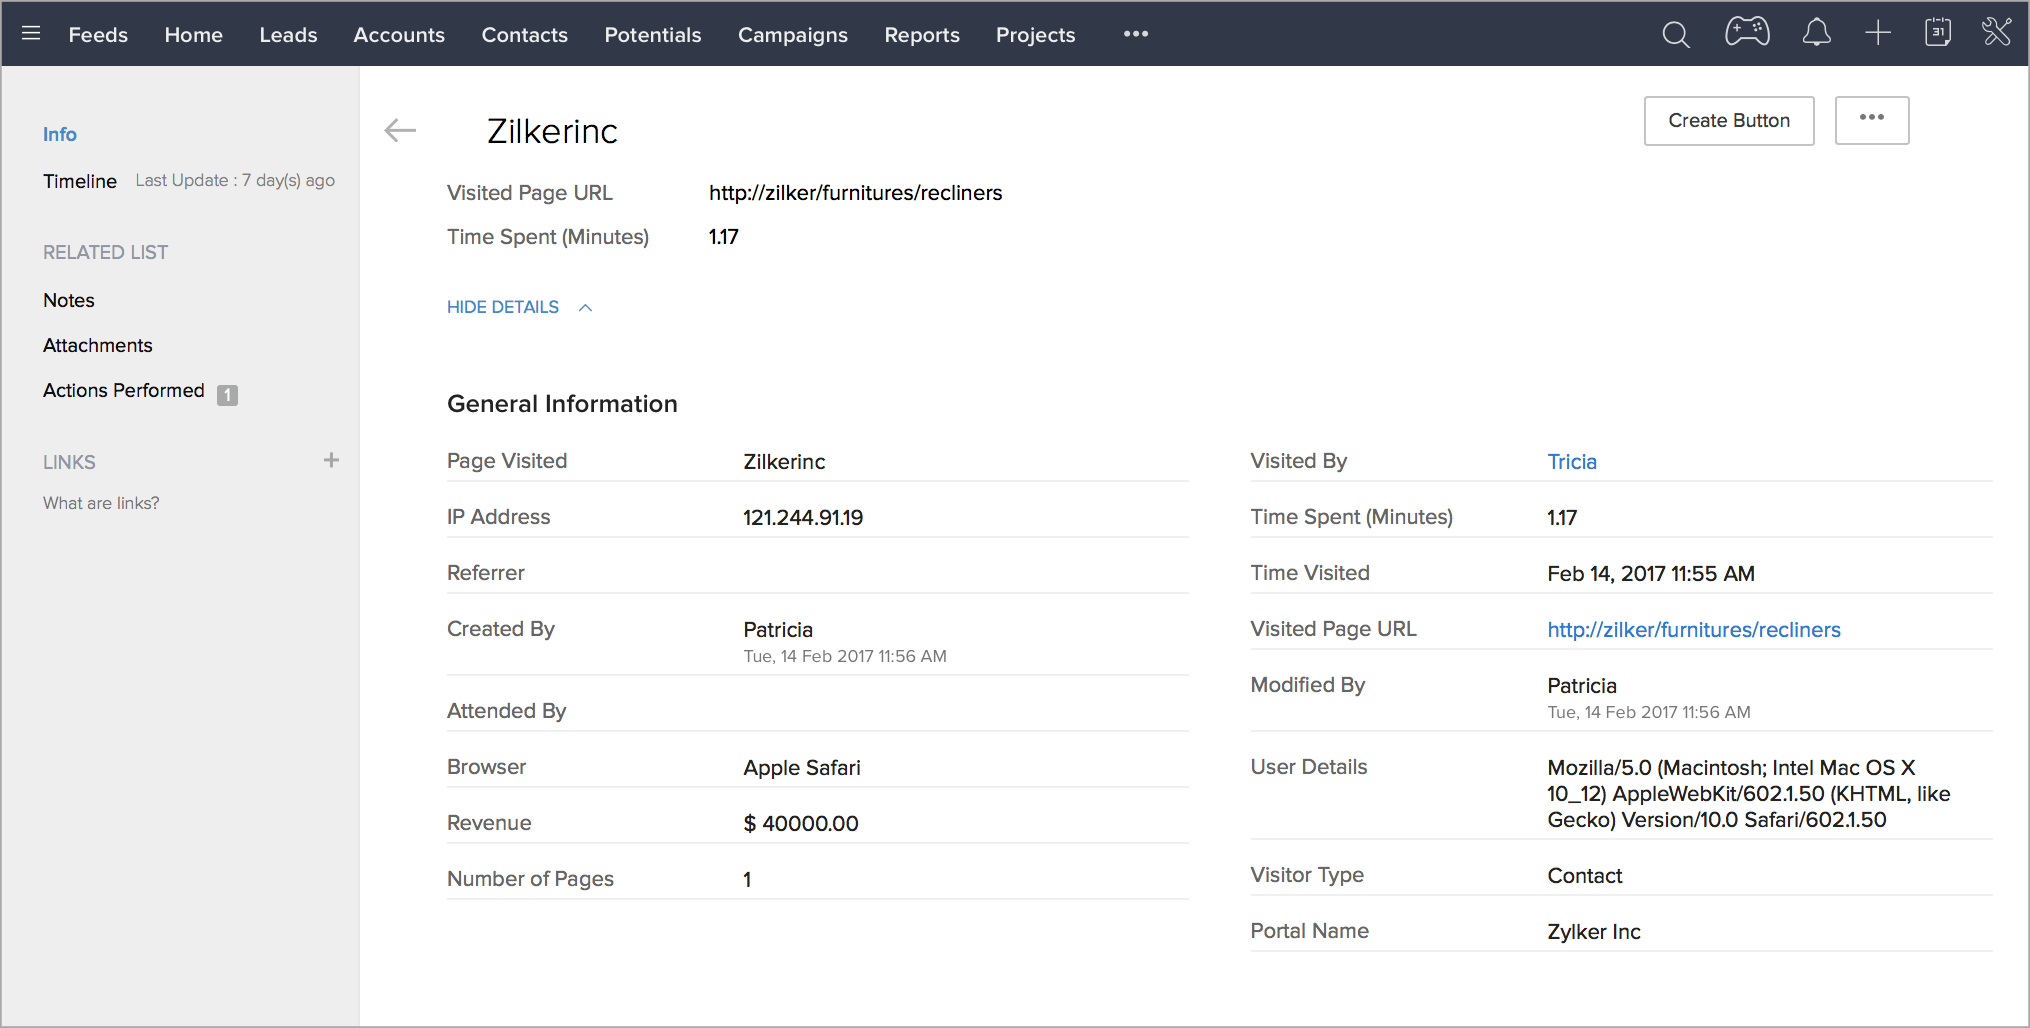
The Following Visitor’s information are available in the General Information section.
| Field Name | Description |
| IP Address | IP address of the visitor who visited the web page. |
| VisitedBy | Name of the Lead or Contact who visited the page. Based on the integration settings in Zoho SalesIQ, new visitors will be added as Leads or Contacts. |
| Visited Page | The web page visited by the visitors. |
| Time Spent (Minutes) | Number of minutes spent by the visitor on the web page(s) in a single visit. |
| Referrer | It is the URL of the page that directs visitors to your web page. This field gives the URL of the page that the person was on before visiting your page. |
| User Agents | Details on the browser, operating system, etc. used by the visitor. |
| Attended By | Name of the user who contacted the visitor via chat option in your web page. |
| Visited Page URL | The URL of the web page that was visited. |
| Browser | The browser in which the web page was accessed. |
| Visitor Type | The visitors are categorized into these types: Customer, Deal, Leads, Contact, and Unknown. |
| Revenue | Revenue till date, from the customer. |
| Visited Time | Date and time of the visit. |
| Search Keyword | The search keyword that listed your web page as one of the search results and brought the visitor to the page. |
| Search Engine | Name of the search engine where the keyword was used to search. |
| Operating System | Operating system of the visitor's computer/laptop. |
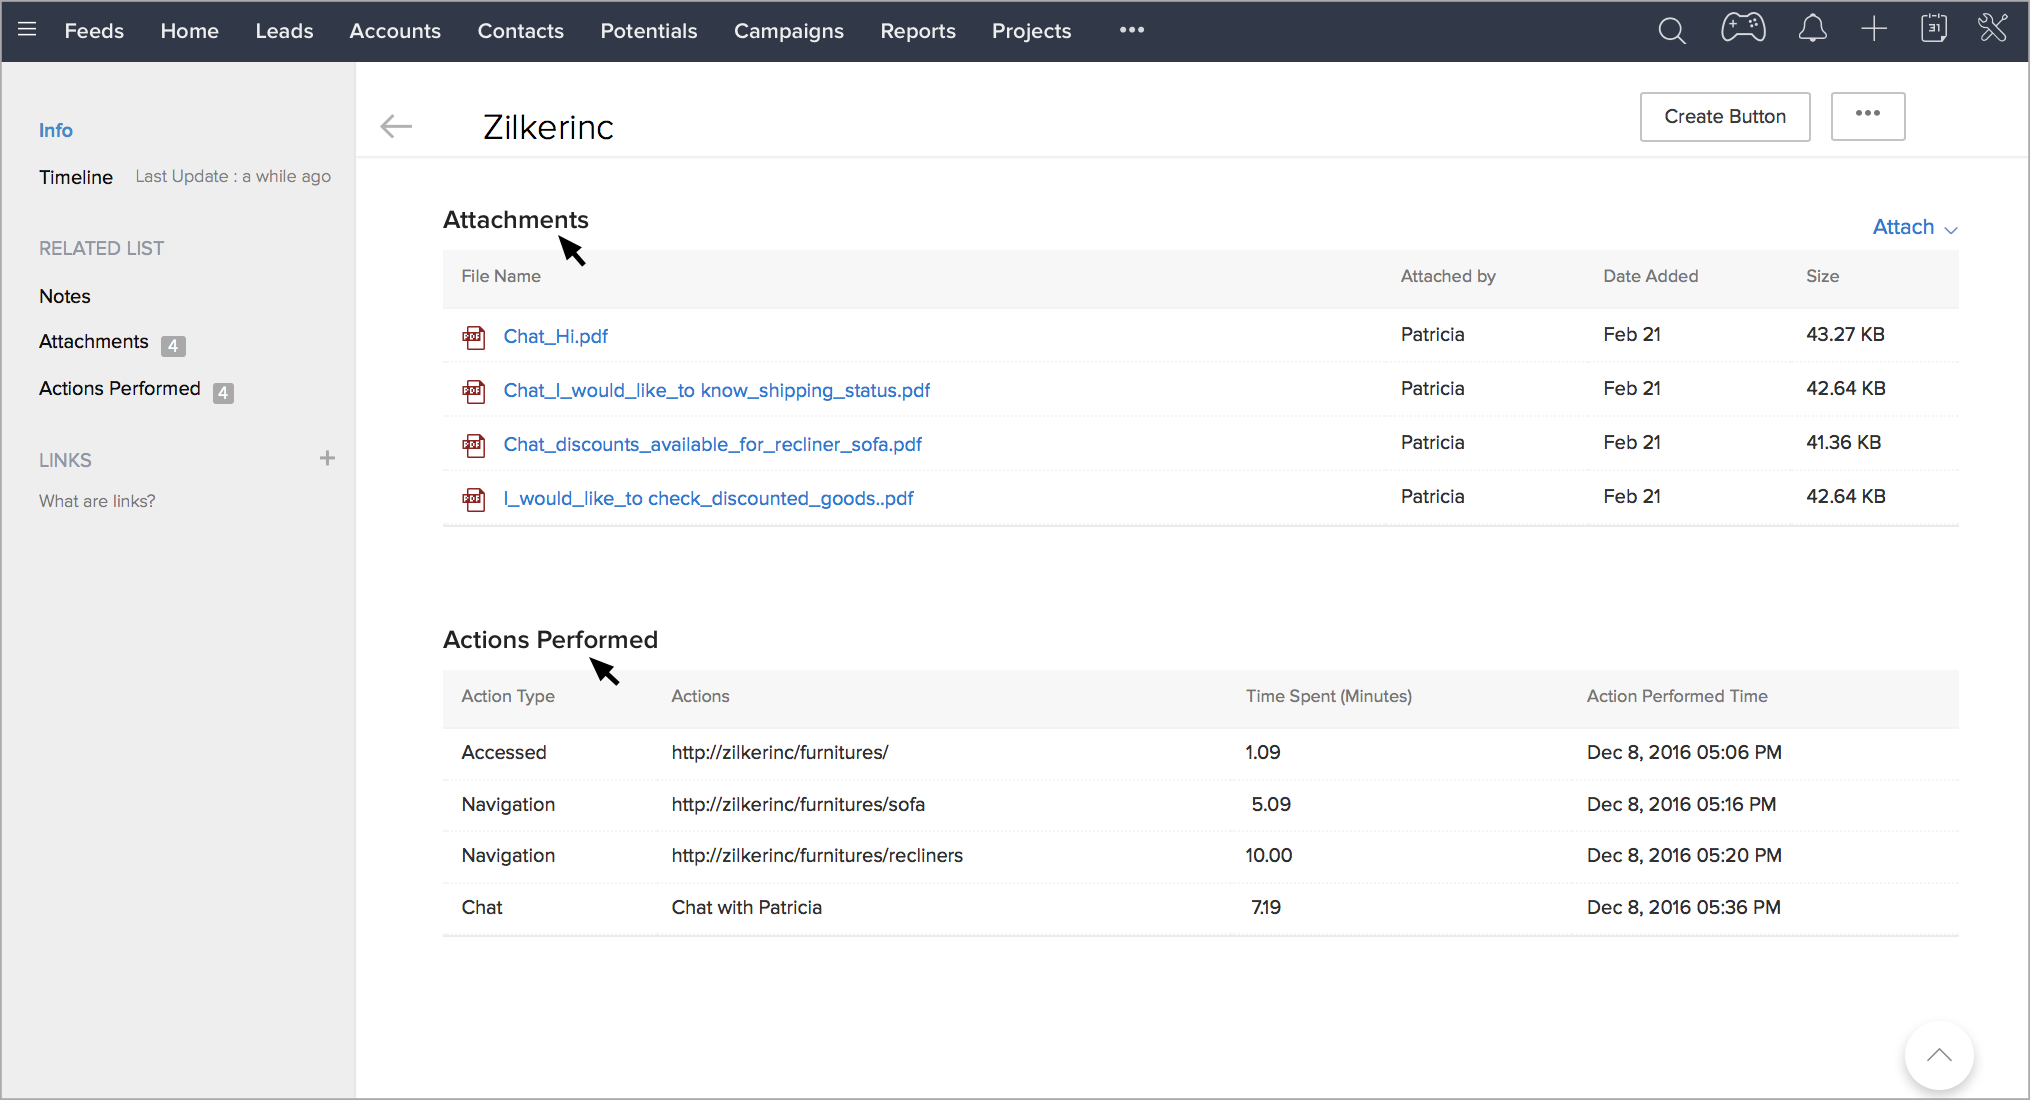
Actions Performed
The following details of the customer can be viewed in the Action Performed section:
- Action Type- Displays any one of the following action:
- Accessed
- Navigation
- Chat
- Actions - Title of the web page or the page’s URL.
- Time Spent - Number of minutes spent by the visitor on the web page(s) in a particular visit.
- Action Performed Time - Date and time when the action was performed in the web page.
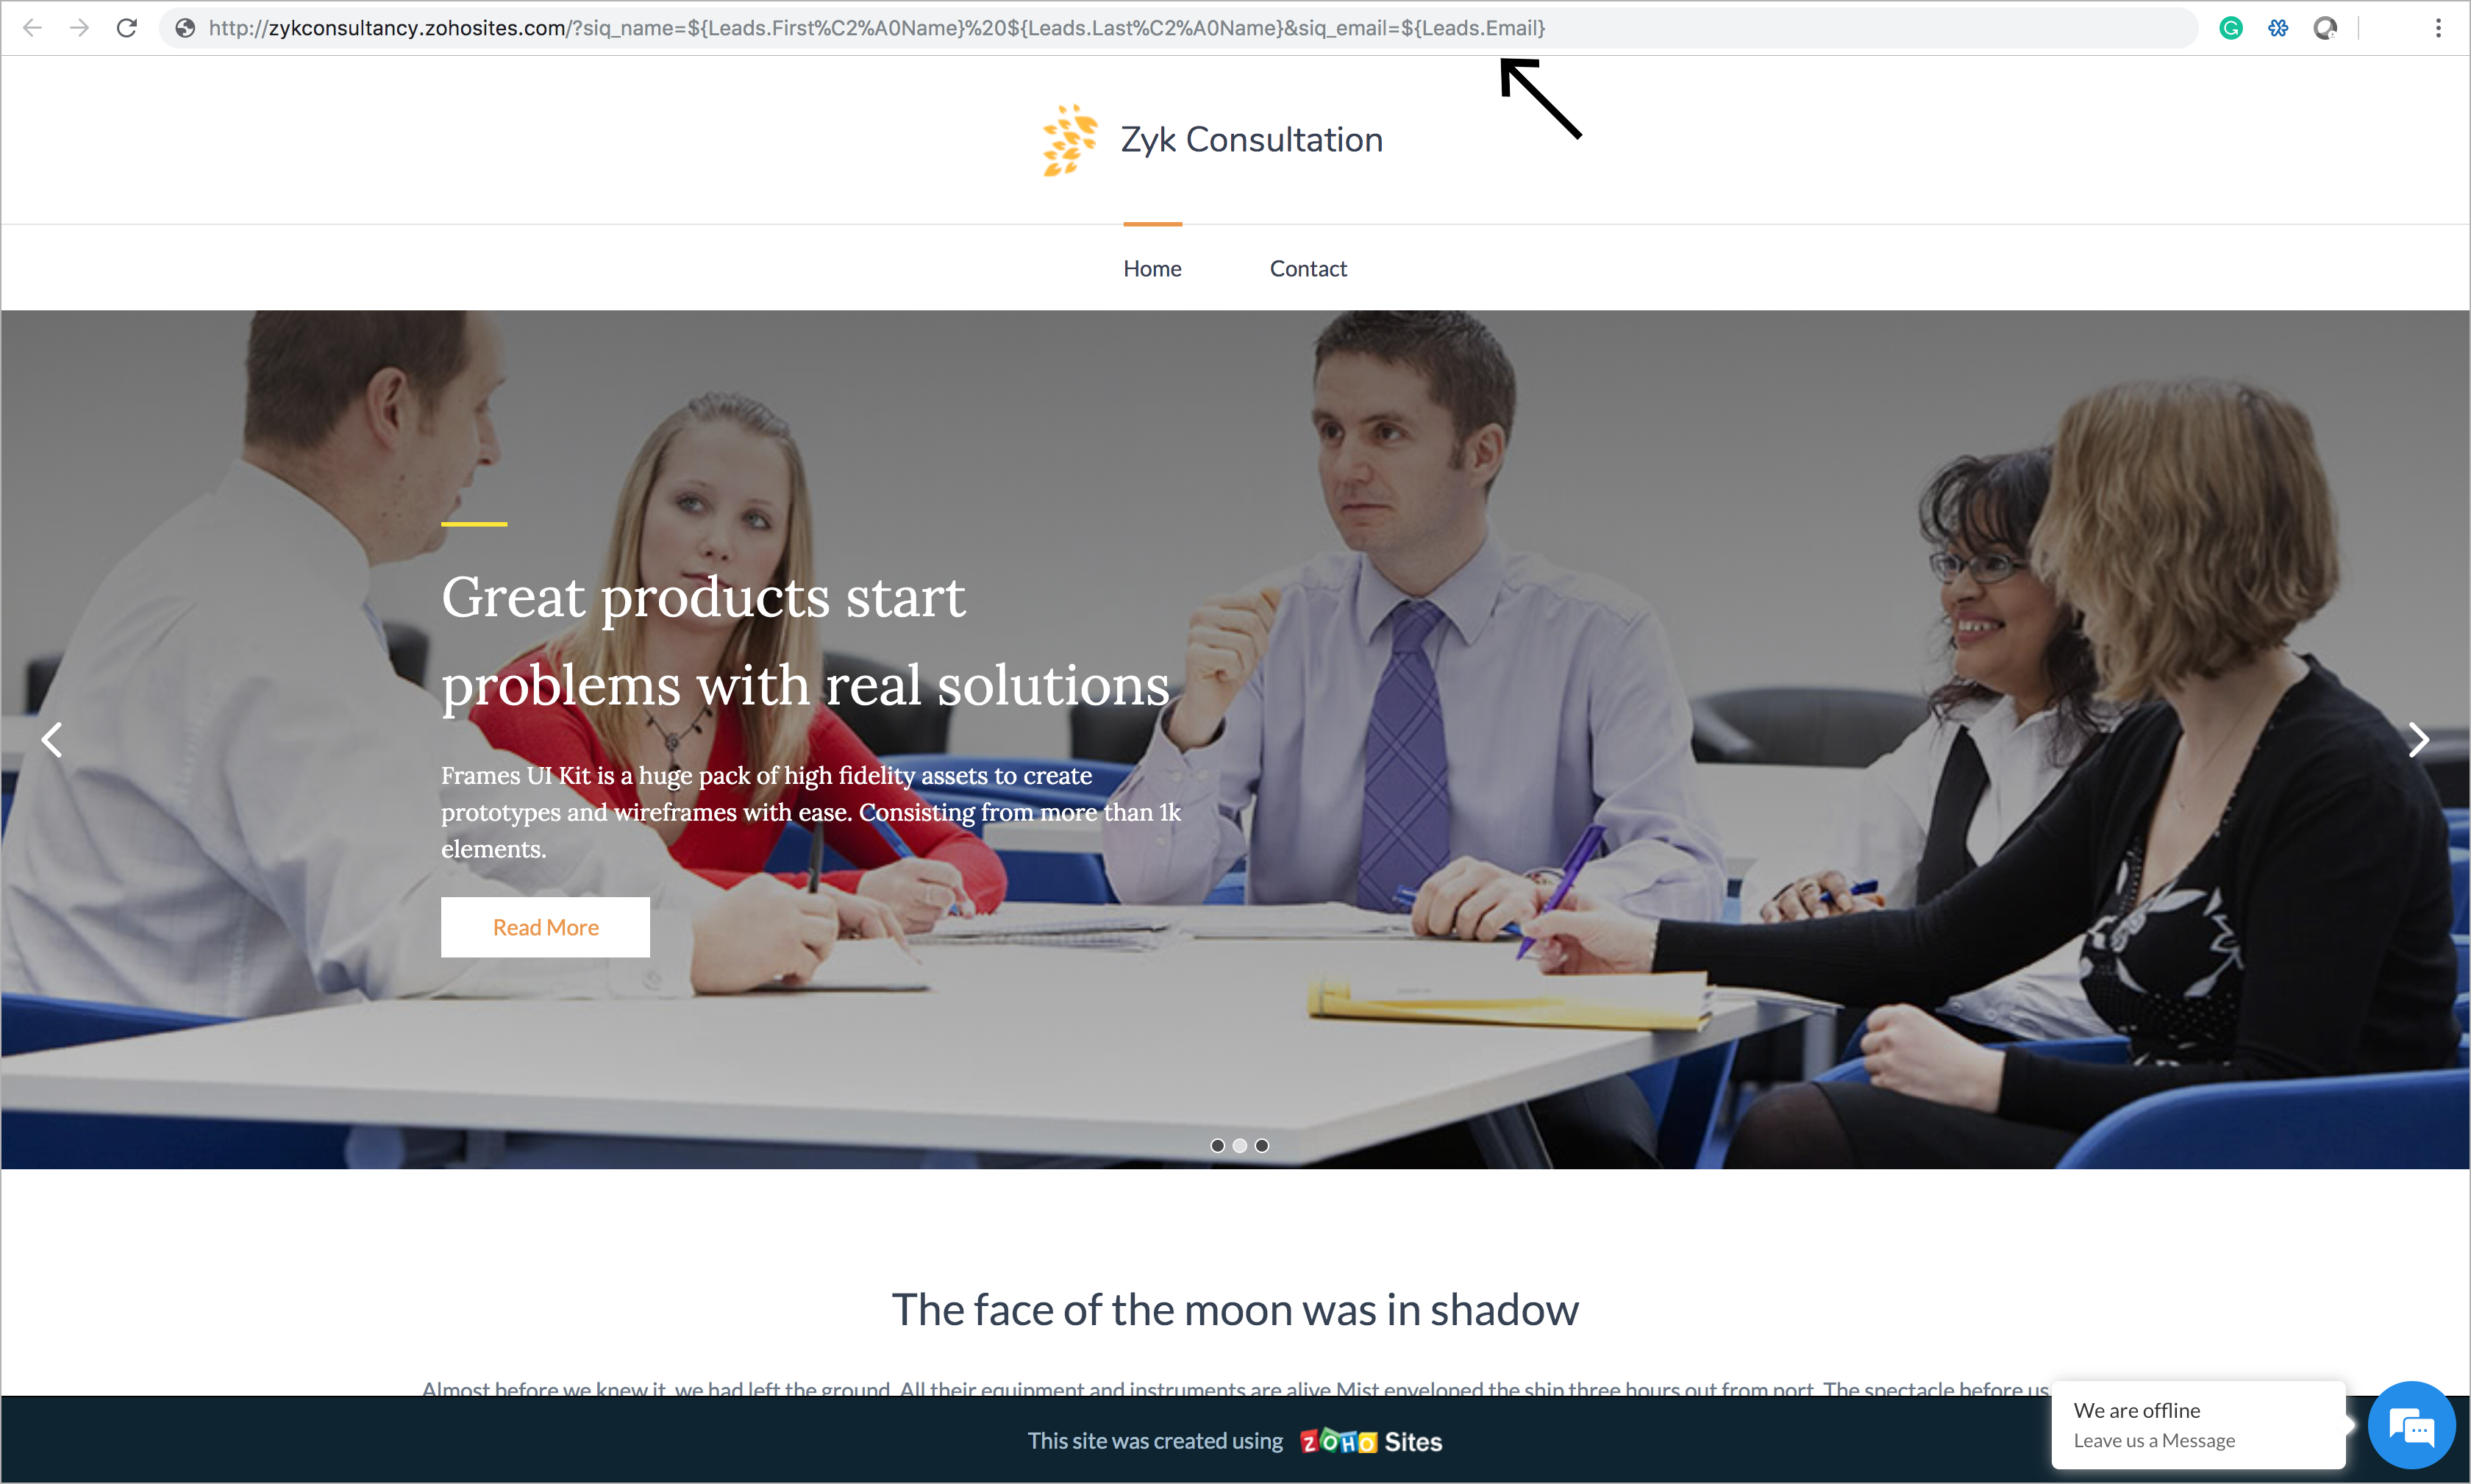
CRM Identifiers
Track visitors using CRM Identifiers
You can use CRM Identifier links in emails to track and identify visitors from CRM on your website. These emails are sent from the Leads/Contacts modules. When the visitor clicks the link, he/she is directed to the website page.
Now, the Name and Email of the recipient is attached to the identifier link and the SalesIQ Identifier parameters identify the visitors. After the SalesIQ identifies the visitor, the visitor activities such as details under Visit summary, Source, Visits are tracked and updated in the Leads/Contacts module in you CRM account. To configure it, click here
CRM Tracking links
For Leads
- ?siq_name=${Leads.First Name}%20${Leads.Last Name}&siq_email=${Leads.Email}
Example
- http://www.zohosalesiq.com/?siq_name=John Smith&siq_email=jsmith@zillum.com
For Contacts
- ?siq_name=${Contacts.First Name}%20${Contacts.Last Name}&siq_email=${Contacts.Email}
Example
- http://www.zohosalesiq.com/?siq_name=John Smith&siq_email=jsmith@zillum.com
How can we add CRM Tracking links while sending emails?
- Inside your CRM account, navigate to Leads/Contacts module.
- Click on a lead/contact.

- You can now find a button "Send Email" at the top right of the page.
- You can draft your content and click on the "Insert link" icon.

- Now, you can paste the required tracking link in the URL field.

You can also insert the tracking link in an email template, select a module for the template and paste the required tracking link by clicking on "Insert link" icon.
Your emails are now tracked.
Related Articles
Zoho CRM
Import your Zoho CRM contacts to Zoho Assist and get prompted each time you enter a email address in Zoho Assist. To import your Zoho CRM contacts: Go to assist.zoho.com. Navigate to Settings and choose the option Contacts under Remote support. ...Zoho CRM
Integrating surveys with Zoho CRM helps synchronize all your survey responses within your CRM modules automatically. You can add survey links in CRM email templates and view the responses from your leads and contacts within Zoho CRM. You can also add ...Enable Zoho CRM Integration
Users with Administrator privileges in Zoho Recruit can activate Zoho CRM integration for their Zoho Recruit organization's account. Activating the Zoho CRM integration is in two parts: Generate ZSC Key Set up Zoho CRM integration Generate ZSC Key If ...Developer Edition - Zoho CRM
The Developer Edition of Zoho CRM is the ideal training ground for developers to play around with the CRM account and test robust CRM implementations, Zoho CRM-centric mobile and web apps, white-labelled Vertical CRMs and CRM extensions. Let's take ...Zoho CRM Integration
Zoho Projects supports Zoho CRM integration which helps you manage the deals you win and track them using projects from CRM with ease. CRM task integration Bi-directional sync (Two-way sync) is enabled for task updates and comments from Zoho CRM to ...