Creating Contacts
Methods
In Zoho Recruit, you can create contacts by:
- Entering data in the contact details form: You can manually fill in the Contact details gathered from various external sources.
- Importing contacts from external source: You can gather data through various sources, e.g. contacts from different clients and import the CSV and XLS files into Zoho Recruit.
- Capturing contacts from websites: You can create web forms and allow website visitors to submit their contact details or questions directly through forms. These details submitted in the website are captured directly into the Contacts module.
- Converting candidate to contact: On candidate conversion, contacts, clients and job openings can be created.

Note:
Some of the standard fields may not be visible or editable depending on your organization's recruitment process.
In case you want to add or modify fields or would like to know more details on the usage of fields, please contact your System Administrator.
Create Contact Individually
You can create contacts individually by:
- Filling in the details in the contact creation form.
- Cloning the contacts with a few changes in the existing contact details.
To create contacts individually
- In the Contacts module, click New Contact.
- In the Create Contact page, enter the contact details. (Refer to the Standard Fields)
- Click Save.
Note:
- By default, the person who creates the contact owns it.
- To change owner, click the Change link in the Contact Owner field from the Contact Details page and select another user.
- While selecting the Account from the Lookup field's pop window, there is also an option to create an Account.
- You can use this option to quickly create an account by providing some mandatory information. You have two options:
- Click Save. The record will be saved and it will be listed with the other accounts. You can select it to associate to the contact that you were creating.
- Click Save & Associate with save the new record and also associate it to the contact that you were creating.
To clone contacts
- In the Contacts tab, click a particular contact that you want to be cloned.
- In the Contact Details page, click Clone.
- In the Clone Contact page, modify the required details.
- Click Save.
Work with the Contacts details page
Once you have created a contact, you can view the details of the contact in the record's details page. The details page of a contact presents information related to the contact - for example, deals and accounts related to the contact, activities, notes, events, emails and so on - in a single location.
To view the contacts details page
- Click the Contacts module.
- Click the desired account from the Contacts list view.
- You will see the details page of the contact.
Here is a quick-tour of the Contact's details page:
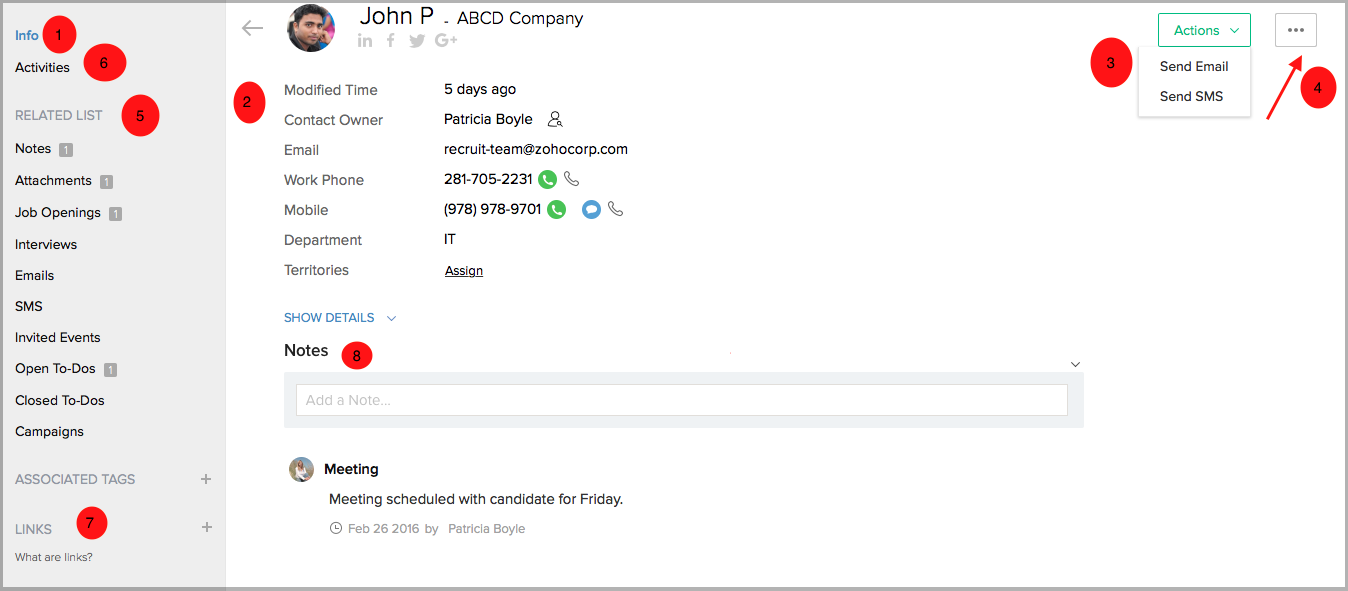
Switch between the Info and Timeline views of the contact's details page.
- Info: Displays the details of the contact
- Timeline: Displays a history of actions performed on the contact's details page.
- View the business card details of the contact.
- Easily Send Mail to the contact or Edit the contact.
- Click the More icon to execute further options such as clone, share, customize the business card and so on.
- From the Related List section, quickly access related lists such as Activities, Attachments, Job Openings, Zoho Projects and so on.
- Scroll down to navigate to all the related lists on the record's details page.
- Access custom links and social links related to the contact.
- View Notes for the contact. This includes check-ins made on your mobile app as well as comments made on a project's task.
Associate Contact with other Records
You can create a 360-degree view of the contact to display all the associated details, such as job openings, trouble tickets, open activities, history of the completed activities, attachments, and notes.
In the Contact Details page, you can update the following:
- Member Clients: To add other divisions or subsidiaries to the parent client
- Open Activities: To add tasks and events
- Closed Activities: To display all the closed tasks and events
- Cases: To create cases for the contact
- Products: To add products for the contact
- Attachments: To attach documents and notes
- Notes: To attach notes to the contact.
- Job Openings: To add job openings to the client
- Contacts: To add contacts to the client.
Related Articles
Creating Contacts
In Zoho CRM, you can create contacts by: Entering data in the contact details form: You can manually fill in the Contact details gathered from various external sources. Importing contacts from external source : You can gather data through various ...Creating Vendors
In Zoho CRM, you can create vendors by: Entering data in the vendor details form: You can manually fill in the Vendor details in the form. Importing vendors from external sources: You can gather data through various sources and import the CSV and XLS ...Creating Tasks
Bigin allows you to carry out actions such as events, tasks or calls with your customers. Ideally, a salesperson has to manually keep tabs on the pending follow-ups or product demos that he has with his customers. With no actual means to remind him ...Creating Events
Events are carried out at the given place and given time for your customers. You can repeat the event that you have created and also set up a reminder. There are two ways of creating an Event. From the activities module. From the record details ...Creating Clients
Methods In Zoho Recruit, you can create clients by: Entering data in the client's details form: You can manually fill in the Client details gathered from various external sources. Importing Candidates from external source: You can gather data through ...