Personal Settings
The following table gives the list of functions that are specific to the Administrator and Standard Users:
| Functions | Privilege |
| Change Name | Administrator and Standard User |
| Change Address Information | Administrator and Standard User |
| Change Language | Administrator and Standard User |
| Change Date Format | Administrator and Standard User |
| Change Time Zone | Administrator and Standard User |
| Change Signature | Administrator and Standard User |
| Change Name Format | Administrator and Standard User |
| Change Email ID* | Standard User |
| Change Password* | Standard User |
| Change Security Question* | Standard User |
| Change Answer* | Standard User |
| Change Profile | Administrator |
| Change Role | Administrator |
| Change Currency | Administrator |
| Add User | Administrator |
| Activate/ Deactivate User | Administrator |
| Re-Invite User | Administrator |
Change Personal Information
You can change your personal details such as name, phone number, website, date of birth, address, language, time format, time zone, etc.
To change personal details
- Go to Setup > General > Personal Settings.
- In the Personal Settings page, click the Edit icon for the corresponding section.
- Modify the personal details in the Account Information pop-up as required. (Refer to the table below)
- Click Save.
List of Standard Fields
| Field Name | Description | Data Type |
| First Name | Specify the first name of the user. | Text box |
| Last Name* | Specify the last name of the user. This field is a mandatory field. | Text box |
| Alias | Specify the other name of the user. | Text box |
| Role* | Select the role (for example, Administrator, Standard User, and others). This is a mandatory field. Only if you have the Administrator profile, you can change this value. | Picklist |
| Email* | Display the primary E-mail ID of the user. This field can be updated in Zoho Accounts. | Email |
| Website | Specify the website URL of the user. | URL |
| Phone | Specify the official phone number of the user. | Picklist |
| Mobile | Specify the mobile phone number of the user. | Text box, an integer value |
| Fax | Specify the FAX number of the user. | Text box |
| Date of Birth | Select the date of birth of the user from the mm/dd/yyyy drop-down list | Date box |
| Street | Specify the primary address of the Zoho Recruit user. | Text box |
| City | Specify the name of the city where the user lives. | Text box |
| State | Specify the name of the state where the user lives. | Text box |
| Zip | Specify the postal code of the user's address. | Text box, an integer value |
| Country | Specify the name of the user's country. | Text box |
| Language* | Select the language. This field is a mandatory field. | Picklist |
| Country Locale* | Select the country locale to specify your date format. This field is a mandatory field. | Picklist |
| Time Zone* | Select the time zone in which you are working. This field is a mandatory field. | Picklist |
Change Locale Information
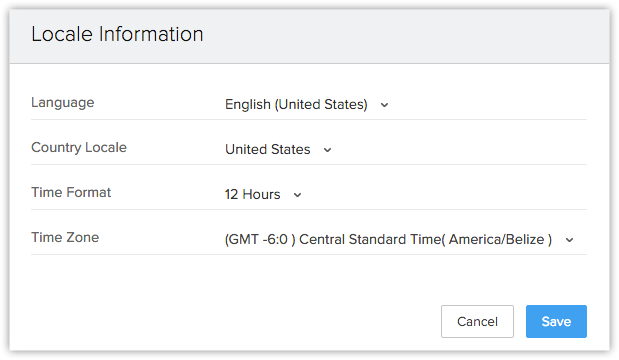
Based on the country locale, you can mention the language for your account. Also, choose between 12 hr time format and 24 hr time format in the Recruit account. The date format is automatically updated with the country locale that you select. The following international date formats are supported:
- dd-mm-yyyy
- mm-dd-yyyy
- yyyy-mm-dd
To change the language, country locale, time format, and time zone.
- Go to Setup > General > Personal Settings.
- In the Personal Settings page, click Edit icon for the Locale Information section.

- Choose the value from the corresponding drop-down lists.
- Click Save.
Change Name Format
By default, the name format is set as <Salutation> <First Name> <Last Name>. However, you can change the name format as per naming conventions used in your country.
Example: In the USA the name format is generally <Salutation> <First Name> <Last Name> whereas in Japan the format is <Last Name> <First Name> <Salutation>
To change name format
- Go to Setup > General > Personal Settings.
- Under Name Format section, drag and drop the Salutation, First Name, and Last Name to change the order.

- Click Save.
Change Password
Zoho provides Single Sign-on service, and so if you change password for Zoho Recruit, it will be changed for all Zoho Services. You can change password from Zoho Accounts. Please note that you cannot change password for other users.
To change password
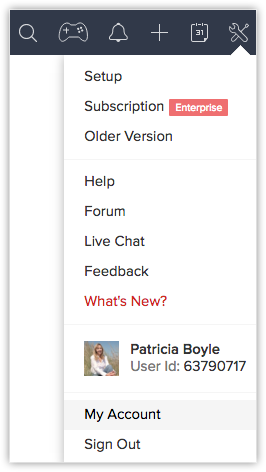
- Click Settings icon and then click My Account.

- In the Zoho Accounts page, click Security.
- In the Password page, enter your Current Password and New Password in the corresponding fields.
- Click Save.
The New Password gets updated and should be used to sign in to all Zoho Services.
Reset Password
Users with any role can reset their password individually by clicking on the Forgot Password link in the Zoho Recruit log in page.
To reset password:
- In the Zoho Recruit - Signin page, click Forgot Password.
The system redirects you to the Zoho Accounts page. - In the Zoho Accounts page:
- Email ID: Specify the registered Email ID as mentioned in Account information.
- Image Text: Enter the captcha code as seen in the displayed picture.
- Click Request.
The system sends an automated e-mail to your Email ID. - Click the link "here" in the email.
You will be redirected to the Zoho Accounts Password Reset page. - In the Password Reset page, enter your New Password.
- Click Change.
The New password gets updated and should be used to sign in to all Zoho Services.
Change Security Question
Zoho Accounts allows you to create your own security question according to your preference after logging in for the first time. The security question can be modified whenever required and it can be used to retrieve the password.
To create secret question
- Click on your login name and then click My Zoho Account.

- In the Zoho Accounts page, under Home tab, click the Security Question link.
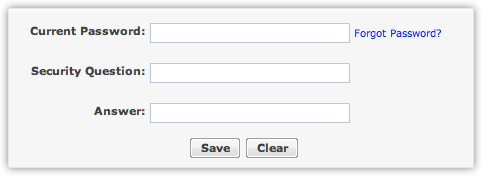
- In the Security question page, specify the Current Password, Security Question and the corresponding Answer.

- Click Save.
The security question gets updated and applicable for all Zoho Services.
Change Preferences
To change preferences:
- Click on your login name and then click My Zoho Account.
- In the Zoho Accounts page, under Home tab, click the Preferences link.
- In the Preferences page, do the following:
- Date Format: Specify the Date format such as dd /mm/yy and MM/dd /yy from the drop-down box, or you can customize a new date format by selecting Custom from the list.
- Newsletter Subscription: Select the type of newsletter subscription such as General Announcements, Product Announcements or Updates to Product by clicking on the check box.
- Browser Connection: Select secure browser access by clicking on the check-box.
- Date Format: Specify the Date format such as dd /mm/yy and MM/dd /yy from the drop-down box, or you can customize a new date format by selecting Custom from the list.
- Click Save.
The preferences will be saved in Zoho Accounts.
 Note: Changing Date Format, or any fields under Zoho Accounts Preferences will not make any changes in Zoho Recruit.
Authorized Websites
To manage authorized websites:
- Click on your login name and then click My Zoho Account.


- In the Zoho Accounts page, under Home tab, click the Authorized Websites link.
- In the Authorized websites page, you can view the websites that have been authorized.
User Sessions
To view user sessions:
- Click on your login name and then click My Zoho Account.
- In the User Sessions page, you can view the list of sessions and its details.
- In the Authorized websites page, you can view the websites that have been authorized.
- Click Close to close the specific session, or Close All Other Sessions to close all sessions (other than Current Session).
Use Signature
To use the signature feature
- Go to Setup > General > Personal Settings.
- In the Personal Settings page, click Edit icon for the Signature section
- Specify the signature in the HTML editor.
To use the signature in emails, you need to enable the Add User Signature checkbox in the email template. - Click Save.
Add Logo in your Signature
You can also add a logo in your signature by providing the image source in the HTML code.
To add a logo in your signature:
- Go to Setup > General > Personal Settings.
- In the Personal Settings page, click Edit icon for the Signature section
- In the editor pop-up box, click
 to select an image and insert.
 - Click Save.
Related Articles
Personal Account Settings
Users in many organizations work from different locations, across different time zones and geography. Each user can set up their personal preferences in Zoho. You can personalize and manage the settings in your Zoho Workerly account that includes ...Marking Personal Fields
GDPR defines personal data as any information relating to an identified or identifiable natural person (i.e. the data subject). There is a wide range of personal data that includes email addresses, location, mobile numbers, identification numbers, ...Privacy Settings
Privacy Settings You can configure your privacy settings to manage the data that is collected and stored in Zoho Lens. Privacy settings let you consent to data gathered and processed from third-party services, limit usage through role-based access ...Privacy Settings
You can configure your privacy settings to manage the data that is collected and stored in Zoho Assist. Privacy settings let you consent to data gathered and processed from third-party services, limit usage through role-based access for ...GDPR Settings
When you have enabled GDPR compliant email marketing, you can view the settings you have configured in the GDPR Settings subtab under Manage Consent. Contact Data Erasure GDPR compliance is a must for companies that store and process personal ...