Editing Criteria Patterns in Reports
Edit Criteria Patterns
Criteria Pattern Editor in the report help you to define advanced filters using simple logic like and / or.

Note
- You can specify a maximum of 25 criteria in a report.
To edit criteria patterns
- Click the Reports tab.
- From the list of reports, click the Customize link for the corresponding report in which you want to edit the criteria pattern.
- In the Customize Report page, click the Criteria tab.
- Review your existing criteria and click the Change Pattern link.
- In the Pattern Editor box, modify filters and click the Save link.
- Save the modified report.
Example:
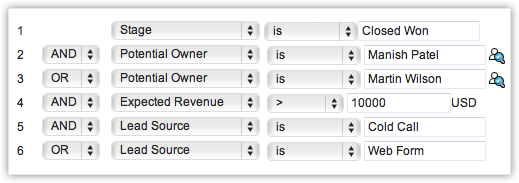
You would like to create a report that lists out the deals based on the following criteria:
Stage is 'Closed Won', and Deal Owner is 'Manish Patel or Martin Wilson', and Expected Revenue is greater than '$10000 USD', and Lead Source is 'Cold Call or Web Form'.
You can create this criteria easily with the Criteria option as given below:
The criteria pattern will be automatically set as:

Since the criteria pattern does not match the requirement, you can edit it as:

The criteria pattern will be automatically set as:
Since the criteria pattern does not match the requirement, you can edit it as:
You can use the following characters in Criteria Pattern Editor:
- Round brackets: ( )
- and / or operators
- Criteria Row Number
Important Notes
- When the Change Pattern box is open, you cannot add or delete a criteria row under the Specify Criteria section.
- The operator precedence will not be taken into account if you do not specify brackets. For example, if you specify the criteria as 1 or 2 and 3, it will be considered as ((1 or 2) and 3)
- You can change the and or or of the criteria rows and it will be updated in the Editor below.
- You can change the and or or condition in the pattern and it will be updated in the rows above.
- If you specify 1 and 2 and save it, on editing the report the pattern will be shown as (1 and 2). For (1 and 2) or 3 the pattern will be shown as ( (1 and 2) or 3 )
- If you add more rows in the editor and delete one by one there will be additional brackets displayed in the pattern. For example if there are 4 rows added and you delete the 3rd row, the criteria pattern will be as ( ( ( ( 1 and 2 ) ) ) or 3 ). If the first row is deleted then it will be shown as ( ( ( ( 1 ) ) ) or 2 ). However, on saving the criteria, it will change as ( 1 or 2 ).
- Make sure that you do not use the following as they are invalid: (), (and), (or)
- If the brackets do not match it will be treated as invalid.
- There will be an error message, if the number of rows and the numbers given in the pattern does not match and also, if there are any missed numbers in the pattern specified.
- Save and Cancel buttons on the report will be hidden while editing the criteria pattern.
- In case the final brackets are missing, there will be a difference in the Criteria Patterns Editor and its view mode.
Your Criteria Pattern in Editor Your Criteria Pattern in View Mode ( 1 and 2 ) or ( 3 and 4 ) (( 1 and 2 ) or ( 3 and 4 )) 1 and 2 and 3 and 4 (1 and 2 and 3 and 4 ) ( 1 or 2 ) and ( 3 or 4 ) ( ( 1 or 2 ) and ( 3 or 4 ) )
Use 'Last Activity Time' in Criteria
The time when any change is made to a record, be it adding a note, closing a task, sending emails or just editing the fields is captured under "Last Activity Time". The information in this field can be used in Reports criteria, to filter out records that had no activity for a specific period of time or those records that had recent activities.
Note
- This option is supported only in the Leads, Accounts, Contacts and Deals modules.
- These modules should be selected as the Primary module or should be one of the Related modules.
- While Last Activity Time under list view criteria captures all updates made to a record, the Last ModifiedTime will only capture changes made to the fields and does not include changes made to the Notes, Tasks or Email sections.
- This criteria can be used in all types of reports.
The activities and updates that will be recorded as Last Activity time:
- Editing fields in a record
- Adding & updating activities, i.e. Tasks, Events, Calls
- Sending emails to leads and contacts
- Adding & editing notes
- Adding deals & contacts under an account
- Changing the owner of the record
- Adding and deleting a record
(This does not include deleting a record associated to the parent record.) - Closing a task
(Not used for events as they are automatically moved under Closed Activities after the End DateTime.) - Deleting and restoring the records (individually or in bulk).
- Mass operations such as Mass Update, Mass Transfer etc.
(Except for the Mass Delete option.)
The activities and updates that will NOT be recorded as Last Activity time:
- Editing contacts or deals under an account will not be listed under the Account.
- Deleting related lists under a record.
Create Report Folders
By default, reports are stored in different categories. You can create personal or public folders to store the frequently used reports in a common folder for easy access.
To create report folders
- Click the Reports tab.
- In the Reports home page, click Create Report Folder.
- In the Create Report Folder page, do the following:
- Enter the Folder Name.
- Enter the Folder Description.
- Select Accessibility Details:
- All Users are allowed to view this Report Folder: Select if you would like to enable the folder access for all the users.
- Show this Report Folder only to me: Select if you would like to enable the folder access only to you.
- Allow the following users to view this Report Folder: Select the users or user roles that can access the folder.
- Enter the Folder Name.
- Click Save.
View Reports
To access standard reports in the Reports tab click the specific report (For example, Contact Mailing List from the Accounts & Contacts Reports) from the Reports folder (for example, Accounts & Contacts Reports, Deals reports, and others).
To view the report
- Click the Reports tab.
- In the Reports Home page, click the required reports group.
- From the list of reports that are displayed, click the required report's link.
- Click the Edit link to modify the Report Name, Folder details and Description of a report.
- Click the Customize link next to the report to customize the report.
- In the Reports page, you can do the following:
- Export: Use this option to export and save the report in Excel, PDF, or CSV format in your local drive.
- Save As: Use this option to save the report with a new name. This option is useful when you filter a specific set of data and save it for future reference.
- Customize: This feature is used to customize the report with regards to the report types, columns, grouping, filter criteria in the report, etc.
- Reload: Use this option to update or refresh the contents of the page.
- Hide Details / Show Details: Click Hide Details to hide the details of the report and click Show Details to see the hidden details of the report.
- Create Chart: This feature enables you to create charts, (such as Bar diagrams, Pie charts, Line charts, Funnel charts) based on the selected report details.
- Export: Use this option to export and save the report in Excel, PDF, or CSV format in your local drive.
- Do one of the following, and then click Apply Filter to view reports based on the filter options specified:
- Select Last Created Time or Last Modified Time from the Column list.
- Select the option from the adjacent list. ( Next FQ, for example).
On selecting this option, the system will automatically display the Start and End date in the respective boxes. - Enter the Start Date and the End Date in mm/dd/yyyy format, or select the date from the calendar displayed.
- Select Last Created Time or Last Modified Time from the Column list.
Note
- A maximum of 2000 records will be listed in a page. You can use the navigate options to view others pages.
- You will be able to export up to 2000 records per page, in each export.
- FQ refers to Financial Quarter and FY refers to the Financial Year.
Delete Reports
Periodically, you may delete some of the unnecessary reports. Please note that you can delete the reports created only by you. Also, you need to have the Manage Reports and Dashboards permission in you profile.
To delete reports
- Click the Reports tab.
- In the Reports home page, click the Del link corresponding to the report that you want to delete.
Edit Standard Reports
You can edit the predefined reports, provided you have the Manage Reports and Dashboards permission in your profile.
To edit reports
- Click the Reports tab.
- In the Reports home page, click the Edit link corresponding to the report that you want to edit.
Related Articles
Generating Reports
Introduction You can create new module-specific reports linking some of the other cross-functional modules. For example, you can create a report in the accounts module linking other modules such as Contacts, Job Openings, and others. Types of Report ...Generating Reports
You can create new module-specific reports linking some of the other cross-functional modules. For example, you can create a report in the Timesheets module linking other modules such as Temps, Jobs, and others. Types of Report Tabular ...Set criteria
Criteria are the fundamental filters of Conditional Assignment. To add a criteria: Choose Users matching the criteria when configuring the rule. Choose an attribute to filter users with. Set the value for the criteria, and the relationship between ...Reports
Reports help you obtain summarised data on work orders and territories and statistics relevant for analysis and decision-making. Data from the following reports are shown in the dashboard: Name Description Closed Work Orders This Month Displays ...Reports
Get updates about your responses in real time with Zoho Survey's reporting tools, and analyze the trends to make better business decisions. Customize reports and set up a schedule to deliver them, or compare different reports and filter your ...