Managing Autoresponders
Important:
- This feature is available only for the Leads and Contacts module.
- You can set a maximum of 3 autoresponders and a maximum of 5 follow-ups per autoresponder.
- You can send autoresponder emails as a part of mass emails also. The number of mass emails that can be sent per day per organization will vary according to your subscription.
- Custom view selected for the autoresponder must contain new data. If you select a custom view in which data is not new, autoresponder will send the first email to the same old data during subsequent iterations. For example, you can select custom views "Today's Leads" and "New This Week Contacts" instead of "All Open Leads" and "Recently Created Leads". In the Today's Leads view, data is always updated with the today's data whereas the data in All Open Leads view may not change frequently.
- While setting up Dynamic type Autoresponders, always select the Custom Views according to the options in the Recurrence Pattern section. If you set the recurrence pattern as By Day, make sure your data in the selected custom view is new every day. Similarly if you select By Week, your data must be a new one for that week before the autoresponder is initiated. If the data used is old, autoresponder will send the first email to the same data during subsequent iterations.
- While executing the autoresponder, system cannot identify the duplicate records. Hence, you are recommended to check for the duplicate contacts and merge with the primary record, before setting up the autoresponder.
- At present, you cannot track the response when customer responds to your email. Hence, you have to manually select the contacts from the mailing list to exclude them from the next follow-up.
- Use the unsubscribe form in the autoresponder email templates. By using unsubscribe form, you can allow the recipients to opt out from your next follow-up and avoid Anti-SPAM complaints. See Also Setting up Unsubscribe Form
To set up autoresponders
- Click theLeads/Contacts tab.
- In the Leads/Contacts Home page, click More Actions
 > Autoresponders.
 - In the Autoresponders page, click Create Autoresponder.
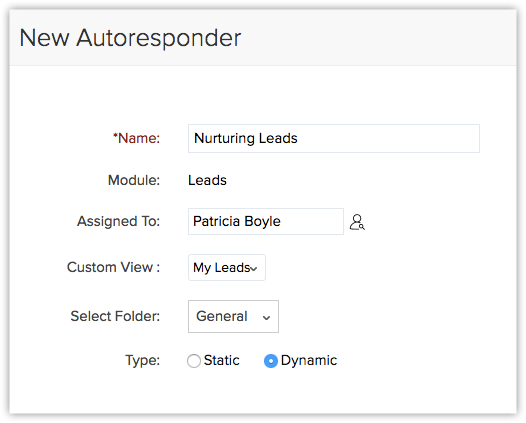
- In the New Autoresponder page, do the following:
- Enter the Name of the autoresponder.
- Enter the Name of the autoresponder.
- Select the owner of the records from the Assigned To pick list.
By default, the field displays the name of the user who creates the autoreponder. - Select the Custom View to set up the recipient list for the autoresponder.
- Select a Folder for the autoresponder.
- Select Static or Dynamic and specify the corresponding details. (Refer the table for the list of standard fields)
- Static- Autoresponder in which the Follow-up happens on a fixed date.
- Dynamic - Autoresponder in which the Follow-up happens on predefined intervals set by you.
- Static- Autoresponder in which the Follow-up happens on a fixed date.
- You can add follow-ups if needed. After selecting the email template in the follow-up, you will be prompted to enter the From and Reply to email addresses.
Here you can choose your account email address, email address of the record owner and the organization email form the drop-down list. - Click Save.

- The autoreponder email will not be sent to the records for which the Email Opt Out is enabled.
- Only when you clear the Email Opt Out check box in the Record's Details page, the autoresponder emails will be sent to those records.
- If you choose an individual email address in the from field, then in the address in the replyto field has to be an organization email address.
If you choose organization email address in the from field, then in the address in the replyto field has to be an individual email address.
The following table gives the list of fields and their description when Static option is selected.
| Fields | Description |
| Follow-up Date | Specify the follow-up date. The follow-up date is calculated with respect to the day when the autoresponder is initiated. |
| Email template | Choose the template from the drop-down list. |
The following table gives the list of fields and their description when Dynamic option is selected.
| By Day - Fields | Description |
| Recur every ___ day(s) | Enter how often in days the autoresponder should be repeated. |
| Recur everyday | Select this if the autoresponder should be repeated everyday. Select the Start date (MM/dd/yyyy format) and time for the autoresponder. |
| End by | Select the End date for the autoresponder in MM/dd/yyyy format. |
| No end date | Select this if the autoresponder should continue repeating till you specify an end date. |
| Choose Email Template | Choose the template from the drop-down list. |
| Add Follow-up | Click the link to add follow-ups for the autoresponder. Example: The autoresponder is initiated on 01-01-2010 and the follow-up dates specified are After 3 daysand After 10 days. In such a case, the first follow-up email will be sent on 04-01-2010 and the second follow-up email will be sent on 11-01-2010. |
| By Week - Fields | Description |
| Recur every ____week(s) on S-M-T-W-T-F-S | Enter how often in weeks the autoresponder should be repeated. Then, select the checkbox(es) that correspond to the day(s) of the week on which the recurrence should occur. |
| Start by | Select the Start date (MM/dd/yyyy format) and time for the autoresponder. |
| End by | Select the End date for the autoresponder in MM/dd/yyyy format. |
| No end date | Select this if the autoresponder should continue repeating till you specify an end date. |
| Choose Email Template | Choose an email template for the autoresponder from the drop-down list. |
| Add Follow-up | Click the link to add follow-ups for the autoresponder. Example: The autoresponder is initiated on 01-01-2010 and the follow-up dates specified are After 3 daysand After 10 days. In such a case, the first follow-up email will be sent on 04-01-2010 and the second follow-up email will be sent on 11-01-2010. |
| By Month - Fields | Description |
| Day __ of every ___ month(s) | Enter how often in months and on the specified date the autoresponder should be repeated. |
| ____ ____ of every month | Select a particular day when the autoresponder should be repeated every month. |
| Start by | Select the Start date (MM/dd/yyyy format) and time for the autoresponder. |
| End by | Select the End date for the autoresponder in MM/dd/yyyy format. |
| Choose Email Template | Choose an email template for the autoresponder from the drop-down list. |
| Add Follow-up | Click the link to add follow-ups for the autoresponder. Example: The autoresponder is initiated on 01-01-2010 and the follow-up dates specified are After 3 days and After 10 days. In such a case, the first follow-up email will be sent on 04-01-2010 and the second follow-up email will be sent on 11-01-2010. |
Create Folders
In Zoho CRM, you can create various folders for a better organization of your autoresponders. This helps you to keep them classified under different categories for quick access.
To create folders
- Click theLeads/Contacts tab.
- In the Leads/Contacts Home page, click More Actions > Autoresponders.
- In the Autoresponders page, click Create Folder.
- In the Create Folder page, do the following:
- Enter the Folder Name.
- Enter the Description.
- Specify the accessibility to the autoresponder feature.
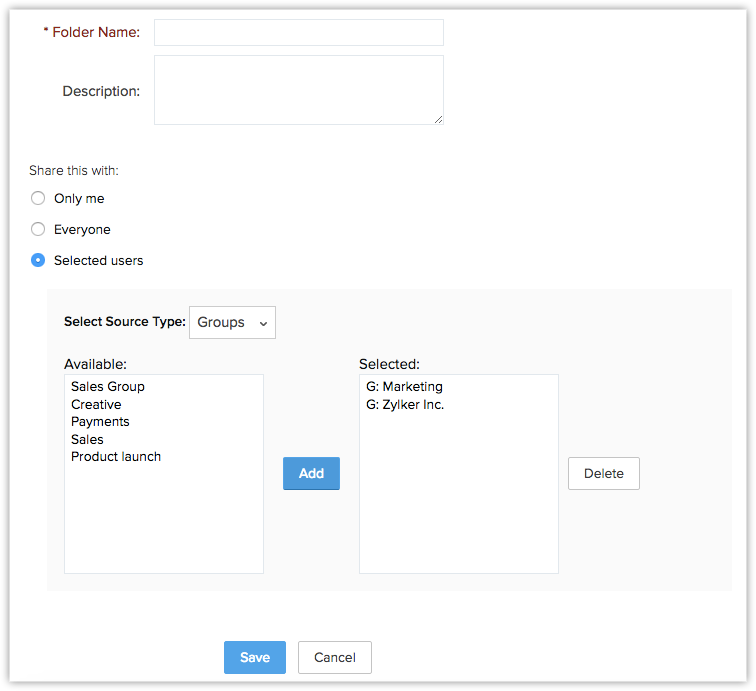
- Enter the Folder Name.
- Click Save.
Excluding Contacts from Follow-up
After receiving replies from the recipients, you can exclude the leads or contacts from the follow-up, and schedule the next follow-up only to the leads/contacts that have not responded.
To exclude records from the next follow-up
- Click the Leads/Contacts tab.
- In the Leads/ContactsHome page, click More Actions > Autoresponders.
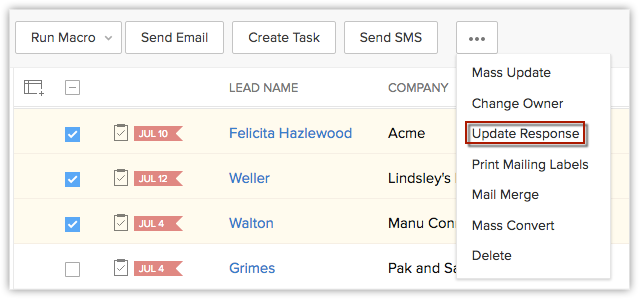
- In the Autoresponders page, click the Update Response link corresponding to the autoresponder.
- In the Mail Sent List overlay, select the leads/contacts to be excluded from the next follow-up.
- Click Update Response.
Note that the Update Response option is available only for the Dynamic type autoresponders.
To exclude records before the autoresponder is initiated
The Mailing List will be available only after the autoresponder is initiated. In case you want to exclude some contacts from the mailing list, even before the autoresponder is initiated, follow the steps given below:
- Click theLeads or Contacts tab.
- In the Leads/Contacts Home page, select the check box(es) corresponding to the records that you want to exclude.
- Click More Actions > Update Response.
- In the Select Autoresponder popup window, select the autoresponder from the drop-down list.
- Click Save.
Including all Contacts in the Follow-up
This option enables you to include all the contacts for the follow-up that you had excluded from the mailing list.
To include all the record for the next follow-up
- Click the Leads/Contacts tab.
- In the Leads/ContactsHome page, click More Actions > Autoresponders.
- In the Autoresponders page, click the Reset link corresponding to the autoresponder.
Related Articles
Managing autoresponders
How do I clone an autoresponder? From the Navigation toolbar select Engagement and choose Autoresponders . A page will appear, displaying all your autoresponders. Mouse over the autoresponder you wish to clone. Click the Clone icon in the far-right ...Managing Autoresponder
Clone an autoresponder From the Navigation Toolbar, choose Automation tab and select Autoresponder. Mouseover the autoresponder you wish to clone from the autoresponder lists page. Click the Clone icon in the far-right corner. You can also clone the ...Autoresponders
Setting up Autoresponders Autoresponders are the solution to send automated replies and follow-up emails to the clients. Once you receive a response from the Temp or Contact, you have to manually exclude the contacts from the mailing list. Important: ...Managing your Subscriptions
For some small businesses, the free version of Zoho Campaigns has all the features they require, such as creating and sending email campaigns and viewing reports. However, when your business starts to expand, upgrading your account to a paid plan ...What is the difference between date-field autoresponders and calendar autoresponders?
Date field autoresponders are sent based on the date in the date field. This date won't be the same for all contacts. Calendar-based autoresponders are sent based on the date and time you schedule.