Support customers from your own domain
Provide customer support from your own domain with Zoho Desk. By default, the web address of your Help Center is a Zoho Desk subdomain such as "desk.zoho.com/portal/<mycompany>". However, you can personalize this so that your customers can submit their tickets from a subdomain, such as 'support.mycompany.com'. This feature is called domain/host mapping.
Here is an example: You have a company called Bay & Co., and are using Zoho Desk for customer support. By mapping your subdomain (of www.bayandco.com) with Zoho Desk, customers can access your help desk at 'support.bayandco.com' instead of 'desk.zoho.com/portal/bayandco'. This way, your agents can also access their support portal at 'support.bayandco.com/support'.
Note:
- The domain mapping instructions in this document will apply only to your agent interface and the default Help Center.
- Custom domain mapping is not available on the Free edition.
- Wildcard or other SSL certificates purchased from third-party vendors cannot be installed in Zoho Desk.
Prerequisites
Before providing your domain in Zoho Desk, there are a few settings that must be configured in your domain registrar's control panel.
- Add a subdomain (E.g., support.bayandco.com) to your main domain, which will be used as your address for customer support. You can get help from the hosting provider's website for instructions on adding a subdomain.
- Create a CNAME entry and point it to Zoho Desk. This is to create an alias of your default Zoho Desk address.
Create a CNAME
To create CNAME and point it to Zoho Desk:
- Sign in to your domain registrar's control panel.
- Access the 'DNS Management' settings to change the DNS records. If you can't locate DNS Management, look for options like 'Advanced Settings' or 'Name Server Management'.
- Create or edit a CNAME (or Canonical Name) record and point it to "desk.cs.zohohost.com".
If you are accessing help desk at "desk.zoho.eu", point your CNAME to "desk.cs.zohohost.eu".
If you are accessing help desk at "desk.zoho.in", point your CNAME to "desk.cs.zohohost.in".
Changes to the DNS system are not immediate; it may take some time for them to take effect.
Configure your domain address
Now that you've completed the prerequisites, you must move on to Zoho Desk to specify the new domain address. The workflow for changing the domain address consists of the following 3 steps:
- Add Domain Address
- Verify Domain Ownership
- Get SSL
STEP 1: Adding Domain Address:
The first step is to specify the domain address that you would like to configure in Zoho Desk.
 Do not proceed with this step unless you've created a CNAME entry and pointed it to Zoho Desk as instructed above.
Here are the steps to add your domain address:
- Log in to Zoho Desk with Administrator privileges.
- Click the Setup icon (
) in the top menu.
- Click Rebranding under the General menu.
- Click Domain Mapping under the Rebranding sub-menu.
- Click Map Domain on the Domain Mapping page.
This will launch the Setup Wizard to map your domain. - Enter your Domain URL for customer support.
From the example above, this would be where you'd enter 'support.bayandco.com'. - Click Next.
STEP 2: Verifying Domain Ownership:
You must now verify your domain before you can apply it in Zoho Desk. The domain can be verified in one of the following ways, depending on which is most convenient.
- CNAME Method
- HTML Method
CNAME Method
The CNAME method requires you to add the unique code displayed in Zoho Desk in your DNS Manager. Once you add the CNAME entry, click "Verify" displayed below the "CNAME method" option on the Setup Wizard.
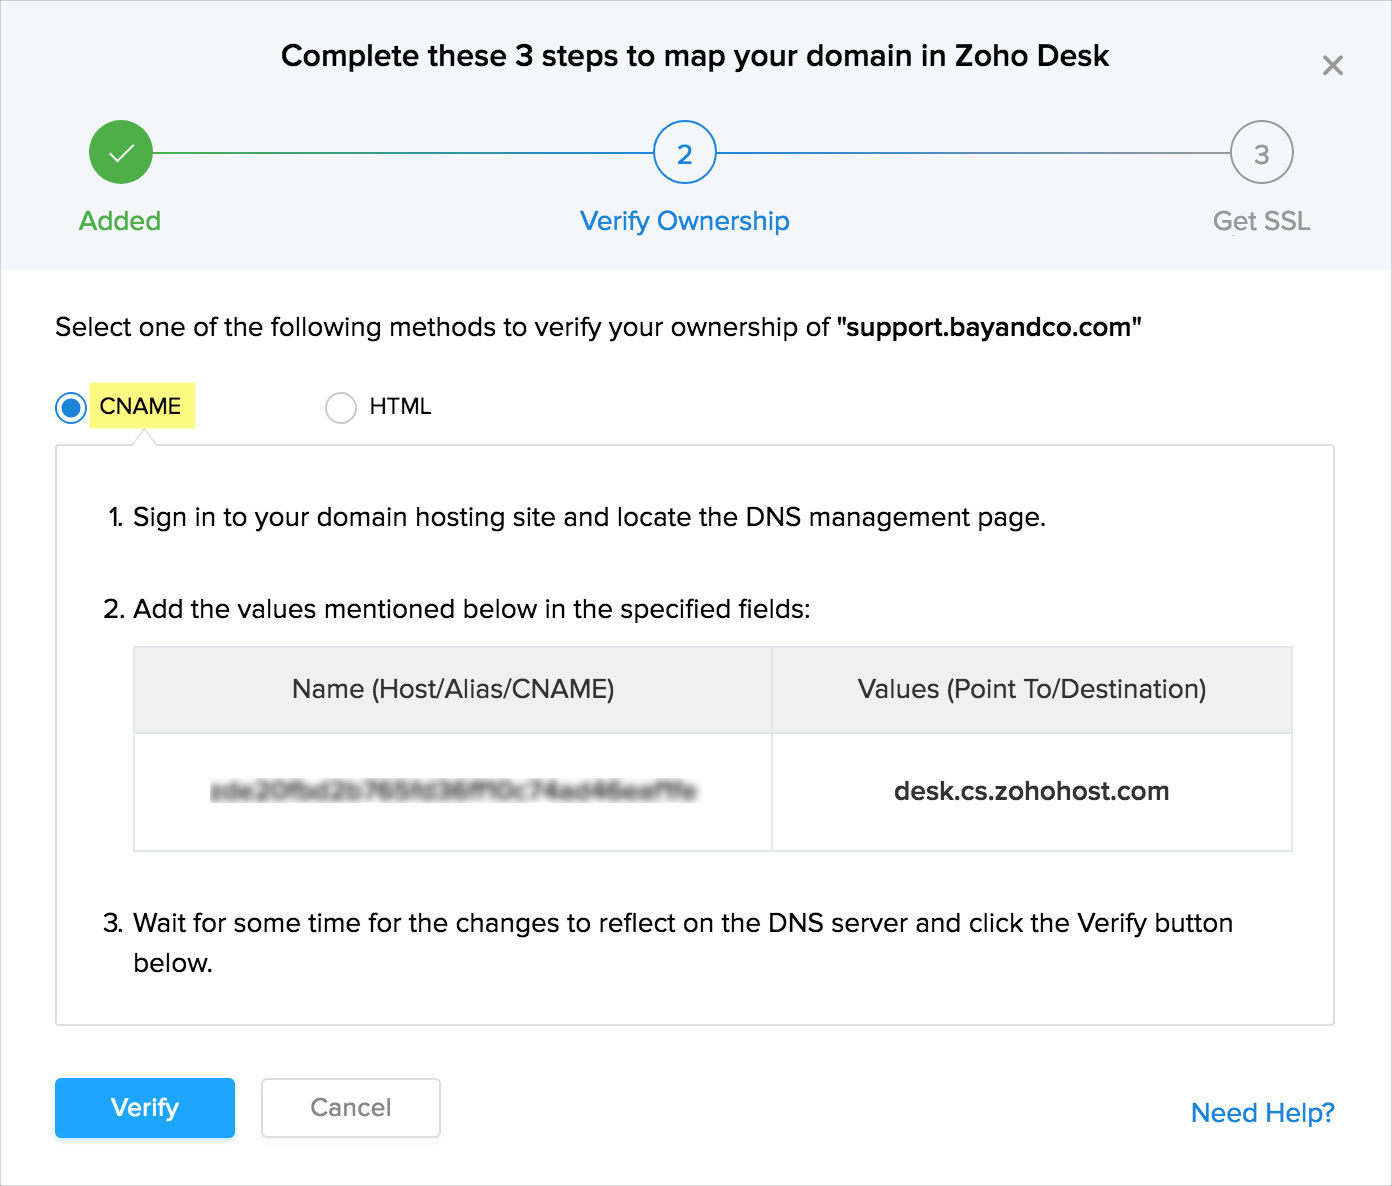
Here are the steps to do this:
- Sign in to your domain hosting service and locate the DNS management page. For help, contact your domain host directly.
- Create your new CNAME record by entering the following details:
- In the Name/ Host/ Alias/ CNAME field add the code generated in Zoho Desk (i.e., zb********).
- In the Value/ Points To/ Destination field add desk.cs.zohohost.com. For EU hosted accounts add desk.cs.zohohost.eu.
For India hosted accounts add desk.cs.zohohost.in. - Click Save or Add Record to save the CNAME record.
- Return to the Setup Wizard page in your Zoho Desk account.
- Click Verify displayed below the "CNAME" option.
Note:
- Zoho Desk will not be able to validate the CNAME if your sub-domain is enabled for Cloudflare. We recommend that you disable Cloudflare (
) until you verify the domain in Zoho Desk. Once verified you can re-enable it (
) again to continue with the security protections.
HTML Method
The HTML method requires you to add the verification file we provide in the root folder of your website page. When you click "Verify," we will look for the particular file in your website, and verify your domain based on its availability.
Here are the steps to do this:
- Select the HTML method on Zoho Desk's Setup Wizard page.
- Click the zoho-domain-verification.html file within the wizard to download the verification file.
- Upload the file to the root folder (top-level folder) of your domain's website. For example, http://bayandco.com/zoho-domain-verification.html
- Open any browser window and go to the address of the uploaded file on your website. If the file uploaded correctly, you'd see the string of characters that you uploaded to your webpage.
- Return to the Setup Wizard page in your Zoho Desk account.
- Click Verify displayed below the "HTML" option. This prompts Zoho Desk to check for this HTML file at the same address you viewed it. Once we find the file, your domain will be updated as verified.
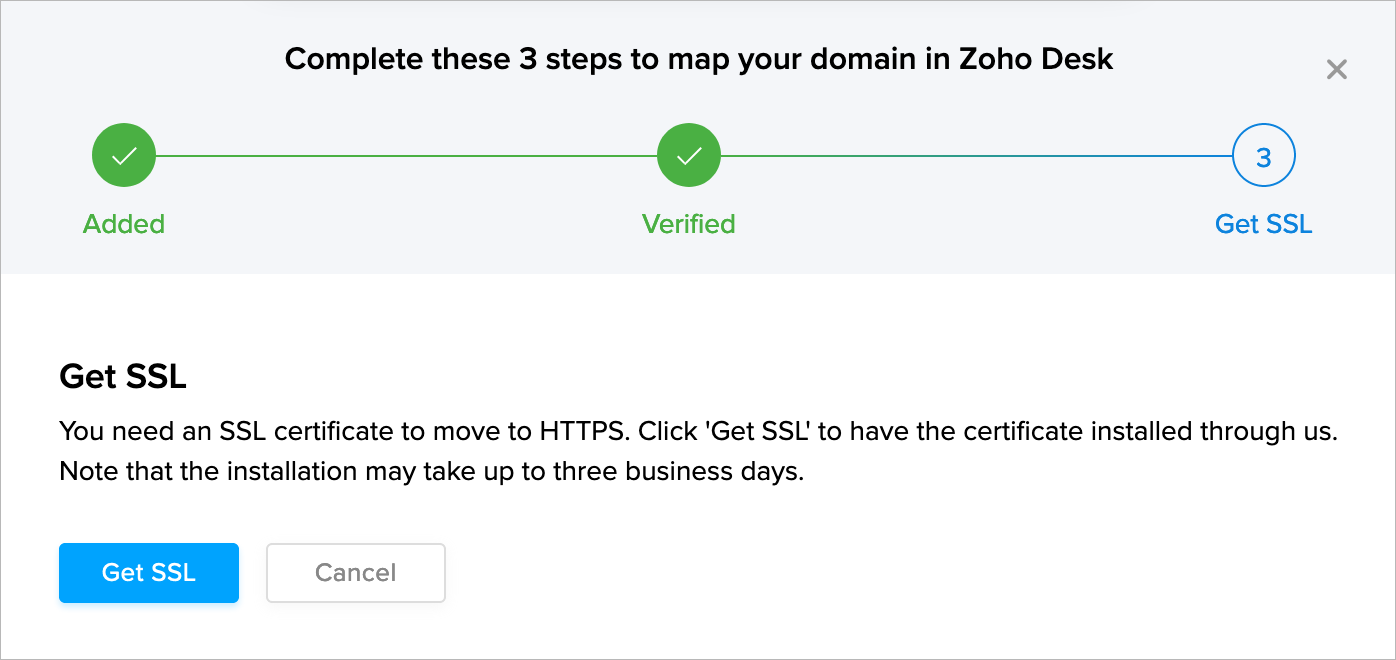
STEP 3: Get SSL:
You must now get an SSL certificate installed for your domain through us. The certificate is used to establish a secure, encrypted connection between your browser and our servers. The installation may take up to 3 business days and will be taken care of by Zoho, at no cost to you. To get an SSL, click GET SSL within the wizard.
Apply Domain
Once we have installed an SSL certificate for your domain, you can apply it to your Zoho Desk. Please keep in mind that you are allowed to apply only one domain unless you have enabled the multi-branding feature.
Here are the steps to apply a domain:
- On the Domain Mapping page, click Apply Domain corresponding to the verified domain you want to apply.
- Click Apply within the Setup Wizard.
The new domain will be successfully mapped to your Zoho Desk. - Click Visit Domain to open the domain on a new tab.
- If everything is fine, click Reload on the original tab.
You can now access Zoho Desk at the new domain.
Reset Domain
You can reset the domain mapping if you want to access Zoho Desk at its default URL, i.e., desk.zoho.com.
To reset domain mapping:
- Click the Setup icon (
- Click Rebranding under the General menu.
- Click Domain Mapping under the Rebranding sub-menu.
- On the Domain Mapping page, hover your mouse pointer over an applied domain and click the Reset icon (
).
- Click Reset on the confirmation screen.
You can now access Zoho Desk at the default URL.
Note:
Note:
- The domain mapped to a multi-brand Help Center cannot be reset.
Delete Domain
You can delete both the verified and the unverified domains that you've added to your Zoho Desk.
To delete a domain:
- Click the Setup icon (
- Click Rebranding under the General menu.
- Click Domain Mapping under the Rebranding sub-menu.
- On the Domain Mapping page, hover your mouse pointer over a domain and click the Delete icon (
).
- Click Delete on the confirmation screen.
Note:
- The domain applied to Zoho Desk cannot be deleted until you reset it.
- The domain mapped to a multi-brand Help Center cannot be deleted until you unlink their domain or delete the Help Center.
Frequently Asked Questions
1. I had configured an incorrect domain in my help desk and got locked out of my account.
Visit this URL: http://desk.zoho.com/support/<portalname>/DomainMapping.do to access your Zoho Desk account. Please make sure to enter the correct domain URL and save your settings.
Yes. When users access "desk.zoho.com", their browser will be automatically redirected to your mapped domain.
3. Will notification emails sent from Zoho Desk use the new domain address?
Yes. All user notification emails including invitations, approvals, escalations, etc., will be sent using the new domain address. The change will take effect once your domain has been mapped.
Related Articles
Providing Multi-brand Customer Support
Your brand distinguishes the products or services you offer from those of others. As much as your brand you must be unique and consistent with your customer service. Multi-brand customer support in Zoho Desk allows you to distinguish the identity of ...Forwarding your Support Emails to Zoho Desk
Create support tickets in Zoho Desk by forwarding the emails received at your external email address. You must configure a forwarding rule (in your email client) to route the emails received in your mail client to an equivalent email address in Zoho ...Renaming your Help Center Sub Domain
It is not uncommon for established companies to make a name change and start again. In fact, there are plenty of very good reasons for the same. For instance, the name no longer represents what they do; the brand has become stagnant; or for trademark ...How do I publish my survey in my own sub-domain?
A white label survey allows you to have your brand name on your surveys, without having a Zoho Survey logo anywhere on the questionnaire. Essentially, it lets you distribute surveys from your sub-domain. The Domain Mapping feature enables you to ...Customers
Details of all the customers who have booked an appointment for any of your service, staff, resource, or workspace, are stored in the Customers section. New customers can be added or deleted from this section. This section can be accessed by ...